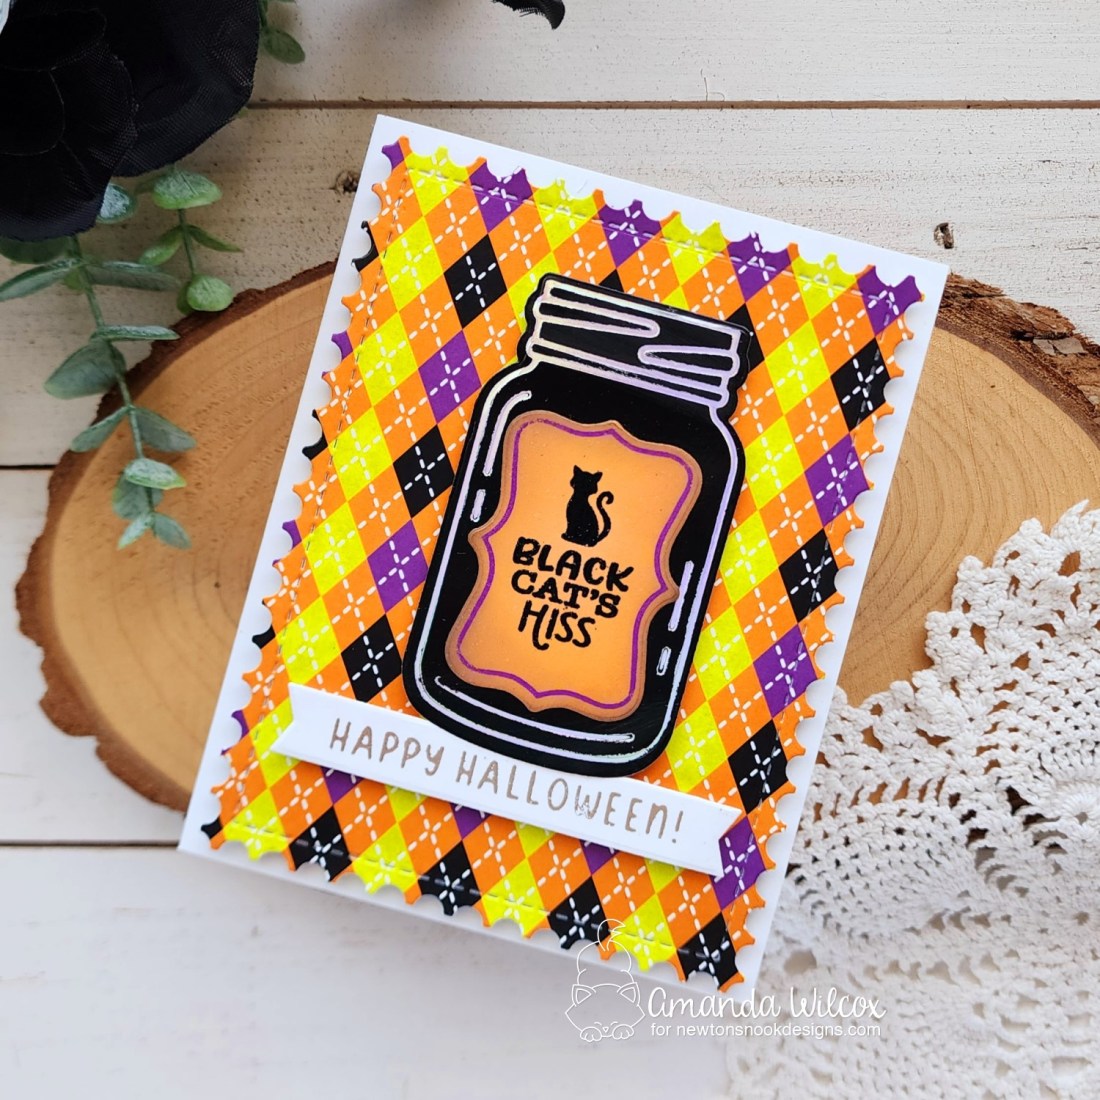
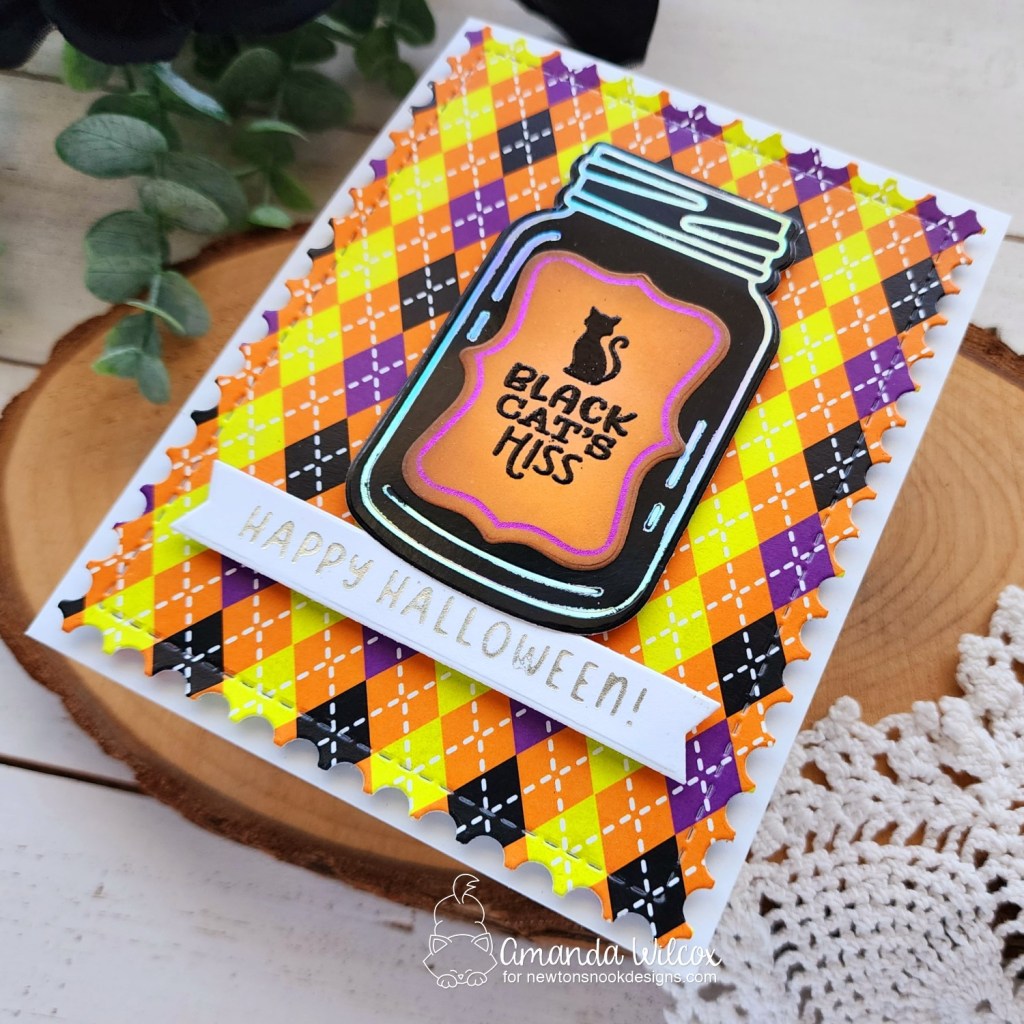
Happy Halloween everyone! I love this holiday so much that I wanted to be sure and pop in with a card to share celebrating the occasion! Today I’ve got hot foiling fun from Newton’s Nook.
It is a fairly simple card, focusing on hot foiling for sure. The jar, label and sentiment are all using different Spellbinders hot foils. The fun plates and dies are all from Newton’s Nook.
I chose a piece of patterned paper from the Newton’s Nook Halloween Time paper pad and cut it with the largest Framework die. I popped it up with foam tape on a white card base. Then I popped the sentiment banner and jar up with foam squares on that.
I inked the edge of my jar label with black soot distress ink before gluing it down with liquid glue. I feel like that dingy feeling adds a bit of spooky to the jar.
Be safe and have so much fun out there today and tonight!!!
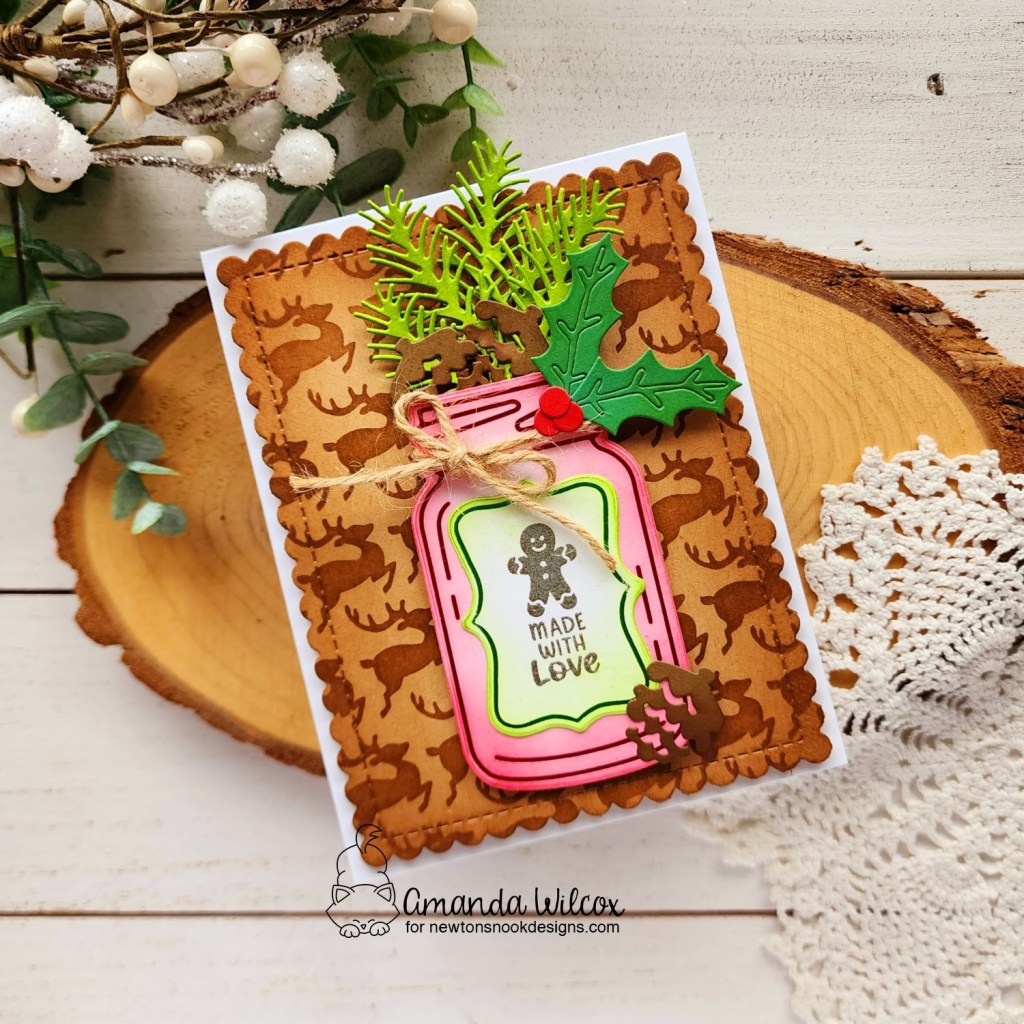
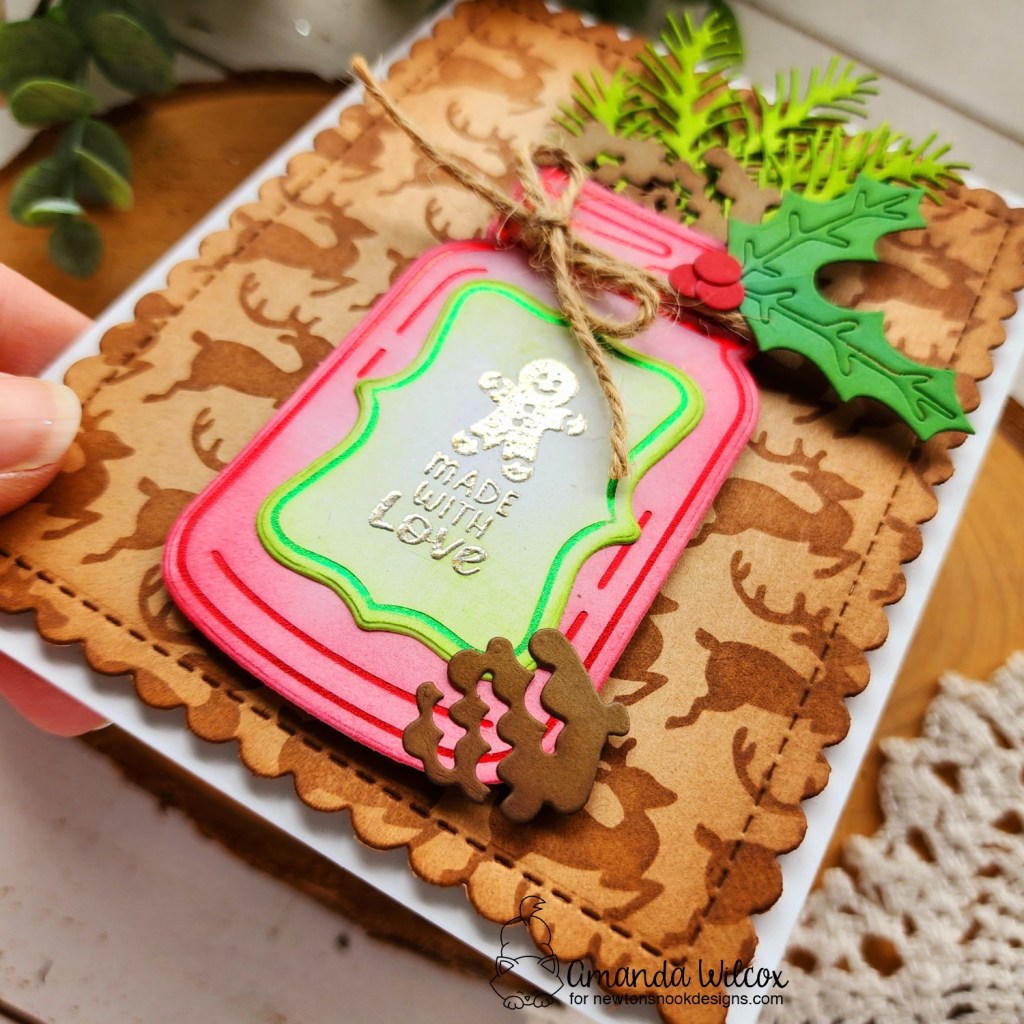
Welcome back everyone. The Newton’s Nook Holiday Release is available for purchase as of yesterday but for the next few days we’re highlighting the new products and sharing fun inspiration with them.
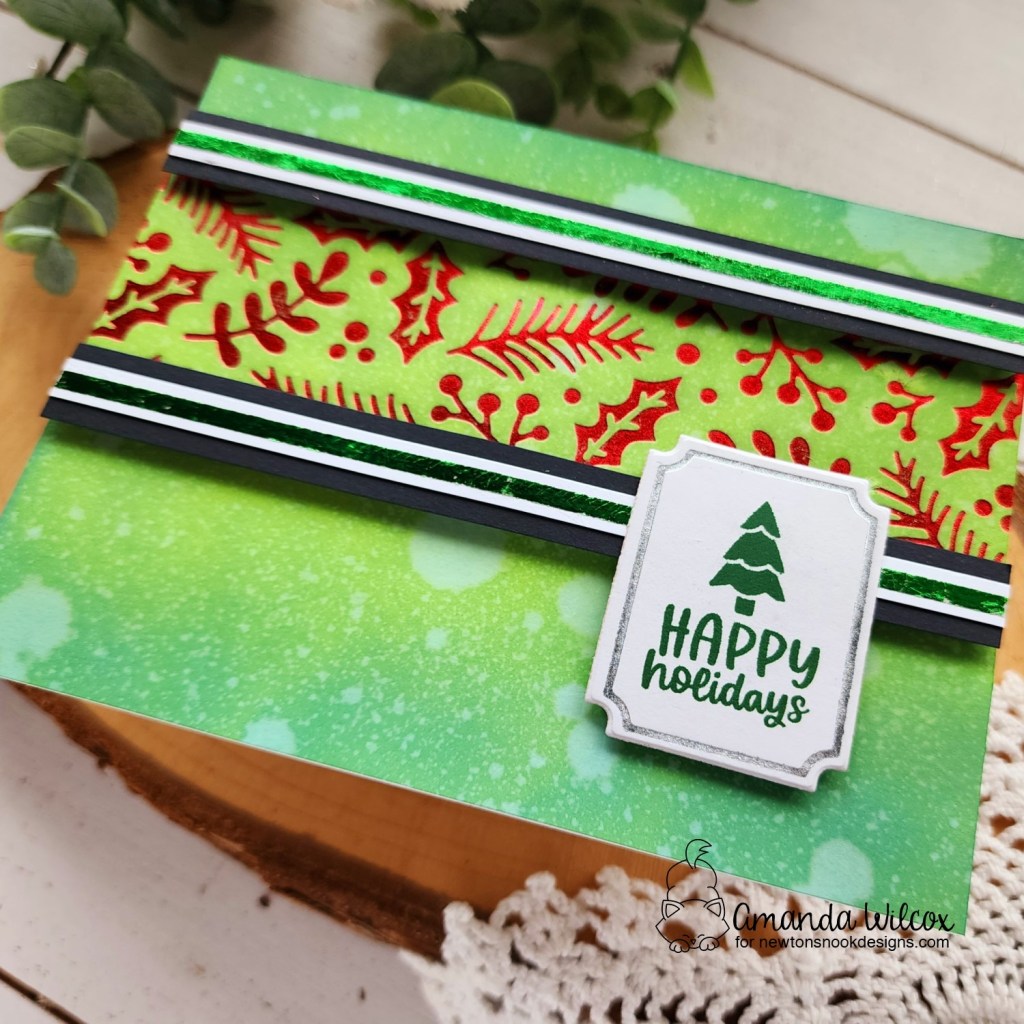
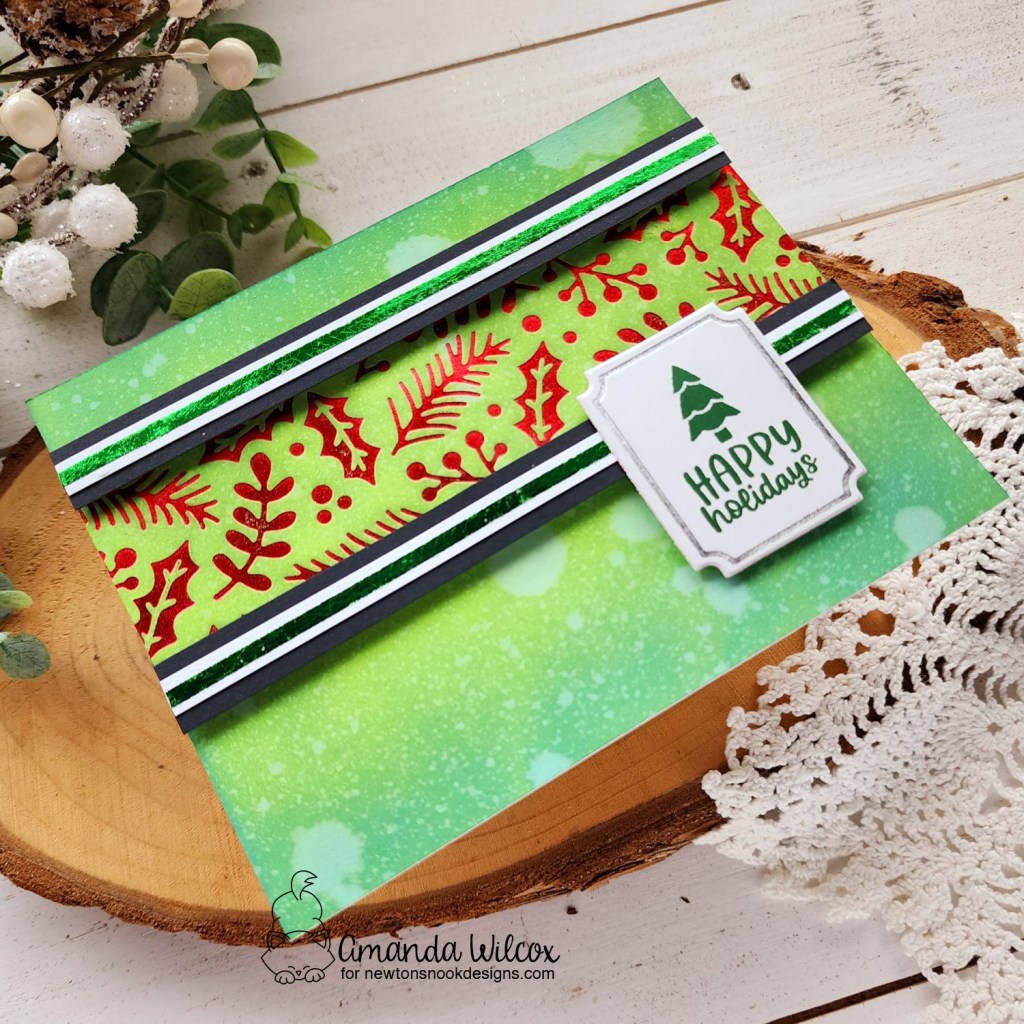
Today we have the Holiday Elements stamp set and a collection of new hot foil plates. I created a card using some of both that I wanted to share with you.
I started by card by foiling the new Holiday Foliage hot foil plate on a piece of white cardstock. Then I ink blended the panel with distress oxide inks in rustic wilderness, mowed lawn and twisted citron and spritzed it with water. I blotted it dry and set it aside.
Next, I foiled a silver label and used the coordinating die to cut it out. I stamped the sweet tree from Holiday Elements in green ink to coordinate. I cut 2 – 1/2″ strips of black cardstock and glued 1/4″ strips of white cardstock on those. Then I lined the center of that with 1/8″ tear tape. I removed the backing paper and pressed foil into the adhesive. This gives a textured foiling, not smooth like the hot foil plates. It’s fun and different; also a great way to use scrap pieces of foil.
Before assembling my card pieces, I used a dry cloth to rub any ink off my foiling so that red really shines through. Then I glued the panel to a white card base and added my strips and sentiment label with foam squares and strips.
We’ll be back tomorrow with more inspiration featuring more of the Newton’s Nook Holiday Release!
The Newton’s Nook Design Team is hopping along today with inspiration using our BRAND NEW holiday products! Make sure you scroll down to the bottom of this post to see the whole list and hop along and comment for a chance to win!
I’m sharing a fun card today using the new Holiday Elements stamp set, paired with previously release hot foil plates and other goodies! The Holiday Elements stamps fit perfectly inside any of the Labels Hot Foil plates and dies combo. Today I foiled in green and red, ink blending to coordinate with my foil. Then used liquid glue to assemble all my elements.
I ink blended the Reindeer stencil on a piece of kraft cardstock and then cut it out with the largest Frames & Flags die before inking up the edges for some depth. Then I pulled out the Pines & Holly dies and created a wintery “bouquet” for my jar. After that I tied twine around the neck of the jar for some rustic texture.
I popped the stenciled panel up on a white card base with foam tape and then did the same with my jar.
Be sure to check out the Newton’s Nook shop to see everything included in this amazing holiday release! There’s even a sale to help you out!
Enter to Win a $25 Prize!
We will be choosing two lucky winners to win a $25 store credit for Newton’s Nook Designs online shop! To enter, just leave comments on the Design Team Member blogs (see list below)! Two winners will be chosen at random from the collective blogs in the blog hop. Make sure to check out each of their blogs and comment for your chance to win. You will not know which blog has been chosen so the more you comment on the better your chances are of winning! You have until Thursday, November 2nd at 9 pm ET to comment — winners will be announced on the NND blog on Saturday, November 4th.
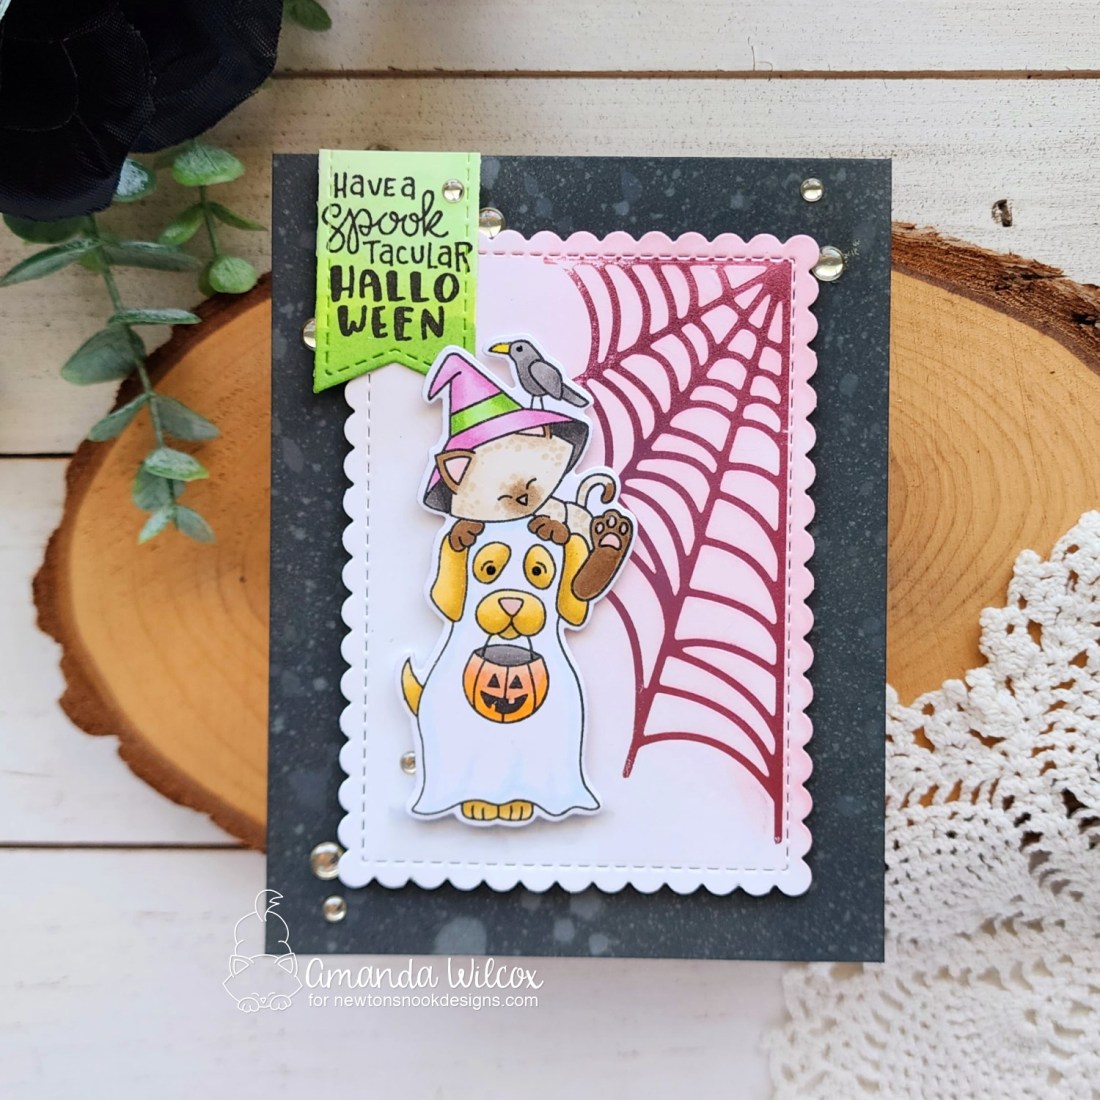
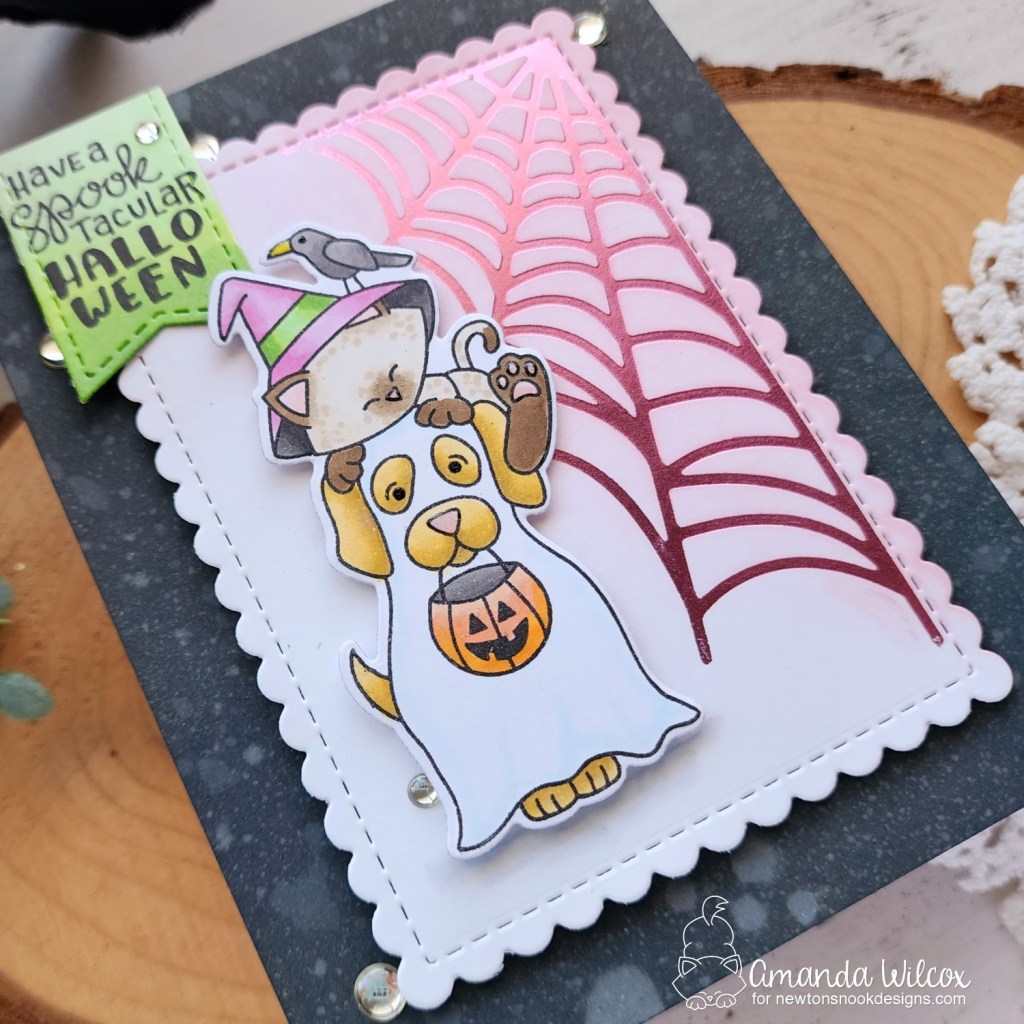
Happy Wednesday everyone! I’m so happy to be over on the Newton’s Nook blog today. I have a card featuring some super fun hot foiling and a pile of Halloween critters that are too cute to spook!
I started my card by die cutting a scalloped rectangle in the Framework die set using white cardstock. Then I hot foiled the spiderweb in the corner using Spellbinders pink foil. Then I ink blended from the corner out using a light pink dye ink to intensify that cute pink look.
Next, I stamped and colored Halloween Pile with copic markers and used the coordinating die to cut it out. I also cut a banner from the Frames & Flags die set to stamp my sentiment on. I wanted to pull more green into the design so I used the same copic markers from the witch hat on the flag before stamping my sentiment.
Before putting everything together, I ink blended black soot distress oxide ink on the outer edge of my card front and splattered it with water. Then I popped my scalloped panel up with foam tape and did the same with the sentiment and critter pile.
For finishing touches I added some silver mirror enamel dots across the design. Then I added black glaze pen to the open eyes and touch of gloss to noses, tow beans and beaks.
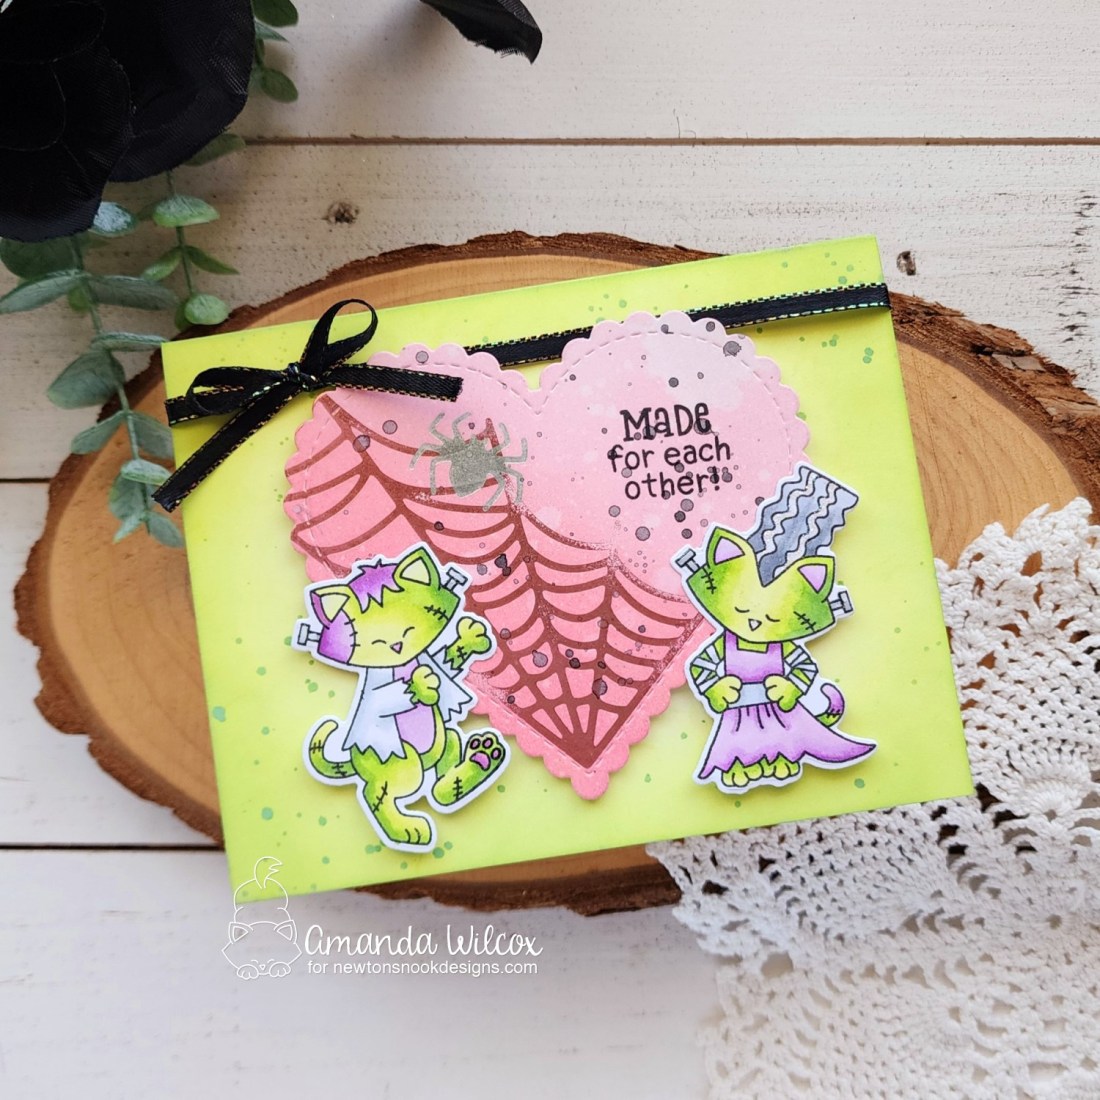
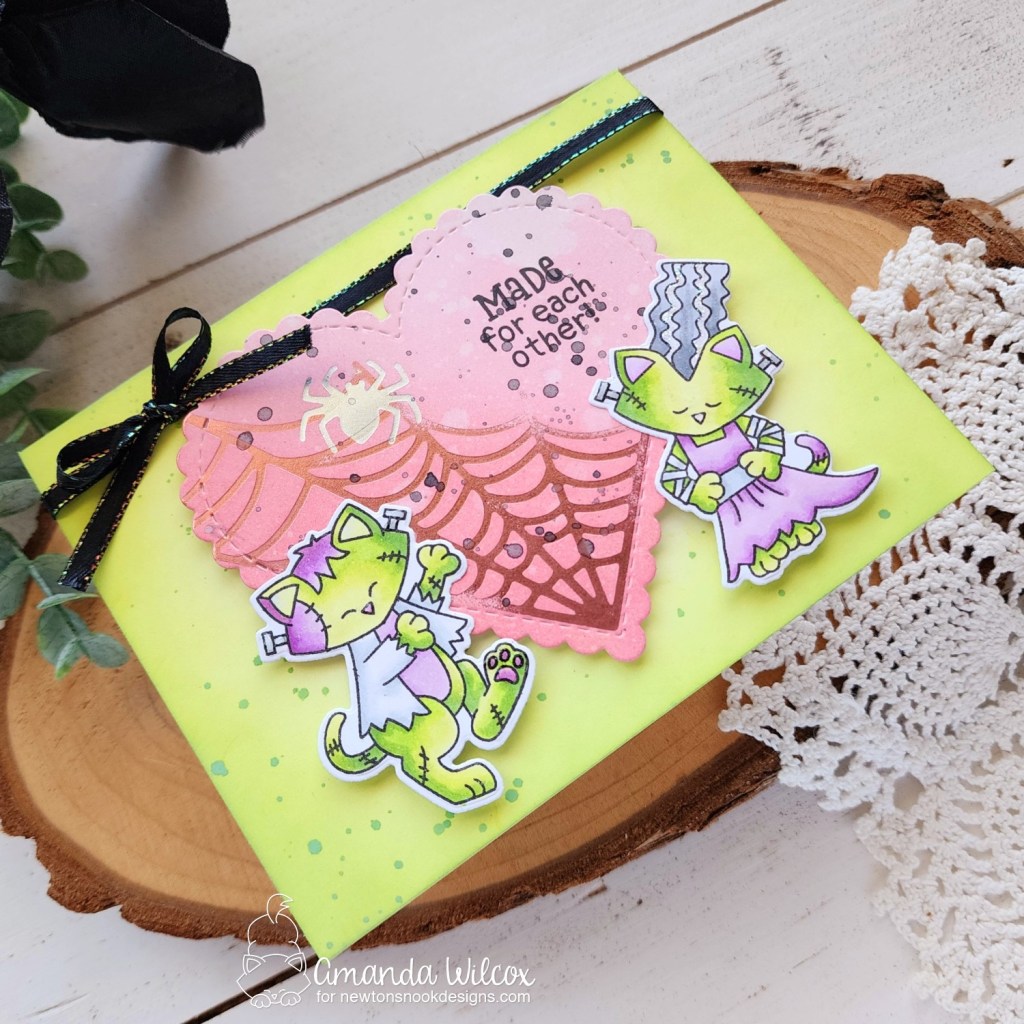
Welcome everyone! I’m happy you’re here because I’m really excited to share today’s card that is featured on the Newton’s Nook blog today. I’m using new and previously released Halloween goodies in a really fun and different way.
We all know that I love spooky season and extending it in any way is just a bonus for me. And that’s kind of what I feel like I did with my card today.
While creating for the September release I figured out that the new Spiderweb hot foil plates fit perfectly in the corner of the Heart Frames dies…so fun is that! So I foiled one in pink and did some ink blending over the top to add color. This time I used distress oxide ink in worn lipstick and spun sugar. Then I splattered black soot over the panel and let it dry.
While it was drying I went digging in my stash…I had a couple of ideas in mind but the moment I saw Franken-Newton I knew I had to put these two cuties together with my spooky heart. So I stamped, colored and die cut my heart out. Next, I chose a sentiment that I just love from that set and stamped it in the open spot away from the foiling.
The background panel is inked with twisted citron distress oxide ink and splattered with green watercolor from LH Colors. I added everything to my panel with foam tape and squares and added that to a white card base with liquid glue.
For finishing touches I added glossy accents to the kitties and tied a bow around the top for a splash of dark dramatic to go with all these neons. Then I came in with stardust Stickles on the girl kitty’s hair.
I hope you love this card half as much as I do! I know spooky isn’t for everyone but my heart was so happy creating it!
Hey friends! I’m back with another card featuring some of the September release from Newton’s Nook that just went live on Friday and one of my favorite Newton’s ever…Batty Newton!
I am a huge bat lover and Batty Newton is just too cute to spook! So I snagged him for my card today. I colored him with copic markers and used the coordinating die to cut him out. I hot foiled the new spiderweb and spider in silver and purple foils, using my scan-n-cut to cut out the spider.
I ink blended distress oxide inks in black soot and hickory smoke over the foiled spider web, then stamped a sentiment from Newton’s Candy Corn in the corner. I also inked up a white panel measuring 4×5.25 inches with twisted citron and mowed lawn distress oxide and splattered it with black paint.
Adding everything to a white card base with foam tape and squares, I finished the design off with glossy accents on Newton’s nose and toe beans.
Hello everyone! Spooky season is my very favorite and I’m happy to be starting release reveals for the Newton’s Nook September Release and it’s full of spooky goodness! Today we’re revealing a bunch of great products that we’ll be using throughout the week.
Labels Hot Foil dies and Halloween Apothecary stamps (labels fit the jar hot foil dies perfectly)
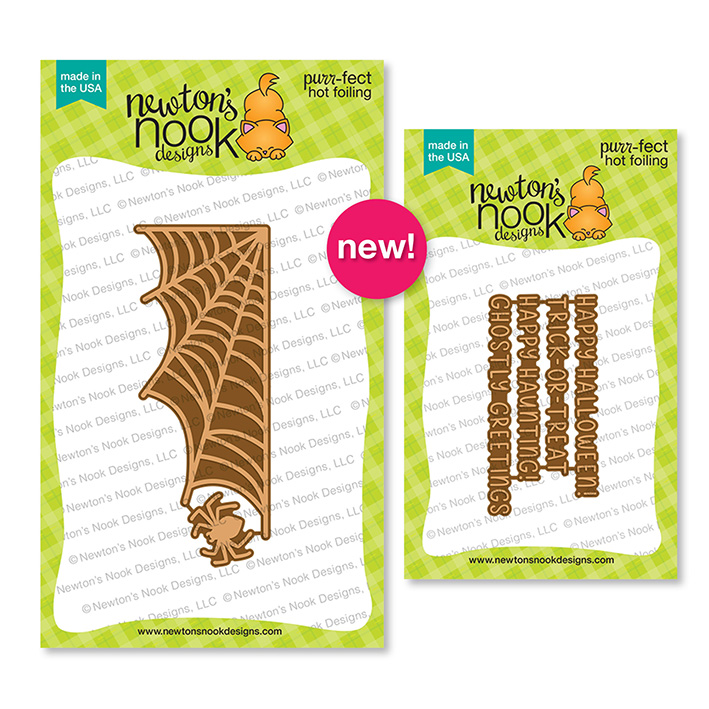
Spider Web and Spooky Sentiments hot foil plates (sentiments work perfectly with Banner Duo dies)
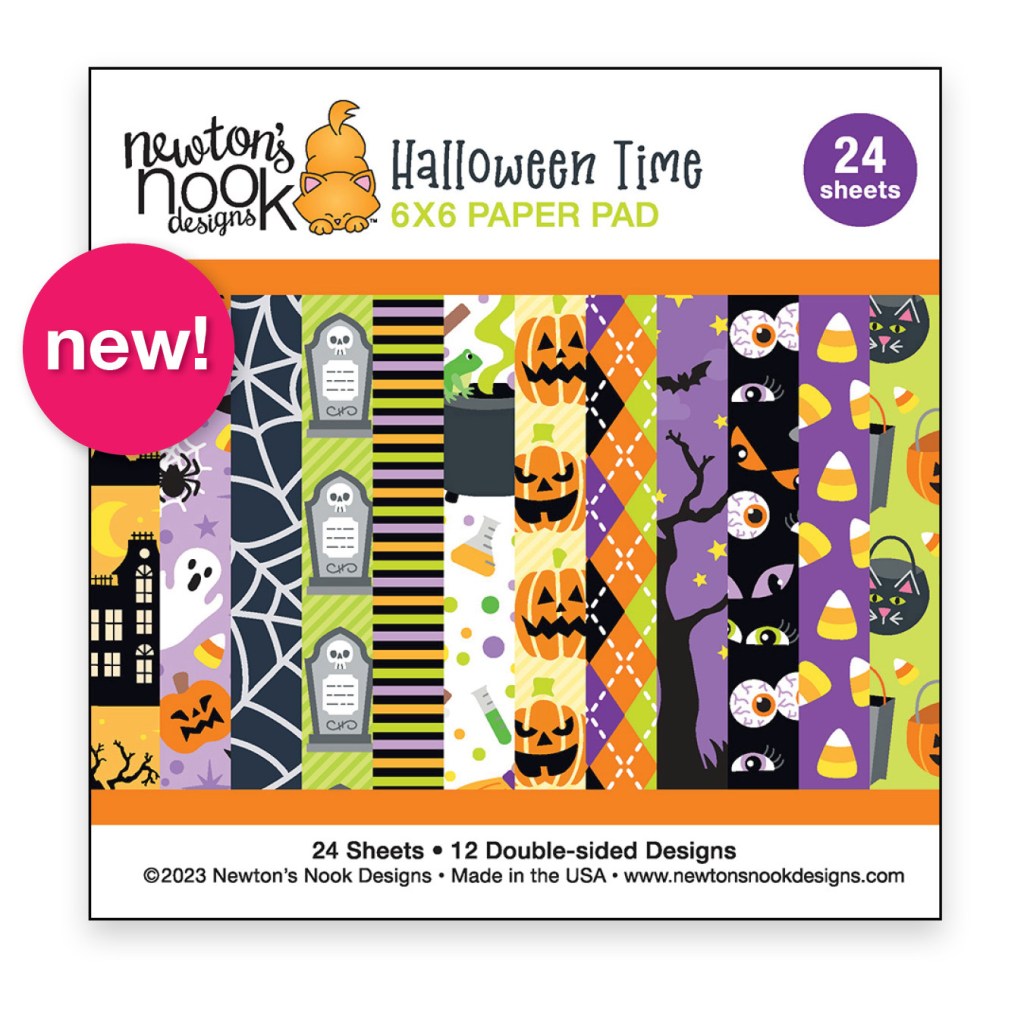
Halloween Time paper pad
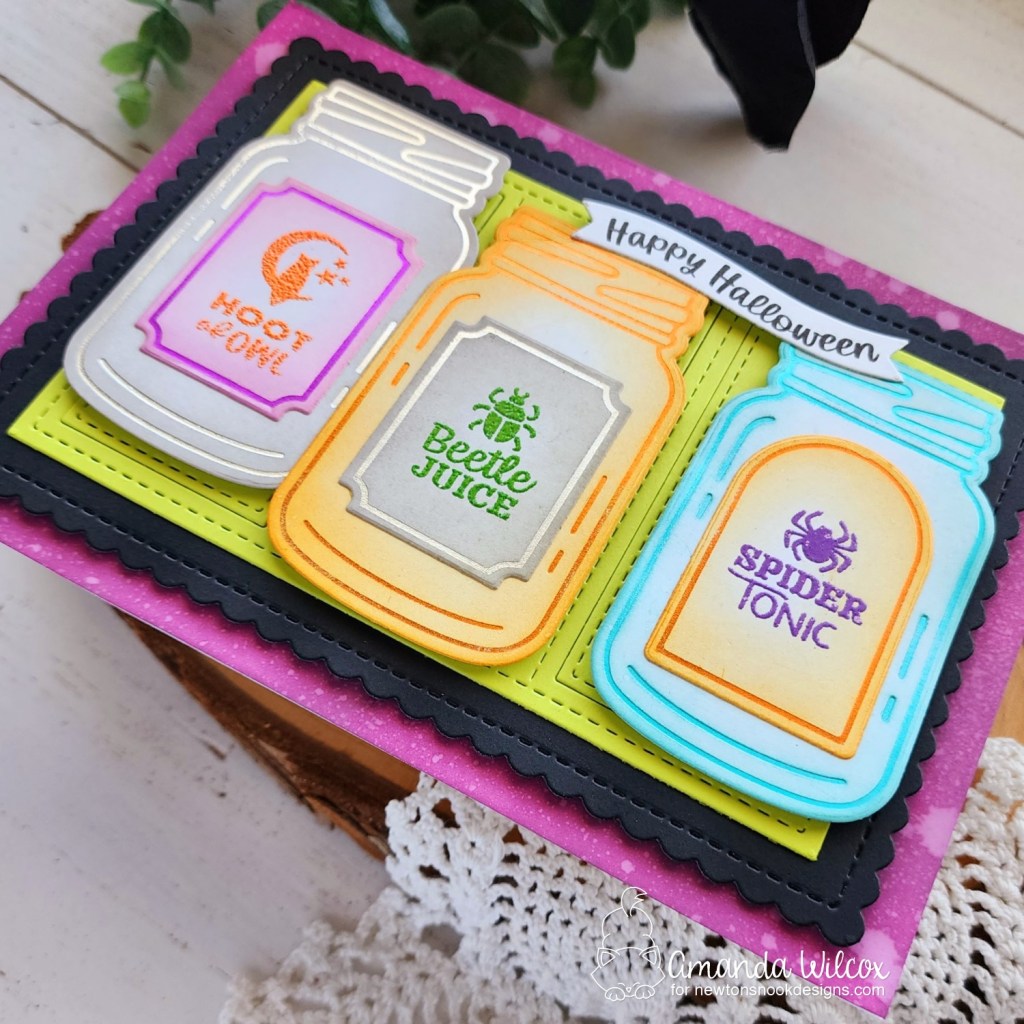
Isn’t this collection of goodies an incredible start to release week?!? I had so much fun creating with it all. Today I have a card focusing on the Halloween Apothecary stamps and Labels hot foil plates.
I had grand ideas for my card today so I hot foiled a few jars in different colors, then did the same with the new labels. Then I used the coordinating dies and cut everything out. I ink blended each piece to coordinate with the color of hot foil and then heat embossed a different image on each label in colored embossing powder.
I was very determined to get all three awesome jars on my card so I swapped my A2 size card base out for A7 and absolutely love the outcome! I cut the largest A7 Frames die from black cardstock and then the next size down from lime green. I kept the pieces that cut the windows because I wanted a solid panel and just embraced the extra stitching texture.
My card base is inked with distress oxide in seedless preserves and splattered with water. I popped the black panel up with foam tape, glued the green down with liquid glue and then popped all of the jars up with foam tape as well.
Last of all, I curved the sentiment in Halloween Apothecary to match the skinny banner in the A7 Frames die set and stamped it in black ink. I added this with a combo of liquid glue and foam squares to keep it level with the jars.
Would you like to win the “Halloween Apothecary” Stamp Set? This stamp set will be given away to ONE lucky winner!
Here’s how to win: Comment on the NND blog and Design Team blogs (see list below)! Thewinner will be chosen at random from the collective reveal posts. Make sure to check out each of their blogs and comment for your chance to win. You will not know which blog has been chosen so the more you comment on the better your chances are of winning! You have until Thursday September 14th at 9pm ET to comment — winners will be announced on the blog post on Friday, September 15th.
Check out all the awesome Design Team Blogs below to enter:
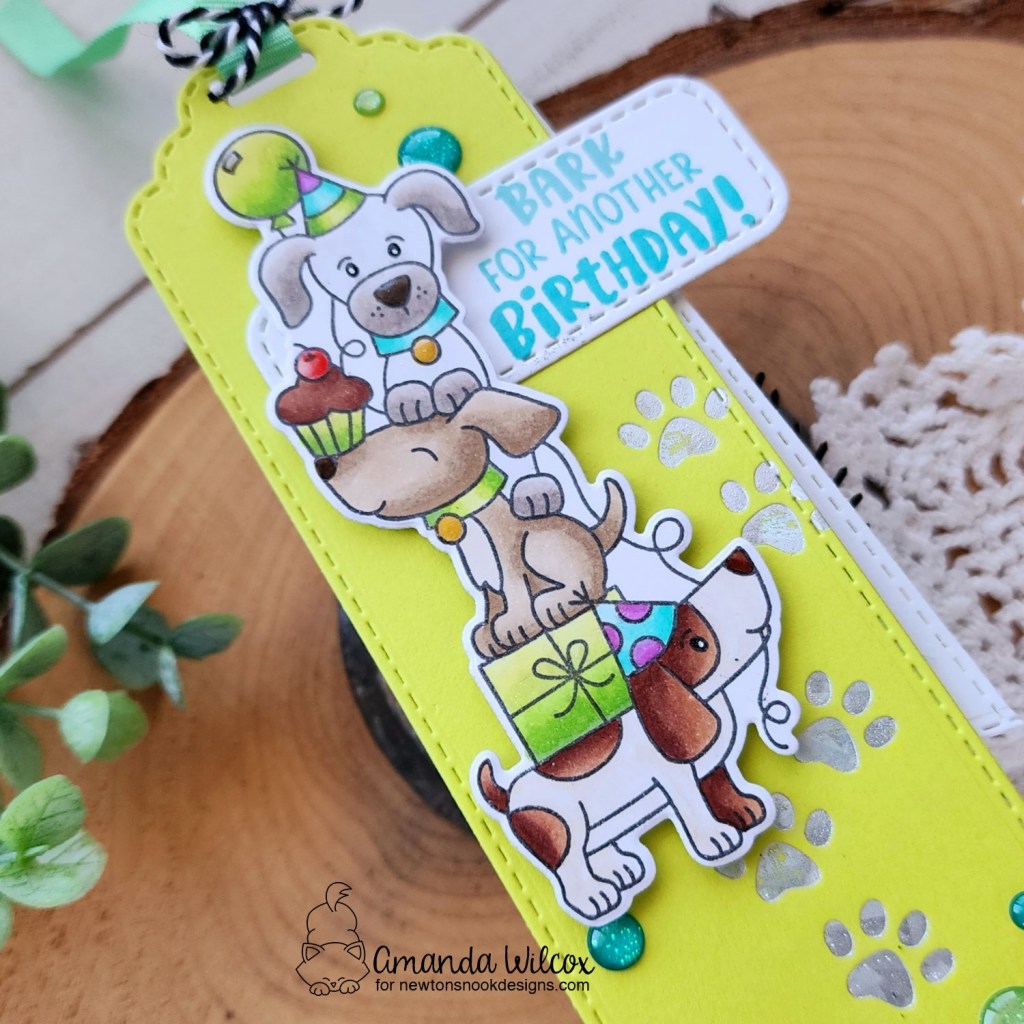
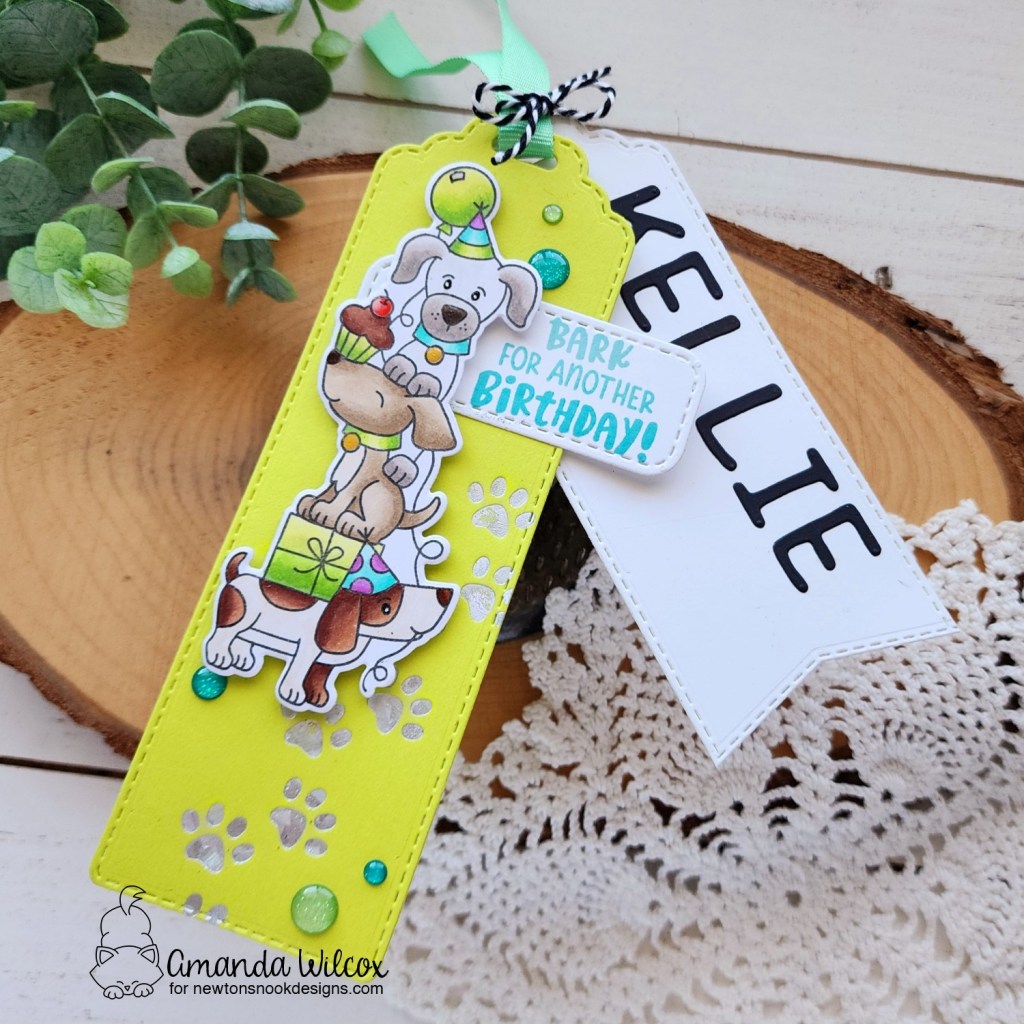
Hello everyone! I’m happy to be on the Newton’s Nook blog sharing this fun personalized gift tag that I made for my sister-in-law’s birthday gift bag. It was so fun to create and really easy to personalize too.
I started by stamping one of the Birthday Barks images and colored it with my copic markers. Then I used the coordinating die and cut it out. I chose a sentiment that I wanted to use and stamped it on a die cut label from the A7 Frames die set in two teal inks. This label die is solid so remember to cut and then stamp to save yourself a lot of headache.
I cut two tags using the Bookmark die set – one green and one white. Then I used an edge die from the Fancy Edges Tag die set to cut the white one shorter. I hope foiled the Paw Prints hot foil plate with shattered silver hot foil at an angle across the green panel before die cutting it for some fun shine and detail.
Then I glued my sentiment label in place and popped the pups up with foam squares. I added some enamel dots for extra sparkle and finished the image off with black glaze pen eyes and white gel pen highlights. Then a little touch of gloss on the noses, cherry, balloons, collar tags and party hat.
I used the Essential Alphabet dies to cut my sister-in-law’s name and glued it to the white tag before threading ribbon through the hole and tying it to her gift bag. This let me add her name but also gave room to write a message to her too!
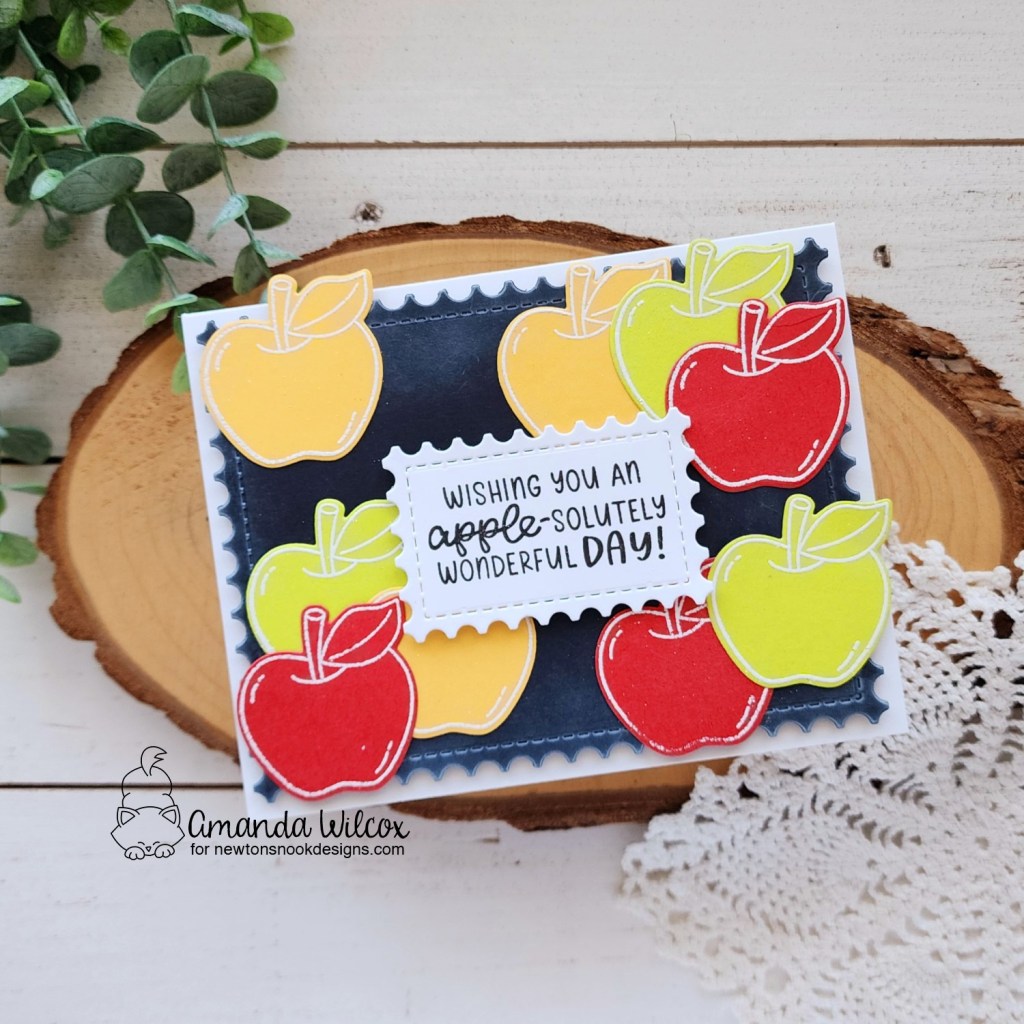
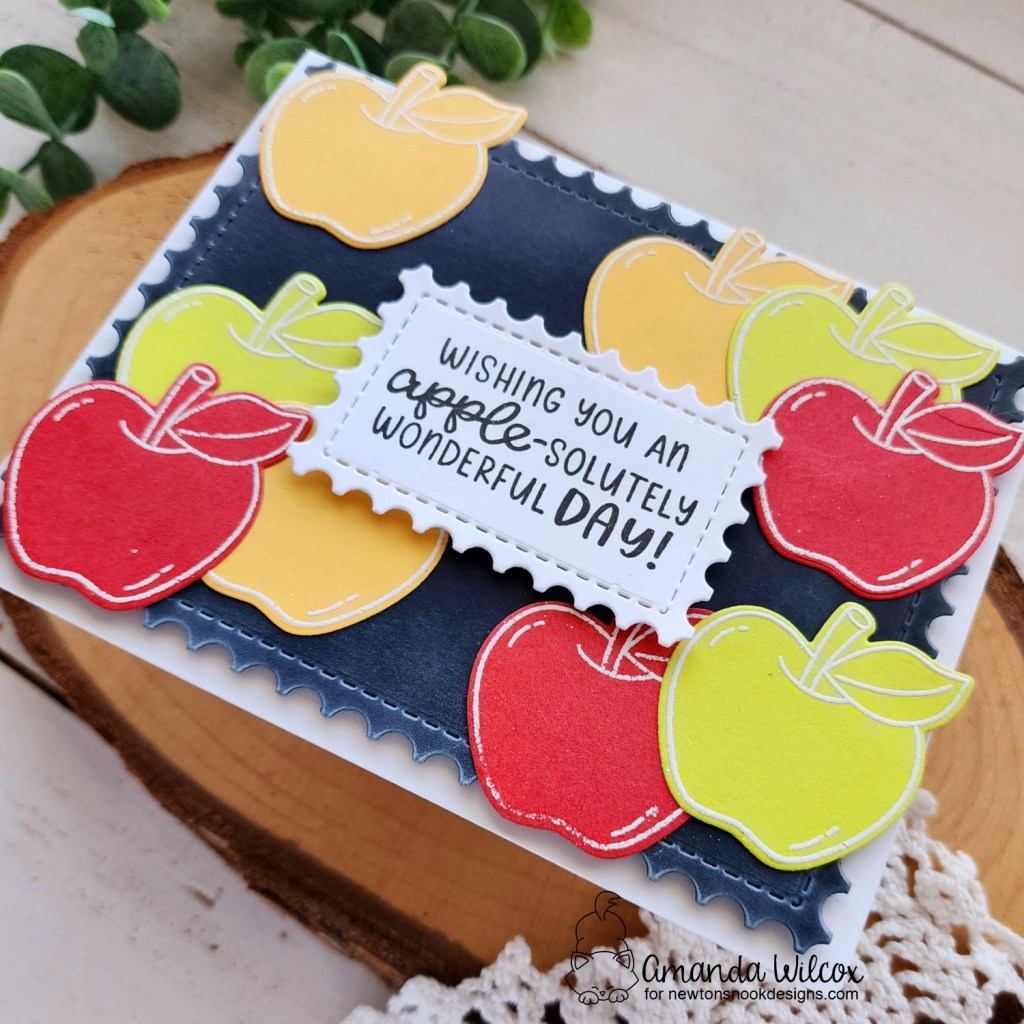
Hello everyone! I’m happy to be here sharing a simple and fun project using the Newton’s Nook Autumn Apples stamps and dies. I love these images and the variety of sentiments to pair with them. It makes a this a great year round set, not just for fall!
I started by repeat stamping and heat embossing the main apple image on red, yellow and green cardstocks…I wanted a variety of apples for my card! Then I used the coordinating die to cut them all out.
Next, I cut a piece of black cardstock with the largest Framework die and a piece of white cardstock with the next-to-smallest one in the same set. I stamped my sentiment on the small one and ink blended some chalky white pigment ink on the black one…you see where I’m going here. Chalkboards and apples for back-to-school!
Next, I arranged the apples all over the black panel and glued them down with liquid glue. I added foam tape to the back of the panel and popped it up on a white card base and then added the sentiment to the center with foam squares too.
We don’t start school here until after Labor Day so I’m excited this set came out in time for back-to-school projects for us!
Hey there! So happy you’re here because it’s the start of the Newton’s Nook August Release reveals and it’s SO MUCH FUN!!! Y’all know I’m an out and out fall girl. If I could do fall all year long, I would! So this release has my heart in every way!!! Here we go!
Autumn Leaves Hot Foil Plate
Autumn Greetings Hot Foil Plates (coordinated with Banner Duo dies)
Fall Harvest stamps and dies
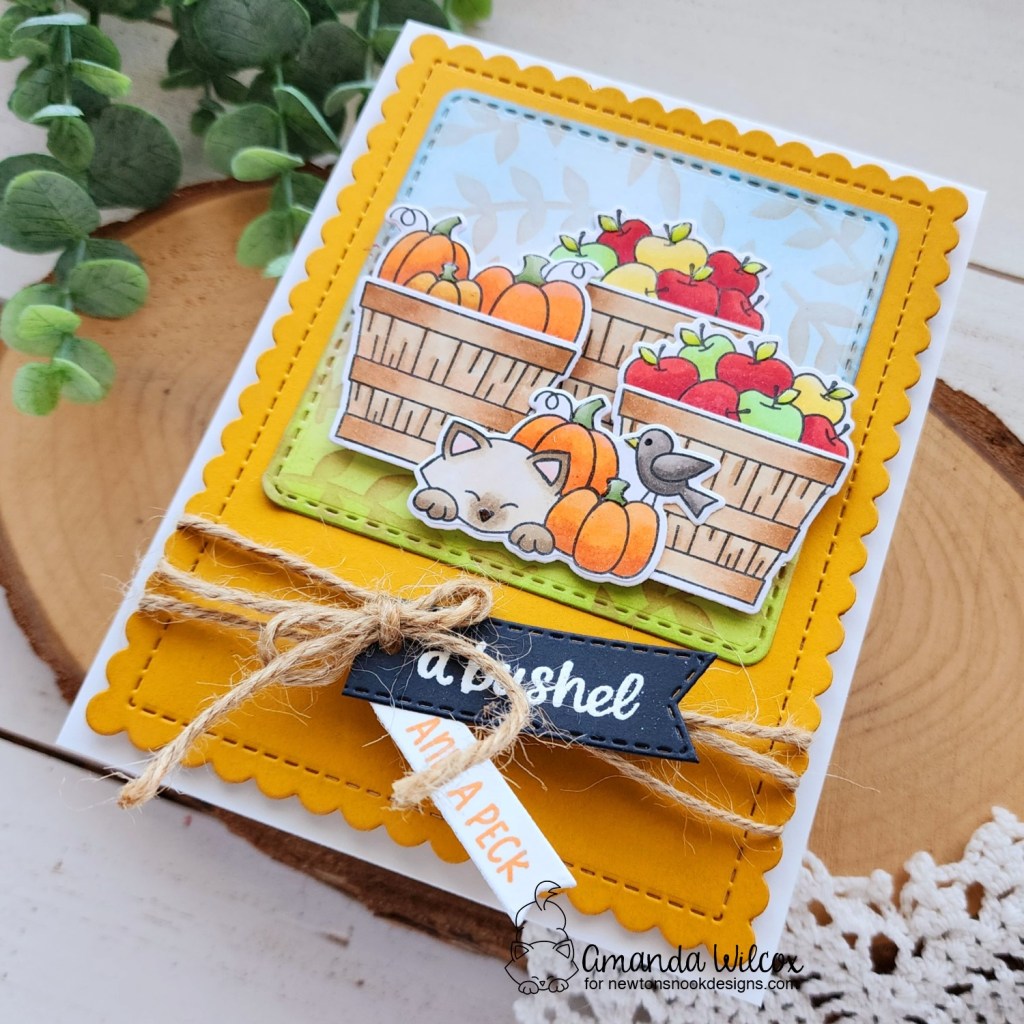
Today I have a card to share with you featuring Fall Harvest stamps and dies but throughout the week I’ll be sharing projects including all of the hot foil plates too! They’re soooo good!
These little bushels for the basket are just adorable and so fun to mix and match…but I also thought the ones especially with the kitty and puppy worked perfectly on their own too!
After stamping and coloring all the elements with copic markers, I used the coordinating dies to cut them out and liquid glue to adhere the bushels to the baskets. Then I cut a rounded square from the Frames Squared die set and ink blended it. After adding sky and grass, I went over the whole thing lightly using brown ink and the Trailing Leaves stencil. I thought it added an extra touch of interest. Then I glued one basket down with liquid glue and popped the other images up with foam tape.
Using the largest Frames & Flags die I cut a background panel and adhered my mini scene to that with liquid glue. Next, I chose some banners from Banner Trio and A7 Frames die sets to stamp my sentiments. I punched holes in them and strung them on my background panel.
I added foam tape to the back, avoiding the twine area so it lays flat, and popped it on a white card base. Then for finishing touches I added glossy accents to the pumpkin stems, apple leaves, bird beak and kitty nose.
Would you like to win the “Fall Harvest” Stamp Set? This stamp set will be given away to ONE lucky winner!
Here’s how to win: Comment on the NND blog and Design Team blogs (see list below)! The winner will be chosen at random from the collective reveal posts. Make sure to check out each of their blogs and comment for your chance to win. You will not know which blog has been chosen so the more you comment on the better your chances are of winning! You have until Thursday August 17th at 9pm ET to comment — winners will be announced on the blog post on Friday, August 18th.
Check out all the awesome Design Team Blogs below to enter: