Pink & Main – Life is Better in Flip Flops

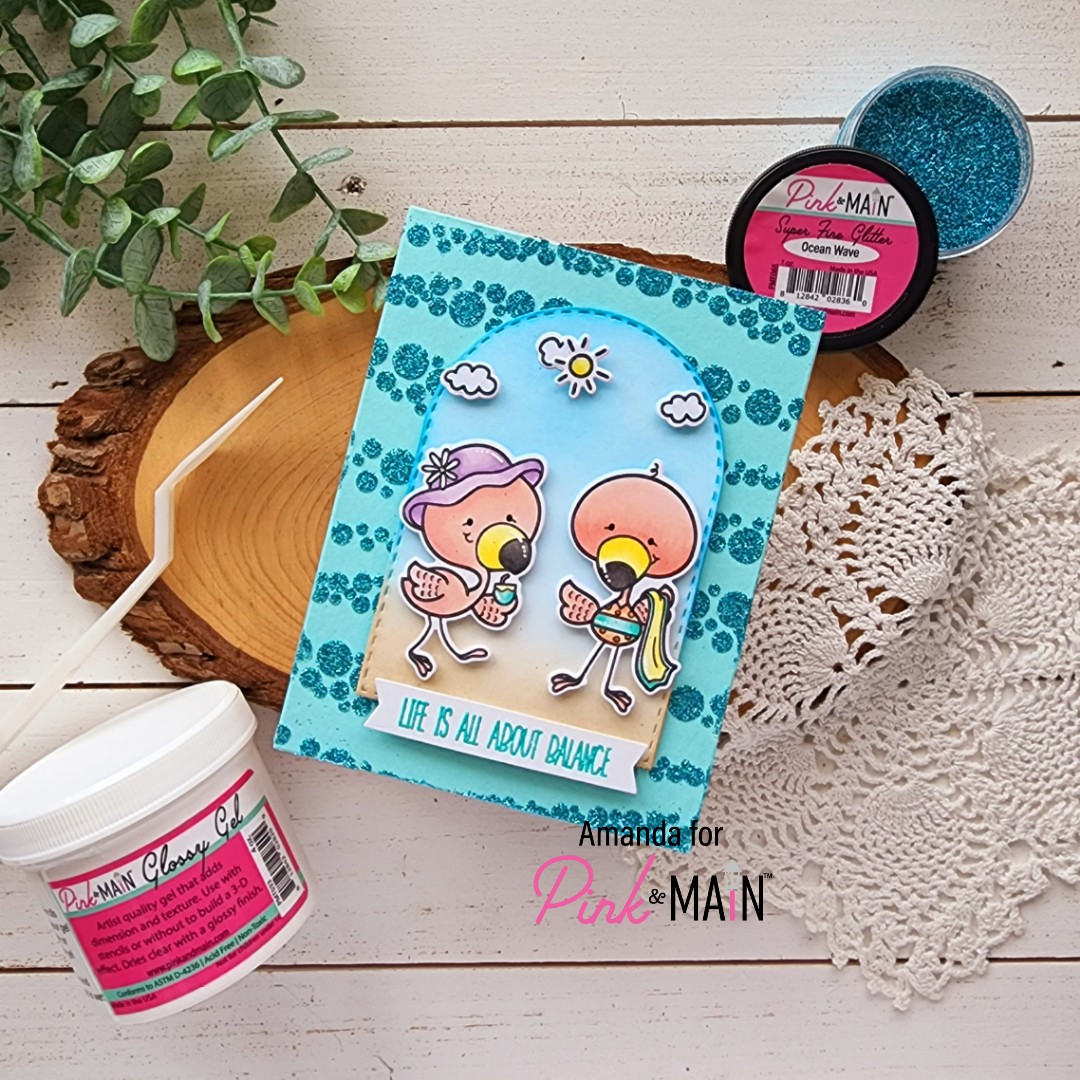
Woo-hoo! Happy Friday crafty friends! We did it! We made it through another awesome week. Today I’m popping in with a bit of summery fun inspiration featuring stamps, dies, a stencil and an embossing folder from the most recent Pink & Main release! Phew! That’s a lot of goodies but it’s SOOOO COOL! Let’s check it out.

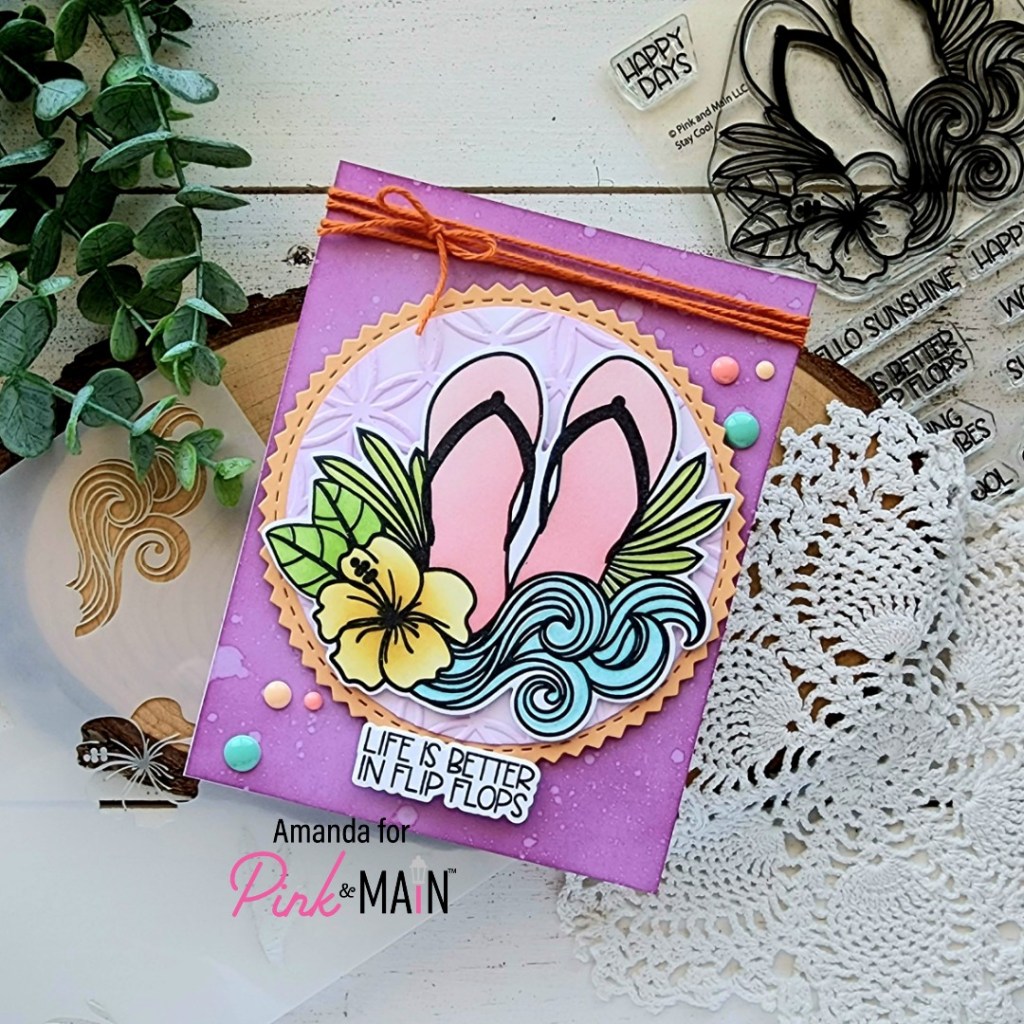
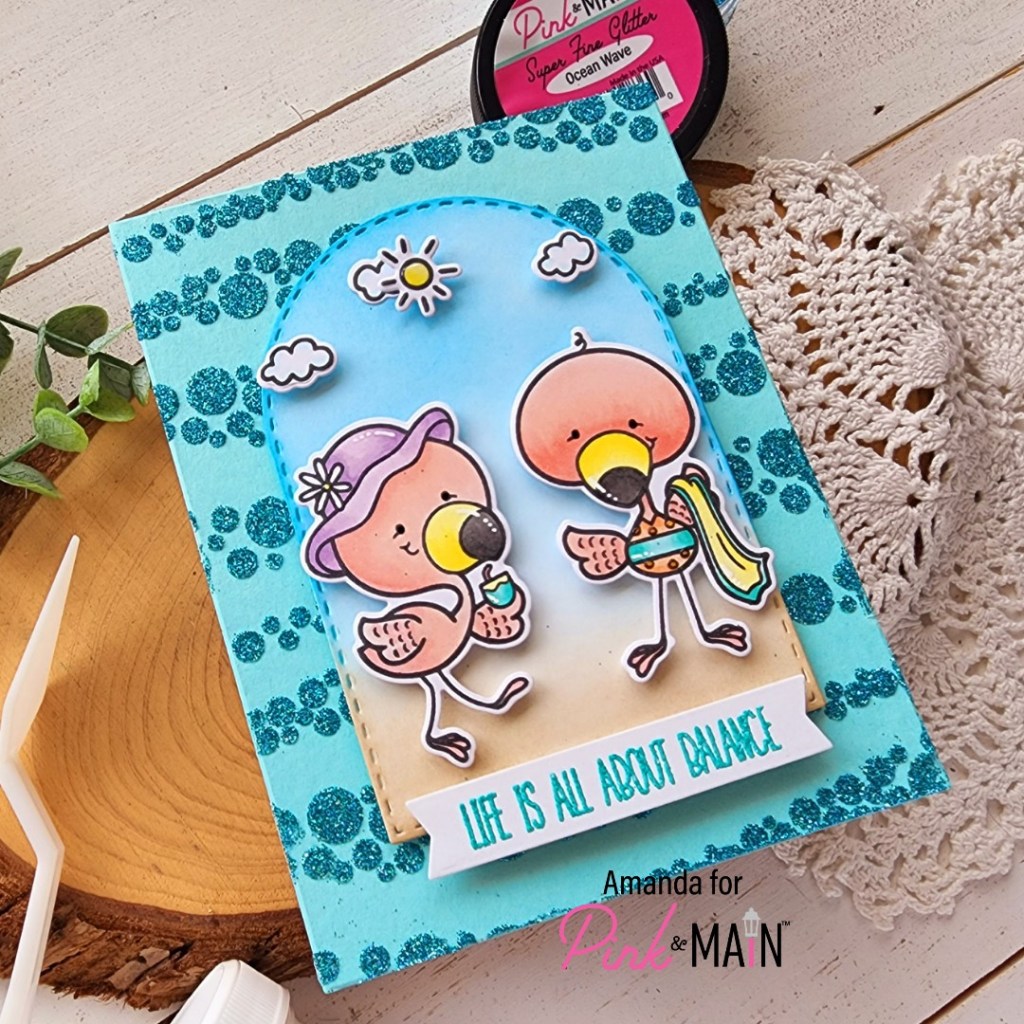
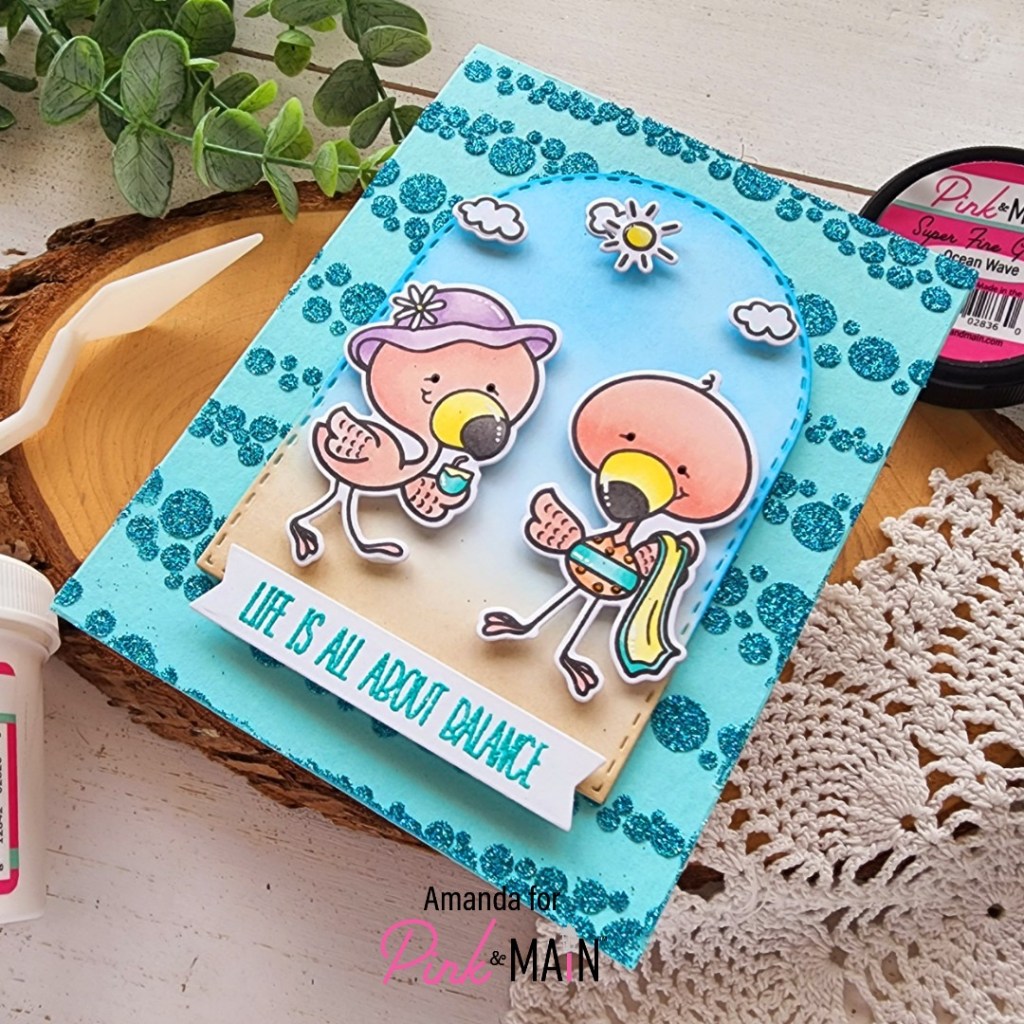
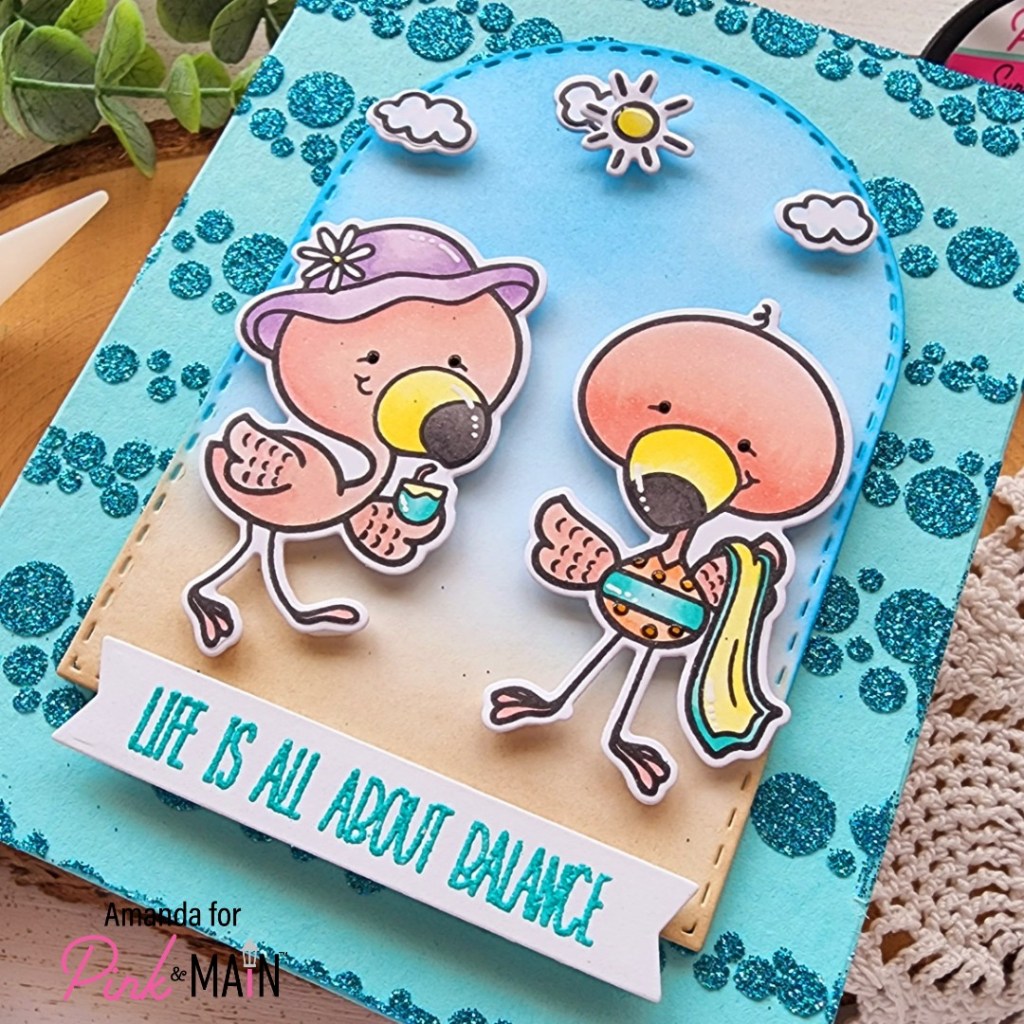
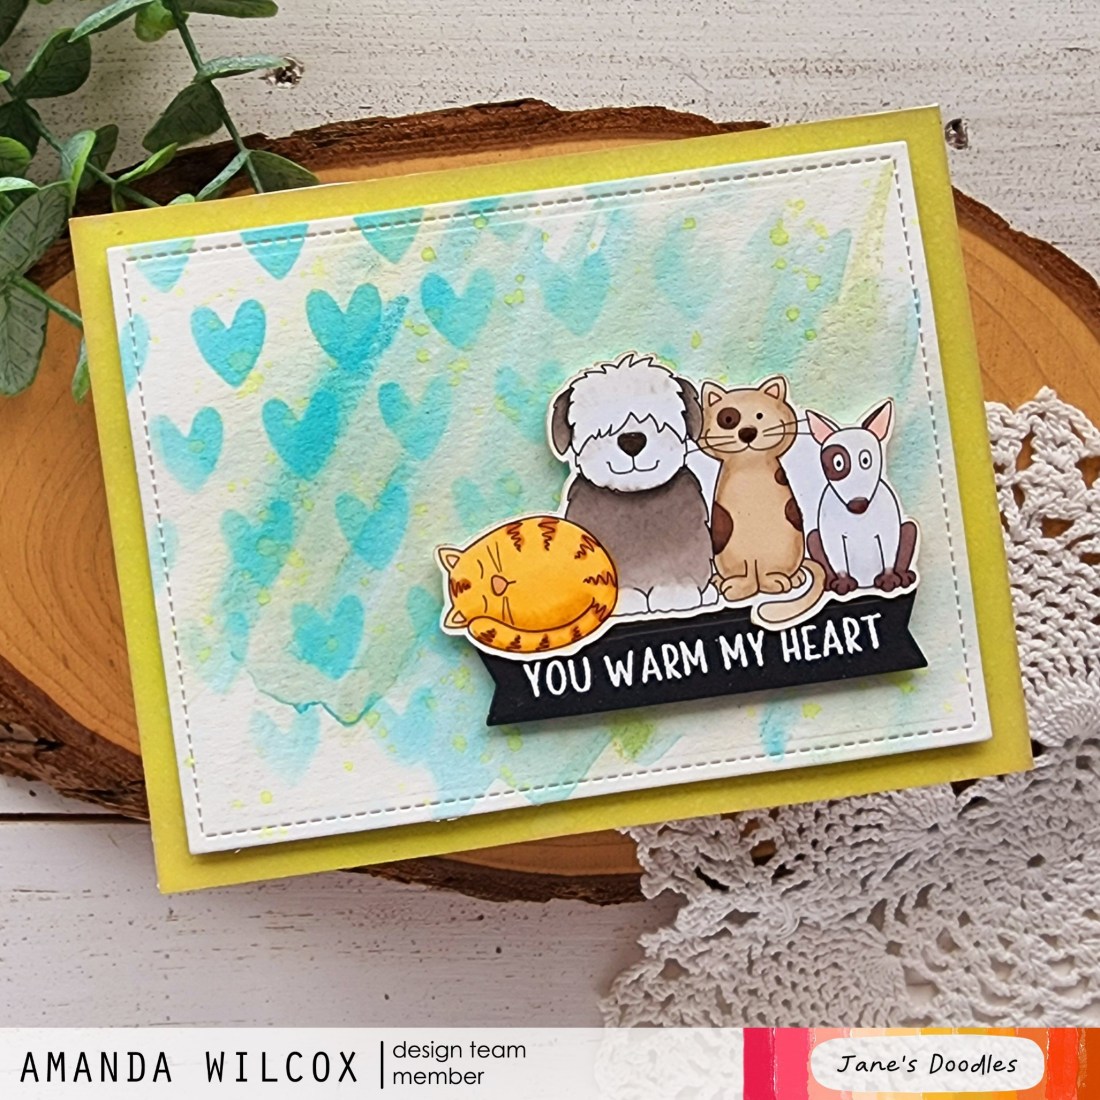
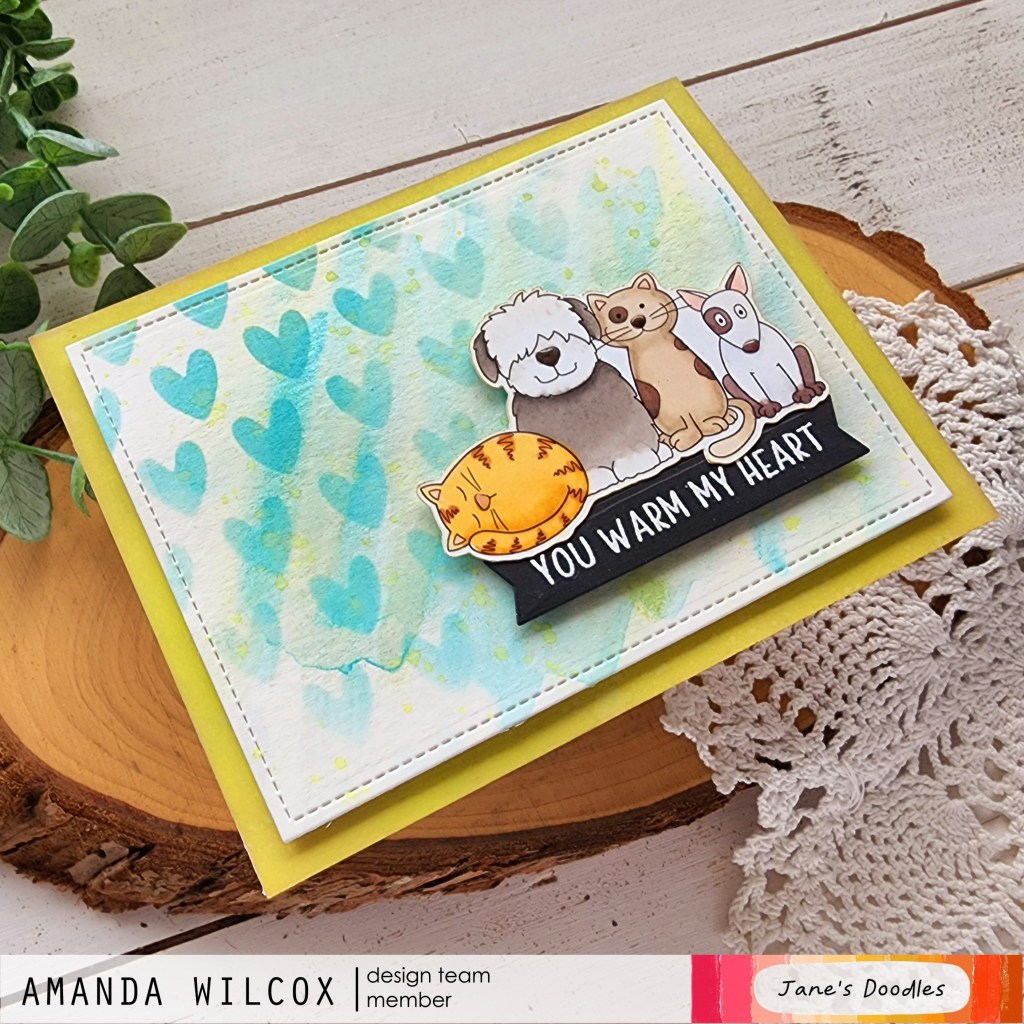
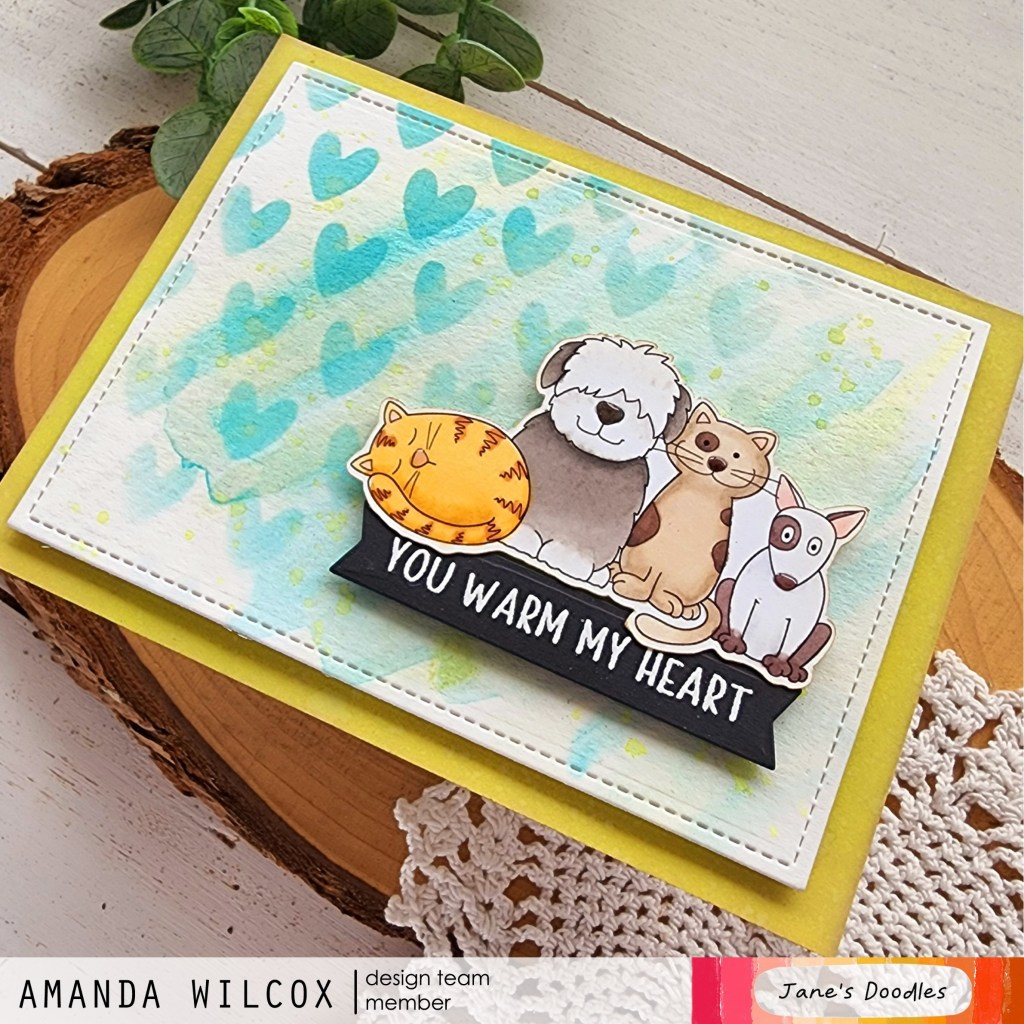
I started by stamping my Stay Cool image and then used the coordinating stencil to apply ink over the different areas with a blending brush, essentially “coloring” in my image. I know there are other products out there like this but this is my first time trying it and I was totally blown away! It was so fun and easy to do! Next, I used the coordinating die to cut the image out, along with a sentiment from the set too.

Switching gears to my background, I cut a circle from white cardstock using the Layered Circles dies and another from orange cardstock using the Zig Zag Circle dies. I ran the white one through my die cutter with the Roundabout embossing folder to add fun texture to it. Then I went over the whole thing with a blending brush and light purple ink. I used EZ Squeeze liquid glue to adhere the circled together and popped my image up on it with foam tape.

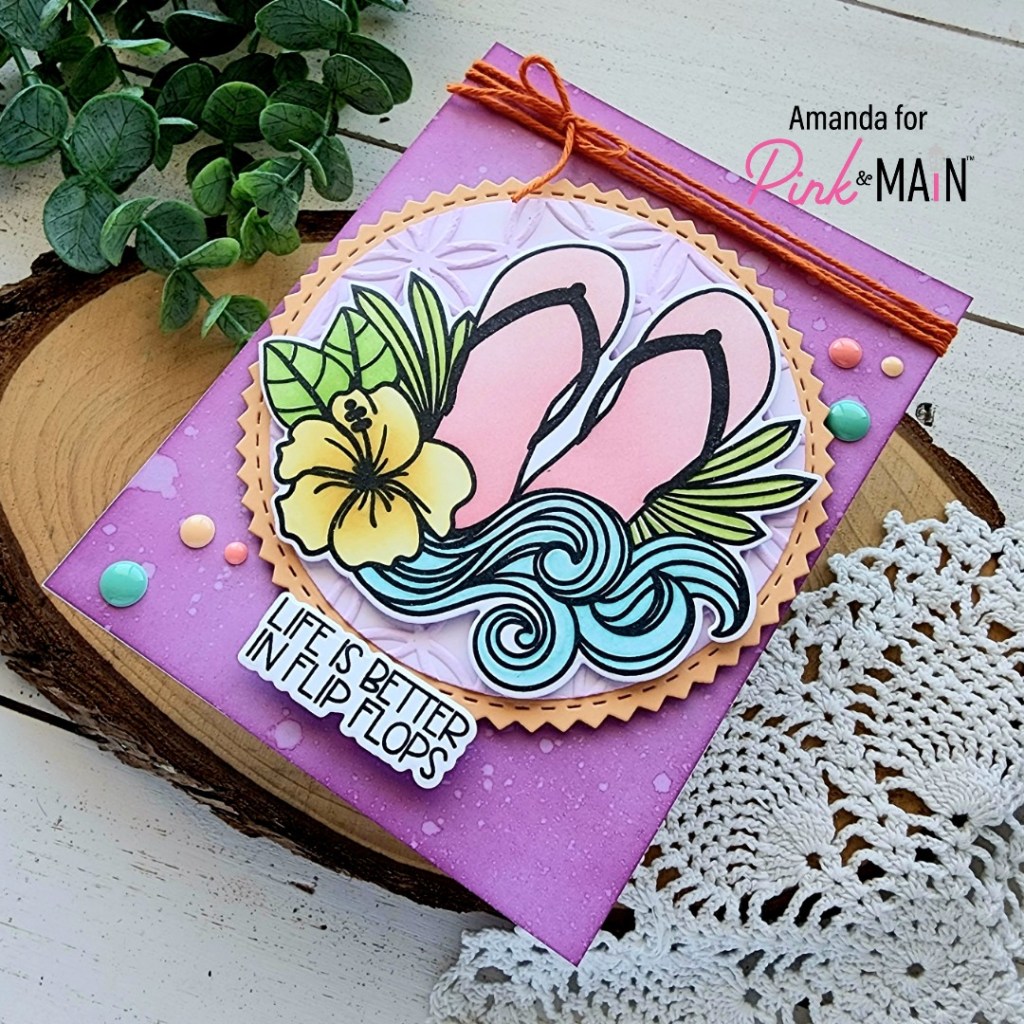
Next, I ink blended some seedless preserves distress oxide ink around the edge of an A2 panel and spritzed it with water. Then I popped the zig zag circle up with foam tape and added my sentiment below that with foam squares. To finish everything off, I added some orange twine around the top of the card and tied it in a bow. I also used a scattering of enamel dots across the design for a little extra shine and interest, tying in colors from the ink blending.

Products used today:
Stay Cool stamps, dies and stencil
Layered Circles dies
Zig Zag Circles dies
Roundabout embossing folder
Enamel dots
Ergonomic blending brushes
EZ Squeeze liquid glue
Foam tape and squares

I appreciate you sharing your time with me. Have a fabulous day!

Pink & Main – Life is All About Balance

Happy Friday everyone! I hope you still have your sunscreen handy from my summery posts all week because you’re going to need it still! Today I have a super sparkly fun card featuring the brand new Pink & Main June release! It’s so summer and absolutely wonderful for so many interests!

Two things I love most when crafting – critters and getting messy! Today I got to do both and I loved every moment of it! I chose some images from the brand new Flocks of Love stamp set. I colored everything with copic markers and used the coordinating dies to cut them out. Then I cut a Stitched Arch from white cardstock and used my blending brushes to ink up a sky and some sand. I popped the images up with foam squares to create a mini scene.

Next, I stamped and heat embossed a sentiment from the set with my favorite aquatini embossing powder! You guys, I’m seriously obsessed with the new Pink & Main embossing powder line! It’s amazing!

Anyway, after the heat embossing was cooled I die cut the sentiment with a Large Sentiment Strip die that fit the length I wanted and popped it up at the bottom of my arch scene with foam squares too.

For my background, I used the Layered Rectangles A2 dies to cut a teal panel the size of my A2 card front and spread Glossy Gel through the new Bubbly Waves stencil. I removed the stencil and sprinkled Ocean Wave super fine glitter on it and set it aside to dry.

I cleaned up my work space and realized, I went about this totally backwards. Lol! It worked out because it was time to cook dinner for my family.

Once the glitter panel was dry, I adhered it to a card base and popped my arch scene up on it with foam tape. Then for finishing touches I added black glaze pen to flamingo eyes, white gel pen accents to various parts of the images and glossy accents to the swimsuit dots, flower center and sunshine in the sky.

Be sure to head to the Pink & Main shop and check out the whole release. It’s so much fun and it sure to get you in the summer spirit!

Products used today:
Flocks of Love stamps and dies
Bubbly Waves stencil
Stitched Arches dies
Large Sentiment Strip dies
Glossy Gel
Super Fine Glitter – ocean wave
Heat Embossing & Watermark Ink
Magic Anti-static Powder Tool
Embossing Powder – aquatini
Ergonomic Blending Brush
Foam tape and squares

I appreciate you sharing your time with me. Have a fabulous day!

Pink & Main – Berry Sweet Scene Card

Hello everyone! Thank you so much for stopping by today. I have a REALLY fun slimline scene card to share with you featuring my favorite Pink & Main bears. I love them so much and have so much fun mixing and matching them whenever I can.

Today my scene includes images from Bear With Wagon and Berry Sweet stamp sets. I chose various images from both sets and stamped them out, multiples of some like the berry plants and jam jars. I colored everything with my copics and used the coordinating dies to cut them all out. I had a plan for layering my images so I used EZ Squeeze liquid glue to adhere the grass tufts to the berry plants and sitting bear and then added the jam jars to the wagon and the wagon handle to the bear’s paw. Now we can switch gears to our scene and get inky!

I used the largest Stitched Slim Line die to cut two white panels. The main panel I inked with blueprint sketch and tumbled glass distress oxide inks for my sky. The second panel I cut in half and inked one side with twisted citron and mowed lawn distress oxides while the other half was gathered twigs and tea dye. I spritzed all the panels with water and blotted them dry. Then I splattered them with pearl watercolor and black acrylic paint. It’s silly, but I don’t wash my brush going from the pearl watercolor to the paint so my black ends up a little shimmery too. I think it’s fun but you could just rinse the brush to avoid it if you wanted.

When my panels were dry, I used EZ Squeeze liquid glue to adhere the layers together and also put them on a slimline card base. Then I added my images with a combination of liquid glue and foam squares for dimension and interest.

The last things I did were stamp and heat emboss my sentiment and finishing touches. I love that the sentiments in Berry Sweet are all punny and the the word “berry” is a separate stamp so you have options. Because it’s super easy to stamp one part and then the other, I decided to heat emboss them using different colors to emphasize the pun even more. These new heat embossing products are absolutely amazing and my favorites to use everyone! The ink stamps crisp and perfect, the anti-static tool is incredible and the embossing powders all melt beautifully.

I digress, but seriously, these products are awesome! So, after my sentiment was heat embossed, I came in with glossy accents on the bear’s noses and flower centers on the berry bushes for a little shine here and there.

I hope you enjoyed today’s project even a sliver of the amount that I enjoyed creating it.

Products used:
Bear with Wagon stamps and dies
Berry Sweet stamps and dies
Stitched Slim Line dies
EZ Squeeze liquid glue
Magic Anti-Static brush
Embossing & Watermark Ink
Embossing powders – licorice and candy apple
Foam squares
Glossy accents
Distress Oxide Ink – blueprint sketch, tumbled glass, mowed lawn, twisted citron, tea dye, gathered twigs

I appreciate you sharing your time with me. Have a fabulous day!

Pink & Main – Sunshine & Smiles Slimline Card

Welcome everyone! Today I’m over on the Pink & Main blog sharing this slimline card featuring the newly released Window View stamp set. When I pulled this set out to play with, I immediately wondered if I could fit multiple windows on a slimline card. I absolutely LOVE the fact that I can easily fit two like the front of a house. It’s so fun!

Once, I realized that, I chose the “decorations” for each window and stamped all my images. I colored them with copic markers and used the coordinating dies to cut everything out. I adhered the flower box and puppy with liquid glue and popped the kitty and bee up with foam squares.

Next, I inked blended a slimline panel with aged mahogany and fired brick distress oxide inks. I spritzed the panel with water and blotted it dry before adhering it to a slimline card base measuring 8.5×3.5 inches. I wanted a more substantial sentiment than the one in the Window View set so I went digging and found this cute one in the Spring Sayings stamp set. I stamped and heat embossed it with Icicle embossing powder and cut it out using the smallest Notched Corners die.

I added the windows with foam tape and then layered the sentiment in the upper center with a foam squares and liquid glue where it overlaps the windows. Then I moved on to finishing touches, adding glossy accents to various parts of the images like flower centers and bee wings.

For the critter window, I just added glossy accents to their noses and the kitty’s tag. Aren’t they literally the cutest thing ever?!? I just love their faces!

Products used today:
Window View stamps and dies
Spring Sayings stamps
Notched Corners dies
EZ Squeeze liquid glue
Embossing Ink
Embossing powder – icicle
Anti-static powder tool
Foam tape

I appreciate you sharing your time with me. Have a fabulous day!

Pink & Main – Ribbit!

Hello everyone! I can’t even begin to explain how excited I am to share today’s card. Do you ever create something that you’re just so perfectly happy with that you’re beaming and love looking at it over and over again? That’s seriously how I am with this card today. I don’t know what it is exactly but I love it so much and I really hope you do too!

I started this card by stamping a few images from the May Stamp of the Month – Ribbit, and colored them with my copic markers. I used the coordinating dies to cut them out and they sat on my desk for a few days because I just couldn’t decide what I wanted to do. Then one night, it all just came together!

My background panel is embossed with the Wide Stripes embossing folder and adhered to a white card base. Then I cut a couple of frames using the A2 Layering Rectangles dies and the Hooray paper pad. Those are adhered with EZ Squeeze liquid glue. Finally I cut the largest Double Stitched Dome from another piece of Hooray paper and popped it up with foam squares. I arranged my images around the dome and popped them up as well.

Totally flying by the seat of my pants, I placed the whole thing in my MISTI and stamped the RIBBIT! sentiment in the center of the dome between that adorable from and the log at the bottom. I seriously love it!

Finally, for finishing touches I added a massive scattering of Silver Glossy Dots around the whole design and glossy accents on things like the cattails and frog’s tongue. I also added unicorn Stickles to the dragonfly wings for extra sparkle.

Isn’t this card so cool!?! I just love it so much and can’t wait to share it with someone soon!

Products used today:
Ribbit stamps and dies
Double Stitched Dome dies
Layered A2 Rectangle dies
Wide Stripes embossing folder
Hooray paper pad
Silver Glossy Dots embellishments
Stickles – unicorn
Glossy accents
Foam squares

I appreciate you sharing your time with me. Have a fabulous day!

Jane’s Doodles – You Warm My Heart

Welcome friends! I have a sweet watercolor card to share with you today featuring Jane’s Doodles stamps and stencil, paired with my new LH Colors watercolors for some sparkle and texture in the background.

I knew I wanted to create a card with these sweet kitties and pups from the Jane’s Doodles Cats and Dogs digital stamp set, so I printed them out and colored them with my copic markers. I used the scan-n-cut to cut the image out and set it aside to play with a watercolor background.

I cut an oversized panel of watercolor paper and slopped some water on it with a big brush. Then I added limeade and pool party from the LH Colors Summer Fun collection randomly on the paper. I heat dried it a couple of times in the middle to get some layers but when I was finished I wanted it to have more texture. So, I pulled out the Hearts stencil and inked it with salvaged patina distress oxide ink. Then I splattered some watered down twisted citron distress oxide on the panel to bring in the limeade watercolor. Once the panel was dry I cut it down with the largest of the Lawn Fawn Small Stitched Rectangle Stackables dies.

Last, I inked a white panel with twisted citron distress oxide ink for my base panel but didn’t like how bright it was so I toned it down with tea dye distress oxide very lightly. I glued that panel to a card base and popped up the watercolor panel with foam tape. Before adding my critters, I stamped and heat embossed a sentiment from Love You and cut it out with a Pink & Main Large Sentiment Strip die.

Finally, I added the sentiment strip and critters with foam squares on the lower right corner of the card. To finish things off I just added glossy accents to all of their noses.

Products used today:
Jane’s Doodles Cats and Dogs digital stamps
Jane’s Doodles Hearts stencil
Jane’s Doodles Love You stamps
Pink & Main Large Sentiment Strips dies
Lawn Fawn Small Stitched Rectangle Stackables dies
LH Colors – limeade and pool party
Glossy Accents
Distress Oxide Ink – twisted citron and salvaged patina
Foam squares and tape

I appreciate you sharing your time with me. Have a fabulous day!

Pawsome Stamps – Just Because I Miss You

Hello everyone! Today I have a sweet little card showing how to pull your stamps from one theme and stretch them into anything you’d like. I’m using a couple of adorable stamp sets from Pawsome Stamps and new watercolors from LH Colors for my background!

I recently received this adorable bear set called Hoppy Easter from my crafty friend Katie. I just adore this bear and love all of the cute accessories in the set. However, it’s very Easter and I didn’t have a chance to use it in time but I hate to leave it sit a whole year. So I didn’t! I stamped that cute bear and his bowtie and colored them with my copic markers. Then, I used the coordinating dies to cut them out. I used liquid glue to adhere the bowtie in place and went searching for what I wanted to use as a grounding platform for my bear.

I landed on this awesome woodgrain textured cardstock from Birch Press Design that I cut into a strip that ended up being 4×1.5 inches. I inked the edges with a blending brush and some brown dye ink for added interest. Then for the background, I cut a piece of watercolor paper, spritzed it with water and embossed it with the Pink & Main Wide Stripes embossing folder. Using these stripes as a guide I watercolored the Mint Chip color from LH Colors on each strip and set it aside to dry.

I went looking in other Pawsome stamp sets to see what sentiments I had available that were not holiday and thought this miss you one was sweet from the Cup of Tea set. So, I stamped it on the woodgrain panel and also stamped the snail and bumblebee to fill in my design a little.

For assembly on my card today, I adhere the bear to the back of the woodgrain and added foam tape to that whole thing before adhering it to the watercolor panel. Then I added foam squares to the snail and bee and popped them in place. Finally I popped the whole panel up with foam tape on a white card base.

For finishing touches I wrapped twine around the top of the card and tied it in a bow. Then I added black glaze pen to the bear and snail eyes and glossy accents to the nose and shell. Last, but not least, I came in with a little unicorn Stickles on the bee wings and white gel pen highlights on the bear’s bowtie.

Remember to look at your stamps and see if they might be flexible in their use. This time I didn’t change anything with the images, just chose specific details like the bowtie, omitted any bunny ears and picked a new sentiment. Super simple but sometimes we forget and overlook something because it was originally intended for a specific theme or holiday.

Products used today:
Pawsome Stamps Hoppy Easter stamps and dies
Pawsome Stamps Cup of Tea stamps and dies
Pink & Main Wide Stripes embossing folder
Birch Press Design – woodgrain cardstock
LH Colors watercolor – mint chip
Thermoweb 3D foam tape and squares
Glossy accents
Stickles – unicorn

I appreciate you sharing your time with me. Have a fabulous day!

Pink & Main – Release Day Take 2

Hey friends! We had a bit of a kerfuffle last week and the calendar was marked a week off for release day. So you got a fun sneak peek of an upcoming set and today I’m back for the real release day with that same Bear with Wagon set again paired with a new Gone Fishing stamps and dies as well.

I stamped the images from both sets and colored them with my copic markers before using the coordinating dies to cut them out. Then I took all of the small images from Gone Fishing and stamped them in embossing ink on a white panel. I heat embossed them with the new Candy Apple embossing powder, then used my blending brush to ink over the panel with a red ink. I love the tone-on-tone design to bring a little detail to the design.

Next, I inked an A2 size panel with distress oxide ink from chipped sapphire to blueprint sketch and finished the top off with a little salty ocean. I spritzed the panel with water and blotted it dry. Then I flicked vanilla and bluebell watercolor from LH Colors on the panel.

Once it was dry, I trimmed the red panel to 1.5 inches and added a thin strip of black cardstock to the top edge with EZ Tear Tape and popped the panel up on the blue one with foam tape. Next, I added my images with foam squares.

Finally I stamped sentiments from Gone Fishing and Love You More, and die cut them with Large Sentiment Strip dies, popping them up with foam squares. For finishing touches I added glossy accents to the bear noses, fishing pole reel and bobber too!

I had so much fun combining these unrelated sets for a whole new look and a fabulous Father’s Day card idea for any fisherman!

Products used:
Bear with Wagon stamps and dies
Gone Fishing stamps and dies
Love You More stamps
Large Sentiment Strip dies
Anti Static Powder Tool
Embossing Ink Pad
Candy Apple embossing powder
Ergonomic Blending Brush
EZ Tear Tape 1/4 inch
EZ Squeeze liquid glue
Glossy accents
Foam tape and squares
LH Colors watercolor – vanilla and bluebell

I appreciate you sharing your time with me. Have a fabulous day!

Jane’s Doodles – Have a Brew-Tea-Ful Day Outside the Box Card

Welcome, welcome! Thanks for stopping by today. I’m sharing a fun box card and a tag using the recently release Tea Time digital stamp set from Jane’s Doodles. This set is packed full of images so I printed everything and just started coloring for fun. In the end I had extra images after arranging my box card so I made a sweet little tag for the heck of it too!

After coloring the images, I went digging through my paper stash for cardstock or patterned paper that coordinated with the colors I had used. I landed on these fun prints from Pink & Main’s All Occasions Florals paper pad. I cut all of the elements for my Outside the Box card from white cardstock, including the cloud layers. I also cut the cloud layers from vellum and stacked them behind but in the end, that gets covered up so you could skip it.

After building the box and adding the decorative elements on the sides and back, I added all of my colored images to the different layers. In the end, I chose a sentiment from the Brew-Tea-Ful stamp set. I added the card folded up into my MISTI and stamped it down on the upper right side of the arch.

Then, for a little extra something, I took the hearts from the Tea Time set I had colored, added them to acetate picks and adhered them with glue dots. I love the look of the hearts floating in the air.

Now, in a completely different color palette, I have a simple little tag that will be perfect to attach to a tea themed gift. I used a craft knife to cut a slit in the teacup so I could slide the teabag inside of it. The sentiment stamped on the teapot is also from Brew-Tea-Ful.

I hope you enjoyed today’s projects!

Products used today:
Jane’s Doodles Tea Time digital stamps
Jane’s Doodles Brew-Tea-Ful stamps
MFT Stamps Outside the Box Level Up dies
MFT Stamps Outside the Box Clouds
Pink & Main Fancy Tag dies
Pink & Main All Occasion Florals paper pad
Bearly Arts liquid glue
Scrappy Tape – 1/4 inch

I appreciate you sharing your time with me. Have a fabulous day!

Pink & Main – Release Day | Sending Cheer

Happy Friday everyone! It’s release day for Pink & Main and, once again, it’s packed full of cuteness! Much to my happiness are more of the sweet bears, which I absolutely had to create with right away!

***CORRECTION*** We had a little mix up and release day is next week. So here’s a fun sneak peek of one of the new sets coming your way. Sorry about that.

I immediately wanted to create a sweet little scene with these bears pulling a wagon full of happy mail. There are a bundle of options in the set but I was very drawn to the envelopes. So I stamped and colored the images with copic markers and used the coordinating dies to cut everything out. I glued the wagon handle to the bear’s hand and figured out how my spacing was going to work – landscape or portrait.

I decided on landscape because it filled the space so perfectly. Then I grabbed the double stitched dome dies and cut the middle size from white cardstock. I used my ergonomic blending brushes to add blue sky and green grass to it before stamping my sentiment in the top center.

I used the largest layered A2 rectangle die to cut a piece of Year Round Plaid paper and adhered it to a white card base with EZ Squeeze liquid glue. I popped the dome up with foam tape and then added my images with foam squares too.

My scene was a little empty so I pulled out some clay hearts from my stash and also added the two bees from Spring Snow Globe Scenes to fill things in. For finishing touches I added Stickles to the bee’s wings and the heart on the letter. Then I came in with glossy accents for the bear’s noses and stamps on the envelopes.

Be sure to head to the Pink & Main shop to check out the entire release that’s available now!

Products used today:
Bear with Wagon stamps and dies
Spring Snow Globe Scenes stamps and dies
Double Stitched Dome dies
Layered A2 Rectangles dies
Year Round Plaid paper pad
EZ Squeeze liquid glue
Ergonomic Blending Brushes
Foam tape and squares
Glossy accents
Stickles – unicorn
Twiddler’s Nook Sweethearts embellishments

I appreciate you sharing your time with me. Have a fabulous day!