Pink & Main – Hooray For You!

Happy Friday everyone! Today I’m sharing more birthday inspiration over on the Pink & Main blog. I had so much fun creating today’s card and absolutely love all the texture going on! It’s so fun!

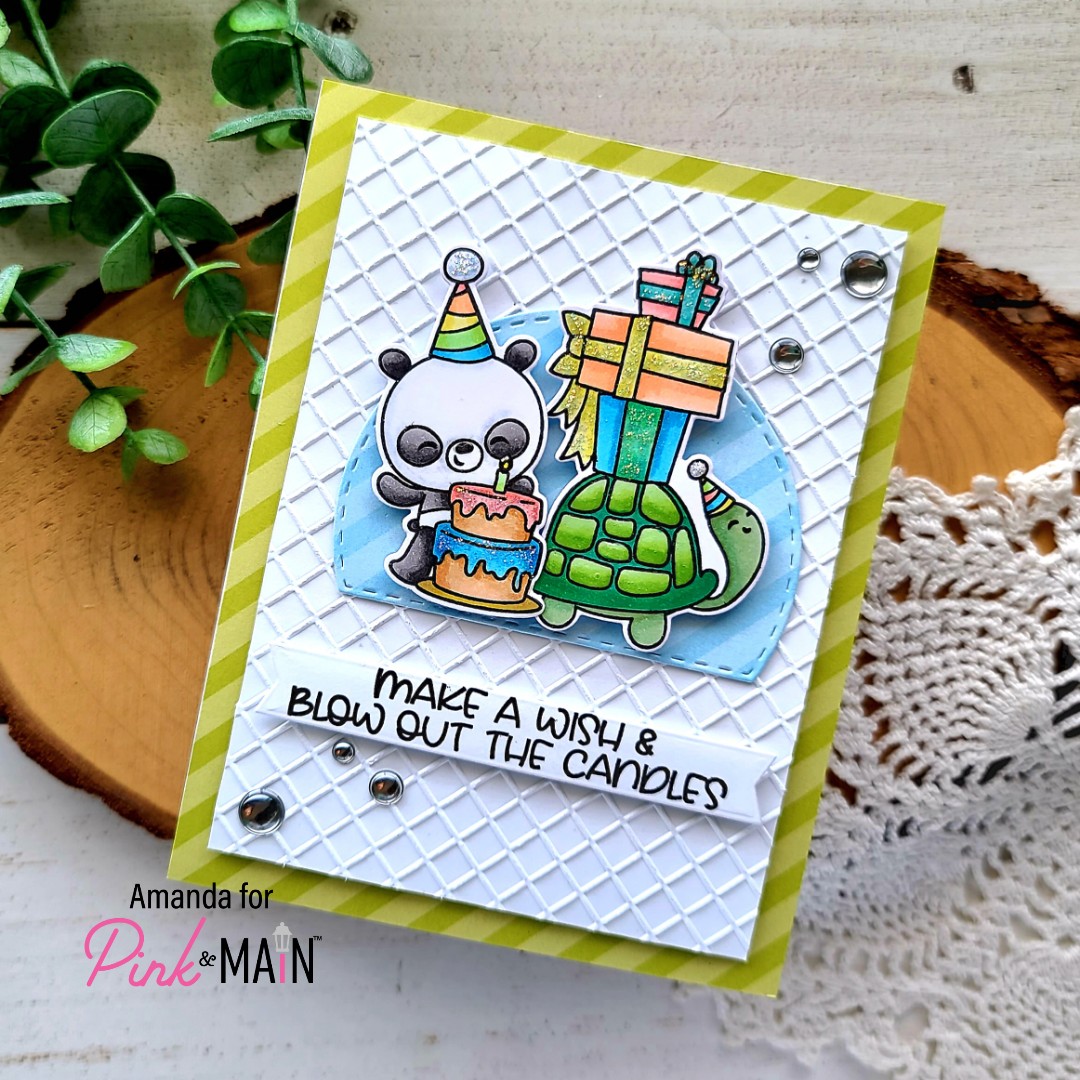
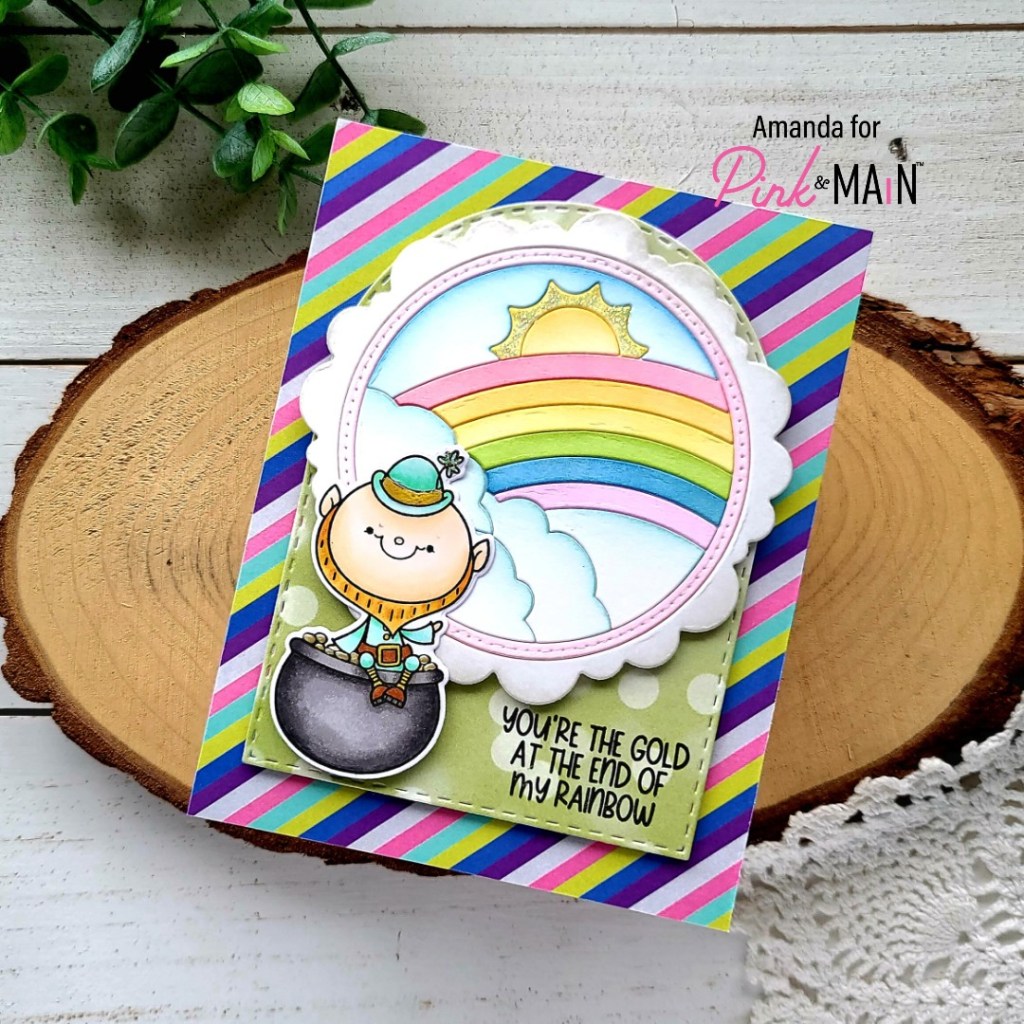
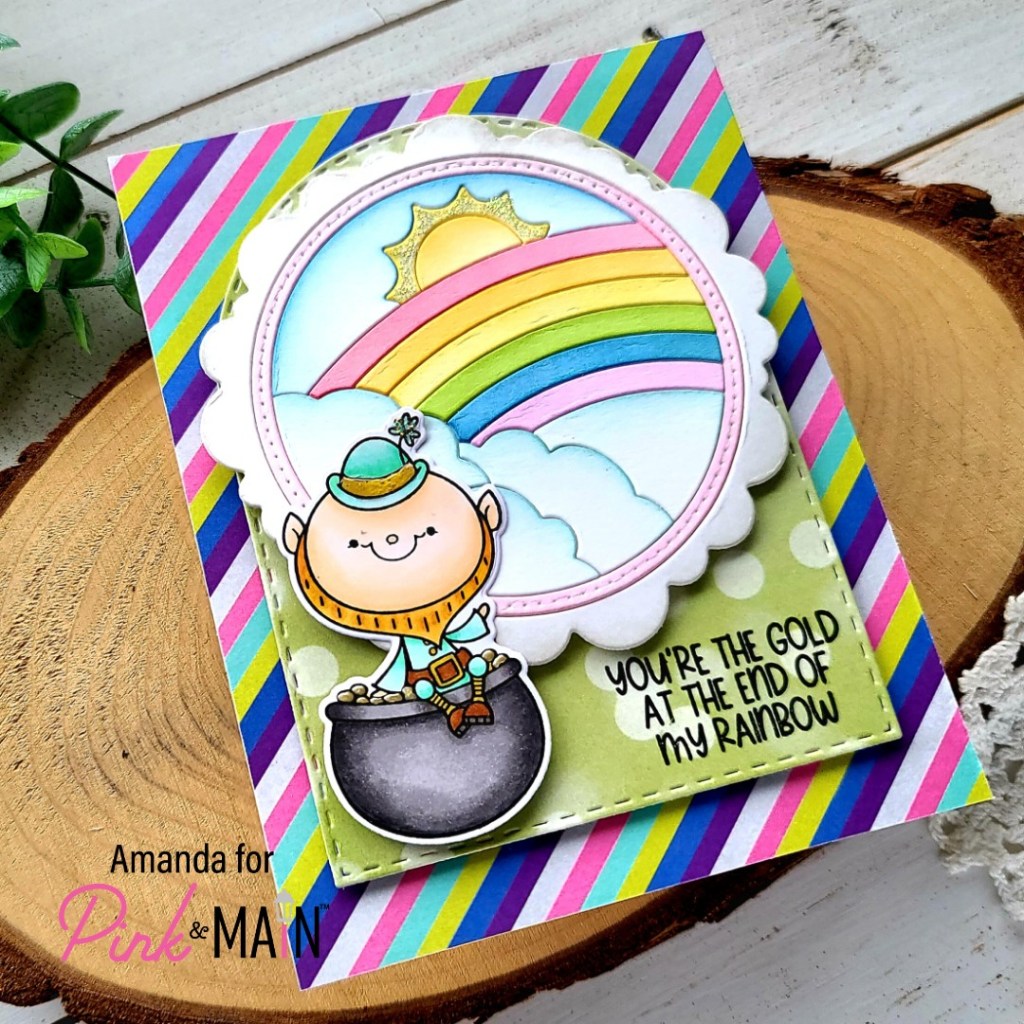
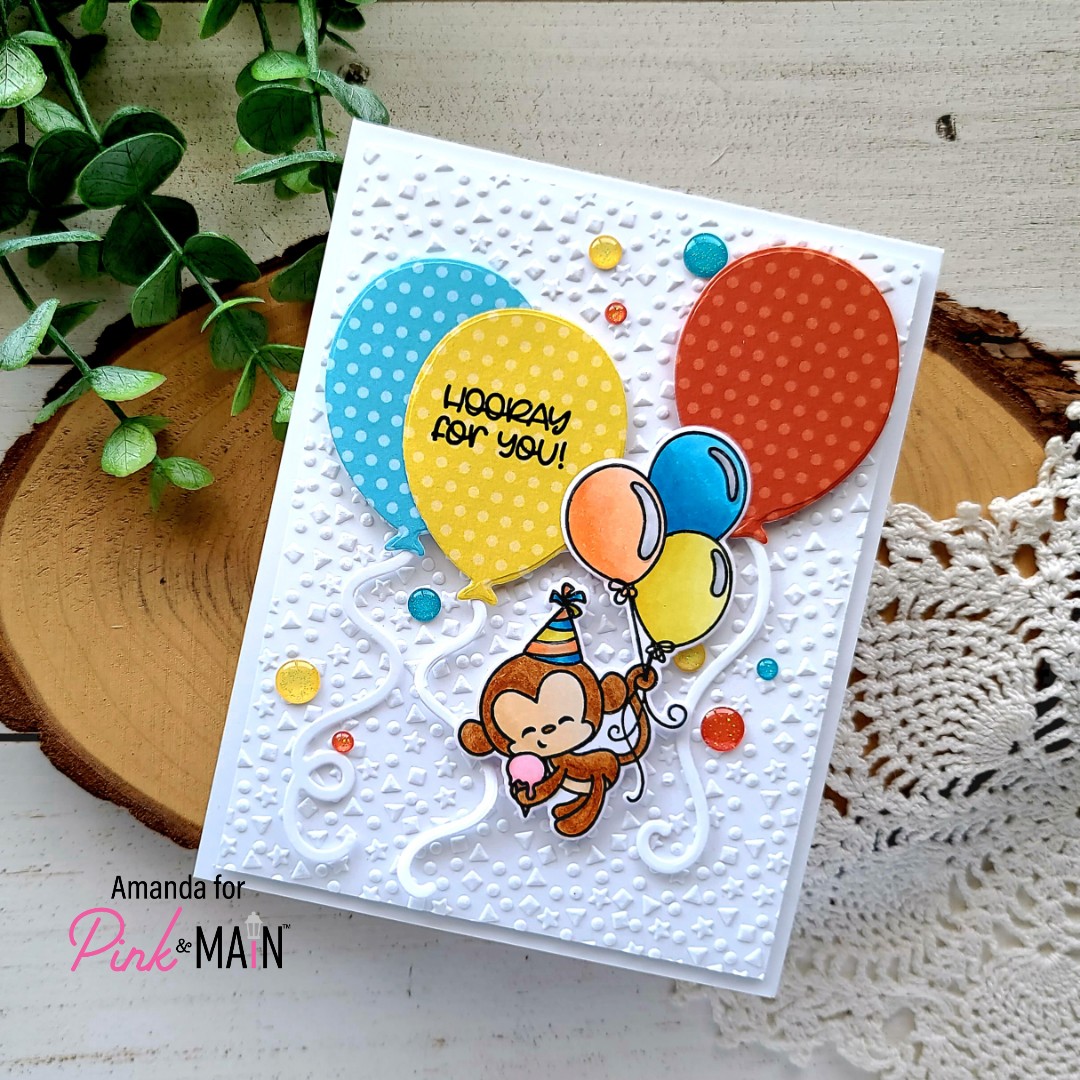
I really wanted to pair this sweet monkey from Party Animal with the new Fun Balloons dies. It’s just too perfect! So I stamped and colored him up with my copic markers, used the coordinating dies to cut him out and found papers that went with the colors of his balloons to die cut. The paper is from the new Year Round Dots and Stripes paper pad. I am slightly obsessed with this one. It’s perfect!

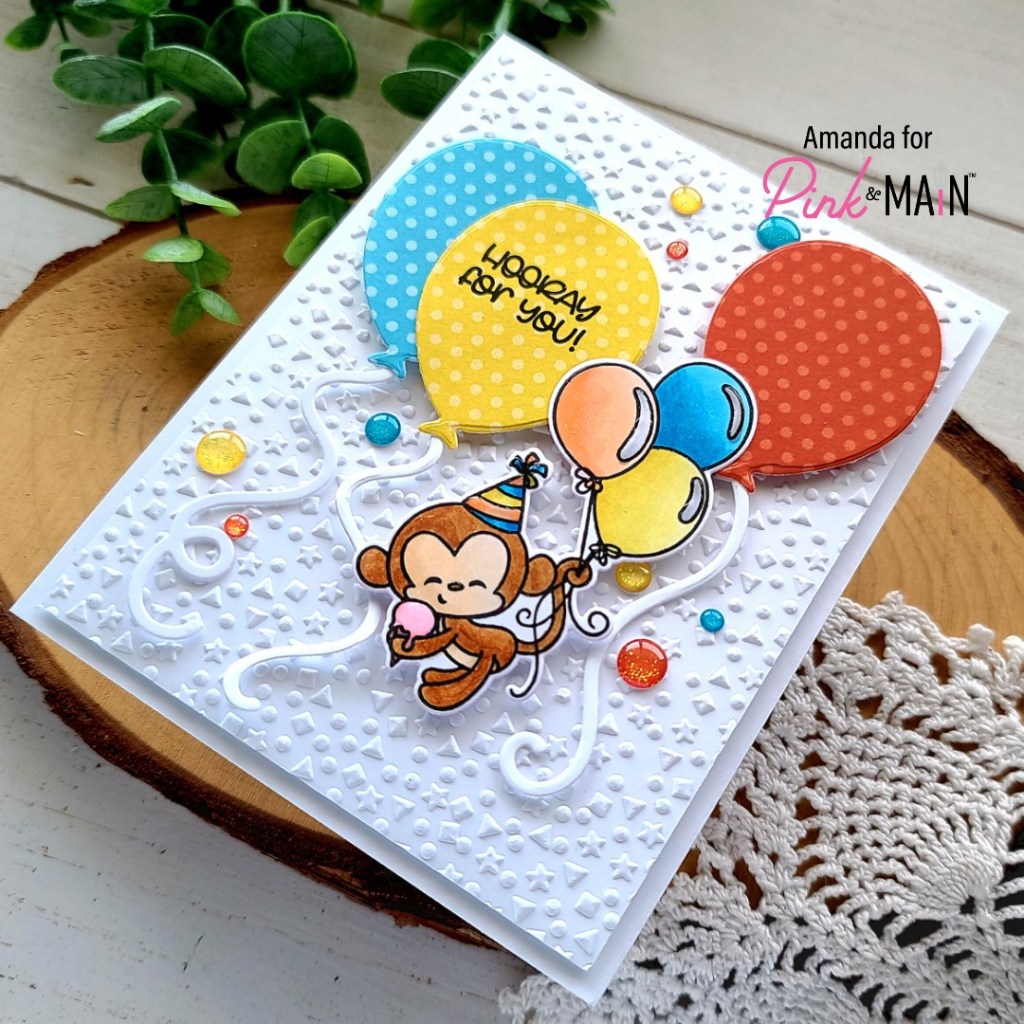
I embossed a white panel with the Confetti embossing folder and started arranging all of my images on it. Before I adhered things but had an arrangement, I decided to stamp my sentiment on the yellow die cut balloon. After that everything was adhered with a combination of liquid glue and foam squares.

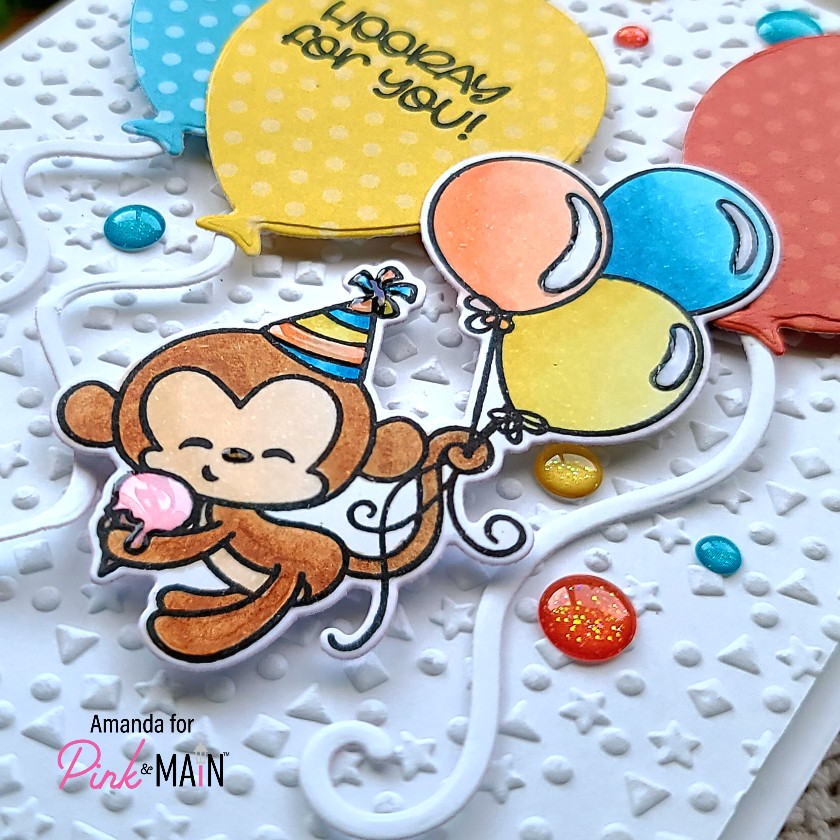
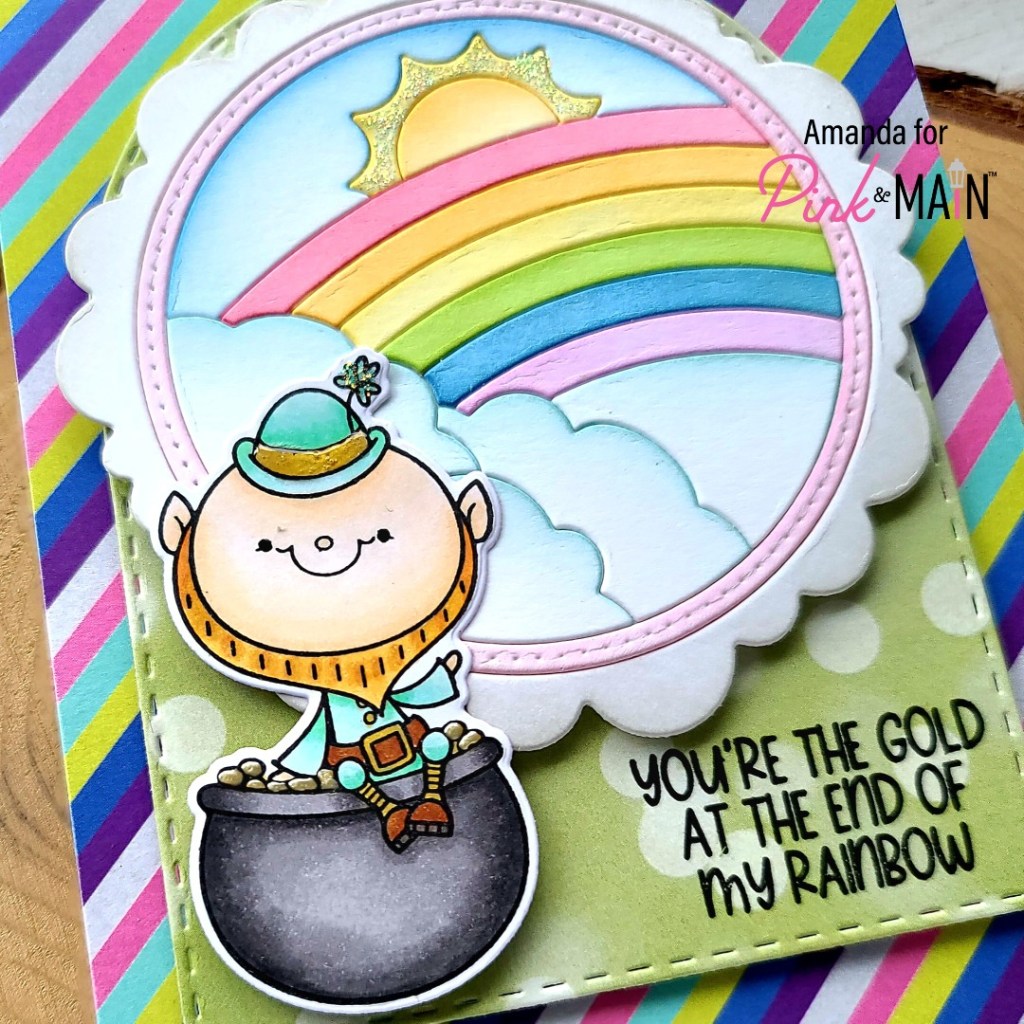
For finishing touches I added enamel dots from the In the Garden pack scattered around the images. Then I came in with glossy accents on the balloon highlights, ice cream, monkey’s nose, and his hat.

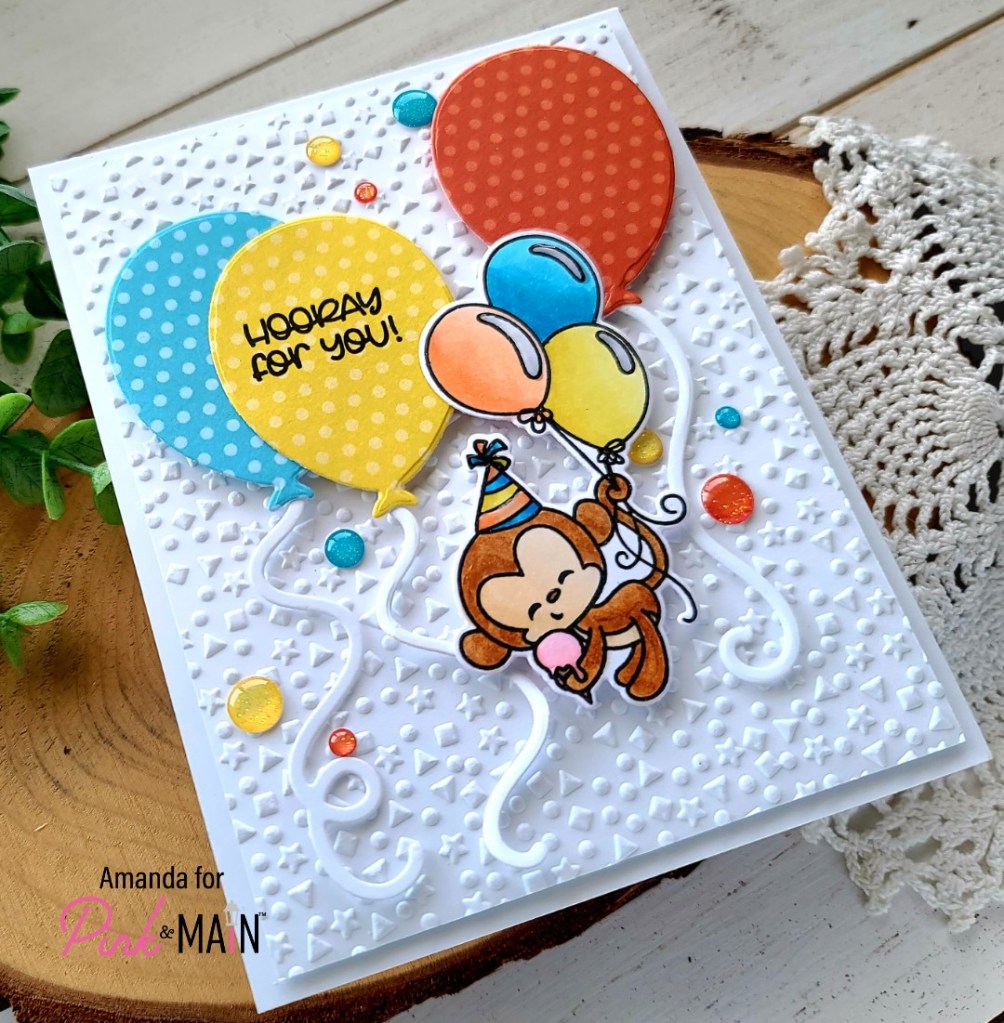
I think this card turned out SO FUN and just makes me smile to see it! I hope you enjoyed it today too!

Products used:
Party Animal stamps and dies
Fun Balloon dies
Confetti embossing folder
In the Garden enamel dots
Year Round Dots and Stripes paper pad
EZ Squeeze liquid glue
Foam squares
Glossy accents

I appreciate you sharing your time with me. Have a fabulous day!

Miss Ink Stamps – It’s a Jungle Out There

Welcome everyone! Today I have an atypical style card to share with you featuring more from the newest Miss Ink Stamps release. These critters and all the fun supporting images just don’t get old and I haven’t been able to create with everything yet so I’m not even close to done!

Last weekend I was out of town for my daughter’s State Championship competition for dance. Thinking ahead and knowing I would have lots of down time while the team prepared I stamped some images and packed my Zig Clean Color Real Brush Markers with me. Typically I reach for copics but they don’t travel as well as my Zig collection. I had some wonderfully relaxing time watercoloring and created my card once I was home.

I chose images from Jungle Ruins, Go Bananas and Pretty Bird. Not everything made it on today’s card but now I have a little tray full of images ready to create with this weekend when I hit the craft room again!

To create this card, I cut the background image down with a Pink & Main Layered Rectangle die and cut a black panel one size larger. I adhered the black panel to a white card base and popped the image panel up with foam tape. Then I used the same rectangle die to cut the edge of the ruins image off so they matched and popped it up with foam squares. I also added one extra monkey with foam squares too.

I stamped and heat embossed a sentiment on black cardstock and used the same rectangle dies to cut it out. I adhered it with foam squares to help it stand out. Then, for finishing touches I glued down a scattering of confetti embellishments from Trinity Stamps across the design.

Once that was all finished I thought it was lacking so I went back to my pre-colored images and found the flowers from Pretty Bird and thought that bright red/orange pop of color was perfect! So I used liquid glue and adhered those in various places around the scene too.

I hope you’re enjoying inspiration from this fantastic release!

Products used today:
Jungle Ruins stamps
Pretty Bird stamps
Pink & Main Layered Rectangle dies
Trinity Stamps Glass Slipper confetti mix
Foam tape and squares
Liquid glue

I appreciate you sharing your time with me. Have a fabulous day!

Pink & Main – Make a Wish

Happy Friday everyone!!! I’m over on the Pink & Main blog today sharing a SUPER fun and TOTALLY adorable card featuring the new release that is available in the shop now! This release has me squealing with delight every time I look at it. You’re absolutely going to love every piece of it. It’s amazing!!! Click HERE if you want to just go shop now. Or keep scrolling for today’s card fun! No judging. LOL!

I started my card by choosing two of the images from Party Animal that complimented each other, stamped them and got to coloring with my copics. I used the coordinating dies to cut them out. Then I chose 2 of the striped papers from the Year Round Dots and Stripes paper pad, cut one for my card background and another with the Double Stitched Dome die.

For a little added texture, I used the Grid embossing folder on a white panel and then trimmed it down until I liked the amount of stiped paper showing on the size. I added the green stripes to a card base, popped the embossed panel up with foam tape, then glued the arch to that with EZ Squeeze liquid glue. I popped my images up with foam squares next.

I chose a sentiment from Party Animal, stamped it and cut it out with a Large Sentiment Strip die. This is also popped up with foam squares. For finishing touches I started with a scattering of enamel dots across the design.

But this is a birthday card, so I couldn’t leave these cute images alone! I added glossy accents to the turtle’s shell and panda’s nose. Then I went nuts with the unicorn stickles on the hats, cake and gifts! I think it adds so much and makes this such a happy and fun card!

Products used today:
Party Animal stamps and dies
Grid embossing folder
Large Sentiment Strip dies
Double Stitched Dome dies
Year Round Dots and Stripes paper pad
Enamel Dots
EZ Squeeze liquid glue
Foam tape and squares
Glossy accents
Stickles – unicorn

Thanks for stopping by! Be sure to check out the new release! I appreciate you sharing your time with me. Have a fabulous day!

Pink & Main – Happy Easter

Hello friends! It’s time for your Friday installment of Pink & Main inspiration and today I’m sharing a super fun Easter card with you! The last release was packed full of spring and Easter goodies and I’m still having so much fun creating with it all!

I started by stamping images from Easter Greetings and colored them with my copic markers. I used the coordinating dies to cut them out and arranged everything on my card front to make sure that the big Happy Easter word dies would fit like I wanted. Once I decided it would work, I cut the words from white cardstock 4 times and adhered them together with EZ Squeeze liquid glue. I cut the shadow from vellum and used tape runner to adhere it because I find that liquid glue warps the vellum.

For my background, I chose some teal cardstock and cut it out with the largest Layered A2 Rectangle die, then I splattered it with watered down dark teal ink for a little texture. I cut the Basket cover die from purple cardstock and adhered the two together. I added them to a white card base and started adding the other elements.

The word dies are added with tape runner and the images are all added with foam squares. I did use a little liquid glue to add the small items to my Easter basket before the foam squares. I feel like it helps things stay put.

Moving on to finishing touches, I added glossy accents to parts of the eggs, critters eyes, noses and beaks. I’m ready to switch gears to these super fun and happy spring colors. Aren’t you?

Products used today:
Easter Greetings stamps and dies
Happy Easter word dies
Basket cover die
EZ Squeeze liquid glue
Glossy accents
Foam squares
Tape runner

I appreciate you sharing your time with me. Have a fabulous day!

Pink & Main – You’re the Gold

Happy Friday friends! Today I’m over on the Pink & Main blog with a fun and festive card perfect for a friend at St. Patrick’s Day. I just adore this Lucky Leprechaun set. It’s super cute and I’ve never had a St. Patty’s Day stamp set to play with before so I was definitely inking this up before it gets here and I miss my chance.

For this card, I die cut the main image from Rainbow Friend and then used my blending brushes and dye inks to ink up the various pieces. Then I used the Layered Circles dies to cut a circle just smaller than the scallop edge so I could adhere all the pieces together. Once that was complete I decided on this cute leprechaun and his pot of gold from Lucky Leprechaun. I stamped and colored him with copic markers before using the coordinating dies to cut him out.

Next, I chose 2 patterned papers from the Butterfly Kisses pad. I cut the stripes to A2 size and adhered it to a white card base. Then I cut the bokeh green piece with a Stitched Arches die. Using the rainbow and leprechaun as guides, I stamped my sentiment on the arch and then popped it up with foam tape on the stripes.

Then I popped the rainbow up with foam tape next and finally used a combo of liquid glue and foam tape to add the leprechaun. Then I moved on to finishing touches.

I actually kept those pretty simple today by just adding glossy accents to the band on the hat, unicorn Stickles to the clover in his hat and the rays of the sun. Then I switched to pale gold Nuvo Crystal Drops for the gold in the pot for a change of pace.

Isn’t this card so much fun! I absolutely loved putting it together and can’t wait to send it out.

Products used:
Lucky Leprechaun stamps and dies
Rainbow Friend dies
Stitched Arches dies
Layered Circles dies
Butterfly Kisses paper pad
EZ Squeeze liquid glue
Ergonomic Blending Brushes
Foam tape
Glossy accents
Nuvo Crystal Drops – pale gold
Stickles- unicorn

I appreciate you sharing your time with me. Have a fabulous day!

Pink & Main – Just Bee-cause Box Card

Happy Friday my crafty friends! You know what Friday means…another fantastic inspiration day for Pink & Main! Today I’m over on their blog sharing this adorable box card using the mini scenes from the recently release Spring Snow Globe Scenes stamp and die set. I love these images and thought they would layer together great for a fun spring scene in a box card.

I stamped and colored two of the scenes from Spring Snow Globe Scenes and a few of the individual bees too. After I colored everything with my copic markers, I used the coordinating dies to cut it all out.

I die cut all of the elements for my box card using paper from the Happy paper pad for the outside of my box and white cardstock for the supports on the inside to hold my images. Once they were die cut, I used copic markers to color them green to blend in with the bottom of my images.

I used 1/4 inch EZ tear tape to adhere my box together and 1/8 inch EZ tear tape to add all of my images. Then I die cut the decorative stitched panel for the front flap, stamped a sentiment from the set on it and added it with tear tape too. I glued all the flaps down and tied some cute sparkly twine around the whole box before popping that last little bee up with a foam square.

I have been on a huge interactive, 3D card creating kick lately and this one was definitely a favorite! I love this die set and had a blast putting this card together.

Products used:
Spring Snow Globe Scenes stamps and dies
Box Card dies
EZ Tear Tape – 1/4 inch and 1/8 inch
Happy paper pad

I appreciate you sharing your time with me. Have a fabulous day!

Pink & Main – Spring Greetings Release Day

Welcome everyone! It’s Friday and it’s release day for Pink & Main! Squeeee!!! Soooo much cuteness in this release to get us all geared up for spring and Easter! Today I have a snowglobe shaker card to share with you.

The new Spring Snow Globe Scenes are totally adorable and so fun to create with. I love that they fit in the snow globe but you can use them without it too. I chose these cute birds and colored them with my copics. Then I cut the snow globe backer, acetate window, 6 frames and the base piece. I did a little cloudy inking on the background of my scene and some grass but it very much gets covered up by my glitter filler. After cutting the snow globe base, I inked the edges with dark brown and a blending brush and ran it through my woodgrain embossing folder for texture.

For my background, I die cut the polka hearts cover die from yellow cardstock and wrapped blue twine around the top, tying it in a bow. Then I adhered it to a white card base. I thought it was a little plain so I inked the edges with yellow before adding my snow globe and sentiment banner.

The new vertical spring greetings set is just perfect and gives your card a different look for sure. I popped that banner up with foam strips but adhered my snow globe with liquid glue. They are about the same thickness so it’s perfect.

Here’s a close up of the snow globe full of ice rink and a dab of northern lights super fine glitter. The glitter is so fine that it really moves around great in this fun shaker.

Be sure to head to the Pink & Main shop and check out the rest of the release.

Products used today:
Spring Snow Globe Scenes stamps and dies
Spring Vertical Greetings stamps
Empty Snow Globe dies
Polka Heart Cover Plate die
Large Sentiment Strip dies
Super Fine Glitter – ice rink and northern lights
EZ Squeeze liquid glue
Ergonomic Blending Brush
Foam strips

I appreciate you sharing your time with me. Have a fabulous day!

Jane’s Doodles – Hugs and Kisses

Happy Valentine’s Day everyone!!! I hope you had a wonderful weekend and today is starting off your week wonderfully. I’m over on the Jane’s Doodles blog today and wanted to squeeze in one more fun Valentine that I created but the design could be adapted easily for year round inspiration and fun.

I started with the mouse digital stamp from Jane’s Doodles – printed and colored him with my copics and then used the scan-n-cut to cut him out. However, this left a big blank white space between his tail and the balloon that bugged me so I took the craft knife and cut it out.

Then I cut the slimline scalloped panel from the Heffy Doodle Slimline Pull Tab die set and folded it in half to create my card base. Next, I used the Pink & Main Layered Slimline dies to cut a white panel that would fit inside. After cutting it out, I realigned the die and cut the other end to create a custom sized panel to fit my mini card front.

I stenciled the panel with the Jane’s Doodles Hearts stencil to create a scene background – green fading up to yellow. Then I came in with a small heart from the Jane’s Doodles Love You stamp set for some tone-on-tone heart accents in the background. I adhered the stenciled background to my card base and popped up the mouse image.

Next, I used a banner die from the Newton’s Nook A7 Frames & Banners die set and cut out a sentiment that printed with my mouse image and popped it up with foam strips.

Last, I opened up my card and stamped a sentiment inside from Love You along with another heart from the same set.

Oh, and there were a couple of small finishing details today too. I added black glaze pen to the mouse’s eyes, Wink of Stella glitter brush pen to the highlight in the balloon and a teeny big of glossy accents on the mouse’s nose too.

Remember, valentines don’t have to be pink and red all the time. When your daughter’s favorite color is yellow…sometimes they’re yellow.

Products used today:
Jane’s Doodles Mouse digital stamp
Jane’s Doodles Hearts stencil
Jane’s Doodles Love You stamps
Heffy Doodle Slimline Pull Tab dies
Newton’s Nook A7 Frames & Banners dies
Pink & Main Layered Slimline dies
Foam squares
Wink of Stella glitter brush pen
Glossy accents

I appreciate you sharing your time with me. Have a fabulous day!

Pink & Main – Punny Trio

Happy Friday everyone! I’m over on the Pink & Main blog squeezing in one more Valentine card share before the big day! I love Valentine crafting and tend to over do it most years. But it’s all so cute and so fun!!! I just can’t help myself.

Today I have images from Take the Cake and One Smart Cookie. I love how these sets work together! I chose kind of a theme between the images, stamped them out and colored them with my copic markers. Then I used the coordinating dies to cut them out.

Next, I stamped and heat embossed the coordinating sentiment for each image pair in white on black cardstock. I cut them all out with Large Sentiment Strip dies and adhered the feet of the images to the top of each strip.

Then I cut the Polka Hearts cover die from a textured teal card stock in my stash and inked up the edge with a darker teal ink for depth. Then I cut a piece of white glitter paper just a smidge smaller so they were easy to layer together. I used EZ Squeeze liquid glue to adhere them together and to a card base. (Tip: I find liquid glue works best with glitter paper and inked panels.)

Last, I added foam squares to all my images and popped them on the front of my card. Then I came in with white gel pen accents on all of them for some added texture and interest.

Finally I added glossy accents to all of those adorable hearts for some shine to go with our glittery background.

Isn’t this just so much fun! These images and sentiments are absolutely perfect to use singly but can be so fun to stack together for an added message too!

Products used today:
Take the Cake stamps and dies
One Smart Cookie stamps and dies
Polka Hearts cover die
Large Sentiment Strip dies
Metallics Glitter paper pad
EZ Squeeze liquid glue
Ergonomic Blending Brush – mini
Foam squares
Glossy accents

I appreciate you sharing your time with me. Have a fabulous day!

Miss Ink Stamps – How’s It Goating?

Happy Thursday friends!!! I’m so happy you’re here today. I have a very punny and adorable Miss Ink Stamps card to share with you today. I hope you like it!

For today’s card, I am using one of the Punny Farm Goats from Miss Ink Stamps. I started by stamping and coloring him and his envelope with my copic markers. I used the scan-n-cut to cut the images out today. Then I used my craft knife to cut his mouth open so I could slide the envelope inside. I used a little liquid glue and washi tape on the back side to hold it in place.

My background hearts are distress oxide ink blended on an A2 panel with abandoned coral, tattered rose and dried apricot. They are spritzed with water and flicked with gold watercolor. Then I actually die cut the A2 panel with the Mama Elephant Heart Grid Cover die. I used the frame on a card I’ll share very soon but I couldn’t just toss the leftover hearts. They were too pretty! I also die cut the Mama Elephant Big Scripty Hello from white cardstock 3 times and gold glitter once. I adhered the white ones with liquid glue and then added the gold the same way but offset a little to the right.

To assemble my card, I cut a light teal piece of textured cardstock to 4×5.25 inches and popped it up on a white card base. Then I popped the hearts up with foam squares and glued the hello directly to those with liquid glue. I added the goat with foam squares so he layed nice against the layered die cut sentiment. Last, I stamped and heat embossed a sentiment on vellum and cut it out with a Pink & Main Large Sentiment Strip before carefully hiding adhesive behind the letters to adhere it down.

For finishing touches, I added black glaze pen to the goat’s eyes and white gel pen highlights to him too. Then I finished things off with a little dab of unicorn Stickles to the heart on the envelope.

Voila! This adorable card is complete and ready to make someone smile!

Products used today:
Punny Farm Goats stamps
Heart Grid die
Big Scripty Hello die
Large Sentiment Strip dies
Gold glitter cardstock
Distress Oxide Inks – abandoned coral, tattered rose, dried apricot
Foam tape and squares
Stickles – unicorn

I appreciate you sharing your time with me. Have a fabulous day!