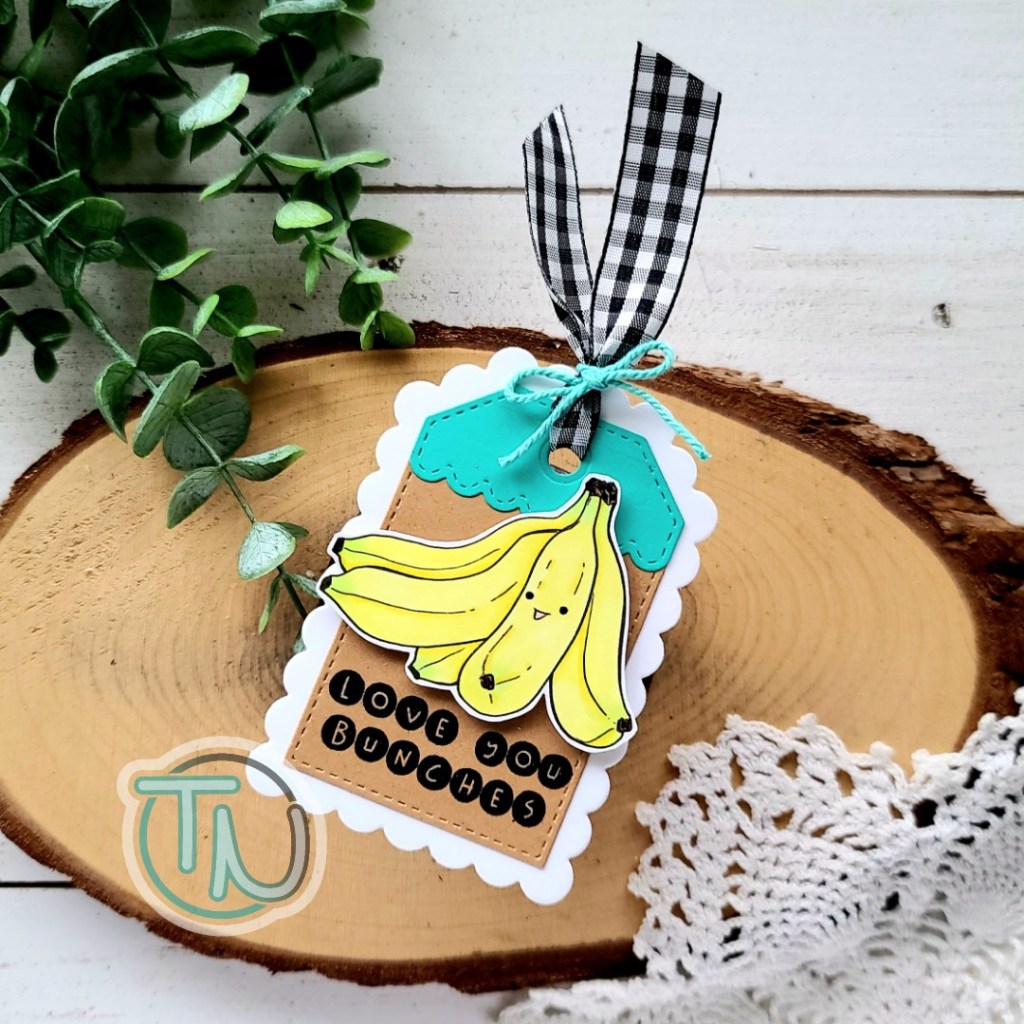
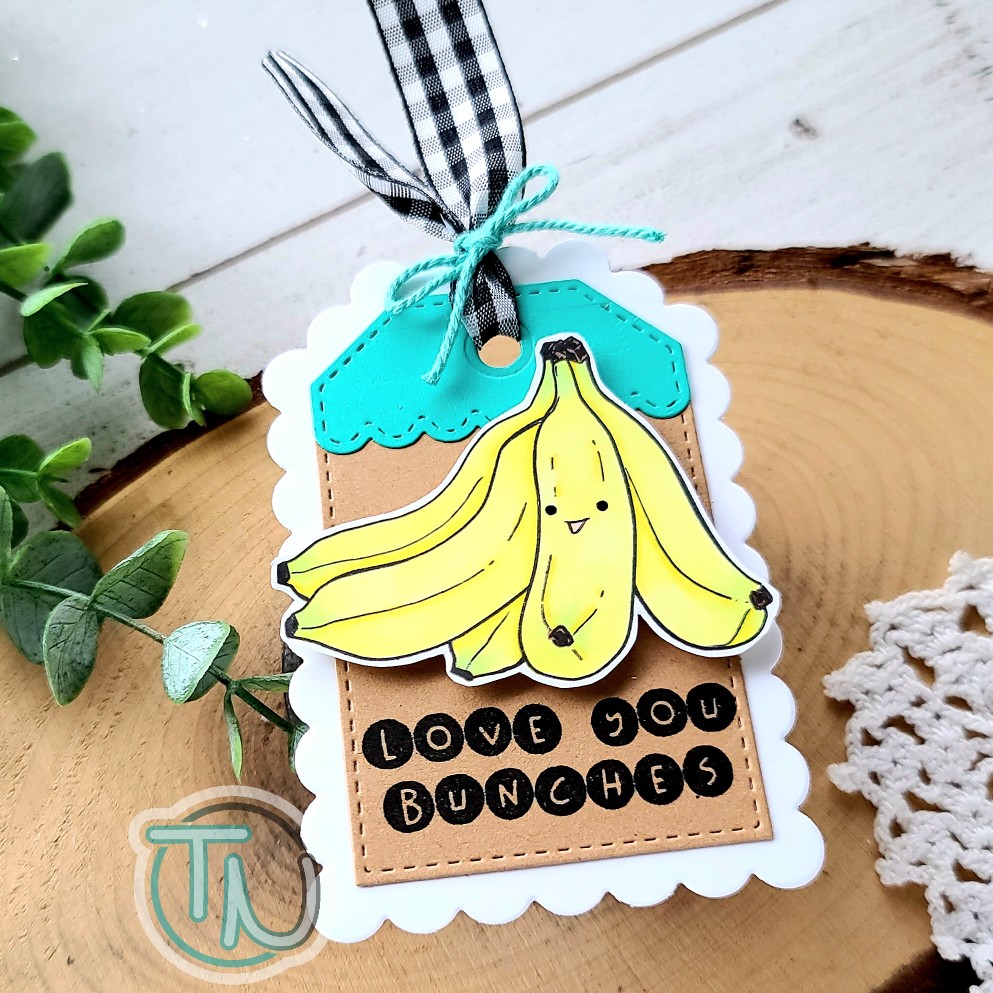
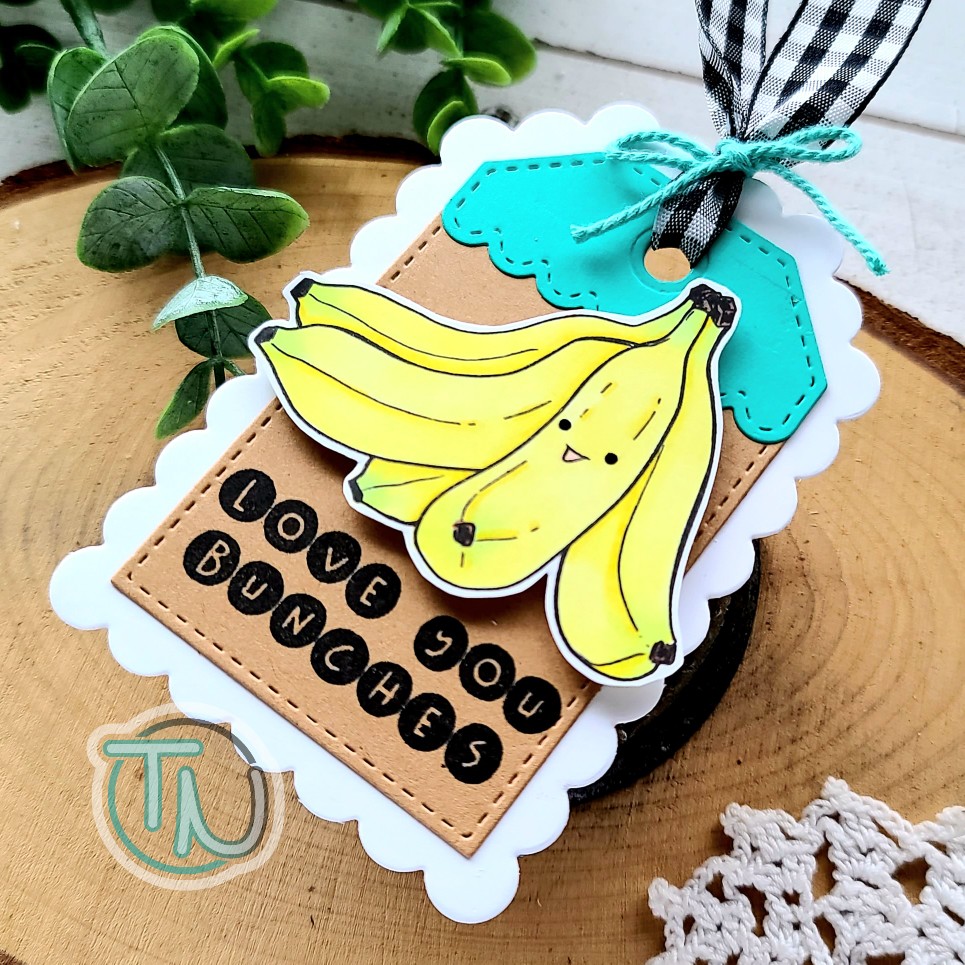
I recently received my very first order from Unity Stamp Co and am so excited about all the fun goodies I got! First off, I had to use this super adorable bunch of bananas because my daughter has a thing for food with faces and this is just too perfect! She has her last dance competition of the fall/winter season before championships today so I’m attaching it to some goodies for her.
I mean seriously…how could this not make you smile?!?
To create this tag, I stamped and colored the bananas with copic markers and then fussy cut the image out. I die cut the elements of the Pink & Main fancy tag from kraft, white and teal cardstock. I stamped the sentiment on the kraft layer and adhered everything with tape runner. Then I added the bananas with foam squares.
Next, I threaded some gingham ribbon through the hole and tied it with teal twine matching the cardstock. I finished things off with some simple black glaze pen on the eyes to help them shine.
And the back of the tag is bright white and ready for a special message to encourage her before performing! How fun is that!?! I love it!
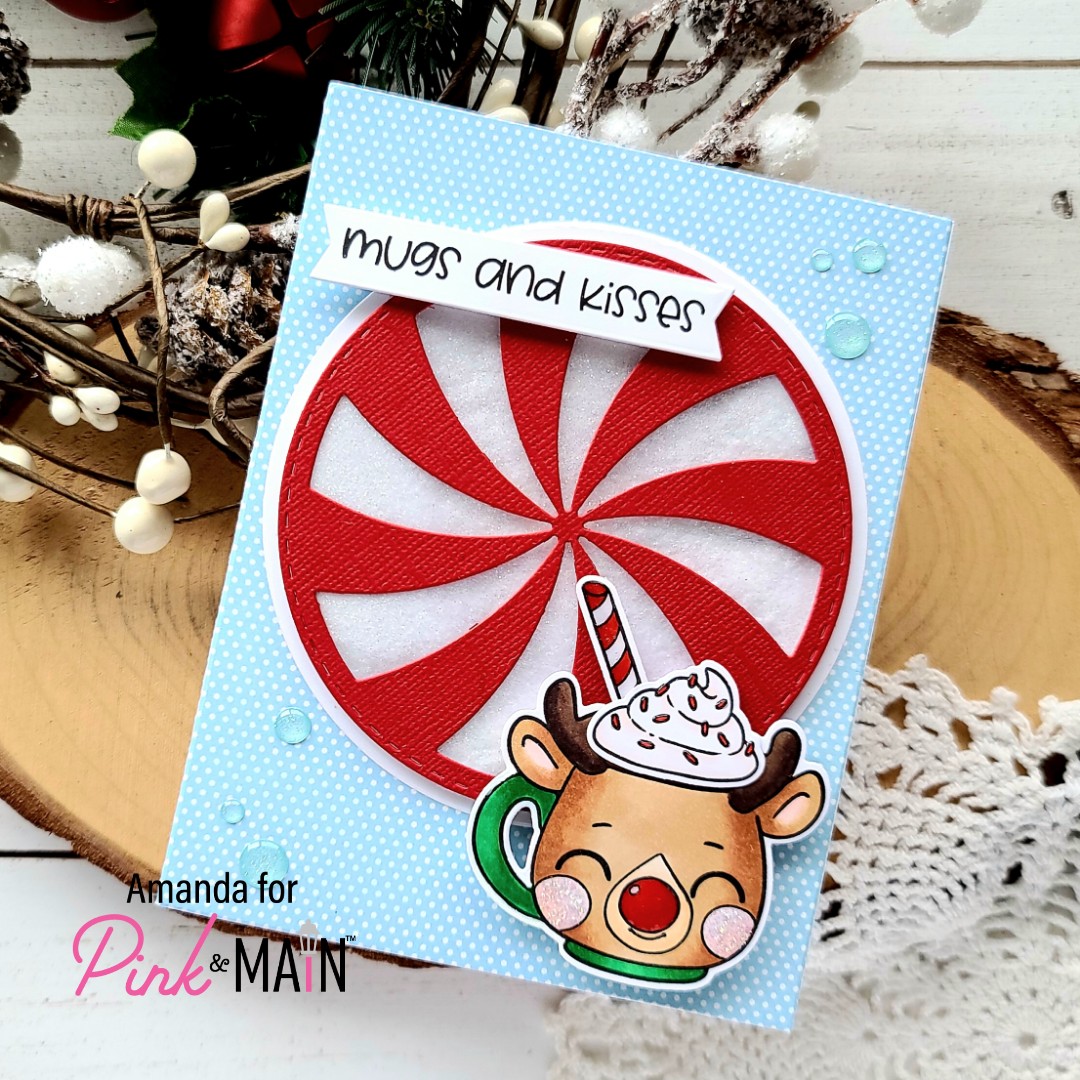
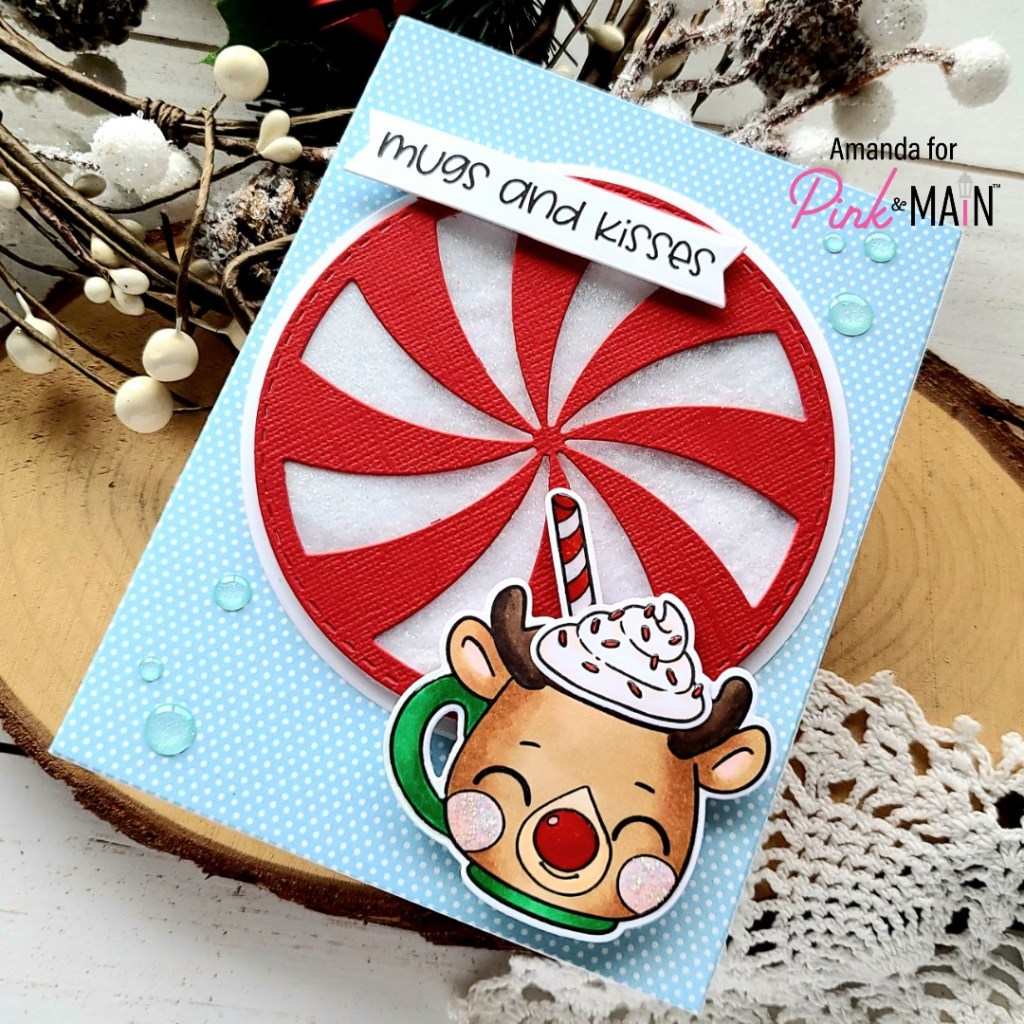
Happy Friday everyone! Today I’m over on the Pink & Main blog with a super fun Christmas shaker card! It’s adorable and fits in with the final day of the Fall | Winter Coffee Lovers Hop too! Pink & Main is a super sponsor, did I mention that?!? Even better!
I started my card by stamping some images from Mugs and Kisses and colored them with my copic markers. I used the coordinating dies to cut them out and then glued everything together with my EZ Squeeze liquid adhesive. I chose a sentiment from the set, stamped it on white cardstock and cut it out with a large sentiment strip die.
Then I created my shaker mechanism. For that I cut the peppermint swirl die from red cardstock. I found the corresponding size circle in the layered circle dies and cut it from acetate. I used liquid glue to adhere these together and carefully lined the back with thin foam strips. I sprinkled in some sparkling cotton tail flock and ice rink super fine glitter and sealed it up with a white circle. This one was cut from the circle one larger than the acetate.
For my background, I chose a fun light blue patterned paper in the Best Friends paper pad and cut it out with the largest rectangle stack A2 dies and adhered it to a white card base. Next, I added the peppermint shaker and finally added the sentiment strip and reindeer mug with foam squares.
For finishing touches, I added glossy accents to the sprinkles, peppermint stick and rudolph’s nose. Then I came in with unicorn Stickles for his cheeks and finished everything off with a few glitter enamel dots from the Thankful pack.
The mugs in this stamp set are just too cute for words! It was really hard to choose just one so I’m going to have to make more of these just to color the rest of those cuties!
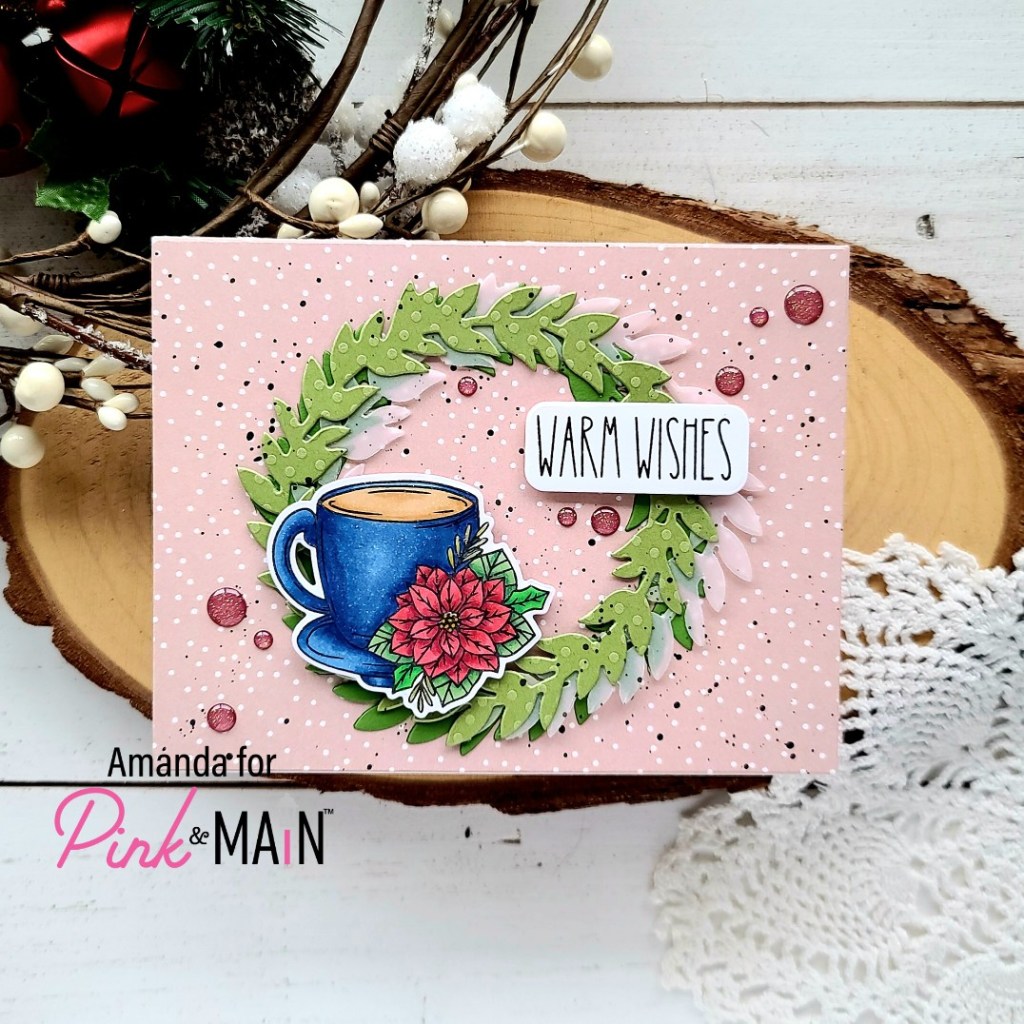
Hi again! I’m over on the Pink & Main blog today, celebrating the start of the Coffee Loving Cardmakers hop, which they are also a sponsor of! I created a fun Christmas card and wanted to share it with you here too!
I started by stamping the image from Holiday Mugs and colored it with my copic markers. Then I used the coordinating die to cut it out. This set also has a die for the sentiment so I stamped and cut it out too. Then I cut 3 wreaths using the Wreath Base die set – 2 from green cardstock and one from vellum.
For my background, I sifted through my amazing stash of Pink & Main patterned paper and landed on this cocoa colored dotted paper from the Pumpkin Season stack. I cut it out with the largest layered rectangle die and adhered it to a white card base with my EZ Squeeze liquid glue. Then I used the same glue to adhere the wreath layers together and down to the card base. For a little extra texture I flicked black acrylic paint across the design before popping the image and sentiment up with foam squares.
For finishing touches, I added glossy accents to the center of the poinsettia and some of the foliage. Then I stuck down a scattering of the red dots from the Rainbow Glitter enamel dots pack.
Are you playing along with the Coffee Loving Cardmakers Fall | Winter Hop? I hope so! It’s so much fun and there are lots of prizes to win!
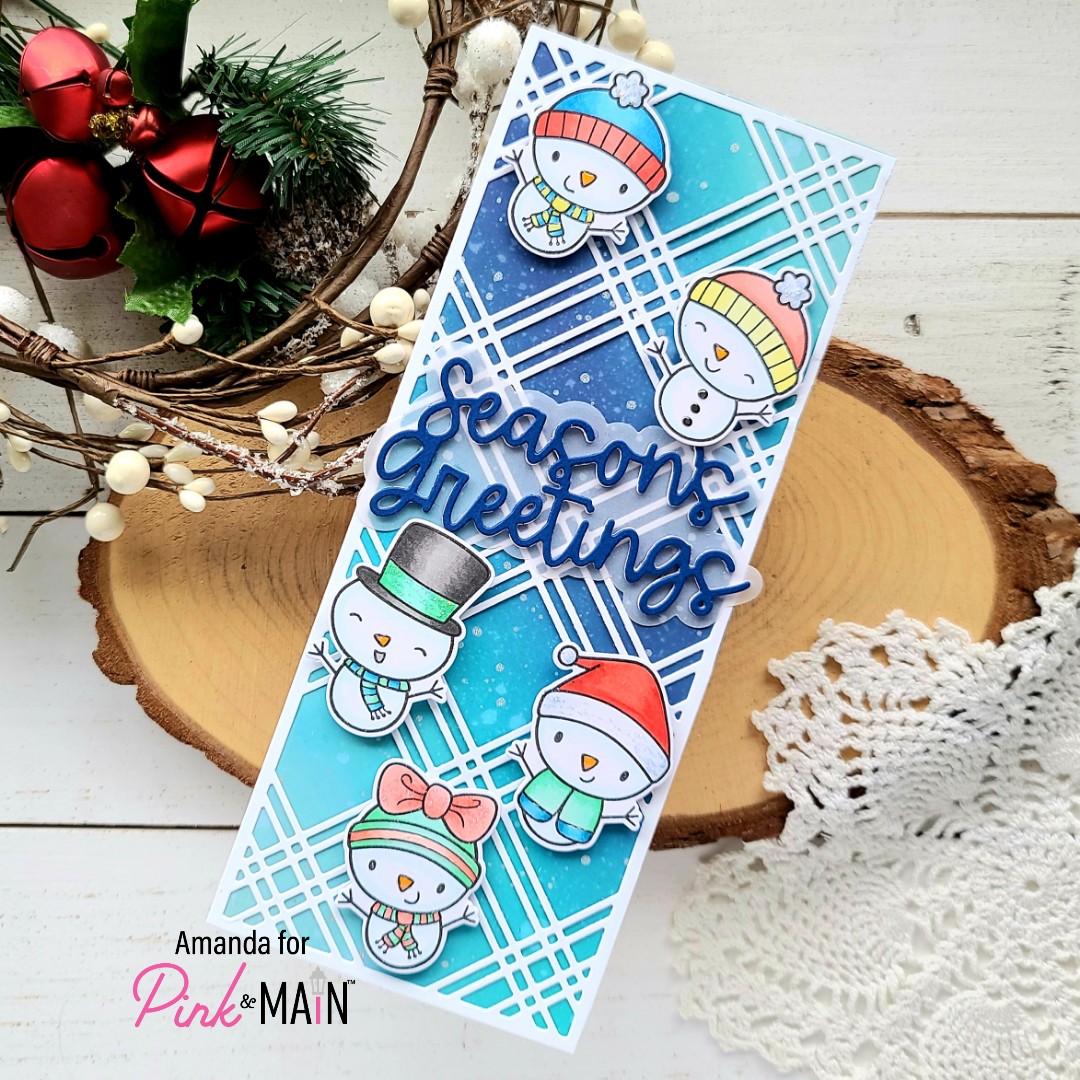
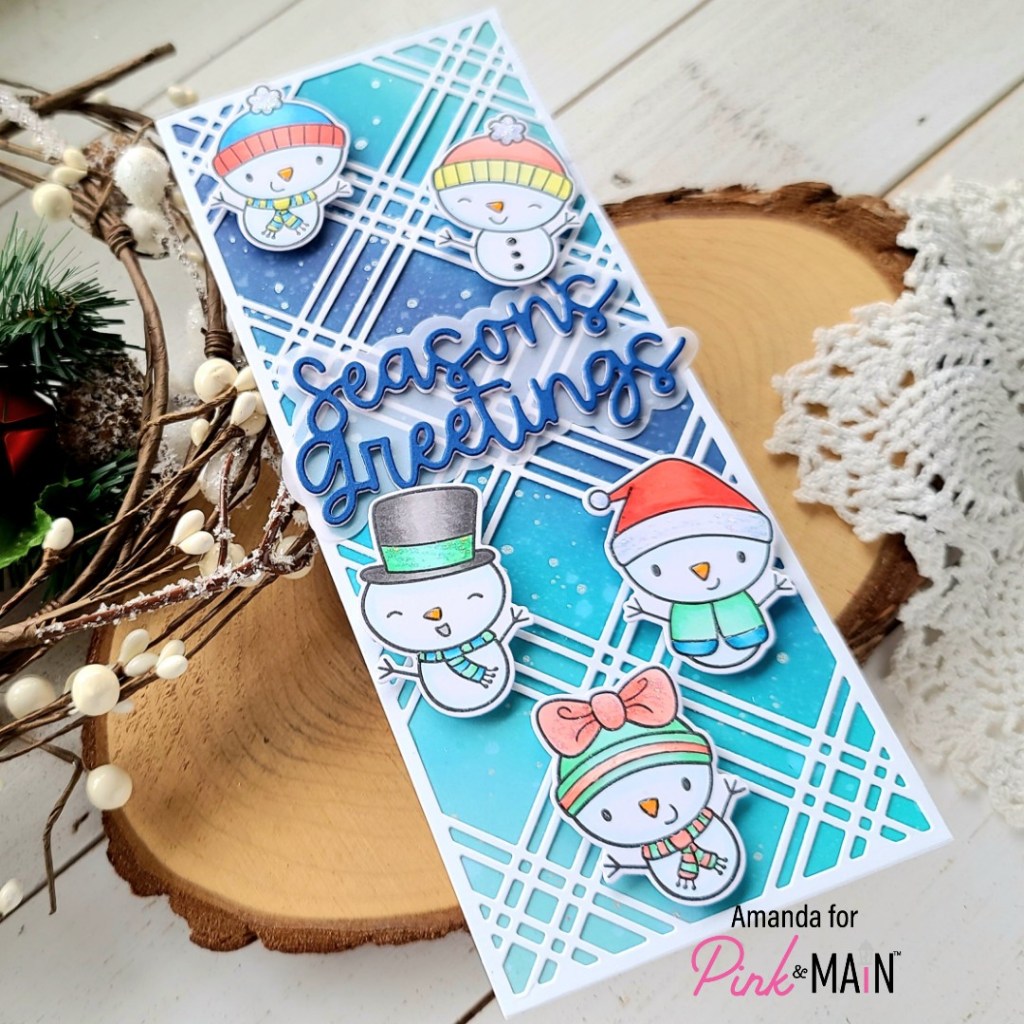
Happy Sunday everyone! Today I’m part of a super fun Pink & Main hop over on Instagram featuring the design team and special guests! So much inspiration to be had! We wanted to kick start the holiday crafting season and share some fun ideas.
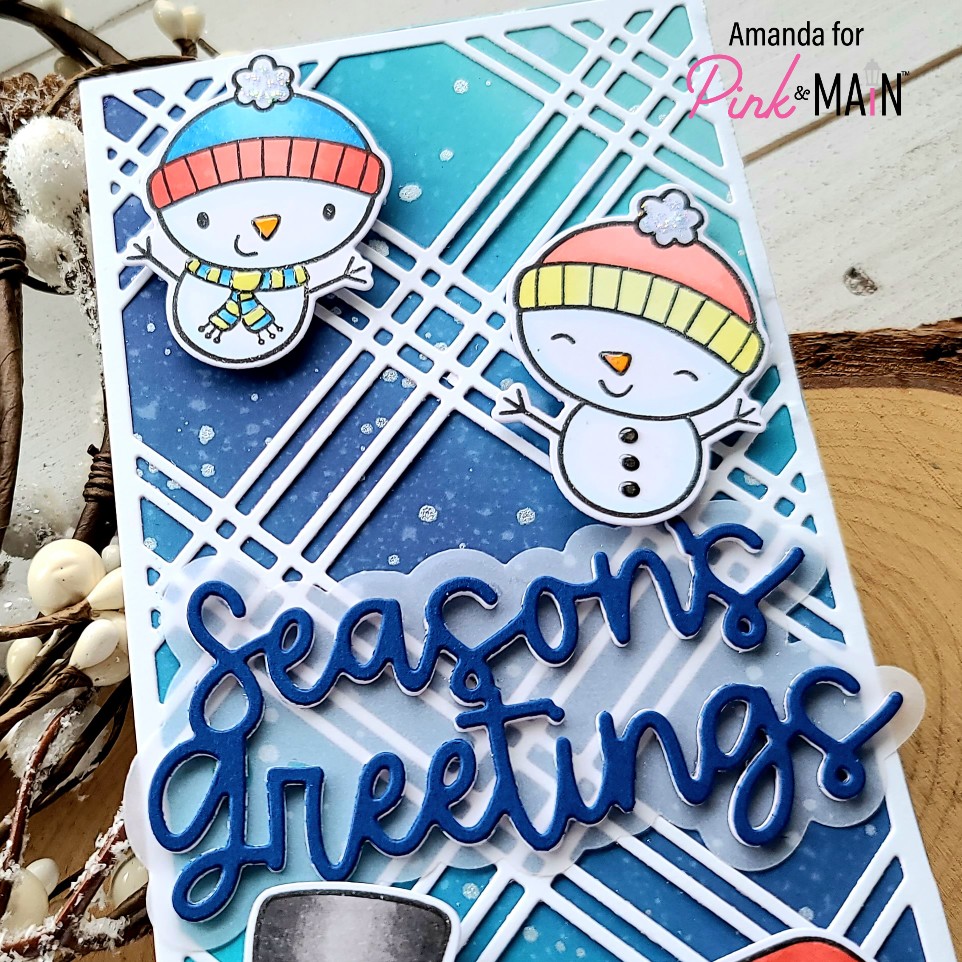
I’ve got an adorable slimline card featuring the Stamp of the Month – Snow Sweet! I started by stamping all the images in the set and colored them with my copic markers. Then I used the coordinating dies to cut them out. Next, I die cut the Season’s Greetings sentiment dies from white cardstock 3 times and the shadow from vellum. Then I used my EZ Squeeze liquid glue to adhered the layers together.
Next, I blended distress oxide inks on speckled egg, peacock feathers and chipped sapphire at an angle down a slimline panel. I spritzed it with water and flicked pearl watercolor all over it. While it was drying I die cut the slimline plaid die from white cardstock and created a card base. Then I glued all the layers together.
I popped the snowmen up with foam squares and adhered my sentiment with liquid glue. I didn’t like how stark the white was so I cut the words from dark blue cardstock and adhered them to the top. I like this much better!
Finally, I came in for some finishing touches of glossy accents and unicorn Stickles on various parts of each snowman. They are just too cute and I love how sweet this card turned out!
Don’t forget to head to Instagram and hop along, commenting the whole way. There are 4 $25 gift certificates to the Pink & Main store up for grabs!
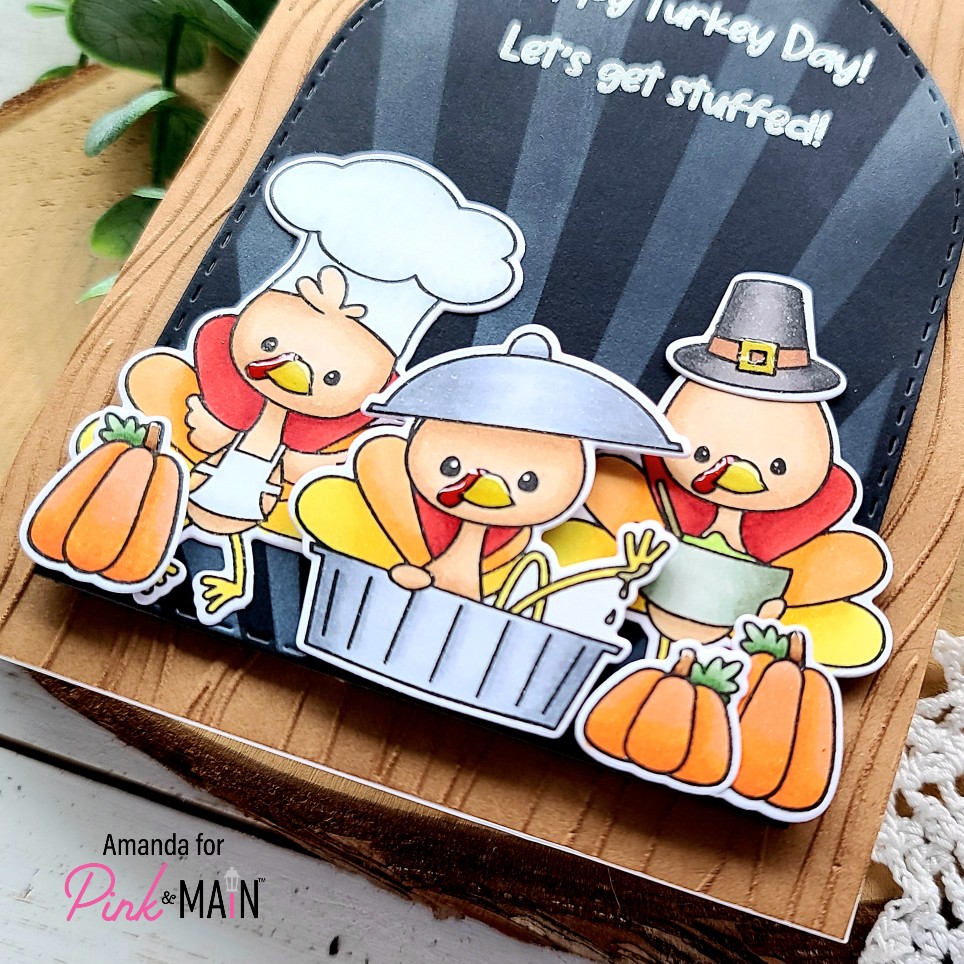
Hey friends! I’m over on the Pink & Main blog today with a fun Thanksgiving card to share with you featuring the October stamp of the month. Don’t worry, if you haven’t signed up yet, you can still purchase the stamps and die set in the shop!
I started my card today by stamping and coloring images from Turkey Time. Then I cut them out with the coordinating dies. For the background, I cut a piece of kraft cardstock to A2 size and ran it through my die cutter with the woodgrain embossing folder. Then I used an ergonomic blending brush and brown ink to enhance the grain texture.
I adhered it to a white card base and cut a piece of black cardstock with a stitched arch die. I taped the arch to the sunshine layers stencil and inked it up with some white pigment ink. I went over the rest of the panel with the ink left on my brush to soften the lines. I stamped and heat embossed two sentiments from the set at the top of the arch and popped it on the card front with foam tape.
Next, I adhered two of the turkeys with EZ Squeeze liquid adhesive and popped the last one up, plus the pumpkins, with foam squares. I finished things off with some glossy accents on parts like turkey beaks, pumpkin stems and the buckle on the hat.
Now that Halloween is over, I always get another burst of energy for fall crafting and this card was just the start of it! Wouldn’t these cuties be fabulous on place cards for all of your Thanksgiving guests?!? I have an idea up my sleeve!
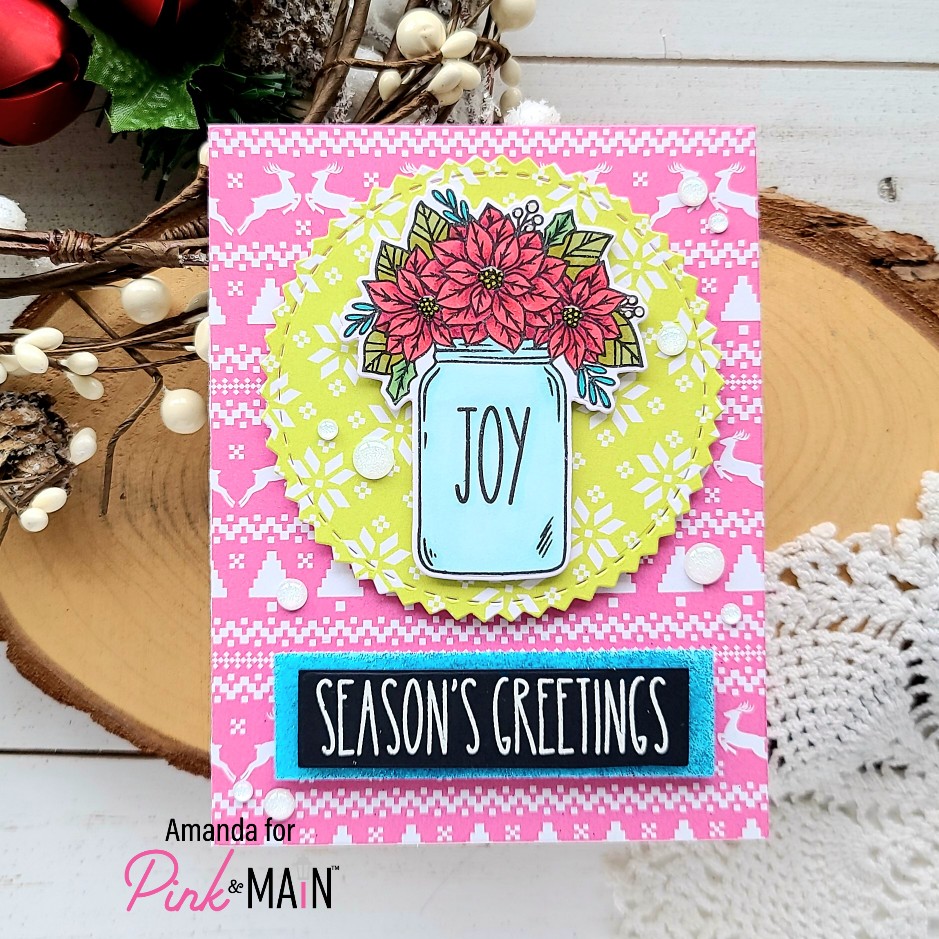
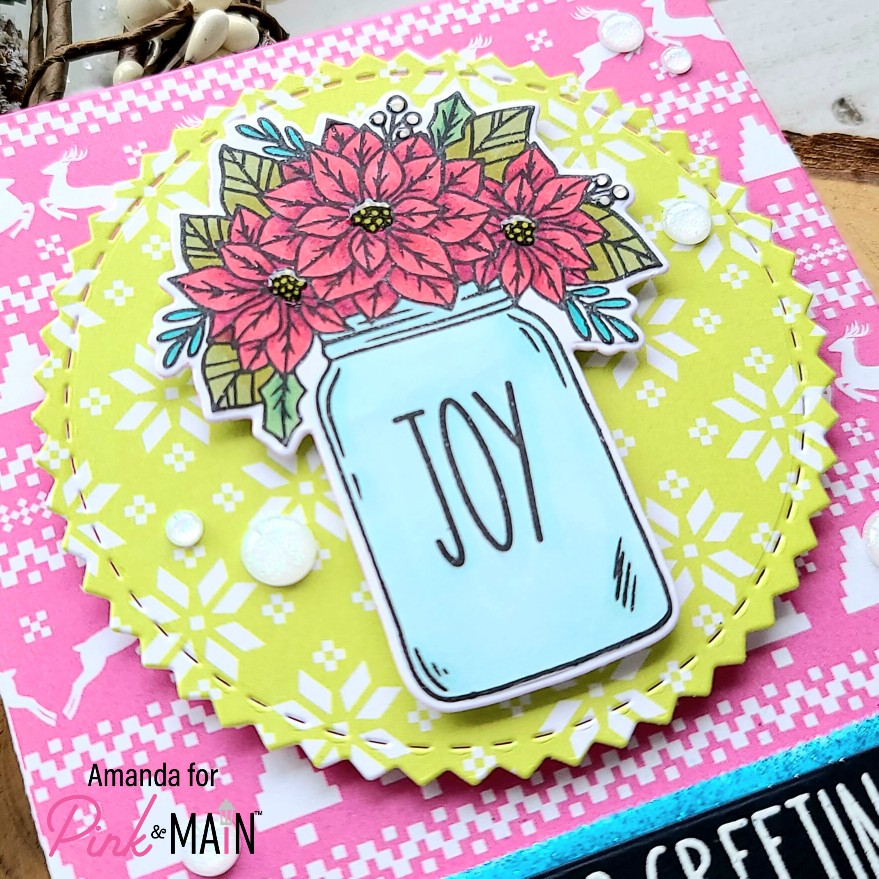
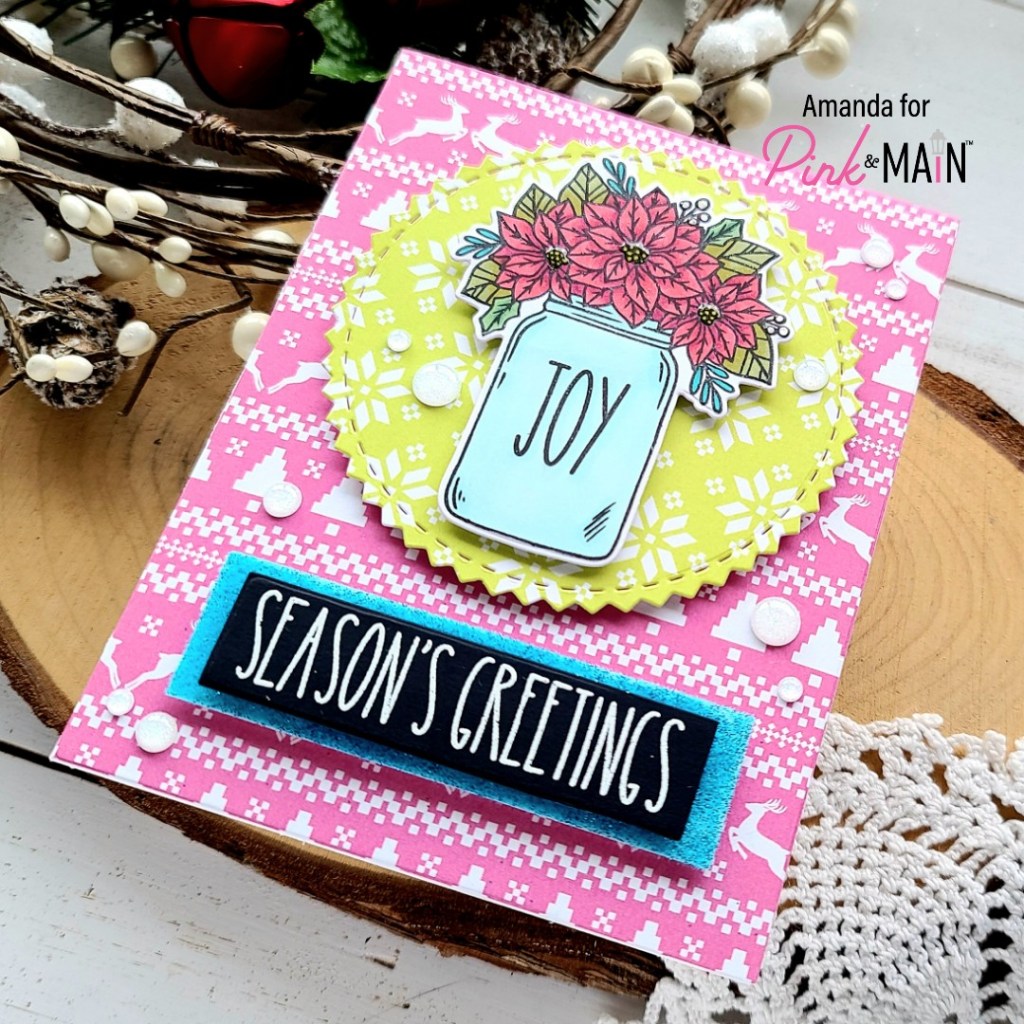
Happy Friday everyone! I’m over on the Pink & Main blog today sharing a card using the Homespun Christmas Card Kit that’s available! This kit is packed full of amazing products that are super fun to create with! I’ll be sure to link it below but let’s take a look at the card I created first!
I was really in love with the idea of this jar full of poinsettias being my focal point. It’s such a pretty image and I have always had a thing for Mason jars for some weird reason. Anyway, I stamped and colored the image with my copic markers. I used the coordinating dies to cut it out and then pulled the paper pad out of the kit to choose my backgrounds. I cut the pink paper to A2 size and adhered it to a card base included in the kit. Then I die cut the green panel with a zig zag circle and popped it up with foam tape. I also popped the jar up for extra dimension.
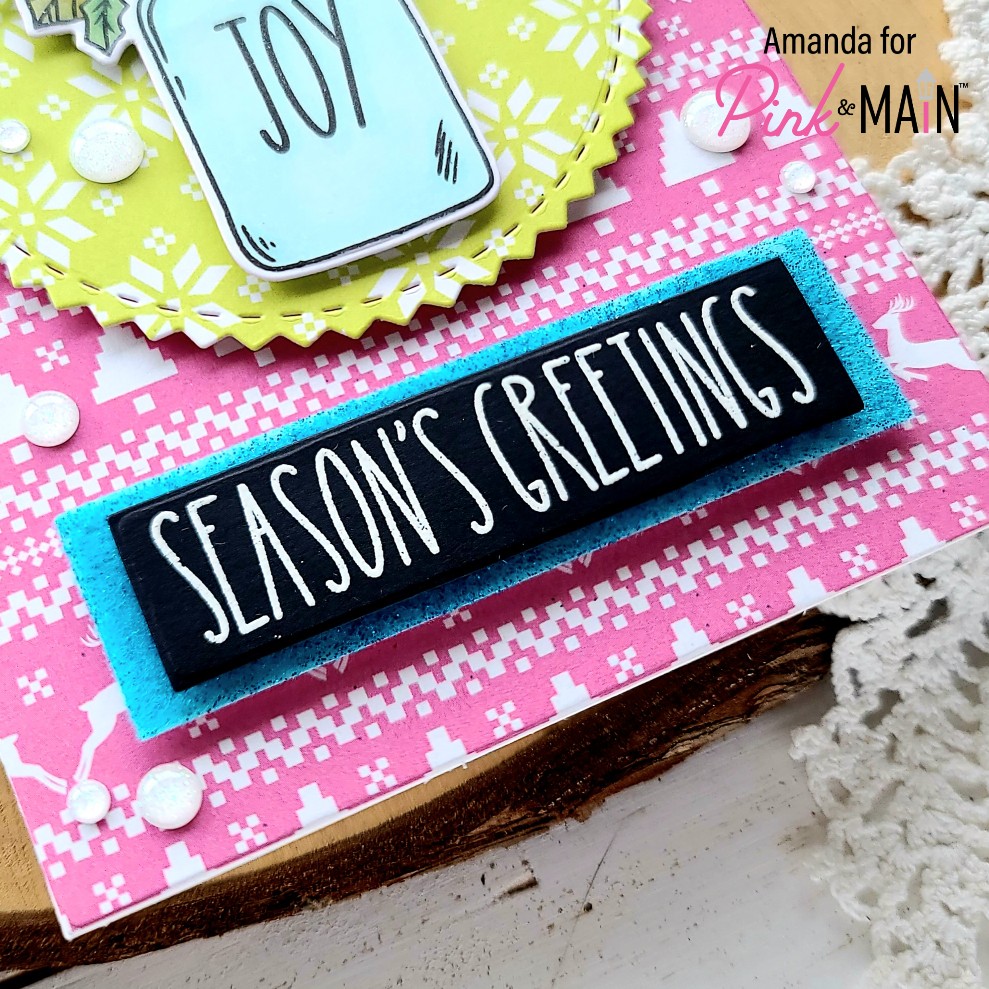
I stamped and heat embossed a sentiment on black cardstock and found that the second to smallest die in the slimline layers was perfect so I cut it out with that. Then I took a piece of the new adhesive sheets and adhered it to a white cardstock scrap. I die cut the scrap with the next largest slimline layer, removed the release paper and smothered it with sparkling fuzzy monster flock! This stuff is SO FUN!!! I used foam squares to pop the layers up and placed it on the card below the circle.
Because I love texture and dimension I also came in with glossy accents for the flower centers and berries on my image. Then for a little extra extra, I added some of the glitter enamel dots from the kit across the design too!
I am loving these non-traditional, bright colors for a Christmas card! They are happy and vibrant and sure to make the recipient smile!
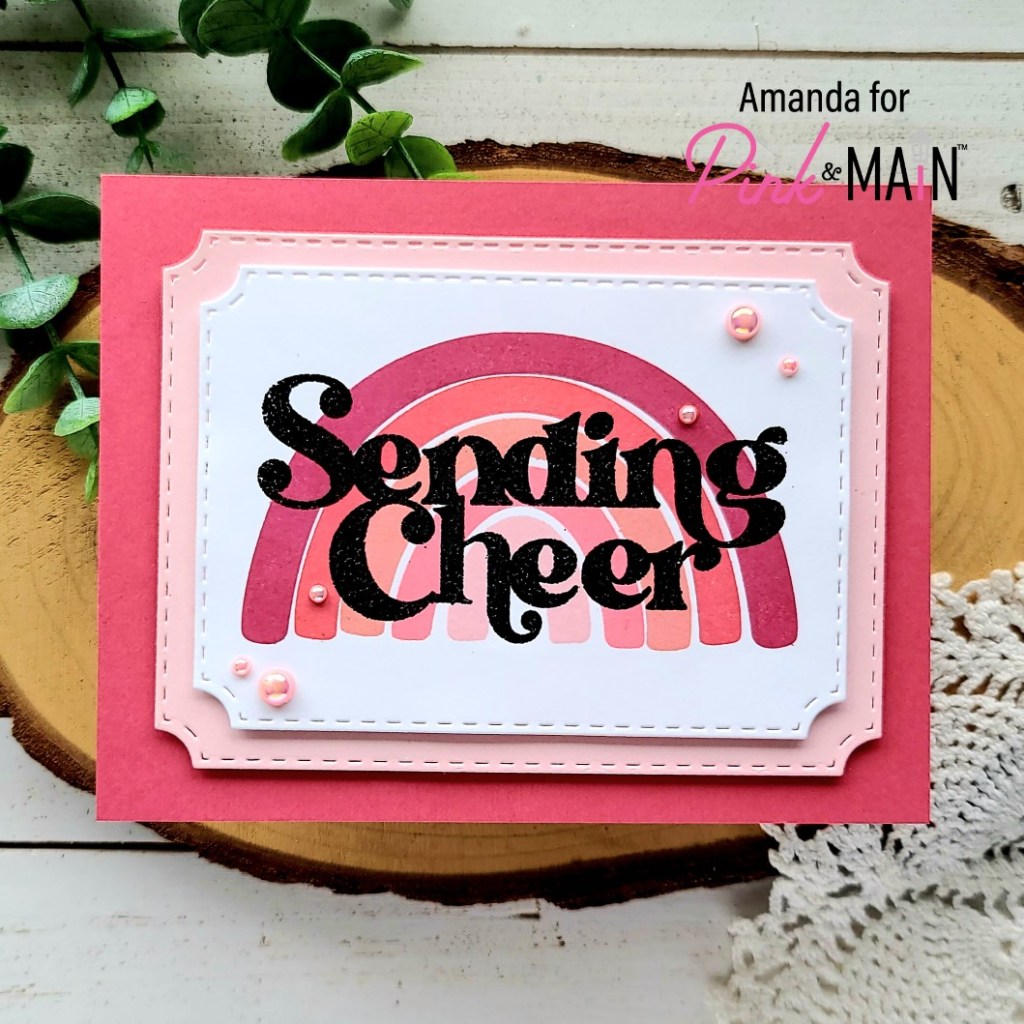
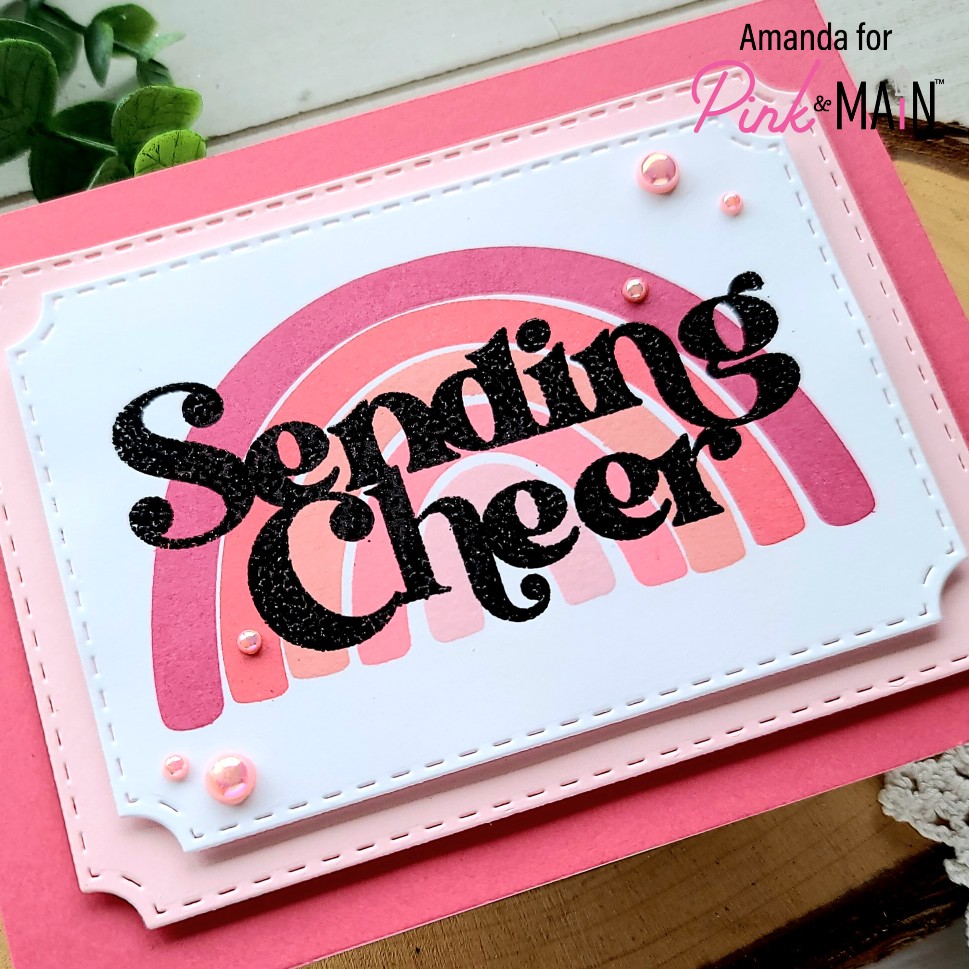
Hi everyone! I’m over on the Pink & Main blog today with a very special card to share with you. Given that it’s National Breast Cancer Awareness day and Pink & Main is a sponsor of the INK! Pink Hop, I used goodies from the brand new release to create another thinking of you card for the occasion.
To create my card, I die cut the smallest size in the notched corners die set from white cardstock and placed it in my MISTI, then I stamped each layer of the Sending Cheer rainbow with a different color of pink dye ink. Next, I stamped and heat embossed the sending cheer sentiment in black.
I chose light pink and melon colored cardstock and cut one from the next size up notched corner die and then trimmed the other to fit on my card base. I used the EZ Squeeze liquid adhesive to adhere the largest to the card base, then foam tape to adhere the other layers down.
To finish things off I glued down a scattering of pink pearls from the new Rainbow Pearls Set 2 collection.
My favorite thing about rainbows is their cheerfulness and versatility in crafting. You can make a rainbow any color scheme, in any order and it’s just happy. All the time.
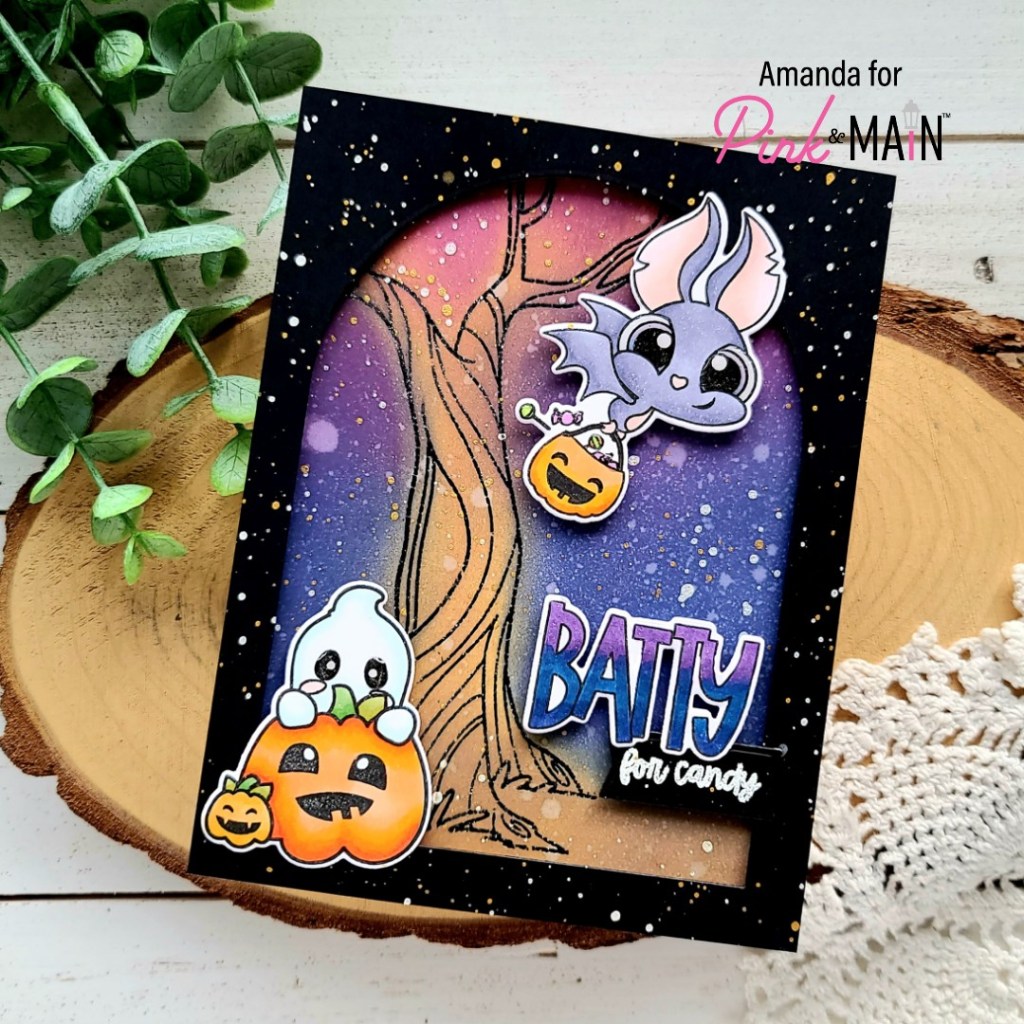
Welcome everyone! Today I’m popping in with a fun Halloween themed card featuring some super fun goodies from the September Pink & Main release. I hadn’t had a chance to ink up these adorable bats and I really just couldn’t let that happen!
Today I pulled out a few stamp sets from the September release to create my fun Halloween scene. I started with the bat and sentiment from Batty For You and decided to add that sweet little peeking ghost from Hello Bootiful. I inked them all up and colored them with copic markers. Then I used the coordinating dies to cut them out, stamped the second part of my sentiment and heat embossed it before die cutting it with a Large Sentiment Banner die.
I wanted something more than ink blending for my background so I took the tree from Oh Nuts and heat embossed it on a large panel. Then I did some messy fun ink blending with distress oxide inks to “color” my scene in. I used gathered twigs, seedless preserves and chipped sapphire. Then I spritzed the panel with water.
To frame everything up I cut an A2 rectangle and then die cut the next-to-largest Stitched Arches die from it. I added foam tape and popped it on the inked panel. Next, I used foam squares to adhere all of my images and sentiments.
Total transparency…I didn’t like my card at this point. So I walked away and came back later. I decided that the black frame and background were too stark for me. So this is where we remember that it’s just paper and we can change things!
I die cut the images another time from scrap cardstock and laid them over the colored images that were already in place. Then I carefully put the card in my splatter box and went to town with my favorite pearl and gold watercolors. I left it to try for a few minutes and just dumped the die cut masks in the trash.
I know this may be too busy for some people but I LOVE IT! Moving on to finishing touches, I added glossy accents to the ghost and bat eyes and the candy in the bucket.
Last, I went over the word “batty” with a Wink of Stella glitter brush pen for some shimmer in the light. This card was quite a process and I loved all the stages! Mostly, remembering that it’s okay to walk away and it’s even more okay to try something out, it might even work!
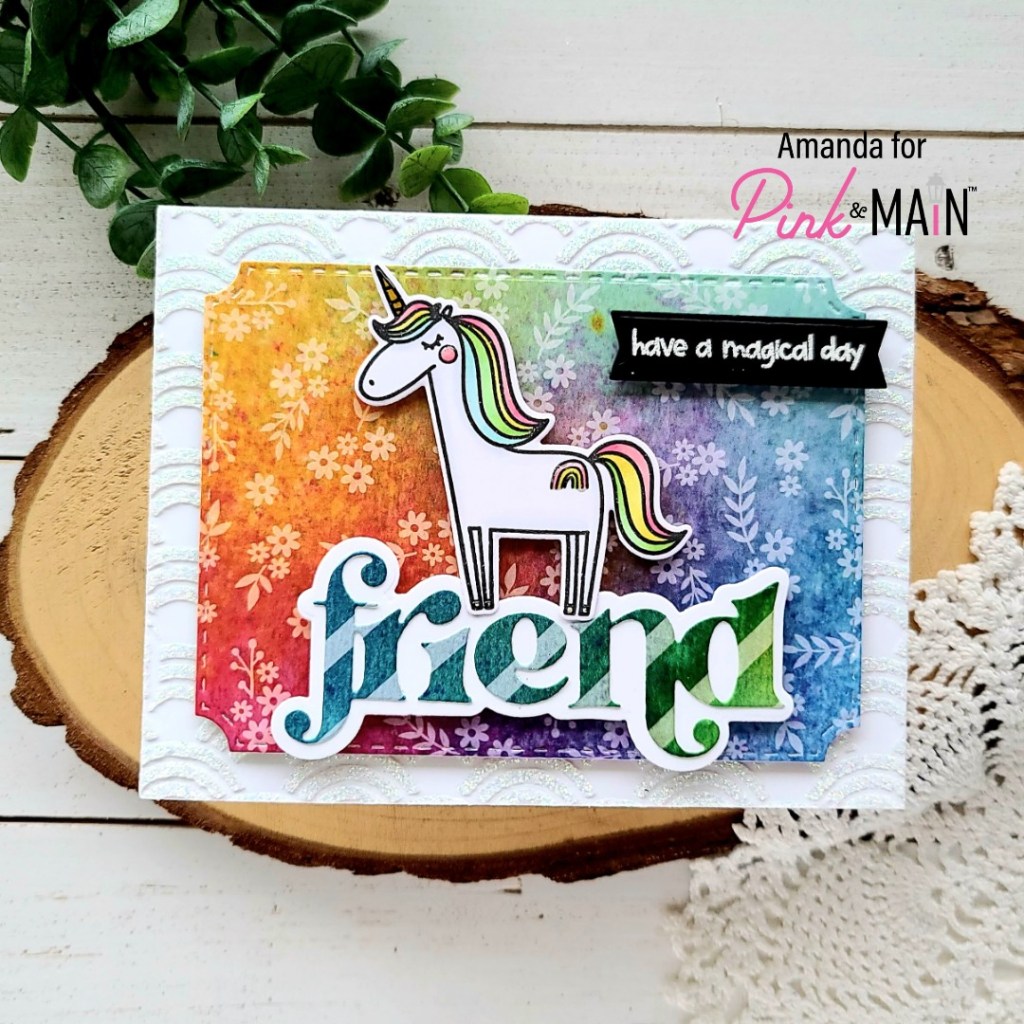
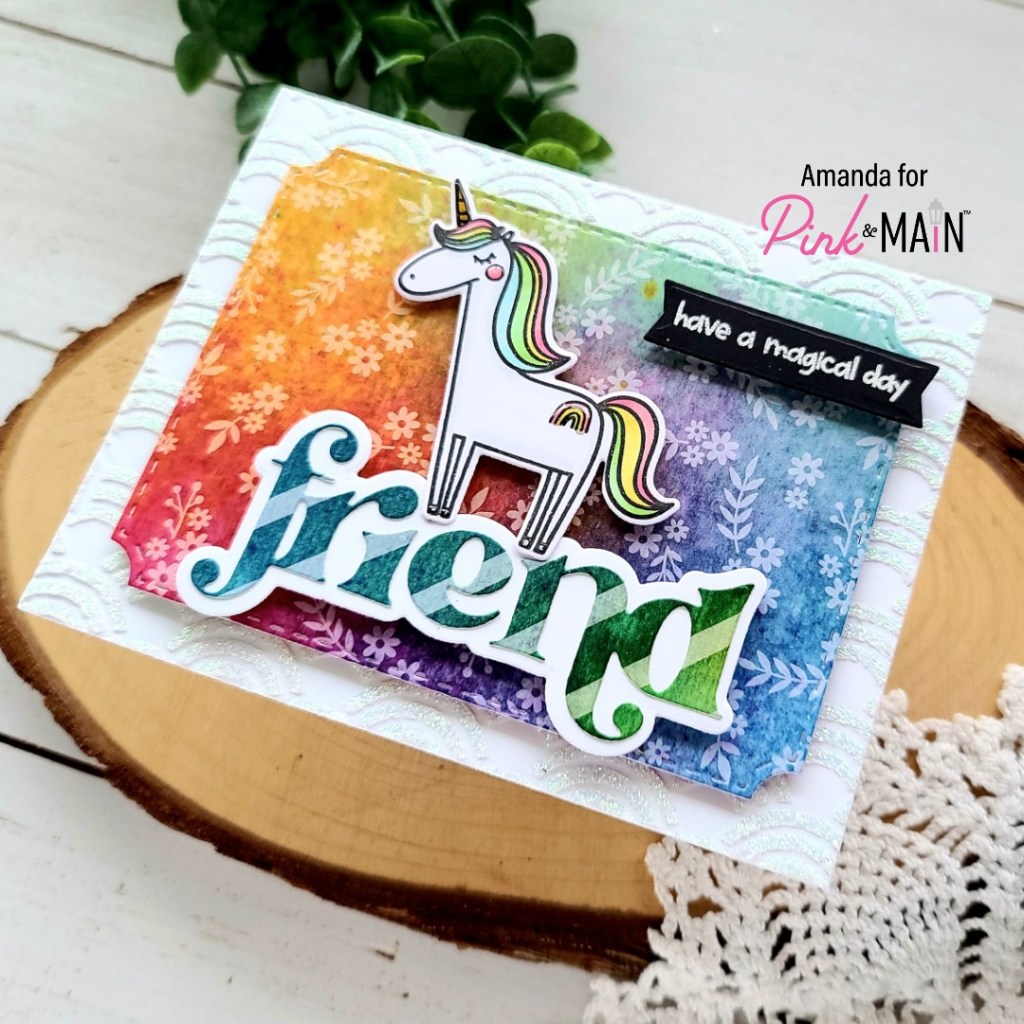
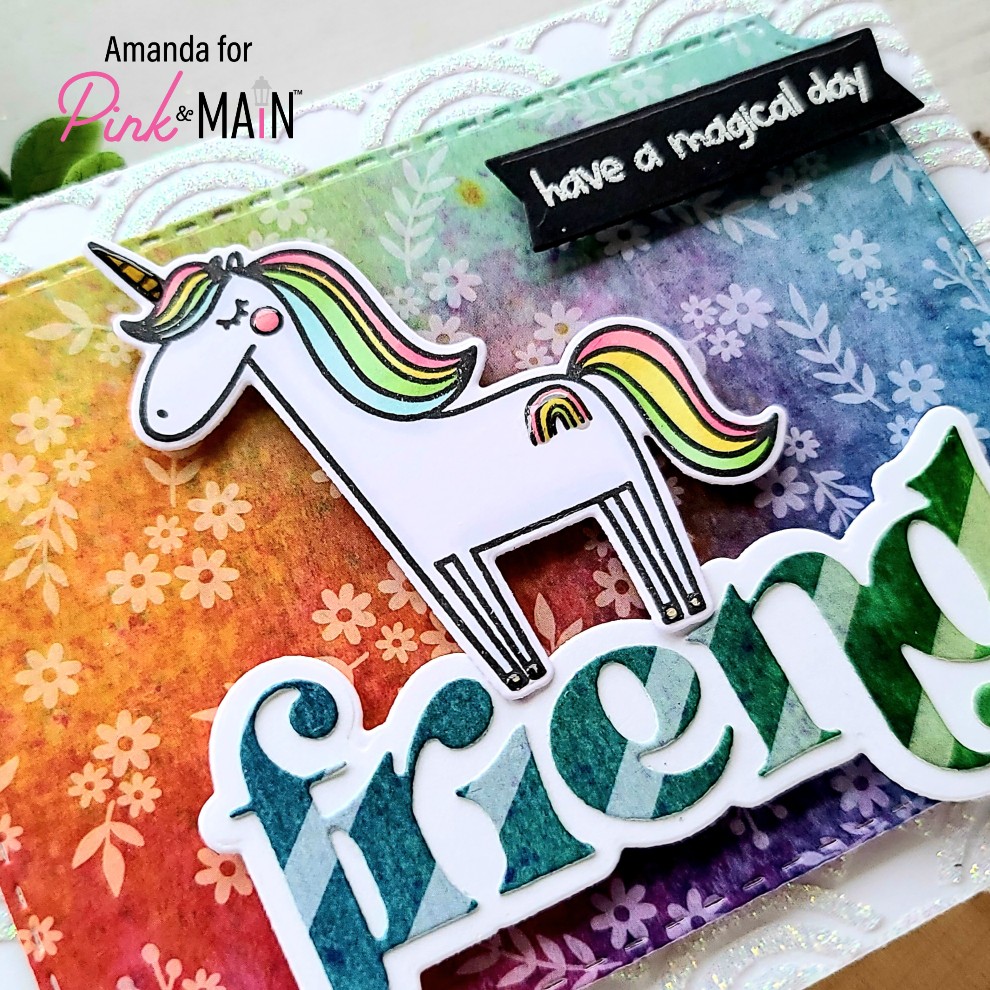
Welcome fabulous friends! Today I’ve got a super fun sneak peek over on the Pink & Main blog featuring lots of goodies from the upcoming October release!
I had a fun design in mind so I started by stamping my image from Unicorn Wishes and colored it with copic markers. Then I used the coordinating dies to cut it out. Next, I started going through the new amazing Watercolor Rainbow paper pad and chose a couple of complimentary sheets to cut my background and sentiment from.
I cut the background panel from the next-to-largest of the new Notched Corners dies and the word die is from the Rainbow Friend dies.
Instead of having a plain white background, I decided that a fun unicorn card needed some bling so I spread iridescent glitz glitter gel through the new Rainbow Fun stencil! After that was dry, I cut the panel out with the largest Layered A2 Rectangle die and adhered it to a card base.
I added foam tape and squares to the back of everything and layered them up. I love good dimension and texture on my cards. It seemed like it was missing something and the sentiments in Unicorn Wishes go great with what I already had so I stamped and heat embossed one on black cardstock and cut it out with a Large Sentiment Strip die. I also added it with foam strips.
For some simple finishing touches, I added glossy accents to the unicorn horn, hooves, rainbow and cheek. Then I came in with Wink of Stella glitter brush pen on the mane and tail.
I can’t wait for you to see more sneak peeks from the rest of the team before the release goes live for purchase on Wednesday, October 20!
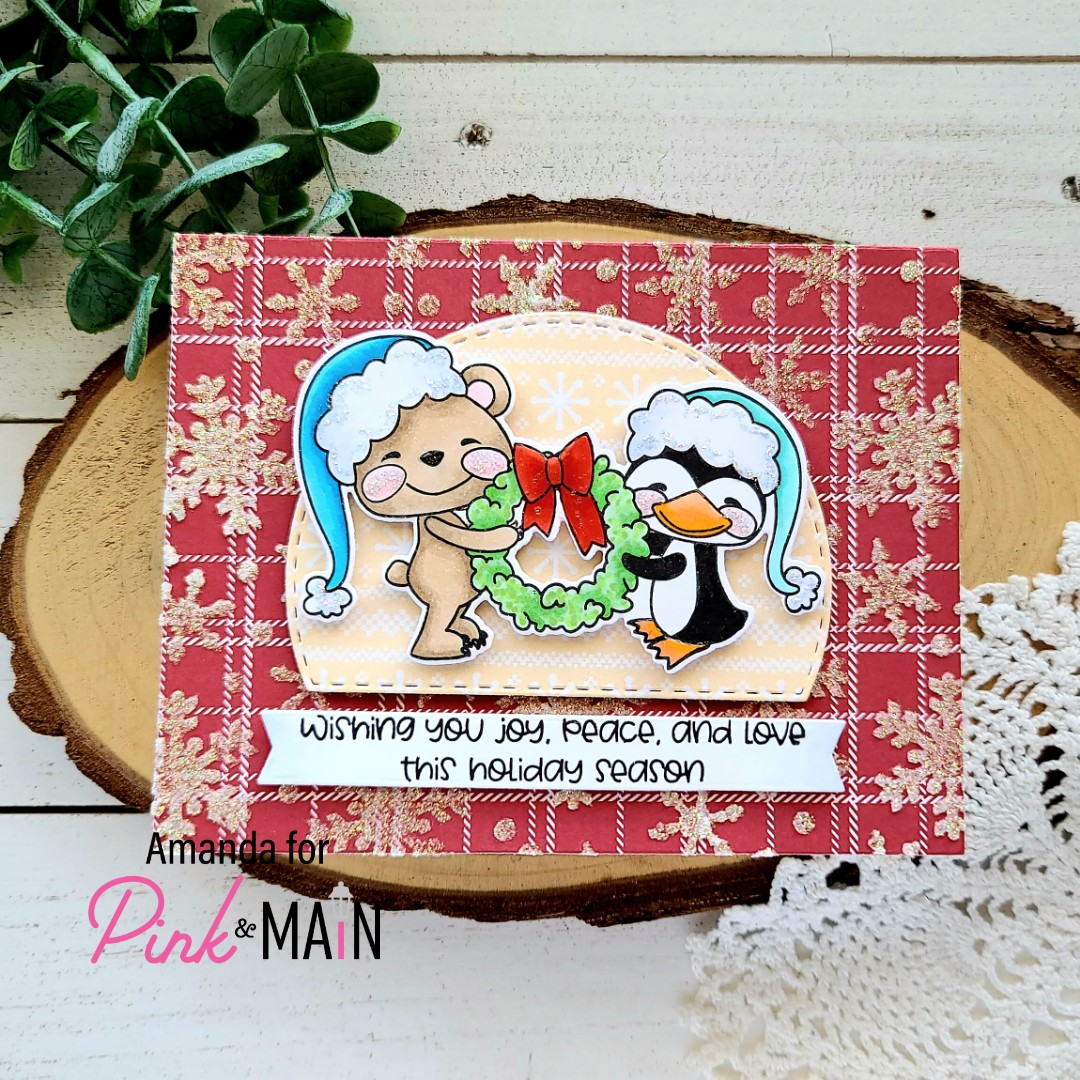
Happy Friday friends! I’m over on the Pink & Main blog today with some more Christmas fun from the September release. The Polly and Pete series are just too cute for me to leave alone. I love them!
I had a layout in mind so I stamped my cute image and colored it with my copic markers. Then I used the coordinating dies to cut it out. I chose a large sentiment strip die that would fit the sentiment, cut the banner and then stamped the sentiment. Because this is a little squishy it gave me more control over where my stamping landed on the banner.
Next I chose 2 patterned papers from the Homespun Holiday paper pack and cut one with the largest layered rectangle dies and the other from the largest double stitched dome dies. I layered the new blizzard stencil over the rectangle and spread iridescent glitz glitter gel through it. The snowflakes over the plaid just make me so happy! I love them together!
Once the panel was dry I adhered it to a white card base with EZ Squeeze liquid adhesive. Then I popped the dome and sentiment banner up with foam squares and then did the same with my image.
For finishing touches I added glossy accents to the bow, bear nose, penguin beak and feet; and unicorn stickles to their hats and cheeks.