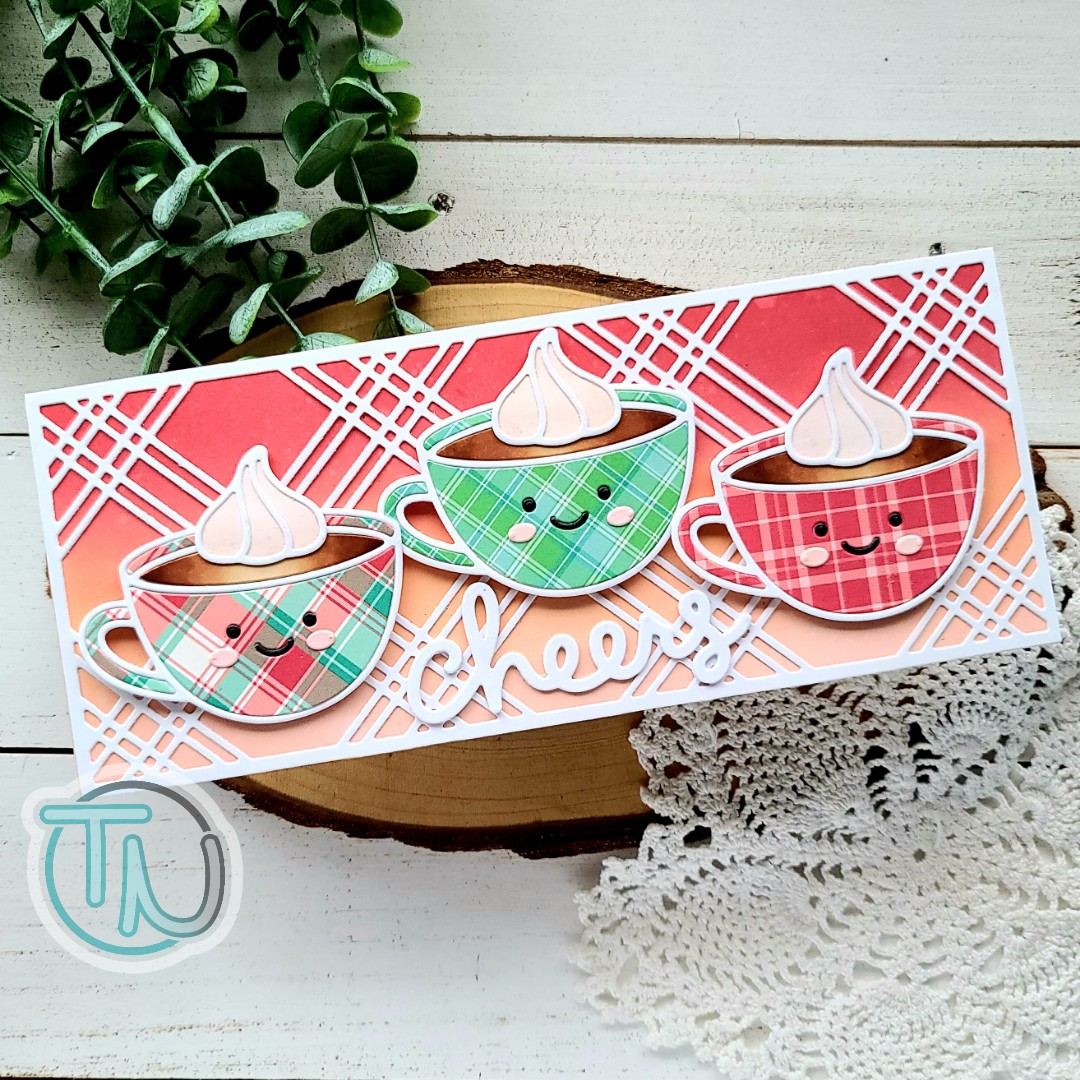
Hey friends! I have an adorable slimline card to share with you today. I snagged the new Lawn Fawn Lovely Latte die set and had some fun creating different cups with my stash of Lawn Fawn papers.
I cut all the pieces from the Lawn Fawn Perfectly Plaid Christmas paper pad and white cardstock. I used copic markers to color the coffee part of my cups – E35, E34 and E31. This seems to be my go-to combo for coffee most of the time. For the whipped cream I used E000 and E0000. I used liquid glue and adhered all the pieces together onto the base layer.
To create the background I inked up distress oxides in candied apple, dried marigold and tattered rose. I spritzed it with water and adhered it to a white card base. Then I cut the awesome Pink & Main Plaid Slimline die from white cardstock and layered it on top. I added foam squares to my mugs and popped them in place.
Next, I die cut the Lawn Fawn Scripty Cheers sentiment from white cardstock 3 times and glued them together. Then I glued the stack to the card front below the cups. For finishing touches I came in with a Wink of Stella glitter brush pen on the sentiment and whipped cream. Such a fun little touch of shimmer.
I am loving this new line of dies Lawn Fawn has come out with. I hope a few of the other iconic characters get added to the mix too!
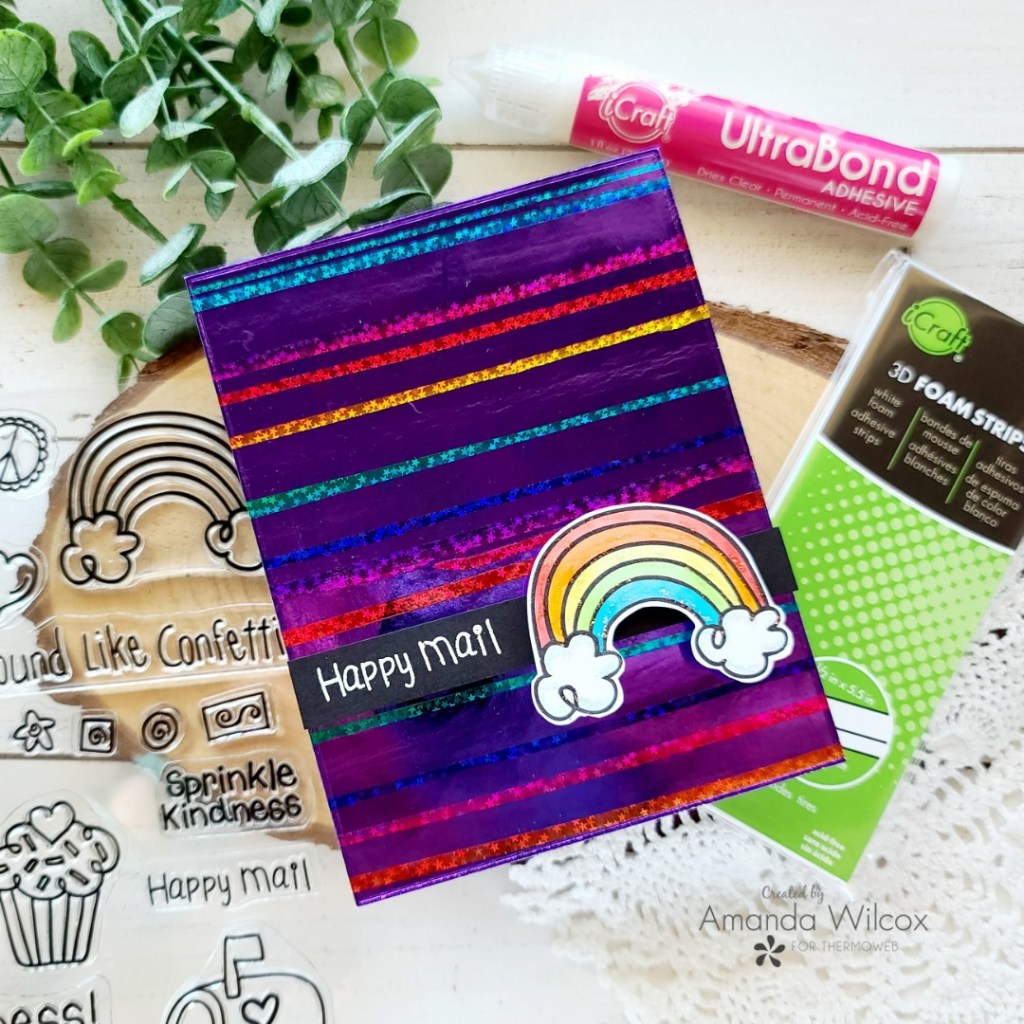
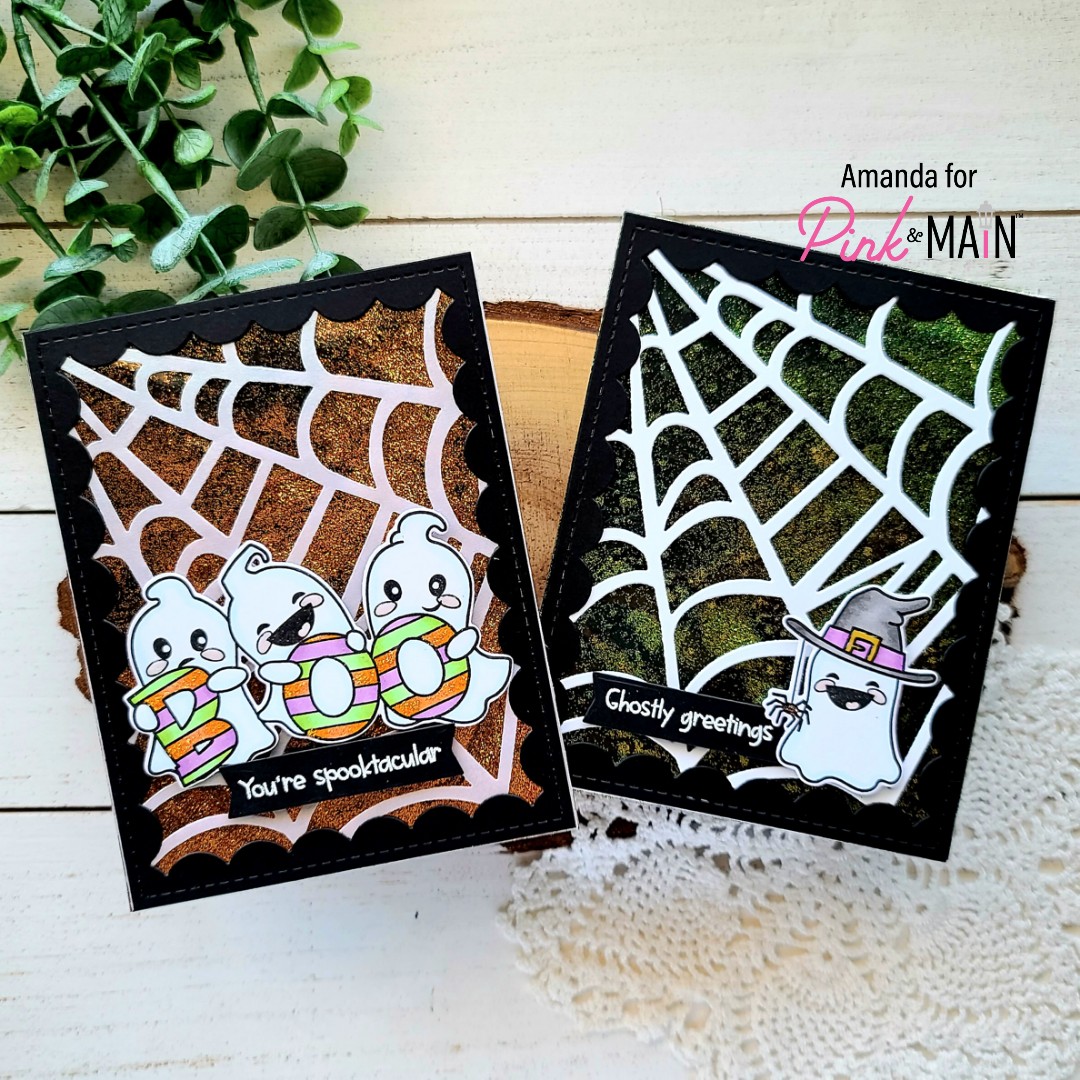
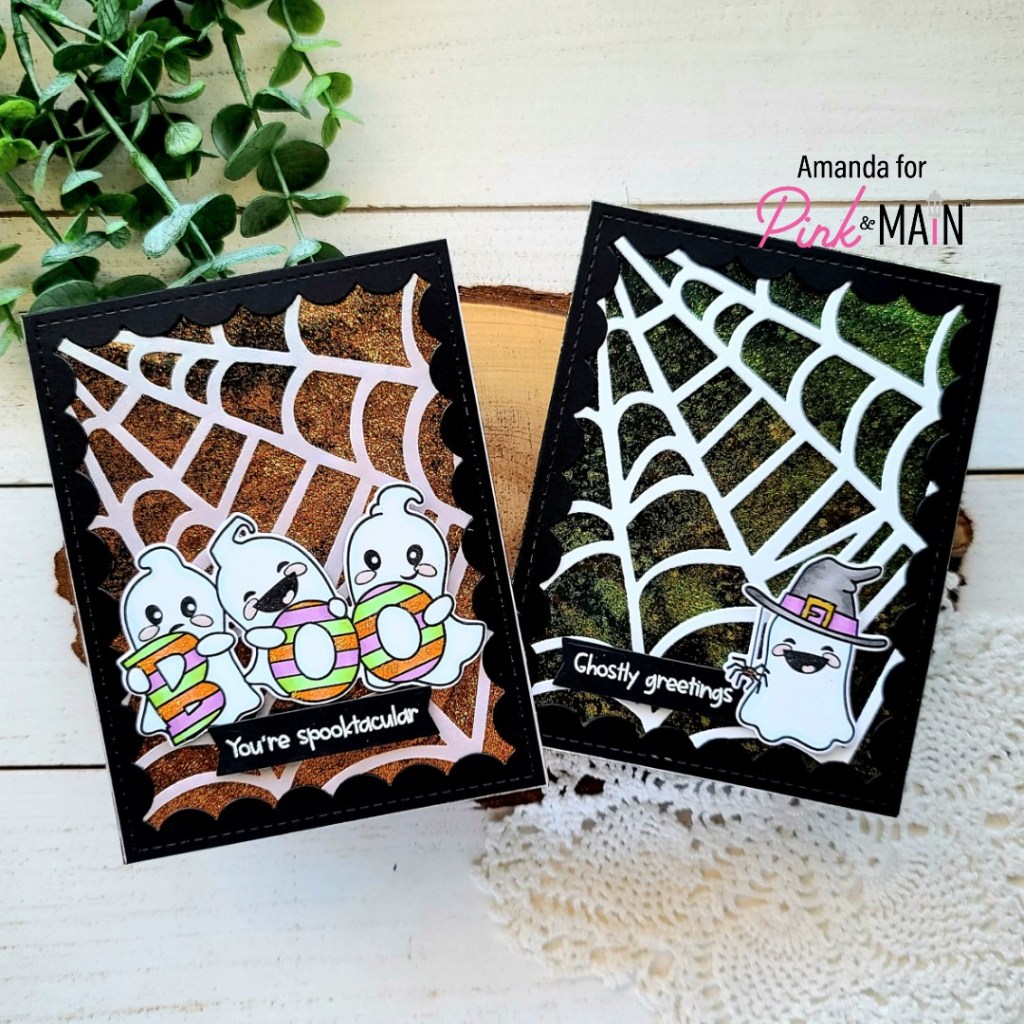
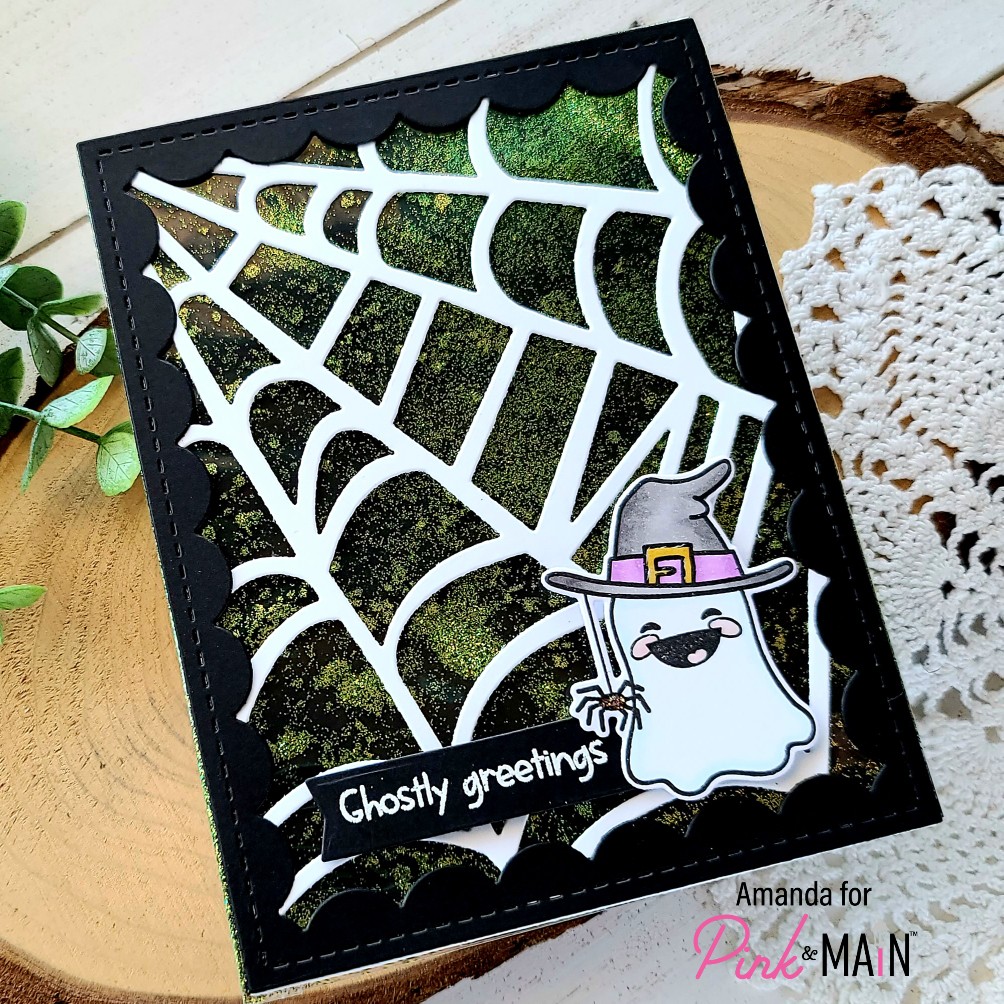
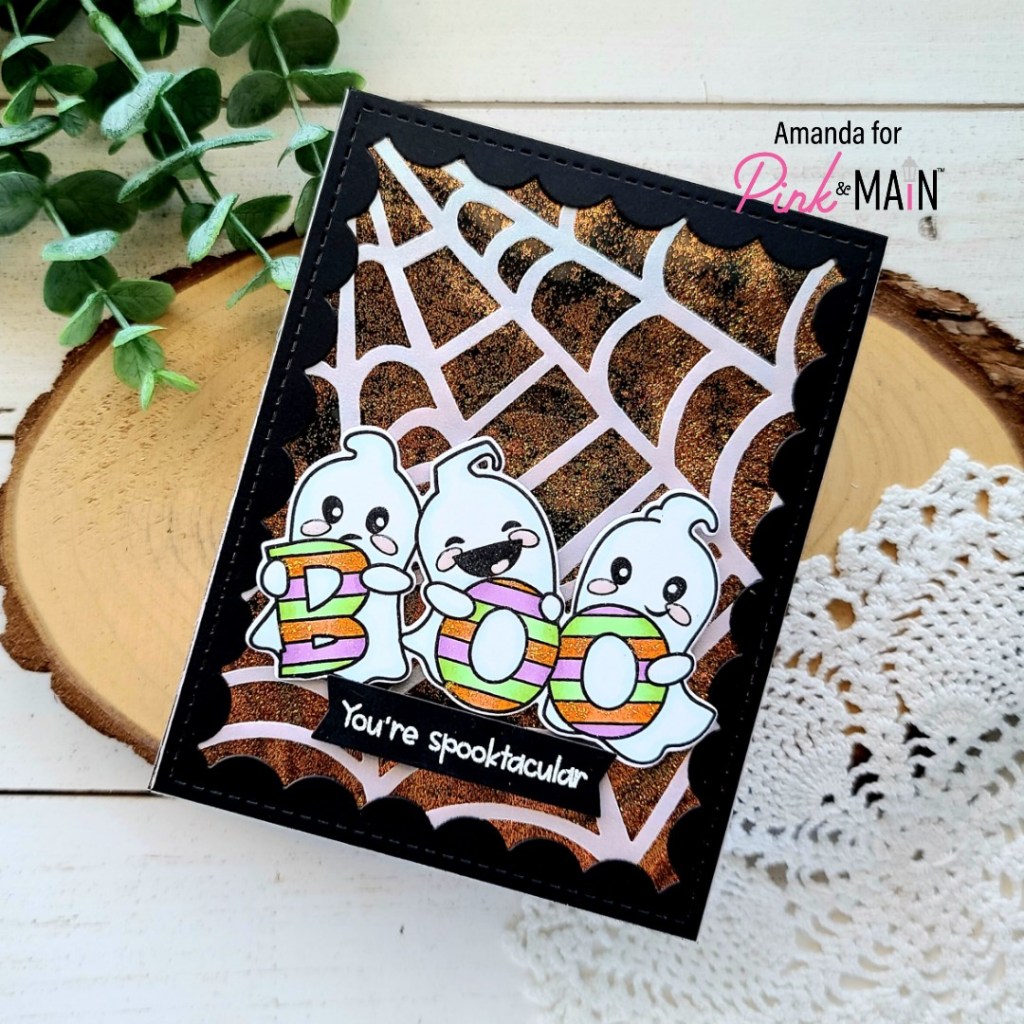
Hello everyone! I’m over on the Thermoweb blog today sharing how I created this pair of cards featuring Laura Kelly Designs products from Thermoweb. Her foil colors and toner card fronts are so fun. Pair those with her whimsical stamps and you’ve got adorable, fun cards!
To create these cards, I started by foiling the toner card front on the right and then adding the negative decofoil sheet to a toner sheet and then foiling the rest with some awesome Rainglow decofoil. It’s kind of a process but it’s fun and magical as you do it!
To add a little something to this first card, I added glitter gltiz gel with a Pink & Main stencil over the foiling. Isn’t it so much fun!?!
And then this amazing double-foiled card needed nothing added because it is so gorgeous!!!
Be sure to head over to the Thermoweb blog for the step-by-step and a list of products used too!
I appreciate you sharing your time with me. Have a fabulous day!
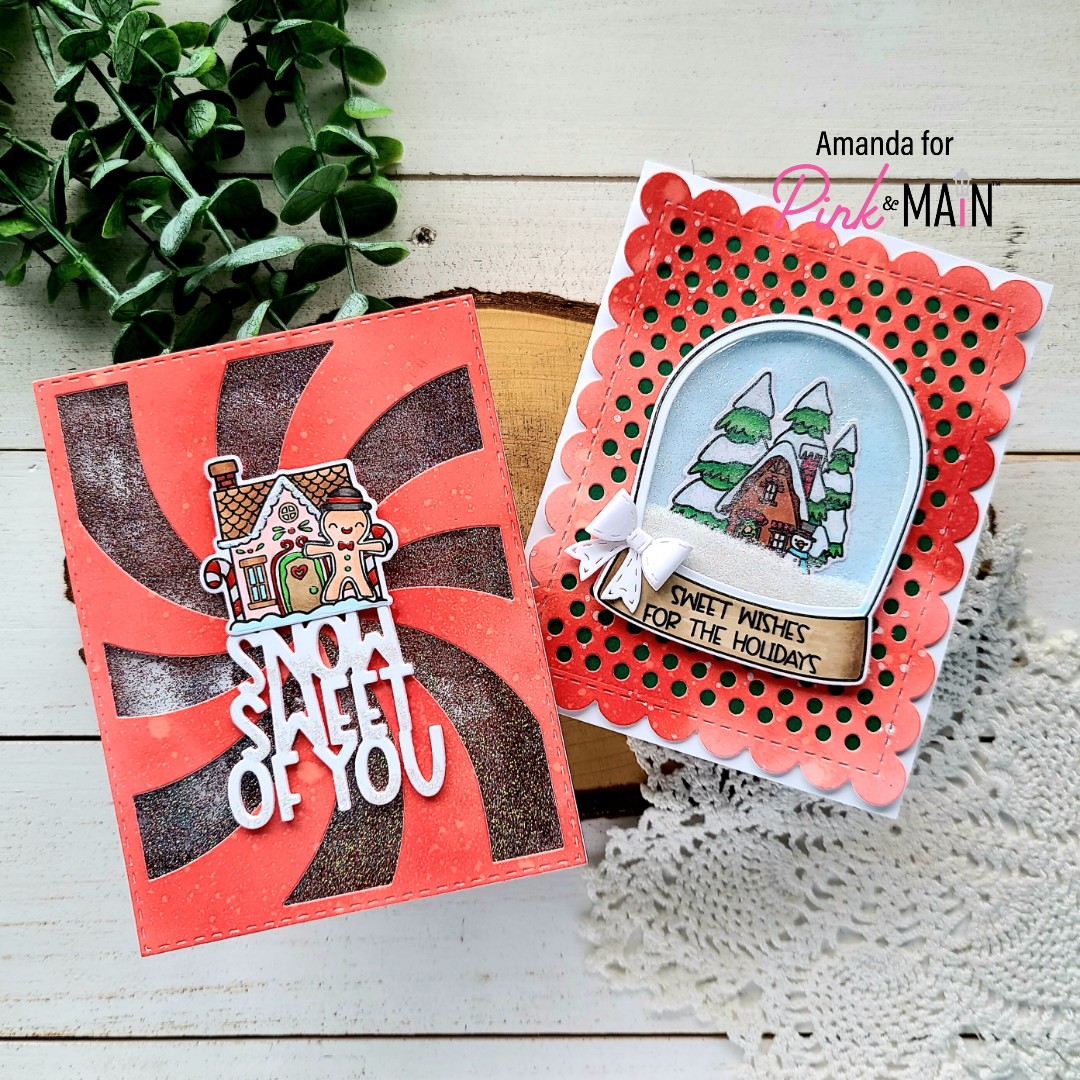
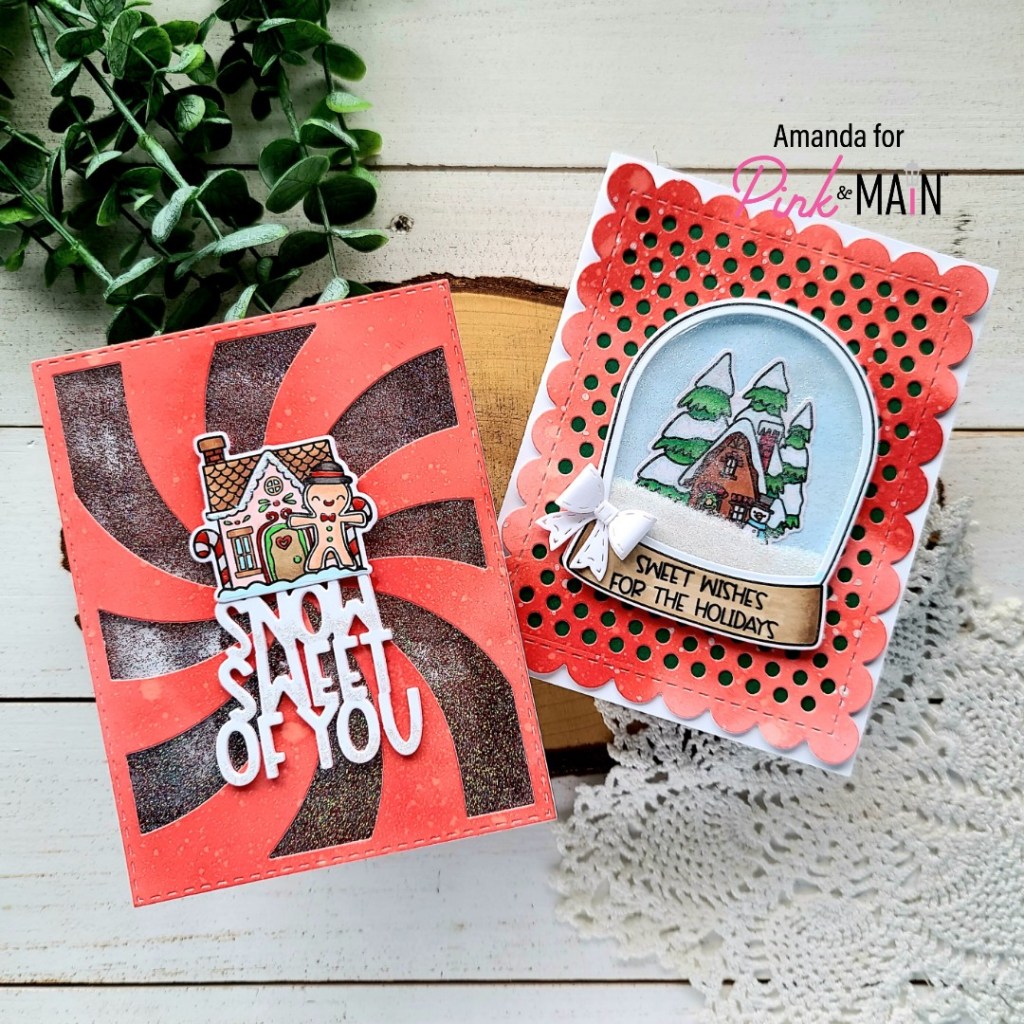
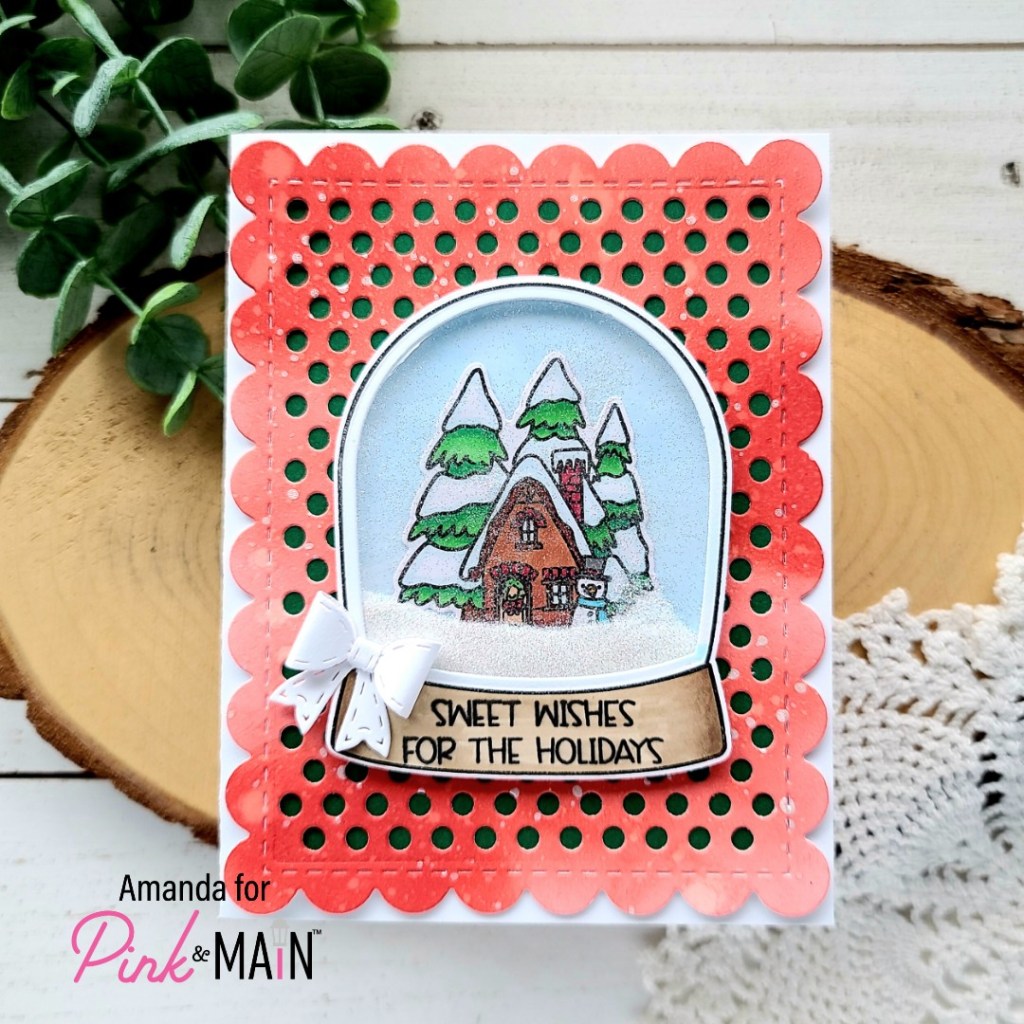
Happy Friday friends!!! Today I’m over on the Pink & Main blog sharing a couple of super fun shaker cards featuring some of the amazing Christmas release. I was creating the first snowglobe card, not planning to make it a shaker and then I couldn’t resist. But while I was creating it I had another idea that I just couldn’t pass up. So today you get double the inspiration! I hope you enjoy them.
This all started because I wanted to make one of those adorable snowglobes. So I stamped images from the Empty Snowglobe set and Winter Snowglobe Scenes and colored them with my copic markers. It became apparent pretty quickly that I did want to make this cute scene into a shaker so I cut the additional elements needed like the acetate panel a new base panel and cut the window out of the stamped snowglobe I already had.
Next, I inked up the base panel with blue and adhered my house scene down to that. Then I adhered the acetate to the frame and lined it with foam strips. I added some ice rink fine glitter to my scene and sealed it all up.
For the background panel of my card, I inked up a white piece of cardstock with candied apple distress oxide as messy as I could. Some heavy spots, some light spots and some streaks. Then I spritzed it with water and flicked pearl watercolor all over it. Once it was dry I die cut it with the Dotted Cover die and just love how it looks! I lined the back with green cardstock and adhered it to a white card base. Next, I adhered the snowglobe down with liquid glue. I thought it was missing something so I pulled out the Stitched Bow dies and cut the smallest one from white cardstock. I used my awesome new reverse tweezers and liquid adhesive to assemble it and glued it to the left of the sentiment.
This was so fun to create and I love how the ultra fine glitter looks like a grand snow bank waiting for kids to run out and play on. Super cute!
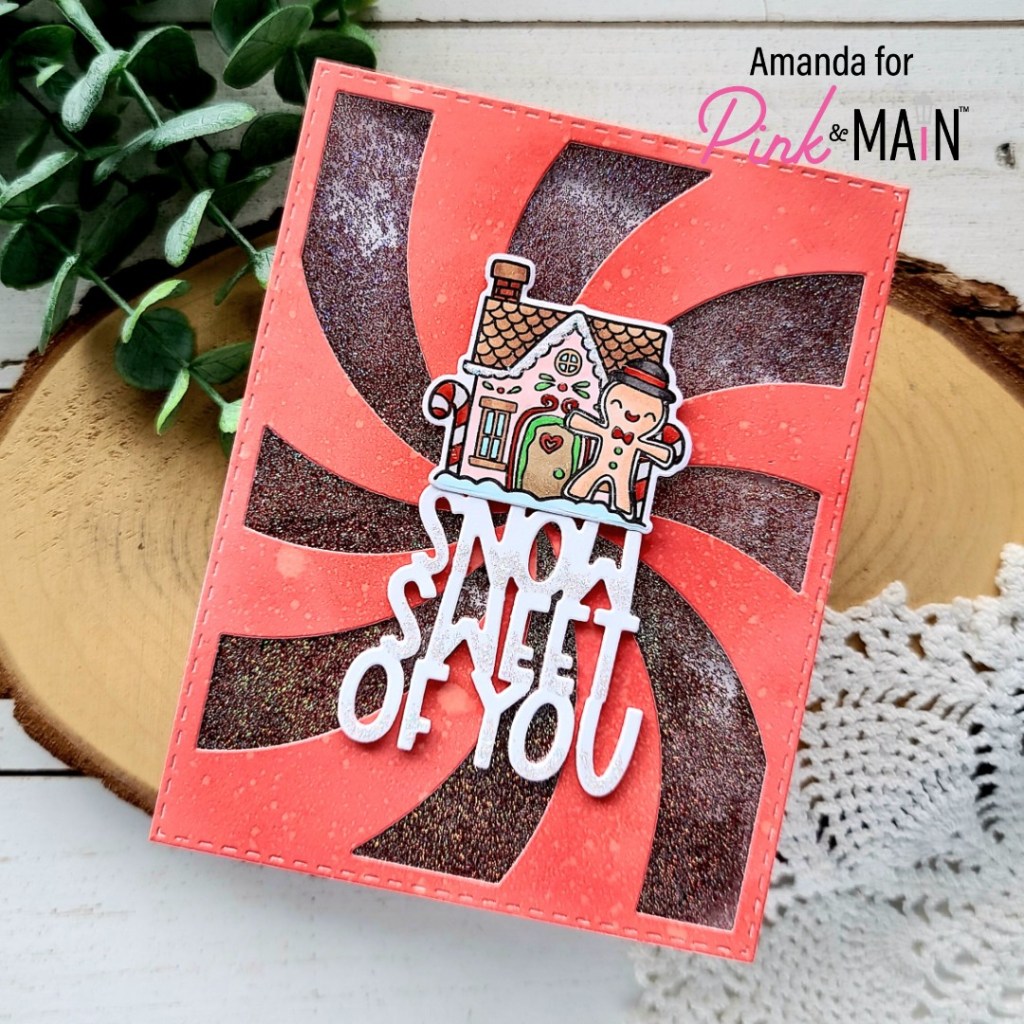
While I was using the Empty Snowglobe dies, I had to move the sentiment die in the set out of the way…which got me thinking that it would go so cute with the gingerbread image from the Winter Snowglobe Scenes. Hence, I have another adorable card to share with you.
For this card, I stamped and colored the Winter Snowglobe Scene with my copics and used the coordinating dies to cut it out. Then I cut the sentiment from white cardstock 5 times and adhered the layers together with liquid glue.
I used the same candied apple distress oxide ink, but this time I started in the center of my panel and inked it up in a circular motion working my way out. I spritzed the panel with water and let it dry. Once it was dry I cut it out with the Peppermint Cover die, trimmed a piece of acetate to fit and adhered them together with liquid glue. I lined it with foam strips and filled it with holly and silver bells fine glitter. Once it was all sealed up I adhered the shaker to a white card base.
Next I used liquid glue to adhere the sentiment on the front and foam squares to pop the image up to same height. For finishing touches, I added unicorn stickles to the bottom of the letters in the sentiment and the roof line of the house. Then I added glossy accents all over the image to anything that looks like frosting. I think these two things really tie them in to the super shimmery glitter shaker.
These are so much fun and such happy cards! They’ll be great to share with someone at Christmas time! I’m also excited to have two more cards for my holiday stash! Have you started yet?
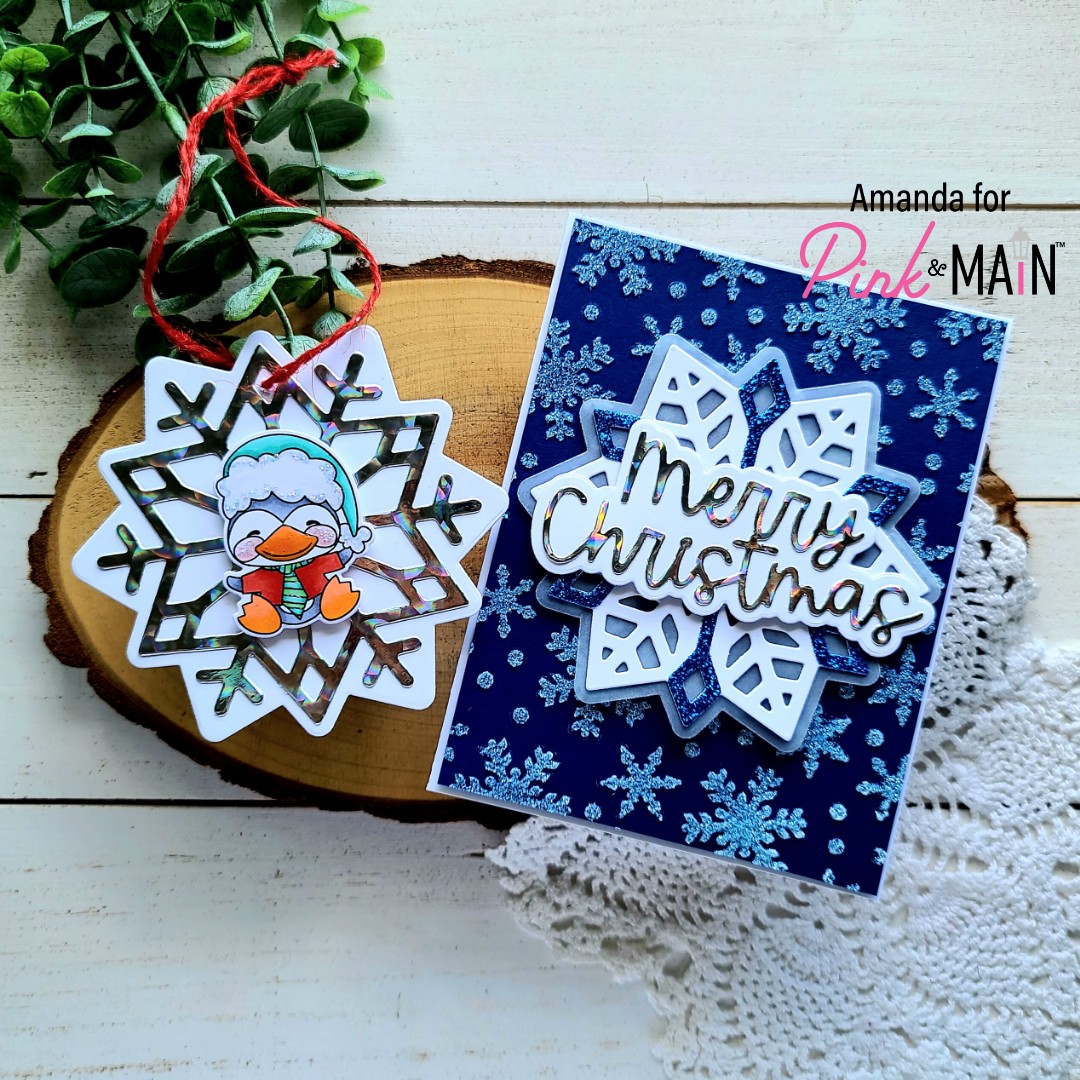
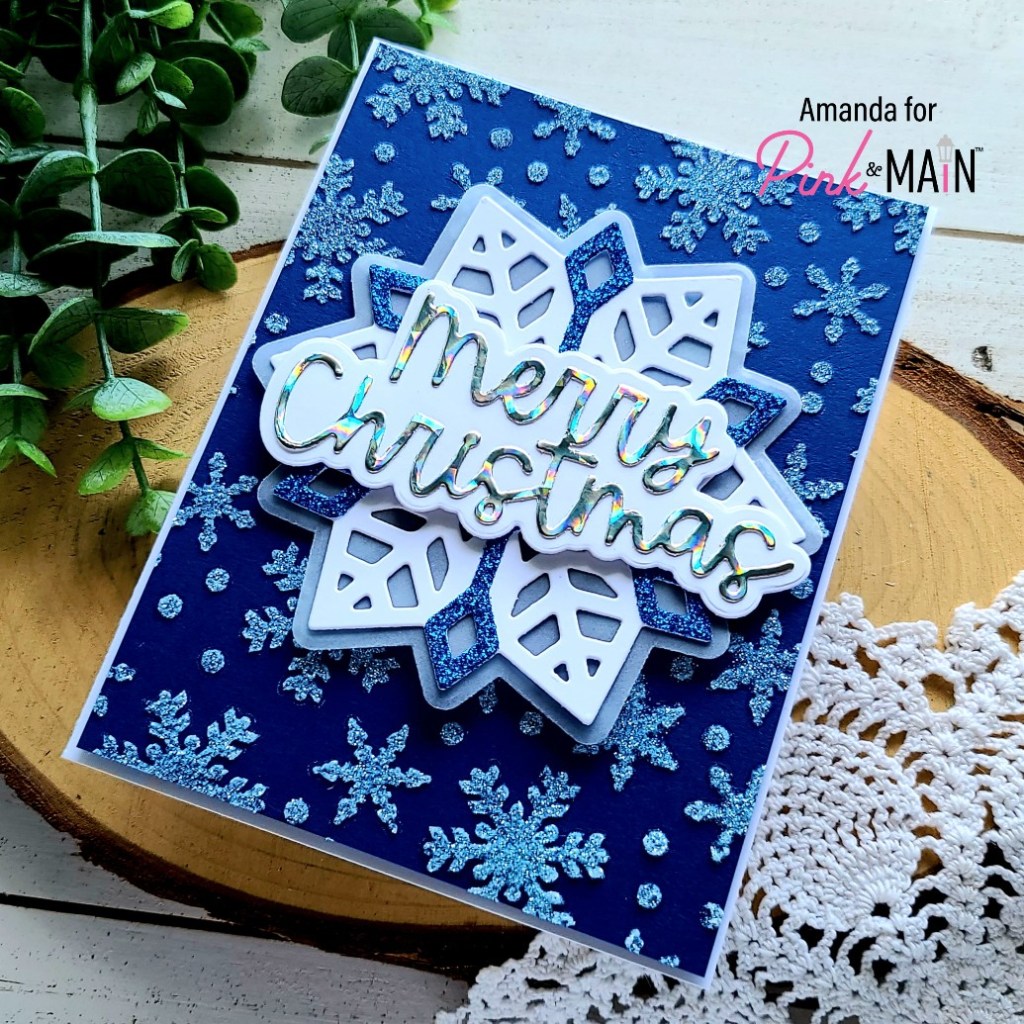
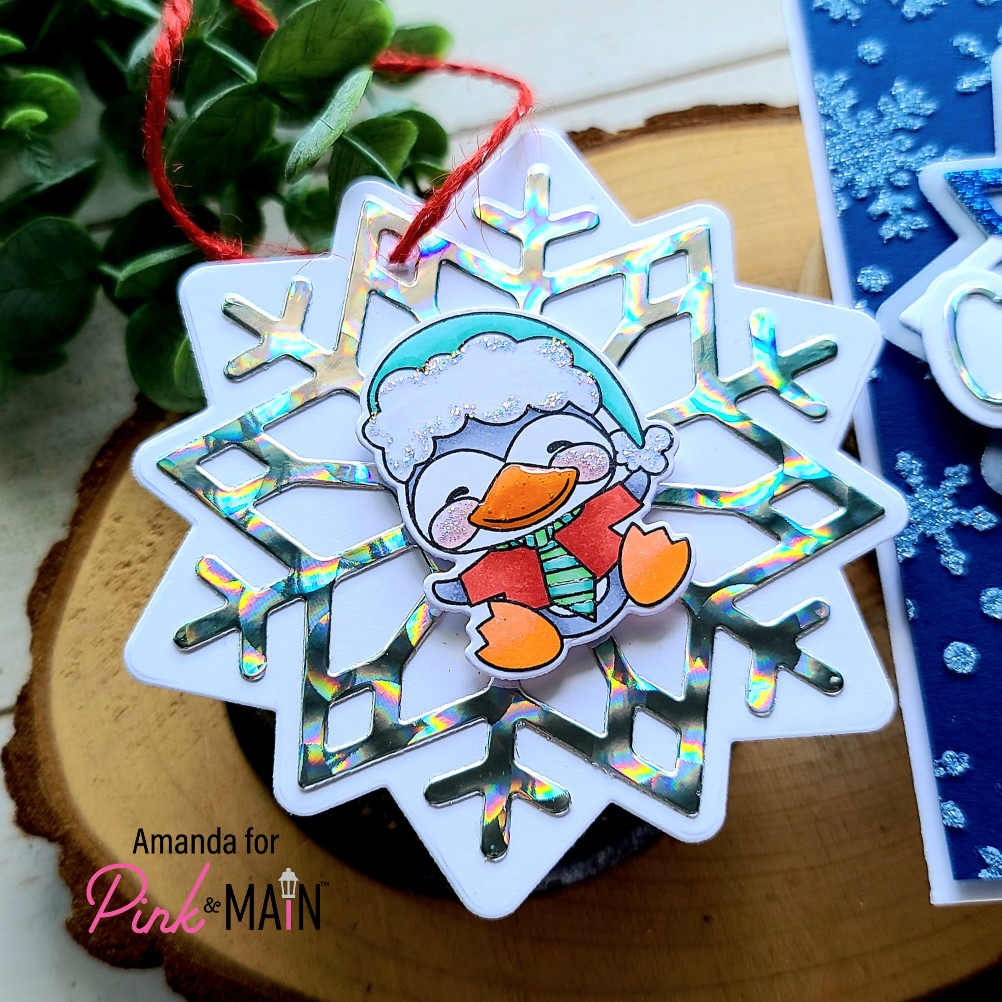
Hi there! Today I’m over on the Pink & Main blog sharing this fun snowflake themed Christmas card with a coordinating Christmas ornament to go with it! During the holidays I just love doing little sets like these. It makes it extra fun to give gifts or just pop in the mail together to brighten someone’s day!
All of the products I’m using today were just released earlier this week! So if you haven’t checked it out yet, you need to for sure! It’s bursting with amazing!!!
To start this project, I wanted to play with the snowflake stencil and also the layering snowflake dies…so I did. I used white Thermoweb Glitz Glitter Gel on dark blue cardstock with the snowflake stencil and set it aside to dry.
While that was drying I die cut some elements from the layered snowflakes dies. For the card, I cut the base from vellum, the large piece from white cardstock and the smallest layer from blue glitter paper in the winter glitter paper pad.
Next, I die cut the Merry Christmas from holographic paper and the shadow from white cardstock. I adhered the layers together with EZ Squeeze liquid adhesive but popped the sentiment up with foam squares and popped the snowflake up with foam squares as well.
To complete the card, I trimmed the snowflake background down by 1/8 inch on each side. This cleans up the excess glitz gel and gives it a nice white border from the card base. This panel is popped up with foam strips and then the snowflake is added to the center.
Here’s a closer look at one side of the ornament. I die cut the base piece from white cardstock twice. Then the snowflake outline from holographic paper twice. I used EZ Squeeze liquid adhesive once again to adhered the snowflakes to the shadow and then back-to-back so the whole thing is double-sided.
Finally I took out the sweet Polly and Pete Jolly set and stamped each critter, coloring them in with my copic markers. I used the coordinating dies to cut them out, added foam squares and popped one on the center of each side.
I punched a hole in the top of the snowflake and threaded some red baker’s twine through it, tying a knot so it’s ready to hang.
For finishing touches on the critters, I added glossy accents to things like beaks and noses, and unicorn Stickles to their cheeks.
I can’t even pick a favorite product today! They are all so much fun to use and I seriously need some dedicated crafting time because I am itching to make a bundle of these cute snowflakes! They will be everywhere for sure!
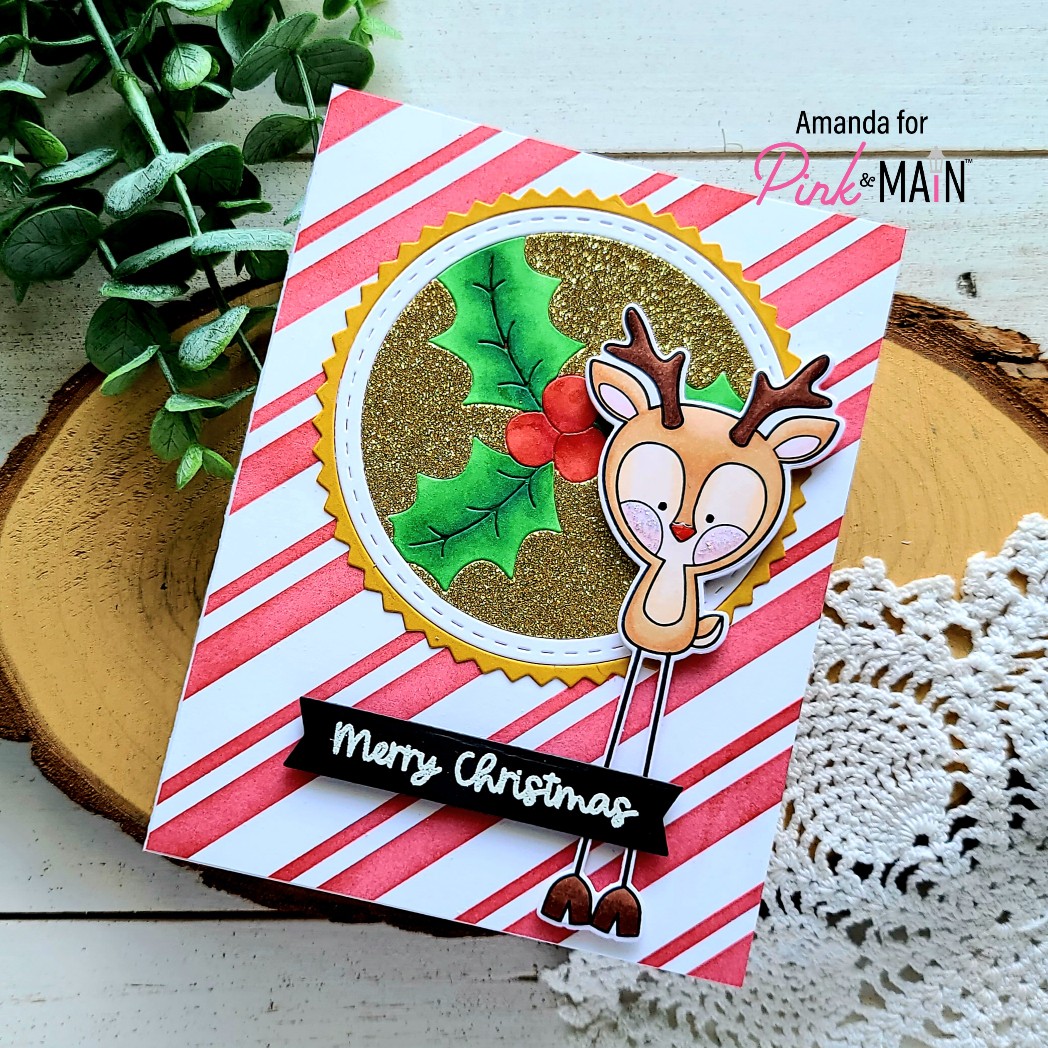
Hey friends! I’m over on the Pink & Main blog today sharing a fun sneak peek of multiple products coming in with the September release! You’re going to love it! This release is packed full! Like seriously, someone had to sit on that suitcase to zip it up for sure!
Okay seriously…more cute long legged critters!?! I’m dying! I just love them so much! This reindeer is perfect to add to the line up! And another paper piecing die that is just too fun to resist!
And don’t even think about skipping over that new stenciled background! Are we singing Christmas carols yet? This is so much fun!
Stay tuned to the blog for more sneak peeks and get ready because the release is available on Monday, Sept. 20!
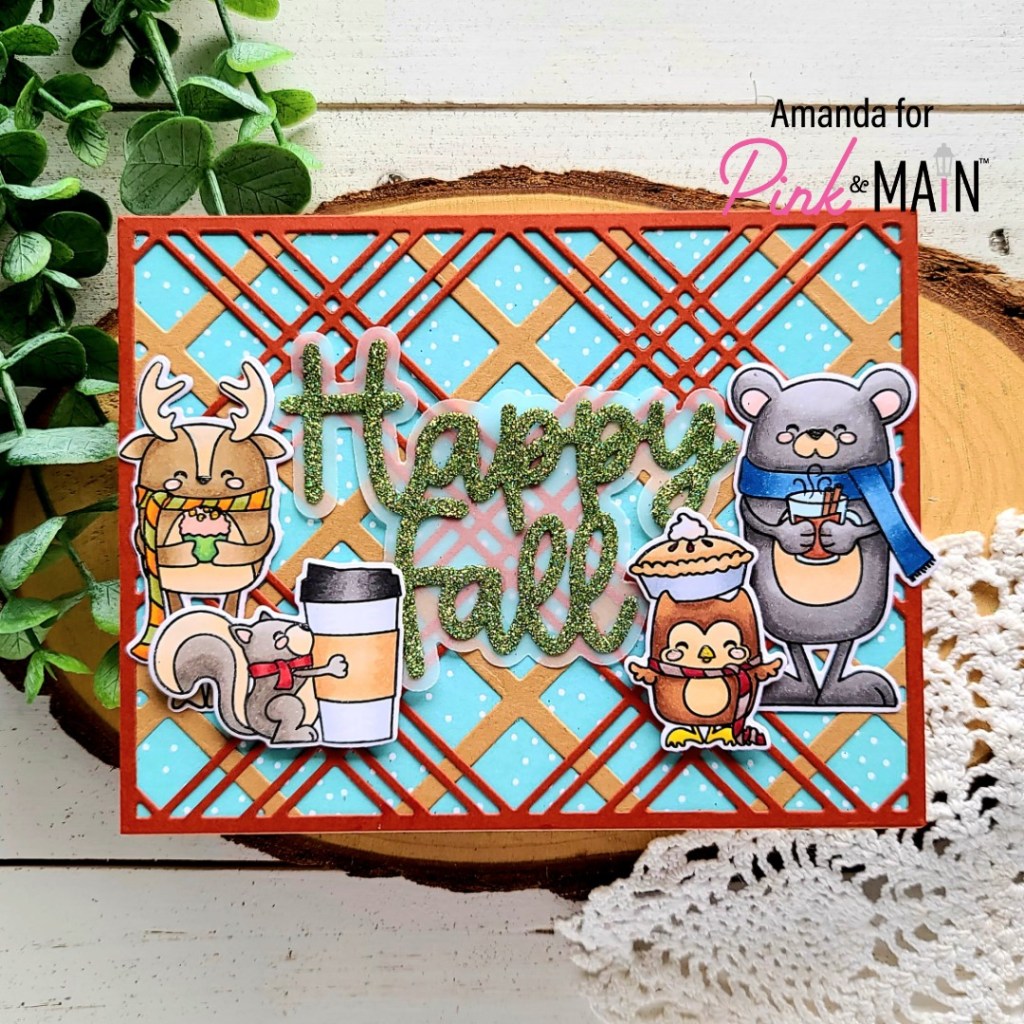
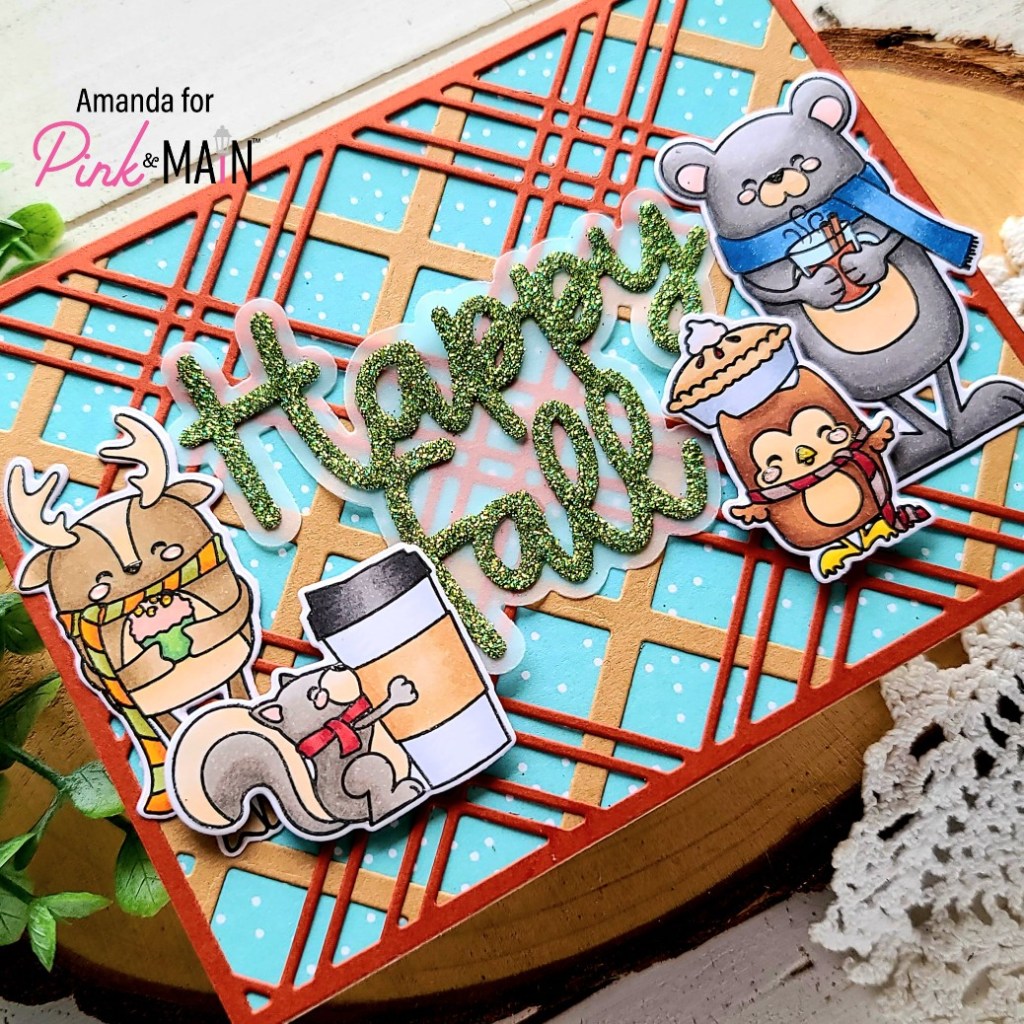
Welcome everyone! Today I’m over on the Pink & Main blog sharing a super fun fall themed card that is just packed full of all the fall feels! I hope you like it!
I started by stamping a variety of images from Cozy Critters and colored them with my copic markers. These guys are just too cute, it was super hard to choose just a few of them! Once they were colored, I used the coordinating dies to cut them out. For my sentiment, I used a bunch of new goodies including the Happy Fall word dies with the adhesive sheets and super fine glitter!
To create the words, I cut a piece of adhesive sheet and adhered one side to a piece of white cardstock. Then I used the happy fall die cut to cut it out. I removed the release paper from the top of the adhesive and sprinkled foliage super fine glitter on it. I used the finger to press the glitter into the adhesive and it created this gorgeous sentiment! After that I cut the shadow from vellum and adhered them together.
For the background I chose the blue spotted paper from Pumpkin Season, cut it to A2 size and adhered it to a white card base. Then I used the Plaid Cover Plate bundle to cut my plaid overlay. One layer is kraft and the other is a burnt orange cardstock from my stash. I love the fall color palette! It just makes me so happy!
Moving on to assembly, I used EZ Squeeze liquid adhesive to attach my background layers together, the sentiment dies and my two larger critters. Then I added foam squares to the smaller ones and popped them up. For finishing touches I added glossy accents to all the cheeks and noses but didn’t want to distract too much from that awesome glittered sentiment!
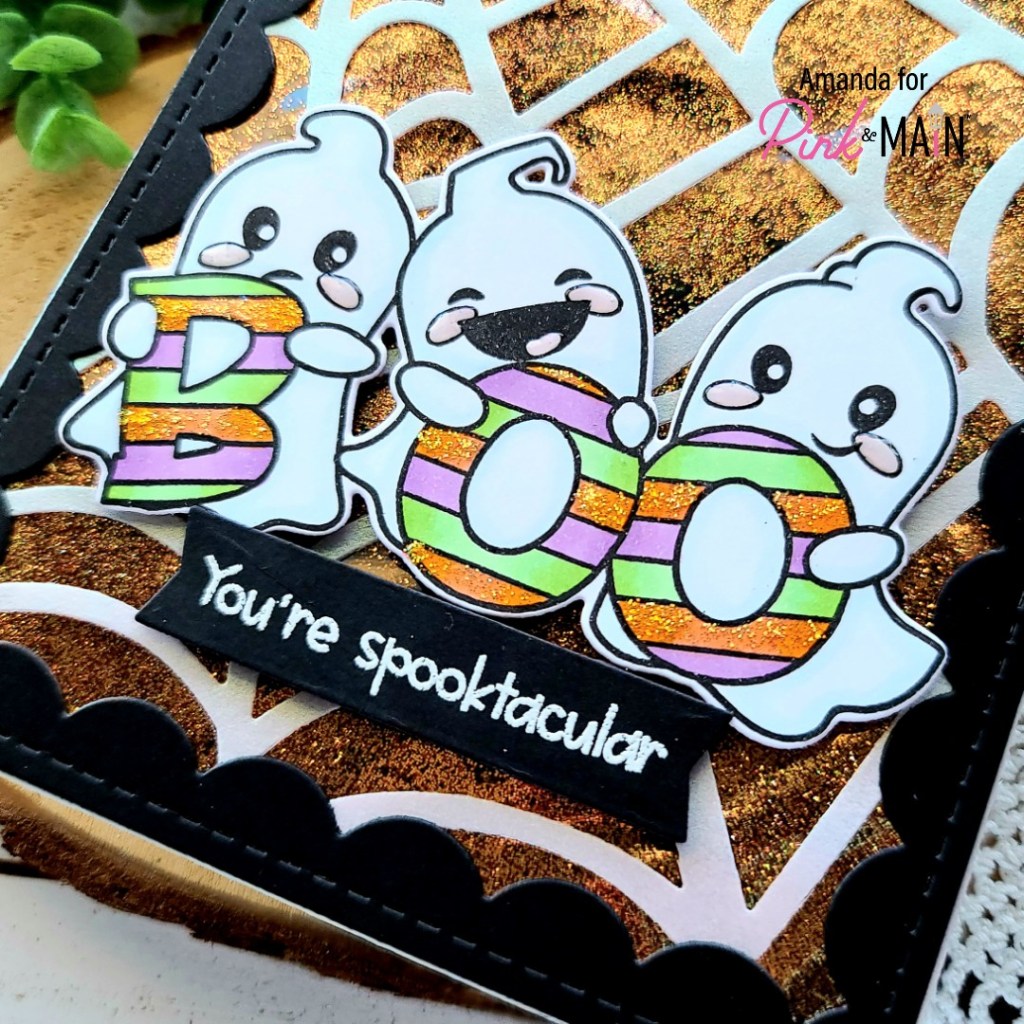
Hello again! I have been totally immersed in everything fall and Halloween lately and just loving it! Today I’m over on the Pink & Main blog with a couple of infinity shaker cards featuring some older products paired with the new Hello Bootiful! These ghosties are just super fun so I couldn’t stop at one card.
To start my cards, I stamped the images from Hello Bootiful and colored them with my copic markers. I used the coordinating dies to cut them out. Next, I stamped and heat embossed sentiments from the set on black cardstock and used the large sentiment strip dies to cut those out too.
To create my card front, I cut a piece of black cardstock to A2 size and slipped it inside a plastic sleeve I used to store my cards in. These are a bit oversized so I lined the back with the new EZ tear tape and folded the sides in to secure them. Then I poured some of the new extra fine glitter in the top and sealed that up too.
It did that twice, once with foliage glitter and one with pumpkin spice. Then I die cut the spider web cover die with white cardstock and iridescent vellum and glued them to the front of the shakers. I thought it would be fun to add a frame so I cut 2 black reverse scalloped rectangles and glued those down next.
I added foam squares to the back of my images and sentiment strips and placed them on the shaker panels next. Then I moved on to finishing touches.
For those I added glossy accents to ghost cheeks and tongues. Then unicorn Stickles on the spider and the boo letters the ghosts are holding.
Because of the minor bulk on the back of these panels, I went ahead and used more EZ tear tape to adhere the shaker card fronts to white card bases.
After that, these super cute cards are all finished and ready to go!
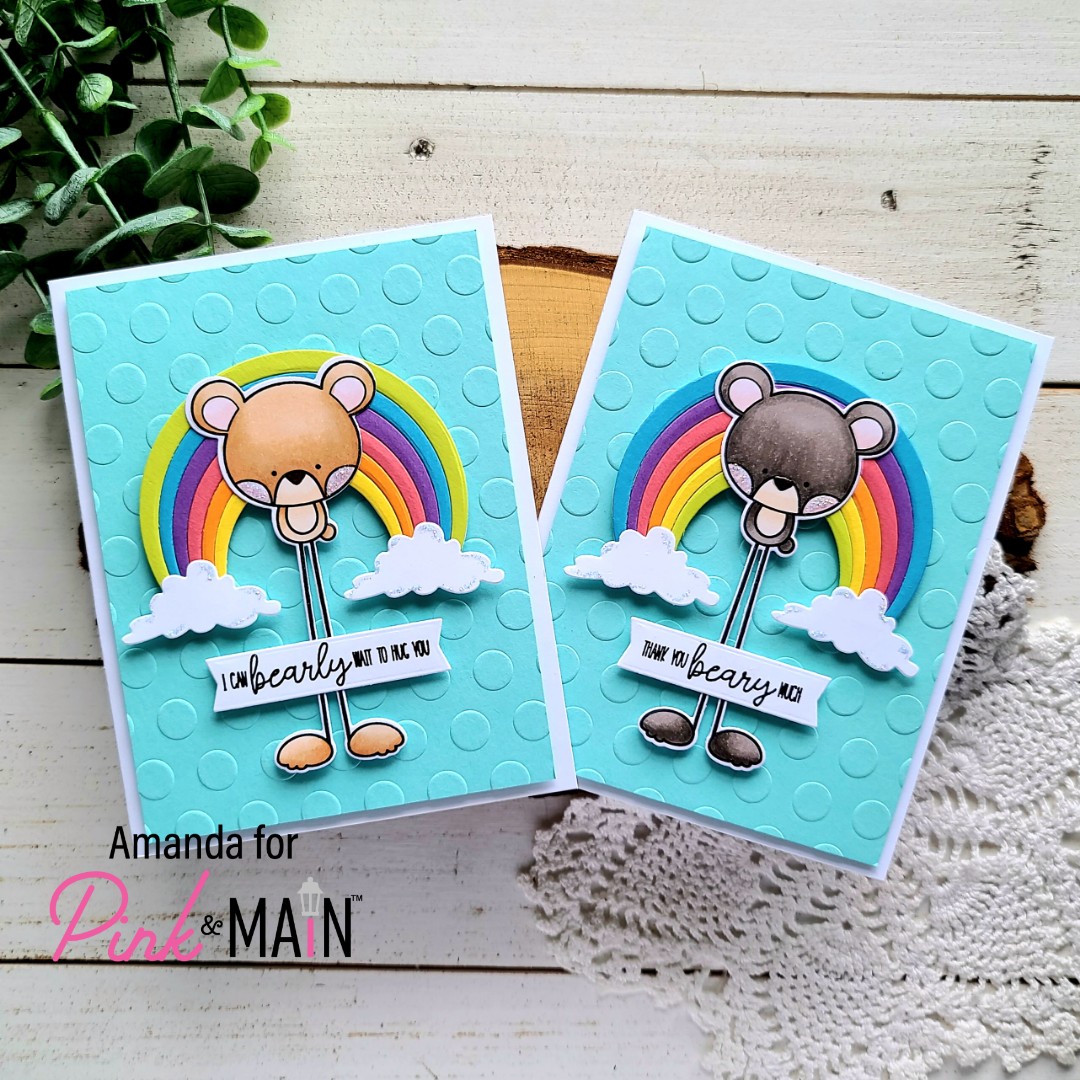
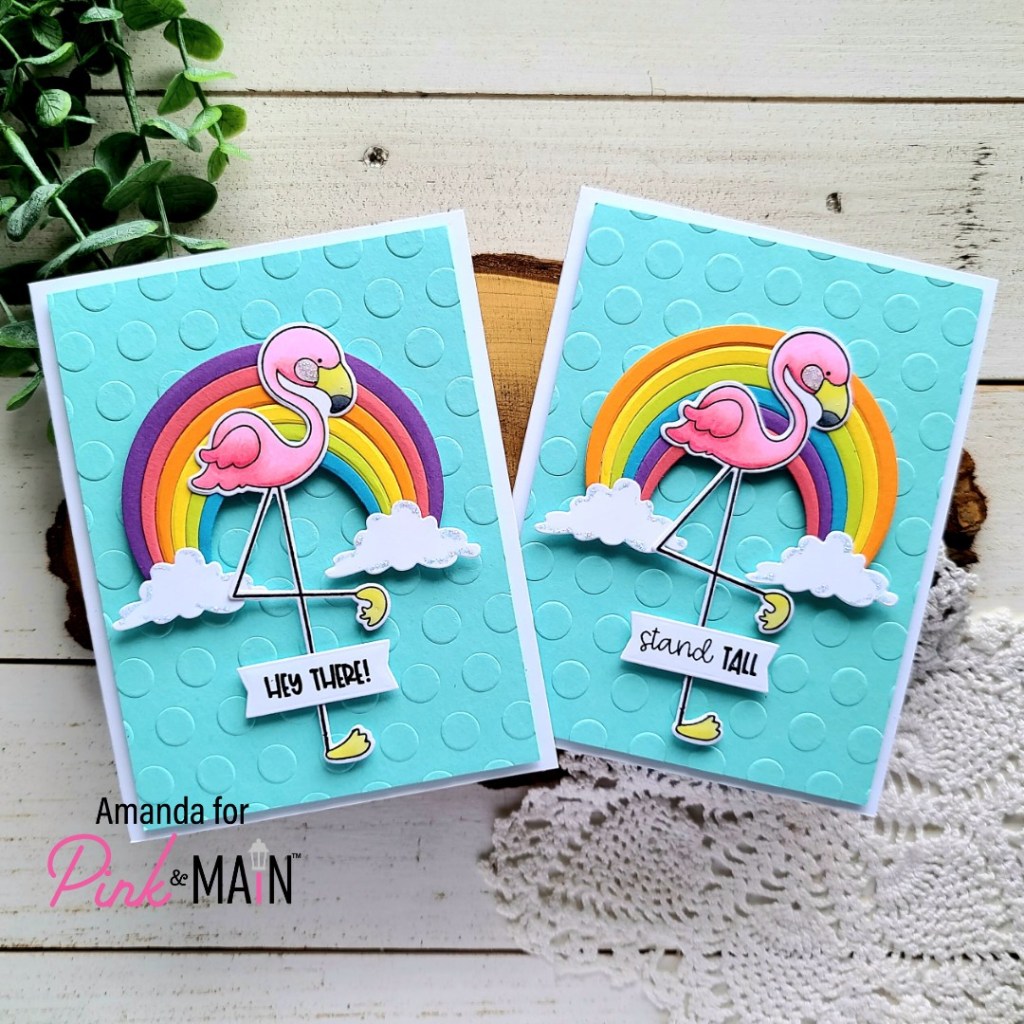
Hey friends! I have some fun cards to share today using the leftovers of a card I made ages ago. These are all pull of Pink & Main goodness and are the result of a card I made for them back in June. Click HERE to check out the original post.
Whenever I make rainbows like these I end up with 6 rainbows in the end. Most of the time I make all of the cards immediately but this time I just tucked the rainbows away for another day. Well, that finally came because these new long legged cuties were just too perfect for the occasion. So I used the new Bearly Wait bear and the sentiments in it for a few. Aren’t they adorable?!?
But I didn’t feel like doing all bears when this adorable flamingo from Stand Tall is just as perfect and fun!
These were just a few quick cards that were fun to create and I wanted to share for more inspiration!
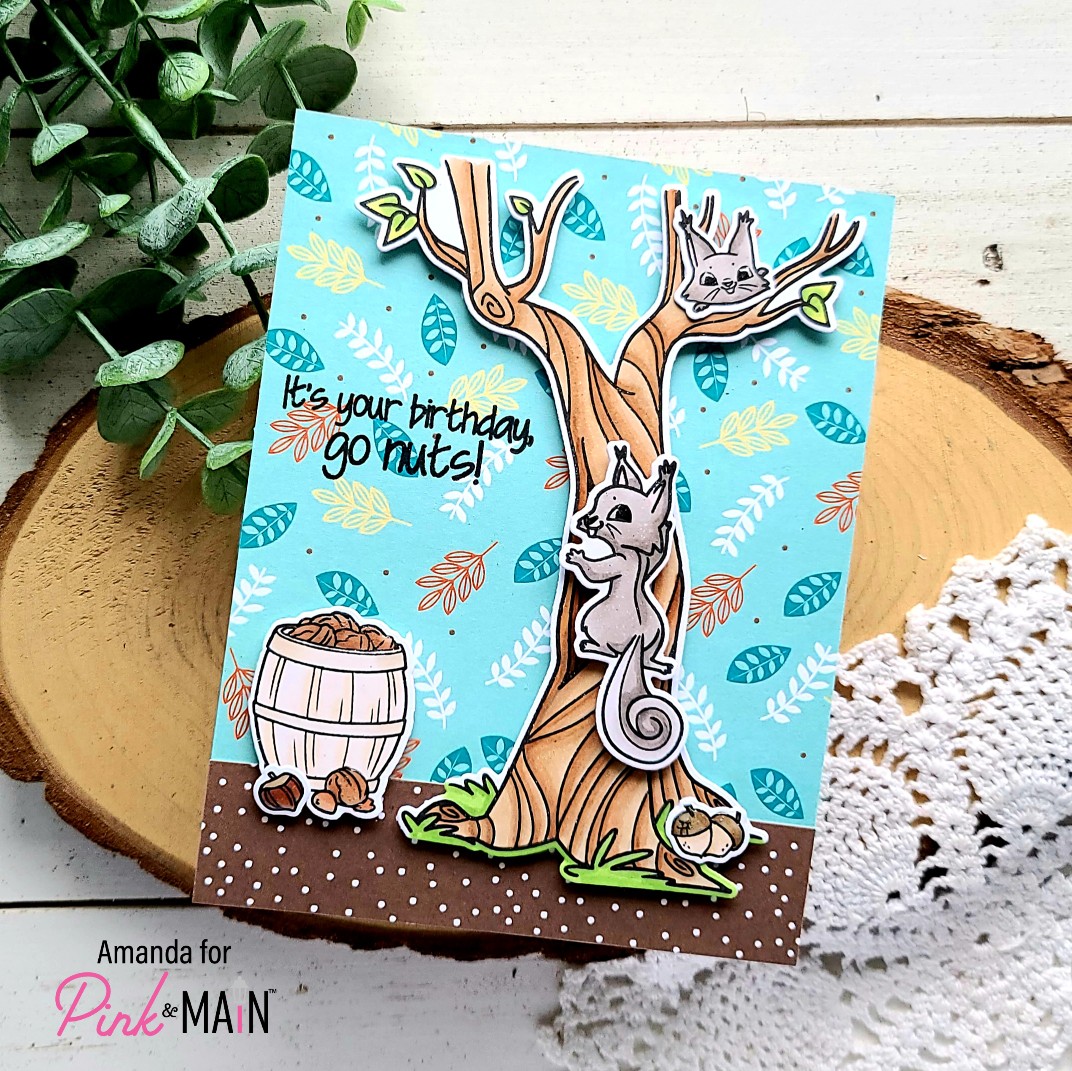
Hello again everyone! I’m over on the Pink & Main blog today with another fun fall-themed card using one of the new August release stamp sets called Oh Nuts! Since last summer when we had a teeny baby squirrel literally fall into our lives, I’ve had an extra special place for them and am drawn to all the cute squirrel things I see. So it was a no-brainer that I just had to use this new set immediately!
To start, I stamped a bundle of the images from the set and colored them all with my copic markers. I used the coordinating dies to cut them out and switched to my background. For that, I decided to play with the new Pumpkin Season paper pad. I’m absolutely swooning, in love over this entire pad! It’s the best for this fall-loving girl!
I thought the blue leafy paper was great for a sky so I cut it to A2 size and then trimmed a 1 inch strip of the brown dotted sheet for my ground. I adhered them together with my EZ Squeeze liquid adhesive and then to a white card base. Next, I added foam squares to all my images so I could decide final placement.
Using those as a guide in my MISTI, I stamped my sentiment in the open air spot on the left side of the tree. Then I removed the release paper from my images and popped them all in place.
For finishing touches on this card, I added glossy accents to the squirrel’s eyes and noses and then to all the nuts.
Don’t these cuties just look mischievous, like they’re getting away with something. I just love it! It totally cracks me up!
I hope you enjoyed today’s card and found a little inspiration to create something wonderful and share it with someone!
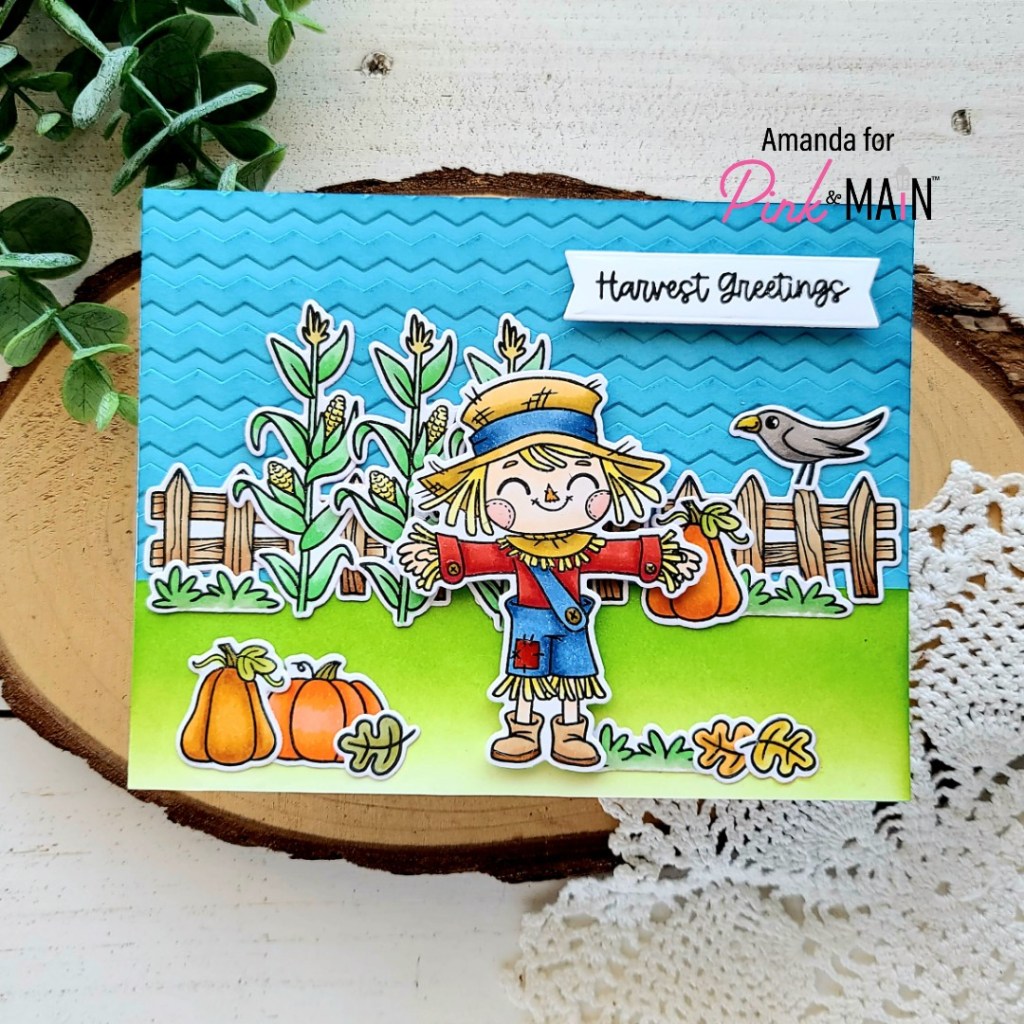
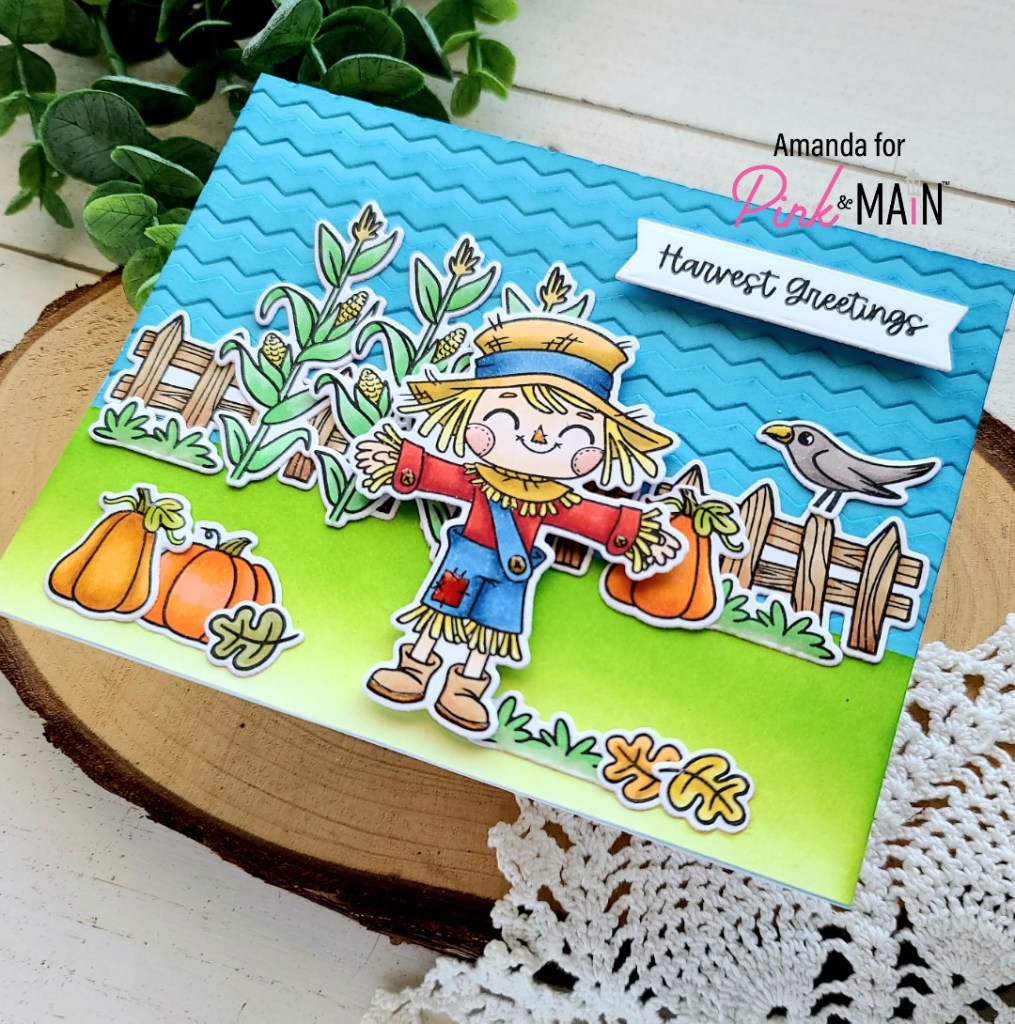
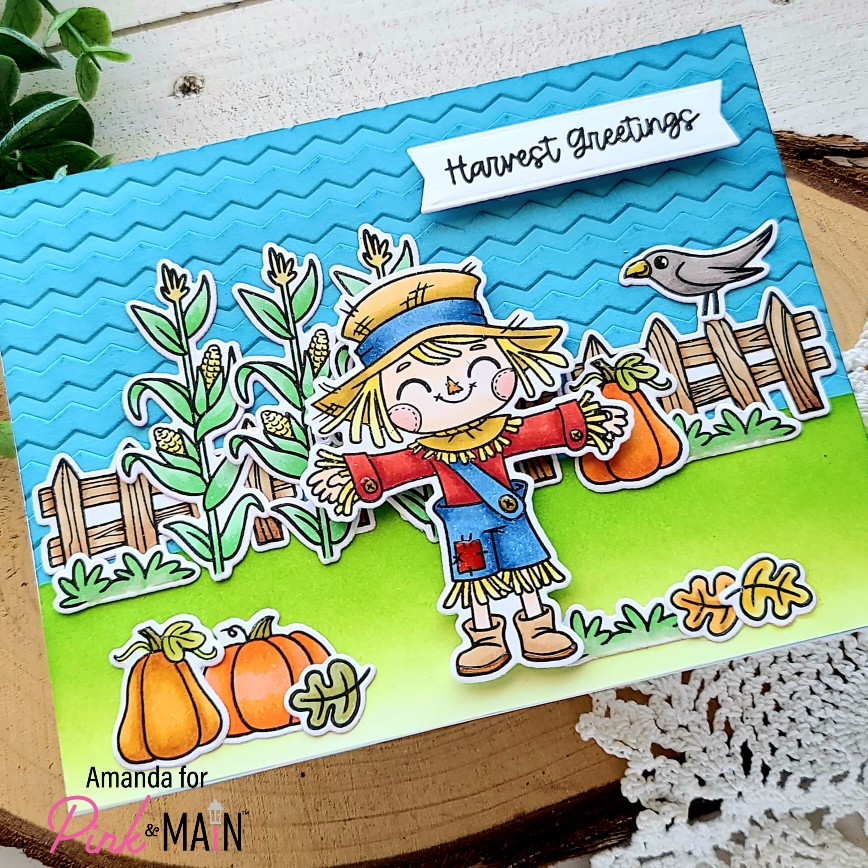
Hello again, I know it’s a busy day but it’s packed full of cuteness so it can’t be all bad, right?!? Thanks for hanging in there with me. I’m also over on the Pink & Main blog today with a few sneak peeks of the upcoming August release. It’s full of fall amazingness and I’m swooning over every bit of it!
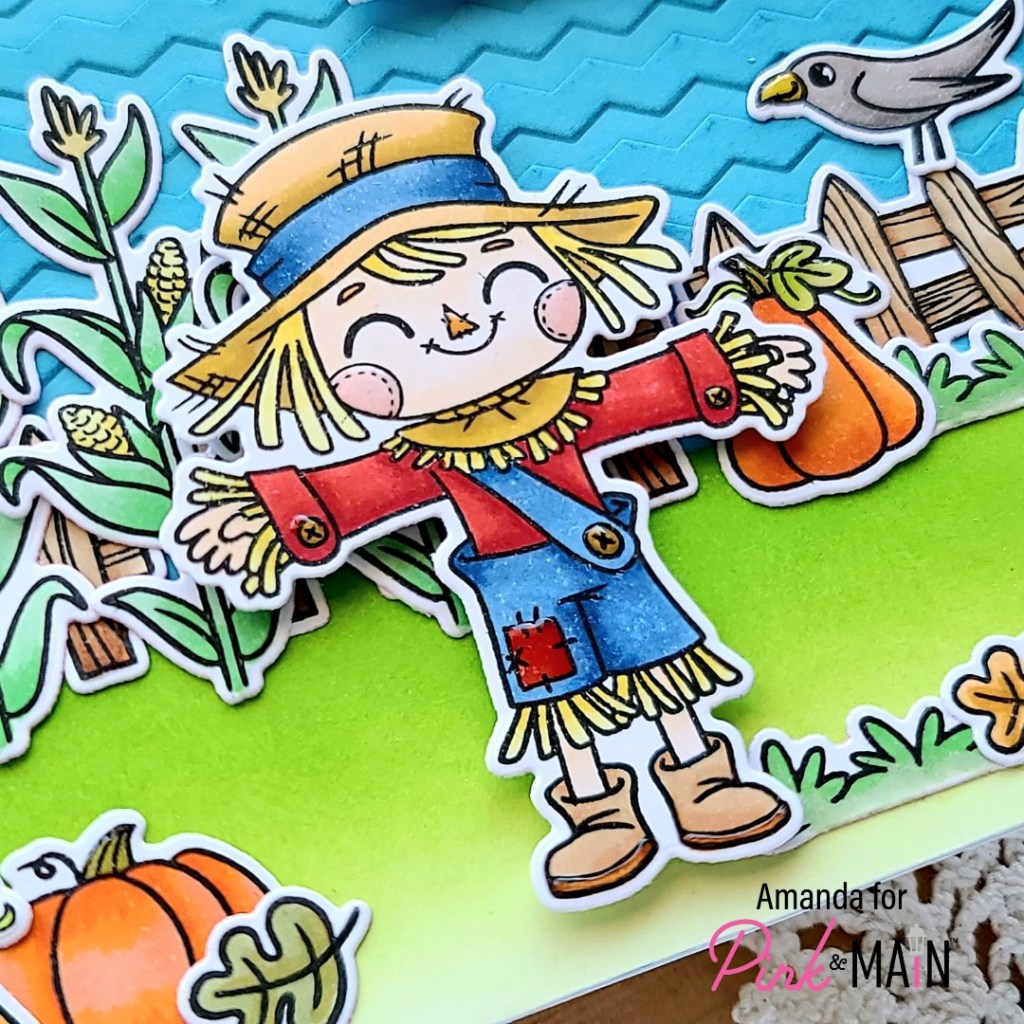
I used the new embossing folder to give my sky a little texture and inked the blue cardstock with a darker blue ink and my blending brush for added definition and texture. I stamped and colored images from the new Harvest Greetings stamp set with my copic markers. Then I used the coordinating dies to cut them out.
I chose a sentiment from the set and cut it out with a large sentiment strip die. To create a little grassy ground, I inked up a white panel with two different green dye inks and my blending brush, then moved on to assembly.
For that I used EZ Squeeze Liquid Adhesive to adhere the grass to the embossed sky panel, then adhered that to a white card base. For the images, I added them all flat to the card with liquid adhesive except the scarecrow and sentiment banner that I popped up with foam squares.
Moving on to finishing touches, I added glossy accents to the scarecrow’s nose, cheeks, patch, shoes and buttons. Then I also added them to the stems and leaves of all the pumpkins and the crow’s beak.
We’re so excited to share this new release with you! You’re going to love it! Stay tuned during the rest of the week for more sneaks and inspiration from the design team. The release will be available on Friday!