Pink & Main – Forever Friends

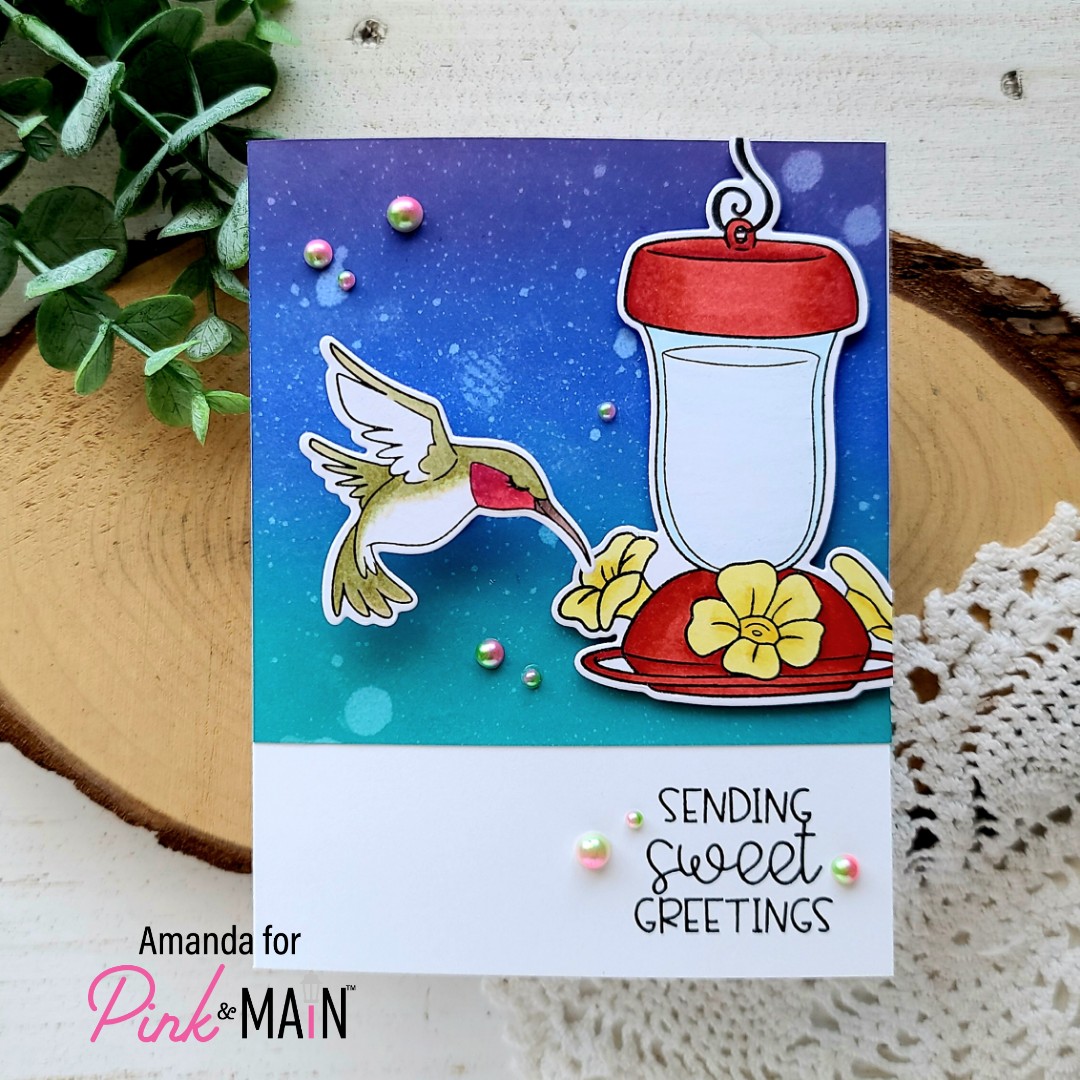
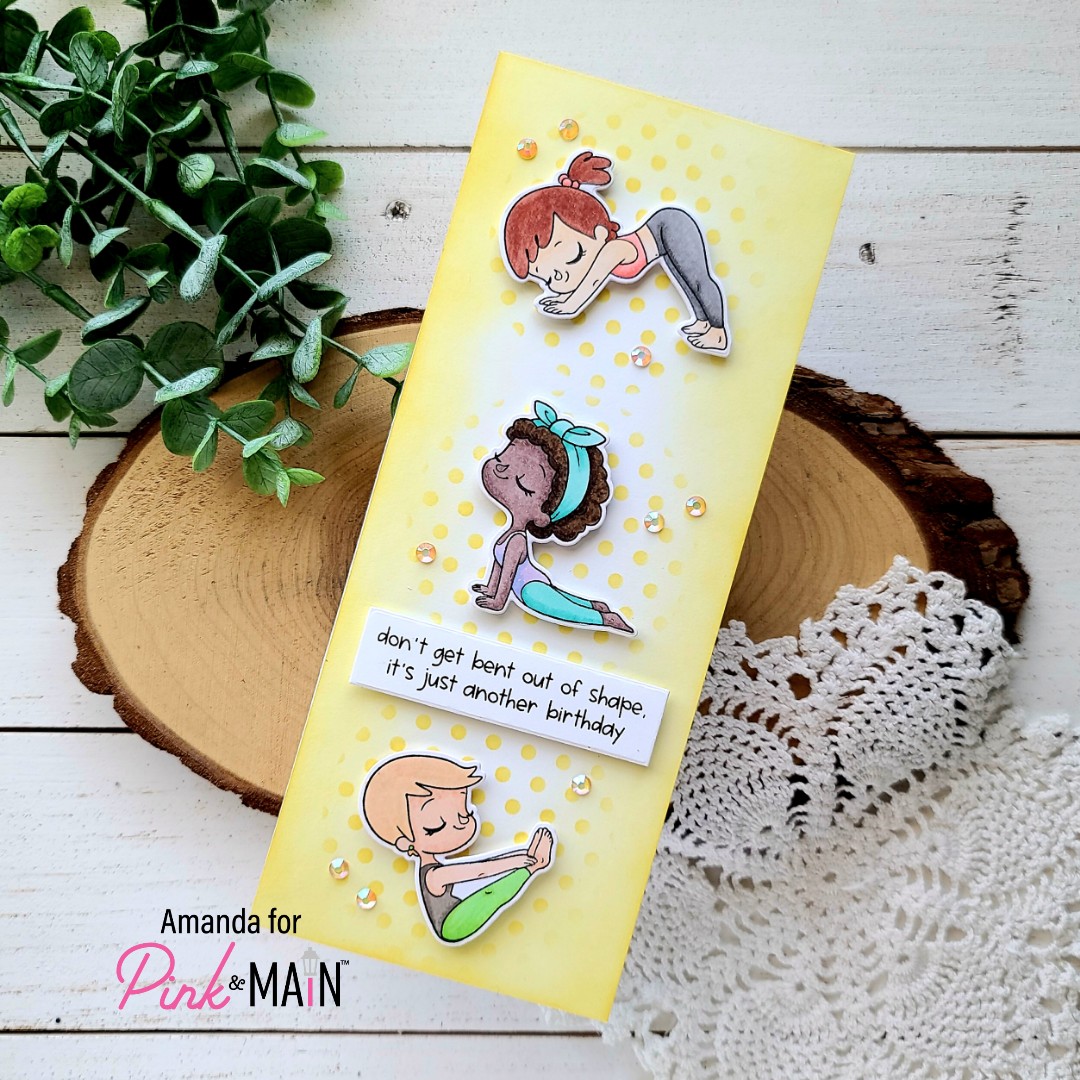
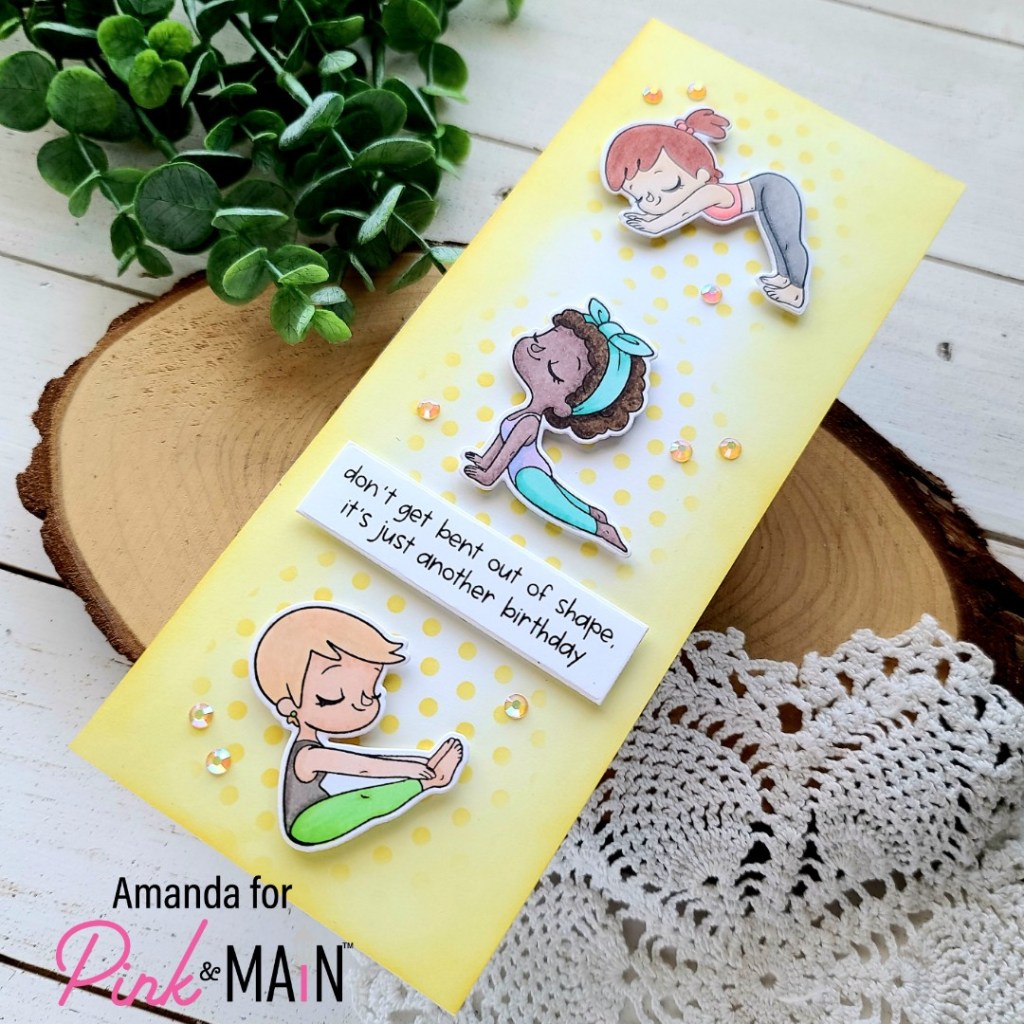
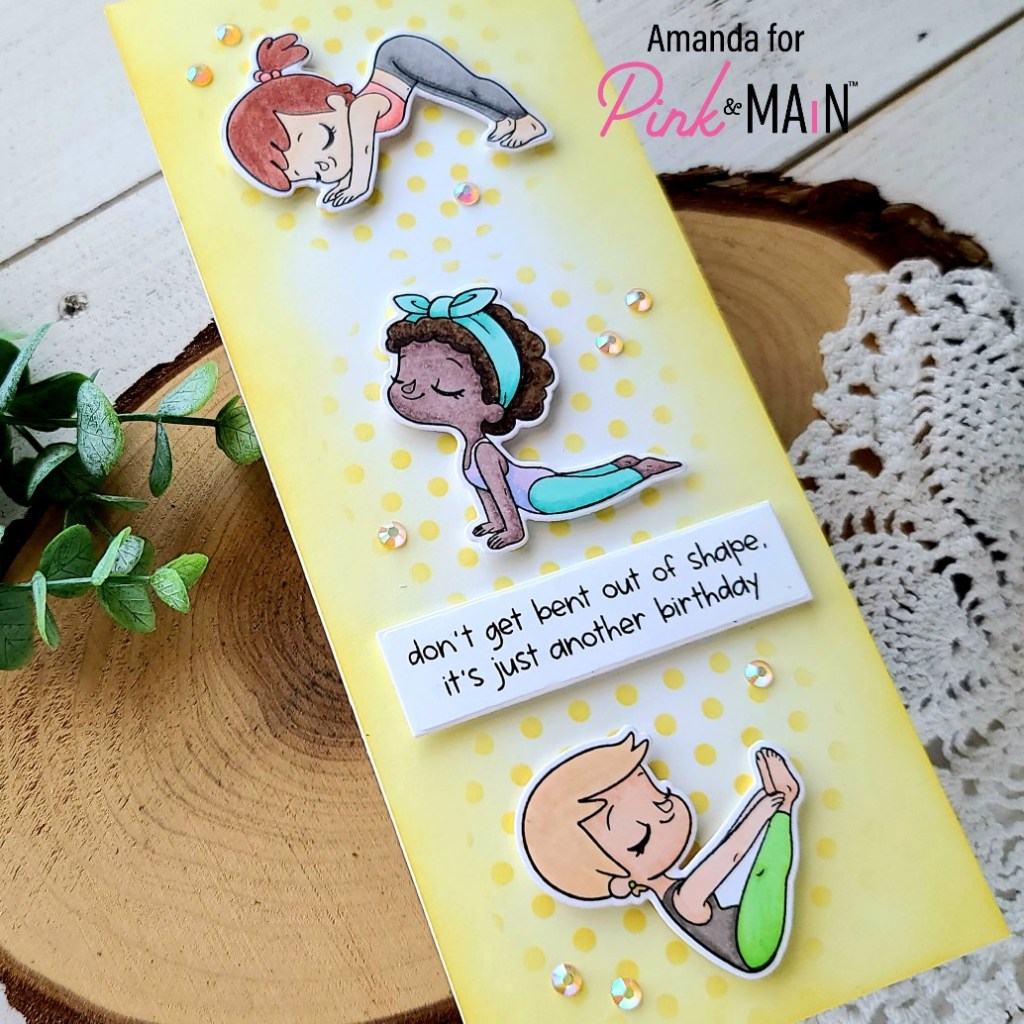
Happy Friday my crafty friends! I hope you had a wonderful week and will be able to do what makes you happy this weekend! Today I’m over on the Pink & Main blog with a floral slimline card.

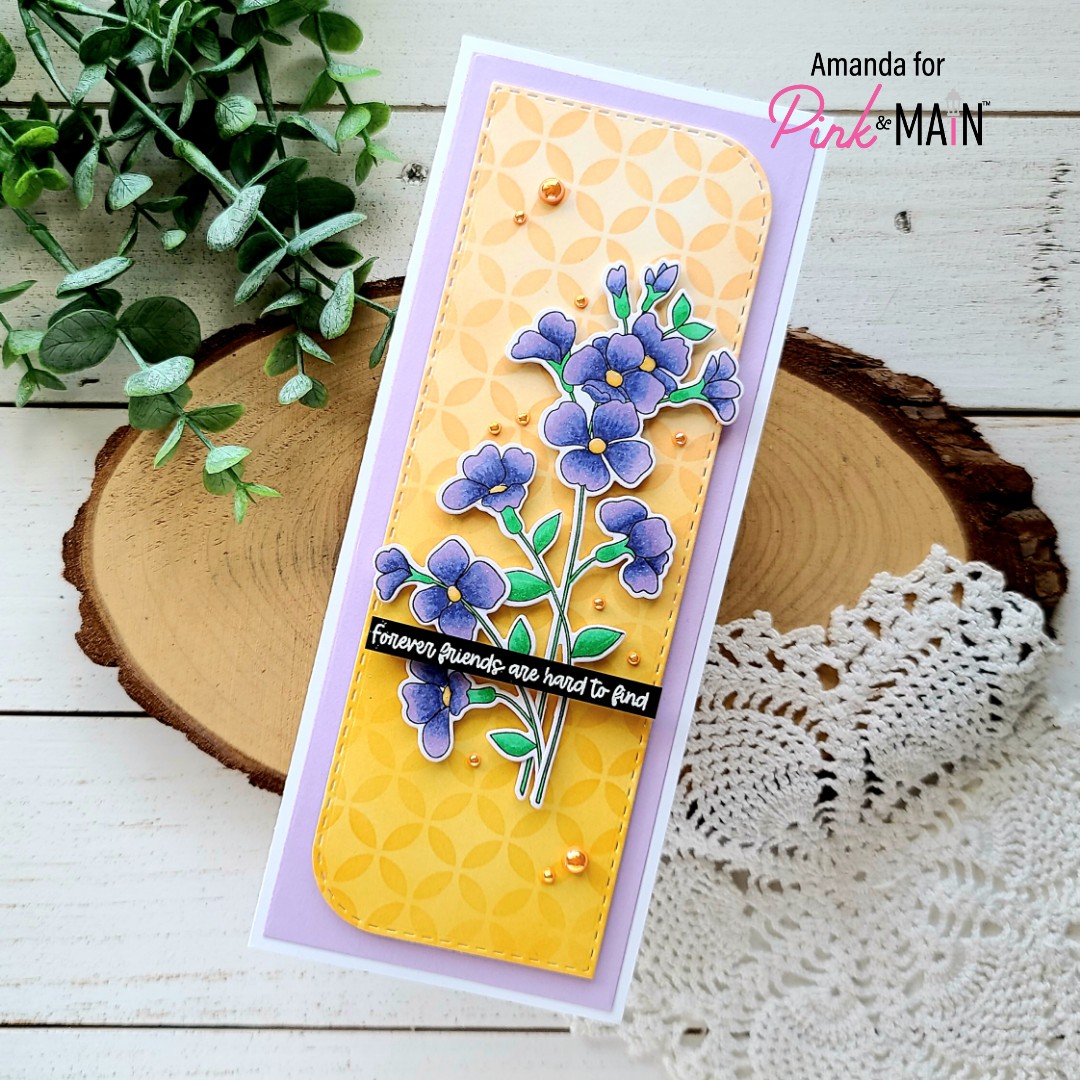
I thought these florals would be great for a slimline card with their long stems so I started by stamping both images from the You stamp set. I colored them with my copic markers and used the coordinating dies to cut them out. Playing off the colors I used on the flowers, I chose inks close to the flower centers and blended them across a white panel and then again over the deco stencil. Then I used the smaller slimline shape from the Beautiful Slim Line die set to cut the panel out.

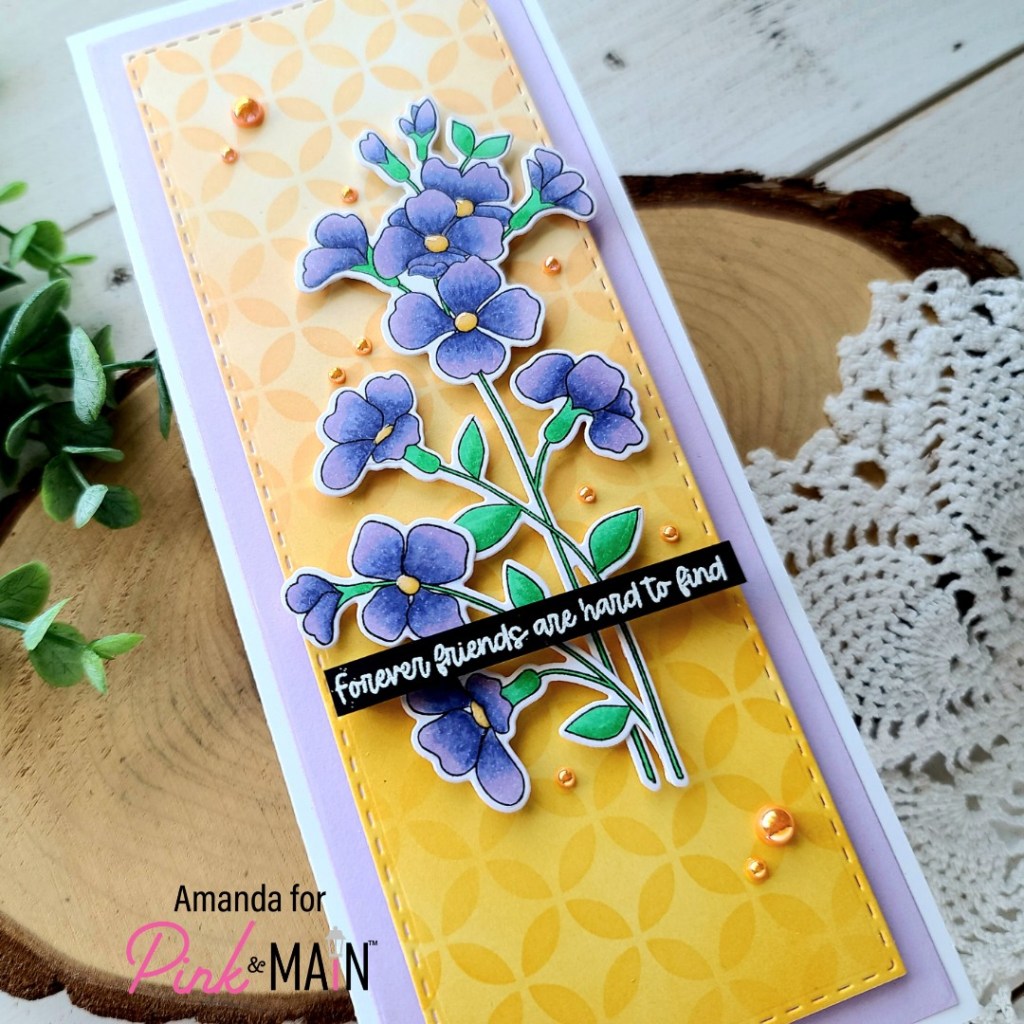
Next, I die cut a purple panel with the next-to-largest Layered Slim Line dies and moved on to assembling my card. First I used EZ Squeeze glue to adhere the purple panel to a white slimline card base. Then I popped the stenciled panel up with foam tape. Finally I used foam squares to pop up my flowers.

This latest release was packed full of wonderful sentiment sets so I looked through those and landed on one, which I heat embossed on black cardstock. I trimmed it into a strip and used foam to pop it up as well.

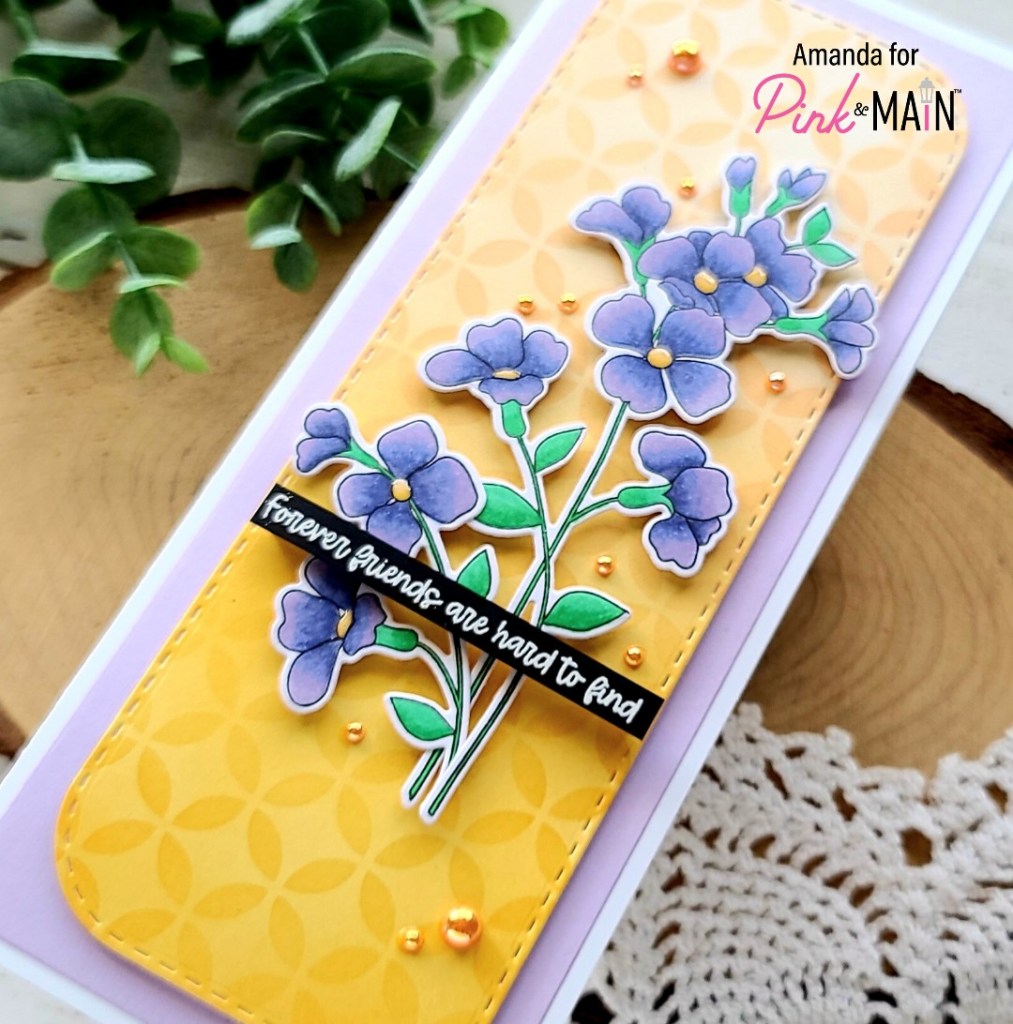
For finishing touches, I added glossy accents to all of the flower centers. Then after much hemming and hawing, I chose beautiful orange pearls to adhere all around my design from the Rainbow Pearls embellishment wheel.

I’m not a floral girl at all but I was quite happy with the way this turned out and had fun coloring these sweet images.

Products used on today’s card:
You stamps and dies
Beautiful Slim Line dies
Layered Slim Line dies
KSue Friendship 1 stamps
Deco stencil
Rainbow Pearl embellishments
Ergonomic Blending Brush
EZ Squeeze liquid adhesive

I appreciate you sharing your time with me. Have a fabulous day!

Pink & Main – Sweet Greetings

Happy Friday friends! Today I have a fun interactive card to share with you featuring the new Pink & Main stamp set called Sweet Greetings. The hummingbird images in this set are beautiful and so fun to color! Today I just couldn’t resist keeping the design simple and putting my hummingbird on an action wobbler. It just seemed too perfect!

I stamped and colored my images with copic markers, then used the coordinating dies to cut them out. Next, I inked up a panel with distress oxide inks in peacock feathers, blueprint sketch and seedless preserves. I spritzed the panel with water and trimmed it down to 4×4.25 inches.

Next, I used EZ Squeeze liquid adhesive to glue the panel to a white card base and then used my MISTI to stamp a sentiment in the white space at the bottom. I added foam tape to the back of the hummingbird feeder and placed it down, trimmed off the excess hanging over the side. Then I added my wobbler to the hummingbird and placed it so it’s beak is just over the feeder.

For finishing touches, I glued down a scattering of the pink and green pearls from the Unicorn Pearls embellishment pack. Then I came in with my Wink of Stella glitter brush pen on the hummingbird’s wings, face and the liquid inside the feeder.

I love how this set comes with a few flowers that you could use instead of the feeder for a totally different look too! Such a sweet stamp set with lots of fun possibilities.

Products used on today’s card:
Sweet Greetings stamps and dies
Unicorn Pearl embellishments
EZ Squeeze liquid adhesive
Wink of Stella glitter brush pen
Distress Oxide ink – peacock feathers, blueprint sketch, seedless preserves

I appreciate you sharing your time with me. Have a fabulous day!

Pink & Main – Don’t Get Bent Out of Shape

Have you all checked out the most recent Pink & Main release yet? It’s got some different and really fabulous goodies in it! Today’s card is featuring a new set called Namaste. I love these sweet girls and the great sentiments that go with them!

For my card today, I chose 3 of the girls and colored them with my copics. Then I used the coordinating dies to cut them out and played around with a final design layout. originally I was thinking of a landscape slimline but when I stacked them vertically I really liked it.

Next, I took a slimline size panel and inked the edges up with my blending brush and yellow dye ink. For a little interest I used the Circle Spotlights 1 stencil to add polka dot highlights to the areas I was going to pop the girls up on.

I chose my favorite sentiment from the Namaste set, stamped it and cut it out with the next-to-smallest Layered Slim Line die. Then I added foam squares to the back of the images and sentiment and popped them in place.

I used EZ Squeeze liquid adhesive to glue my panel down to a white slimline card base. Then for finishing touches I arranged a scattering of yellow gems from the Crystal Gems embellishment pack on my design.

Do you do yoga? I totally don’t but these cute girls make me want to try! Haha!

Products used on today’s card:
Namaste stamps and dies
Layered Slim Line dies
Circle Spotlights 1 stencil
Ergonomic Blending Brush
EZ Squeeze liquid adhesive
Crystal Gems embellishments

I appreciate you sharing your time with me. Have a fabulous day!

Pink & Main – Ducky Duo

Happy Friday everyone! Today I have a super cute pair of cards over on the Pink & Main blog! The new release is live and available for purchase so don’t hesitate to head over and treat yourself! There are so absolutely amazing products added to the mix this month!

I couldn’t help myself so I took the same design idea and created two cards to share with you today. It actually started because I pulled out the woodgrain embossing folder and embossed the grain the wrong direction for my original design. I couldn’t let it go to waste so I decided it was a perfect opportunity to make two fun cards to share with you!

Like I said before, I used the new woodgrain embossing folder for my backgrounds. Because these are 6×6 you can take your A2 size cardstock and turn it portrait or landscape for different looks. I ended up with one of each. Then I took a white panel and ink blended distress oxide inks in blueprint sketch and mermaid lagoon. I spritzed the panel with water and die cut the letters from the new Just a Note dies and Big Hugs dies. Then I cut them from white 2 more times each and used EZ Squeeze glue to adhere them together. I die cut the shadow for each from pearlescent vellum and adhered those with tape runner.

Next, I stamped images from the July Stamp and Die of the Month – Just Ducky and colored them with my copics. I used the coordinating dies to cut them out and decided on sentiments to go with each card. This die set comes with these awesome rounded banner dies that fit the sentiments in the set so I was able to die cut them perfectly too!

I adhered the woodgrain backgrounds to white card bases with EZ Squeeze glue. Then I added the ink blended sentiments to those. Next, I added foam squares to the back of the images and sentiment banners and popped those in place.

For finishing touches, I added yellow pearls from the new Rainbow Pearls embellishment wheel to both card designs. Then I came in with glossy accents on the ducky eyes, beaks and feet.

Aren’t these ducks just too cute for words?!? I love them and the different positions they are all in. So many options! The new word dies are an absolute must for any crafty stash! They are versatile and so fun to use! I’m swooning over the font too!!! It’s just perfect!

Products used on today’s cards:
Stamp and Die of the Month: Just Ducky
Just a Note dies
Big Hugs dies
Woodgrain embossing folder
Rainbow Pearls embellishment wheel
EZ Squeeze glue
Glossy accents
Distress Oxide inks – mermaid lagoon and blueprint sketch

I appreciate you sharing your time with me. Have a fabulous day!

(This blog uses affiliate links whenever possible, at no additional cost to you.)

Pink & Main – Be a Mermaid

Hello again! Today I’m over on the Pink & Main blog hanging with my mermaid friends! I sure do love them! The cuties in this new stamp set are so much fun and I love the different images where the mermaid is peeking out of the water or her fin is all that’s left from diving down. You can build some awesome scenes with these!

For today, I chose one of the sweet mermaids and a couple of friends for her to have too. You know me, I have to add critters whenever possible! I just love them all! I colored these guys with my copic markers and used the coordinating dies to cut them all out.

Next, I took a blue panel and used the waves embossing folder on it. To enhance the embossing, I used a blending brush and blue dye ink and lightly blended the whole panel. This really helps the embossing design pop visually.

Originally this was going to be my card front but I loved how it looked behind the images so I switched gears by die cutting it with one of the stitched banner dies. Now I needed a different background panel so I immediately pulled out the new awesome paper pad and started comparing, picking and choosing. I think these fish were too perfect not to use! So I used the largest Layered Rectangle to cut it out and adhered it to a white card base.

Next, I added foam tape to the banner and popped it in place, followed by foam squares and liquid glue to adhere all the images. Last, I stamped a sentiment in blue ink and die cut it with a Large Sentiment banner die. I popped it in place with foam squares and trimmed off the edge.

For finishing touches on this card, I added glossy accents to the open eyes, noses and spots. Then I used unicorn Stickles on the mermaid’s fin and seashells. Last, I used a Wink of Stella glitter brush pen on the seaweed for a little shimmer on the bottom half of the card too.

Products used on today’s card were:
Be a Mermaid stamps and dies
Catch a Wave embossing folder
Large Sentiment Strip dies
Layered Rectangle A2 dies
Large Fish Tail Banner dies
Vitamin Sea paper pack
Glossy accents
Stickles – unicorn

I appreciate you sharing your time with me. Have a fabulous day!

Pink & Main – Wear a Crown

Welcome everyone! Today I’m having a little fun over on the Pink & Main blog today with some royal fruit! I have always loved the sentiment to be a like a pineapple and always wear a crown. It’s fun and reminds us to have confidence and be proud of who we are. Well, the new Pink & Main set called Sweet Friend is a fabulous new set with a couple of gorgeous pineapples and the coordinating stamps to color them in. This isn’t my typical style but it was so fun!

I decided to go with a circular card shape today because sometimes it’s just fun to be different! I chose the 4.25 inch circle and cut one from a melon cardstock and another to create a white card base. I used the EZ Squeeze liquid adhesive to adhere them together. Then I cut another circle from teal cardstock that is 2 sizes down from that and inked it up with the pyramids stencil and a darker teal ink. Such a fun texture behind the pineapples!

I popped this circle up with foam tape and moved on to stamping my pineapples. For those, I stamped 3 outlines and used the coordinating dies to cut them out. I took the negative that was left over from die cutting and put it in my MISTI. I lined up the first fill-in stamp and picked it up with the lid, then I just inserted the die cut into the hole and stamped my colored ink, one at a time. It’s like an assembly line. It worked perfectly and I just breezed through stamping all of my pineapples.

I used liquid adhesive to adhere the two back pineapples and foam tape to adhere the middle one. Then I stamped my favorite sentiment from the set in a melon ink to coordinate with my base circle and die cut it with a large sentiment strip. I popped this up with foam tape and my card is all finished.

Products used on today’s card:
Layered Circle dies
Sweet Friend stamps and dies
Pyramids stencil
Storage binder
EZ Squeeze liquid adhesive
Ergonomic Blending Brush
Foam tape

I appreciate you sharing your time with me. Have a fabulous day!

(This blog uses affiliate links whenever possible, at no additional cost to you.)

Pink & Main – Hello Sunshine

Welcome back everyone and thanks for stopping by! Today I have another beachy awesome Pink & Main card to share with you! This one is all die cut but I did color some of it so it’s not technically no coloring…although you could totally alter it to that if you’re not feeling the coloring thing at the moment.

For this card, I die cut the scalloped circle die from the Aloha die set from white cardstock. Then I used copic markers to color all of the pieces in. This is where I’m talking that you could die cut the whole thing multiple times and paper piece if you’re not in the mood to color. However, I find this kind of copic coloring relaxing and very forgiving because there are no lines to go outside of.

Once everything was colored, I die cut a circle from copy paper and adhered all my pieces to it. Then I used the new Catch a Wave embossing folder with some teal cardstock for my background. After that panel was embossed, I trimmed it to A2 size and adhered it to a white card base with EZ Squeeze liquid adhesive. Then, I popped my hibiscus circle up with foam tape.

I stamped and heat embossed a sentiment from the new Sunkissed stamp set in white on black cardstock. Then I used a large sentiment banner die to cut it out. I popped it up with foam tape as well.

For finishing touches, I added a scattering of the halftone green/teal pearls from the Unicorn Pearls set across the design. Then I took my Wink of Stella glitter brush pen to just the stamen on the flower for a little added shimmer in the light.

Products used on today’s card:
Aloha dies
Catch a Wave embossing folder
Sunkissed stamps
Large Sentiment Strip dies
Layered Circle dies
Unicorn Pearls
Wink of Stella glitter brush pen
EZ Squeeze Liquid Adhesive

I hope you enjoyed today’s card and found some inspiration to create something wonderful and share it with someone!

I appreciate you sharing your time with me. Have a fabulous day!

Thermoweb | Miss Ink Stamps Collaboration – Stenciling with Decofoil and Glitter Glitz Gel

Hello everyone! Today I’m over on the Thermoweb blog for the collaboration with Miss Ink Stamps! This time I have a pair of cards I made using one inked background, cut in half and then stenciled completely different. It was super fun to play around with everything!

Here’s a look at both of the cards I created. One with the Dee and Dum stamp set paired with the Diamond Fade stencil. The other with my favorite pup from Rub-a-Dub Doggies stamp set paired with the Large Random Dot and Random Dot stencils. Those stencils are sold separately if you only want one but they work really awesome together too! (Here’s a pro-tip though…if you only have one you can ink it up and then rotate it to get a second layer of dots in different spots!)

I used Pink & Main Large Sentiment Strip dies to cut out the sentiments for both cards. This one has a scattering of Trinity Stamps Black Eyed Baubles for embellishments along with glossy accents on Tweedle Dee and Dum.

The embellishments on this one include glossy accents for the rubber ducky and dog’s nose. Then unicorn Stickles on the bubbles to help them time in with the background. Last I scattered Twiddler’s Nook half-tone pearls across the design.

Be sure to head over to the Thermoweb blog for all the details on these cards, links to the products and a chance to win prizes from Thermoweb and Miss Ink Stamps! Totally worth the click!

I appreciate you sharing your time with me. Have a fabulous day!

Pretty Pink Posh – Sending Good Vibes

Hello everyone! Today I have a super bright and fun card featuring some of the newest release from Pretty Pink Posh. I absolutely adore everything in this release and couldn’t wait for my orders to arrive!

For today’s card, I started by playing around with Color Burst watercolor powders on watercolor paper and a spray bottle. Oh boy did I make a huge mess! But it was loads of fun! I highly recommend it.

I sprayed my paper with water and shook a little chartreuse powder on it, then sprayed it some more and used my heat gun to push the water around. Once that was dry I shook a teeny bit of fuchsia powder and sprayed it with water, repeating the same thing with the heat gun until my panel was dry. Even when I used watercolor paper, my paper warps when I do things like this so I always run it through the laminator a couple of times to flatten it back out.

Next, I taped my panel down on my glass mat, sprayed the squiggles stencil with pixie spray and adhered it over top. Then I spread iridescent glitter glitz gel through the stencil. I removed it and set the panel aside to dry while I cleaned up.

Then I stamped and heat embossed the summer wreath image in white on vellum and used the coordinating dies to cut it out. Finally I stamped that cute lion from Summer Fun and colored him with my copics. I used the coordinating dies to cut him out and started assembling my card.

I used liquid glue to adhere the stenciled panel to a white card base. Then smeared a thin layer of liquid adhesive behind the wreath and put it in place as well. At this point, I put a stack of acrylic blocks on top of the whole card front while the liquid glue dried. Then I added foam squares behind my lion and popped him in place.

I finished things off with some white pearls from Pink & Main and some glossy accents on the lion’s glasses and nose.

Such a messy fun card to create and I love how everything turned out too!!!

Products used on today’s card:
PPP Summer Fun stamps and dies
PPP Summer Wreath stamps and dies
PPP Squiggles stencil
Pink & Main Essential Pearls
Thermoweb Pixie Spray
Thermoweb Iridescent Glitter Glitz Gel
Glossy Accents

I appreciate you sharing your time with me. Have a fabulous day!

Pink & Main – Sending Sunny Smiles

Happy Friday my wonderful friends! Thank you so much for joining me today! I’m still over the moon creating with this months release and special Stamp of the Month from Pink & Main! It’s packed with summer which, to me, means bright and happy everywhere!

Today I have a card and coordinating tag to share with you featuring the Stamp of the Month – Sunny Smiles, the new Fancy Tag dies and a previously released Stained Glass stencil for fun!

For those that don’t know me well, I’m a panda fanatic…put it with my name and you’ll figure out why it’s been a thing since I was little. ❤ Needless to say, I had to color up this sweet bear from Sunny Smiles just like an adorable panda ready for some fun in the sun! But that pup in the pool is just the sweetest so I snagged him too and thought, why not make a card and tag! It’s so fun!

So I stamped the images and colored them with my copics. Then I used the coordinating dies to cut them out and set them aside. Next, I die cut the pieces for my two matching tags using the new Fancy Tag dies and used EZ Squeeze liquid glue to adhere the layers. Then I stamped my sentiments in black ink and popped my images up with foam squares.

Next, I took an A2 size panel and inked up the Stained Glass stencil with yellow ink. Then I took my blending brush and added a light shadow of the same ink all around the edges. I used EZ Squeeze glue to adhere this to a white card base, tied some orange ribbon through the hole in the tag and popped it in place with foam tape.

For finishing touches, I added black glaze pen to the pup’s eyes, glossy accents to his nose, water splashes and sunglasses. Then I took star dust Stickles to his cheeks and the highlights on the pool just for fun.

For the coordinating tag, I added the image and sentiment banner with foam squares and tied the same orange ribbon through the hole. Then I moved on to just a few finishing touches on this too.

Especially with the panda’s dark fast, I used the black glaze pen on his eyes and glossy accents on his nose. I think this really helps them pop and brings him to life a little bit. I also added glossy accents to his sunglasses.

Products used on today’s projects:
Sunny Smiles – Stamp and Die of the Month
Fancy Tag dies
Stained Glass stencil
EZ Squeeze Liquid Adhesive
Lawn Fawn Sunflower ink
Trinity Stamps Blending Buddy brush
Glossy Accents
Stickles – star dust

I hope you enjoyed these bright and happy creations and found some inspiration to create something wonderful and share it with someone.

I appreciate you sharing your time with me. Have a fabulous day!