Pink & Main – Snowflake Gift Tag Set

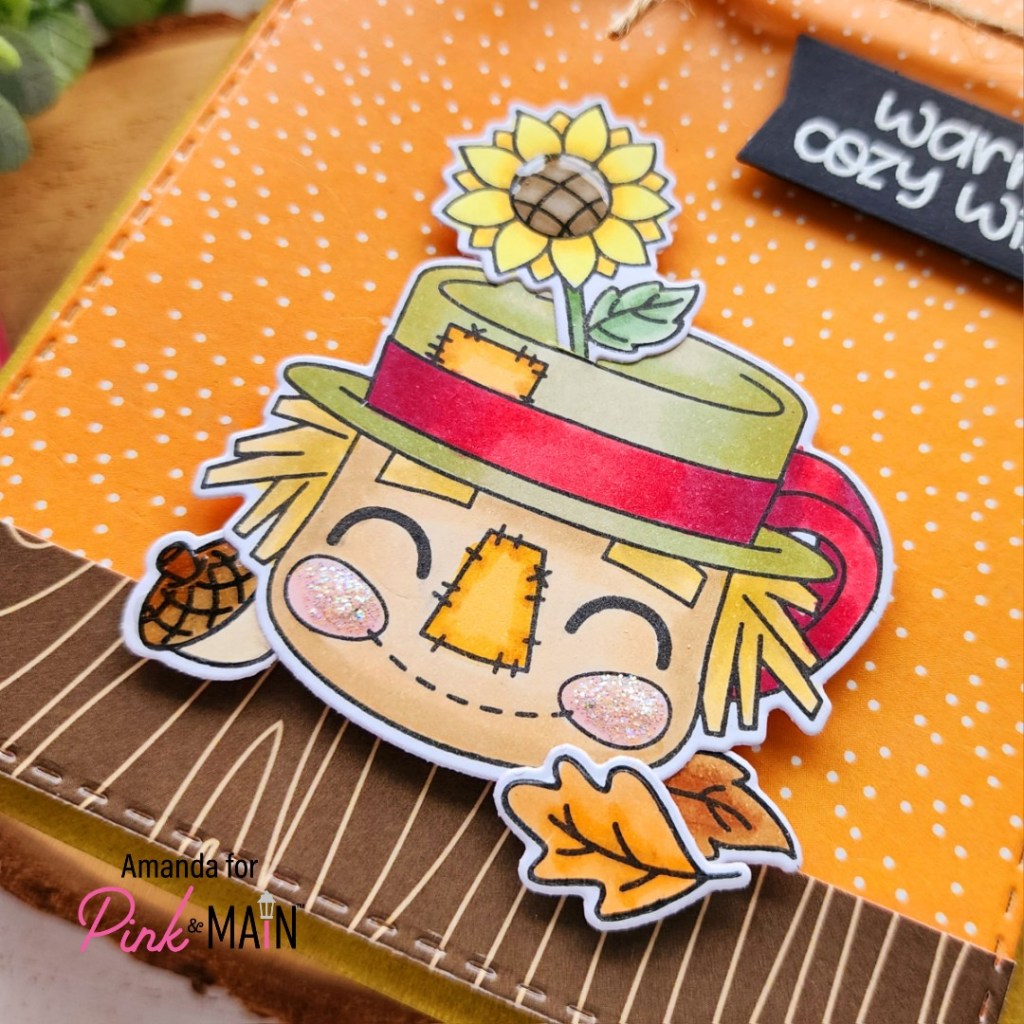
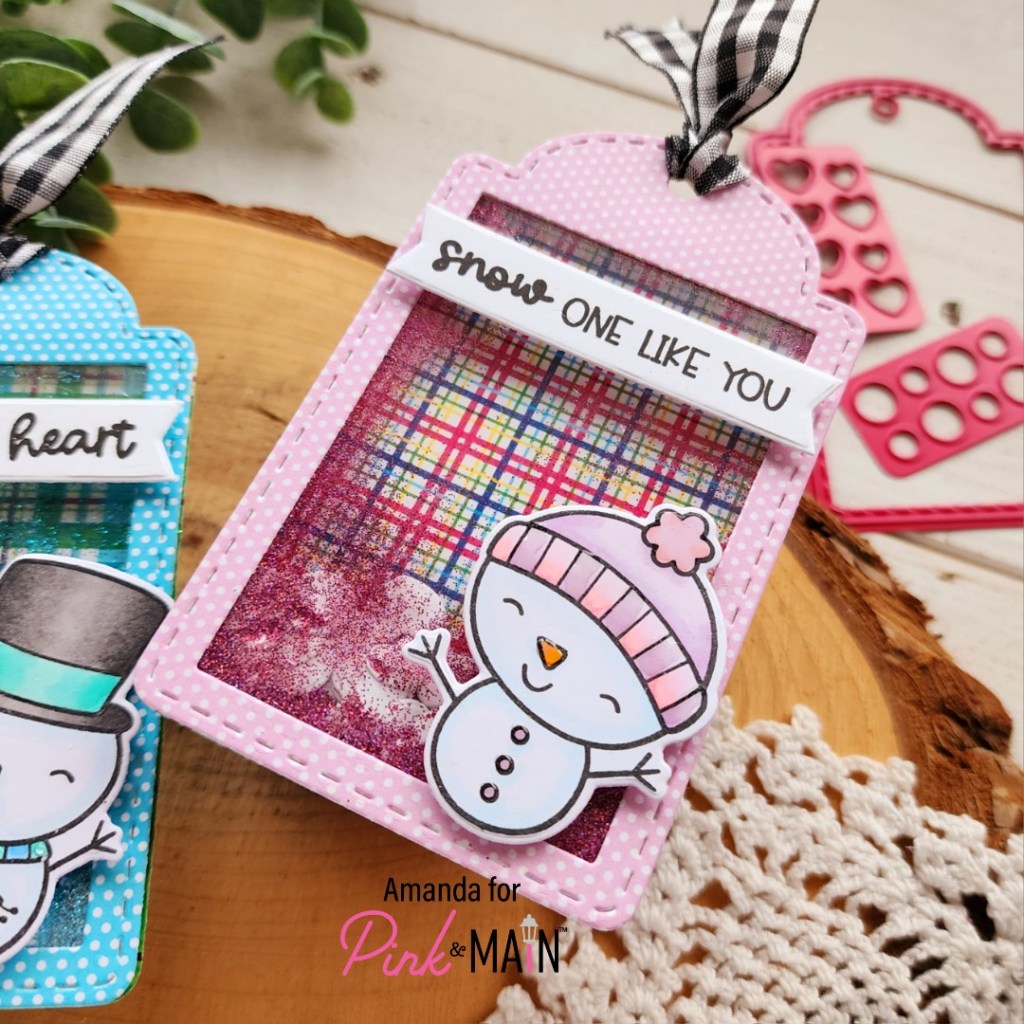
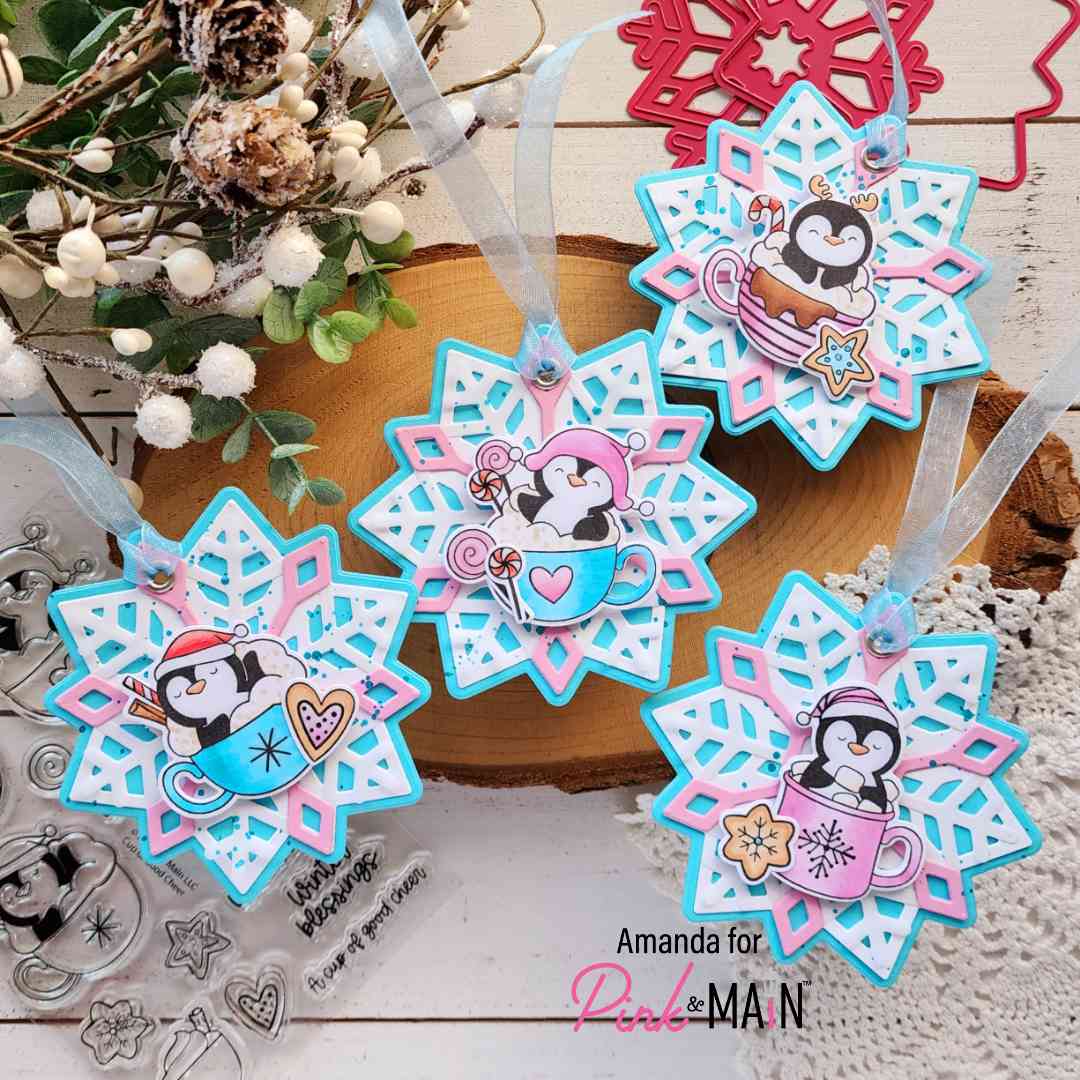
Happy Wednesday friends! I’m on the Pink & Main blog today sharing a set of gift tags I created using the ADORABLE penguins from Cup of Good Cheer. There was no way I could choose one or two of these images and we all need gift tags this time of year, so I stamped them all out plus the little extra cookies and lollipops too!

I had the idea for gift tags right away, but I originally thought I would use a typical tag shape, then I remembered my favorite layered snowflake dies and immediately switched gears! I pulled out some Pink & Main cardstock for the layers and chose my copic colors from there.

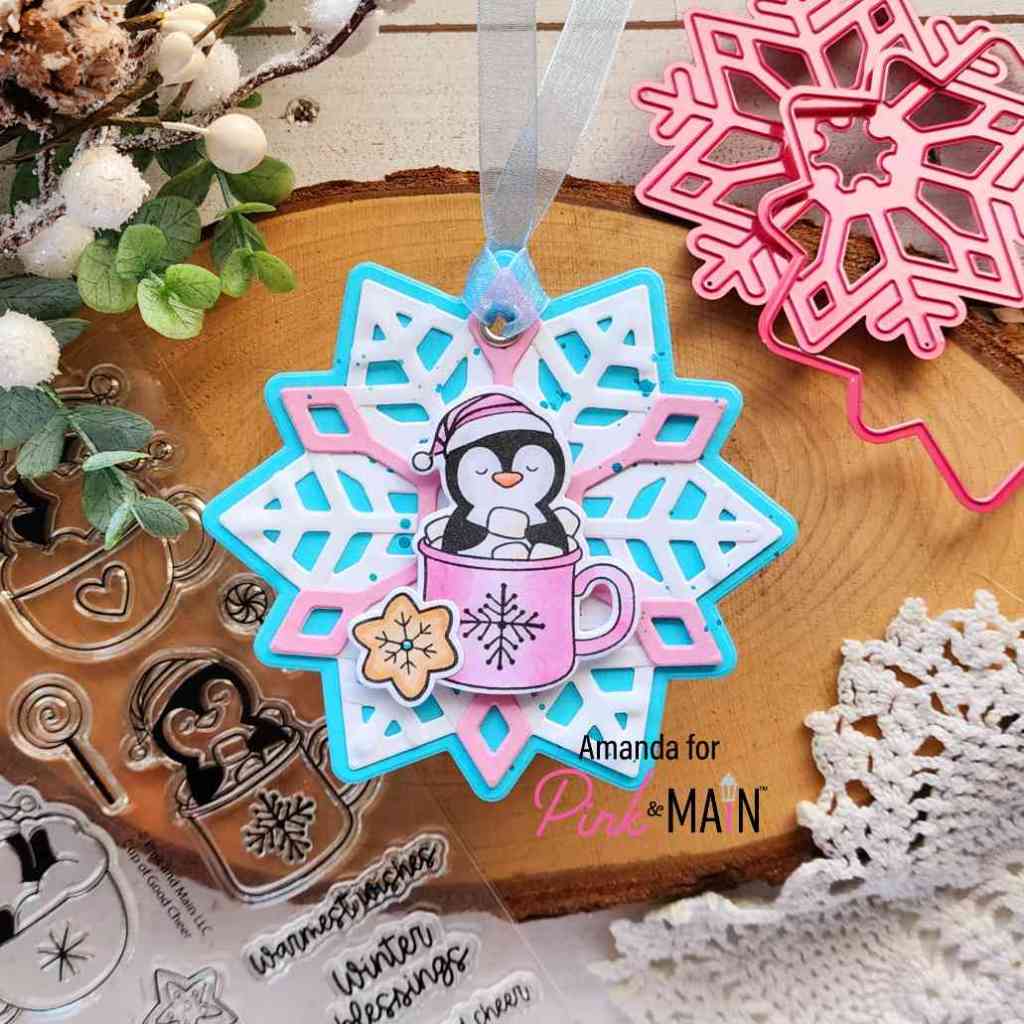
I used coordinating dies to cut the colored images out. Plus I also added a white cardstock layer and a vellum layer for my snowflakes.

I used EZ Squeeze liquid glue to adhere all the snowflake layers together. Then I pulled out the trusty, dusty (very dusty) Crop-a-dile to punch holes and add rivets to my tags. I haven’t done this for ages but I LOVE how it looks!

Before I forget to mention, after adhering the snowflake layers, before punching holes and adding penguins, I splattered the snowflakes with Water Gems watercolor. I chose the Caribbean color because it went with the cardstock best.

Then I popped the penguins up with foam squares and added Touch of Gloss to each one in various spots. All the penguin beaks for sure, then other pieces like cookies, candy, and the like.

Last, I threaded some organza ribbon through the holes and these beauties are ready for gifts!

Products used today:
Cup of Good Cheer stamps and dies
Stacked Snowflakes dies
Water Gems Sparkling Watercolors
EZ Flow Water Brushes
EZ Squeeze liquid glue
Touch of gloss
Foam squares

I appreciate you sharing your time with me. Have a fabulous day!

Pink & Main – Watercolor Christmas Wishes

Hello everyone! I’m on the Pink & Main blog today with a pearly slimline card wishing a Merry Christmas. I played with the gorgeous Water Gems powdered watercolors and the new Snowflakes Emboss and Cut Folder.

I did things a little backwards because I was just playing around so I will be transparent with my process but suggest you do the opposite. Lol. I used the Snowflakes Emboss and Cut Folder on two sheets of white cardstock giving me 8 snowflakes to play with. Then I sprayed them with water and sprinkled water gems powder on each. I sprayed more water to move the powder around and let them dry.

Let me suggest that you watercolor your paper, let it dry and then cut your snowflakes. I feel like the impression from the embossing folder will be better and make your snowflakes that much more vibrant.

Next, I cut the Christmas Greetings shadow from black once and words from white 4 times, using liquid glue to adhere everything together. While they sat with an acrylic block on top to dry, I moved on to my background.

I blended Dress Shop ink on a slimline card base fading from the top down. Then I die cut the Plaid Slimline die from white cardstock and glued it on top. I finally glued my snowflakes on the card front and trimmed off the excess. Some of the pieces were large so I glued them back on in different spots to fill in spaces. Last, I added my sentiment to the center with liquid glue as well.

The watercolor snowflakes are pearly and gorgeous in the light! And I’m so happy with the look of the blue/teal/pink color combo too! It’s so pretty!

Products used:
Snowflakes Emboss and Cut Folder
Plaid Slimline die
Christmas Greetings dies
Water Gems
EZ Squeeze liquid glue
Dress Shop ink
Ergonomic blending brush

I appreciate you sharing your time with me. Have a fabulous day!

Pink & Main – Release Day IG Hop

Hey everyone! It’s release day for Pink & Main and we’re having a fun hop over on Instagram to celebrate. It’s packed with inspiration and you’ve got a chance at a $50 gift card to the Pink & Main shop too!

I wanted to share the details for my card that’s part of the hop and then I’ll link to my Instagram at the bottom so you can get started!

It’s been a while since I created many scene cards so I jumped at the chance when I saw this new Winter Joy stamp set. I chose a tree and the sweet fox to stamp and color first. Then I used the coordinating dies to cut them out, along with a sentiment as well.

Pink & Main has a product called Stickies that are adhesive transfer shapes. This release has snowflakes in it. I cut those apart and layered them on in two groups – first I heat embossed with frosting and the second I used lavender. I did some ink smooshing with barbershop ink for my background and finished that panel off by splattering silver watercolor all over it.

I cut a snow hill and glued it to my background panel. Then I spread glue along the edge and sprinkled it with cracked glass chunky glitter. I also added glue and glitter to my tree. Once the glue was dry, I cut my background panel with the largest Notched Corner die. I wanted a coordinated red edge on my card so I used the darkest marker from my fox and colored the edge of an A2 cardstock panel.

I glued the red panel to a card base and popped everything else up with foam tape and squares. Then I added Touch of Gloss to the fox cheeks, mittens and pompom.

Products used:
Winter Joy stamps and dies
Notched Corners dies
Stickies – snowflakes
Embossing powder – frosting and lavender
Barbershop ink
Touch of gloss
Foam tape
Cracked Glass chunky glitter
EZ Squeeze liquid glue
LH Colors silver watercolor

Remember the Instagram hop – click HERE to get started.

I appreciate you sharing your time with me. Have a fabulous day!

Pink & Main – Sneak Peek Winter Foiling Fun

Welcome friends! I’m on the Pink & Main blog today sharing a sneak peek of Friday’s release. There are lots of fun products coming your way – new foiling fun, cute critters and fun dies too! Today I’m using a new die and Foilables too!

I did the two-for-one technique with my foiling today. The card on the right is the new Funky Flakes Foilables using an upcoming foil too. Next I took the negative foil and ran it through on one of the Bright Ombre Foilable sheets. Now we’ve got two foiled panels to create cards with.

I ink blended barbershop ink on the first one darker at the top, fading as I went down. Then I took this new Happy New Year die and cut my sentiment from the other foiled panel, right in the center. I glued the letters to a white shadow die cut and popped it up with foam tape on the original foiled panel.

I took my barbershop ink pad direct to a piece of cardstock to create matching blue paper and glued it to a card base. Then I popped the snowflake panel up with foam tape and wrapped silver wire ribbon around the whole thing for added interest.

Next, we have the second panel with words cut right out of the center of it. Easy to cover up with the shadow die from that set. So I cut another set of words from blue glitter paper and glued it all together. I cut the foiled panel with a large fishtail banner die and repeated the same process as the first card.

Foam tape layers between everything and I drug my ink pad along another piece of white cardstock for that same rich blue background. I also added the same wire ribbon because I really like how it looks.

New Years is always a blingy, flashy holiday to me so all this bright and happy foiling is perfect for the occasion!

Products used:
Happy New Year dies
Large Fishtail dies
CheerFoil
Funky Flakes Foilables
Bright Ombre Foilables

Mini Minc Machine
Winter Glitter paper pack
Foam tape
EZ Squeeze liquid glue
Barbershop ink
Blending brush

I appreciate you sharing your time with me. Have a fabulous day!

Pink & Main – Warm & Cozy Wishes

Hello everyone! I’m back with more caffeinated inspiration from Pink & Main! This mug stamp set is one of my forever favorites and I couldn’t pass the chance to ink it up and play. Today I chose the scarecrow mug and a few small images to go with him.

I colored everything with copic markers and used the coordinating dies to cut it all out. Then I used a craft knife to cut a slit and slid the sunflower into the top of the mug. I used liquid glue to keep it in place and also added my acorn and leaves the same way.

I chose two patterns of paper from the Cozy Critter paper pad and cut them out with the largest Stitched Arch die. I trimmed the woodgrain down to about an inch and glued them together. Then I cut an Extra Large Sentiment Strip and heat embossed my sentiment on that.

Next, I tied twine around the top of the arch and held it in place with washi tape. I added the sentiment banner and images with foam squares and then carefully added foam strips to the back of my arch, avoiding the twine.

I didn’t like the white border so I inked my card base with crushed olive distress oxide ink and then popped the panel in place. I like how all of the color tones have that fabulous fall feel!

To finish things off I added stardust Stickles to the scarecrow cheeks and Touch of Gloss to the acorn top and sunflower center. A little sparkle and shine never hurts!

Products used:
Cocoa For You stamps and dies
Cozy Critter paper pad
Stitched Arches dies
Extra Large Sentiment Strip dies
EZ Squeeze liquid glue
Foam tape
Touch of gloss
Embossing and watermark ink
Embossing powder – frosting
Magic anti-static brush

Stardust stickles

I appreciate you sharing your time with me. Have a fabulous day!

Pink & Main – Holly Jolly Holiday

Happy Friday everyone! A little change of pace, I’m on the Pink & Main blog today and since the Coffee Loving Cardmakers Hop has begun, I decided to play off that to create a cute little mini card to share.

I stamped my cute Santa and colored him with copic markers. Then I stamped my sentiment and used coordinating dies to cut them both out.

I hadn’t had a chance to use the new Layered Scallops Square dies yet so I jumped at the chance to make a cute mini card with them. I cut the largest scallop from white and red cardstock and used liquid glue to adhere them together. Then I cut the stitched square that goes on top from green cardstock and added white swirl to it with the rectangle area of the Swirly stencil.

I popped my Santa and sentiment up with foam squares and finished things off with Touch of Gloss and clear enamel dots. Then I created a 3×3 card base and glued it to the back of my scalloped panel.

I feel like you could even punch a hole in the corner of this card and make it a gift tag. How cute would that be hanging off the side of a gift bag?!? I love the idea!

Products used:
Silly Santas stamps and dies
Layered Scallops Square dies
Swirly stencil
Blending brush
White pigment ink
Foam tape
Touch of Gloss
Liquid glue

I appreciate you sharing your time with me. Have a fabulous day!

Pink & Main – Shaker Tags for Christmas

Hi friends! If you’ve been around for a minute, you know that I absolutely love making tags for any occasion I can make an excuse for. I love gift giving and adding a tag I made gives me all the feels! It’s so fun and a different size and shape canvas to create on. So today, I have a couple of fun Pink & Main shaker tags to get the holiday crafting really going for me.

I pulled out my favorite snowmen from Snow Sweet and colored them to coordinate with a couple of the plaid papers in the new Merry and Bright paper pad. I used the coordinating dies to cut them out. Then I pulled out two tag die sets – Fancy Tag and Shaker Tag dies. I used the banner from the Fancy Tags to add my sentiments and the new Shaker Tag dies to create my tags and shaker bits to go with my glitter.

I EZ Tear Tape to add my acetate to the shaker window and foam strips to adhere the layers together. My shaker filler is super fine glitter plus circles and hearts die cut using the dies this set comes with.

I popped up my snowmen and sentiment strips with foam squares and tied ribbon through the holes in the tag. For finishing touches I added Touch of Gloss to parts of the snowmen like noses, buttons, scarves and hats.

A fun part of using this paper pad for your tag pieces is that the paper is that they are double-sided so all sides of your tags are cute!

Products used:
Snow Sweet Set 2 stamps and dies
Shaker Tag dies
Fancy Tag dies
Super Fine Glitter – ocean wave and raspberry
Foam squares and strips
Touch of Gloss
EZ Tear Tape – 1/8 inch
Merry and Bright paper pad

I appreciate you sharing your time with me. Have a fabulous day!

Pink & Main – Sneak Peek Week

Hello everyone. It’s time for sneak peeks on the Pink & Main blog because release day is already upon us! Friday is the big day and today I’m sharing a little peak at some new Foilables and stamps. Crafty theme, you say? Oh yessss!!!

I used the Watercolor Warm CheerFoil on the new splatter foilables and I love the outcomes! The variance in the foiling color makes those splatters come to life.

I stamped, colored and die cut that adorable painting dragon from the new Crafty Pals. Then I stamped and heat embossed a sentiment from the upcoming Oh Craft and die cut it as well. I added them both with foam squares. Then I tied some ribbon around the foiled panel and added it to a card base with foam tape.

Last of all, I added black glaze pen to the dragon’s eyes and Touch of Gloss to the paint splatter from his brush.

There’s so much to see. I hope you’ll check it all out on Friday when it’s available in the Pink & Main shop!

Products used:
Paint Splatter Foilables
Watercolor Warm CheerFoil

Mini Minc Machine
Oh Craft stamps and dies
Crafty Pals stamps and dies

Magic Anti-static brush
Embossing and watermark ink
Embossing powder – frosting

Touch of gloss
Foam tape and squares

I appreciate you sharing your time with me. Have a fabulous day!

Pink & Main – Happy Holidays Embossing: Heat and Dry

Hello everyone! I’m on the Pink & Main blog today with some more holiday inspiration. Today we’re mixing heat embossing and dry embossing for lots of texture effects on our card.

I started by stamping and coloring images from the Holiday Peeker Places set and colored them with my copic markers. I used the coordinating dies to cut them out and set them aside to find a sentiment for my card.

The big sentiments in Joy to the World are fabulous and this Happy Holidays one looks so great across the wreath. I stamped and heat embossed it on black cardstock with Pink Champagne glittery embossing powder. Then I found some cardstock that coordinating well with my color palette in my stash so I cut it from a Concave Rectangle, along with a white panel one size up. But the cardstock was too plain so I decided to add texture with the Knit Sweater 3D embossing folder. It’s so stunning!

I used EZ squeeze glue to adhere the concave rectangles together, then foam tape to add them to a white card base. Next, I used foam squares to add my wreath, hearts and sentiment.

For finishing touches, I wanted shine to go with my sparkle and embossing so I added Touch of Gloss to all of the hearts floating up.

I’m definitely still celebrating all things Halloween and fall but it’s always fun and a good idea to whittle away at your Christmas card list before it’s suddenly upon us!

Products used:
Joy to the World stamps and dies
Holiday Peeker Places stamps and dies
Concave Rectangle dies
Knit Sweater 3D embossing folder
Embossing & Watermark Ink
Embossing powder – pink champagne
Magic anti-static brush
Foam tape and squares
Touch of Gloss
EZ Squeeze liquid glue

I appreciate you sharing your time with me. Have a fabulous day!

Pink & Main – Peppermint Circle Shaped Cards

Hey friends! We’re making our way through the week. Today I’m on the Pink & Main blog sharing a pair of circle shaped cards that I made using images from the new Oh My Garland stamp set and last year’s Peppermint Swirl die.

I started these cards by just stamping a few of the sweet images from Oh My Garland and spent some time coloring with my copic markers. I had no design or plan in mind. I just wanted to color these cuties. Then I used the coordinating dies to cut them out. This is when I started playing around with groupings and thinking about designs.

I remembered the Peppermint Swirl die from last year and had to try it out. So I cut it from some melon pink cardstock in my stash, keeping the stripes too. Then I cut it from white cardstock as well. Next, I cut white circles using the Layered Circles die that is one size bigger than the peppermint swirl. I glued the pink swirl to one and inlayed the white stripes to it.

Something about this blue mug on the pink swirls was just perfect to me so I added him and that cute star, plus a heat embossed sentiment. Last, I added some enamel dots and a bit of Touch of Gloss to this hat.

For my other peppermint swirl, I didn’t like the white swirl on the white circle so I took the green copic marker I used on my images and colored the edge to match. Isn’t that super cute?!? I love how that turned out.

I added my images and heat embossed sentiment with foam squares. Then I added Touch of Gloss to the elf hat and doorknob on the gingerbread house. Last, I had to add Stickles to the gumdrops on the roof. They were just asking for it!

To turn these into cards, I cut the same white circles two more times, scored them about 1/2 inch from one side and adhered that portion to the back of my decorated circles with EZ Tear Tape. I folded them open and reinforced the crease with a bone folder.

Products used:
Oh My Garland stamps and dies
Peppermint Swirl die
Foam tape
Touch of Gloss
Magic anti-static brush
Embossing ink
Embossing powder – icicle
Enamel dots – fall fun
Stickles – stardust

I appreciate you sharing your time with me. Have a fabulous day!