Pink & Main – Espresso My Gratitude

Hi friends! I’m over on the Pink & Main blog today featuring some caffeinated fun to keep you inspired for the Coffee Loving Cardmakers Fall | Winter hop going on right now!

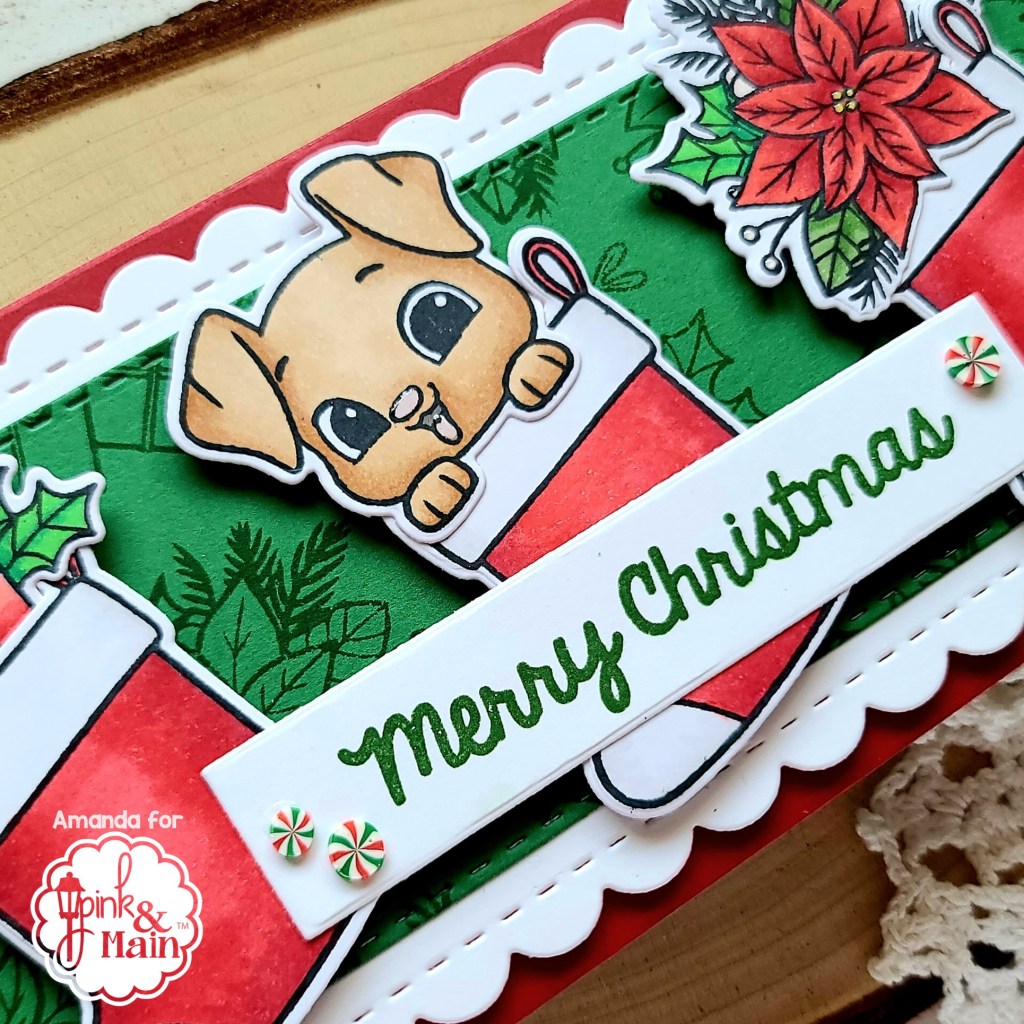
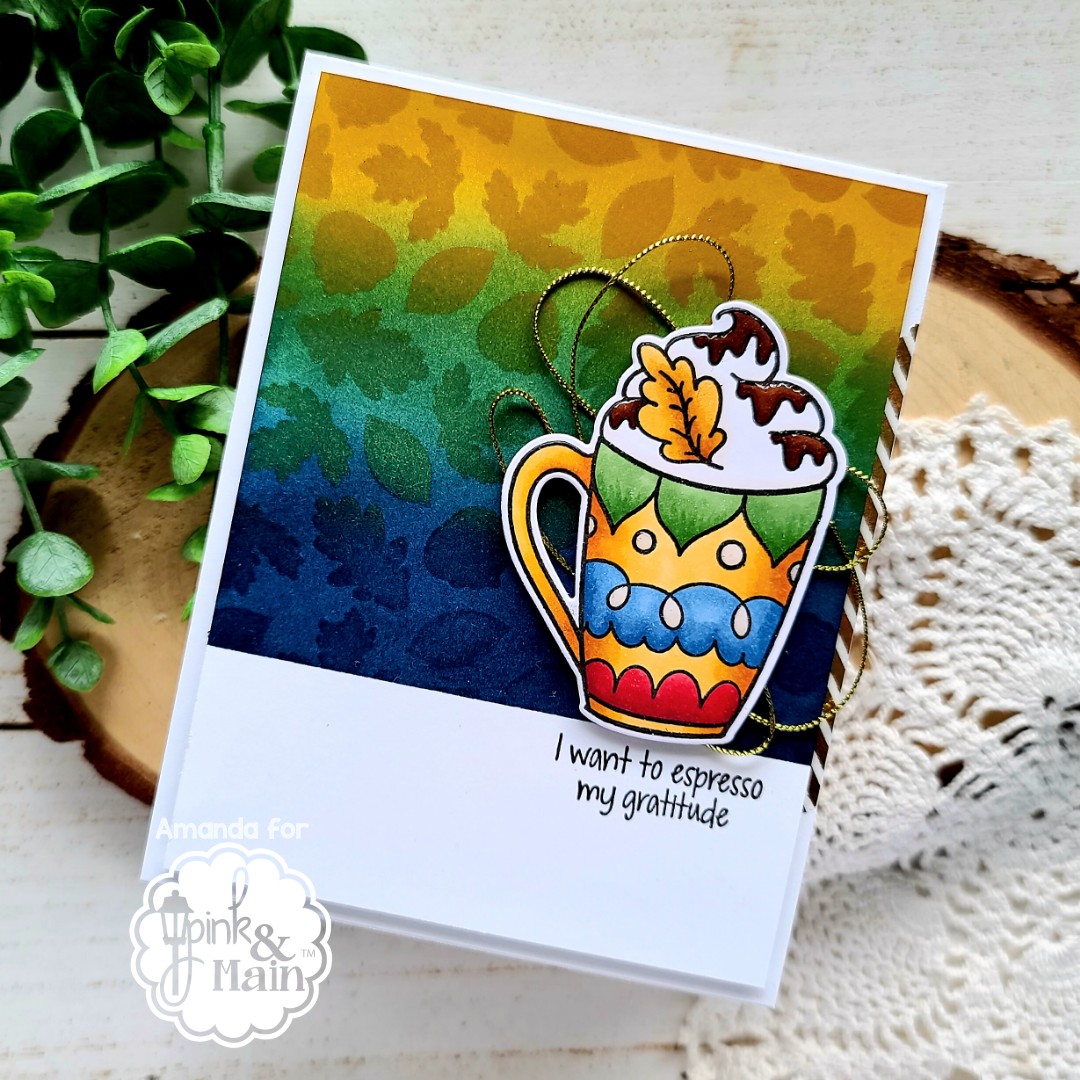
I just think this Need to Venti set is so much fun! I pictured today’s cup of yummy to be a fantastic mocha with whipped cream and chocolate syrup on top! Drooling yet? Yeah, me too. Let’s get to crafting now. 😉

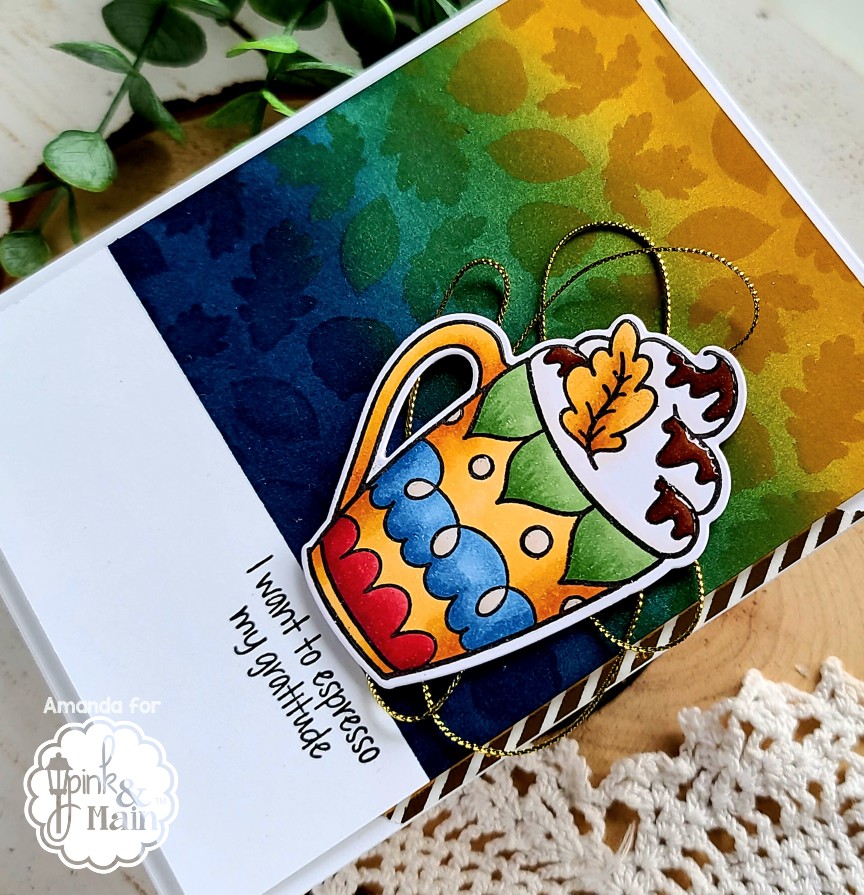
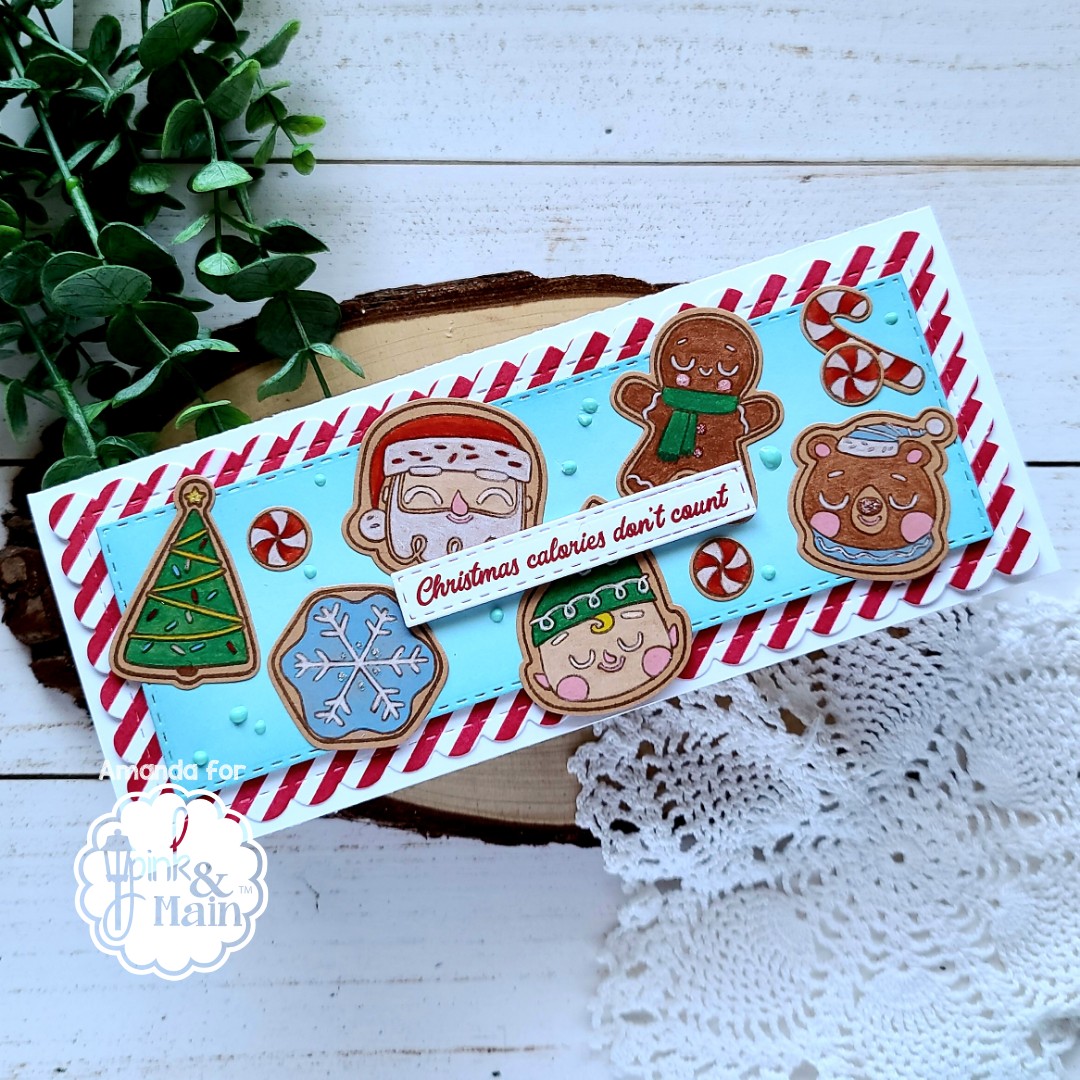
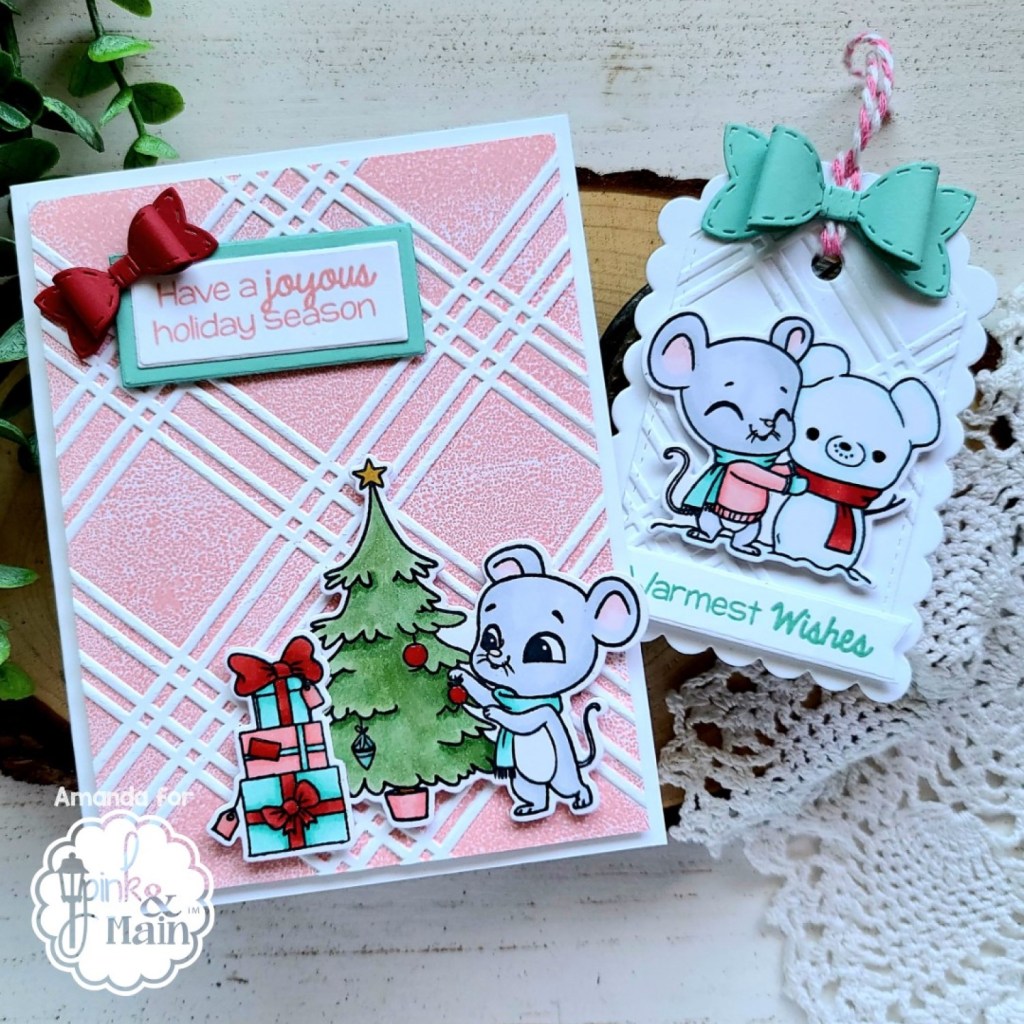
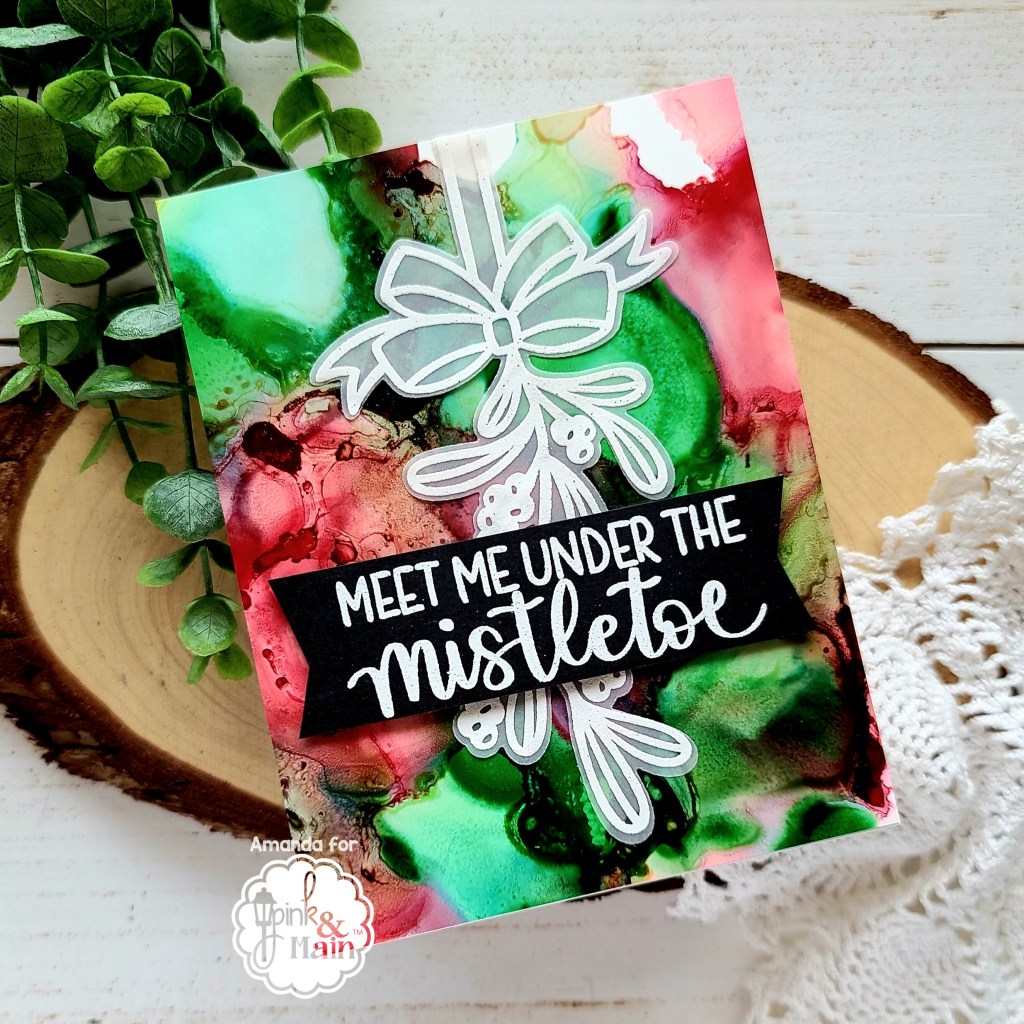
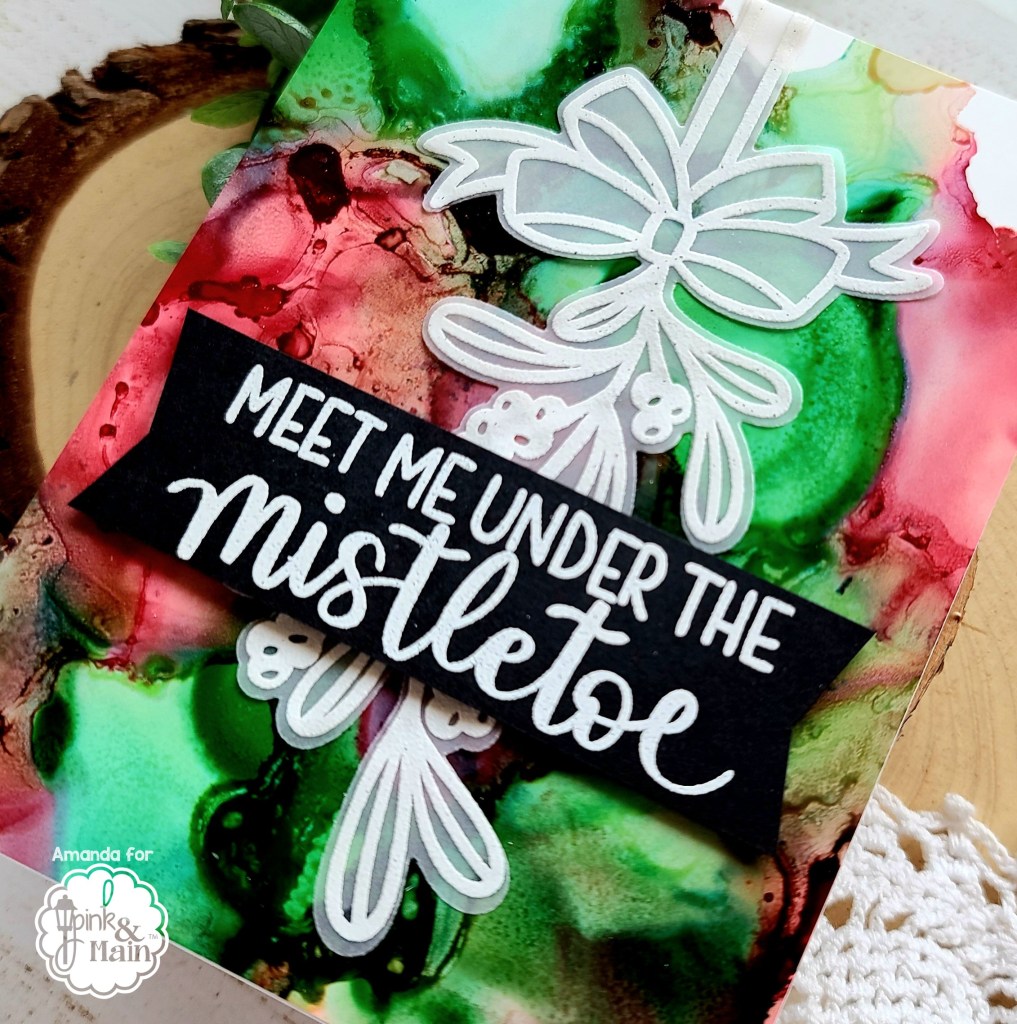
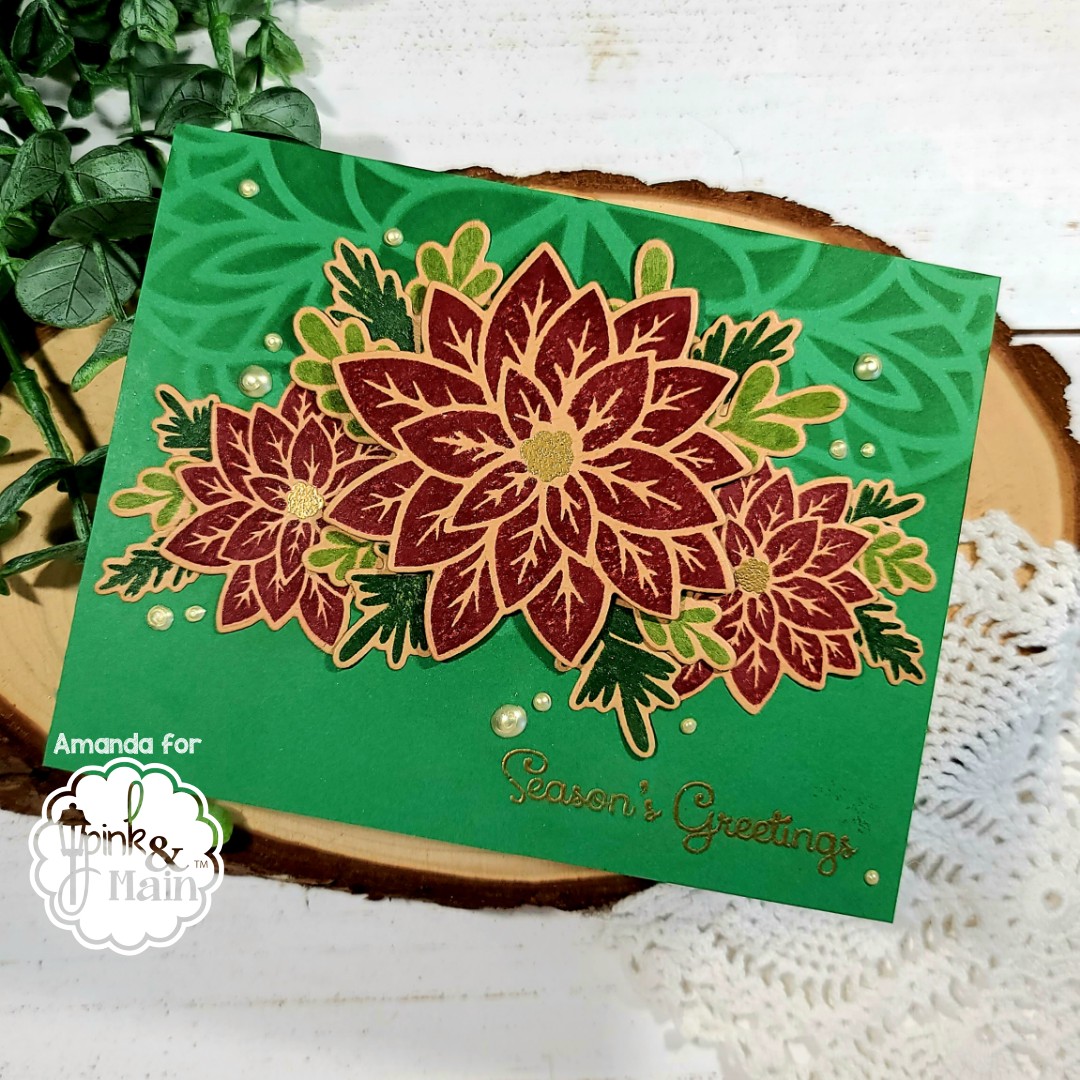
I stamped and colored my image with copics. Then used the coordinating dies to cut it out and moved over to stenciling my background. For that I used the leafy stencil, my blending brushes and some dye inks. I inked up the panel, then put the stencil over the top and did another layer of the same colors on top of that. Isn’t it fabulous? I’m totally in love with it. After removed my mask, I used my MISTI to stamp the sentiment just below the stenciling on the right side of the card front.

I created a white card base and stuck some gold striped washi tape to the side. Then I trimmed the stenciled panel down to 4×5.25 and popped it up with foam tape. I added foam squares to the back of my image and stuck some gold wire thread to the back, then flipped it over and put it in place.

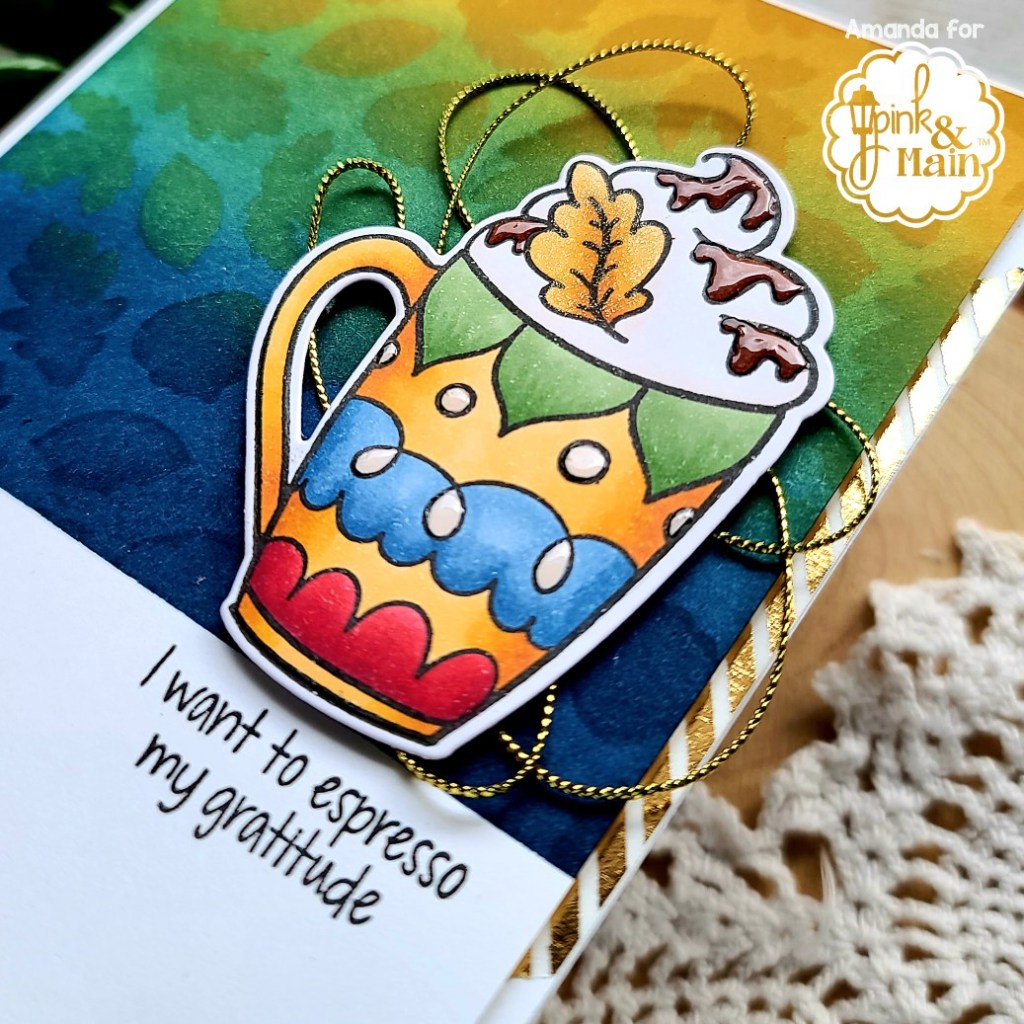
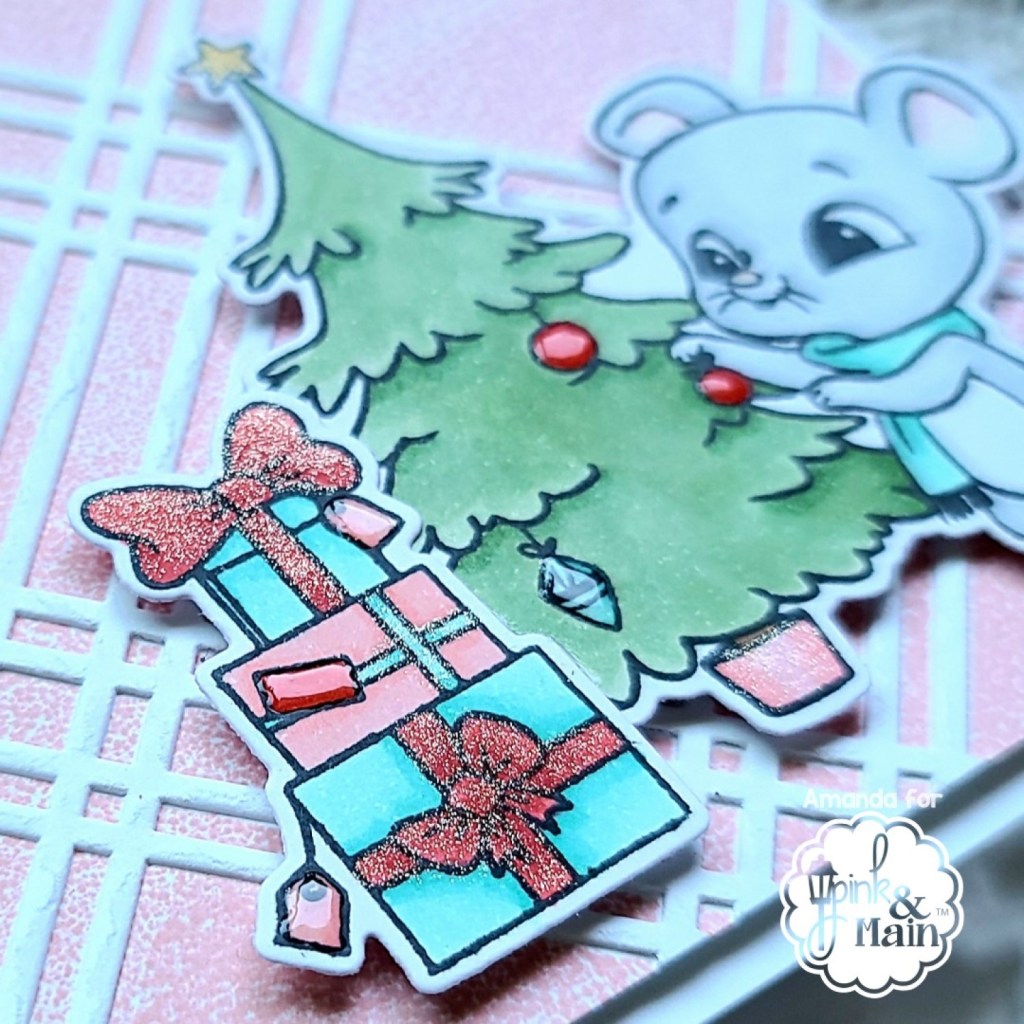
For finishing touches, I added glossy accents to the chocolate syrup and a few select places on the mug. Then I decided to add Wink of Stella glitter brush pen to the leaf in the whipped cream. I’ve decided this is made of chocolate and that edible glitter.

I hope you enjoyed today’s yummy creation and found some inspiration to play along with the Coffee Loving Cardmakers Hop too!

I appreciate you sharing your time with me. Have a fabulous day!

Coffee Loving Cardmakers | Pink & Main – Fintastic Together

Hello again! I’m popping in with a quick, fun card featuring some goodies from Pink & Main. This card was on their blog this morning as part of the Coffee Loving Cardmakers Fall | Winter hop but I wanted to explain the process, in case anyone had questions.

This Mermazing Coffee set was my first purchase from them and I just love it sooo much still! It’s super fun to create with so I just had to pull it out!

This was a pretty simple card to make but fun and messy, just how I like it! I stamped and heat embossed the mug and heart images from the set on watercolor paper. Then I did ink smooshing with my Tombow markers and set it aside to dry. I stamped the mermaid image and colored her with copics, cutting her out with the coordinating dies. I used the A2 layered rectangles to create a frame for my sentiment and mermaid to go on.

The black panel is adhered to the watercolor panel directly, then the white panel is popped up and the mermaid is popped up from there. I finished things off with a small scattering of cute embellishments and, voila, my card is finished!

I appreciate you sharing your time with me. Have a fabulous day!

Pink & Main – Christmas Cookies

Welcome back! I’m over on the Pink & Main blog today sharing this fun Christmas Cookies slimline card. I decided to try stamping on kraft cardstock for my cookies and doing some coloring with colored pencils for a change of pace.

It was a fun process. One trick I use when coloring with colored pencils is to leave my stamps in my MISTI and when I’m finished coloring, I stamp the images a second time to cover up and pencil markings that cloud up the image lines. I feel like this makes a big difference in the final product.

A new toy I’ve got on my craft desk that I’m absolutely loving, but hadn’t shared yet, is this new mini die cutter called the Mini Maker from The Maker’s Movement. It’s fantastic and so convenient! I used scraps of cardstock for my images today so it was easy to pop them on the plates and run them through without even getting up. This cutter is super easy to use and cuts like butter!

Separately I die cut the scalloped panel from Sympathy Slim Line Dies and stenciled it with a diagonal stripe in red ink. I also cut the third largest Stitched Slim Line Die in a soft blue and inked the edges for a tone-on-tone effect. I arranged my cookies and glued them down. Then I popped the blue panel up with foam tape. Last, I stamped my sentiment and did partial die cutting with the smallest Stitched Slim Line Die to make a matching sentiment strip. Then I popped it up on top of my cookies with some foam strips.

I added my panels to a white card base and moved on to finishing touches. For those I added some Stickles in Sprinkled Sugar for a sugary effect on various parts of the cookies. Then I added a scattering of Nuvo Crystal Drops in calming aqua around the background.

I love this set and had so much fun dreaming of Christmas baking while I was putting it together. But let’s be real, that will be here before we know it!

I appreciate you sharing your time with me. Have a fabulous day!

Pink & Main – Believe

Welcome! I’m over on the Pink & Main blog today with this soft and sweet Christmas card featuring a sweet angel and dove along with some fun techniques.

To make my card, I started by stamping and coloring the images from Little Angels with my copics. Then I cut them out with the coordinating dies. Next, I cut the wreath base three times – from vellum, pink cardstock and white glitter cardstock. I layered them together and adhered them with liquid glue. I placed acrylic blocks on top while I die cut and assembled the medium sized bow from the new Stitched Bow dies. Then I used liquid glue to adhere the bow to the wreath. I held it together with my tweezers while it dried.

I cut an A2 panel and, using my wreath as a guide where not to ink, I used the holly layering stencil and some pastel inks to match the feel of my angel. Once that was done I took the same pink ink and blended the center of where the wreath would be breaking up the stark white. Now, I used my MISTI and stamped the sentiment below where the wreath would be.

On to assembly now! I adhered the wreath with liquid glue and then popped the angel and dove up with foam squares. For finishing touches I added a couple of pink clay hearts and Wink of Stella glitter brush pen to the dove and angel’s horn.

I am very much a typical red and green Christmas girl but I am just in love with how this soft color palette turned out. What are your favorite Christmas colors?

I appreciate you sharing your time with me. Have a fabulous day!

Ink Pink | Pink & Main – Get Through It

Hello again! I am part of a second Instagram Hop today to celebrate Think Pink – breast cancer awareness. It’s called Ink Pink! and there is a wonderful group of us so be sure to head there and hop along. Comment lots for chances to win prizes from great sponsors like Pink & Main and Twiddler’s Nook!

For my card, I stamped and heat embossed images from Sunny Greetings in black. Then I watercolored them with my Zig markers and cut them out with the coordinating dies. I took spun sugar and picked raspberry distress oxide inks and blended them in a panel. I spritzed it with water and flicked black paint on it. Once that was dry, I used the larger of the Beautiful Slim Line dies to cut the panel out. Then I took the largest Stitched Slim Line die and cut a black panel.

Time for assembly, the black panel was adhered to a white card base and the inked panel was popped up with foam tape. The Sunny Greetings images were adhered with liquid glue. I laid acrylic blocks on them to hold them flat while drying and heat embossed my sentiment in white on black cardstock. I used on of the sentiment strips from the Sunny Greetings coordinating dies and did partial die cutting to stretch it long enough to cut the whole thing out. Then this was popped up with foam squares on the card front.

My finishing touches were simple, just a scattering of holographic hearts from the Twiddler’s Nook shop for a little added interest. They look really cool when they’re caught in the light.

Remember, head over to Instagram and hop along. Comment for chances to win! And most importantly ladies…get those tatas checked!!! You never know and it’s been to be squished than sorry. Love you all!

I appreciate you sharing your time with me. Have a fabulous day!

Pink & Main | Scrapbook & Cards Today Feature

I’m absolutely flabbergasted to be sharing with you that I’m over on the Scrapbook & Cards Today blog featuring an adorable card and tag set using a bundle of Pink & Main products. I hope you love it, please take a moment to head over there and leave a comment if you do!

I started this fun project by stamping and coloring the images from Christmouse with my copic markers. I decided to stick to a limited color palette for my card. I like doing this to keep things coordinating. Today I went with one of my favorites – mint, pink and red. Then I used the coordinating dies for Christmouse and cut the images out. I set them aside while I worked on the rest of the card.

I pulled out the soon-to-be-released plaid embossing folder, inked up one side with pink, put my cardstock in and ran it through my die cutter. This inked up part of the panel, leaving the raised plaid lines white. You could do it reverse as well by inking the other side of the embossing folder. This is a really fun technique to play around with and when you’re done playing, you have a bundle of backgrounds ready for cards!

I trimmed the panel down to 4×5.25 inches and popped it up with foam tape on a white card base. Then I popped my mouse and presents up with foam squares on that. I stamped a sentiment from the Christmouse set in pink and used the A2 Layered Rectangle dies to cut it out. Then I cut the next side up in the same die set from mint and glued them together. They are popped up with foam squares. Last, I created a small red bow from the new Stitched Bow Dies and glued it to the corner of my sentiment.

I love adding finishing touches to my projects! …almost as much as I love creating the projects themselves. I feel like they aren’t complete until I add some little details. For this card, I added glossy accents to the christmas ornaments, package tags and the mouse’s nose. Then I went back with a Wink of Stella glitter brush pen and glittered up the package ribbons, star and tree base.

I had colored all the images at the beginning, unsure of my final design and while I was working on the card I thought it would be so cute to make a coordinating tag to go with it. So I die cut the Fancy Tags pieces from white and then ran the stitched panel through my die cut machine with the plaid embossing folder, without inking it this time. I glued those layers together and popped up my mouse image with foam squares. I stamped another sentiment from Christmouse, in mint this time, and cut it out with the banner die in the Fancy Tags Die Set. It’s also popped up with foam squares.

I strung some pink and white baker’s twine through the hole, created a medium stitched bow in mint and glued it in place. For finishing details on this little tag, I added glossy accents to the mouse’s nose and black glaze pen to the snowmouse’s eyes and nose.

Aren’t these guys just the cutest? I can’t get over them! They’re so fun to color and create all kinds of scenes with. And there’s even an image in the set I didn’t use today! So many possibilities!

I hope you enjoyed today’s project and found some inspiration to create something wonderful. I appreciate you sharing your time with me. Have a fabulous day!

Pink & Main – Meet Me Under the Mistletoe

Hey everyone! I hope your week has gone wonderfully and you’re all ready for the weekend! Today I’m over on the Pink & Main blog having some more messy fun with alcohol inks.

I had this design in my head so I just started to work on my alcohol ink background immediately. I used Tim Holtz Ranger alcohol inks and the combo for this background was deception alcohol pearl and everglades alcohol ink.

Then I got my MISTI out to stamp and heat emboss my Mistletoe image on vellum and the sentiment on black cardstock. These are both from the Mistletoe stamp set. After heat setting the embossing powder, I used the coordinating dies to cut the image out and then I trimmed the sentiment into a banner.

To put everything together, I hit liquid glue behind the heat embossing and adhered my mistletoe to the alcohol ink panel, wrapping the top over the edge, like it’s hanging on the front of the card. Then I used foam tape to pop my sentiment banner in place.

Voila! This simple but beautiful card is all finished. You could change out the sentiment and create a bundle of these in a jiffy for your Christmas cards too! So much fun to be had!

I appreciate you sharing your time with me. Have a fabulous day!

Pink & Main – Merry Christmas

What are you hoping to find in your stocking this Christmas??? Maybe one of these fun filled stockings would suit you. 😉 I’m over on the Pink & Main blog with this adorable slimline stocking card featuring new goodies from the October release.

To create my card, I stamped and colored the images from Stocking Stuffers and then used the coordinating dies to cut them all out. I used liquid glue to attach the stuffing to the stockings and set them aside.

Then I die cut a green panel from the Stitched Slim Line dies and used the 2 floral images from Stocking Stuffers to create my own patterned paper. I cut a white scalloped panel from the Sympathy Slim Line dies and adhered the 2 together. I cut a red panel with the Layered Slim Line dies and popped the scalloped panel up with foam tape.

I popped my stockings up with foam squares and moved on to my sentiment. For that, I stamped it in green on a white piece of cardstock and die cut it with a smaller Layered Slim Line die, shifted the die down and cut it a second time to shorten the length. It’s like making your own custom sentiment strips. I attached it with liquid glue and moved on to finishing touches.

For those, I added glossy accents to the puppy’s nose and tongue, all the mistletoe berries and poinsettia center. Last, I glued a couple of wintermint candy embellishments from my shop to the sentiment strip.

I appreciate you sharing your time with me. Have a fabulous day!

Miss Ink Stamps – Roll With It

Hello again. I’m stopping by today to feature a new, funny stamp scene – Roll With It – that just released in the Miss Ink Stamps shop this last week.

I let the stamp do all the talking with this one and just colored the scene with my copic markers and trimmed it down with my Pink & Main layered rectangles. I framed it up with a slightly larger black rectangle and popped that up on a white card base.

I finished it off by trimming the sentiment into a strip, using a black pen to edge it and help it stand out. This is adhered with liquid glue along with a couple of stray TP rolls that got left behind. 😉

I added glossy accents to the house windows because I love how this looks and some stars in the sky with a white gel pen.

I hope this gave you a little chuckle today. I appreciate you sharing your time with me. Have a fabulous day!

Pink & Main – Season’s Greetings

Hello everyone, I’m over on the Pink & Main blog today sharing a card featuring stamps and dies from the new release. It’s all things Christmas and I’m in love with every bit of it! Typically I like stamping and coloring on my cards but today it’s all about stamping in color and heat embossing for accent.

Today’s stamps all come from the new Mistletoe set and I’ve paired them with the mandala stencil from the September release. I started this card by stamping my images on kraft cardstock with different dye inks. I heat embossed the flower centers in gold for a little texture and contrast. Then I used the coordinating dies to cut them all out.

I trimmed down a piece of green cardstock and used the mandala stencil with green ink and my mini ergonomic blending brush. I placed my images where I wanted them and used a combination of tape runner and foam squares to adhere everything to the green panel. When I was finished, I heat embossed my sentiment at the bottom and adhered the panel to a card base.

For finishing touches on my card, I scattered Nuvo Crystal Drops in pale gold around the design. It’s incredible to me what something so simple does to round out a design. I just love what they add.

I appreciate you sharing your time with me. Have a fabulous day!