Pink & Main – In Your Future, I See…

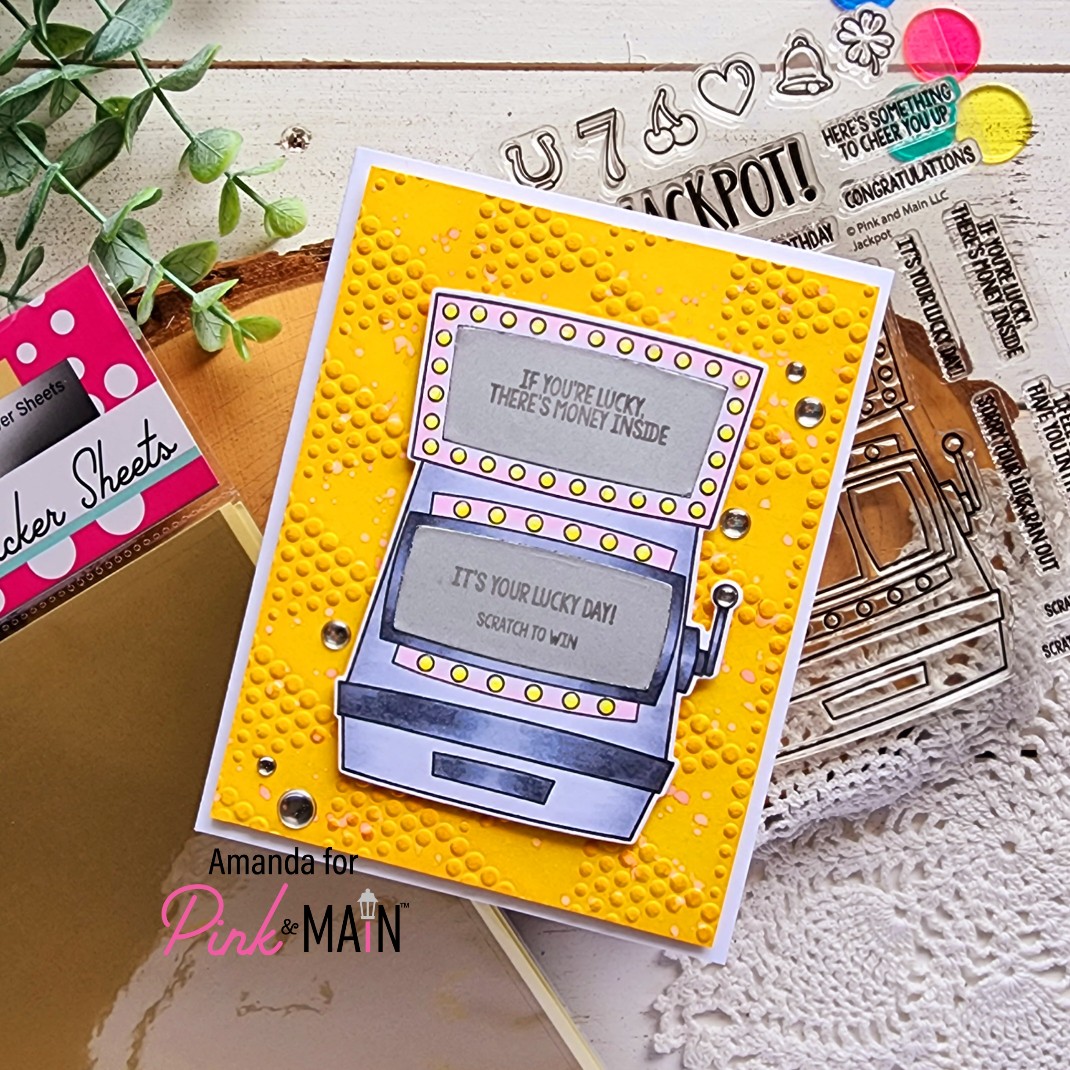
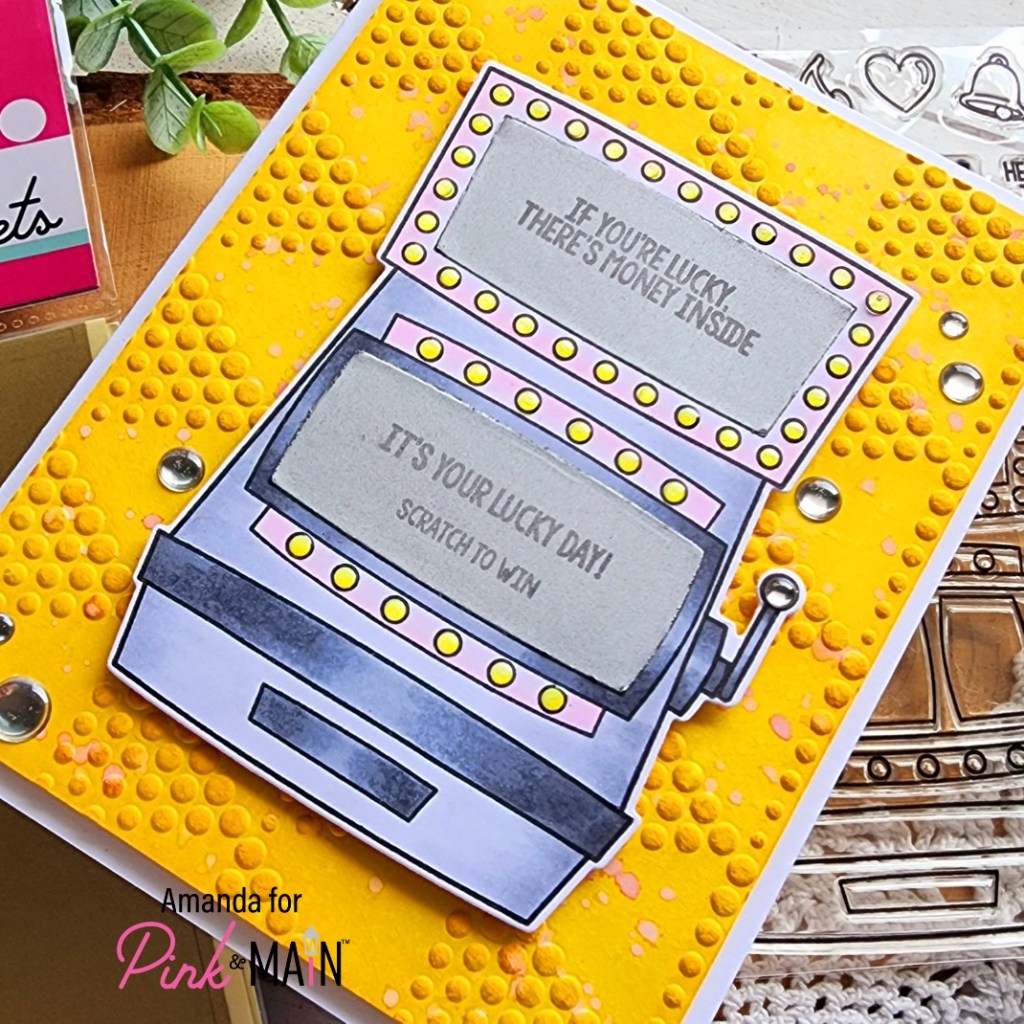
Welcome everyone! Today I’m over on the Pink & Main blog with another way to use those new fantastic scratch off stickers! This time, I have used the pre-cut circles on the new, AMAZING fortune teller! She’s stunning!

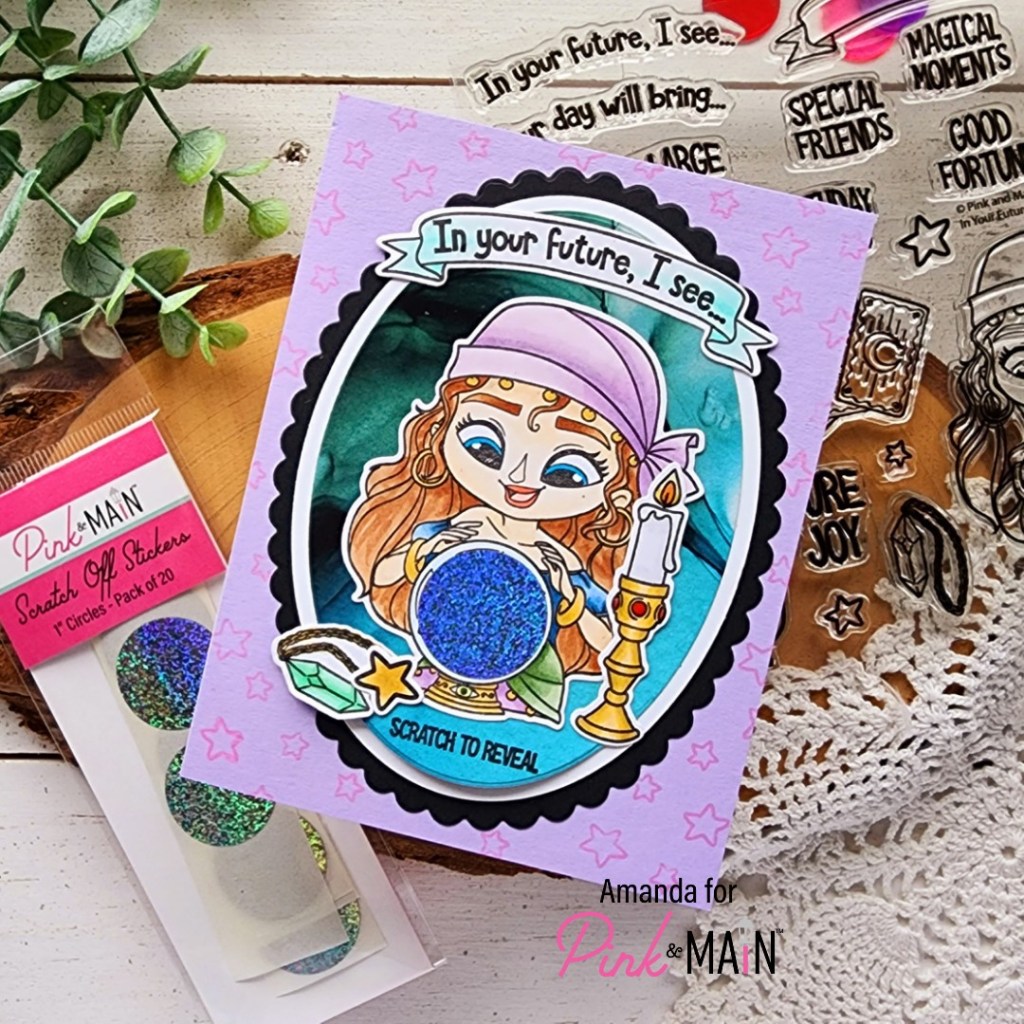
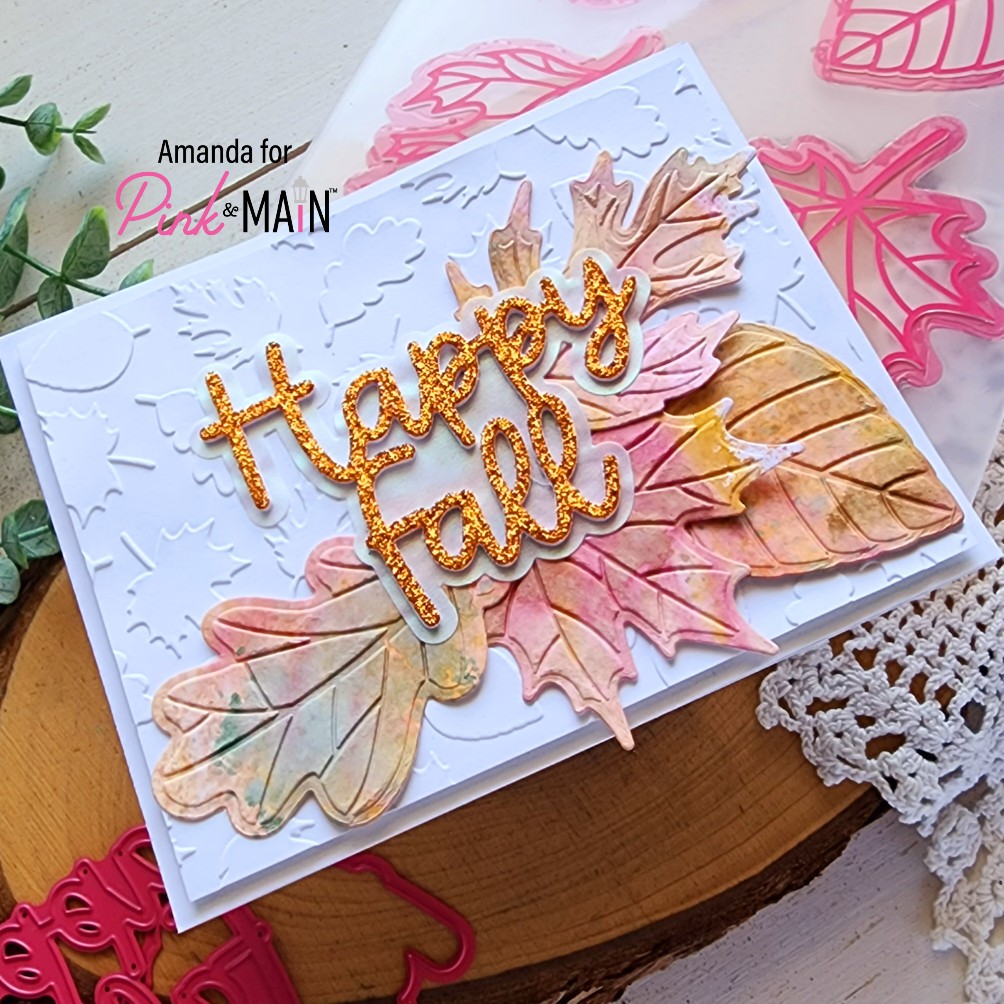
I started by stamping and coloring her with my copics. Then I chose a mystery sentiment from the set to stamp in the crystal ball and die cut everything with the coordinating dies. Then I adhered one of the holographic scratch off stickers over the top.

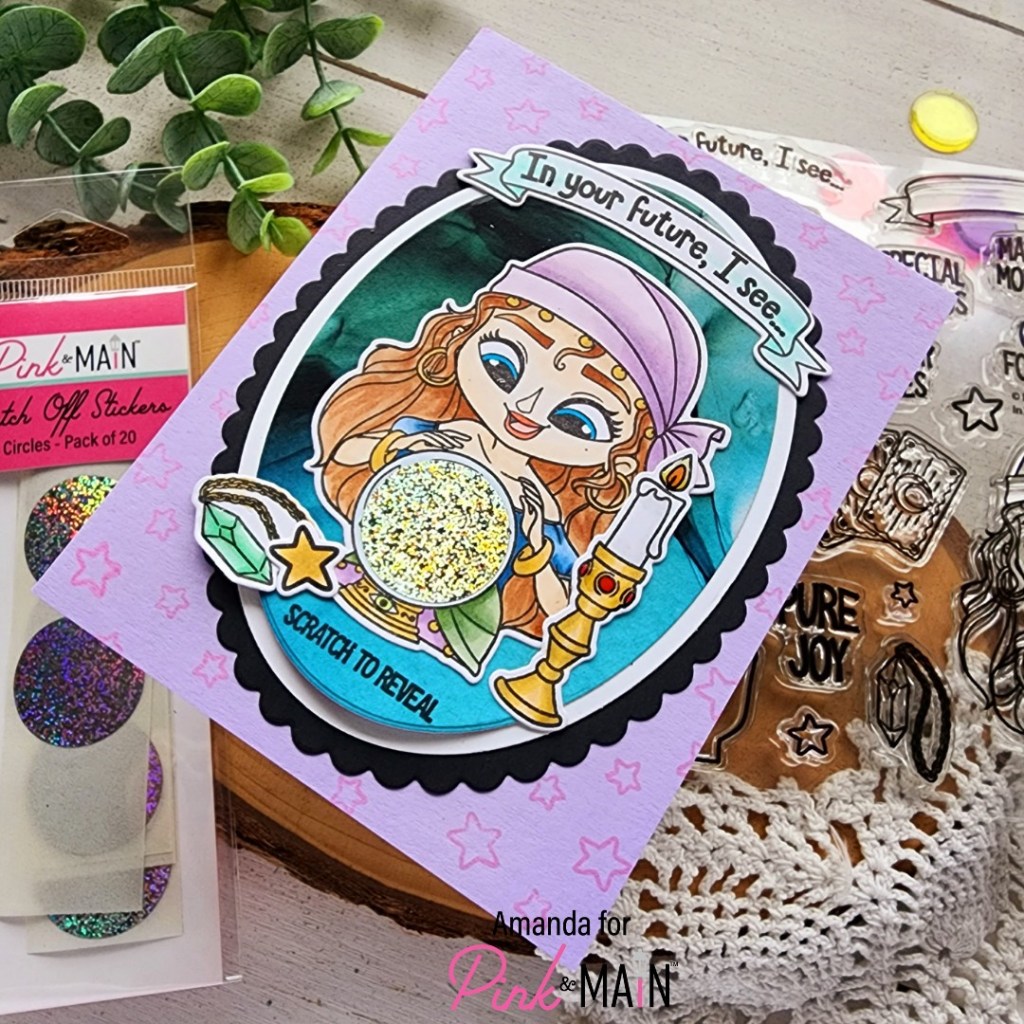
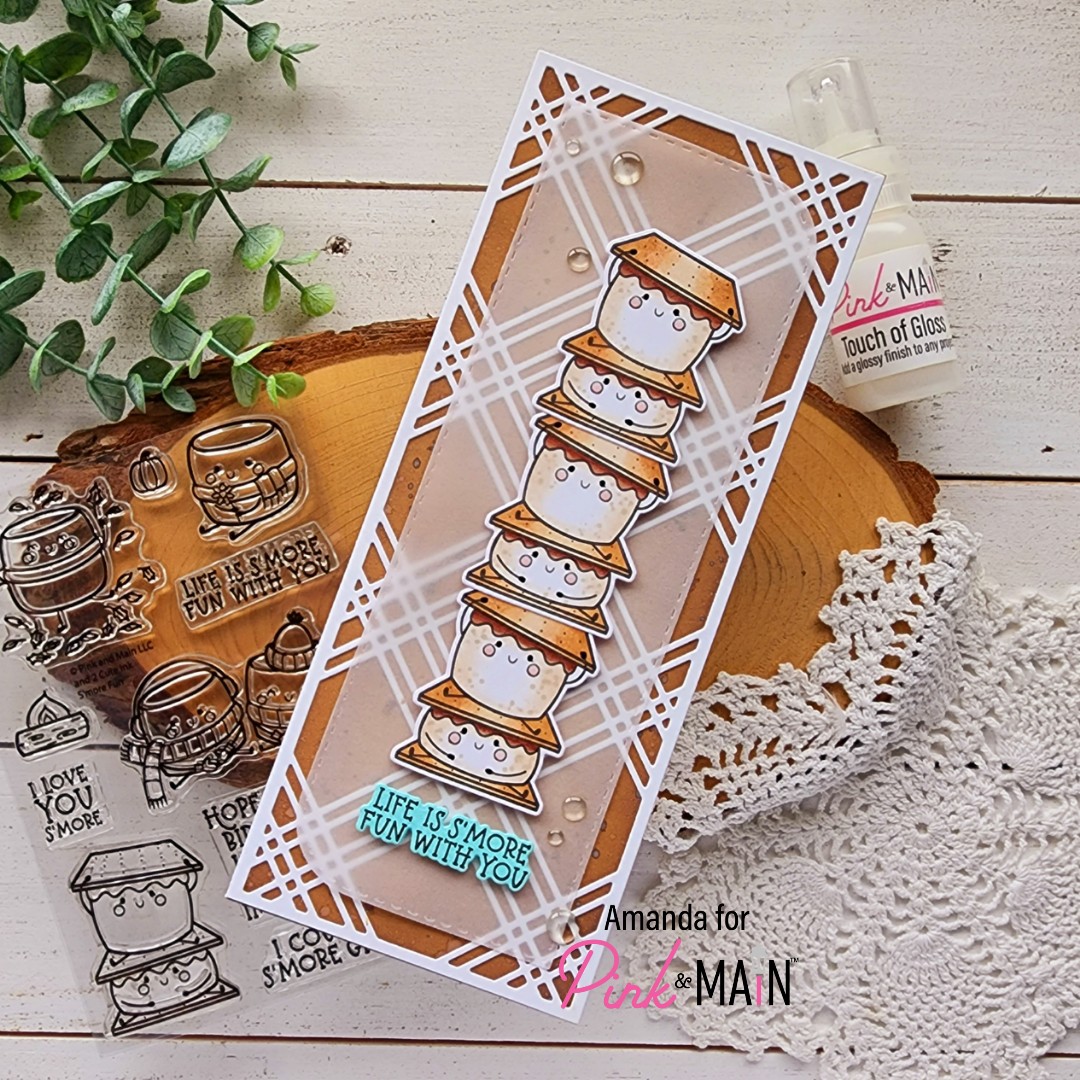
To create the setting for my fortune teller, I chose a piece of patterned paper from Inked Oasis paper pad and cut it with a Stacked Oval die. Then I cut the next largest oval from white cardstock and finally a scalloped oval just a smidge bigger from black cardstock. Then I adhered everything together. Pulling from the colors of my fortune teller, I cut a card front from purple cardstock and stamped some stars around the outside edge. Now we can put everything together.

I adhered the purple to a white card base, then added the ovals next with liquid glue. I placed the card in my MISTI and used the images as a guide for where to stamp the “scratch to reveal” instructions. I stamped it down and then added all the images with liquid glue too.

I chose to keep things flat and not use foam like I always do so that there was nothing impairing the ability to scratch the circle off. It might not make it difficult but I wasn’t sure since these are so new. Better safe than sorry until I test things out a bit.

Products used today:
In Your Future stamps and dies
Scallop Oval dies
Layered Oval dies
Scratch Off Circles – glitter
Scratchers

Inked Oasis paper pad
EZ Squeeze liquid glue
Touch of Gloss

I appreciate you sharing your time with me. Have a fabulous day!

Pink & Main – Stack o’ S’mores

Hey crafty friends! So glad you’re here today. I’m sharing a fun way to use the Stamp and Die of the Month from Pink & Main today. This subscription is such an amazing deal and I have been over the moon in love with literally every single one since it started. It’s SO GOOD! This month we have s’mores characters doing different antics that are amazing to create with all year long. They’re so cute!

I decided to take the stacked s’mores and stack them even higher! I stamped three and colored them with copics before using the coordinating die to cut them out. I used a little EZ Squeeze liquid glue to adhere them together and lined the back with foam tape. To add a splash of color, I stamped the sentiment on teal cardstock and die cut it as well.

For my background, I cut a kraft panel 8.5×3.5 inches for a slimline card. I inked the edges with ground espresso distress oxide and spritzed it with water. Then I flicked watered down ink on it and set it aside to dry while I die cut the Slimline Plaid cover plate from white cardstock. I used liquid glue to adhere them together and then to a white card base.

Next, I die cut the smaller mod rectangle from the Beautiful Slim Line die set out of vellum and adhered the s’mores and sentiment to that. I hid tape runner behind those to adhere it to the card front.

For finishing touches I added some clear enamel dots around the images and black glaze pen to the s’mores eyes and hands. Then I added Touch of Gloss to their cheeks for some shine.

Aren’t they just adorable?!? I love them!

Products used today:
S’more Fun stamps and dies (Stamp and Die of the Month)
Beautiful Slim Line dies
Plaid Slim Line die
Crystal Clear enamel dots
EZ Squeeze liquid glue
Touch of Gloss
Distress Oxide – ground espresso
Foam tape

I appreciate you sharing your time with me. Have a fabulous day!

Pink & Main – October Sneak Peek Scratching Fun

Hey friends!!! It’s sneak week for the Pink & Main October release and it’s got SOOOOOOOO many new products in it and that ridiculous fun! I can’t wait to share everything with you! Today I have a little sneak of Jackpot and some new accessories that are going to make your cards extra fun to send out!

Check out this super fun slot machine we’ve got this month! And guess what?!?!?!? Scratch off stickers!!!! These are so fun! There will be circles and also sheets you can die cut any shape you want! So for my card today, I die cut two so the majority of the image is a surprise for the recipient. Then I stamped sentiments over the top of the scratch stickers too!

I embossed my background with the new Dotted Triangles embossing folder for texture and interest. How cool is that new design!?! Then I glammed the image up with Touch of Gloss and enamel dots too!

You guys, this release is so much fun and it’s so different! I hope you love it and have an amazing time crafting with it!

Products used:
Jackpot stamps and dies
Dotted Triangles embossing folder
Touch of Gloss

Enamel dots
Scratch Off Sticker sheets
Street Light cardstock

I appreciate you sharing your time with me. Have a fabulous day!

Pink & Main – May Your Holidays Be Sweet

Happy Wednesday everyone! I’m over on the Pink & Main blog today with some Christmas inspiration featuring these hilariously adorable gingerbread men from Gingerbread Kisses. I also pulled out the fabulous Peppermint Cover die from last year to set the scene.

First, I blended distress oxide ink in candied apple and aged mahogany on a piece of white cardstock. I kept the darker to the center, fading out to the edges. I splattered the panel with water and blotted it dry. Then I cut the Peppermint Cover die from white cardstock and glued them together with EZ Squeeze liquid glue. I added these to a white card base and started stamping next!

These two gingerbread men in a frosting fight just cracked me up so I had to color them immediately! I used my copics to color and the coordinating dies to cut everything out. Then I stamped and heat embossed my sentiment, also using the coordinating die to cut it out. Everything is popped up on foam squares for added interest and dimension.

For finishing touches I added glossy accents to all three peppermint candies and stardust Stickles to the frosting everywhere. Last, I snagged some fun red enamel dots from the Musical pack and scattered those about the design.

Products used today:
Gingerbread Kisses stamps and dies
Peppermint Cover die
EZ Squeeze liquid glue
Enamel Dots – musical
Magic Anti-static brush
Embossing & Watermark Ink
Frosting embossing powder
Glossy accents
Foam squares
Distress Oxide Ink – candied apple, aged mahogany

I appreciate you sharing your time with me. Have a fabulous day!

Pink & Main – Tidings of Comfort & Joy Shaker

Happy Wednesday everyone! It’s time for some Pink & Main inspiration using the recently released Poinsettia stencil. This single stencil has all of the layers to create a gorgeously inked poinsettia flower that covers your card front. It’s so beautiful! Today I turned my inked panel into a shaker card for added fun.

I started by inking the poinsettia layers with my blending brushes and dye inks, except for the center. Once I got to that point, I spread gold Glitz Glitter Gel through for some added bling. Then I set the panel aside to dry while I cleaned up.

To create a frame for my shaker, I took an A2 size piece of kraft cardstock and ran it through my die cut machine in the Woodgrain embossing folder. Then I cut a window out using a Stitched Arch die. I saved the inside piece for another card which is an extra bonus! Then I lined it with EZ Tear Tape and added a piece of acetate. I then, lined that with foam strips, sprinkled some Holly Super Fine Glitter to my panel and adhered them together.

Next, I stamped and heat embossed a sentiment from Pine Boughs with the new Platinum Ring embossing powder and used the coordinating die to cut it out. I popped it up with foam squares and adhered my shaker to a top folding white card base. Then, to finish off the design, I tied some twine around the top in a cute little bow.

I love the glitz and shine from the different elements, paired with the rustic feel of the woodgrain and twine wrapping.

Products used:
Poinsettia stencil
Stitched Arches dies
Pine Boughs stamps and dies
Holly Super Fine Glitter
EZ Tear Tape – 1/4″
Foam squares and strips
Ergonomic Blending Brushes
Magic Anti Static Brush
Platinum Ring embossing powder
Embossing & Watermark Ink
Glitz Glitter Gel – gold

I appreciate you sharing your time with me. Have a fabulous day!

Pink & Main – Merry & Bright Mini Slimline

Hey crafty friends! I’m popping in with a little Pink & Main inspiration featuring the stamp and die of the month, plus a freebie set that you can still pick up! They go perfectly together and you’re going to want to snag them before the month is up! The main stamp and die of the month is called Winter Cardinals and the freebie is Winter Birdhouse. They are so adorable and I think they would be fun colored in so many different combos!

I started by stamping and coloring images from both sets with my copic markers. Then I used the coordinating dies to cut them all out. I chose a sentiment from Winter Cardinals, stamped and heat embossed it on vellum with the new Cranberries embossing powder. It’s glittery and gorgeous! I used the coordinating die to cut it out too.

For the background panel, I trimmed a piece of Barbershop cardstock down to 3×6 inches and inked up the Blizzard stencil with white pigment ink. Then I swapped for the Random Dots stencil and spread Glossy Gel through that one. It dries clear with a fun gloss to it so it adds great interest and texture to the background.

I added foam squares to the images and popped them up on the panel once it was dry. Then I added EZ Squeeze liquid glue to the back of the vellum and patted it off with my finger. This leaves a thin layer to adhere it down but doesn’t show through.

For finishing touches today, I added black glaze pen to the birds’ eyes and glossy accents to their beaks and all of the holly berries. Then I came in with stardust Stickles to all of the snow bits.

I think this is such a sweet and fun card. I’m happy to add it to my stash of Christmas cards, ready for the season!

Products used today:
Winter Cardinals – Stamp and Die of the Month
Winter Birdhouse stamps and dies
Blizzard stencil
Random Dots stencil
Glossy gel
Palette knife
Magic Anti-static Brush
Embossing and Watermark Ink
Cranberries embossing powder
EZ Squeeze liquid glue
Barbershop cardstock
Glossy accents
Stickles – stardust

I appreciate you sharing your time with me. Have a fabulous day!

Pink & Main – Happy Fall Embossing Magic

Hello again everyone. Today I’m over on the Pink & Main blog with a very fun fall card featuring new embossing products from the September release.

I started with a white panel measuring 4×5.25 inches and spritzed it with water. I placed it in the Leaves embossing folder and ran it through my die cut machine. After the bit of water dried from the panel, I added foam tape and popped it up on a white card base. Now it’s time to get messy!

Now, I cut a 6×6 piece of white cardstock and did major ink smooshing all over it with fall colors of Tombow markers. This type of play is so therapeutic for me. Color on an acrylic block, spray it with water and smoosh it on your cardstock. For extra texture and layering, dry your cardstock in between color applications. It’s so fun!

Once the panel was good and inked up, I placed it in the Fall Leaves Emboss and Cut folder and ran that through my die cutter next.

Last, I pulled out the Happy Fall word dies from last year and cut the shadow from iridescent vellum and the words from white cardstock 4 times. I used EZ Squeeze liquid glue to adhere them all together and arranged them with my leaves on the front of my card. Once everything was in place, the white letters were a little lost so I pulled out the amazing Fall Glitter paper pad and cut them out from the orange glitter. Doesn’t that extra bling and texture add so much awesome to this card?!? I love it!

Products used today:
Fall Leaves Emboss and Cut folder
Leaves embossing folder
Happy Fall dies
Fall Glitter paper pad
EZ Squeeze liquid glue
Foam tape

I appreciate you sharing your time with me. Have a fabulous day!

Pink & Main – September Release Sneak Peek

Welcome friends! Today I am on the Pink & Main blog with a sneak peek of the upcoming release and it’s sooooooo cute!!! They knocked it out of the park again and I had a blast creating today’s card.

I stamped and colored images from the upcoming Christmas Squares set with my copic markers on pre-cut cardstock squares. Then I used one of the new Mini Squares dies to add frames around each one. Aren’t those little polaroids just the cutest ever?!?

For my background, I ink blended a panel with distress oxide in salvaged patina and evergreen bough, then I spritzed it with water and adhered it to a card base. Next, I used Stop Sign and white cardstock to cut the Plaid cover plates and adhered them with EZ Squeeze liquid glue.

After adding the photos to the design, I snagged a fun sentiment from the upcoming Pine Boughs set, stamped and heat embossed it, then used the coordinating die to cut it out. I added it with liquid glue as well.

For finishing touches I added glossy accents and stardust Stickles to something on each image. I love the added interest and fun this gives the images.

I really can’t wait for you to see the rest of the release! You’re going to absolutely love it all!

Products used today:
Christmas Squares stamps
Mini Squares dies
Pine Boughs stamps and dies

Plaid Cover Plate dies
Stop Sign cardstock
Embossing & Watermark Ink
Magic Anti-static Brush
Frosting embossing powder
EZ Squeeze liquid glue
Distress Oxide Ink – salvaged patina and evergreen bough
Glossy accents
Stickles – stardust

I appreciate you sharing your time with me. Have a fabulous day!

Pink & Main – Autumn Blessings

Hello crafty friends! So glad you’re here today. I’m sharing this fun fall card over on the Pink & Main blog today. I love that they have the empty snow globe stamps and dies but so many add-ons to create snow globe scenes all year long too!

I started by stamping the empty snow globe image and the cute fox with his wheelbarrow from Fall Snow Globe Scenes and colored them with my copics. After coloring, I stamped a sentiment on the bottom of the snow globe. This helps with potential smearing when blending that section of coloring. I used the coordinating dies to cut everything out and added the fox to the snow globe with foam squares.

I wanted a texture filled background so I started with an A2 panel of white cardstock and layered the Leafy stencil over top. I inked it up with red, yellow and brown dye inks using my blending brushes. I removed the stencil and layered a Reverse Scallop Rectangle along with two Wreath Base 2 die cuts – one from kraft and another from vellum.

I layered the snow globe on top of it all with foam tape and wrapped twine around the left side of the panel before adhering it all to a white card base.

Summer is hanging on where I live but I’m very ready for fall so creating cards like this and decorating early have been extra fun!

Products used today:
Fall Snow Globe Scenes stamps and dies
Empty Snow Globe stamps and dies
Reverse Scallop Rectangle dies
Wreath Base 2 dies
Leafy stencil
Ergonomic blending brushes
Foam squares and tape
EZ Squeeze liquid glue

I appreciate you sharing your time with me. Have a fabulous day!

Pink & Main – Stamptember with Simon Says Stamp

Oh my gooooooodness!!!! Friends! It’s time for the release of the Pink & Main contribution to Simon Says Stamp Stamptember! This set is absolutely adorable and so much fun to create with! Today I made a set of tags that I will be attaching to Snowman Soup closer to Christmas. If you don’t know what that is I’ll explain it later on. But now, let’s check these cute marshmallow snowmen out!

I immediately thought tags when I saw this set. It’s got so many adorable images with lots of fun sentiments to choose from too! So I stamped everything and colored them with copic markers. I used my scan-n-cut to cut them all out and switched to tag making.

This is one of my all-time favorite tag die sets. I cut the scalloped base from red cardstock 4 times. Then I cut 4 stitched inserts. I inked the white panels up with light blue ink and the Snowflake stencil. I used EZ Squeeze liquid glue to adhere the layers together.

Next, I added foam squares to all of the images and started pairing sentiments with images. I wanted something generic but different for each tag. Once the sentiments were stamped, I removed the release paper and added the images to each tag.

I found some great Gina K Designs black and white plaid ribbon in my drawer. I cut 4 lengths of 10 inches and threaded them through each hole. Then I cut 4 lengths of jute twine at 8 inches long and tied bows on each one, trimming the ends as I went.

For finishing touches I added glossy accents to all the noses, cheeks and buttons on the snowmen. Then I came in with white gel pen highlights on the hats, scarves and other accessories.

I just love how cute these turned out! Be sure to pick this set up while you can. Stamptember sets never last long so don’t wait!

Products used:
SSS Stamptember *** stamps
Pink & Main Fancy Tag dies
Pink & Main Blizzard stencil
Ergonomic Blending Brush
EZ Squeeze liquid glue
GIna K Designs gingham ribbon
Glossy accents
Foam squares

I appreciate you sharing your time with me. Have a fabulous day!