Pixi Dust Designs – What’s This? Jack Mug Card

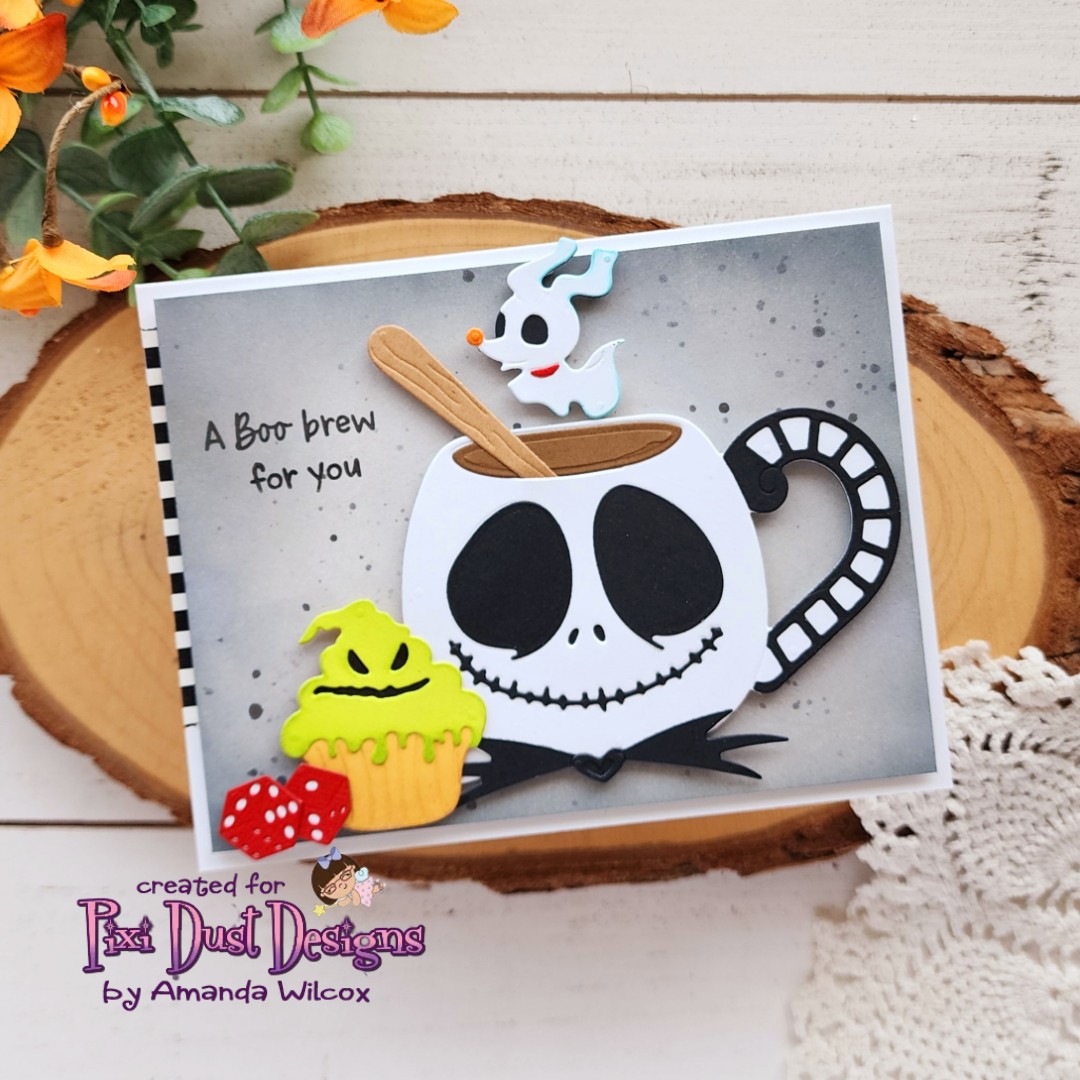
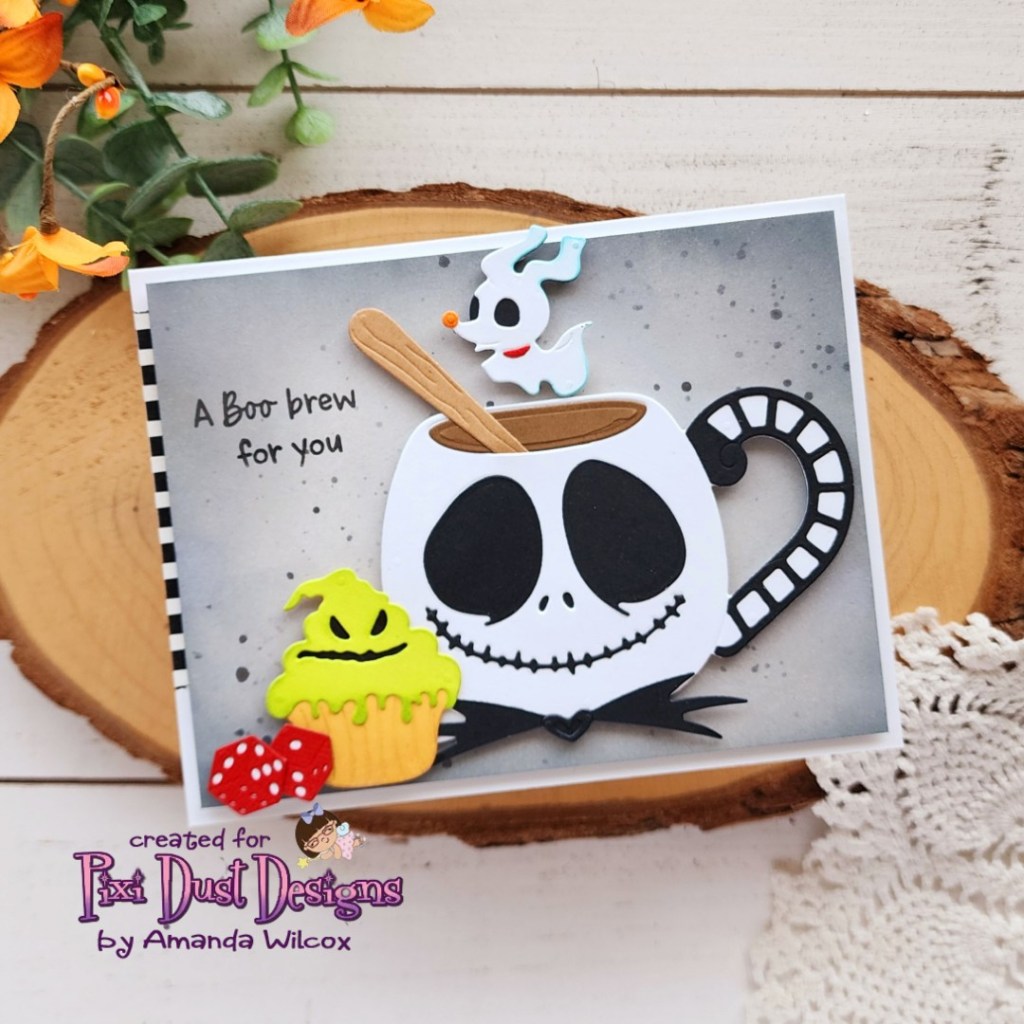
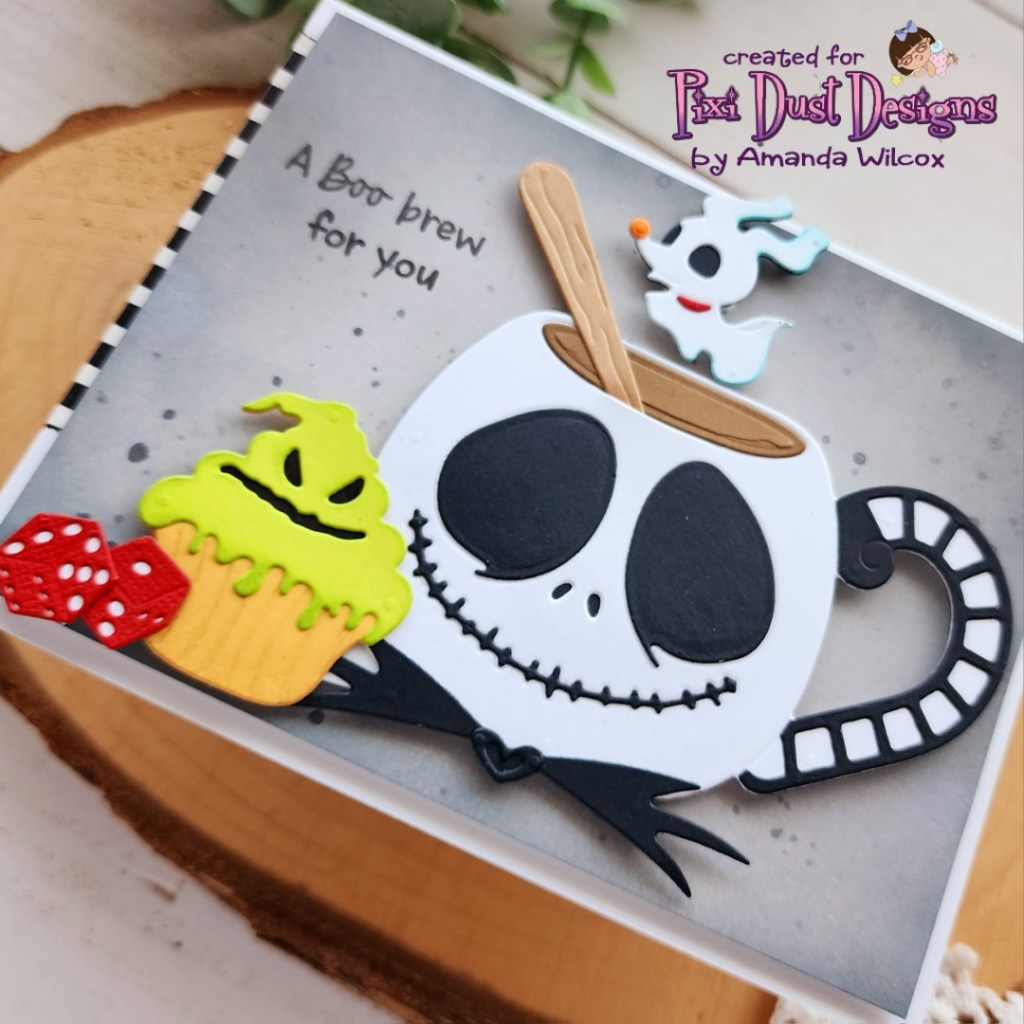
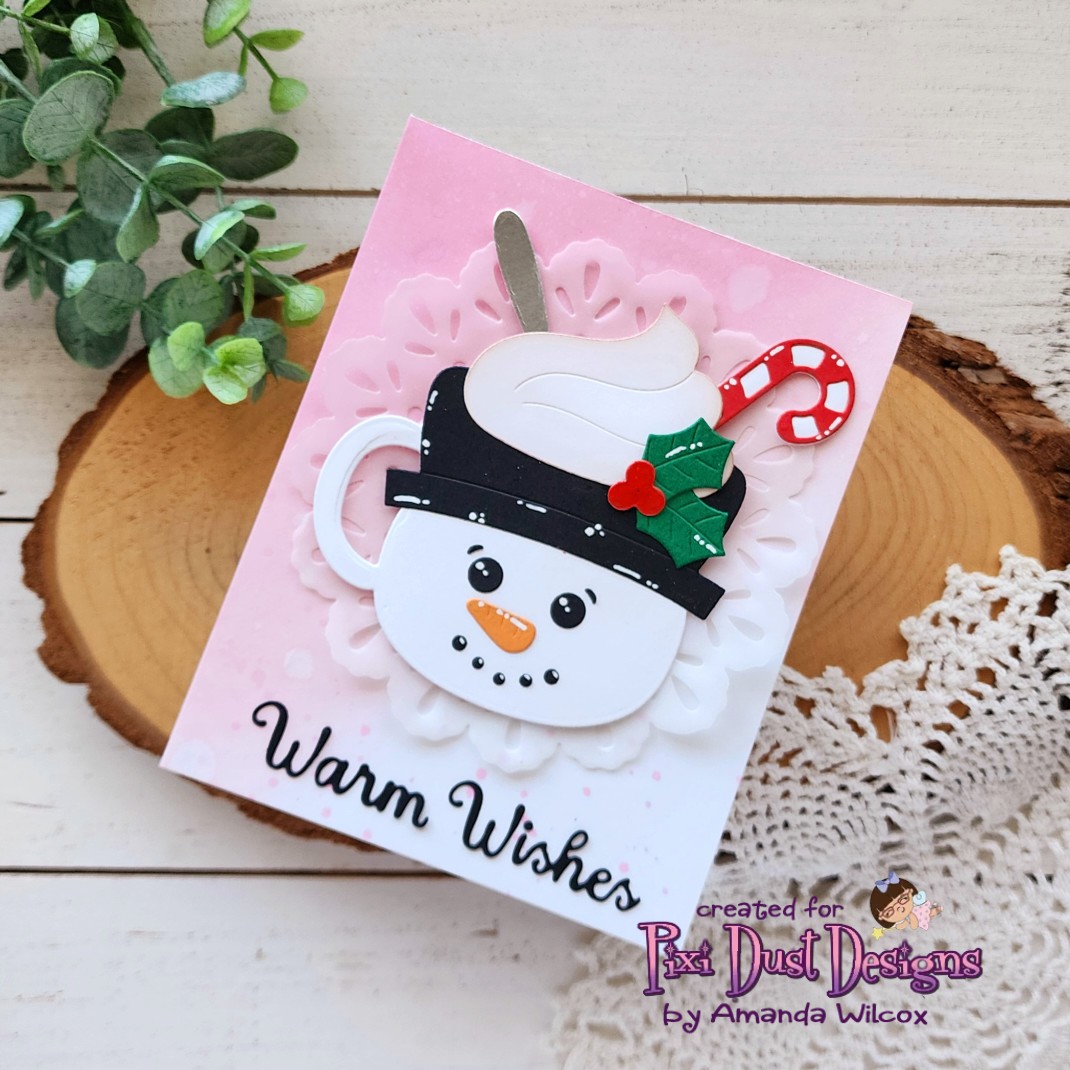
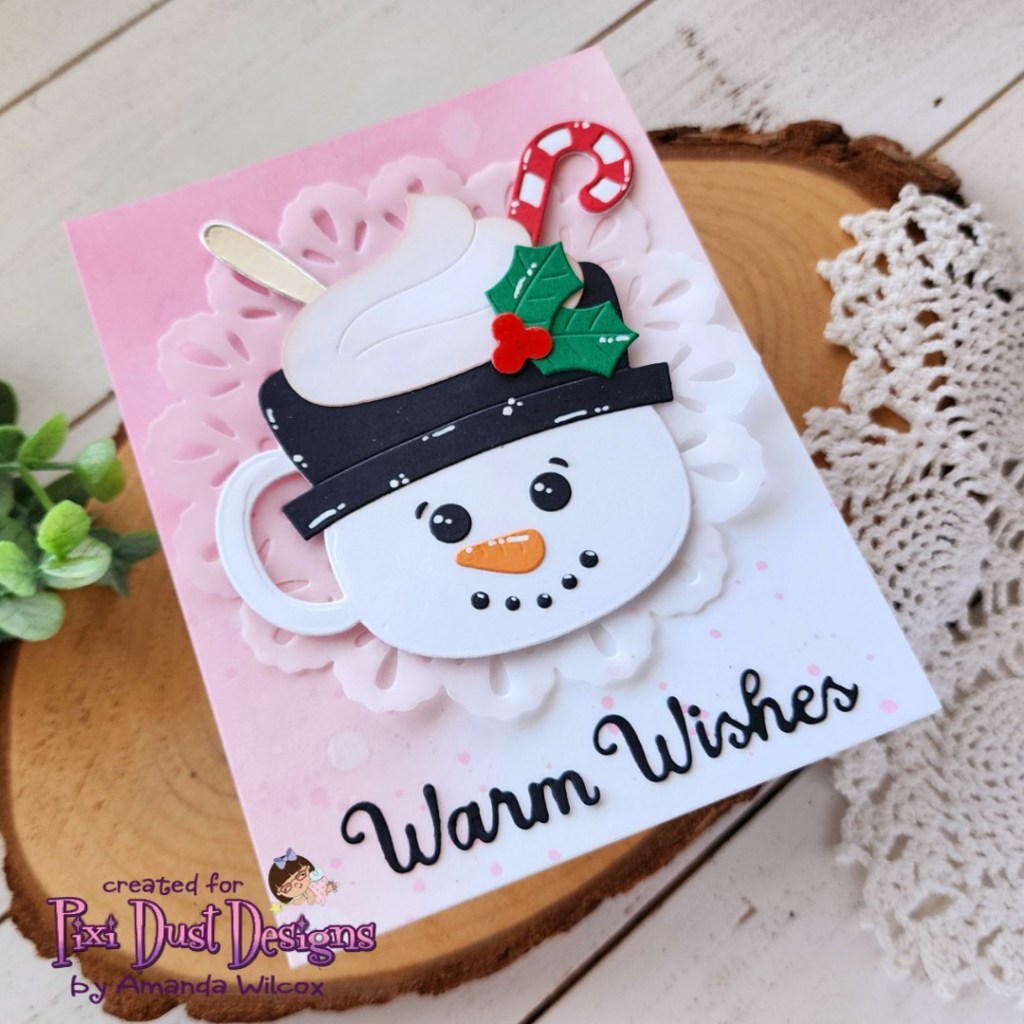
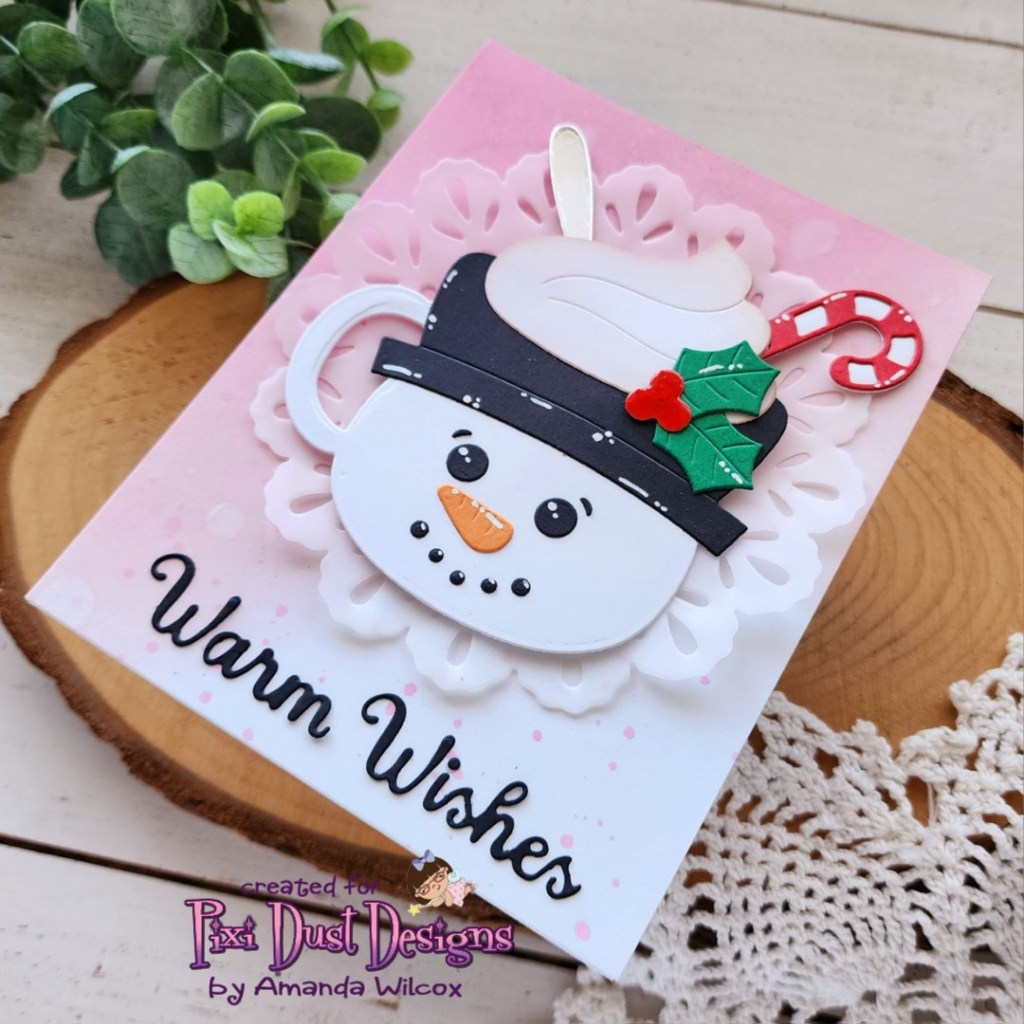
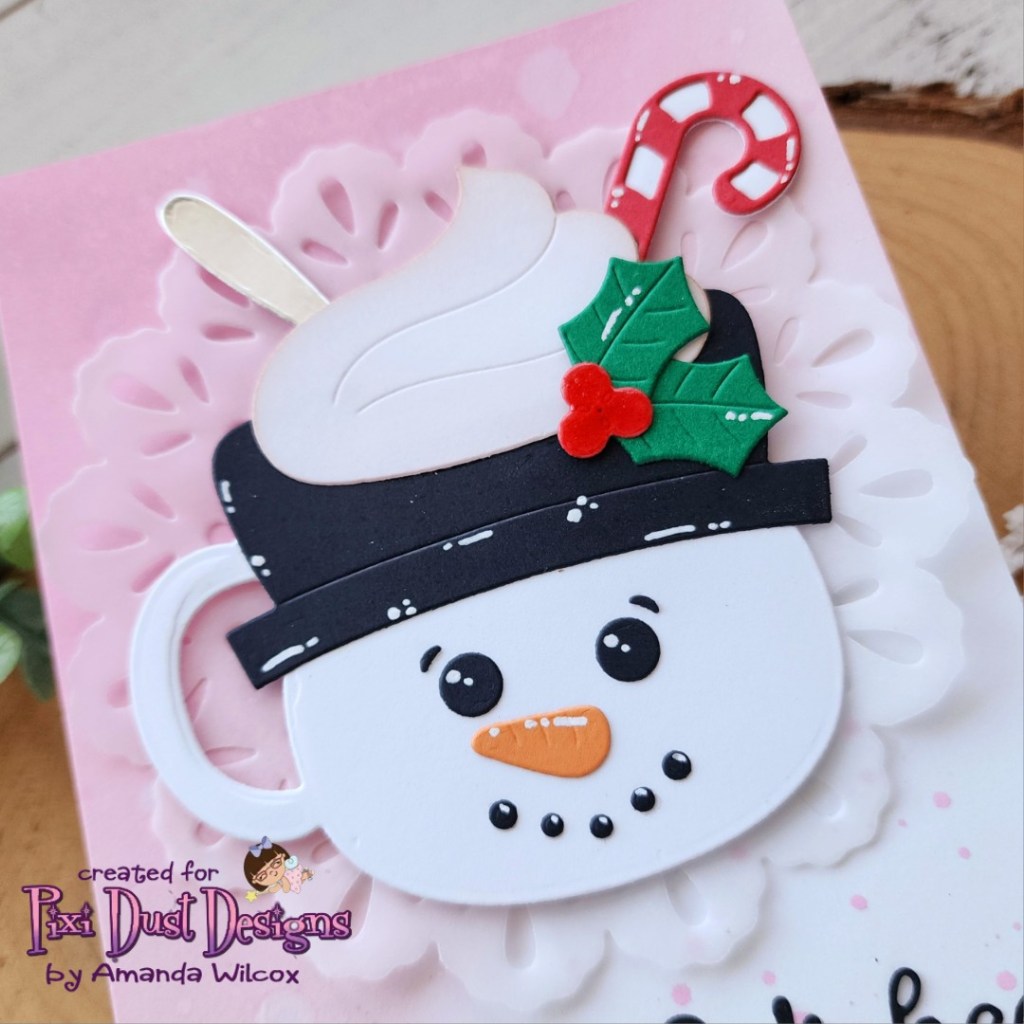
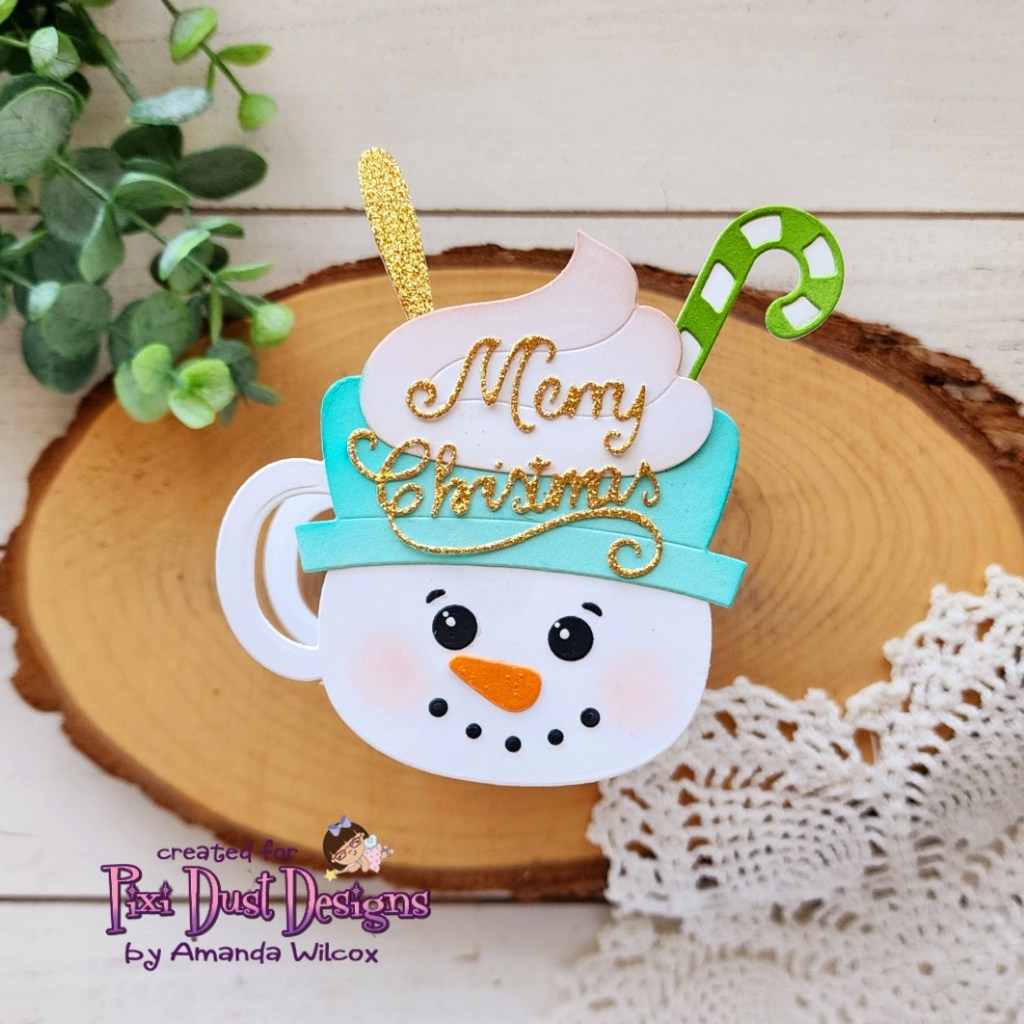
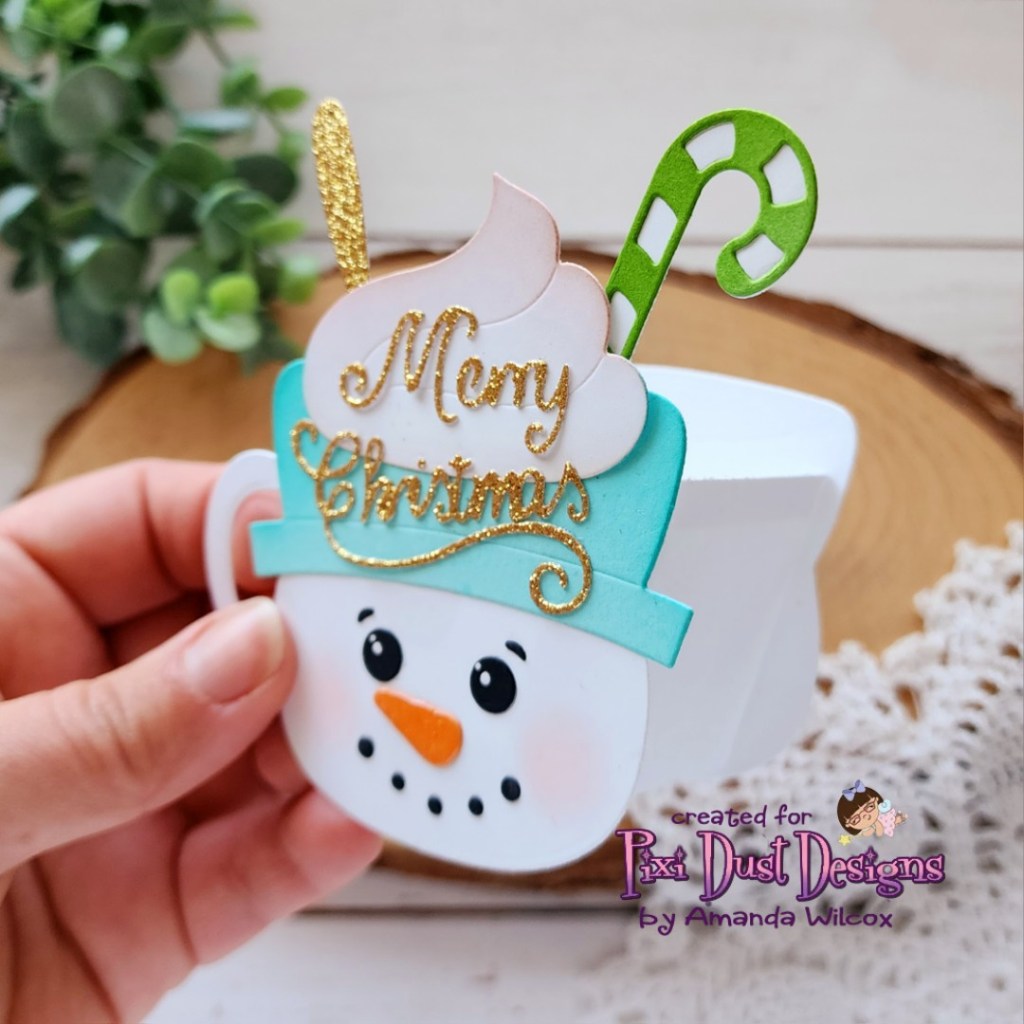
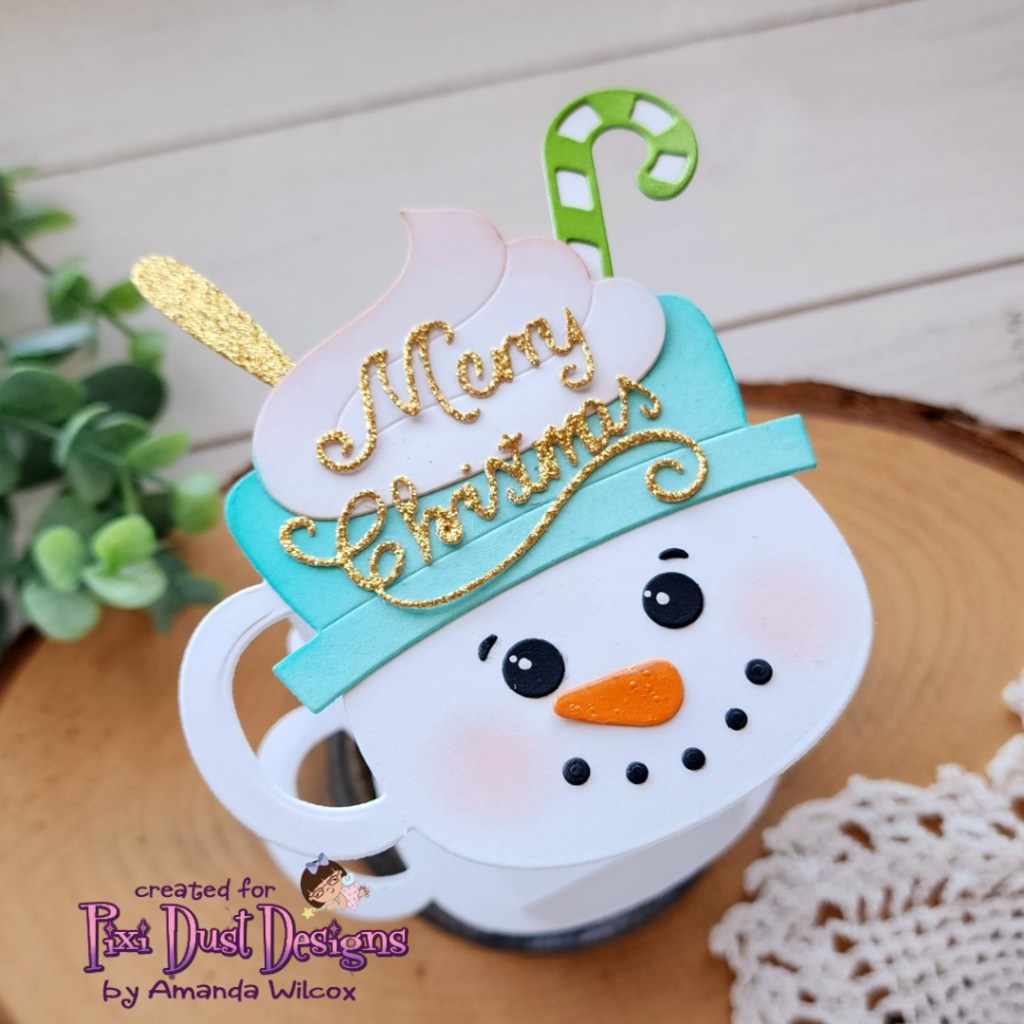
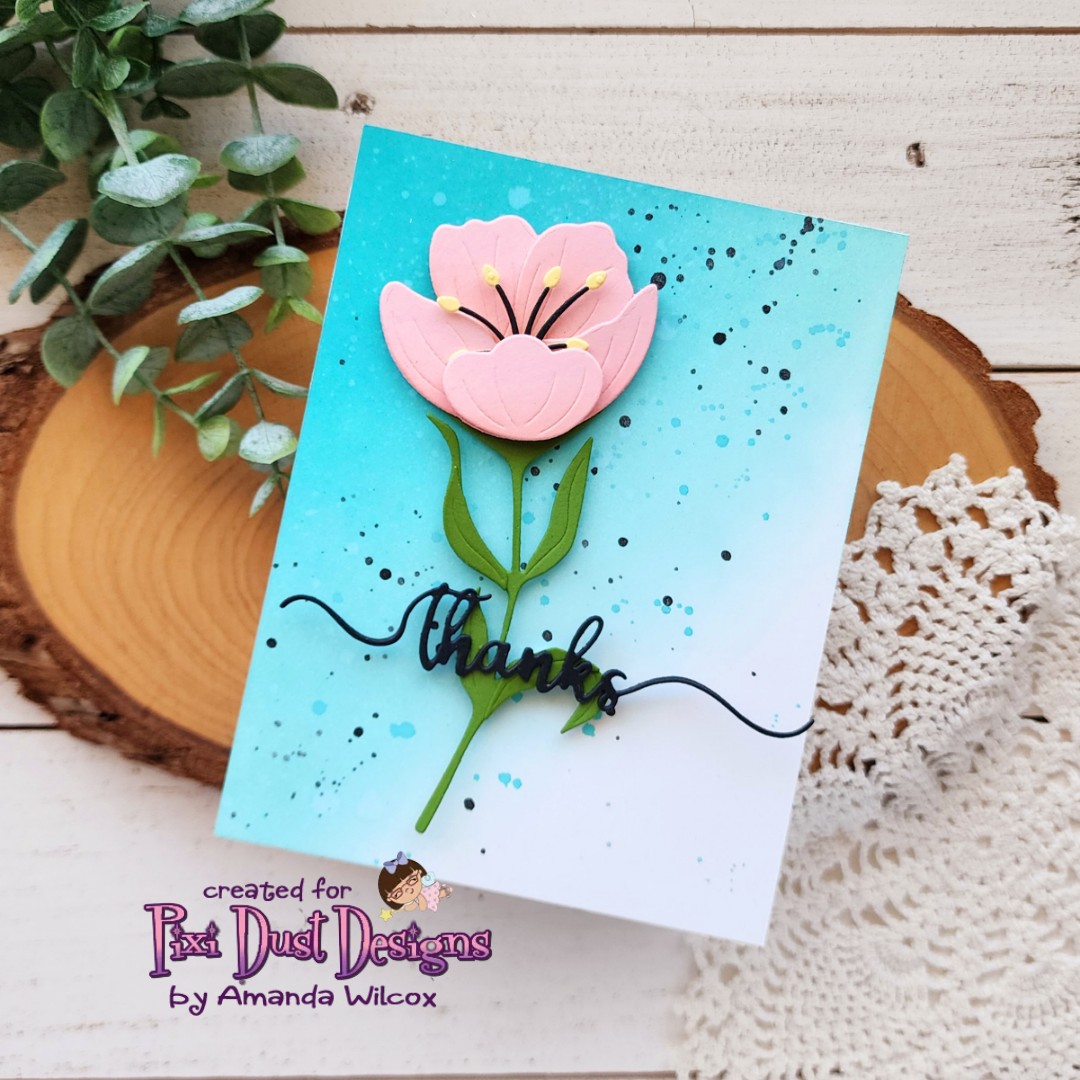
Welcome everyone! I’m sharing a card featuring the new Jack Mug dies from Pixi Dust Designs. I am absolutely loving this new die set! Jack is one of my very favorite characters and this die set is just perfect! If you’ve seen the movie you’ll know that I had to use this sentiment too.

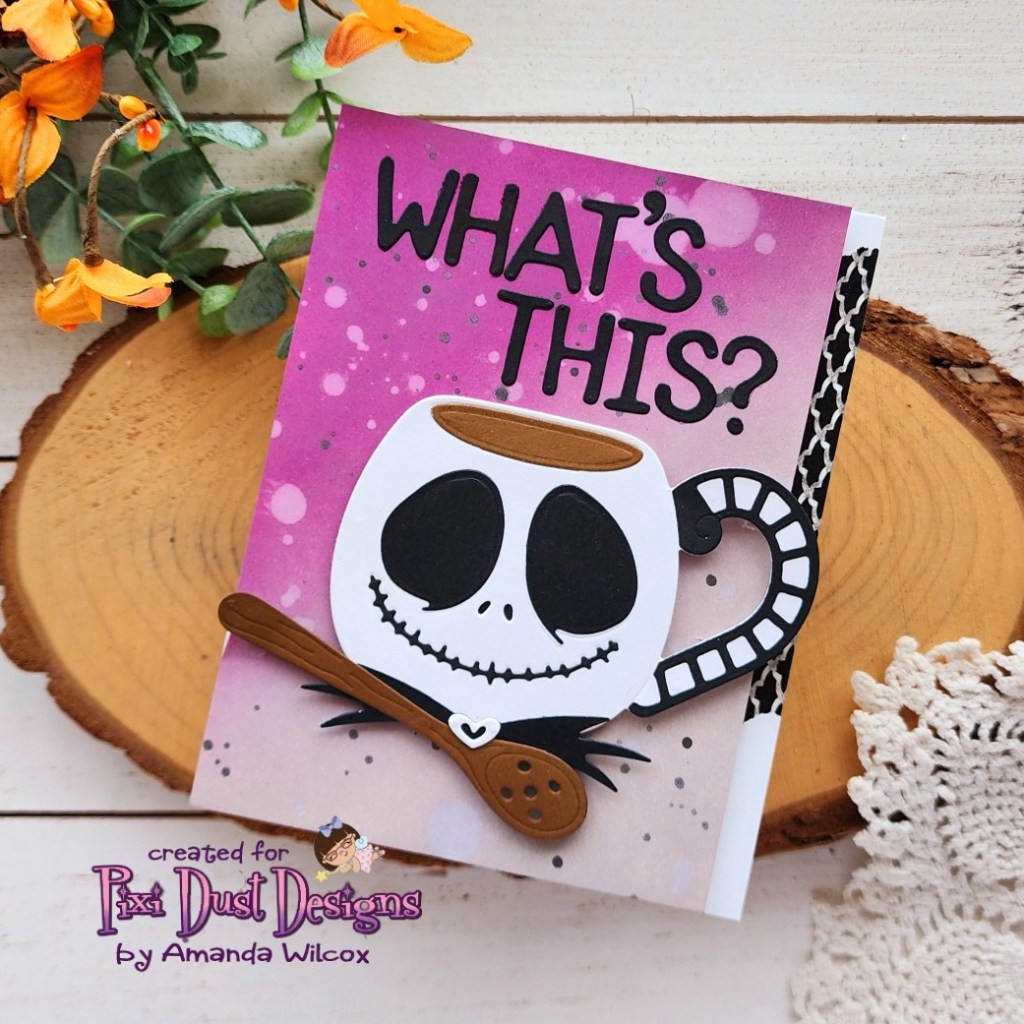
I cut all of my elements and used liquid glue to adhere them. Then I used a blank card base to figure out placement of my spoon and mug together and glued them in place as well. I added foam tape to the back and set it aside to work on my ink blending.

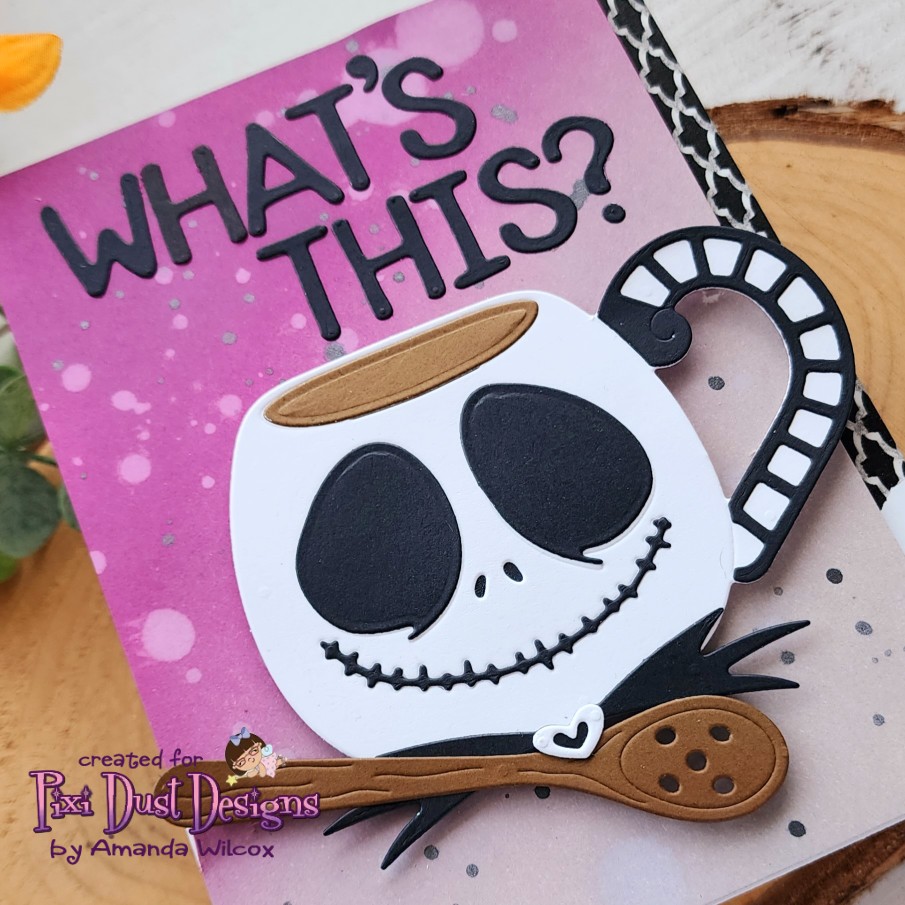
I blended distress oxide inks in seedless preserves and pumice stone at and angle from one corner to the other. Then I splattered the panel with water and black metallic watercolor. Next, I trimmed 1/4″ off the right side of the panel and added foam tape to the back.

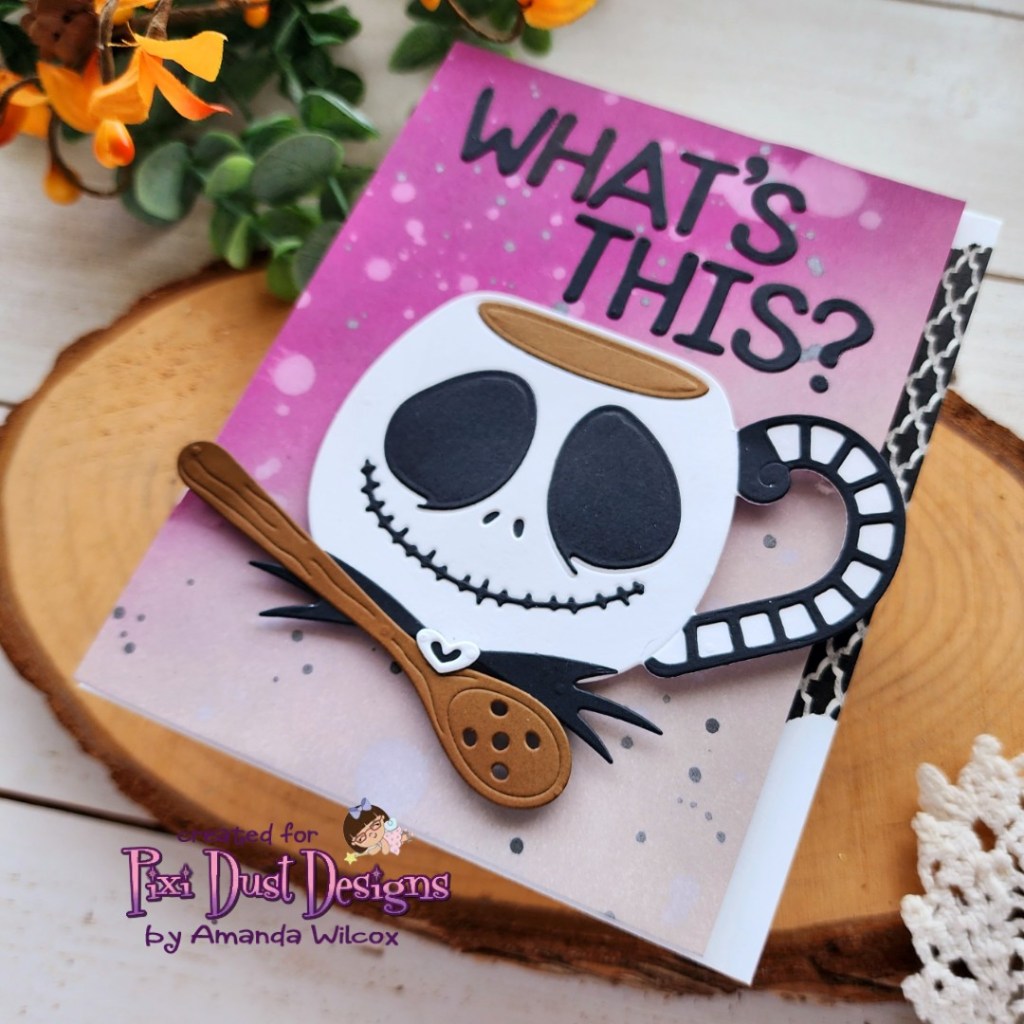
I added a strip of bat washi tape to the side of my card base and adhered the inked panel over that. Then I cut the letters for my sentiment from black cardstock and arranged them on my glass mat. I used pixie tape to keep them lined up, added glue to the back and adhered them to the inked panel. After those were in place I popped my mug and spoon below them and my card is finished.

Is the song playing in your head yet? It’s definitely in mine.

Products used:
Pixi Dust Designs Jack Mug dies
Newton’s Nook Essential Alphabet dies
Distress Oxide Ink – seedless preserves and pumice stone
Bearly Art liquid glue
Foam tape
LH Colors watercolor – black

I appreciate you sharing your time with me. Have a fabulous day!

Pixi Dust Designs – Spooky Mugs

Hey spooky friends! I hope you’re ready for today’s card because I’m RIDICULOUS excited to share it with you! It’s part of the new release from Pixi Dust Designs and the die set is called Jack Mug.

I can’t even you guys! He’s my favorite and I love this set SO MUCH! I took my time and die cut everything from cardstocks in my stash. Then I wanted to give somethings extra life, even in death, so I ink blended the edges a bit of Zero and Oogie cupcake. Then I used liquid glue and assembled everything.

I trimmed a piece of white cardstock down to 4×5.25 inches and ink blended it with distress oxide ink in hickory smoke and black soot. I splattered it with water and black metallic watercolor for texture. After that dried I stamped a sentiment and added my images with foam tape.

I added washi tape to the side of my card front and popped the inked panel up with foam tape on that.

Do you love it? I seriously love it! So much that this one might stay in my stash instead of going to a new home.

Products used:
Pixi Dust Designs Jack Mug
Trinity Stamps Trick or Drink stamps
Distress Oxide Ink – black soot and hickory smoke
LH Colors watercolor – black
Bearly Art liquid glue
Foam tape

I appreciate you sharing your time with me. Have a fabulous day!

Pixi Dust Designs – Adventure Awaits Fishing Card

Welcome everyone! I’m giddy to be sharing my card with you today. I loved this sweet fishing squirrel from the Outdoor Fun set and wanted to create a tag with him on it. But when I went through my Pixi Dust tag dies…the circle tag jumped out at my looking just like one of those old school red and white fishing bobbers! The rest is history!

To start off, I stamped and colored some images from Outdoor Fun and die cut them out, thinking I was making a tag.

But when I came across Tag B dies, I had to go with the giant fishing bobber idea. So I cut all the pieces to make two and used liquid glue to adhere them. Then I stamped my sentiment on one.

Next, I did a little ink blending and watercolor splatter to create a background for my scene. I used distress oxide inks in mowed lawn and tumbled glass with blending brushes and pearl watercolor from LH Colors for a little shimmer.

Now we assemble all of the pieces to a card base. Start by popping up the ink blended panel with foam tape on a card base. Then, glue down the bobbers with liquid glue and add the images with foam squares.

The top of the card was missing something so I decided to add a little cloud cover so no one gets sunburned today. Isn’t this just adorable and so fun!?!

This set is going to make it really easy to make masculine cards for tons of occasions which I love too!

Products used:
Outdoor Fun stamps and dies
Tag B dies
Clouds and Grass Slimline dies

Foam squares and tape
Liquid glue
Blending brushes
Distress Oxide Ink – tumbled glass, mowed lawn
LH Colors – pearl

I appreciate you sharing your time with me. Have a fabulous day!

Pixi Dust Designs – Making Memories Camping Slimline Box Card

Hey friends! It’s release day for Pixi Dust Designs and I’m excited to be sharing a fabulous camping themed box card using one of the new stamp and die sets that’s available!

Here’s a look at the finished card, then we’ll take a simple step-by-step how to put this box card together and decorate it with your favorite cuties, whether it be these new adorable camping squirrels or something else from your stash.

Start by die cutting all of the pieces from the Fall Box Card die set – parts A and B. I decided to cut them from the same color because I will be ink blending them to help parts stand out.

One think I didn’t photograph but is good to mention now, is that I cut a second back panel (the largest piece) from white cardstock and glued the two together. This gives me a nice big white space to write a message to the recipient but totally optional. It also covered the tabs.

I used rustic wilderness distress oxide ink to add depth and interest to each piece that has little grass tufts on it. The pieces that are left plain will have inked pieces glued to them.

Next, we add tear tape to all of the tabs. When I’m adding tape to something like a box card that will get wear and tear, I like to add pieces larger than the tab and trim off the excess so I know the entire tab has adhesive on it.

***Pro-tip so you don’t make the same mistake I did*** On this piece with the embossed lines, add tear tape to one tab and turn it over, adding tear tape to the opposite side for the second tab.

After adding the large tab to the back panel, I had to remove this adhesive and add a new piece to the opposite side. This was I can hide my tabs and they won’t be seen. It just keeps your final card cleaner.

After adding the sides to the back, I added a middle section to each emboss line. I chose to line the flap with the back of the embossing line but you could use the front. Then I added the front panel to the far left as you can see here as well.

Next, fold everything flat, remove all of the release paper from the remaining tabs and secure the other side. After that fold your box card back and forth a bit to reinforce those fold lines and make sure everything lines up.

Now, it’s time to decorate!

I added 1/8 inch tear tape to the bottom of each of my images and added them to all of the sections, filling in the whole box card. We leave for camping tomorrow so this card was extra fun for me to create because I’m really in the mood.

Here’s a look at it folded flat and ready for an envelope. How exciting and fun will this be for someone to pull out of an envelope!?!

Products used:
Fall Box Card dies
Happy Camper stamps and dies

Rustic Wilderness Distress Oxide Ink
Tear tape – 1/4″ and 1/8″

I appreciate you sharing your time with me. Have a fabulous day!

Pixi Dust Designs – Snowman Mug Card with Ink Blending Fun

Hi crafty friends! Thanks for stopping by. Today I have a card using the Pixi Dust Designs Snowman Mug dies, instead of the box I shared on release day. I am all about treat boxes and 3D projects with our cardmaking supplies, but it’s so great when things can work both ways!

When creating my snowman mug, I went with a more traditional color palette this time. I used liquid glue to adhere all the pieces. That extra wiggle time is great when creating projects like these.

Pro tip, the mug die cuts a slit for the candy cane and spoon that gets hidden by the whipped cream. I slid my pieces in the slot and held them together with washi tape to keep them from moving around while the glue dried and I was adding my other elements.

Next, I started on my background. This time I used distress oxide inks in kitsch flamingo and spun sugar for a soft pink tone. After blending at a diagonal on the panel, fading to nothing, I spritzed it with water and blotted it dry. For extra texture I splattered both colors on the panel too.

To create a focal point for my mug, I cut the largest Doily die from vellum and used foam squares to attach my snowman to that. Then I used liquid glue to adhere that to the inked panel. This hides the glue and makes it easy to attach. next, I used the Mug Add On dies to cut a sentiment from black cardstock and glued that with liquid glue at the bottom.

For finishing touches today I just added white gel pen highlights around the whole mug. Isn’t he just the sweetest!?! Totally adorable and other Christmas card for my stash, ready to go in December!

Products used:
Snowman Mug dies
Mug Add On dies
Doily dies

Foam squares
Liquid glue
Distress Oxide Ink – kitsch flamingo and spun sugar

I appreciate you sharing your time with me. Have a fabulous day!

Pixi Dust Designs – Christmas in July Release Day

Welcome and happy Friday everyone! Pixi Dust Designs has a new release today and it’s all about getting a jump on Christmas crafting. They are re-releasing the holiday mugs die series and adding some other new products in as well! Be sure to check it out. Today I have a fun treat box for you using the Snowman Mug and Mug Add-on dies.

I started by cutting all of my pieces from different colors of cardstock. Then I inked some of the edges for a little depth and added rosy cheeks to my snowman face too. Using liquid glue, I assembled the front mug.

I cut another solid mug piece from white cardstock and also cut the mug add on piece at the same time. I folded and creased the mug add on piece at all the score lines and added tear tape to all the flaps. I removed the release paper from one side and adhered it to the blank mug back. Then did the same thing on the other side, adhering the front decorated mug on top.

Since I used glitter paper for my spoon and sentiment, I didn’t thing it needed much extra. I simply finished things off with white gel pen highlights on his eyes and Touch of Gloss on his nose.

Now, this cute box is ready for treats when the holidays roll around. And with this much lead time, I think this cutie might multiply enough for my whole office! How fun would that be?!?

Products used:
Snowman Mug dies
Mug Add On dies
EZ Tear Tape
EZ Squeeze Liquid Glue
Touch of Gloss

I appreciate you sharing your time with me. Have a fabulous day!

Pixi Dust Designs – Floral Bergenia with Negative Die Cut Sentiments

Welcome back everyone! I’m happy to be sharing another card featuring the Bergenia dies from the June Pixi Dust Designs release. I am finding it so fun to cut and assemble these gorgeous layered blooms. Today I have a simple card with a fun twist to try.

I started, once again, by die cutting all the pieces to my flower and ink blended some shadows on the layers with a blending brush and dye inks. Then I used liquid glue to assemble all the pieces, except a foam square for the top layer of the flower.

Then, for my sentiment, I cut a piece of white cardstock to 4×5.25 inches and arranged my dies, using the flower for help with placement. I used pixie tape to hold the dies in place and ran the panel through my die cut machine. I was careful to keep all the little pieces of the letters too. I glued the white panel to a piece of purple cardstock and then inserted all the letter centers with liquid glue.

I added the flower with foam squares and finished the design off with a scattering of gemstones for some pretty bling. I love adding sparkle to things!

Products used:
Bergenia dies
Foam squares
Liquid glue
Rainbow Reflection Rhinestone embellishments

I appreciate you sharing your time with me. Have a fabulous day!

Pixi Dust Designs – Just Keep Swimming Slimline with Soft Ink Blended Backgrounds

Hello everyone! I’m so glad you stopped by. Today I’m sharing a slimline card featuring the new Keep Swimming die set from Pixi Dust Designs. I went a completely different direction from my last card with this set and it was really fun!

I started by die cutting the slimline cover plate in the Keep Swimming die set from white cardstock. I tossed the little bubbles that cut out but I saved the larger opening pieces to ink blend on. I chose blue, teal and purple dye inks and randomly blended them on each piece with blending brushes. Then I splattered them with some pearl watercolor and set them aside to dry.

Then I chose some characters and scene setting dies from the set and cut them all from colored cardstock. I ink blended some shading on each one and used liquid glue to adhere the different layers together.

you might notice that I sort of followed a certain Disney movie’s character colors because I love that movie so much and totally couldn’t resist myself. After everything was glued together I started deciding what was going to go in which panel.

When that was figured out, I cut a piece of teal cardstock and glued it to a white slimline card base before gluing the die cut frame over it. This colored in all the bubble holes. Next, I added foam tape to the back of the three scene panels and popped them up in their respective spaces.

Finally, I added the images to my mini scenes with a combination of liquid glue and foam squares. Last, I die cut my sentiment using dies in the Birthday Sentiments set. I cut skinny foam pieces to pop it up and make it the same level as the background panels.

Aren’t these ocean critters just the cutest thing ever??? I’m totally smitten with this die set and can see so many more projects coming in the future!

Products used:
Keep Swimming dies
Birthday Sentiments dies

Twiddler’s Nook blending brushes
LH Colors pearl watercolor
Foam squares
Liquid glue
Lawn Fawn dye inks – mermaid, forget me not and juice box

I appreciate you sharing your time with me. Have a fabulous day!

Pixi Dust Designs – Follow Your Heart Bergenia Card with Ink Blending

Welcome everyone. Today I have another card using the Pixi Dust Designs June release. This time I tried one of the new floral die sets – Bergenia. It’s so pretty and almost too simple to create. I loved it!

I started by die cutting all of my floral elements from colored cardstock. Then I used blending brushes to add some shadows to the different parts of the flower petals and leaves. I used liquid glue to adhere all of the layers together except the most front layer of the flower petals which I added with a foam square.

Then I took an A2 white panel of cardstock and ink blended with distress oxide inks from the top left corner fading to nothing. I used peacock feathers and salvaged patina and then splattered water, peacock feathers ink and black paint across the design. Once the panel was dry I adhered it to a card base and then popped the flower up with foam squares.

Last, I die cut thanks from the Tag Accessories die set using black cardstock and glued it to the flower leaves with liquid glue. I left the ends free and it really gives a beautiful look in person. You just have to be mindful putting it in an envelope.

Products used:
Bergenia dies
Tag Accessories Add On dies

Distress Oxide Ink – peacock feathers and salvaged patina
Foam squares
Liquid glue

I appreciate you sharing your time with me. Have a fabulous day!

Pixi Dust Designs – June Release | Just Keep Swimming Ink Smooshing

Yay friends! It’s release day for Pixi Dust Designs! This release has some beautiful florals and really fun ocean goodies. Of course I was totally drawn to the critters. They’re so cute, really easy to put together and, most of all, fun to create with!

For my first card with these cuties, I went lots of texture and made an inky fun mess! The technique I used is ink smooshing which is super simple, gives amazing results and is totally forgiving for us perfectionists.

I took a couple pieces of watercolor paper, Tombow brush markers, a clear block, spray bottle and heat gun to accomplish everything. I scribbled with the markers on the block, sprayed it with one or two spritzes from a small spray bottle and smooshed it on the paper. Then I used the heat gun to dry the area and repeated all over.

Sometimes I used the same color twice – this still gives layering and visual texture if you dry between applications. Then I also layer different colors on top of each other.

Next, you grab your dies and star cutting. Pick and choose as you move through the papers that you inked on. Don’t these look so cool!?! I love them!

Last, I cut the back layer that fills in the eyes from black cardstock and used liquid glue to adhere all the layers together.

I arranged the die cuts all over an A2 card front and then carefully glued everything in place with liquid glue. You can accomplish this a few ways. Lift each one, add glue and replace it or take a piece of press’n’seal to lift your arrangement up at once, add glue to the back and place it back down.

Then I trimmed anything hanging off the edge and filled in empty spots with large pieces of seaweed that were trimmed off.

I cut the sentiment from silver glitter and black cardstock and used liquid glue to adhere the layers together and then to the card front. For finishing touches I added Nuvo Crystal Drops like bubbles in all of the open white spaces.

Be sure to check out the whole release. There is definitely something fun for all tastes!

Products used:
Keep Swimming dies
Tombow Brush Markers
Bearly Arts liquid glue
Nuvo Crystal Drops – teal

I appreciate you sharing your time with me. Have a fabulous day!