Doodlebugs – Christmas Mixes

Hey friends! It’s Mix it up Monday on the Doodlebugs blog and today I went the holiday route. I feel like Christmas is one of those holidays where mixing and matching all the themes together work, pretty much no matter what. It’s all fun and festive, and I love it!!!

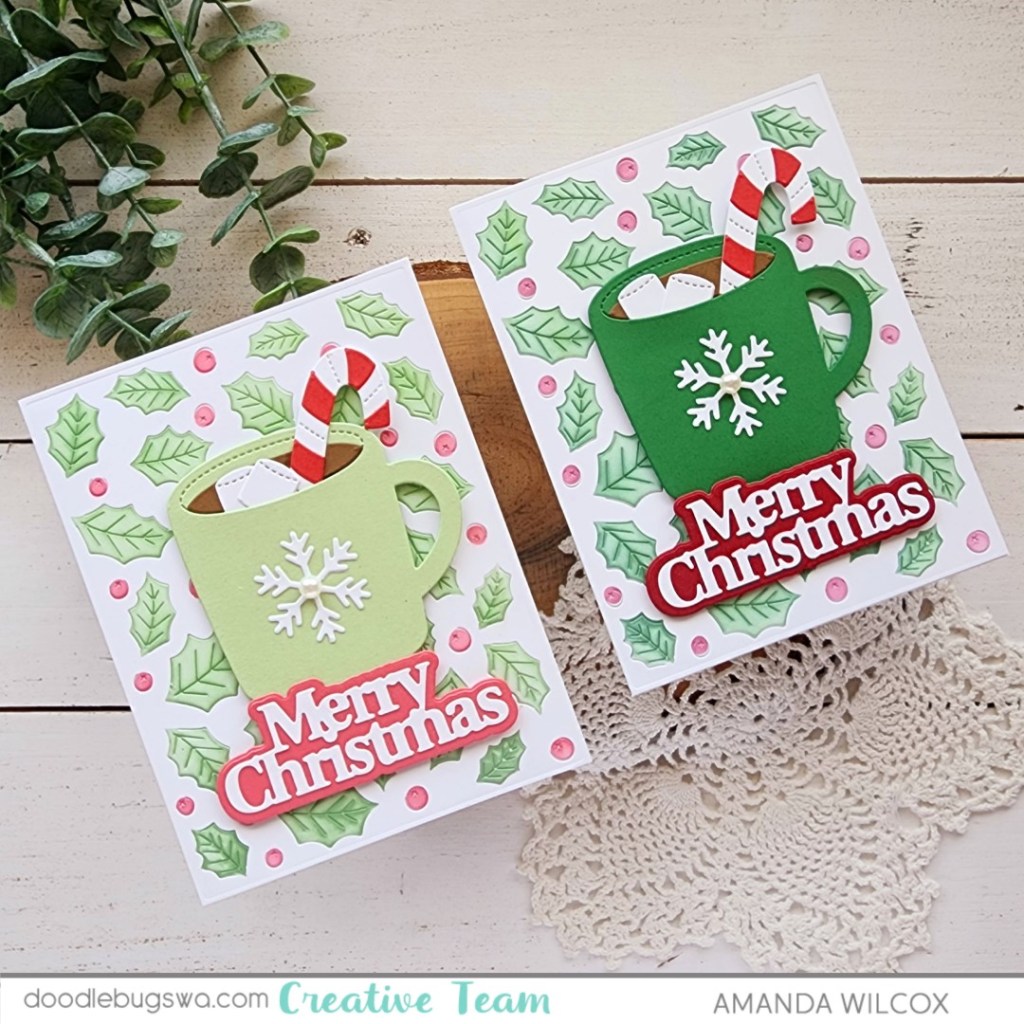
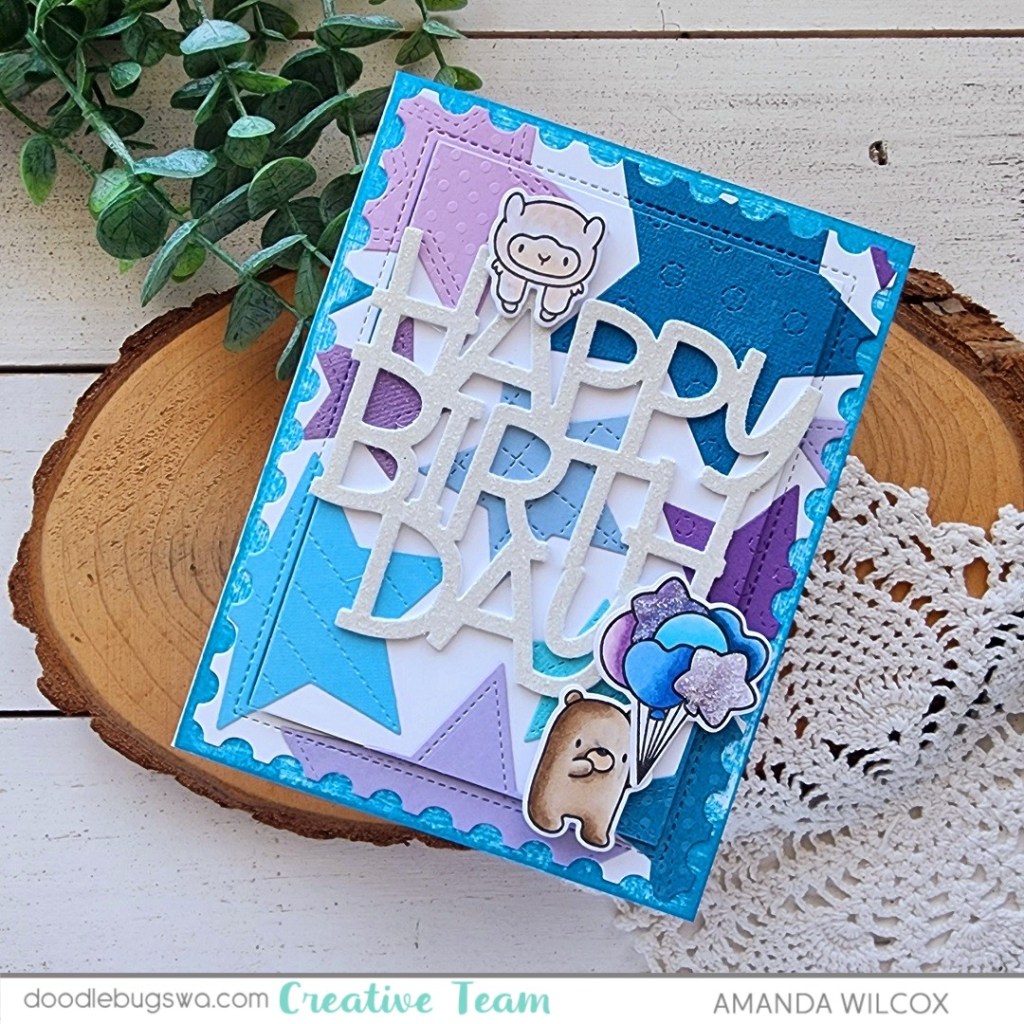
I started by playing around with the Waffle Flower Holly background die and stencil combo. These background dies from Waffle Flower are genius and so much fun to play with different color combos. I can never stop at one because one color idea leads to another and next thing I know, I’ve got 12 backgrounds and some serious cardmaking ahead of me. It’s wonderful!

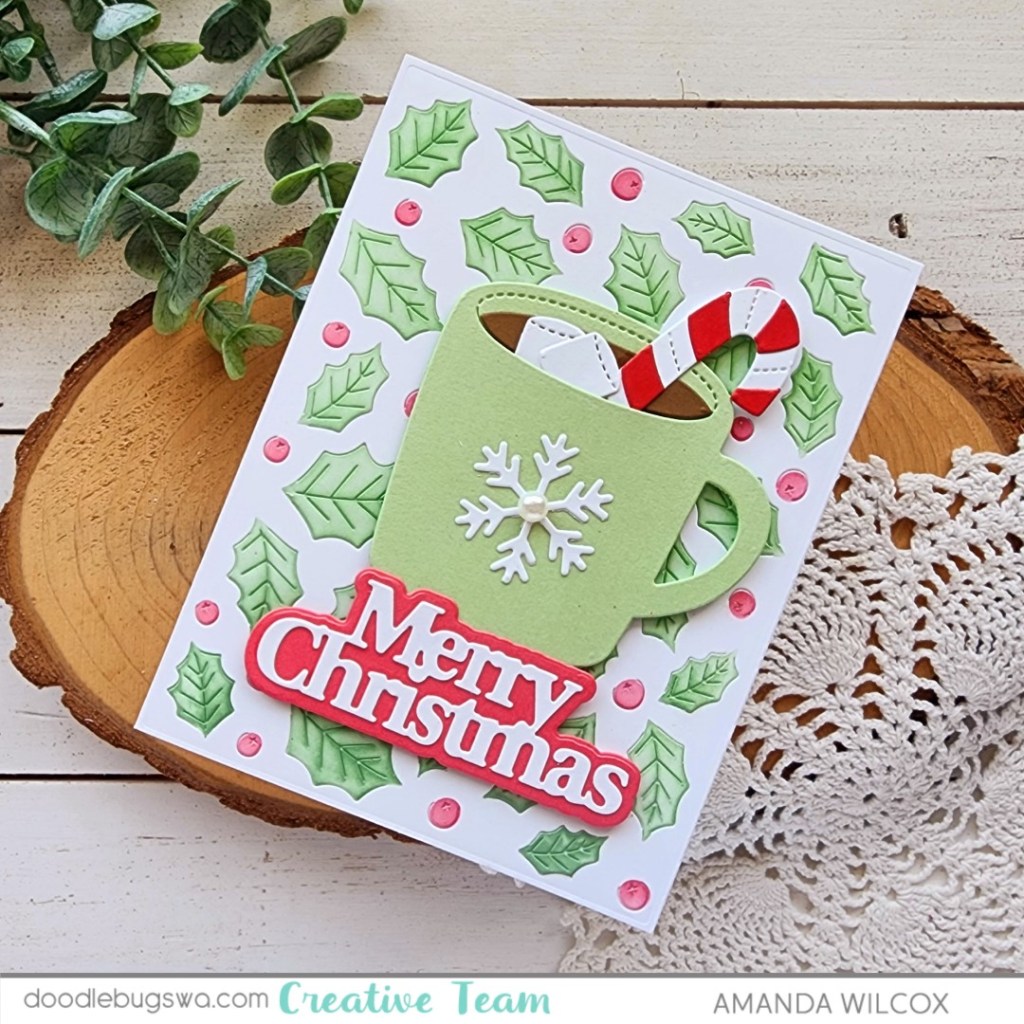
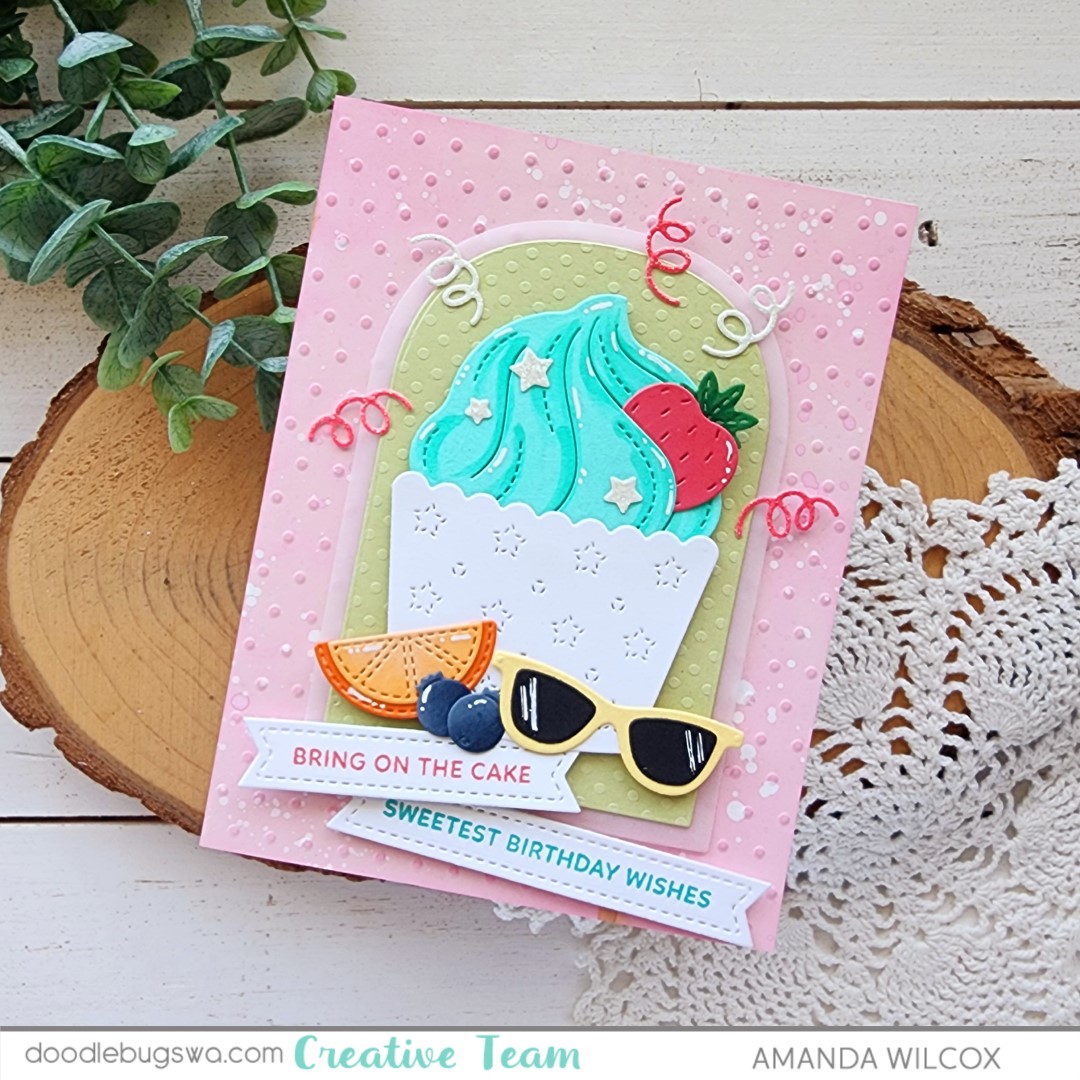
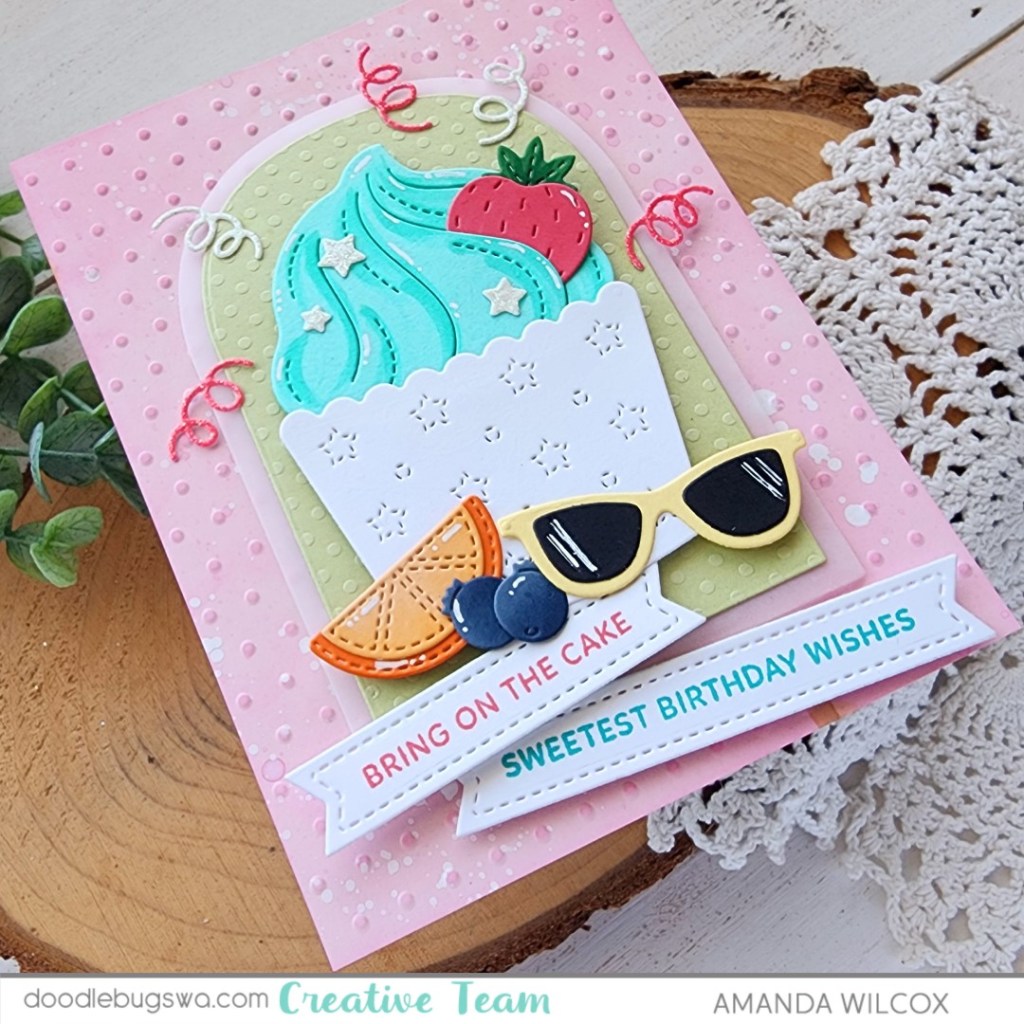
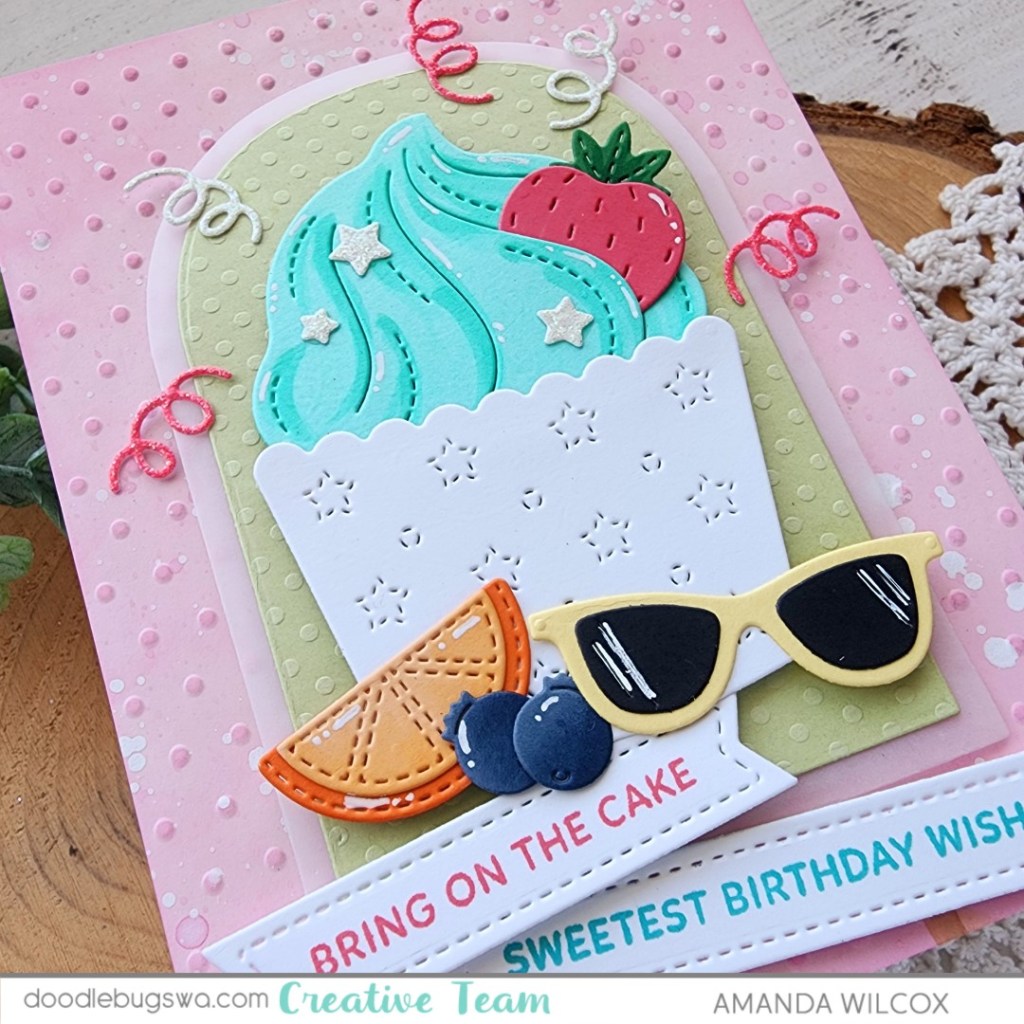
With the backgrounds inked up, I pulled out the Waffle Flower Merry Christmas sentiment dies and cut the shadows from coordinating cardstock as the berries on my background. The words are white and everything is assembled with liquid glue.

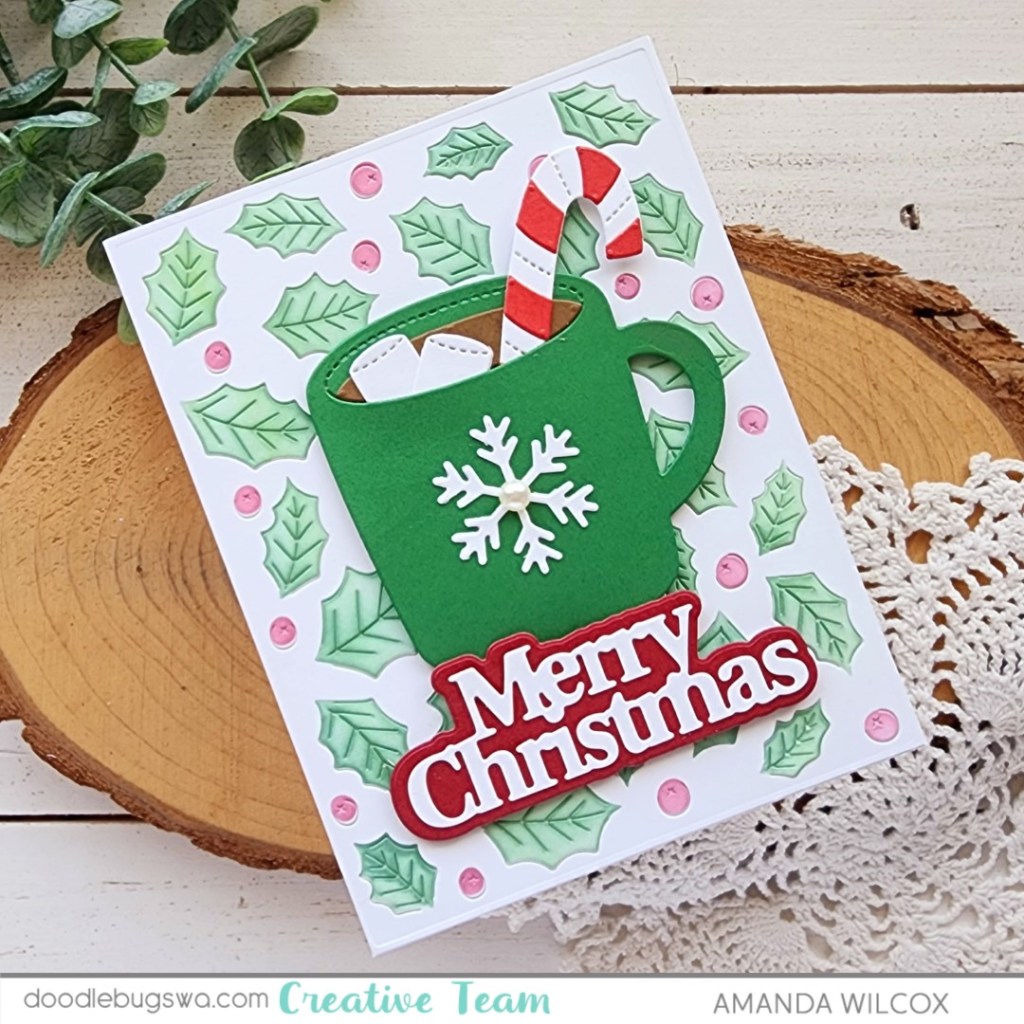
I really think I could have just popped the sentiment up in the upper center but what’s the fun in that?!? So I pulled out the Pretty Pink Posh Winter Mug dies and created a couple of those in coordinating colors to each background as well.

I popped everything up on the background panel with foam tape and added a pearl to the center of each snowflake for a little something.

These cards would be simple and quick to mass produce for the holidays, especially if you got started early! I’ll definitely be adding a few more color combos to my stash before I’m done with them.

Products used:
Waffle Flower Holly Jolly die and stencil
Waffle Flower Merry Christmas Print dies
Waffle Flower blending brushes
Pretty Pink Posh Winter Mug dies
Pretty Pink Posh pearls
Liquid glue
Foam tape

I appreciate you sharing your time with me. Have a fabulous day!

Doodlebugs – Summer Birthday Fun

Hey friends! I’m on the Doodlebugs blog today sharing a fun birthday Mix it up Monday with summer vibes. We don’t have many summer birthdays in our family and friends so I don’t make many cards this style and it was really fun!

I started with the fun Pretty Pink Posh Celebration Cupcake dies, wanting to expand the use from 4th of July vibes to general summer, so I cut the fruit and sunglasses, omitting all the other parts at first. I added some detail with copic markers instead of ink blending this time and used liquid glue to adhere all the parts and pieces together.

Next, I cut 2 Mama Elephant Arches from vellum and a green polka dot cardstock in my stash. I used tape runner to adhere the layers together and foam tape to add the cupcake to that.

I started with a blank pink background but didn’t like that so I ran the panel through my die cutter with the Spellbinders Tiny Dots embossing folder, ink blended the edges with some picked raspberry distress oxide ink and splattered it with white paint. Ahhh, that feels so much more like me. Then I popped the arches up with foam tape.

I cut a couple of Pretty Pink Posh sentiment strips from white cardstock and stamped sentiments from the Pretty Pink Posh Sentiment Strips | Birthday stamp set in guava and peacock inks. These are popped up with foam strips.

Now my card is really bottom heavy so I went back to the cupcake die set and cut some of the other decoration type shapes out and glued them all around with liquid glue. I think they add a fun touch and extend the design up without pulling everything apart.

The last thing I did was add white gel pen accents to all of the images.

Products used:
Pretty Pink Posh Celebration Cupcake dies
Pretty Pink Posh Sentiment Strips dies
Pretty Pink Posh Sentiment Strips | Birthday stamps
Mama Elephant B2B Arches dies
Spellbinders Tiny Dots embossing folder
Lawn Fawn ink – peacock and guava
Distress oxide ink – picked raspberry
Liquid glue
Foam squares, tape and strips
Gelly roll pen – white

I appreciate you sharing your time with me. Have a fabulous day!

Doodlebugs – Birthday Fun with Cool Colors

Hey friends! It’s Mix it up Monday on the Doodlebugs blog. Today I’m thinking color theory while creating a birthday card for one of my very favorite humans! She loves those cool tones so that’s where I pulled my color palette from…keeping to the blues and purples more than anything. Do you do that when creating for someone specific?

I started my design my playing with the Pretty Pink Posh Stitched Stars dies. I cut them from lots of different cardstocks and arranged them on a piece of white cardstock. After gluing them down, I cut the panel out with the Mama Elephant Postage Frame die, keeping the inside and frame pieces.

Next I cut the Mama Elephant Big Happy Birthday from white cardstock 3 times and glitter white cardstock once. I used liquid glue to adhere the layers together. Then went hunting for cute critters to add to the mix. I landed on a combo of Mama Elephant Summer Floaties and the balloons from Mama Elephant Peekabuddies. After stamping and coloring the images, I used the coordinating dies to cut them out and switched to assembling everything.

I drug my Lawn Fawn fish tank ink pad across the edges of my card base for some fun textured color. Then glued the outside frame of my background panel down with liquid glue. I popped the center up with foam tape and then glued the sentiment to that. I popped the images up with foam squared and finished things off with a little stardust Stickles and glossy accents.

Products used:
Pretty Pink Posh Stitched Stars dies
Mama Elephant Postage Frame dies
Mama Elephant Peekabuddies stamps and dies
Mama Elephant Summer Floaties stamps and dies
Lawn Fawn fish tank ink
Liquid glue
Foam tape and squares
Stickles – stardust
Glossy accents

I appreciate you sharing your time with me. Have a fabulous day!

Doodlebugs – Out of this World Combos

Hey friends! I’m on the Doodlebugs blog today for Mix it up Monday and it’s totally out of this world! I mixed some fun Pretty Pink Posh and Mama Elephant goodies together to create an anniversary card for my husband recently and am excited to share it with you.

I started by choosing a few images from Mama Elephant Little Agenda Spaceship, stamping and coloring them with copic markers. Then cut them out with the coordinating dies and glued my pup in his rocket with liquid glue.

Switching gears to the background, I cut the Pretty Pink Posh Pierced Stars cover plate from black cardstock and backed it with yellow cardstock from my stash. I inked the edges with Lawn Fawn yeti ink and then went over that with distress oxide mustard seed for a faint glowy look. Then I splattered it with iridescent watercolor for some shimmer.

While the watercolor was drying, I heat embossed the sentiment from Pretty Pink Posh Outer Space and fussy cut it out. With the watercolor dry, I added the images with foam squares and carefully added liquid glue to the back of the vellum and adhered it as well.

For finishing touches I added bits of glossy accents to each of the images and a scattering of clay stars across the whole design. We are in outer space after all.

Products used:
Mama Elephant Little Agenda Space Ship stamps and dies
Pretty Pink Posh Pierced Stars cover plate
Pretty Pink Posh Outer Space stamps
Liquid glue
Foam squares
Glossy accents
Lawn Fawn Yeti ink
Distress Oxide Mustard Seed ink
Blending brushes

LH Colors iridescent watercolor
Twiddler’s Nook Sailor Moon clay embellishments

I appreciate you sharing your time with me. Have a fabulous day!

Doodlebugs – Let’s Spook Up Some Fun Summerween Card

Hey friends! It’s Mix-it-up Monday on the Doodlebugs blog and with the recent spooky release from Mama Elephant, I jumped at the chance to make a Summerween card!

We had a hot spell recently and I try not to use my copic markers when it’s too hot because they leak so I stamped and watercolored these images from Mama Elephant Big Boo, then used the coordinating dies to cut it all out.

I used a combo of liquid glue and foam squares to assemble my mini scene. Then I switched gears to the background panel.

For that, I used the Pretty Pink Posh Spider Web stencil set. I inked the web layer with white pigment ink and then heat embossed white over it so it was shiny and stood out more. Then I added black paint to Ranger Texture Paste for my spiders. This made them puffy and matte next to the shiny webs.

When the spiders were dry, I added the panel to a card base and popped up my scene elements with foam squares. For the sentiment, I grabbed the trusty Pretty Pink Posh Sentiment Strip dies and stamps. After heat embossed one, I popped the strip up under the house for a nice grounding look.

For finishing touches I added some gold watercolor to parts of the images and then splattered a bit across the whole card front too. Last, I added glossy accents to the flame on the candle in front of the haunted house.

Products used today:
Mama Elephant Big Boo stamps and dies
Pretty Pink Posh Spider Web stencils
Pretty Pink Posh Sentiment Strips dies
Pretty Pink Posh Sentiment Strips | Halloween stamps
Embossing powder
VersaMark ink
Anti-static bag
Texture paste
Gold watercolor
Zig Clean Color Real Brush markers
Water brush pen
Glossy accents
Foam squares

I appreciate you sharing your time with me. Have a fabulous day!

Doodlebugs – Hooray! Floral Congrats Card

Hello again. I have a fun mix-it-up Monday card to share with you that started with a very simple idea and definitely evolved into its own. I think it turned out so pretty and I had fun playing with some of my favorite dies while I was at it.

I needed a congratulations card so I went digging in my large sentiment dies to see what struck me with inspiration. I landed on the Lawn Fawn big hooray die, cutting it from white cardstock three times and gluing the layers together before I even formed a solid plan. Then I went digging for a good mini sentiment to go across the center and landed on the Pretty Pink Posh Sentiment Strips collection, and the coordinating dies.

Next, I wasn’t sure what to add around or in the large letters. My initial go-to was cute critters but nothing was vibing for me. So I pulled out my favorite Spellbinders birdie and while I was digging for that, I came across the Spellbinders Kaleidoscope Arch stamp and die set. The florals in this set are so pretty and very low stress to cut and assemble. Some of the more detailed sets stress me out with all the layers and my lack of floral knowledge.

So, I cut all the pieces for the florals and the sweet birdie, using liquid glue to adhere the pieces together. After playing around for a bit I also used liquid glue to adhere the florals popping out of the hooray letters all over. To keep the background interesting but subtle, I embossed a 4×5.25 inch piece of white cardstock with the Spellbinders columns embossing folder.

I popped the background panel up on a white card base with foam tape and then used liquid glue to adhere the floral hooray to that. Last, I added the birdie with a combo of a foam square and liquid glue, and the sentiment strip with a foam strip.

I liked the shine that the foil cardstock gave the flower centers so my finishing touches for this card were just glossy accent on the birdie’s beak and eye. Isn’t she the cutest?!? I love that you can’t go wrong with any variation of color combos on this bird. It’s always fun.

Products used:
Spellbinders Sweet Birdie dies
Spellbinders Kaleidoscope Arch dies
Spellbinders Columns embossing folder
Lawn Fawn Big Hooray die
Pretty Pink Posh Sentiment Strips | Occasions stamps
Pretty Pink Posh Sentiment Strips dies
Liquid glue
Foam squares, strips and tape
Glossy accents
Embossing powder – white
Anti-static bag
Versamark ink

I appreciate you sharing your time with me. Have a fabulous day!

Doodlebugs – Mass Producing Gift Tags

Hello everyone! For this week’s Mix-it-up Monday I’m sharing a gift tag project I created for work. We just had our annual Conference last week and I made gift bags for some of the Board as an end of year thank you to them. You know I can’t have gift bags without cute tags to go with them. So I spent a little bit and assembly lined a batch of froggy cuteness.

This whole project started with me playing around with the Mama Elephant Combo Circle creative cuts. They’re so fun and I thought they would be great for a different tag. Once I chose my scallop colors I started die cutting all the pieces – 2 white centers (front and back), a blue scallop and a green scallop.

I couldn’t decide which little agenda critters to use so I solicited my daughter’s help and she chose my favorite frogs. I can’t get enough of them. So I stamped out nine different ones, colored them all and used the coordinating dies to cut them out.

After assembling the layers of the combo circles, I blended a little green and teal inks in the center and splattered them with cracked pistachio distress oxide ink.

While the splatter was drying, I stamped and heat embossed a sentiment from Pretty Pink Posh Sentiment Strips | Fall and cut them out with a Pretty Pink Posh Sentiment Strip die. This die set and the coordinating collection of sentiments will not collect dust on your shelf. I promise. I am constantly reaching for them to add that perfect something.

Last, I popped the sentiment strips and frogs up with foam squares and strips. I used a Fiskars hole punch and threaded some twine through the holes. Now these are ready to be tied to the bags and handed out.

Products used:
Mama Elephant Little Agenda Frogs stamps and creative cuts
Mama Elephant Combo Circle creative cuts
Pretty Pink Posh Sentiment Strips | Fall stamps
Pretty Pink Posh Sentiment Strips dies
Foam squares and strips
Embossing powder – white
Embossing and watermark ink
Anti-static powder bag
Liquid glue
Distress oxide ink – cracked pistachio
Lawn Fawn ink – mermaid and jalapeno

I appreciate you sharing your time with me. Have a fabulous day!

Doodlebugs – Treat Yourself on your Berry Special Day

Hello everyone! It’s time for another mix-it-up Monday on the Doodlebugs blog. Today we’re mixing all the strawberry things together again in a different way. I love how bright today’s card turned out! It’s so sweet you can almost taste it.

I started with the Pretty Pink Posh Fresh Berries stamp set. I stamped out a few berries and leaves, coloring everything with copic markers before using the coordinating dies to cut it all out.

Next, I stamped and heat embossed a sentiment from the Waffle Flower Birthday Wishes stamp set and cut it out with the coordinating die. I also cut a Waffle Flower Sweet Lattice panel for my background.

With all the pieces ready to go, it’s time to assemble some. Using the sentiment as a guide on the background panel, I used liquid glue to adhere the strawberries and foliage in place. Then I added the sentiment with foam squares so there is some dimension.

Not wanting white on white for my background, I took the Lawn Fawn guava ink pad direct to my card base for some textured color. Then I used liquid glue to adhere the lattice in place.

For finishing touches I added a few Spellbinders pearls and white gel pen highlights to the images.

Products used:
Waffle Flower Sweet Lattice die
Waffle Flower Birthday Wishes stamps and dies
Pretty Pink Posh Fresh Berries stamps and dies
Lawn Fawn guava ink
Liquid glue
Foam squares
Spellbinders Pearls – fashion topaz
Sakura gelly roll pen – white

I appreciate you sharing your time with me. Have a fabulous day!

Doodlebugs – A Berry Fun Full Card Front Shaker

Welcome to mix-it-up Monday on the Doodlebugs blog! We’re creating a quick and fun full card front shaker with a summery strawberry theme. We’ve had a little relapse in weather but I’m not giving up on summer crafting in the slightest!

I started my card today by inking up the Waffle Flower Strawberries background stencil set. To be sure the ink showed up really well on my kraft base, I used distress oxide inks. The colors I chose were candied apple, pine needles, mowed lawn and mustard seed. Then I spread a little glossy gel through the final seed layer for subtle shiny details.

Once the glossy gel was dry, I trimmed the panel to 4×5.25 inches and wrapped a Waffle Flower shaker cover around it. I only adhered 3 sides at first, pouring in my shaker bits and then securing the last side down. I used tear tape for this because it’s strong and instant. I find it works best with the plastic shaker covers. My sequins are from Pretty Pink Posh and Spellbinders.

Next, I stamped and heat embossed a sentiment from Pretty Pink Posh Fresh Berries and used the coordinating die to cut it out. Then I stamped another small sentiment from Pretty Pink Posh Sentiment Strips | Valentine and cut it out with the smallest Pretty Pink Posh Sentiment Strip die. I adhered both of these to the front of my shaker panel with foam strips.

Last of all, I added more tear tape to the back of the shaker panel and adhered it to a white card base. Once again, the tear tape is great against the plastic and gives you instant bond.

Now, just give it a little shake, shake, shake and it’s ready to go!

Products used:
Waffle Flower Shaker Covers
Waffle Flower Strawberries stencil set
Waffle Flower Grip Mat
Pretty Pink Posh Fresh Berries stamps and dies
Pretty Pink Posh Sentiment Strips | Valentine stamps
Pretty Pink Posh Sentiment Strips dies
Pretty Pink Posh Mossy Green confetti
Spellbinders Red smooth discs
Foam strips
Tear tape – 1/4″
Distress Oxide Ink – pine needles, mowed lawn, mustard seed, candied apple
Glossy gel
Palette knife

I appreciate you sharing your time with me. Have a fabulous day!

Twiddler’s Nook Spooktacular – Happy Haunting Shaker Card

Hey friends! It’s that time again…the 31st of the month equals the Twiddler’s Nook Spooktacular Instagram Hop! Today I’m sharing a fun shaker card mixing some of our embellishments together for a custom shaker look.

For my card today, I stamped some images from the fun Lawn Fawn Booyah stamp set and colored them with copic markers. After cutting them out with the coordinating dies, I used liquid glue to assemble my dressed up ghosts. Then I went digging in my stash for a fun die set to create a shaker window frame with. I landed on the Pretty Pink Posh Stitched Torn Rectangle dies. I used the two largest to cut a frame from kraft cardstock. I kept the inside to use as my background as well.

I was thinking spellbook when I pulled the MFT Stamps typewriter background stamp out to stamp on the kraft panels. After stamping, I used gathered twigs distress oxide ink to ink the edges of the frame and center of the panel.

For an added little bit of spooky, I cut the Lawn Fawn Cute Cobweb from white cardstock and colored the spider. Then I used liquid glue to adhere it to the under side of the shaker frame. After that I added acetate to the frame and foam tape in preparation for the shaker bits.

I inked up a piece of dotted purple cardstock with wilted violet and then black soot so it was dark but not totally black. I glued that to a card base, then added the center kraft piece to that. I sprinkled all the shaker bits in the center and sealed it up with the frame.

Finally, I popped the images up with foam squares, along with a heat embossed sentiment that came from the Booyah stamp set. I added a little glossy accents to the witch’s hat and vampire’s treat bag for finishing touches.

Products used:
Twiddler’s Nook Pressure Pal
Twiddler’s Nook Pixie Dust micro beads embellishments
Twiddler’s Nook Glow in the Dark Stars and Moons embellishments
Twiddler’s Nook Happy Jacks embellishments

Lawn Fawn Booyah stamps and dies
Lawn Fawn Extra Sentiment Strips dies
Lawn Fawn Cute Cobweb dies

Pretty Pink Posh Stitched Torn Rectangles dies
MFT Stamps Typewriter background stamp
Distress Oxide Ink – gathered twigs, black soot, wilted violet
Foam tape and squares
Touch of gloss

Remember to head to Instagram and hop along for a chance to win $20 to the Twiddler’s Nook shop!

I appreciate you sharing your time with me. Have a fabulous day!