Trinity Stamps – Thinking of you Sneak Peek

Hey friends! I’m over on the Trinity Stamps blog today, sharing a sneak peek of the upcoming release! It’s absolutely packed full of adorable and amazing products! Be sure to watch the other design team members all week for other sneak peeks and head to Instagram and YouTube on Friday for hops with even more inspiration and prizes up for grabs!

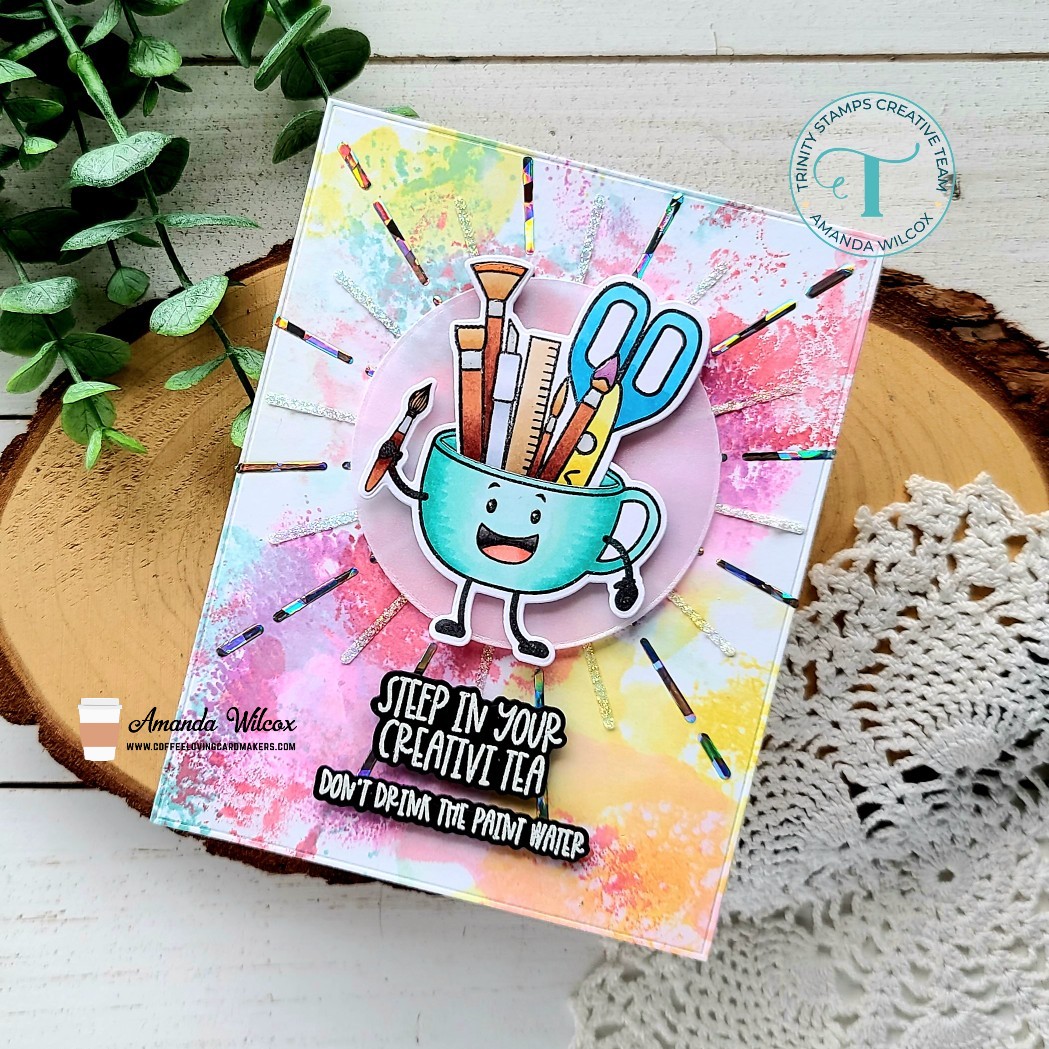
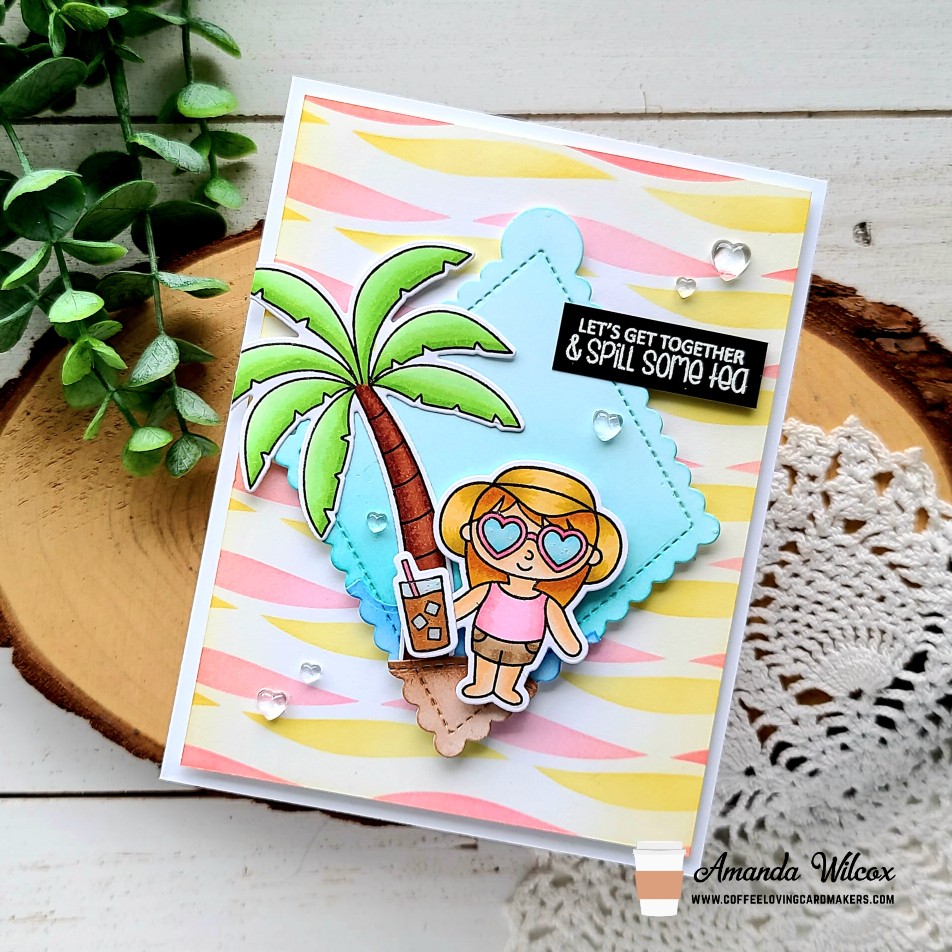
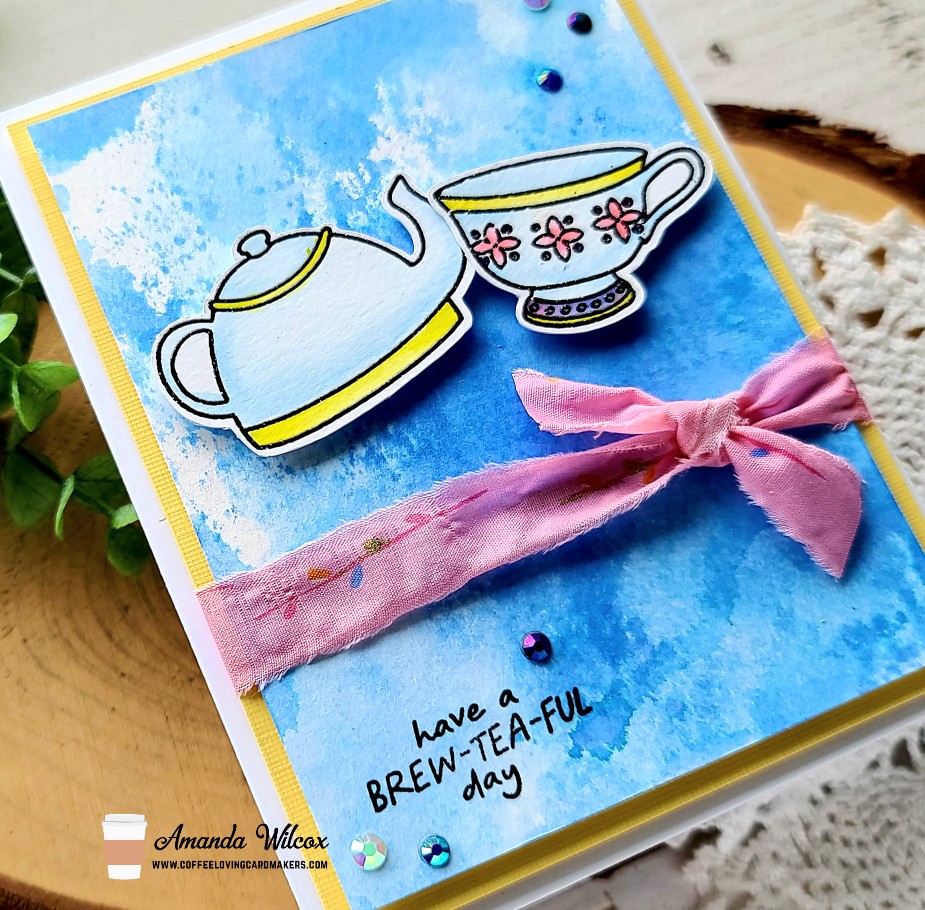
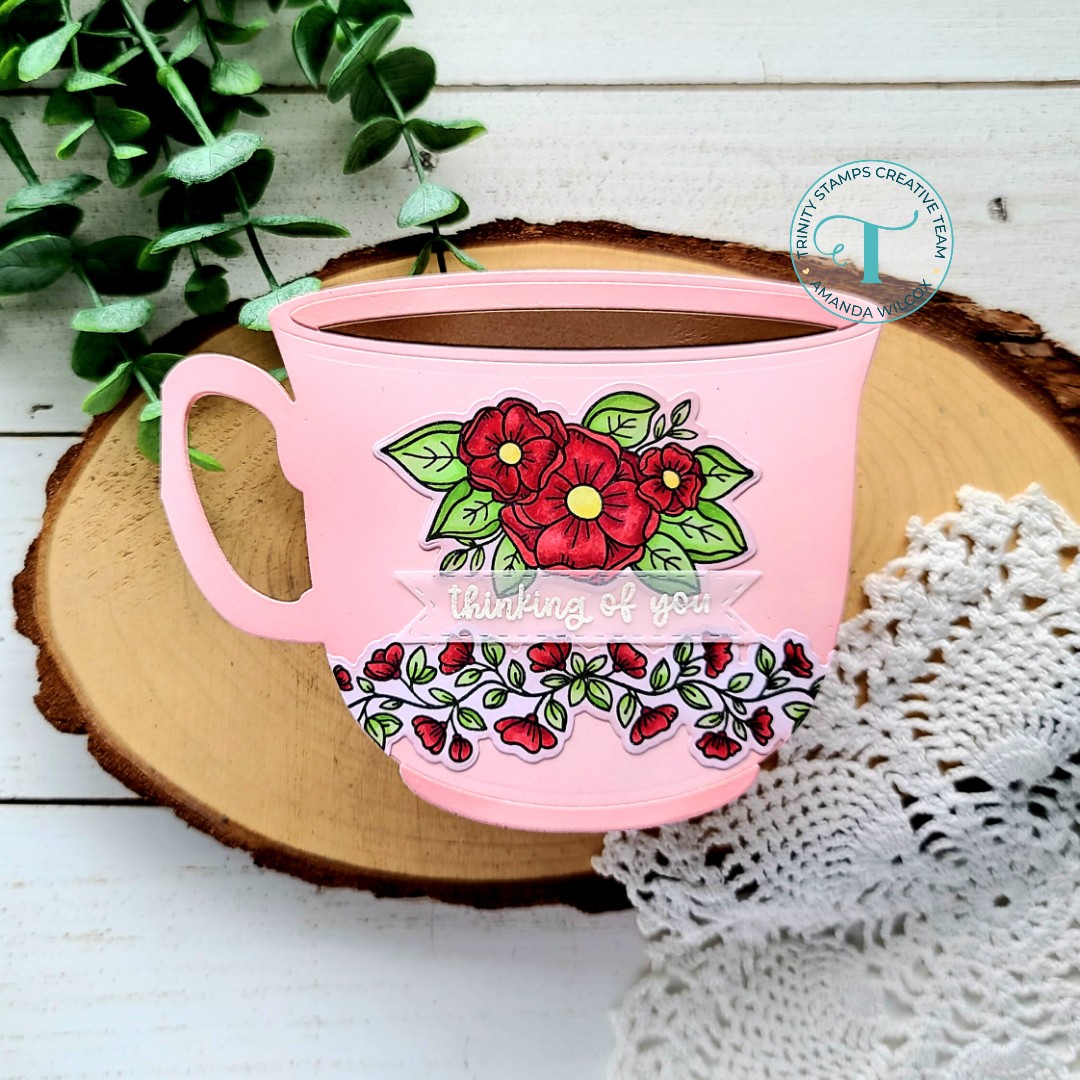
Is this shaped tea cup card not the sweetest thing?!? I fell in love as soon as I saw it! Then, pairing it with new Buttercup Blossoms stamps to create a decorated cup takes me back to the days of tea parties with my daughter. So much fun!

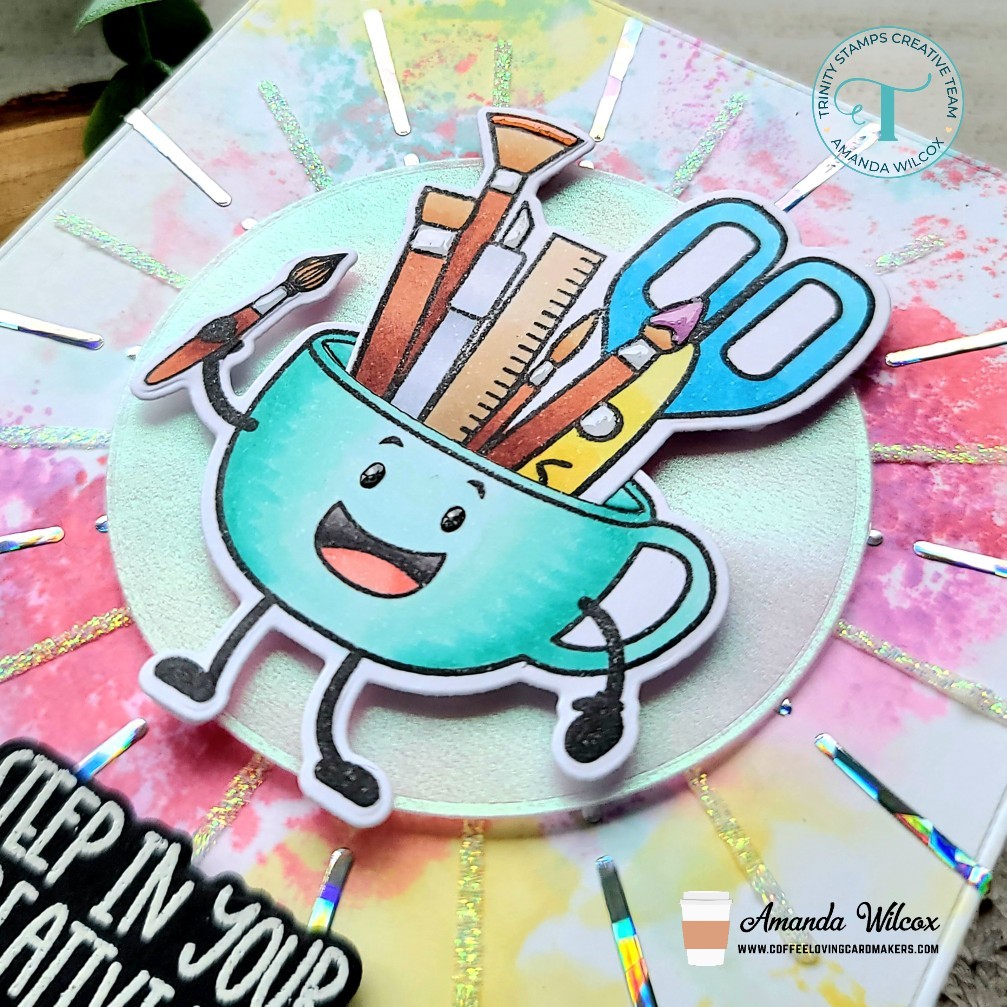
To create this card, I die cut the elements of the Trini-tea Cup die set from pink and brown cardstock and used my blending brushes to add some dimension to various accents. Then I used liquid glue to adhere the pieces. Next, I stamped, colored and die cut a few images from Buttercup Blossoms and inked them up with the same pink ink to help them blend in with my cup. I adhered them with liquid glue and trimmed off the excess.

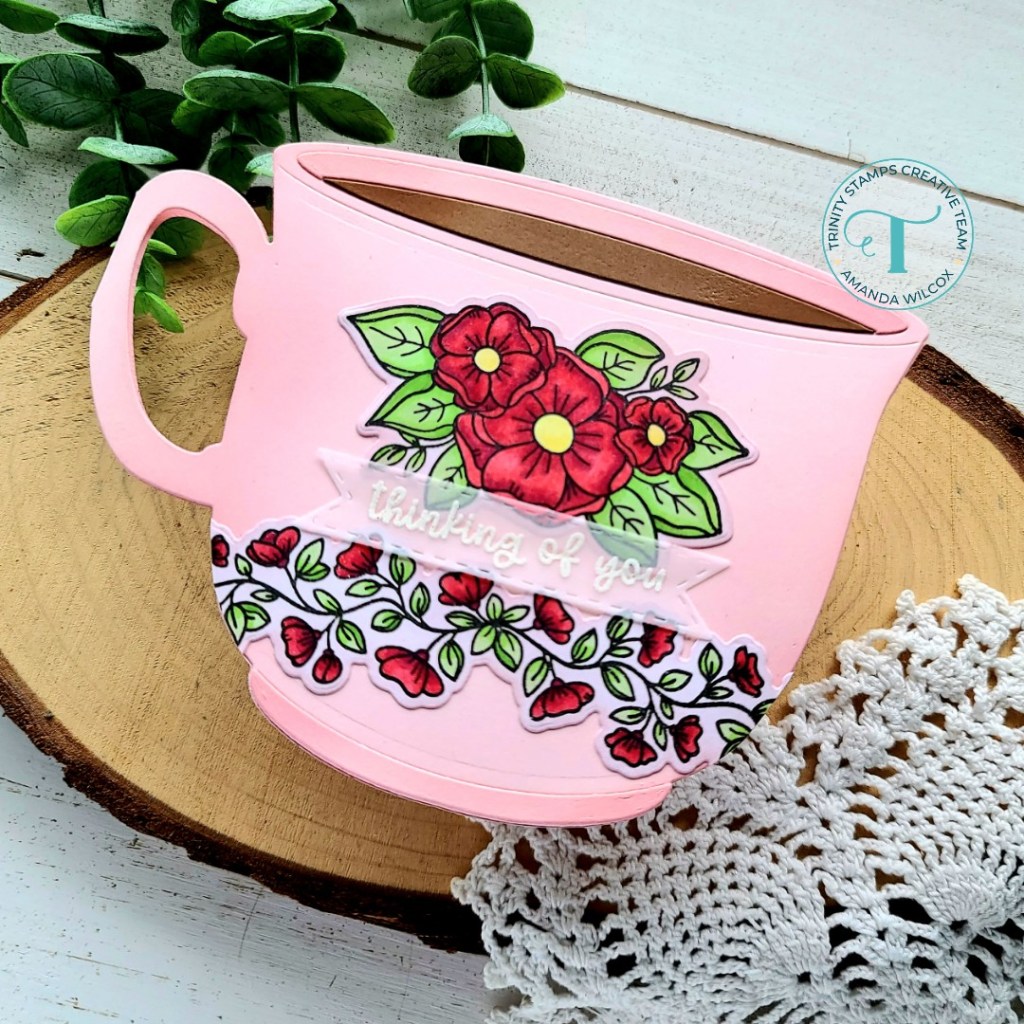
Last, I stamped and heat embossed a sentiment from Buttercup Blossoms and die cut it with a banner from Slimline Scalloped Panels and Banners. I hid a little tape runner behind the words and adhered it to my cup.

I can’t wait for you to see the rest of the release so stay tuned for Friday when it all goes live for purchase!

Products used on today’s card:
Trini-Tea Cup die set
Buttercup Blossoms stamps and dies
Slimline Scalloped Panels and Banners
Blending Buddy Brushes
Lawn Fawn dye inks – ballet slippers and walnut

I appreciate you sharing your time with me. Have a fabulous day!

Coffee Loving Cardmakers – Creativi-TEA Trinity Stamps Sneak Peek

Hello everyone! I’m over on the Coffee Loving Cardmakers blog today with a super fun sneak peek of the upcoming Trinity Stamps release! Trust me when I tell you that it’s TEA-rrific!!! You’re going to love it all!

Today I did a little rainbow ink smooshing on a panel, then used the Trinity Stamps Shine Brighter stencil – first with transfer gel and decofoil and then iridescent glitz gel for the second layer.

I stamped and colored the image from Creativi-TEA with my copic markers. Then used the coordinating dies to cut it out. I stamped and heat embossed a couple of sentiments from the set and die cut those as well. Isn’t he just the cutest!?!

I die cut the background panel with an embossed edge rectangle and adhered it to a white card base. Then Used an embossed edge circle die to cut an iridescent vellum circle out. I popped my image up with foam squares and hid my tape runner behind that to adhere it to the card front. Last, I popped the sentiments up with foam squares and moved on to finishing touches.

For those, I simply added some glossy accents to various parts like paint on paint brushes and the eyes on the mug.

I had a messy inky blast creating this card and am so excited for you all to see the Trinity Stamps release that goes live on Friday! Head over to Instagram and YouTube to check out the inspiration hops then!

Products used on today’s card:
Trinity Stamps Creativi-TEA stamps and dies (Coming soon!!!!)
Trinity Stamps Embossed Edge Rectangle Stack dies
Trinity Stamps Embossed Edge Circle Stack dies
Trinity Stamps Shine Brighter stencil
Thermoweb Transfer Gel Blanco
Thermoweb Glitz Gel – iridescent
Thermoweb Decofoil Silver Shattered Glass
Glossy accents
Lawn Fawn dye inks (for ink smooshing)

I appreciate you sharing your time with me. Have a fabulous day!

Miss Ink Stamps – May Your Coffee Kick In Before Reality

Hey friends! I’m back with a fun Miss Ink Stamps caffeinated card to share with you and the sentiment could not be more true!

I started by stamped the Hay Daze background stamp on an extra large panel and blended distress oxide ink from top to bottom in scattered straw, frayed burlap, shabby shutters and ripe persimmon. Then I die cut it with the Trinity Stamps slimline stitched panel die in the middle size. I took the largest size and die cut a brown panel with that.

I stamped the gnomes from coffee gnomes and colored them with my copics. Then I used the scan-n-cut to cut them out. I chose a sentiment from the same set and heat embossed it on black cardstock, trimming it into a strip.

Moving on to assembly, I used liquid glue to adhere the brown panel to a white card base. Then I popped the inked panel up with foam tape. Next, I added foam squares to the gnomes and sentiment and put them in place.

Sometimes these background stamps can be daunting to color but they are really fun to just ink blend over too!

Products used on today’s card:
Miss Ink Stamps Hay Daze stamps
Miss Ink Stamps Coffee Gnomes stamps
Trinity Stamps Slimline Stitched Panels and Windows dies

I appreciate you sharing your time with me. Have a fabulous day!

Trinity Stamps – Otter This World

I’m back today with an out of this world card to share with you featuring some fun stamps and stencils from Trinity Stamps! Since it’s Trinity’s 3rd birthday, I’m sticking with the birthday theme as long as possible to keep the celebration going!

To start my card, I inked up a black cardstock panel with distress oxides using the space swirl stencil. Then I spread Thermoweb transfer gel blanco through the starstruck stencil and set it aside to dry. While it was drying, I turned my laminator on to heat up and stamped images from Otter Space to color with my copics. Then I used the coordinating dies to cut the images out. I stamped and heat embossed the bowl for the fish onto acetate and die cut it as well.

Once my panel was dry I ran it through my laminator with silver decofoil for a set of fabulously shiny stars in the background! Then I die cut this with a slimline stitched panel. Next, I stamped and heat embossed my sentiments on black cardstock and used the sentiment strip die from Sending Hugs to cut them out. I added foam squares to my images and popped them on the stenciled panel.

I also die cut a silver glitter cardstock panel with the largest slimline stitched panel die and start assembling the layers. Using liquid glue, I adhered the silver glitter to a white card base, then foam tape to adhere the stenciled scene to that.

Moving on to finishing touches, I added glossy accents to the helmets and buttons of the otters and also to the little crater dots on the moon rocks and planet.

Such a super fun, otter this world card that I am excited to share with someone!

Products used on today’s card:
Otter This World stamps and dies
Slimline Stitched Panels and Windows dies
Sending Hugs dies
Space Swirl stencil
Starstruck stencil
Thermoweb Transfer Gel Blanco
Thermoweb Silver Decofoil
Glossy accents
Copic markers

I appreciate you sharing your time with me. Have a fabulous day!

Jane’s Doodles – I Woof You Slimline

Hello everyone! Thanks for stopping by today. I hope your weekend is going splendidly! I have a fun, masculine feeling slimline card for the dog lover in your life featuring Jane’s Doodles Dogs stamp set along with some other goodies from my stash.

I started this card by stamping and heat embossing images from Jane’s Doodles Dogs stamp set. I watercolored them with my Zig Clean Color Real Brush markers and then used the scan-n-cut to cut them all out.

Next, I used the Newton’s Nook Slimline Frames and Portholes set to cut the green panel. Then I stamped the Trinity Stamps Woodsy image on it in dark green ink for a little added interest. Next, I took the Newton’s Nook Slimline Frames and Windows and cut it from dark gray cardstock. I kept the frame for another project and took the squares it creates and taped them to the Miss Ink Stamps Pawsome stencil. I used white pigment ink to add paws to the squares. Then I stamped and heat embossed a sentiment on one with black embossing powder.

With all of my elements ready to go I started assembling my card. I added foam tape to the back of the green panel and placed it on a kraft slimline card base. Then I used tape runner to adhere the gray squares to the green panel. I added foam squares to the back of my images and added them to the squares.

Voila! Super cute card that could be used for guys and girls alike. Even for Father’s Day coming up depending on the message you write on the inside.

Products used on today’s card:
Jane’s Doodles Dogs stamps
Newton’s Nook Slimline Frames & Windows dies
Newton’s Nook Slimline Frames & Portholes dies
Miss Ink Stamps Pawsome stencil
Trinity Stamps Woodsy stamps

I appreciate you sharing your time with me. Have a fabuous day!

(This blog uses affiliate links whenever possible, at no additional cost to you.)

Miss Ink Stamps – Hey There! Hi There!

Oooooo!!! I had so much fun creating today’s Miss Ink Stamps project! I hope you all like it as much as I do!

I recently picked up some of the dies that Miss Ink has in stock and immediately set to creating when they hit my mailbox! And it was so much fun!

I laid everything out on a blank card base to see how it would all fit and then set to work. For the die cutting, I cut the letters and words from black cardstock, then cut “there” from white cardstock an additional 4 times. Next, I used liquid glue to adhere all the layers together. Then I stamped my images from Punny Farm pigs and colored them with copic markers. I used the coordinating dies to cut everything out and set it aside.

To set my scene, I die cut a Trinity Stamps embossed edge circle and taped it to the Heirloom Bloom stencil. Then I used a couple of Lawn Fawn dye inks and blending brushes to create a sky and ground for my piggy!

Moving on to assembly, I used liquid glue to adhere the images to the circle, except the pig which is popped up with foam squares. Then I added foam tape to the circle and placed it down. I used liquid glue and foam strips to adhere the words in place. Last, but not least, I thought the design could use a little something else so I stamped and colored an additional duck and popped him up with foam squares on the bottom left.

Products used on today’s card:
Miss Ink Stamps Punny Farm Pigs stamps and dies
Miss Ink Stamps Heirloom Blooms stencil
Miss Ink Stamps EI-EI-O Word dies
Trinity Stamps Embossed Edge Circle Stack dies
Trinity Stamps Blending Buddy brushes
Lawn Fawn dye inks – forget me not and jalapeno

I hope you enjoyed today’s project and find a little inspiration to create something wonderful!

I appreciate you sharing your time with me. Have a fabulous day!

Coffee Loving Cardmakers – National Iced Tea Day

Hey friends! It’s National Iced Tea Day and we’re having a fun celebration with the Coffee Loving Cardmakers team! A few of us have created cards inspired by this fabulously fine drink and we want to share with you! So grab a nice tall glass and sit back for some fun inspiration!

For my card today, I stamped and colored images from Pretty Pink Posh Summer Friends and Tropical Birds. I colored them with my copic markers and used the coordinating dies to cut them out. Then I die cut the larger Scallop Diamond Tag from white cardstock. I went back and cut the bottom tip two more times from white cardstock as well. Then I used a couple of Lawn Fawn dies to cut the top edges of those portions – waves and a sandy hill.

I used Trinity Stamps blending buddy brushes to ink up the layers – sand is Lawn Fawn doe ink, waves are Lawn Fawn forget me not ink and the sky is Lawn Fawn mermaid and peacock inks. I used liquid glue to adhere the layers together along with my palm tree. Then I used foam squares to add the girl and her ice tea on top of that.

For my background panel, I used Lawn Fawn bubblegum and sunflower inks with the Trinity Stamps Waving Hello stencil. Then I trimmed it down to 4×5.25 inches and went around the edge with the sunflower ink that was left on my blending brush.

I assembled all the layers with foam tape and went digging for that perfect sentiment. When I saw the one in the Clearly Besotted Spilling Tea set I knew I had to use it. I stamped and heat embossed it on black cardstock and adhered it with a combo of foam strip and liquid glue.

For finishing touches, I added some glossy accents to the girl’s sunglasses and iced tea cup. Then I glued down a scattering of boiled sugar jelly drop hearts across the design.

Products used on today’s card:
PPP Summer Friends stamps and dies
PPP Tropical Birds stamps and dies
PPP Scallop Diamond Tag dies
Lawn Fawn Ocean Wave Border dies
Lawn Fawn Sandy Beach Accents dies
Lawn Fawn dye inks
Trinity Stamps blending buddy brushes
Trinity Stamps Waving Hello stencil
Trinity Stamps Boiled Sugar Jelly Drop Heart embellishments
Clearly Besotted Spilling Tea stamps
Glossy Accents

I appreciate you sharing your time with me. Have a fabulous day!

(This blog uses affiliate links whenever possible, at no additional cost to you.)

Trinity Stamps – Happy Birthday Stencil Layering

Happy Wednesday everyone! I’m over on the Trinity Stamps blog today continuing the fun birthday themed celebration by playing with a few stencils today!

I started things off by inking up the Good Morning Sunshine stencil on a white panel with a darker yellow toward the bottom and a slightly lighter yellow toward the top. Then I brought out the Slimline Layered Balloons stencils and inked the first layer up with distress oxide inks, then smeared Thermoweb transfer gel through the second layer. I set that panel aside to dry, turned on my laminator to heat up and moved on to the other elements of my card.

I die cut the Scripty Birthday words from white cardstock 4 times and glued them together. Then I cut the shadow from iridescent vellum and adhered the words to that. I stamped and colored images from You Lift Me Up with my copic markers. Then I used the coordinating dies, cut them out and used liquid glue to adhere a strand of black embroidery floss from the balloon to the bear’s hand. Last, I die cut the reverse scalloped frame from the Slimline Envelope Builder die set.

With my panel dry and laminator heated up I ran it through with wild lilac Deco Foil for a layer of shiny foiled balloons. Then I started assembling my card.

First, I trimmed the stenciled panel down to 3.5×8.5 inches and adhered it to a white card base with liquid glue. Then I added foam strips to the frame and popped it down in place. Then I used tape runner to adhere the scripty sentiment. (I find that liquid glue causes the vellum to warm and ripple so I try not to use it as much as possible.) Last, I added a combination of foam squares and liquid glue to adhere my bear and balloon in place.

For finishing touches, I added white gel pen accents to the images and glossy accents to the bear’s nose.

Trinity Stamps has a super fun sale going on this week only so be sure to head over to the shop and snag your wish list for 30% off!!!

Products used on today’s card were:
You Lift Me Up stamps and dies
Scripty Birthday dies
Slimline Envelope Builder dies
Good Morning Sunshine stencils
Layered Balloons stencils
Transfer Gel Blanco
Wild Lilac DecoFoil

I appreciate you sharing your time with me. Have a fabulous day!

Coffee Loving Cardmakers – Jane’s Doodles card duo

Hi again! It’s Tuesday Tea with Twiddler’s Nook over on the Coffee Loving Cardmakers blog again today. This time I have a pair of really fun watercolor cards to share with you!

I recently ordered some new goodies from Jane’s Doodles and couldn’t wait to ink them up. I had originally planned to just share the tea card with you today but who knows what’s really in that coconut cup and I could really go for a giant coffee flavored ice cream cone, how about you?!?

To create these cards, I started by stamping and heat embossing the images on bristol smooth cardstock. Then I watercolored them with my zig clean color real brush markers. I used the scan-n-cut to cut the images out and separated them so I could focus on one card at a time.

For the tea card, I used the new Brew-tea-ful stamp set. I smooshed some dye inks on my glass mat and spritzed them with water. Then I blotted it up with a piece of watercolor paper, drying in between layers for extra texture. I trimmed the ink smooshed panel down to 3.75×5 inches and stamped my sentiment on the bottom left, then added foam tape to the back. Next, I trimmed a piece of textured yellow cardstock to 4×5.25 inches and also added foam tape to the back of that. I wrapped a piece of pink ribbon around these panels and placed them on a white card base. I added foam squares to the back of the images and adhered them above the ribbon. For finishing touches, I glued some flat back rhinestones to the design from the Twiddler’s Nook Midnight Stroll embellishment mix.

Next, I tried some ink smooshing that I hadn’t done before…with distress oxides. These inks give a much more thorough coverage and layer in a different way than dye inks so it was cool to play with it.

For this card, I used images from the Summer Icons stamp set. For the background I smooshed distress oxide inks on a couple of watercolor panels and then came in with my Trinity Stamps mini slimline dies to cut the panels and the circle windows. I layered the two panels together with foam strips and then a combination of foam squares and liquid glue for the images. I stamped and heat embossed a sentiment on black cardstock and die cut it with a banner die included in the original Trinity Stamps mini slimline card and envelope die set. I adhered it with a combination of foam strip and liquid glue. Then the whole thing is adhered to a white mini slimline card base with liquid glue.

I’m craving sunshine and all things summer these days so this card really speaks to me and let me escape the rain while I was creating it.

Products used on today’s projects:
Jane’s Doodles Brew-TEA-Ful stamps
Jane’s Doodles Summer Icons stamps
Trinity Stamps Mini Slimline Card and Envelope dies
Trinity Stamps Mini Modern Embossed Slimline dies
Twiddler’s Nook Midnight Stroll embellishment mix

I appreciate you sharing your time with me. Have a fabulous day!

Pretty Pink Posh – Celebrate America

Hey friends! I’m stopping in today to share a really fun shaker card I made using some new Pretty Pink Posh goodies. I just fell in love with this 4th of July stamp set the moment I saw it and was quite happy to color it up recently!

I ink blended a couple of panels using distress oxide inks – one in blueprint sketch and the other in candied apple. I spritzed them both with water and set them aside to dry. Then I stamped and colored the images I wanted to use from 4th of July with my copic markers. I used the coordinating dies to cut them out and started working on my shaker.

I used the Celebrate shaker die to cut a window from the blue panel, then cut the same die from white cardstock to use as an inlay. I lined the window with acetate and cover the back of the blue panel with foam tape. I poured some Trinity Stamps Sugared Stars and Stripes clay embellishments along with a small pile of Twiddler’s Nook Pixie Dust micro beads to help the pieces move around in the middle of the red panel, removed the release paper and sealed the shaker up.

Next, I used liquid glue to adhere the frame inlay and all of my images to the card front. That finishes this festively fun card off for the day!

For some reason I really enjoy creating Americana cards and decor so this card was extra fun to create!

Products used on today’s card:
PPP 4th of July stamps and dies
PPP Celebrate shaker die
Trinity Stamps Sugared Stars and Stripes embellishments
Twiddler’s Nook Pixie Dust Micro Beads – Silvermist color choice
Thermoweb foam strips
Distress Oxide Ink – blueprint sketch and candied apple

I appreciate you sharing your time with me. Have a fabulous day!

(This blog uses affiliate links whenever possible, at no additional cost to you.)