Trinity Stamps – Just For You

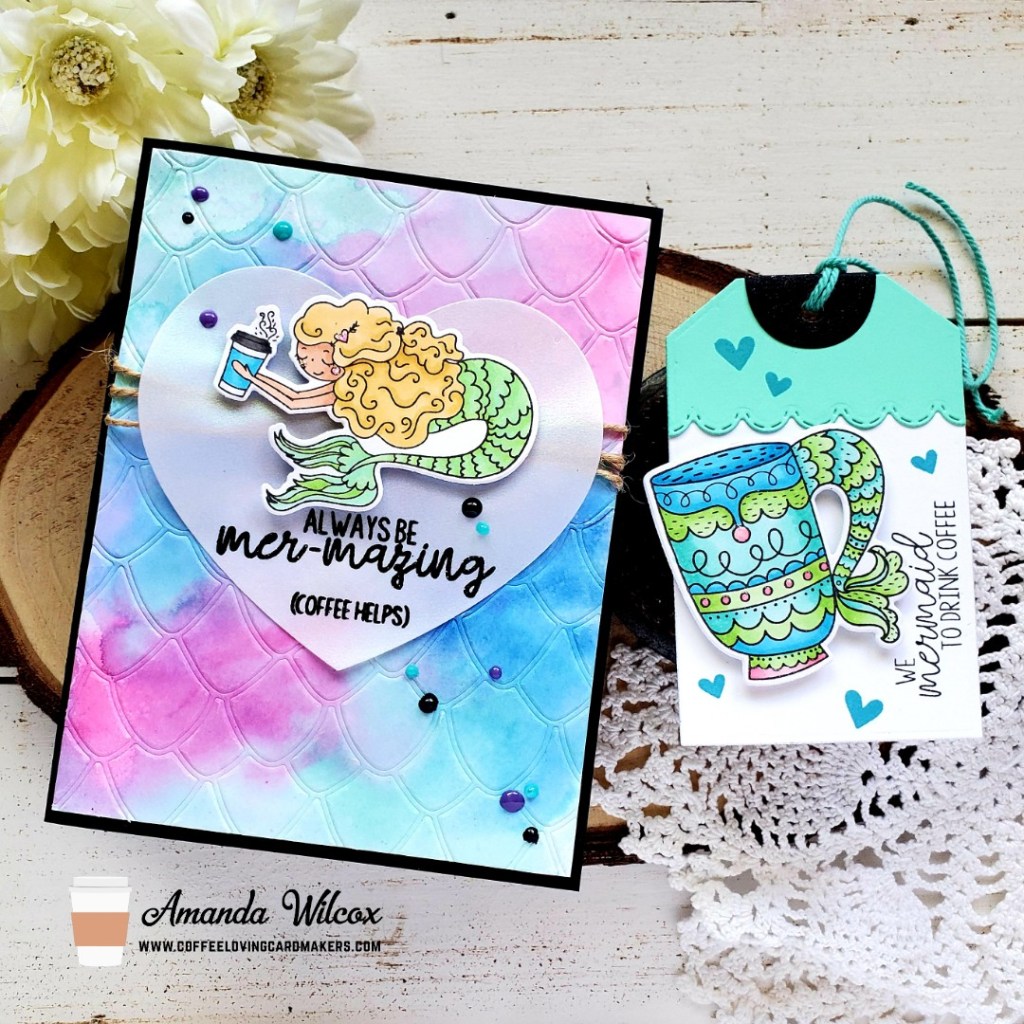
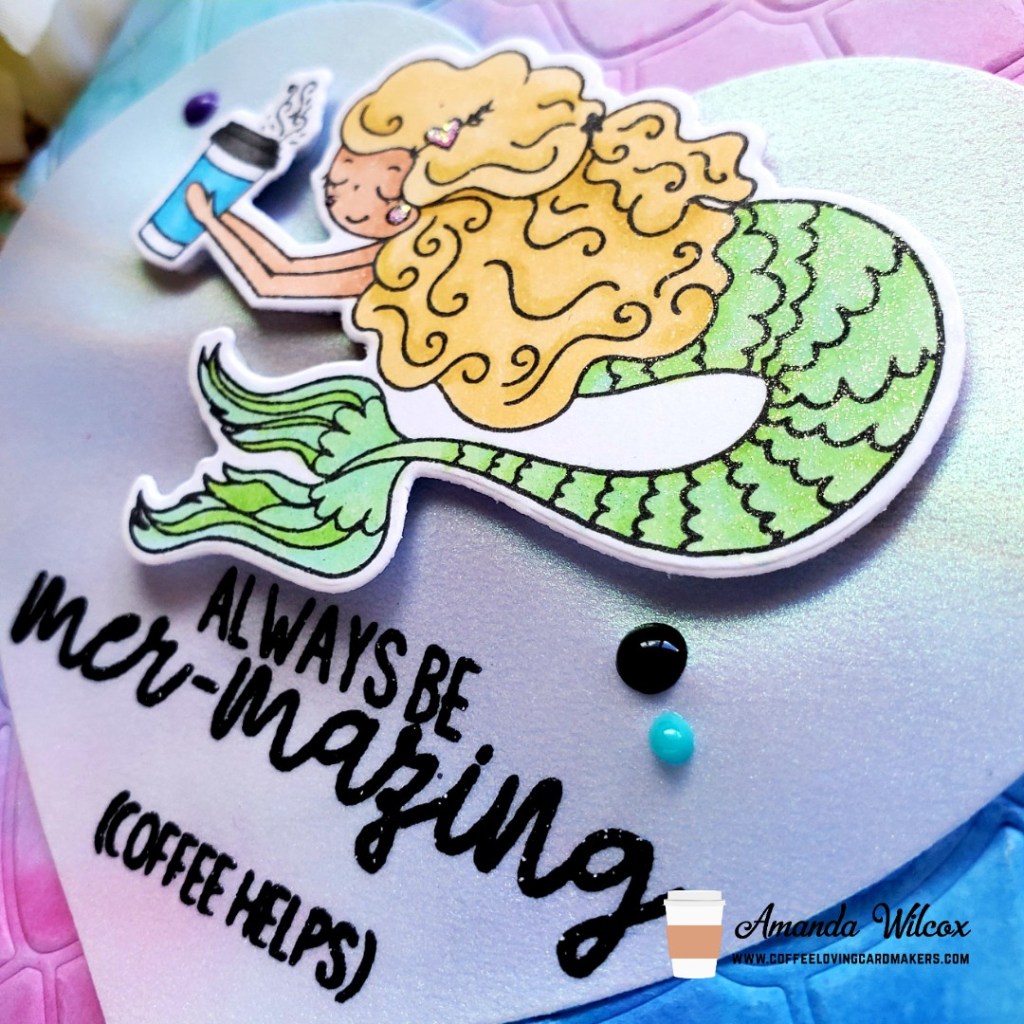
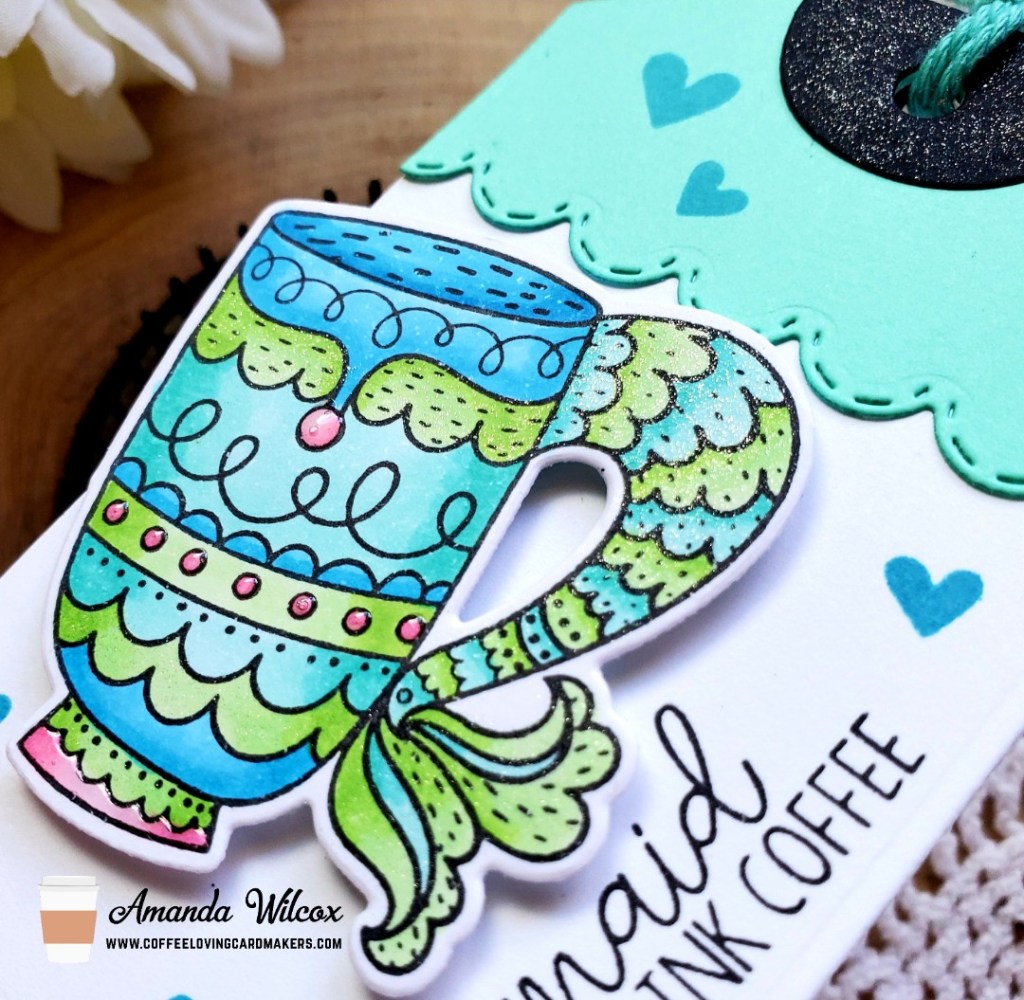
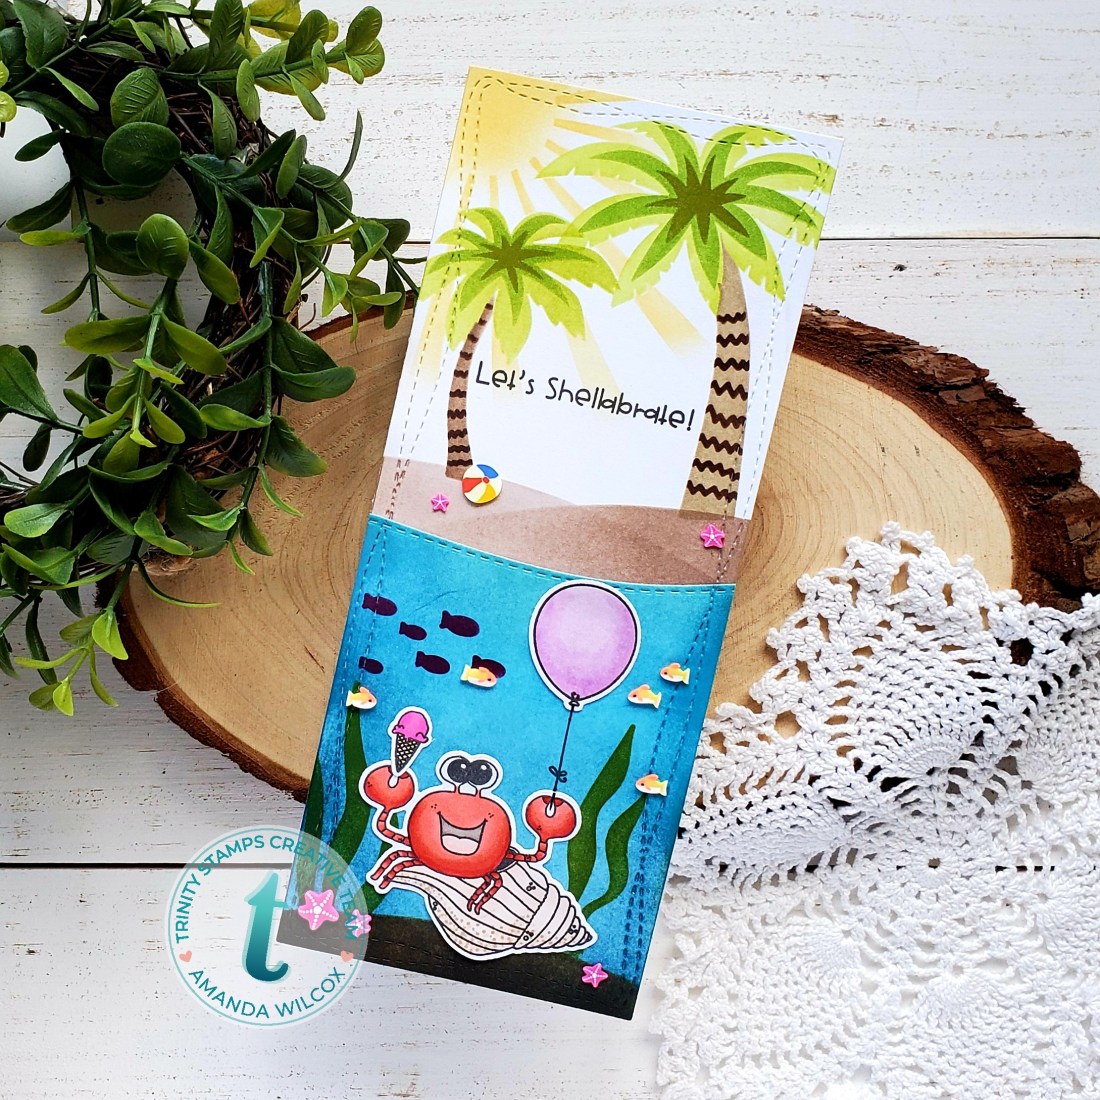
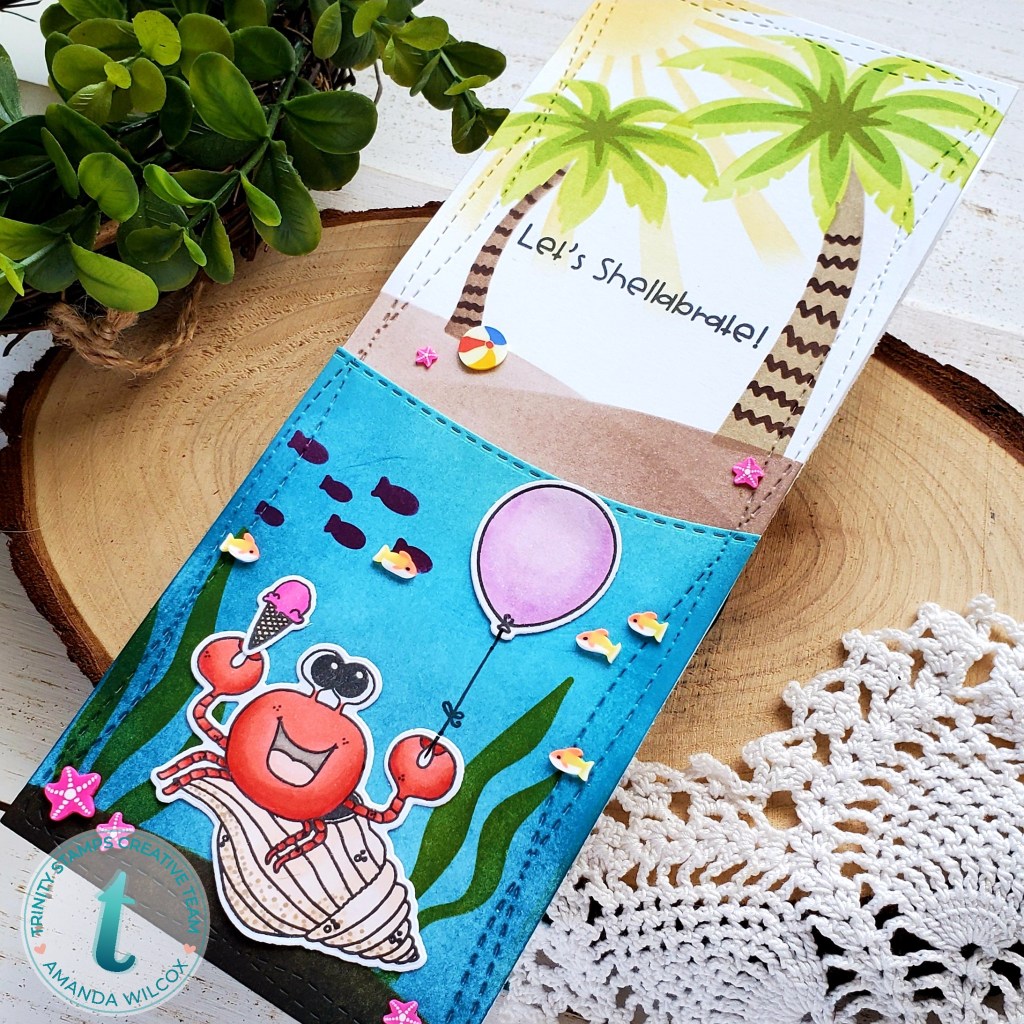
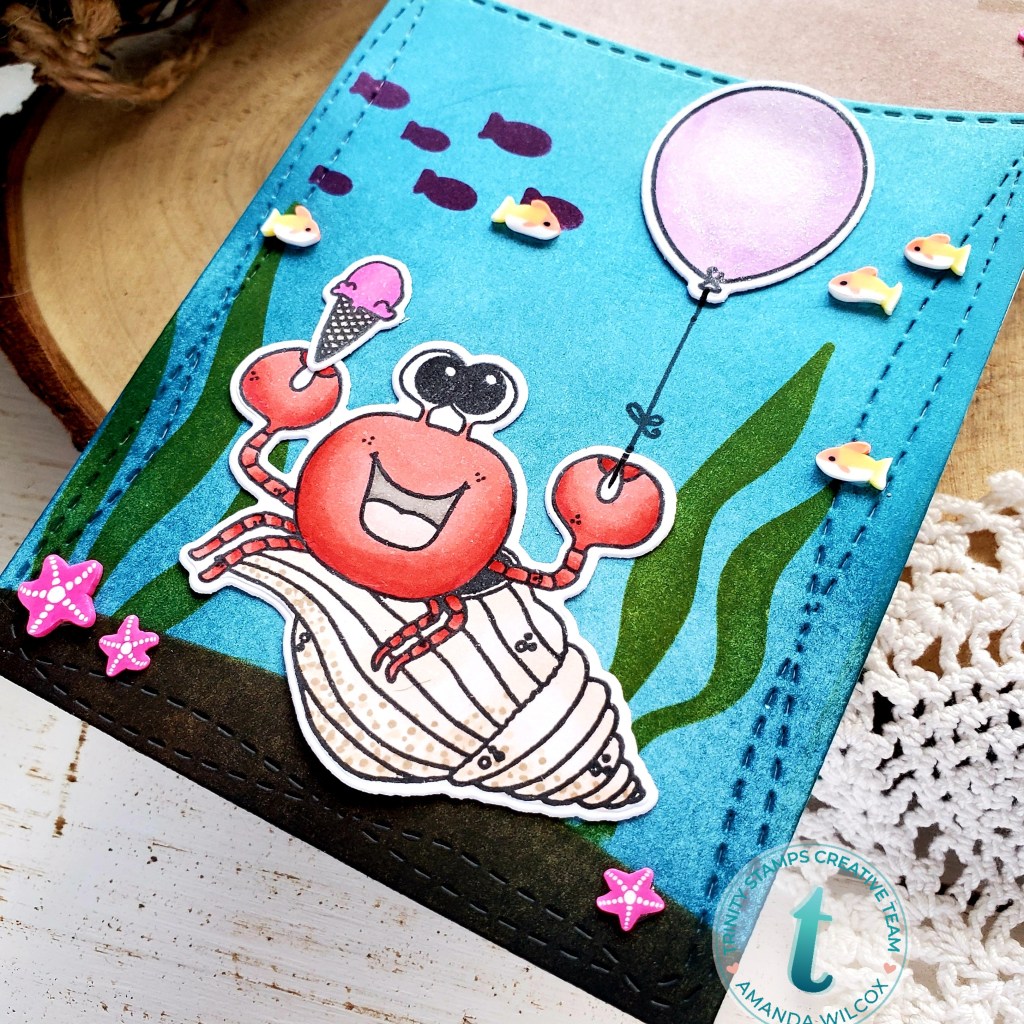
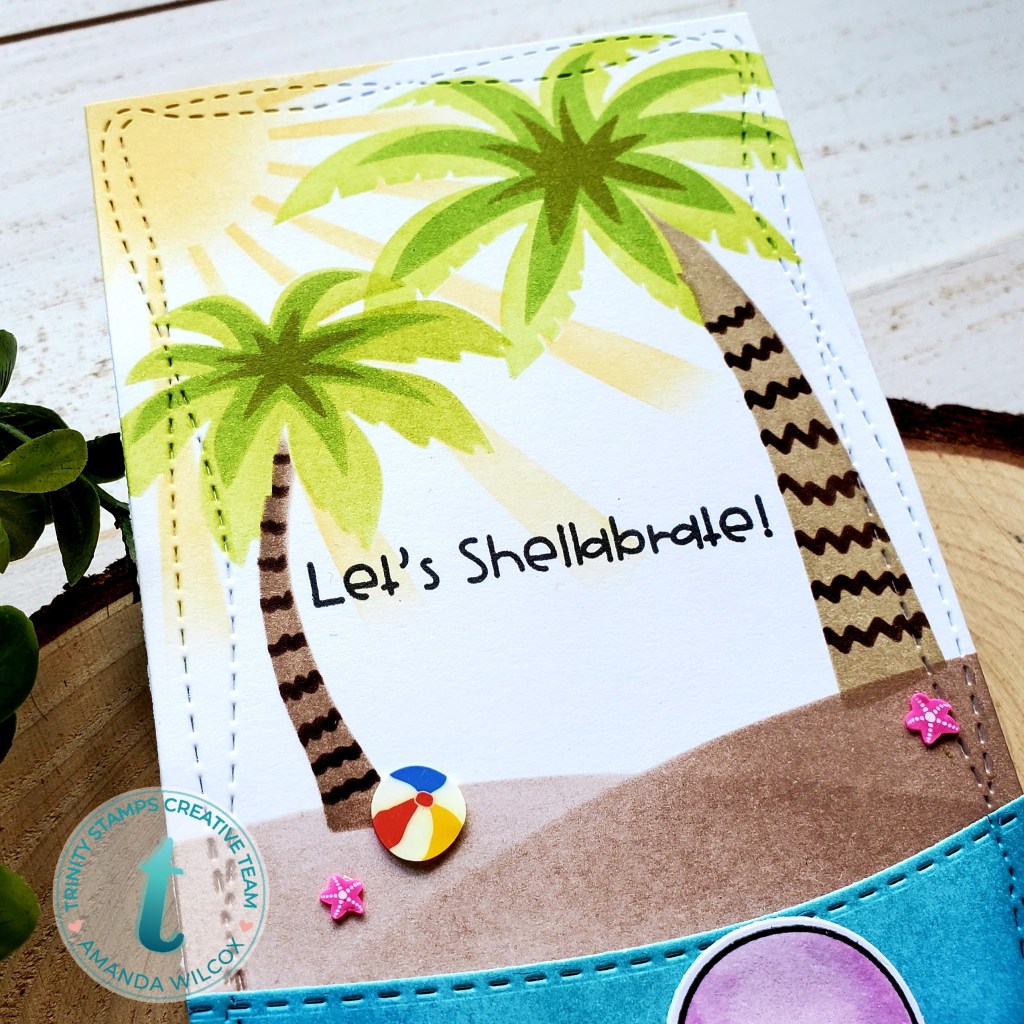
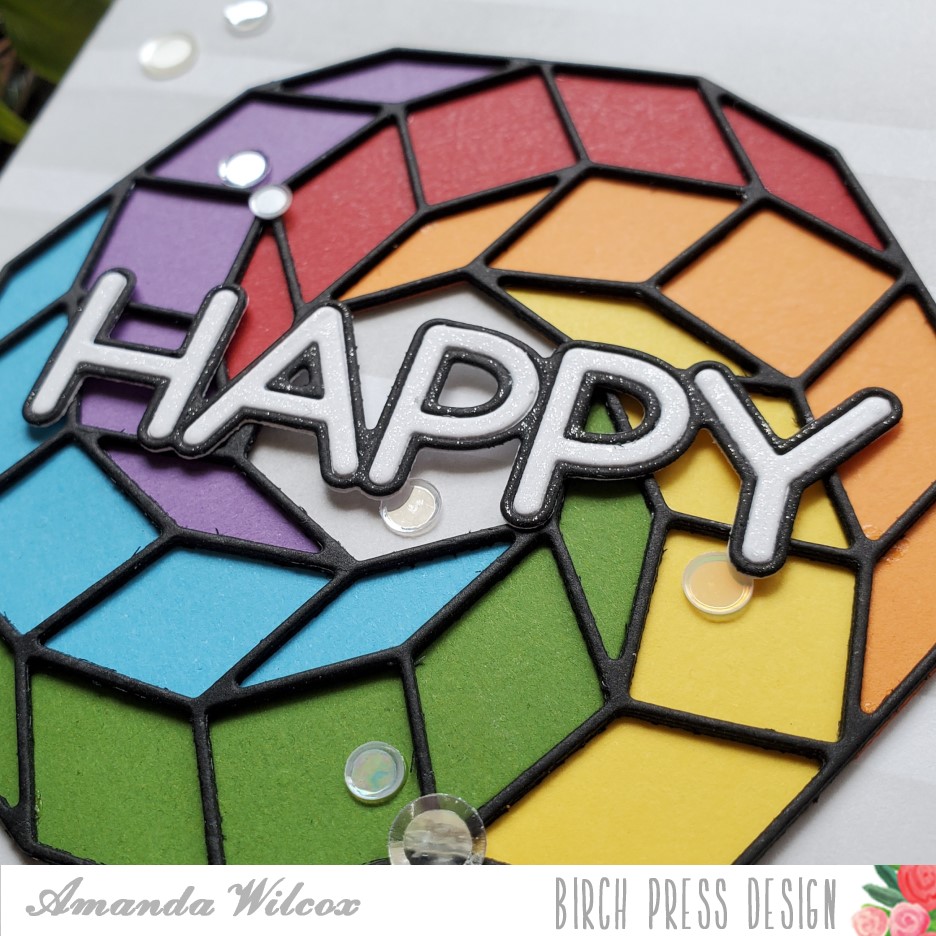
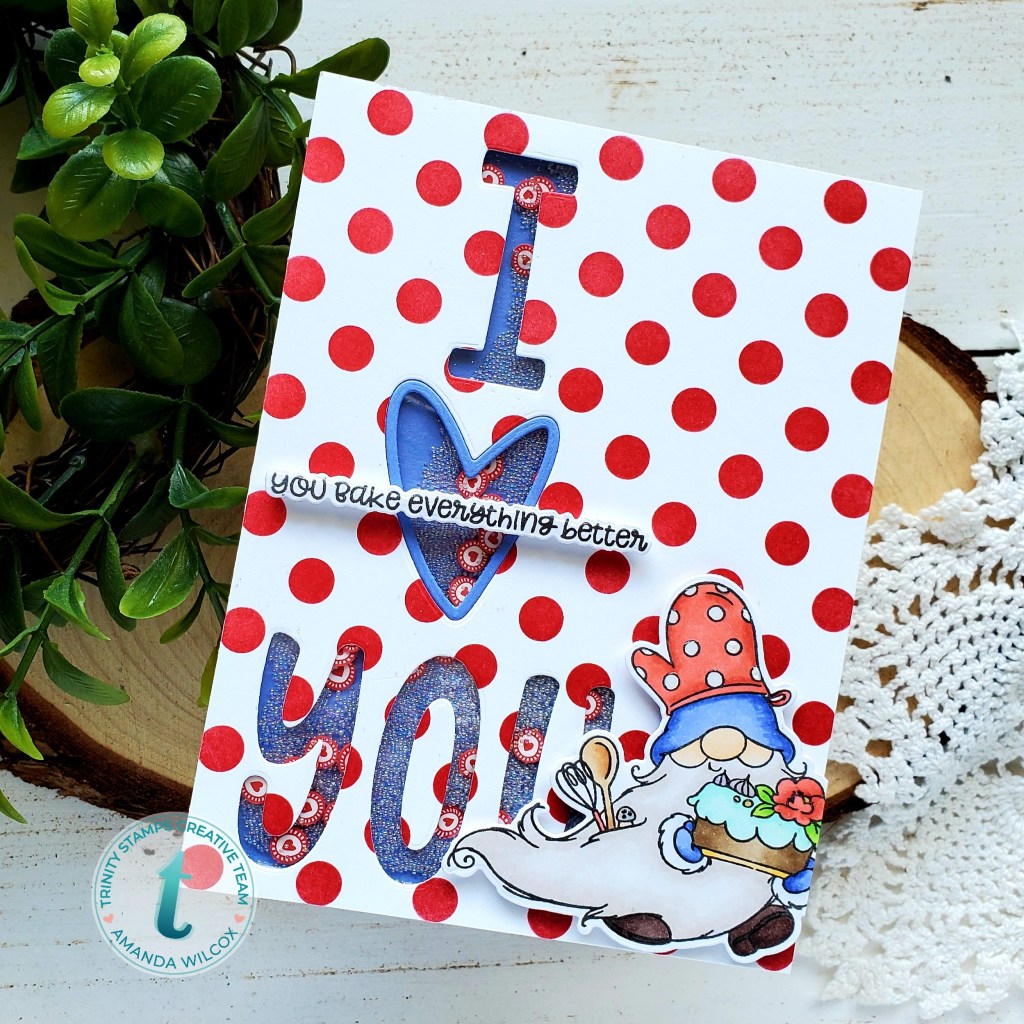
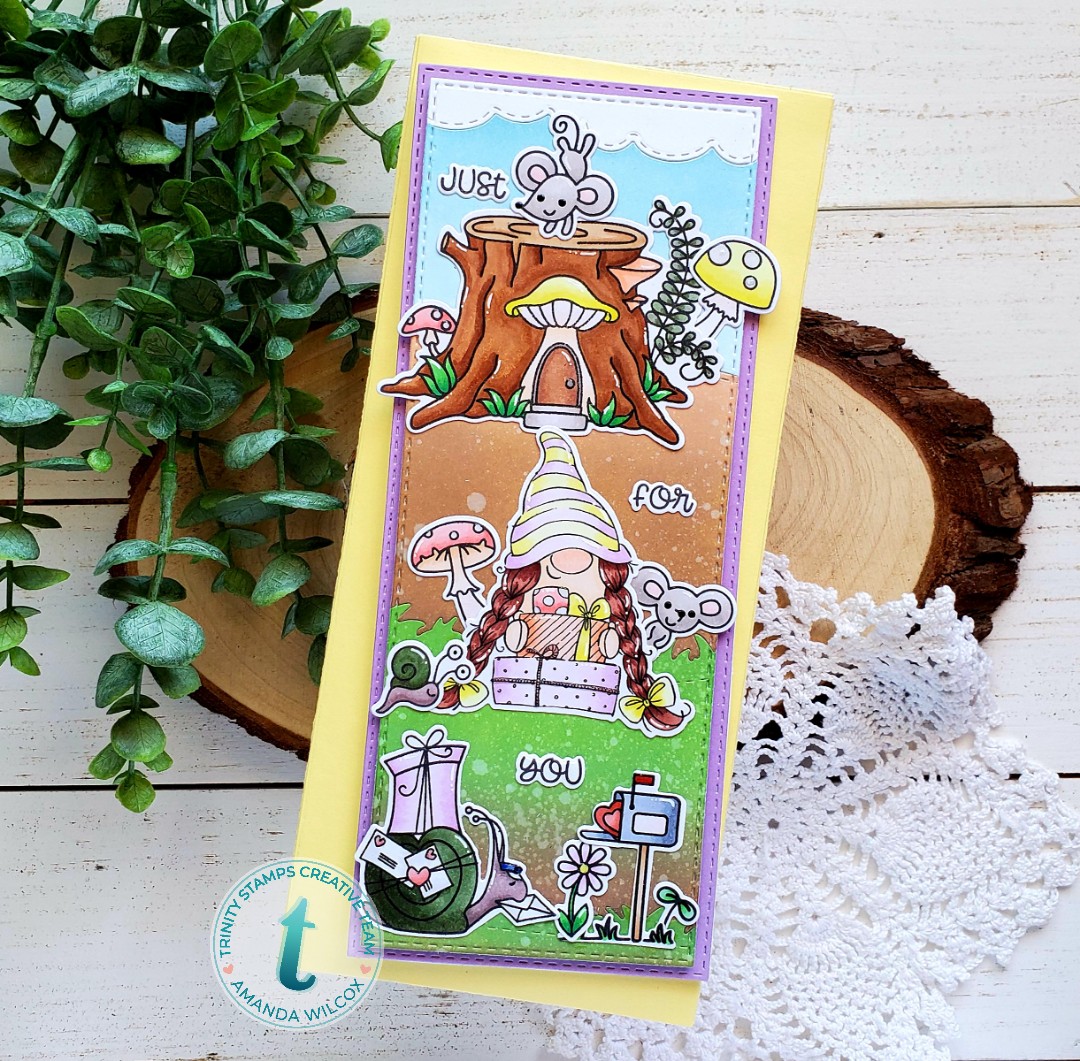
Hello everyone! I’m up on the Trinity Stamps blog today sharing this absolutely awesome card featuring some new and some older stamps and dies. This card started as a simple idea and completely grew a mind of its own. And I’m so glad it did. It’s so much fun!

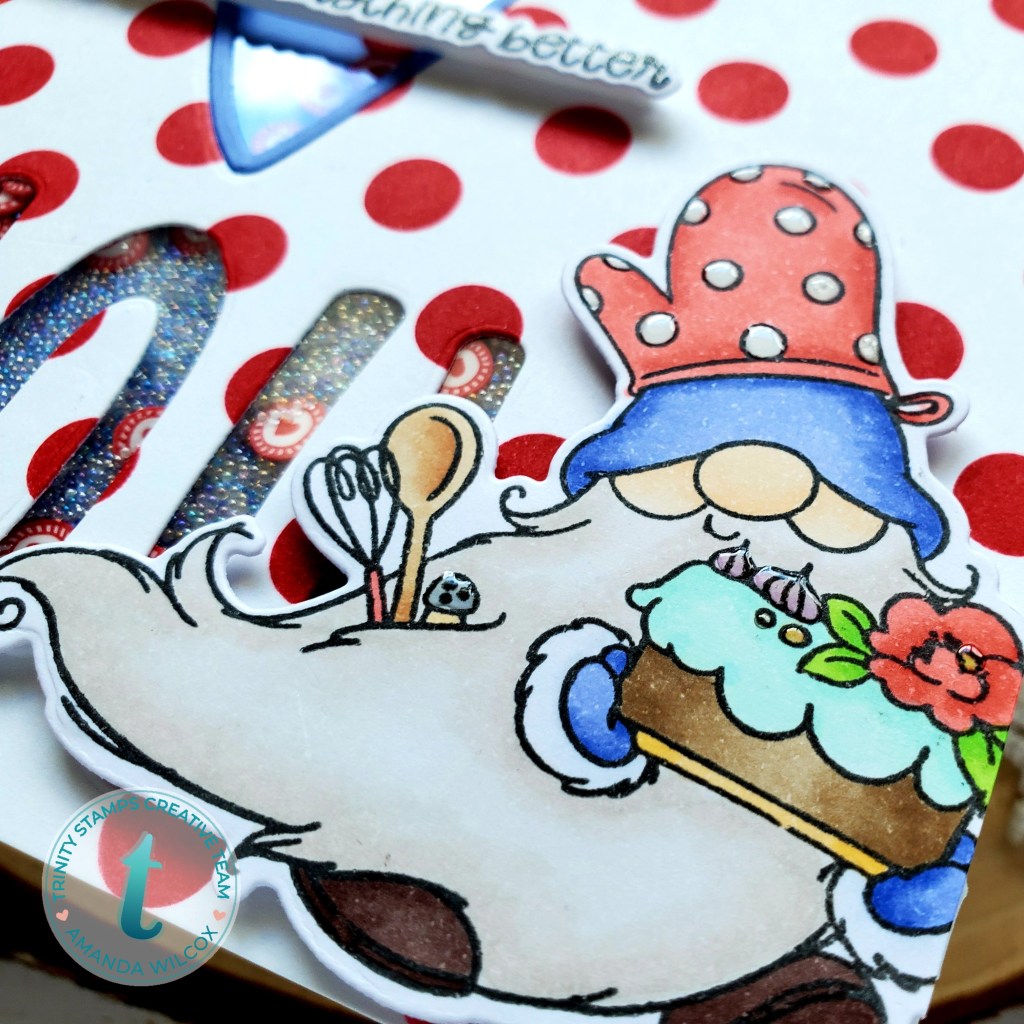
Originally, my idea for this card included the Just For You gnome and Mr. Snailman but it quickly grew to include my favorite Mouse House too! I stamped my images out and spent some time coloring. It was wonderful! Then I used the coordinating dies to cut them all out and moved to the background.

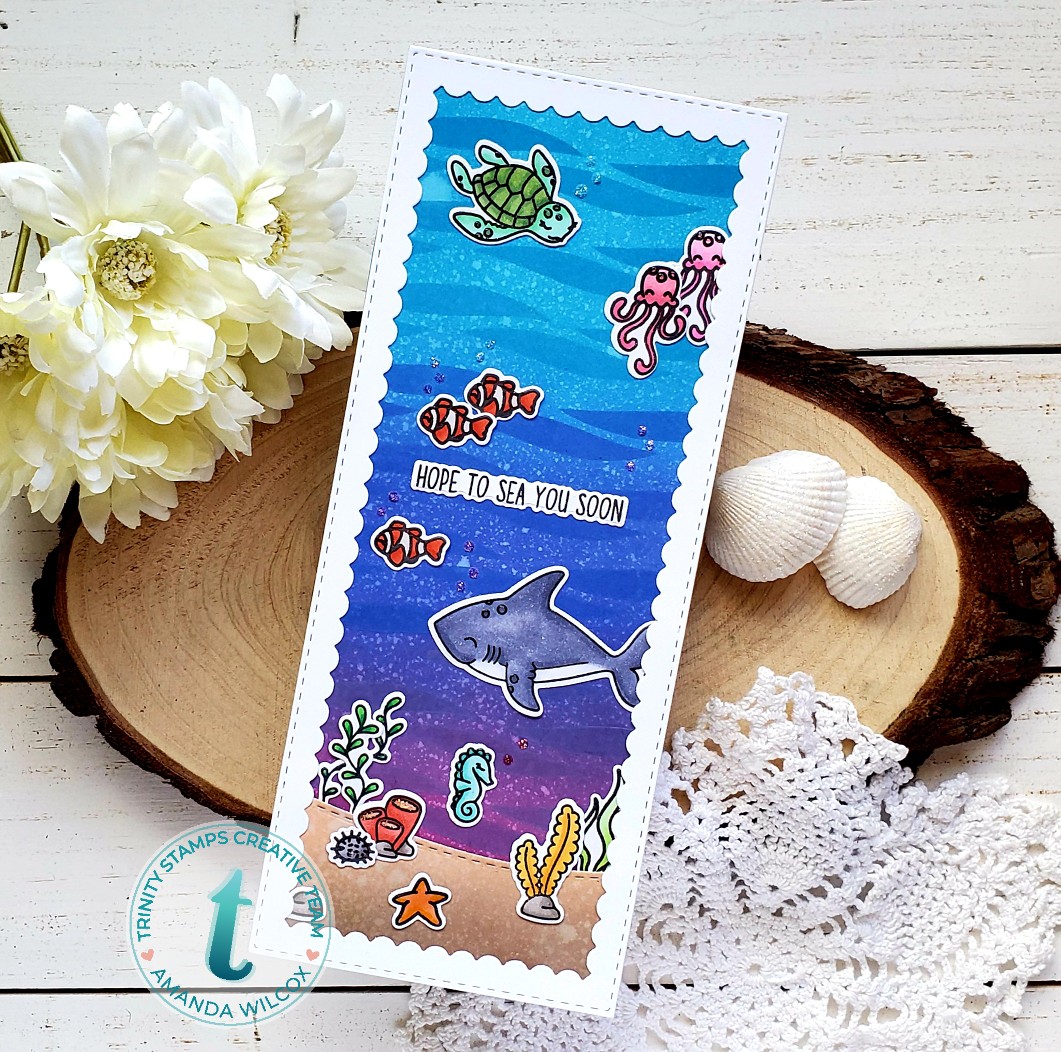
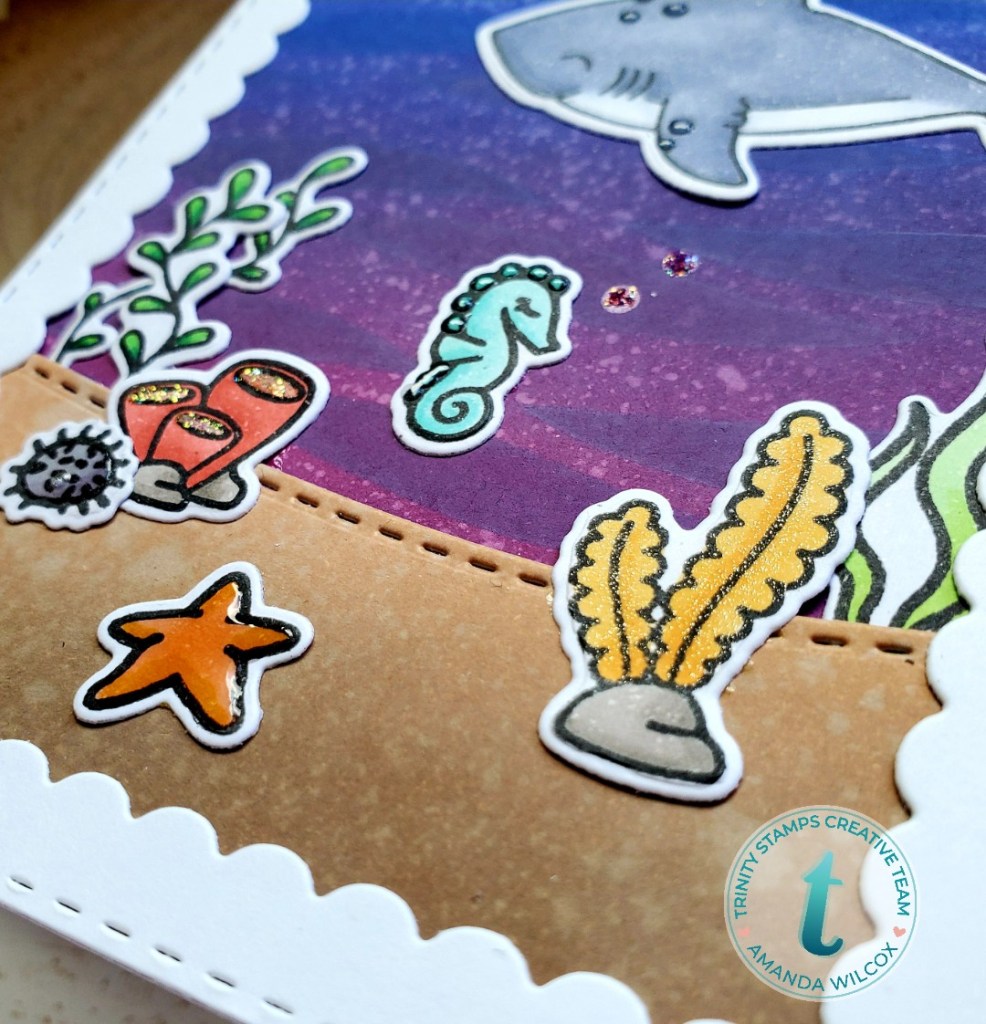
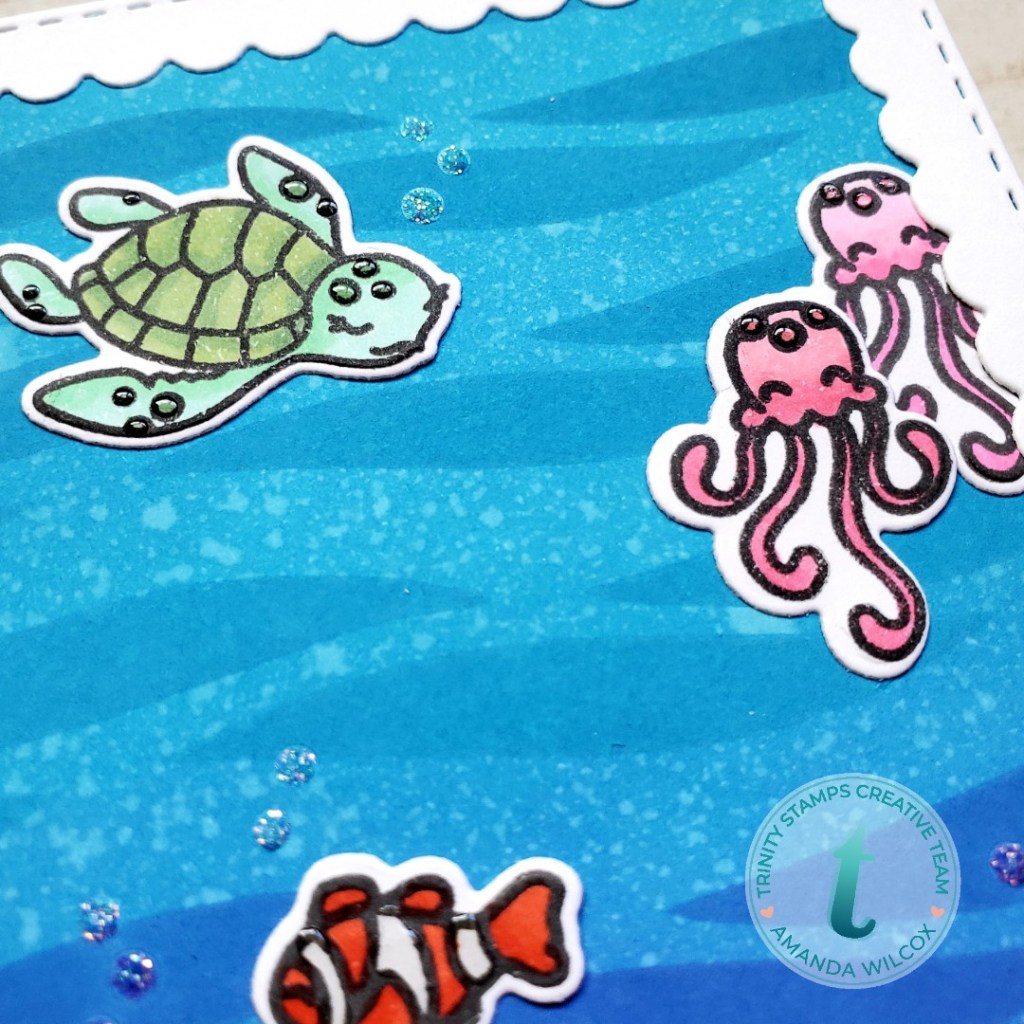
For that I cut the middle Slimline Stitched Panel die from a white panel and then cut that panel into sections with the Slimline Scenic Borders. According to each panel, I inked them up a little differently with distress oxide inks and spritzed it all with water. I die cut a second panel and adhered all my levels to that for stability.

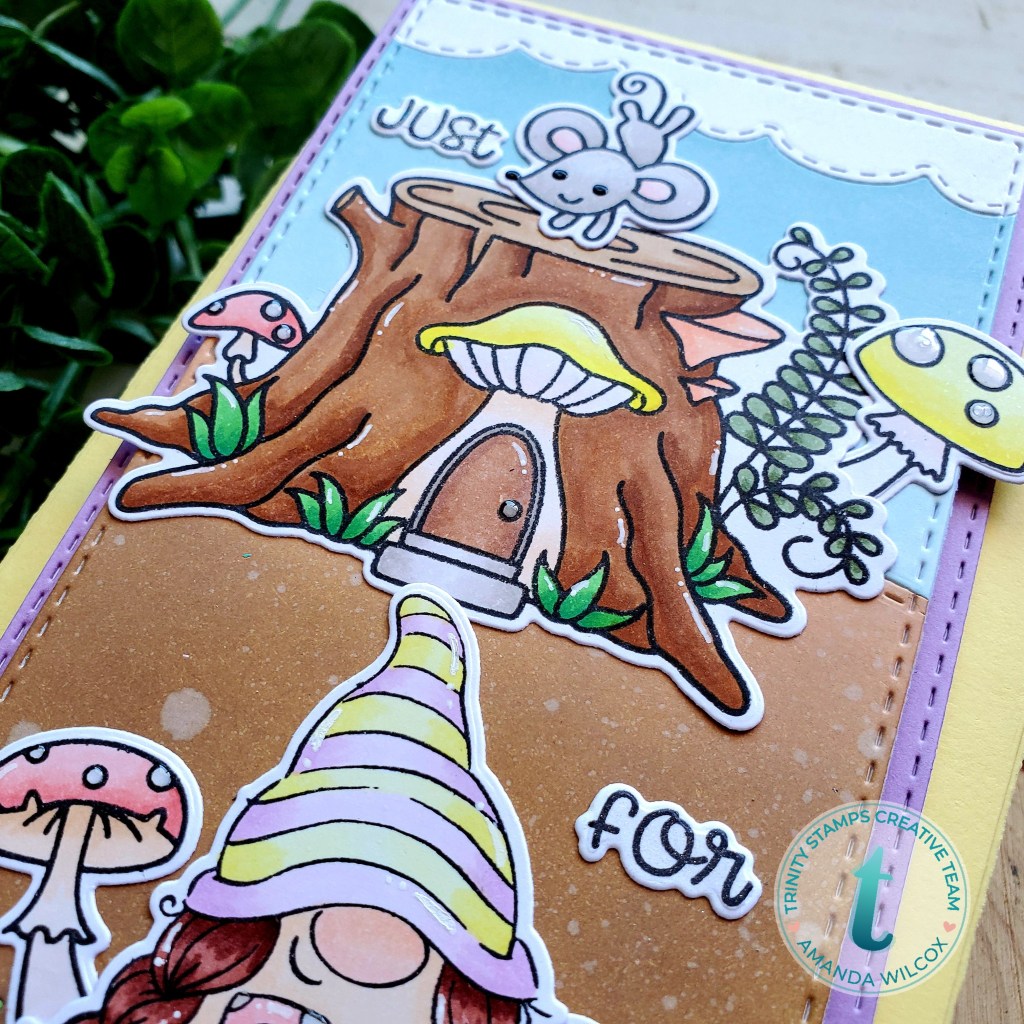
Then, using liquid glue I adhered all of my images to the background and moved on to finishing touches. I added white gel pen accents to most of the images and then moved in with my glossy accents.

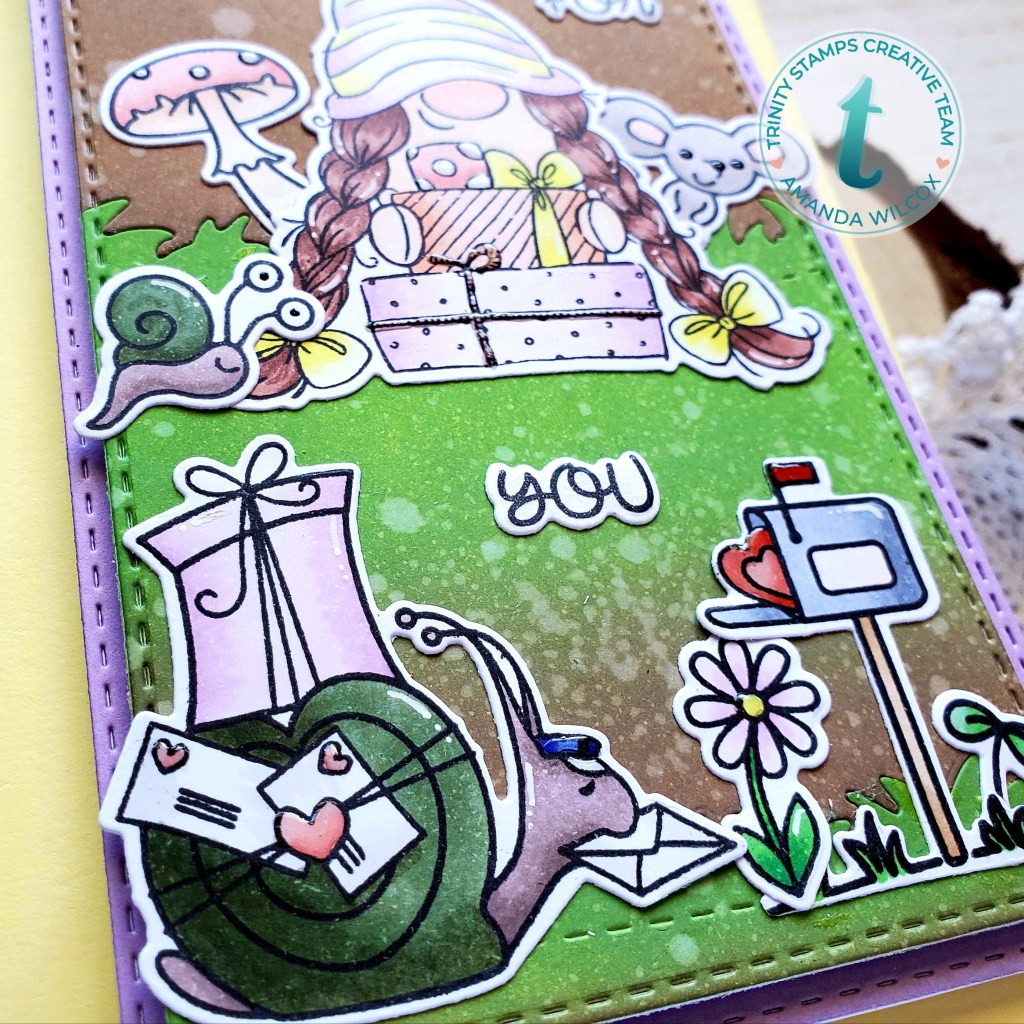
Those are scattered about on things like the hearts, package bows, mushroom spots…kind of random but throughout the whole design. Then I thought it would be good to bring in the black glaze pen on the mice eyes and noses. I love what this little bit of dimension and glossy does for them.

Seriously, all the way up until now, I hadn’t actually planned out my sentiment placement. Totally winging it! Since the awesome Trinity Stamps sets almost always die cut the sentiments too, I decided to trail my sentiment throughout the card design, hoping it would draw the recipient to enjoy the whole design. Then I added a little Wink of Stella glitter brush pen to the words.

Finally, I die cut the largest Slimline Stitched Panel in purple and adhered it to a white card base that measures 3.5×8.5 and popped my scene panel up with foam tape. I also decided to pull from the fun colors I used and make a coordinating envelope in yellow with the Slimline Envelope Builder dies.

If you’ve followed me for very long, you know I like full cards…and I LOVE THIS ONE! It’s got so many fun things to see. Those playful mice and that sweet gnome bearing gifts, finishing it off with Mr. Snailman delivering some happy mail! I hope you enjoyed today’s card and find some inspiration to create something wonderful!

I appreciate you sharing your time with me. Have a fabulous day!

Birch Press Design – Slimline Card Set

Hello again! I’m over on the Birch Press Design blog today with this fantastic set of slimline cards featuring a few stencils, the Cora layering dies and the new Jumbo Lingo word dies! They are fantastic and I thought slimline cards were the perfect way to showcase them!

The whole set started with the thanks card and I just kept going with ideas, so I kept creating. They were so fun to put together. Here’s a close up of each one.

After this one, I thought I would make 3 of the same card, just different colors and switch out the sentiment but that last .2 seconds and I had other ideas I wanted to try.

I thought it was so fun to try this other stencil, inking it up lightly and moving it around the panel. I love how it turned out. And that happy sentiment is perfect for the brightness of this card.

And for this last card, I knew I wanted to try some masculine colors which turned out so cool! By the time I had created 2 landscape cards, I thought it would be fun to break the sentiment free of the shadow part and use it vertically. I love it!

For process photos and description, head over to the Birch Press Design blog!

I appreciate you sharing your time with me. Have a fabulous day!

Trinity Stamps – Hope to Sea You Soon

Welcome back! I hope your week is going well. We’re on the downward end and sailing into the weekend now.

I had an idea pop into my head that I just couldn’t wait to try out and today I finally get to share it with you. It features some new and some older Trinity Stamps prodcuts. Get your gear, we’re heading under the sea again.

The idea that I most wanted to try was layering my distress oxides with the waving hello stencil so that’s where I started. I cut a 3.5×8.5 panel and blended mermaid lagoon, blueprint sketch and seedless preserves. I spritzed it with water and blotted it dry. Then I used both layers of the waving hello stencil with the same colors over the top. I love how this turned out! I inked up another little panel with tea dye and gathered twigs and die cut it with the scenic borders for some sand.

Next, I grabbed shark bait, ocean reef builder and turtlely awesome stamp sets to ink up and get coloring. After that I die cut them with the coordinating dies and started building my scene.

After I decided on placement, I started adhering everything down with liquid glue. I specifically left room for my sentiment in the middle of my scene so I made sure to stamp and cut that out from shark bait as well.

After building my scene, I thought it would look nice to frame it up so I pulled out the scalloped frame die from the slimline envelope builder set and cut one out in white to glue on top. Then I moved on to finishing touches.

For those, I added unicorn Stickles as bubbles and also on some of the coral on the sea floor. Then I gave little bits of shiny to all the critters with glossy accents. Last, I added some shimmer with my Wink of Stella glitter brush pen to some of the plants and the sentiment.

I love how all of these sets go together so well and using them on a slimline card gives you so much real estate to build an awesome scene.

I appreciate you sharing your time with me. Have a fabulous day!

Coffee Loving Cardmakers – Pink & Main Mermazing

Fancy meeting you here again! Today I’m over on the Coffee Loving Cardmakers blog with this fun card and tag combo featuring the Mermazing Coffee stamps and dies from Pink & Main. Keep scrolling to check it all out!

I’ve been wanting to try embossing with a background die for a while and this card just seemed like the perfect scenario to try it out. I did some ink smooshing with my Tombow brush markers to create the bright fun background and then, using the embossing sandwich for my die cutter, embossed the panel with the Neat and Tangled snake scales coverplate die. I trimmed it down to 4×5.25 and set it aside to work on the rest of my card.

I stamped, colored and die cut my images from Mermazing Coffee, not totally sure what I was doing with my card. Then I decided to cut a vellum heart using the Trinity Stamps nested hearts and heat embossed my sentiment. I attached my mermaid with foam squares.

I decided to add some jute twine around the background panel for a little fishy texture and then adhered my heart over that. I finished my card off with some Wink of Stella glitter brush pen on the mermaid tail, Stickles on her cheeks and heart in her hair and finally a scattering of Nuvo Crystal Drops across the design.

But I still had an extra image I didn’t use…so I thought a fun coordinating tag was in order.

I die cut the tag pieces from Newton’s Nook’s Fancy Edges Tag die set and adhered them together. I stamped the sentiment from Mermazing Coffee and also some hearts from the set too. I popped the image up with foam squares and added a little Wink of Stella glitter brush pen here and there for some extra shimmer. Then I thought it needed more so I grabbed the glossy accents and added some of that to the mug on all the pink areas…and then finished it off with some teal twine I had in my stash.

I hope you enjoyed my little project today and found some inspiration to create something wonderful.

I appreciate you sharing your time with me. Have a fabulous day!

Trinity Stamps – Let’s Shellabrate!

Hello everyone. I’m over on the Trinity Stamps blog today sharing a really fun beach card using some fun stencil techniques and new products from the recent Trinity Stamps 2nd Birthday Release! Let’s check it out!

This can seem like a complicated card to make so I’m going to break it down into two parts – beach and ocean. Starting with the ocean, I stamped, colored and cut out my images from Shellabration and set them aside. Then I took the Slimline Wonky Stitched Wilderness and die cut 2 panels from white cardstock. I took one and used the scenic borders dies to cut it down for my under water portion. Let’s focus on that panel now.

Using my blending buddy brushes, I inked the panel up with a blue dye ink and then used the Scenes From the Sea stencils to add the ground, seaweed and fish in the background. Using my images as a guide I stamped the string for the balloon and then adhered everything down. I went ahead and added some embellishments to fill in my scene as well…starfish wish and gold fishes for the underwater portion. Then I moved above water. 😉

Now I moved on to the full white panel cut from the Slimline Wonky Stitched Wilderness dies. Using the water panel as a guide I pulled out the new Layered Palm Tree stencils and created my sand mounds. From there I continued with those stencils and added my palm trees. I just flipped the stencil over to get the trees to lean toward each other. Next, I placed the negative pieces of the palm trees on top to mask them and used one layer of the Catching Some Rays stencil to add a sun in the upper left corner. Last, I stamped my sentiment from Shellabration and added a few more embellishments – Having a Ball and more Starfish Wish.

To assemble everything, I cut a card base measuring 3.5×8.5 and adhered my 2 layers to it. At this point I also decided to draw the string into the crabs pinchers and all the way up to the bottom of the balloon too.

I love the sentiment on this card! It kind of eludes to a birthday but really, you could be shellabrating anything at all! I know I have days like that. Treat yo’self! ❤

I appreciate you sharing your time with me. Have a fabulous day!

Birch Press Design – Rainbow Happy

Hey there! I’m up on the Birch Press Design Blog today with a step-by-step on how to create this super fun rainbow happy card featuring some new products that just arrived in the shop.

As soon as I saw this die set, I knew I had to try it in a rainbow straight away! So I grabbed my cardstock and set to work! I’m thinking a set of these in color tones would be amazing too!

Those awesome confetti bits are from Trinity Stamps and you know I had to add some sparkle to it too…head to the blog to see how I put it all together.

I appreciate you sharing your time with me. Have a fabulous day!

Avery Elle – Suns Out Buns Out

Hello again! The week is just flying by! I’m back today with another installment of happy, bright fun from my recent haul of the Avery Elle summer release. Today I’m playing with the mini set with that cute bunny laying on the unicorn floaty. This is so me in the pool. Just laying about, soaking up the sun. Sounds fabulous!

To create this card, I started by die cutting a panel with the Avery Elle Ray die. I used distress oxides in squeezed lemonade, carved pumpkin and abandoned coral on the panel. Then on the white card base I added some wild honey behind where the hole would be. It gave a little contrast for my sunshine. Then I took a panel and inked it up with salty ocean and mermaid lagoon. I cut that panel with the Lawn Fawn ocean wave borders die to give me 2 waves for my scene.

I stamped my image from Suns Out and colored it with my copics. Then I used the coordinating dies to cut it out as well. Instead of stamping the sentiment on a banner or directly on the panel I thought it would be fun to put it in a speech bubble. For this I used the Avery Elle speech bubbles set but the sentiment from Suns Out. Now we moved on to assembly.

The sunny panel is popped up with foam tape and the first wave border is adhered to that with liquid glue. The second wave was added with foam tape and then the bunny was tucked under it with foam squares behind it. The speech bubble was added with foam squares as well.

For finishing touches, I added glossy accents to the bunny’s glasses and nose, unicorn Stickles to the unicorn horn and Wink of Stella glitter brush pen to the “hair” of the unicorn. Last, I thought it would round the design out to add some Lemon Drop Dream Jelly Drop Hearts from Trinity Stamps around the sun.

Such a silly card, but I really love how it all came together. I’ve been inspired by Jenn Bena to try and create a set of different cards with the smaller mini sets and this one might be fun to start with. I’ll be sure to share when I get brave enough to try it out.

I appreciate you sharing your time with me. Have a fabulous day!

Coffee Loving Cardmakers – Summertime Sips

Hello again! It’s Tuesday Tea with Twiddler’s Nook over on the Coffee Loving Cardmaker’s blog today and I’ve got a doozy of a card to share with you! It was an absolute blast to put together and it took me all day. Totally worth it and I can’t wait to do something like it again!

I knew 2 things when I started this card. I wanted to use the new Trinity Stamps summertime sips dies and my favorite mice from mouse house were going on my cup somewhere. Haha! The rest is history and I’m in love with how it turned out!

I started by die cutting all the pieces from summertime sips from white and red cardstock and a few from vellum too. I ink blended the inside of the cup to look like coffee (or tea) and then die cut another cup and adhered all the pieces to it. Then it hit me to die cut the cup one more time from acetate and put it on the very top so my whole cup looks like a plastic cup.

I took a couple of white panels for my background and started ink blending those next. For the sky I used distress oxides in chipped sapphire, blueprint sketch and mermaid lagoon. For the grass I used twisted citron and mowed lawn. Then I used the Trinity Stamps slimline panels and windows to cut both pieces and went over the top of the green one with the grass border from the slimline scenic borders set.

Next, I moved on to the fireworks stencil one layer at a time. I used glitz gel, metallix gel and ink dyed texture paste, along with some dye inks for all the fireworks layers. Mix all of that with a lot of patience, and you have amazing, fun fireworks for your sky! In between layers of gel drying, I stamped and colored my mouse house images with copics. Then I used the coordinating dies to cut them all out and adhered them to my summertime sips cup.

Once the fireworks were dry I adhered all the pieces of my card. The sky and grass panels are adhered together and then directly to a card base measuring 3.5×8.5. The cup and images are all popped up with foam tape.

To finish this awesome card off I pulled the new summertime sentiments from Trinity Stamps out and stamped one on white cardstock. I used the banner die from the 4 bar card die set and did some partial die cutting to lengthen the banner just right. This is popped up a foam strip. And last, but not least, I pulled out some awesome clay American flags from the sugared stars & stripes clay sprinkles mix to put in a couple of the mice’s hands.

I’m so excited about this card!!! It’s so fun and has so much awesomeness going on! I really hope you enjoyed it too!

I appreciate you sharing your time with me. Have a fabulous day!

Trinity Stamps – I <3 You Shaker

Hey there! I’m over on the Trinity Stamps blog today with a super fun shaker card showcasing one of the super cute gnomes from the release on Friday!

This was a total winging it card. LOL! I started by coloring this cute gnome from Make a Wish and die cutting him out. Then I looked at him for a bit and decided it would be fun to use the punny sentiment in the set and suddenly the idea hit me for a shaker card!

I used the lots of dots stencil on a panel and then die cut the I ❤ YOU with the marshmallow alphabet dies and glued it to a piece of acetate. Pulling from colors used on my image I cut a blue panel the same color as the gnome’s accents, added foam tape, added my shaker bits and closed it all up. I used some clear microbeads from my stash and the twitterpated hearts from Trinity for my shaker. The heart in the marshmallow alphabet dies cuts a frame so I cut it from the same blue in the background and glued it to the acetate opening too.

I stamped and die cut my sentiment and then popped it, and my gnome, up with foam squares. Then I finished the card off with glossy accents on the gnome’s hat, shaker and some of the cake decorations. I also added Wink of Stella glitter brush pen to the stamped sentiment.

Such a fun card! I have so many gnome lovers in my life that I know would enjoy this. Also, I can’t stop playing with the shaker. They are so entertaining.

I appreciate you sharing your time with me. Have a fabulous day!

Trinity Stamps – Release Day

Happy Friday everyone!!! Today is release day for Trinity Stamps and I’m soooo excited for all of you to pick up new goodies and start creating. You’re going to love it all!

Today I’ve got a fun card featuring a couple of new products to share with you!

To create this card, I used the new waving hello stencil in 2 different teal and blue inks on a lighter teal cardstock. Then I colored and die cut my images from Shellabration, along with stamping and die cutting my sentiments. The cool thing about most of the sets is there are coordinating dies for your sentiment too! Don’t you love it? I do!

I adhered the octopus and his goodies to my stenciled piece and adhered it to a white card base. Then I took some wood grain patterned paper and die cut a port hole frame from Lawn Fawn. I cut the same frame from black cardstock and adhered those to an acetate panel.

It looks like you’re inside the ship looking out and seeing this awesome octopus ready for an amazing shell-abration! Haha! I seriously love puns. They are the best.

I adhered my sentiments and then for finishing touches I added Nuvo Crystal Drops in silver living to the port hole frame so it looks like bolts holding it in place.

Today marks the final Instagram Hop to celebrate the new release going live. So be sure to head HERE and join in on that fun too!

I appreciate you sharing your time with me. Have a fabulous day!