Lawn Fawn – Let’s Go Camping

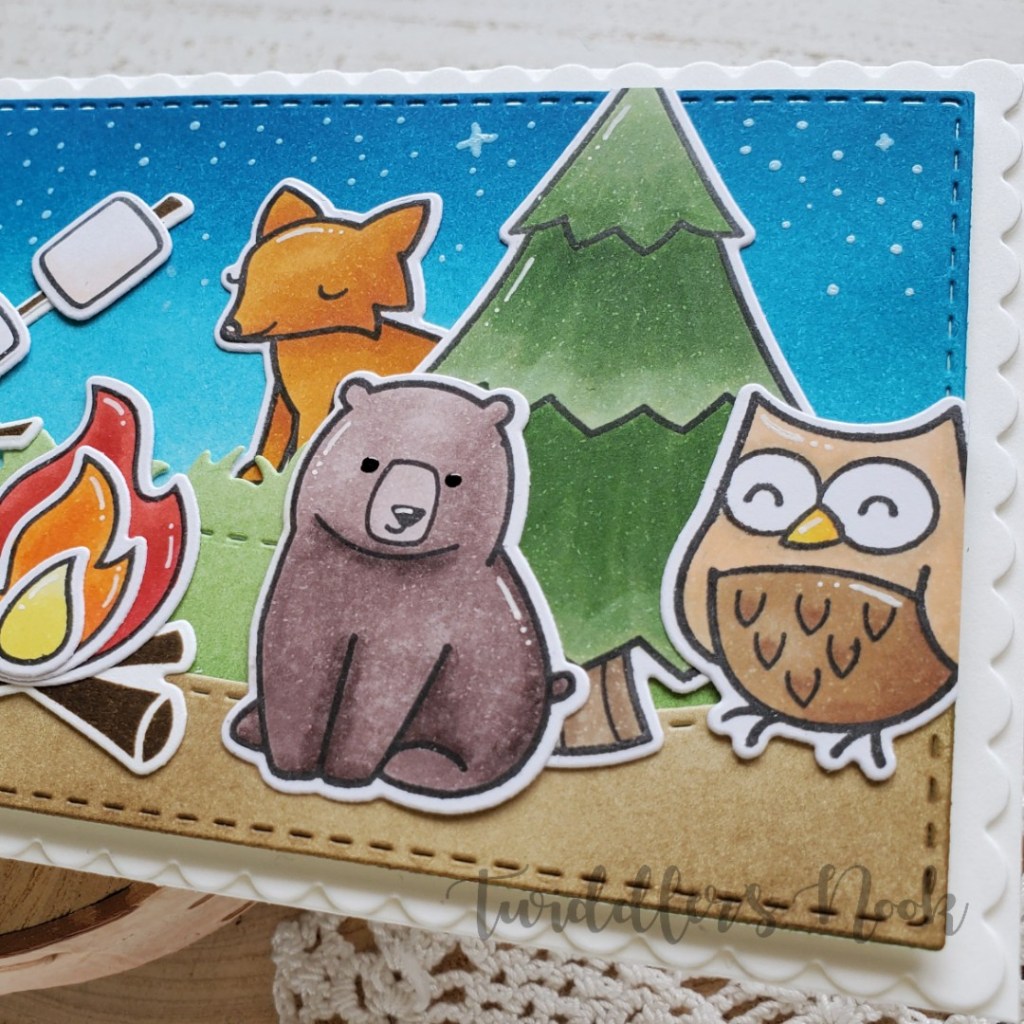
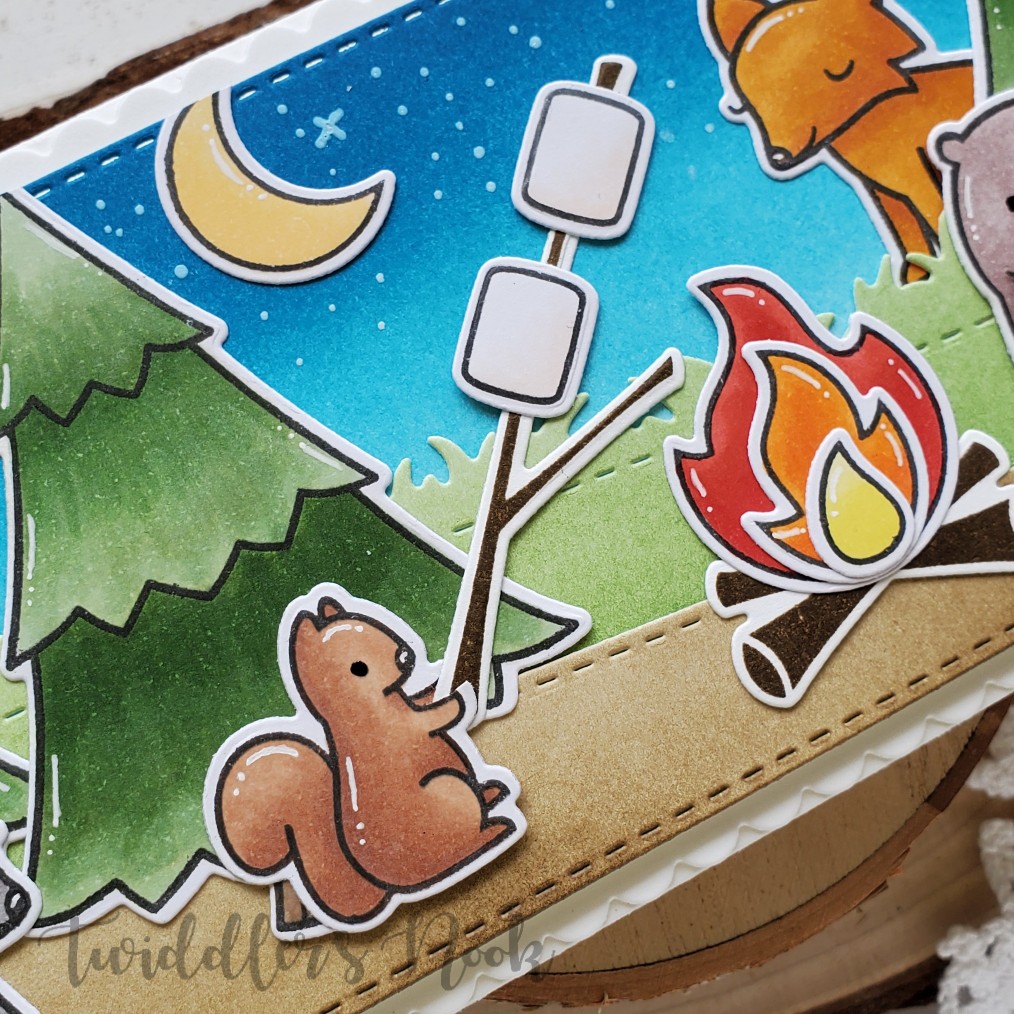
So, I’ve really been in the mood to go camping lately. I’m ready for summer and the warm sun. As I was perusing my stamps to decide what to play with it hit me and I could make a fun camping scene with some awesome older Lawn Fawn sets that I have. Here’s what I came up with.

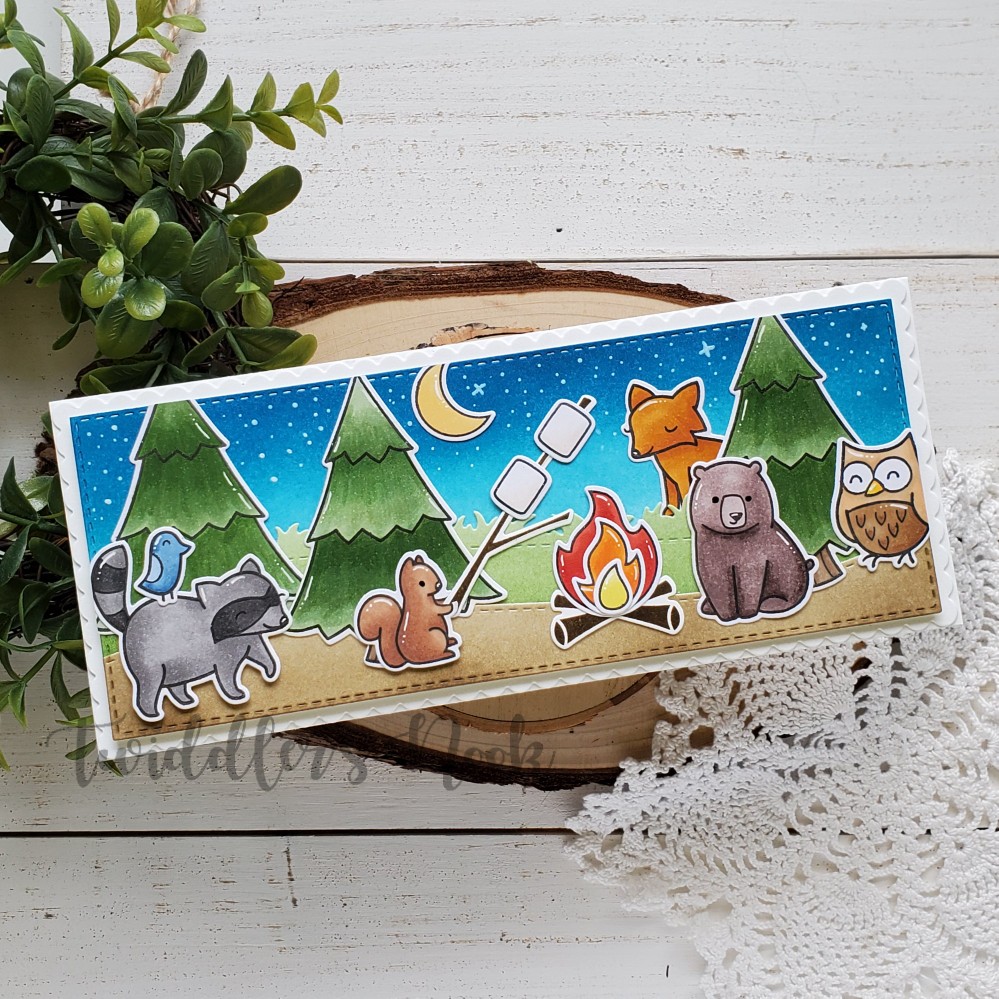
I started by stamping so many critters and other images from Love You S’More and Critters in the Forest and colored them with my copic markers. Then I used the coordinating dies to cut them all out. I die cut 2 white panels from my Trinity Stamps Slimline Stitched Panels set – the middle size and ink blended them. The sky is on one whole panel while I split the other panel between grass and dirt and used my Slimline Scenic Border dies to cut them apart.

Then I moved on to assembling everything. I glued all of the scene layers together with tape runner and arranged my images how I wanted them. Once that was decided I glued them in place too. This panel was attached to a Slimline Scalloped Border panel with foam tape and adhered to a white cardbase measuring 3.5×8.5 inches.

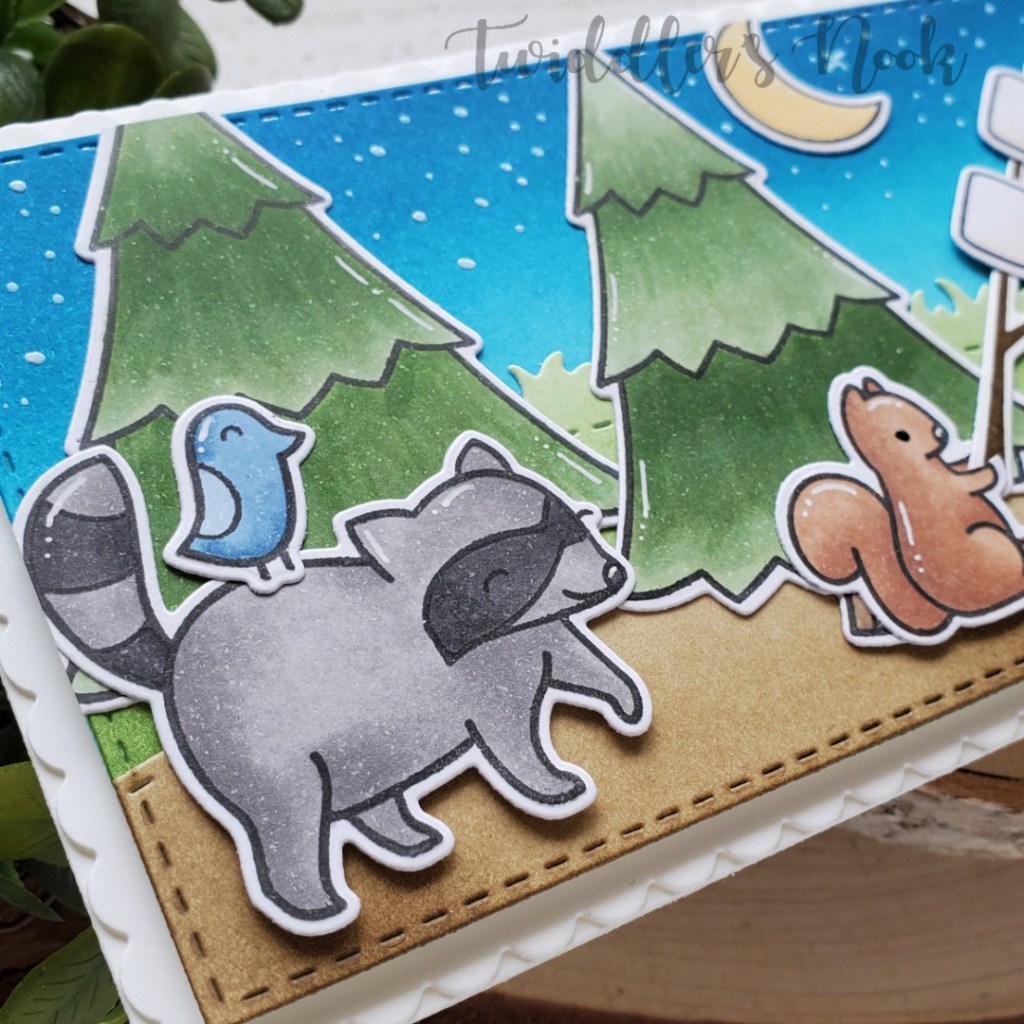
For finishing touches on this awesome scene, I added black glaze pen to the critter eyes and white gel pen accents to the images. Then I took a white glaze pen and added starts to the sky. I think the ink colors look like it’s just starting to be dusk when you can just start to see the stars come out.

I’m so ready to make s’mores over a campfire in the middle of nowhere. It’s going to be amazing! Do you like camping?

I appreciate you sharing your time with me. Have a fabulous day!

Trinity Stamps – Happy Mother’s Day

Happy Mother’s Day to all the moms checking in today. Whether your children are people or furry, you’re all amazing and deserve a day of love and celebration! Today I’m sharing the card I made for my mom this year. It took me out of my comfort zone and I’m blown away with the results.

To create this card I started with the Trinity Stamps sunflower bouquet set and stamped them on masking paper right off. Then I laid my stamps out to decide how I wanted to bouquet to look. I stamped the one that would be in the front and put the mask on it. I kept doing this working my way around until it was as full as I wanted. Then for the reveal – I love this part – I pulled off all the masks and colored everything with my copics.

Then I pulled out my marshmallow alphabet dies and cut mom from the middle of the bouquet. I used a clear ruler to line the first 2 letter up, then placed the “O” die back in it’s slot and used the ruler again to line up the second “M.” I die cut the letters an additional 4 times in blue cardstock and glued everything together. I trimmed the colored panel down to 3.75×5 and adhered it to a white panel that was cut down to 4×5.25. I glued the letters in place and popped this panel up with foam tape on a blue cardbase matching the letters.

I pulled out my So Appreciate set and stamped the “You’re the best” sentiment on a strip and popped it up with foam tape. Then I moved on to the inside of the card.

I trimmed another white panel down to 4×5.25 and stamped the leaf and ladybug from the Sunflower Bouquet using masking again and colored it with copics. Then I stamped the sentiments from So Appreciative and A Sentiment for (Almost) Everything to finish the card off.

I’m really excited to give this card to my mom. I know she’ll love it.

I appreciate you sharing your time with me. Have a fabulous day!

Trinity Stamps – Swimming By To Say…

Hello everyone! I’m sharing a fun under water scene thank you card that I made a couple weeks ago. My daughter and I got some happy mail from my aunt who lives on the coast and I thought it was only appropriate to thank her with some ocean themed thanks.

I started this card by stamping out a bunch of ocean critters and seaweed from the Trinity Stamps Ocean Reef Builder set. I colored them with my copics and cut them out with the coordinating dies. I set those aside and moved on to setting the scene.

I took a couple of white panels and blended distress oxides on them for ocean water and some sand. I spritzed them both with water and also flicked the darkest color of watered down ink on them too. This is a cool way to get extra texture on your inked panels.

I used the scenic borders dies to cut some sand from the brown panel and adhered it to the water. I trimmed that down to 3.75×5.5 and attached two strips of silver cardstock to the top and bottom. Then I popped that on a black card base. I think it kind of looks like a giant fish tank, maybe at the aquarium given what’s in it. 😉 Then I moved on to adhering my images. Some are popped up with foam squares and others are glued directly to the scene.

I used my MISTI to stamp the first part of my sentiment on the top left which comes from the Trinity Stamps Mermaid Wishes set. Then I moved on to finishing touches. I started with glossy accents on the critter spots, sea urchins, fish stripes and sea star. Then I went back with some sprinkled sugar Stickles on the jelly fish for extra texture.

Finally, I trimmed down a white panel to 4×5.25 and stamped the Trinity Stamps Thank You Sentimini on that. Once the front was dry, I adhered it with some tape runner, wrote my message and this card was on its way.

I love scene cards and ocean scenes are some of my favorites! The critters in this set are so fun and the sentiments give you so many options to create with them.

I appreciate you sharing your time with me. Have a fabulous day!

Neat & Tangled – Puppy’s Favorite Things

Welcome! I picked this sweet puppy up from Neat & Tangled a while ago and finally had a chance to ink him up. He’s just adorable and so fun to color! I paired him with some fun Newton’s Nook products to create a birthday card for a change of theme these days.

I started by stamping and coloring the images from Puppy’s Favorite Things and then used the coordinating dies to cut them out.

Then I grabbed my Newton’s Nook balloons stencil and my Trinity Stamps blending buddy brushes to ink up the balloons different colors. Then I used the Framework dies from Newton’s Nook to cut the panel out along with an orange woodgrain floor. I trimmed down a teal piece of cardstock to 4 1/8×5 3/8 and popped the stenciled panel on it with foam tape. This is all glued to a white card base.

I had used the special die to cut the puppy’s hands out so he could hold the cupcake so I glued that in place. Then I added foam squares to the back of all my images and put them in place. Last, I die cut a banner from the Newton’s Nook Frames and Flags set and stamped my sentiment. This banner is also popped up with foam squares.

For finishing touches I added white gel pen accents throughout the images, black glaze pen to the puppy’s eyes and nose and glossy accents on a few images. I also added sprinkled sugar Stickles to the cupcake frosting and yellow Stickles to the top of the birthday hat.

I appreciate you sharing your time with me. Have a fabulous day!

Trinity Stamps – You Rock!!!

I’m so happy to be joining you again with a totally awesome card featuring fun products from the Spring Break Release along with an oldie but goodie die set from the stash! 

To make this card I used the straight stripes stencil but tilted it at an angle on a panel I die cut from the narrow card and bookmark die set. I started with cracked pistachio distress ink and moved on to abandoned coral and then finished with scattered straw. I blended just a bit on one stripe between each color.

Then I found copic colors to match those and colored my image from You Rock. I used my scan-n-cut to cut the images out. Using the images as a guide I chose where to stamp my music notes and decided to heat emboss them black for some shine. Then I popped my images up with foam tape and adhered the panel to a dark gray card base.

I created an envelope with the same gray and went back to the card for finishing touches which were very simple this time. I just adhered some glass slipper confetti embellishments around the design and thought it looked perfect!

I am loving this retro look and can’t wait to share it with someone who appropriately loves the 80s as much as I do! ❤

I appreciate you sharing your time with me! Have a fabulous day!

Trinity Stamps – Dust Because

I have just fallen in love with the newest bunny additions to the Trinity Stamps family. They are the absolute cutest and so much fun to do a variety of things with.

Today I’m sharing a card featuring the Dust Bunnies set and a couple of the famous slimline series dies.

I started out by die cutting the slimline scalloped panel from white cardstock. I quickly decided I wanted extra dimension so I went back and cut the smallest from the slimline stitched panels and started ink blending. I used scattered straw and abandoned coral distress inks. I popped this panel up with foam tape on the scalloped one.

I had already used my Dust Bunnies stamps as a guide to decide on a design so now I just had to stamp, color and cut them out with the coordinating dies. I popped everything up with foam tape except for the images under the bed. I love how having them set back makes it look like they’re really under there. So cute!

Another thing I just love is that this set also die cuts the words out for you. It’s fabulous and makes it fun to have your sentiment really pop!

This sweet card is just perfect for sending some happy mail to someone you’re missing or to someone “dust” because. 😉

I appreciate you sharing your time with me. Have a fabulous day!

Miss Ink – Java Joe’s

Hello everyone! I’ve got a couple of super fun slimline cards featuring the Miss Ink set called Java Joe’s and the fabulous Trinity Stamps slimline dies.

This first card had been floating around in my head since I bought this set. I just had to put ink to paper and make it happen. I love how it turned out soooo much!!!

To make it, I die cut 2 white slimline panels from the Trinity Stamps Stitched Panel and Windows set. I ink blended 2/3 of one with pumice stone and gathered twigs distress oxide. Then I used the slimline scenic borders to cut it. Then I inked the rest of that panel up with twisted citron and mowed lawn distress oxides and cut the top with the same scenic border die. For the second panel I inked the top up with tumbled glass and stormy sky distress oxides. Then I spritzed the panels with water and blotted them dry. I adhered all of these panels together and mounted them on a card base.

I stamped and colored my Java Joe’s images with copics; then used my scan-n-cut to cut them all out. I arranged everything how I wanted it and added foam squares to them all and stuck them in place. At this point I carefully stamped and head embossed my sentiment with black embossing powder next to Java Joe.

For my next card, I originally planned it to be a regular A2 size card but something hit me when I was laying it out that it might look cool as a more simple slimline. I’m still baffled at how awesome this turned out! I used the new Trinity Stamps slimline wonky stitched wilderness die for this one. Don’t you love that extra texture?

I had my images already colored and cut out from the round of coloring I did for the first card so I immediately set to figuring out my general layout. I grabbed my distress inks for this one – walnut stain, tea dye and antique linen. Starting from the bottom right corner and working my way lighter I blended them together. Then I pulled a fun Bo Bunny set out called Distress Textures which has a coffee cup ring stain and some splatters in it. I love using this for backgrounds on all kinds of cards. I stamped it in 3 different brown inks – darker to lighter following the shade of the distress inks.

Then I popped up my images and used a dark brown ink to stamp my sentiment on the left side of the card.

I almost forgot to mention that for both of the sandwich boards I head embossed white hearts on them for a bit of a chalkboard look. I love this little detail.

I hope you enjoyed today’s fun cards!

I appreciate you sharing your time with me. Have a fabulous day!

Paper Smooches – Kitty Hello

Welcome back to day 3 of my Paper Smooches – Happy Hellos series. This was totally unintentional but you all know that I have a hard time choosing which images to use from a stamp set. So I stamped and colored them all. And when the cards just started flowing, who was I to stop it??? No way!

So on to today’s fabulous card. It’s a feminine feline hello featuring some fun ink blending and more Zig coloring.

I started by coloring and cutting out my kitty image from Happy Hellos. Then I chose some distress oxide inks that matched the colors of the letters and inked the bottom 2.25 inches of a white panel. I took my new diagonal stripes stencil from Trinity Stamps and inked it up with black soot distress oxide on the edge of a card base. I trimmed .25 inches off the purple/blue panel and popped it up on the card base with foam tape. I love the contrast this gives!

I popped the kitty image up with foam squares and added some morning dew Nuvo Crystal Drops to her nose. Then I finished the card off with a scattering of Crystalized Unicorn Tears embellishments from Trinity Stamps.

This is such a pretty card and that striped contrast adds so much to a simple design. It’s so great! I’ll be using the heck out of that stencil, I know it.

I’m linking this fun card up to the HAPPY – Paper Smooches Challenge as well.

I appreciate you sharing your time with me. Have a fabulous day!

Paper Smooches – Hola

Hi again! Today is day 2 of my Paper Smooches fun! Let’s shake things up a bit – Spanish-style! 😉 I love avocados and my husband hates them. This leaves so many opportunities for teasing both ways. It’s great fun and our daughter loves to instigate it.

As you can guess, I was super excited to use this fun stamp from the Happy Hellos set to show my love for what my husband calls – dirt fruit.

For this card, I stamped my image on Bristol Smooth Cardstock and pulled out my Zigs again. Then I cut out the two parts that I colored and set them aside.

I grabbed my Trinity Stamps Catching Some Rays stencil and did a two-tone with it. The skinnier stripes are mustard seed to squeezed lemonade distress oxides while the thicker stripes are twisted citron. I just faded the ink the farther our I got from the center. Then I heat embossed the image near the center area and popped the colored images on top of that with foam squares.

I took my panel and popped it up with foam tape on a lime green card base that played off the colors on the avocado well and moved on to finishing touches. I scattered Nuvo Crystal Drops in ripened pumpkin, dandelion yellow and apple green across the design.

This is such a spicy, fun card! I love how it turned out! It’s fun and also easy enough to mass produce if you wanted to send a bunch of happy mail out!

I’m linking this card up to the HAPPY themed Paper Smooches challenge this month too. Stay tuned tomorrow for another installment of Happy Hellos fun!

I appreciate you sharing your time with me. Have a fabulous day!

Trinity Stamps – Rainbow Mix Up

Welcome! I hope you’re having a great day. I’m super excited to share today’s fun card! Not only is it so happy and fun but it’s an awesome way to use scraps and not have to throw your precious cardstock away!

I’ve fallen in love with the Trinity Stamps rainbow dies, as I’m sure you can tell from my posts lately using it every chance I can! (Don’t worry, there are more to come too!) Today’s card came from the “extras” of a card I made a bit ago which used the rainbow in the “correct” order. But really, is there a correct order? Rainbows are just fun in any order! Hence, today’s card!

I die cut some more of the “base” to build the rainbows and mixed the colors all up from what I had left. Then I die cut more clouds and glued them to the bases of the rainbows. I started arranging them on a teal textured panel starting with one whole rainbow and filling in space around it. Then I trimmed off the excess – but don’t throw that away! I used the other half of all those rainbows and arranged them on the rest of my card. I trimmed away the final excess and fell in love with all this happy!

For the sentiment I stamped one from a sentiment for (almost) anything set in teal ink and then used the straight banner from the slimline scalloped card panels and banners set and glued it all together. I popped it up on the panel with foam tape and attached the whole thing to a white card base.

This card was so fun to put together! You could totally switch out the sentiment for any occasion and it would be great!

I appreciate you sharing your time with me. Have a fabulous day!