Trinity Stamps Craft Troop Challenge – Miss Your Face

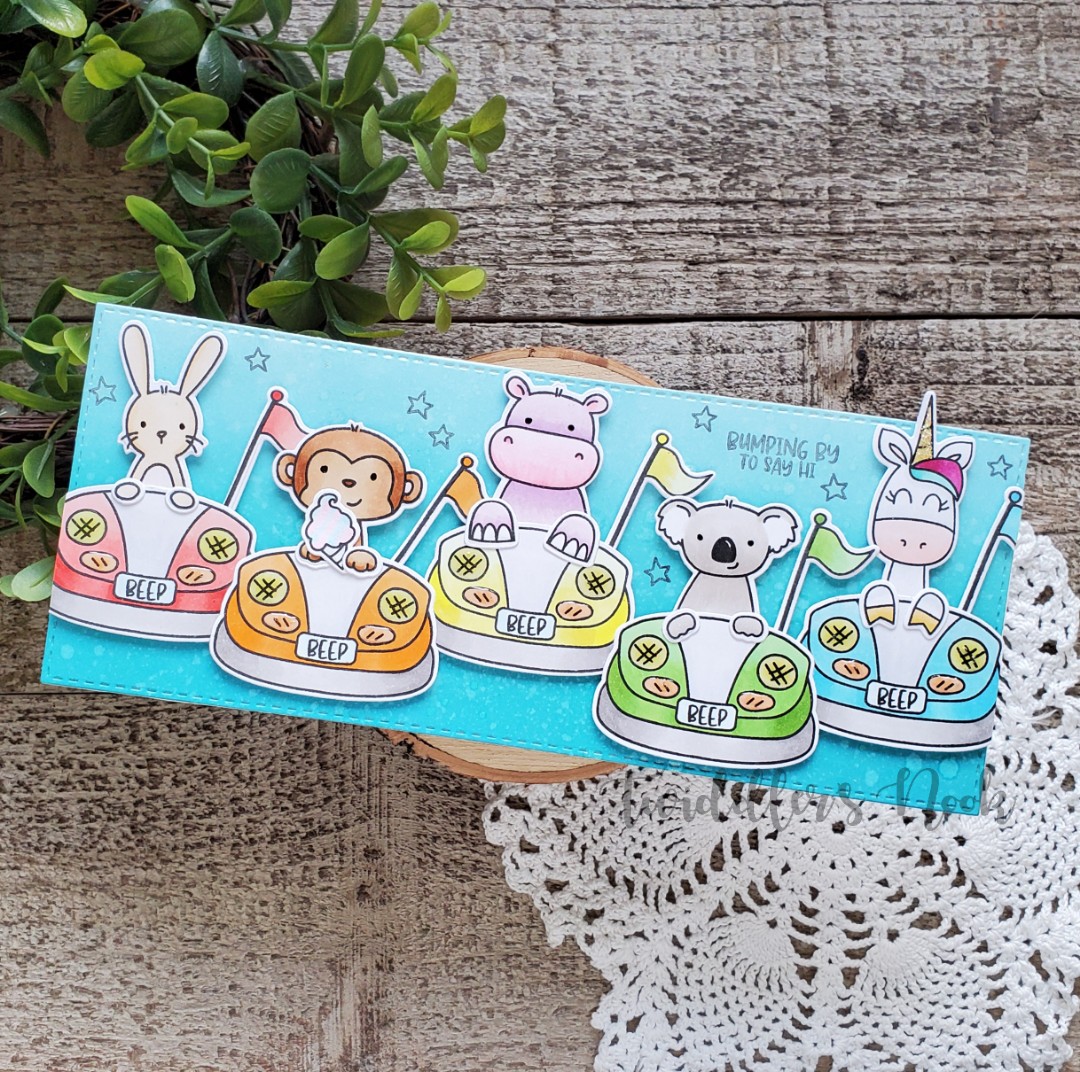
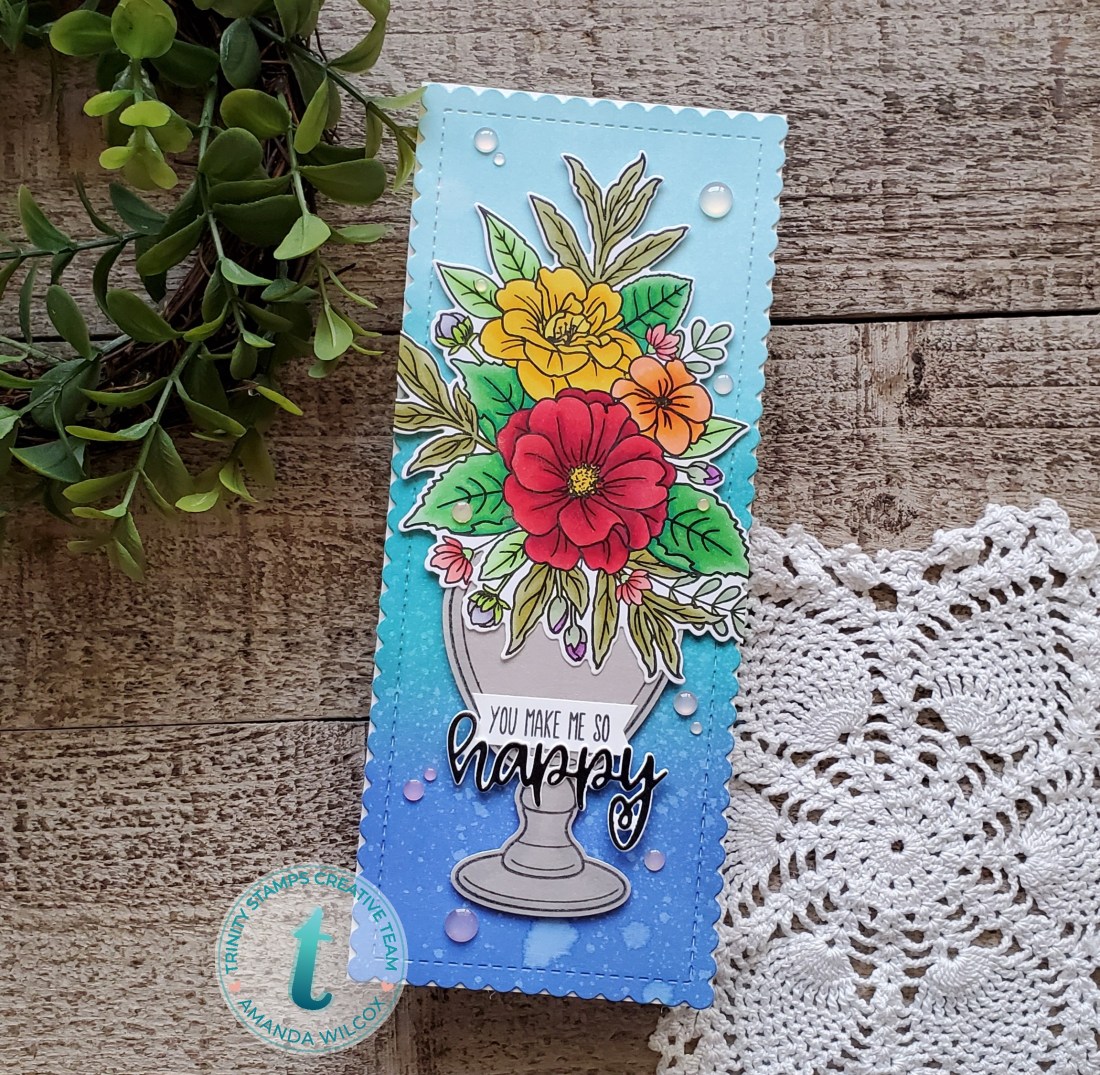
I’m so excited that Trinity Stamps has started a monthly challenge for you to play along with! This month the theme is floral. I wanted to help you think outside of the box so I’ve chosen secondary images from two Trinity Stamps stamp sets to create this beautiful floral card. I used Love You Bunches from the January release and the Nutty Squirrel from last fall!

I had the general design layout in my head so I jumped right in to stamping my images. The cherry blossom and rose are from Love You Bunches and the smaller flower images are all from Nutty Squirrel. I colored them with my copics and used coordinating dies from Love You Bunches and Nutty Squirrel to cut them all out.

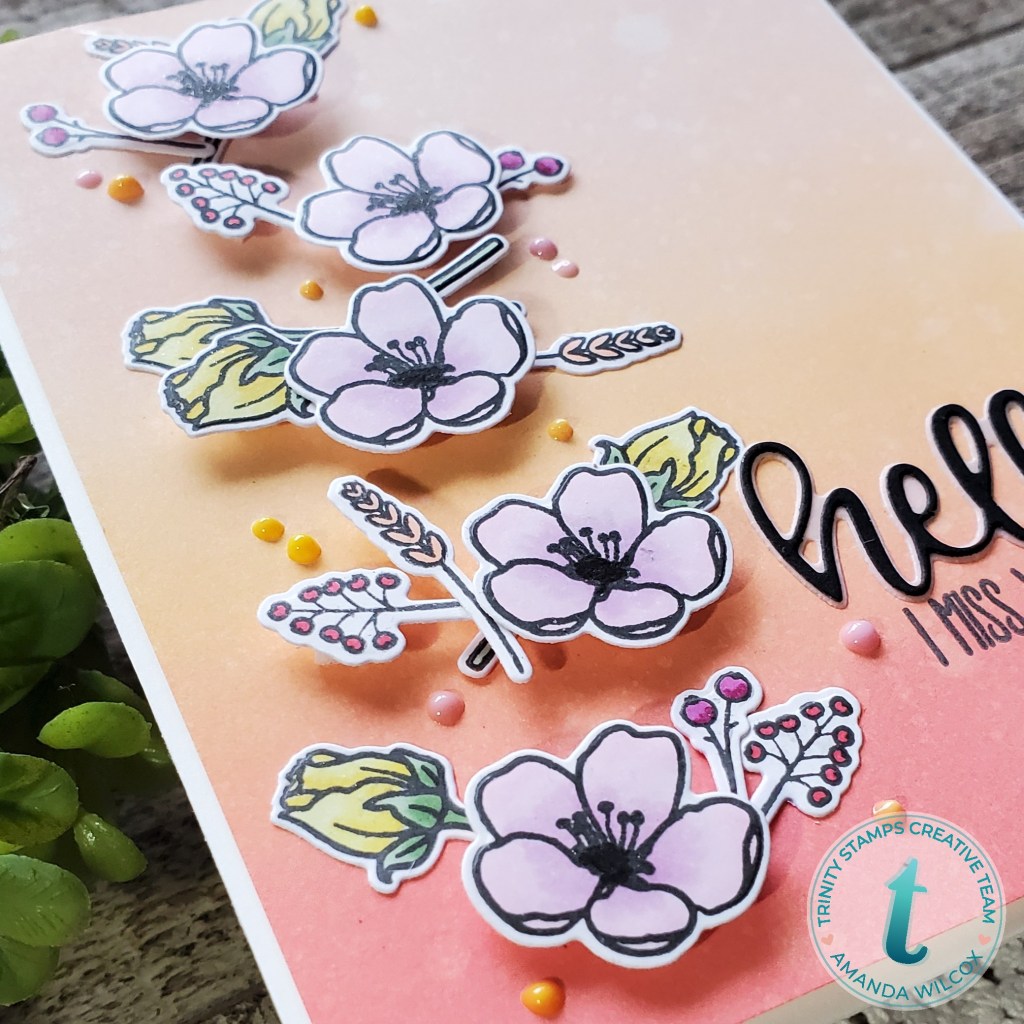
For my background, I was inspired by my friend, Candice Fisher, over at CandiCards. She’s always sharing beautiful inspiration. She used similar colors on a stenciled background last week and I loved it so much I had to try it. I don’t have the same colors she used so I chose distress oxides in abandoned coral, dried marigold and tattered rose. After blending with my Trinity Blending Buddies, I spritzed it with water and trimmed it down so I had a small white border from my cardbase.

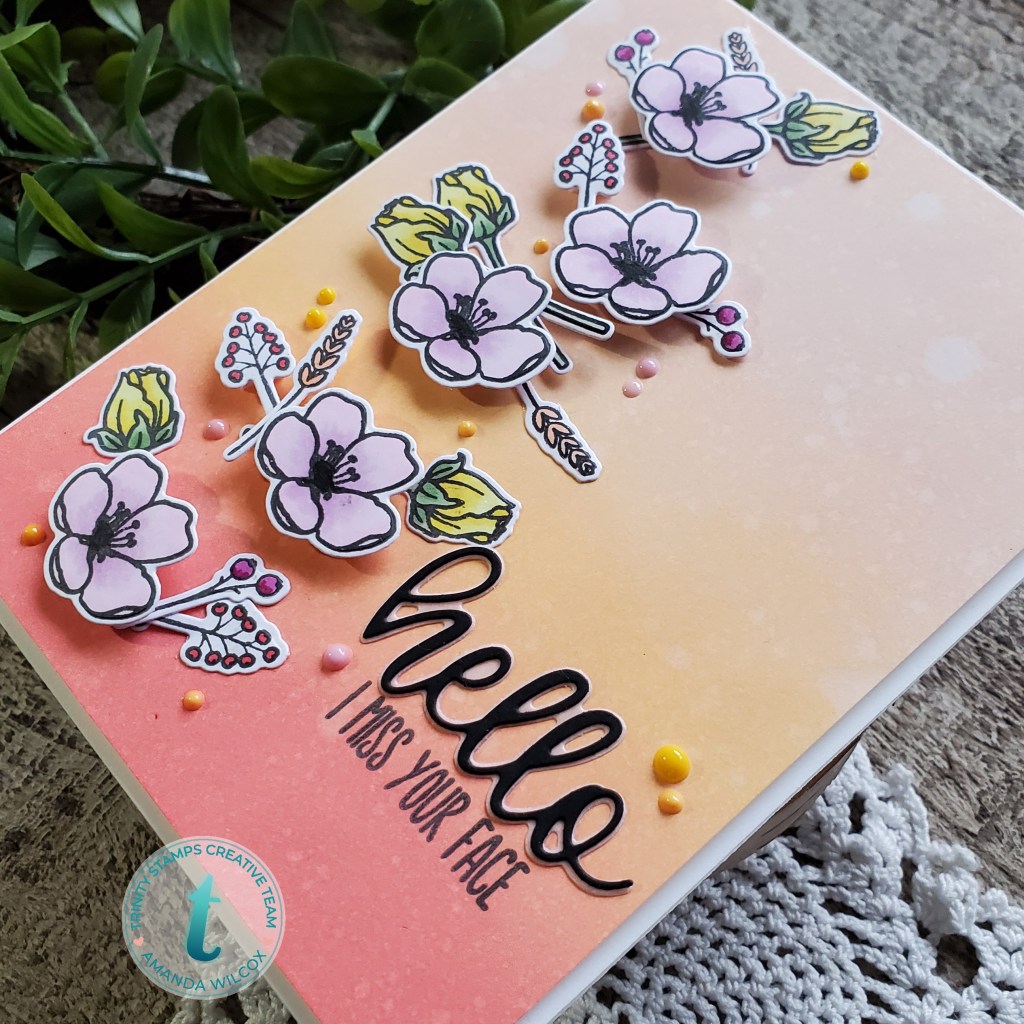
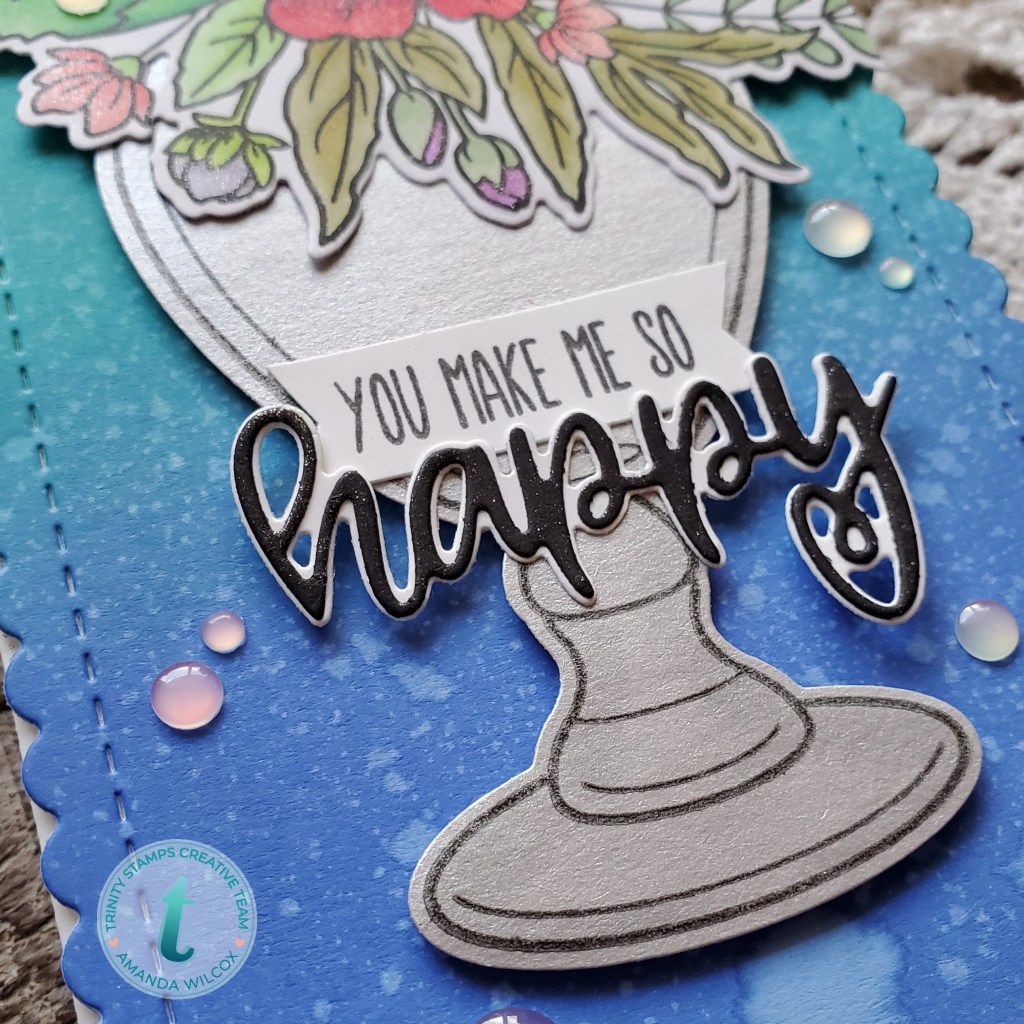
I laid my images out to make sure I had enough to fill the space and get a general idea where I wanted them. Then I used foam squares for some and liquid glue for the rest to adhere them to my panel. Next, I die cut the hello senti-mini words from black and vellum, glued them together and then to the cardbase and stamped a sentiment from the hello senti-mini stamps below that. Then this panel is popped up on my card base with foam tape.

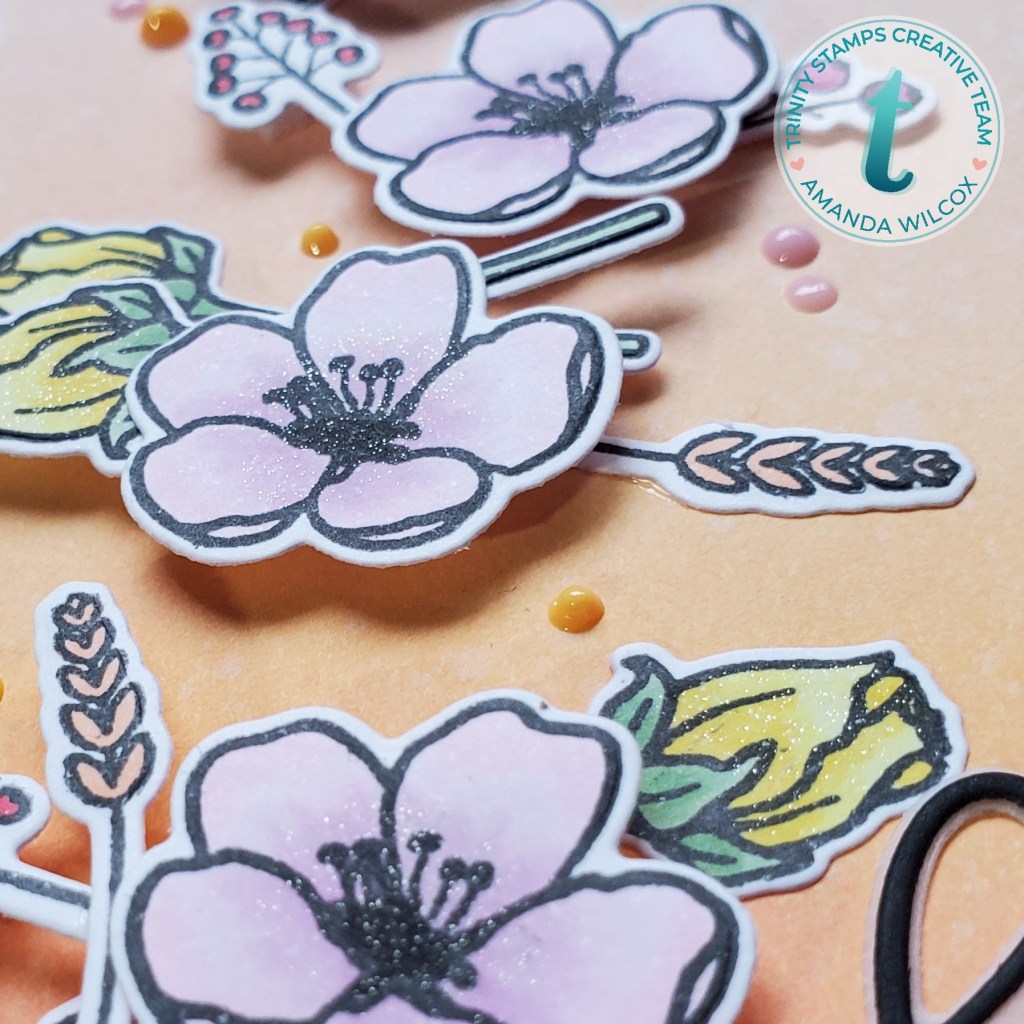
For finishing touches on this card I added Wink of Stella glitter brush pen to the flower centers and roses and also a scattering of Nuvo Crystal Drops around the design.

It’s fun to look at your stamps in a different way and get extra use out of them by using those secondary images that sometimes don’t get touched for a card all their own. I hope you’ll dig in your stash and join us for this fun challenge. Click here to head to the blog post where you can link up your creations!

I appreciate you sharing your time with me. Have a fabulous day!

Coffee Loving Cardmakers – Sending Hugs Gift Card Holder

I’m over on the Coffee Loving Cardmakers blog today with this super fun gift card holder featuring a Honey Bee Stamps dies and two awesome Trinity Stamps coffee themed stamp sets – Coffee with Character and A Latte Love.

I started by die cutting my shaped coffee cup gift card holder from heavy 110 lb. white cardstock and the sleeve from kraft cardstock. Then I took my Coffee with Character stamps and stamped them randomly all over the cup. I chose a limited, sepia-toned color palette from my copics and started coloring. Then I stamped my sentiment on the sleeve and colored the letters on that with the same colors. I added a little shading on the lid with the lightest marker for some dimension too.

Here’s a look at the cup and the sleeve separated. I think it will be so fun to write a little message inside of, add a Starbucks gift card to and send it out for a little extra love to someone unsuspecting. Happy mail is the best!

Have you sent out any happy mail lately? Have you received any?? Share in the comments. We could all use some inspiration and a happy story from time to time.

I appreciate you sharing your time with me. Have a fabulous day!

Avery Elle – Peek-a-boo Pals Fair Fun

I am BEYOND EXCITED to finally have had the chance to play with the most recent Avery Elle release…specifically more of my beloved Peek-a-Boo Pals! I have had this idea in my head since I saw the stamps at Creativation in January and was so happy to finally put ink to paper and make it happen!

To create this card, I started by inking up a panel with distress oxide inks in mermaid lagoon, peacock feathers and tumbled glass and then die cut it with my slimline dies from Trinity Stamps.

Next, I moved on to stamping, coloring and die cutting all my images from Peek-a-boo Pals Fair and Peek-a-boo Pals! They’re so stinking cute! I just love all these critters!!!

I assembled all the bumper cars with their critters and flags and popped them all up on the inked panel with foam tape. Then I stamped my sentiment along with some fun stars to fill in the open space. I really like the look this gives without taking away from the main images.

I added the panel to a card base measuring 3.5×8.5. For finishing touches I added black glaze pen to the animal’s eyes, glossy accents to the bumper car lights and Stickles to the unicorn’s horn.

This card just makes me smile! I hope you enjoyed it too!

I appreciate you sharing your time with me. Have a fabulous day!

Trinity Stamps – Slimline You Make Me Happy Bouquet

Hello everyone! I’m up on the Trinity Stamps blog today featuring this beautiful floral image – Love You Bunches. I had this idea pop in my head the other night when I was laying in bed and was so excited the next morning when I got up and put the flowers over the candy jar and could make it look like a vase instead!

I started by stamping and die cutting my candy jar from silver metallic cardstock. Since these flowers don’t have stems I wanted it to look like a solid vase and I thought the neutral silver would work well with whatever colors I chose for my flowers.

Next I stamped, colored and die cut my flowers from Love you Bunches and set it all aside to create my background. For this I cut a panel to 8.5x a scant bigger than 3.5 and used distress oxides on it – tumbled glass, peacock feathers, to blueprint sketch and spritzed it with water. I hit it with my heat gun to help it dry faster before die cutting it from the largest in the slimline series: scalloped card panels dies.

At this point I started assembling my card so that I could make final decisions on my sentiment. The inked panel is glued directly to my card base and then the flowers and candy jar are popped up with foam tape.

I ended up deciding to use the happy senti-mini stamps and dies together for my sentiment and glued them both directly to the candy jar base.

For finishing touches on this card I scattered fortune teller embellishments throughout the design and then loaded my Wink of Stella glitter brush pen on the flowers and the die cut happy.

Photos really don’t do the Wink of Stella justice. It’s sooooo cool to see it shimmer when it’s moved in the light. And I really love these iridescent embellishments playing off the colors in the card.

Trinity Stamps is starting up a monthly challenge today too! It’s a brand new, fun thing and I really hope you’ll play along. This month’s challenge is floral. Keep an eye out later this morning for all the details!

I appreciate you sharing your time with me. Have a fabulous day!

Trinity Stamps – Awesome Human Mini Card

Happy Weekend everyone! I’m hopping in today to share an extra special card for an extra special someone!

My daughter has a dance team competition today so I made her a special card. They do fun gift deliveries to the kids in their rooms while they are waiting to perform and I try to make a special card each time to tie to a balloon.

To make my card, I started by die cutting the stitched rectangle from Trinity Stamps Slimline Series: Frame and Fold dies. Then I stamped the Awesome Human stamp on it and colored it with copic markers. I chose a coordinating color of cardstock and die cut the card from the same Slimline Series: Frame and Fold dies. I love how many different things you can do with this die set. It’s got amazing potential!

The stamped panel is adhered to fun foam and then adhered to the card for a bit of dimension and interest on a simple card design.

Then, I decided to add a little something fun to the inside of my card too! I grabbed my hello senti-mini stamps and dies and started deciding how I wanted it to look. In the end I chose teal and white cardstock to make the hello from and stamped sunshine below it. This wasn’t quite enough so after digging through my stash I thought it would be so fun to have the cute frog from Puddle Jumpers hopping off the word hello.

This made me giggle for 2 reasons…it’s Leap Day after all! And because my daughter is always bouncing around and loves all things critter just like her mama. 😉

For finishing touches on the front I did a combo of all the things! I started with Wink of Stella glitter brush pen on the word YOU, then moved to yellow Stickles on all the stars. Next I added white gel pen to the banner and then finished it off with glossy accents on HUMAN.

Super fun card and I’m really excited to give it to her! This is the second of four competitions they have this season and my ideas are already turning for what to make next time!

Thanks so much for stopping by! Enjoy your weekend and have a fabulous day!

Coffee Loving Cardmakers – Coffee Date

Happy Friday everyone! I’m over at the Coffee Loving Cardmakers blog again today having a coffee date with someone very special! (It’s actually a hot cocoa date but, hey, details.) 😉

My special date today is my daughter, Micaela, who has been loving making cards with me lately. When I asked if she wanted to join me for this, she jumped at the chance! Together we sat down with our cocoa and came up with a plan.

She decided that we had to use the Trinity Stamps Mug Card die set and then she got on Pinterest and found a color palette we have to follow as well.

color palette credit to colorpalette.net

Next, we took turns taking over the craft room; stamping, coloring, die cutting and all the fun things! Here is her creation.

She die cut her mug out of kraft cardstock and then added a sweet grassy ground for her adorable Love You S’more critters! Then she added a sentiment to a banner from Bannertastic and popped it up with foam squares. She finished her adorable scene off with some white gel pen stars.

Her copic coloring is just fabulous and I think she did pretty amazing sticking to the color palette she chose as well! Whoever gets this card must be pretty darn special! 😉

Next was my turn to figure something out. I wanted to think outside of the typical coffee mug box so I reached for a stamp set I just recently purchased but hadn’t played with yet – Trinity Stamps Sweet Surprise. Here’s what I did with it!

I die cut my mug card and then stamped the cupcake, sentiment and hearts from Sweet Surprise directly to the card. Then I stamped another cupcake on yellow striped paper I had in my stash and cut out the frosting for some paper piecing. I don’t do this often but I thought it would give some fun texture to the scene. Then I colored everything else with copics and did a little ink blending at the bottom for added interest.

I used Nuvo Crystal Drops on the sprinkles and added glossy accents to all the hearts. This was a super fun card to make and I look forward to giving it to a special coffee loving person for their birthday!

We appreciate you sharing your time with us today! Have a fabulous day!

Coffee Loving Cardmakers – Frappy Camper

Happy Tuesday everyone! I’m up on the Coffee Loving Cardmakers blog today. I was recently inspired by my teammate and friend, Katie, to create my own background. Check out her post here. So I grabbed the stamps that spoke to me and started to work!

For this project I actually started with the bookmark that Katie inspired me to create! I die cut it from the Trinity Stamps Narrow Card and Bookmark die set, inked it up with my Trinity Stamps Frappy Camper stamps and then added the banner and hole reinforcer to finish it off.

Then I set to work on the card by stamping, coloring and die cutting my Frappy Camper images and moved on to start building my scene. This time I die cut the card panel from the Narrow Card masked off the edges and used the Layered Birch stencils to create my ground and trees. Last, I added my images with liquid glue and then stamped my sentiment. 

For finishing touches on this card, I added white gel pen accents throughout and then a couple of touches of glossy accents on things like the awning to the trailer and the lid to the guy’s frapp!

I also added black glaze pen to the eyes. When all of that way dry, I added this panel to a 3×6 inch card base and tucked the cute bookmark inside. This will be a great gift to pop in the mail to one of my book loving friends!

I appreciate you sharing your time with me. Have a fabulous day!

Trinity Stamps – Rainy Days are Best Spent…

Hello everyone! I’m over on the Trinity Stamps blog today, sharing this super bright and fun rainbow card featuring Rainy Days Together stamps and dies, along with some other fun products!

To create this sweet card, I started with that great rainbow striped background. I cut up strips of rainbow cardstock, added adhesive to my card base and and put them all in place. Then I took a white panel and die cut the largest Nested Heart die from it and popped the panel up with foam tape.

I stamped my images from Rainy Days Together, colored them and die cut them out. I used a combination of foam tape and tape runner to adhere all of my images down. Then I stamped my sentiment, die cut the word “together” and popped it up with foam tape.

For finishing touches, I added glossy accents throughout and Wink of Stella glitter brush pen too. Then I grabbed a variety of jelly drop hearts and scattered them throughout. The colors I used are: Berry Blue, Peachy Keen, Double Bubble, Hint of Mint, Lemon Drop, and Blackberry Bliss.

I seriously can’t get enough of this sweet girl and those duckies!!!! They are just the cutest! Especially the fact that there is a mini umbrella for them to hold too! It’s too adorable! Don’t you think?

I appreciate you sharing your time with me. Have a fabulous day!

Trinity Stamps – Me + You Valentine

Happy Valentine’s Day everyone!!! I know some people are so against this holiday but I really love sharing love so it’s fun for me! Today I’m sharing one last Valentine card that I made for someone extra special – my husband.

Those that know me, know I’m in love with those Trinity Stamps mice so I just had to use them today! I also pulled out some other new goodies from the latest release. Keep scrolling to check it all out!

I had the design in my head already so I jumped right in and started inking up my heart. I used the new Layered Heart stencil to ink up a heart in the middle of an A2 panel (salty ocean and blueprint sketch distress inks), then spritzed it with water. Then I die cut a heart the next size down from the Nested Hearts dies with an iridescent vellum. The stencil and die cut hearts are the exact same sizes so they work together seamlessly! It’s fabulous!

Next, I pulled out my Love and Stuff sentiments and stamped it on white cardstock. Then I went digging in my stash and found the PERFECT banner die in my Merry Christmas Senti-mini die set so I used it!

This is when I finally sat down to stamp and color my mice from Mouse House. The I used the coordinating dies to cut them out and I moved on to assembling this fun card!

I die cut my inked panel with the largest rectangle from the Newton’s Nook Framework die set and popped it up with foam tape. Then I attached my mouse and banner to the vellum heart so that I could hide my adhesive behind them to attach the heart to the inked panel. (Tricky, tricky.) 😉 Next I adhered the mouse hiding behind the heart and the one at the bottom of the card.

Finally I started on finishing touches. For this card I kept it simple and added black glaze pen to the eyes and noses of the mice so they shine just a bit and after that was dry I added a little white gel pen highlight to the eyes. Last I took some Sweet & Tart Heart Sprinkle embellishments and glued them around the card.

I just love how simple this card is but how much fun it is too! I hope he likes it tonight when I finally get to give it to him.

I appreciate you sharing your time with me. Have a fabulous day!

Newton’s Nook – Be my Meow-entine?

Hello again! Today I’m sharing a fun card I made for my daughter for Valentine’s Day! She loves Newton as much as I do so it was a no-brainer to grab this cute Newton’s Valentine image and put something fun together for her.

I decided to make Newton laying among puffy pink clouds instead of on the ground this time. I thought it brought a bit of whimsy to the card design. I really like how it turned out.

I stamped my images from Newton’s Valentine, colored them and then cut them out with the coordinating dies. Next I moved on to the scene for my card.

To start that I used the Sky Border dies to cut 2 cloud borders and then inked them pink with my Trinity Stamps blending buddy. Then I cut an A2 panel and used the Bokeh Hearts stencil with a couple of different pink inks.

I glued the clouds to the stenciled panel and the used the largest rectangle in the Framework die set to cut it all at the same time so I knew it would line up. Then I used the same ink I blended on the clouds to stamp my sentiment in the upper left corner.

I adhered my flowers directly to the card and popped my Newton image up with foam tape.

For finishing touches I added white gel pen accents throughout all the images and Wink of Stella glitter brush pen to the heart Newton is holding. Then I took glossy accents to the bird’s beak, Newton’s nose and toe beans, and the centers of all the flowers.

I felt like it still needed a little something so I pulled out my Cinnamon Red Hots jelly drop hearts from Trinity Stamps and added a couple to make my card feel complete.

Then very last, I popped my panel up with foam tape on a melon-colored card base.

I’m really happy with how this fun card turned out and think my daughter will be quite happy with it as well. I’m excited to give it to her.

I appreciate you sharing your time with me. Have a fabulous day!