Eeekkk! So excited to be back in the groove of sponsoring these fun hops again! It feels like it’s been a while and I’m here for it! This is the start of the Coffee Loving Cardmakers 2023 Spring | Summer Hop and I’m very proud to be a sponsor of it.
I love carrying a variety of coffee products in the shop to keep you all in perfect theme while crafting – whether it be your tools or embellishments for your creations, we’ve got it.
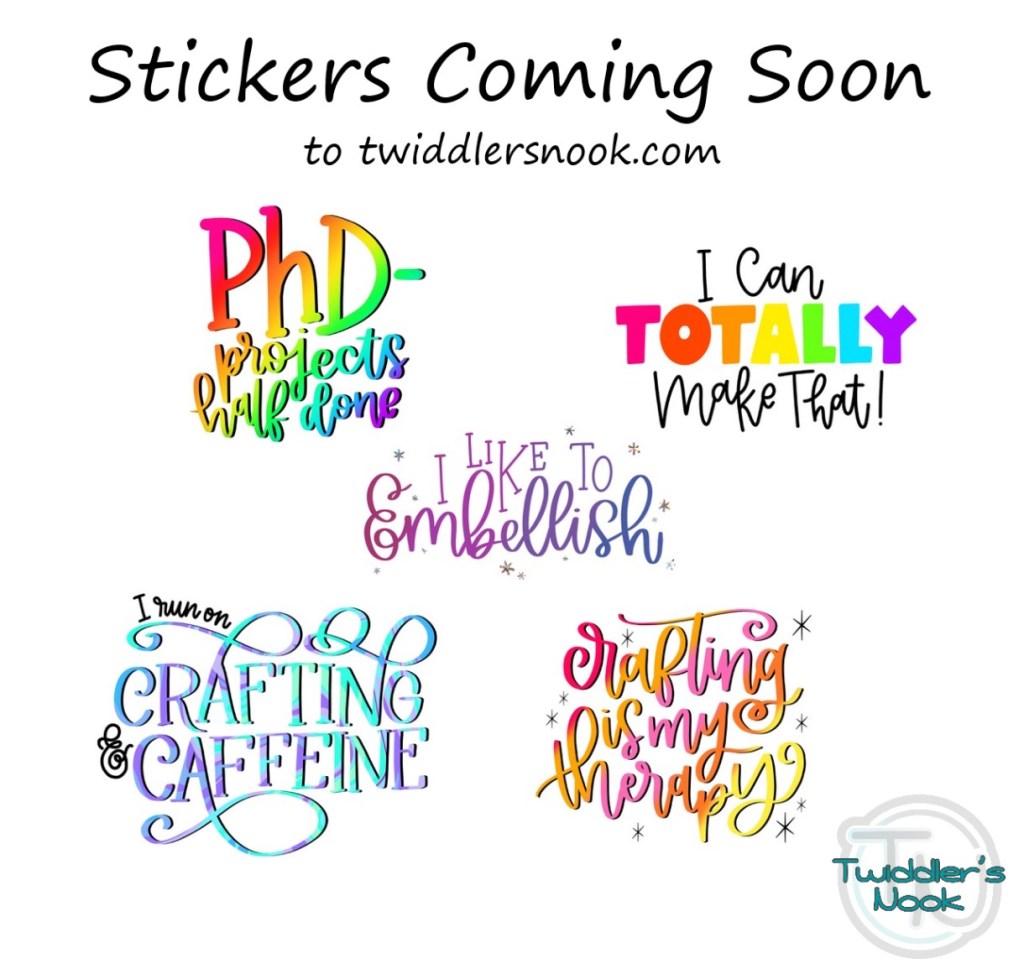
I’m super excited to announce that I have a new product coming to the shop…
Drum roll please…
The plan is to have them available on Sunday, as long as UPS cooperates and delivers them on Saturday. So be sure to check the shop for new items HERE.
These stickers are going to be so fun! Decorate your water bottles, laptops, project bags…all the things!
GIVEAWAY
I’m going to be giving away a full set of the new stickers plus one of our new project bags to one commenter on today’s post. Then I’m going to give a second set of stickers plus a $20 gift code to the shop to another commenter.
Commenting closes Thursday, May 11 at midnight PDT.
Good luck everyone!
BLOG HOP
This is your last stop on the hop but if you didn’t start at the beginning, head back to the CLC post HERE and catch up whatever you missed.
Hey crafty friends! I just wanted to pop in with a winner from the Build Your Stash Holiday Cardmaker Hop. I said that I would giveaway one of my $50 destash packages to a random commenter.
Drum roll please…
Congratulations Von Marie! Please email me at twiddlersnook@gmail.com or message me through social media to claim your prize.
Thank you everyone for your comments, orders and just taking a moment to check out the Twiddler’s Nook shop.
Remember we have a sale going on through tomorrow, April 29, so there’s still time to shop!
I’m very happy to be a sponsor for another BYSHC hop. These are so fun and such a great inspiration to get a jump on your holiday cardmaking. It gives you an extra excuse to use what you have before the new holiday goodies are there to tempt you, plus you have holiday cards ready to go!
For those of you who are new here, I’ll give a little run down of the products we offer at the Twiddler’s Nook Etsy Shop.
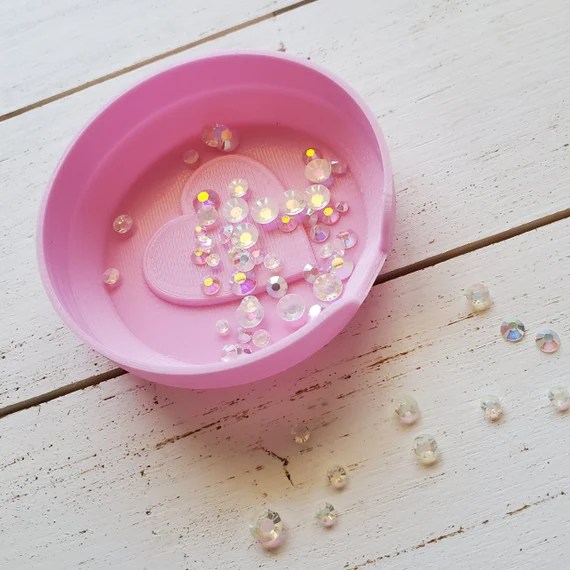
My initial drive for the shop was to create some simple tools to help me while making cards. Thus the embellishment tray. I hated dumping embellishments on my desk and having to pick them up one at a time to get them back in the bag. These grew very quickly to lots of shapes from customer requests and lots of fun colors because we all have different styles.
The next thing was the magnetic die holder. I wanted a safe place to stick my dies while I was in the middle of something and didn’t want to keep putting it away or risk losing it. I also have a second one that lives on my desk with the basics I’m always reaching for.
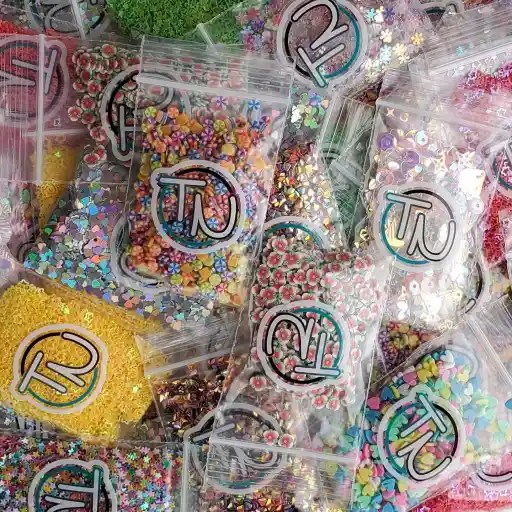
After a bit I wanted to expand so I started carrying fun embellishments to use in cardmaking and various other crafts too. I have had people order these for making slime with kiddos, decorating tumblers and snow globes, so many ideas!
We have a number of other products available like blending brushes with color coordinating caps and platforms for them to magnetize to so they stand up, but this gives you a little idea where things came from. Do you have a crux in the craft room that needs a remedy? Reach out and I’ll see what we can do.
In case you don’t follow me on social media, I have been doing a destash mystery box sale this week. I happen to have a few left – price points at $50, $75 and $100. Message me if you’re interested. The packages are stuffed full and worth at least 4x the price. Someone was so excited that she just ordered a second box today! No duplicates because this is my stash of stamps, dies and embellishments from over the last couple of years.
GIVEAWAY I’m going to reserve one $50 package to giveaway to a lucky commenter on here. Comment whatever you’d like and you’re in the running for a fun package of crafty goodies. Commenting closes Wednesday, April 26, at noon.
SALE Extra bonus for you…we’re having a sale in the Twiddler’s Nook shop. Click HERE to get there.
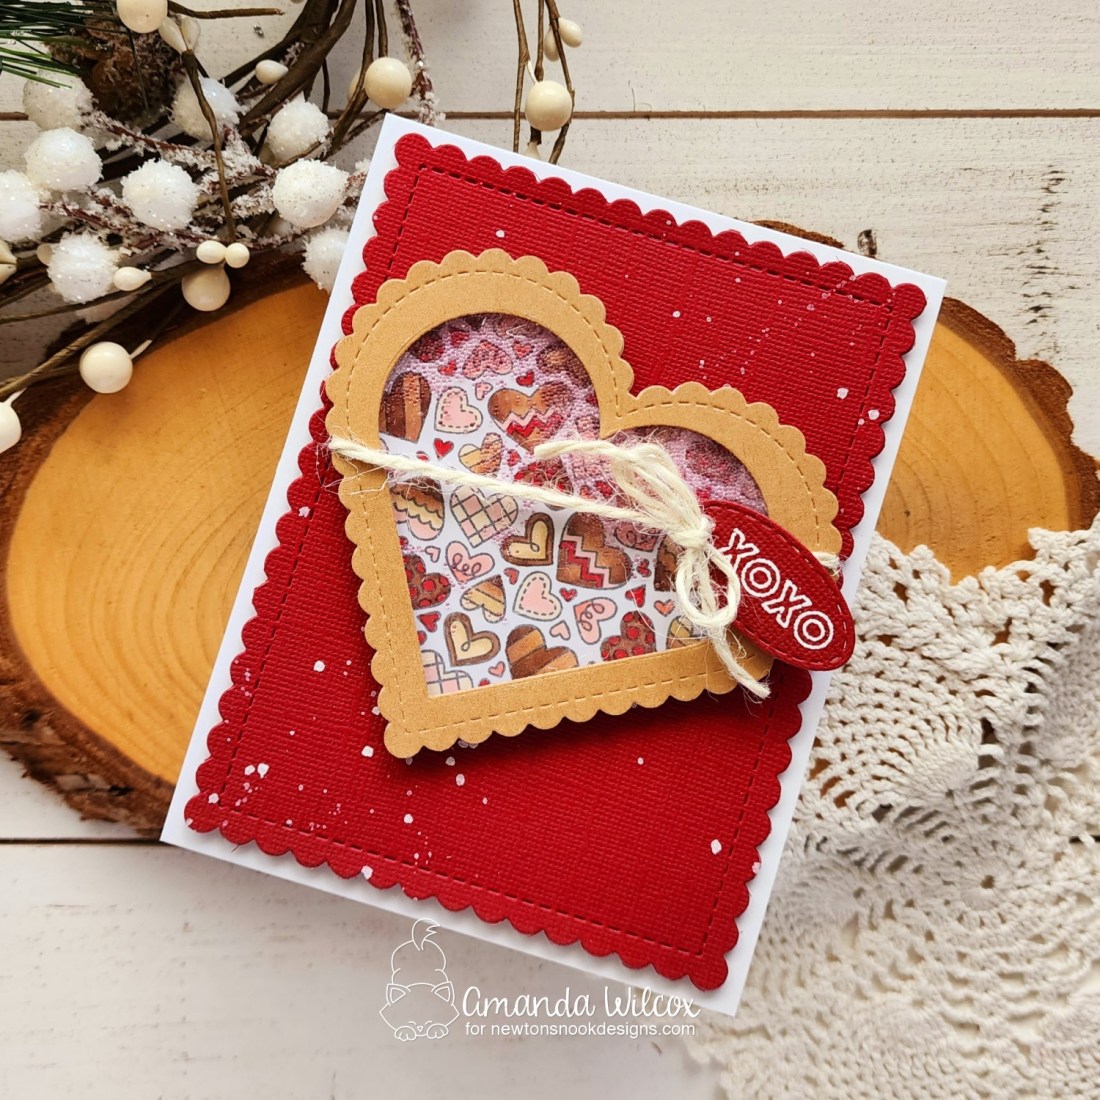
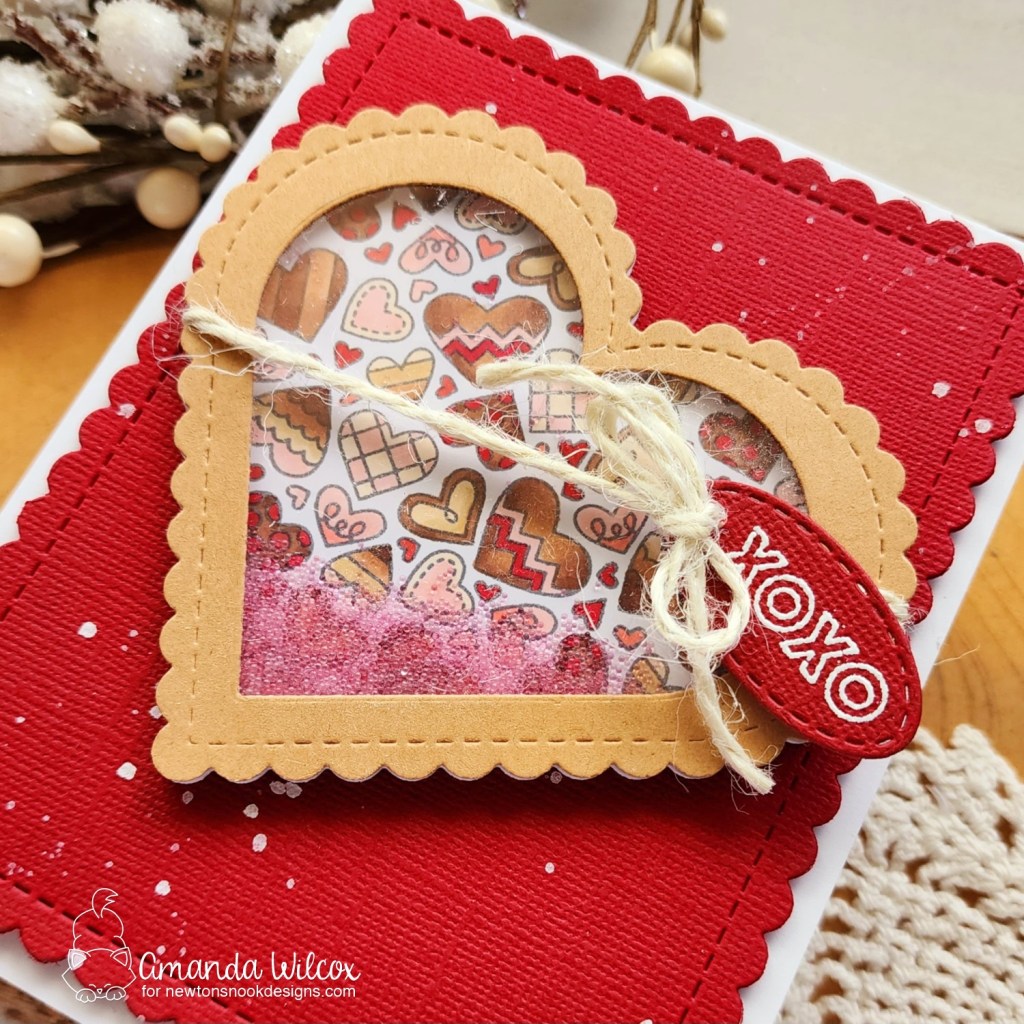
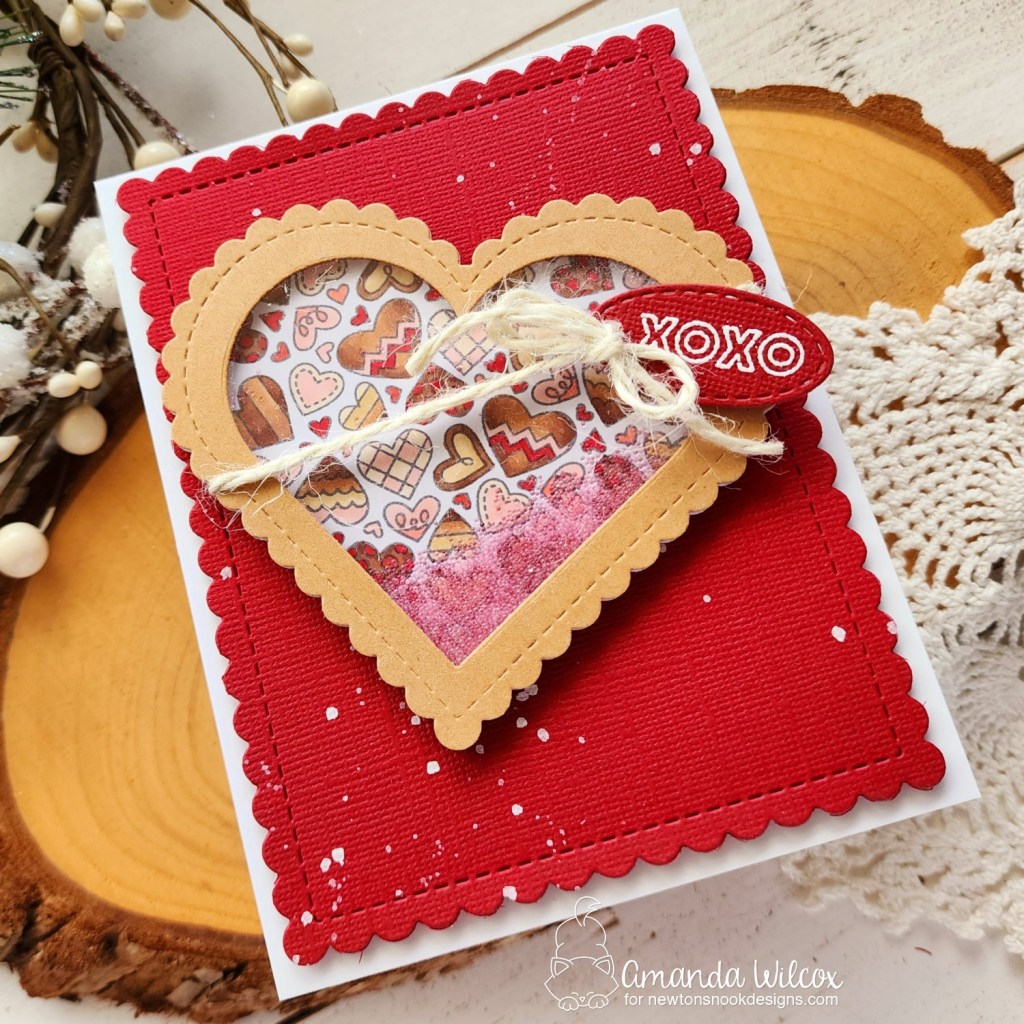
Hey friends! I’m over on the Newton’s Nook blog today with a “sweet” shaker card to share with you! Pun intended. Lol. My intentions were for my heart shaker to look like a box of chocolates and I had so much fun coloring them all!
I started by die cutting the scalloped heart first. Then I lined up the Heartfelt Love image and stamped it. I used copic markers to color everything. I kept to the E30 and E50s for chocolate and R20s for accent colors. I was imagining this to be everything from white to dark chocolate and super yummy to boot!
Once everything was colored, I cut another scalloped heart from kraft and then cut the next smallest heart from that to create a frame. I cut another scalloped heart from acetate and adhered these together with liquid glue. Then I lined the frame with foam strips, sprinkled my pixie dust inside and sealed it up with the colored chocolates.
I die cut a red scalloped rectangle using the largest Frames & Flags die and splattered it with white paint. Once the paint was dry I added foam tape and adhered it to a white card base.
Next, to finish up the box of chocolates, I chose a sentiment from Heartfelt Love, stamped and heat embossed it and then die cut it with the smallest oval in the Oval Frames die set. I punched a hole in it and tied it to the box with sparkle twine from my stash.
To add the heart to my card front, I placed foam tape on the back but avoided the twine so it lays nice and flat. After that, my card is all finished. It’s simple but fun and definitely gives that Valentine vibe I was looking for.
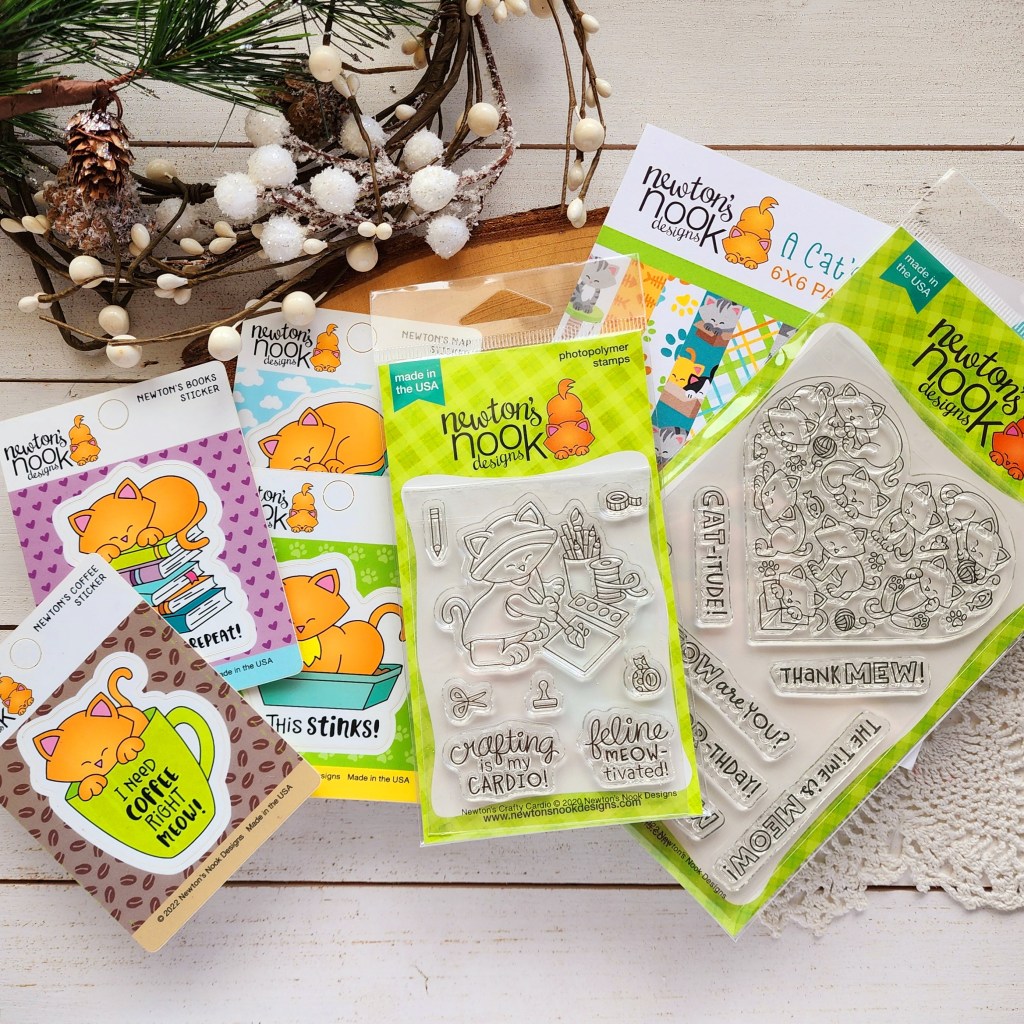
As a way of celebrating continuing on with the Newton’s Nook Design Team and everything they do for us. I am hosting a giveaway of some super fabulous Newton’s Nook goodies. I’ve got a set of the new stickers plus a couple of fabulous stamp sets and a paper pad.
To enter, just comment on here with your favorite Newton’s Nook product – new or old – or maybe something you’d like to see them create! Giveaway closes Feb. 1. Winner will be announced on the blog Feb. 2.
I appreciate you sharing your time with me. Have a fabulous day!
Hello everyone! Very happy to be a super sponsor for another Coffee Loving Cardmakers hop! I actually think I’m a little extra excited this time because we’re also having a new release of super fun products today too!!!
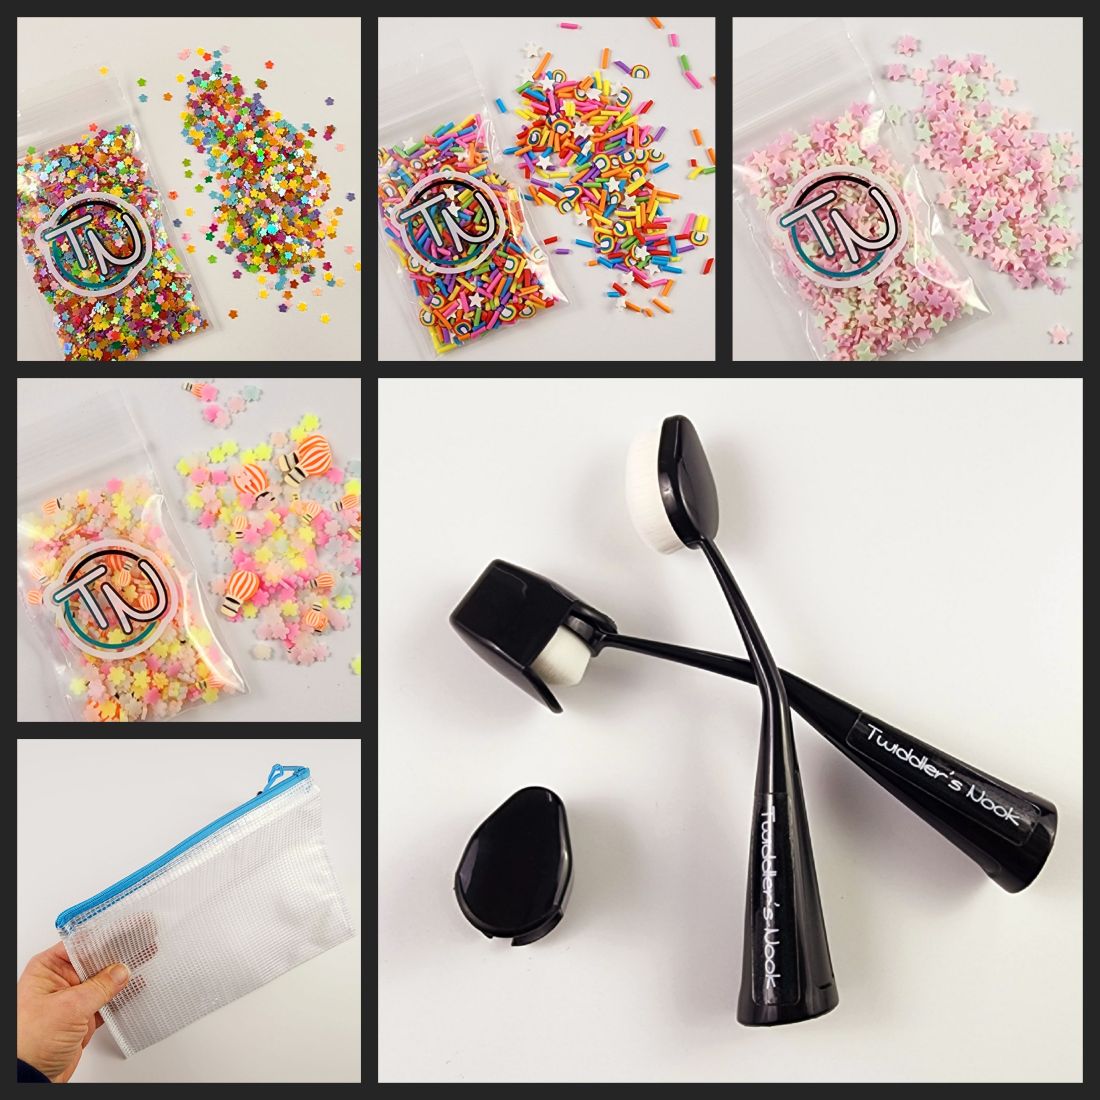
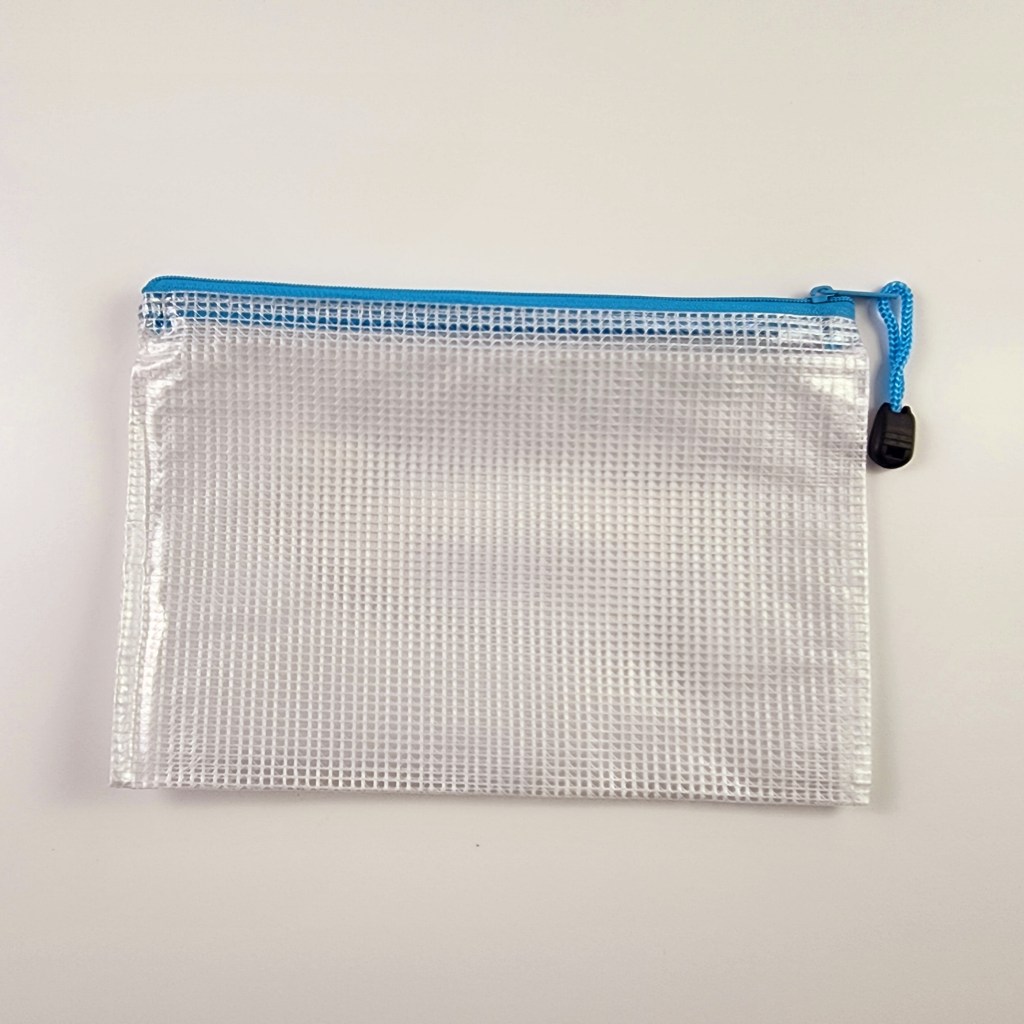
We’re releasing a handful of new embellishments along with two new other products too! We have Twiddler’s Nook Stand Up Blending Brushes available! I’m so excited about this and hope you love them too! We also have mesh zipper pouches to hold your embellishments or project pieces! I know, so many exclamations points. Sorry not sorry. I’m really excited, friends!
Okay, so we’ve got our own blending brushes now. They have bright white bristles, come with a cap and stand up on their own. However! They coordinate with our magnetic color coding caps which also coordinate with all of our platforms so they have a place to be. The magnets in the color caps stick to the metal in our platforms so you can have your brushes at your fingertips and they don’t fall over if you bump your desk. Click HERE to check it all out!
Our new mesh zipper pouches measure 6×9 inches and have a gorgeous blue zipper. They work great to keep embellishment bags under control or pieces to your projects that are in process. These are also amazing if you’re a traveling crafter to pack things in manageable amounts. Click HERE to check them out!
Pro Tip: I love cleaning the outside with rubbing alcohol and decorating them with my waterproof stickers!
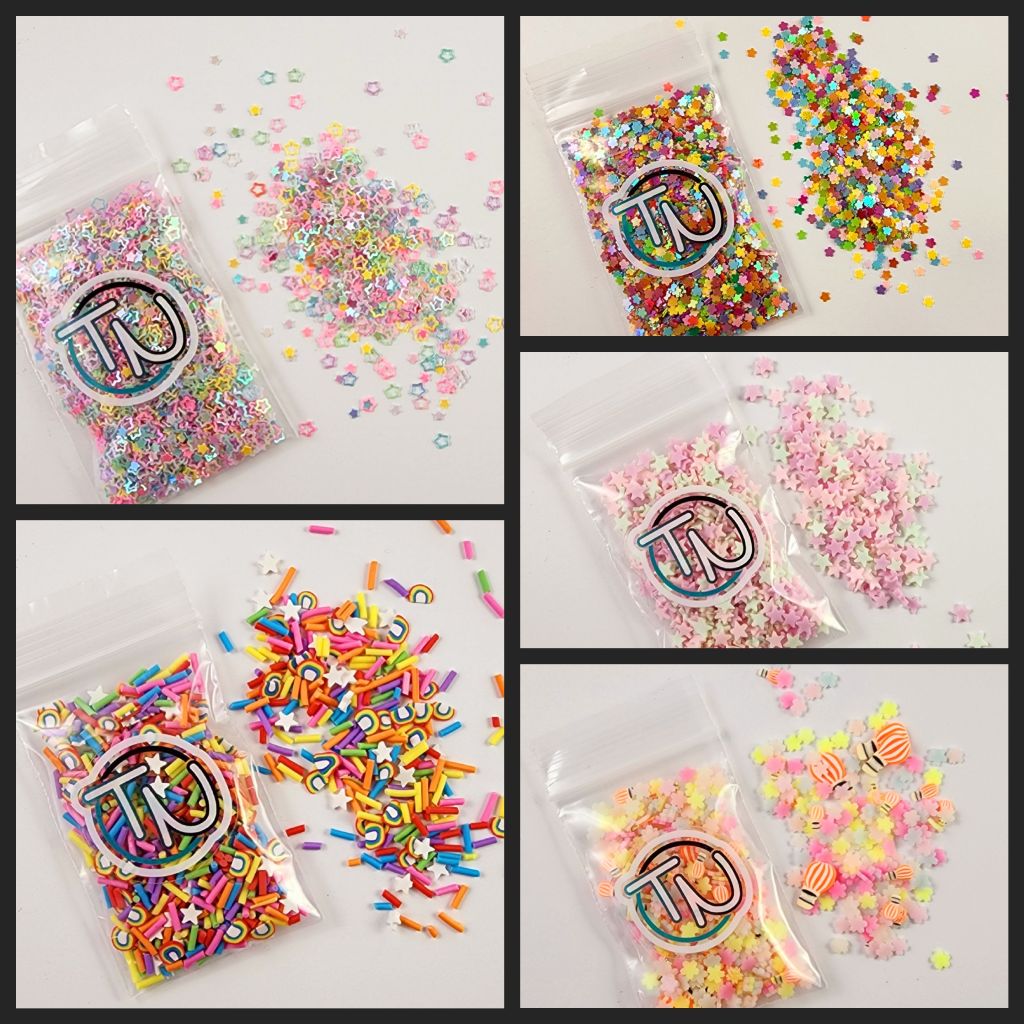
We also have 5 new embellishment mixes to share with you today! So much fun and so much great color! I hope you enjoy creating with them.
I would love it if you headed to the shop to check out all the great things we have to offer! If you see something you like, use the code COFFEE10 to save 10% on your order from today through November 18.
I appreciate you sharing your time with me. Have a fabulous day!
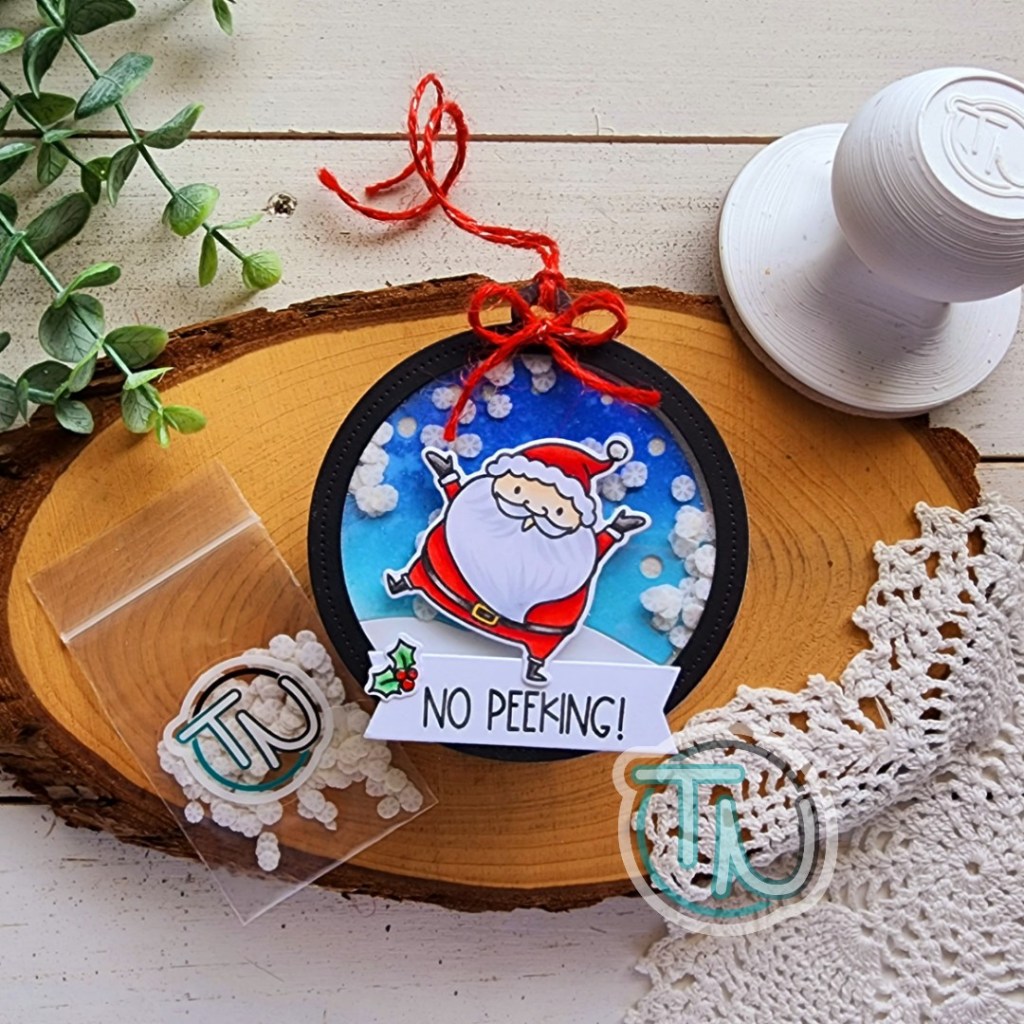
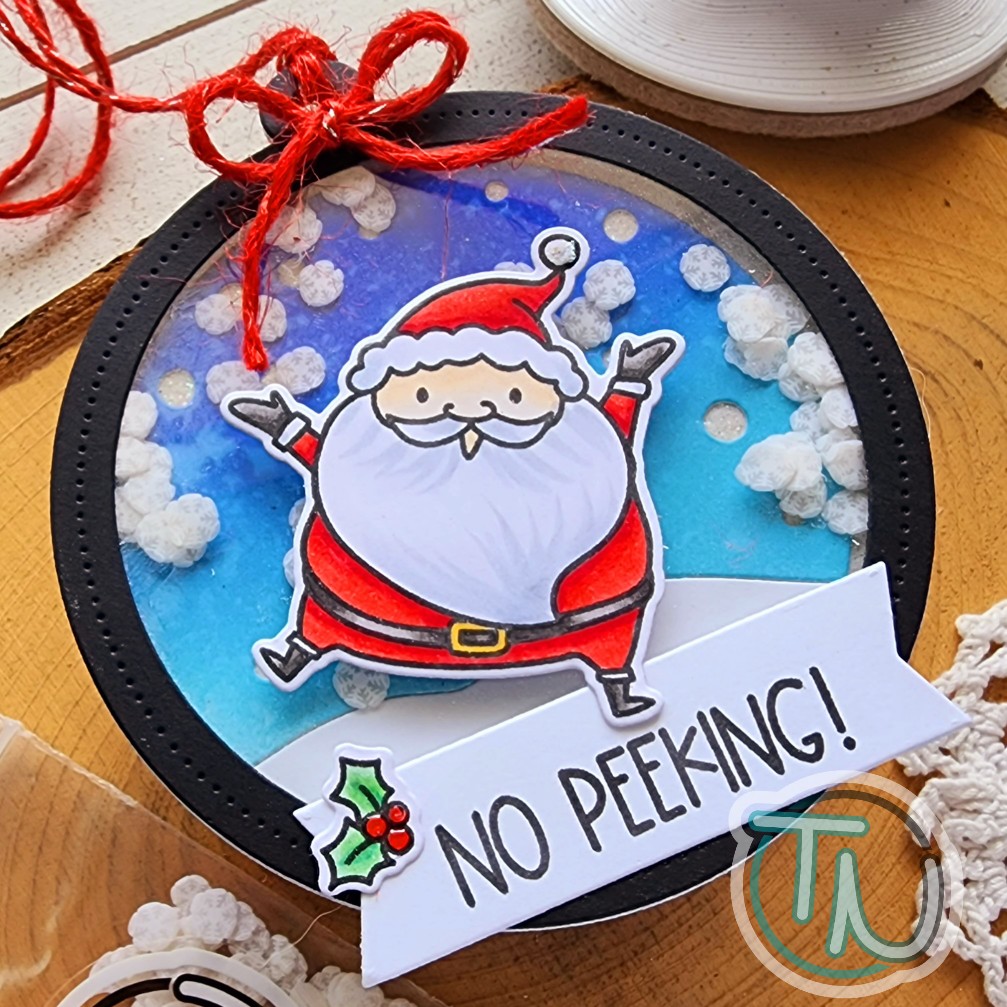
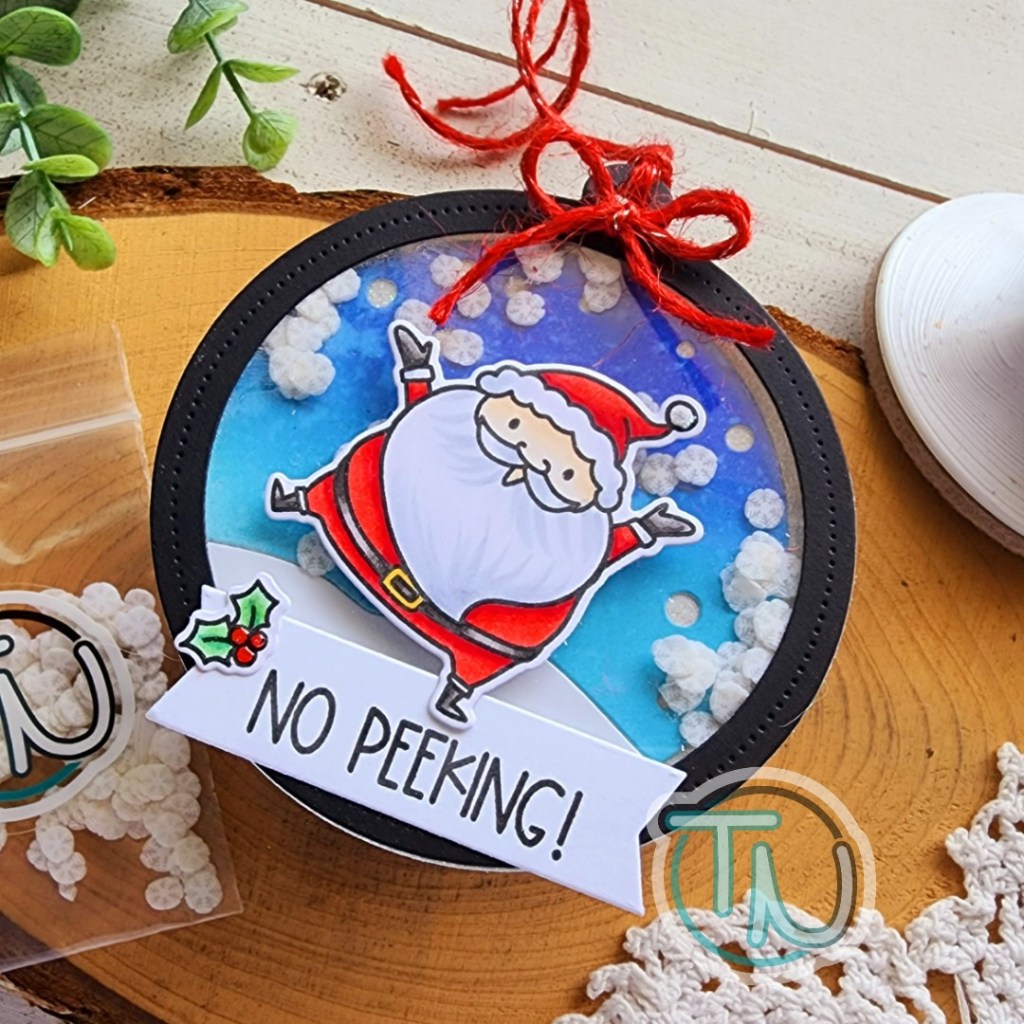
Hey friends! So excited to be sponsoring another BYSHC Hop! Today I have a super simple and fun shaker tag to share with you using one of our embellishments and, of course, I use our crafty tools whenever I craft!
To create my tag, I stamped Santa and the holly from Avery Elle’s Ho Ho Holidays using my pressure pal and colored them with my copic markers. Then I used the coordinating dies to cut them out and set that part aside.
For the tag I used the new Avery Elle Snowy Tag dies. I cut multiple layers to create the different elements.
Whole tag – 1 acetate, 1 white glitter cardstock and 1 white cardstock Frame – 1 black Snowy elements – sky portion from ink blended cardstock using blueprint sketch and salvaged patina distress oxide, hill from white cardstock
I used liquid glue to adhere the glitter tag to the white. This give the back of the tag a pretty side to write on. Then I added the frame to the acetate and finally the background scene pieces over the glitter. I added foam strips to the frame, sprinkled in some Snowy Day clay embellishments and sealed it up.
Next, I die cut the banner from the Avery Elle Easy Layer Tag and stamped a sentiment on it from Ho Ho Holidays. I adhered the images and banner to the tag front with liquid glue. Next, I threaded red sparkle twine through the hole. Cut another piece to tie in a bow and adhered it down.
Then, for finishing touches I added glossy accents to the holly berries and a bit of stardust Stickles to the ball on Santa’s hat.
Click HERE to head to the BYSHC main blog post for the hop listing.
SALE We’re having a sale in the shop Friday through Sunday – 15% all crafty tools and embellishments. Mention the BYSHC Hop in your notes to the seller and I just might add an extra something in your package too. 🙂
GIVEAWAY We’re sponsoring a $20 gift card to the Twiddler’s Nook shop! Happy crafting!
Happy Friday everyone! As promised I’m back with our 2 winners from the National Coffee Day hop! They have both won a $20 gift code to the Twiddler’s Nook shop.
Congratulations Amy Cooley and fitkitty1! Please email me at twiddlersnook@gmail.com by Friday, October 14, to claim your prize or I’ll choose new winners.
Thank you so much to everyone who hopped and commented. I appreciate each and every one of you! Have a fabulous day!
Welcome everyone! I’m so happy to be sponsoring another fun hop with the Coffee Loving Cardmakers! Today instead of my usual rundown of products we sell, I’d like to share a fun card with you and invite you to take a look at the shop to see all the things we have to offer. You’ll get a bonus entry into our giveaway if you check out the shop and comment with your favorite item too! Click HERE to visit the shop.
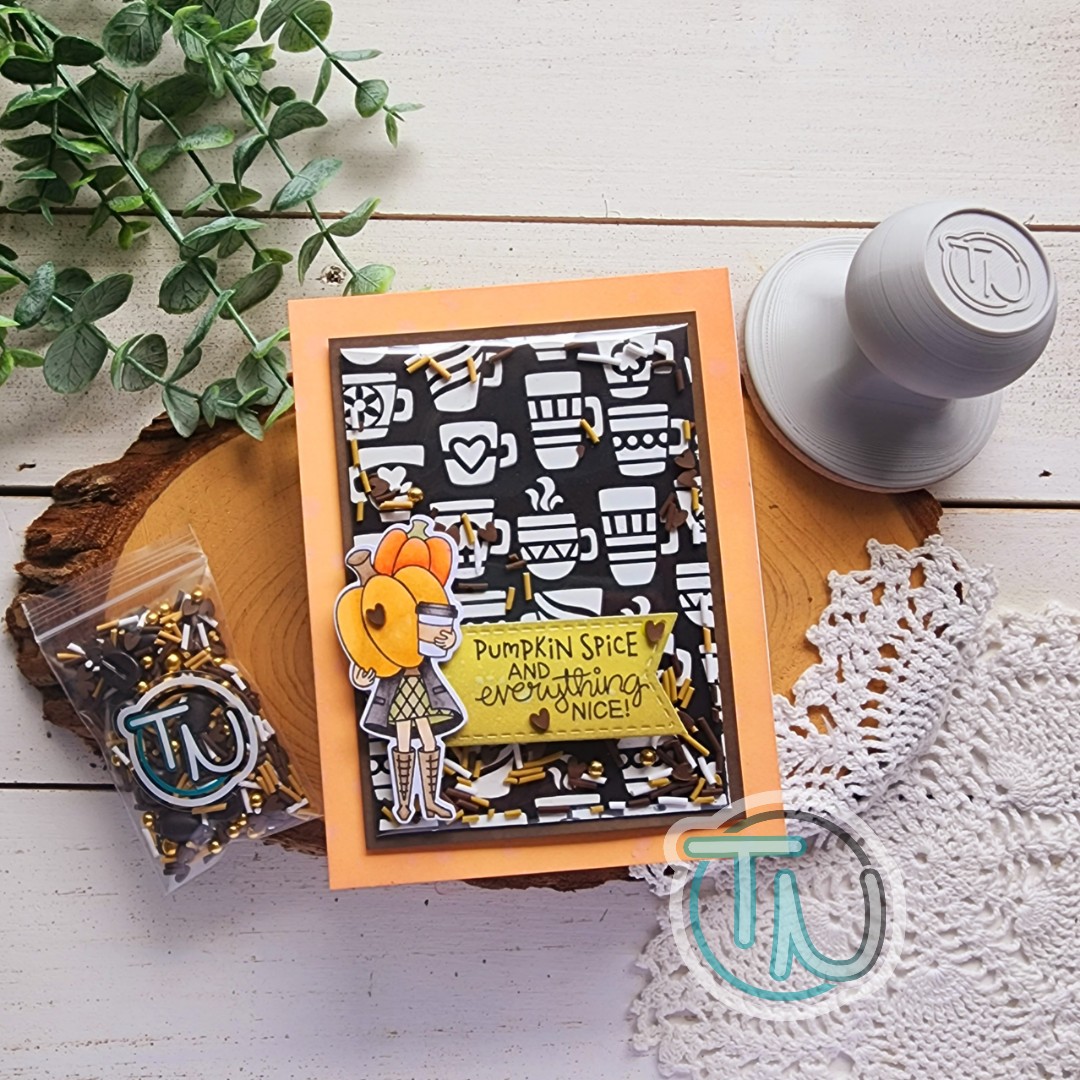
For my card, I cut down a piece of black cardstock and layered the Newton’s Nook Mugs stencil over top. I spread Thermoweb transfer gel blanco through the stencil and set it aside to dry. While I was waiting, I stamped and colored my favorite image from Newton’s Nook Pumpkin Latte. I used the coordinating die to cut it out and set it aside. Now that I had a bit of a color palette chosen, I switched to my card panel.
I took an A2 panel and die cut the stitched banner from Newton’s Nook Frames & Flags die set from the center. This is a sneaky way to save cardstock because you’re going to cover up the hole.
Then I inked up the edge of the panel with distress oxide in rusty hinge and dried marigold. I splattered the panel with water and let it dry. Then I inked the banner with distress oxide in shabby shutters and forest moss and splattered it too.
With my stenciled panel dry, and laminator heated up, I layered Snow Day Deco Foil over the top and place them in a Craft & Carrier sheet. I ran this through my laminator so I have shiny, bright white mugs. Next, I wrapped some recycled packaging around the panel, sealing up 3 sides and sprinkled in Twiddler’s Nook Caffeinated Crafting embellishment mix in the pouch. I sealed it up and adhered that to a dark brown panel. I added foam tape to the back of that and adhered it to the ink blended card front.
Finally, I added my image and sentiment banner with foam squares. Then, for finishing touches I added 3 hearts from the Caffeinated Crafting mix to both. I especially love the heart on the pumpkin. I think it’s extra cute!
GIVEAWAY We are giving away 2 $20 gift codes to the Twiddler’s Nook shop. One for a random comment and another for someone who stopped by the shop and shares their favorite product. Remember to do these in two separate comments so you have double the chance to win! Commenting closes October 4 at midnight PT. Winner will be announced here and also on the Coffee Loving Cardmakers on Friday, October 7.
Good luck everyone and, as usual, I appreciate you sharing your time with me. Have a fabulous day!
Hey friends! I’m super excited to be sponsoring another Build Your Stash Holiday Cardmakers Hop! This is such a genius way to use your products more throughout the year and get a jump start on holiday cardmaking. Goodness knows we never have enough time to get it all done during the holiday season, so why not start early!
Since we’re sponsors of the hop, I wanted to highlight a few of our products.
Magnetic Die Stand
This product comes in a variety of shapes and colors to match your personality and style. Great for keeping track of dies while you’re crafting and not ready to put them away.
Pressure Pal
Our ever popular Pressure Pal helps apply even pressure with less stress on your hands when using a stamping look like a MISTI. This also comes in a variety of colors.
Embellishments
We offer a huge variety of embellishments to adorn your cards, create shakers, slime and so much more! Something for every occasion, all through the year!
Embellishment Trays
Be sure to check out our embellishment trays while you’re at it! These are fantastic for dumping embellishments into, rooting around to find what you want and then using the pour spout to easily put them back in the bag. It sure beats picking them up off your table one at a time or trying to dig in those little baggies.
We have a bunch of shapes and colors of these too. They are so fun and I seriously keep 4 on my desk at all times to hold die cut images and other things as well! They’re so cute and handy.
We have lots of other products in the shop so please take a moment to head over and then leave me a comment on what you plan to add to your stash!
This wouldn’t be a proper hop and celebration without a sale. So, before I go. Let’s put the shop at 20% off so you can try us out and get crafting!