Heffy Doodle – Hip Hip Hooray Shaker Tag

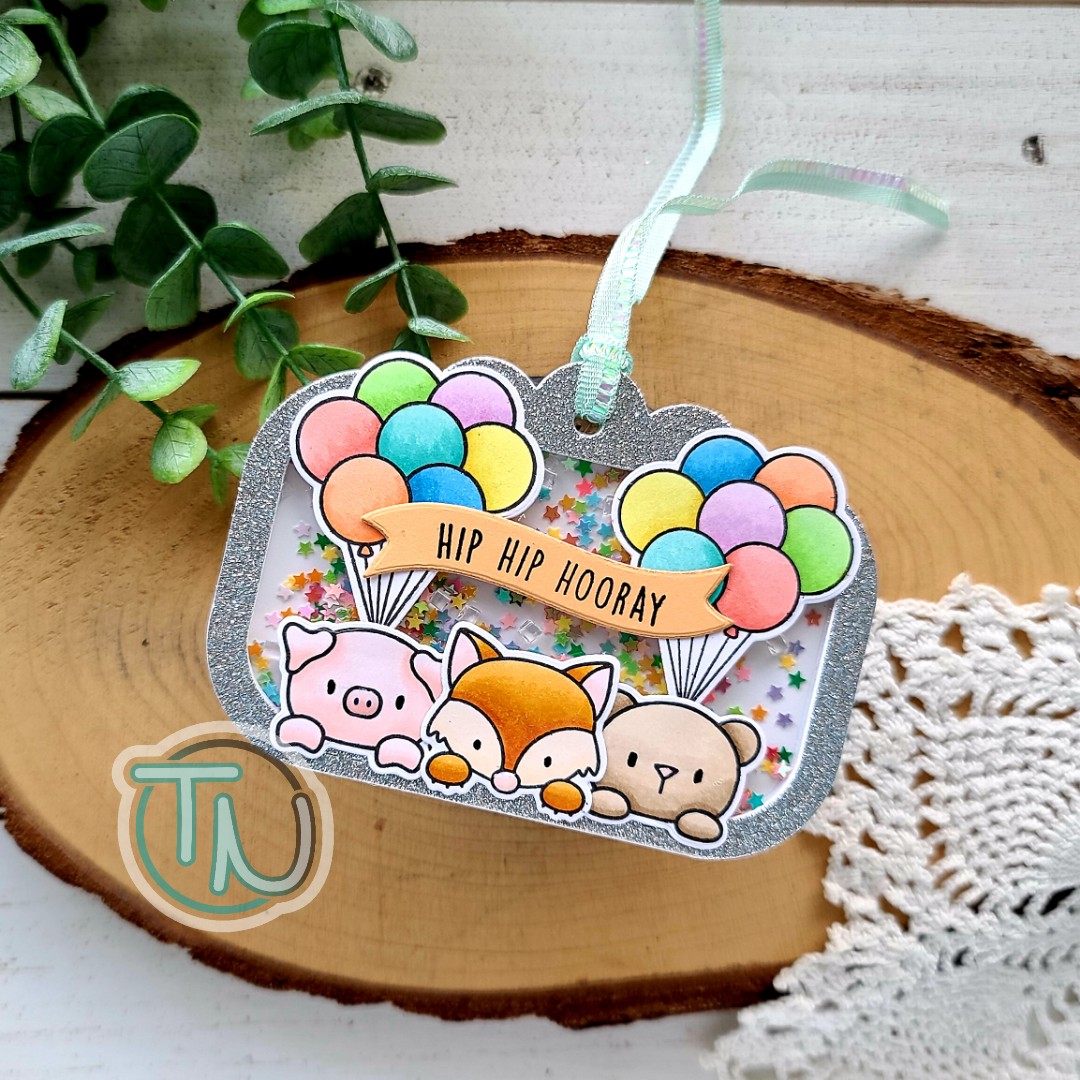
Well, hello again! Today I’m back with a super fun and snazzy shaker tag to share with you. I’ve been creating a fun, usually punny, tag for my daughter for each dance team competition she’s performed at. Today is State Championships and the last tag for this season.

For this one, I chose images from Bed Heads and Popping By from Heffy Doodle, along with their Tag Along die set. My sentiment is from the Wavy Banner Sentiments and coordinating dies.

To create my tag, I started by laying the images on the tag frame die to see what I could get to fit. I decided that the three cute critters and a couple of balloon bundles would be just perfect. So, I stamped everything out and colored them with my copic markers. Then, I used the coordinating dies to cut everything out and used liquid glue to adhere them together.

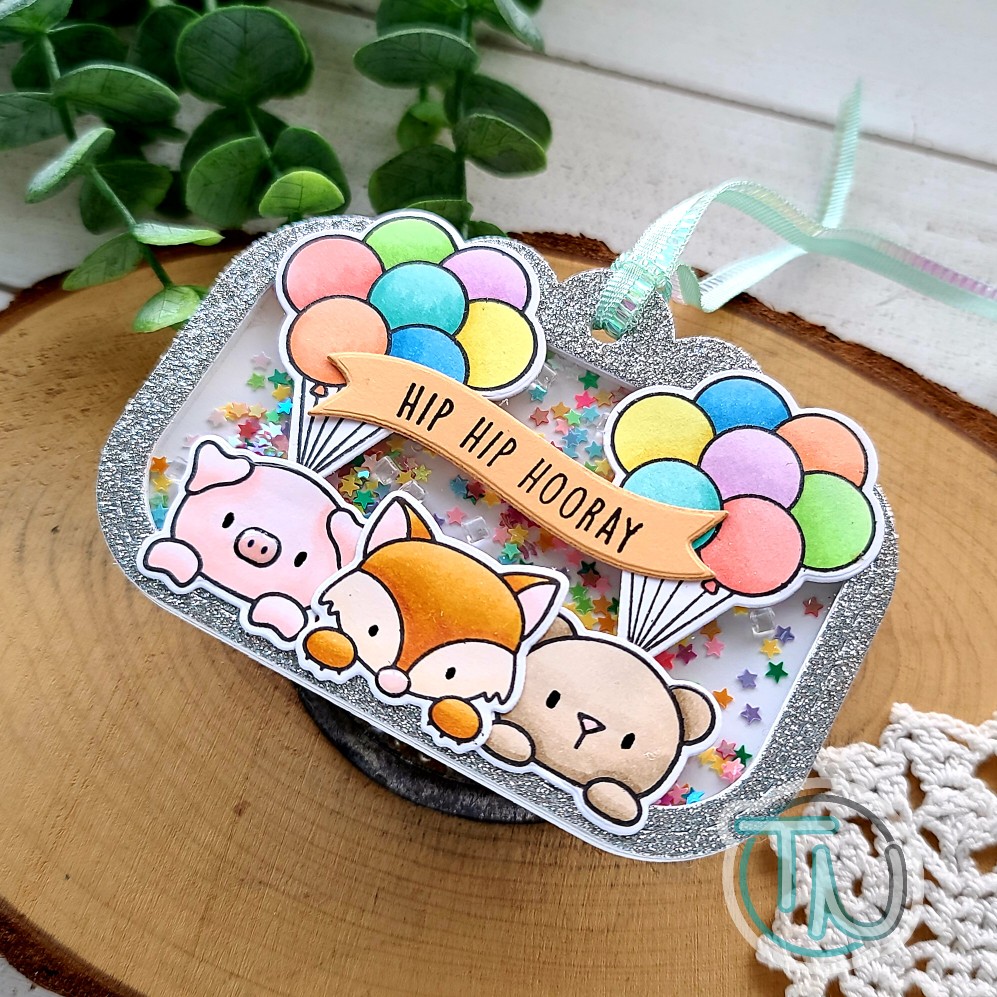
Next, I created my shaker tag using the solid die to cut 2 backing pieces from white cardstock and one more from acetate for my window. Then I cut the frame from silver glitter cardstock once and white cardstock six times. I added the silver frame to the acetate and the other white frames to one of the white solid backing pieces. I filled the shaker well with embellishments from my shop called Wishing on Rainbow Stars and sealed it up.

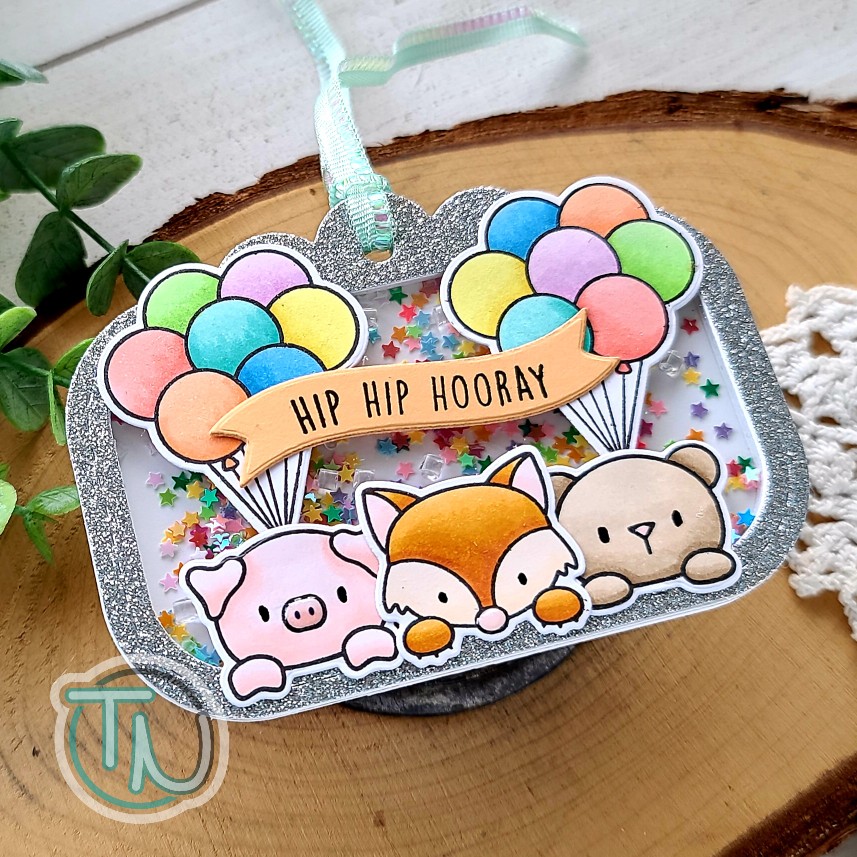
I added my images to the front of the tag with liquid glue. Then stamped and die cut a sentiment and banner from the Wavy Banner Sentiments set. I also added this with liquid glue.

For finishing touches I added black glaze pen to all of their eyes and glossy accents to all of their noses. Then I added a little sparkle to the balloons with Wink of Stella glitter brush pen, tied a ribbon through the hole and it’s ready for our message on the back and to be delivered to her with a small gift.

Products used today:
Popping By stamps and dies
Bed Heads stamps and dies
Wavy Banner Sentiments stamps and dies
Tag Along dies
Wishing on Rainbow Stars embellishments
Bearly Art liquid glue
Wink of Stella glitter brush pen

I appreciate you sharing your time with me. Have a fabulous day!

Coffee Loving Cardmakers – Double Pocket Card

Hey everyone! Today is Tuesday Tea over on the Coffee Loving Cardmakers. Today I’m bringing back an oldie but goodie folding technique called a double pocket card. I have made these in the past and filled the pockets with a variety of items – from double notes to the recipient to flower seed packets, Starbucks Via packets, gift cards, cash – lots of options! If you have other ideas, I would absolutely love for you to leave them in the comments below. Giving little gifts like this is a favorite of mine and I’m always looking to add things to the list.

To create my card base, I followed this tutorial from Splitcoast Stampers through step 7. Instead of folding the second layer over on the bottom pocket, I folded it back and actually created a regular card to go with my pockets.

Here’s a look at the inside. I used a 12×12 rainbow plaid paper from Lawn Fawn for a fun and bright card base and my Newton’s Nook Frames & Flags dies for the stitched rounded rectangles for my inserts. The front inserts have ribbon stapled to the top which adds a little whimsy and makes them easy to pull out. This is where I will add either gift cards or probably Starbucks Via packets taped with cute washi tape.

To decorate the front of my card, I used images from Pawsome Stamps Coffee Besties and Playful Pandas. They are colored with copic markers and cut out using the coordinating dies. My thought bubble is from Newton’s Nook and the sentiment today is a mini set from Impress Crafts. The scalloped edging on the pockets is a border die from Newton’s Nook too.

With all the folds and layers this card is a little thick on it’s own so my images are all adhered with liquid glue directly to the card front. Shocker, I know. I am quite addicted to my foam squares, we all know.

For finishing touches I added black glaze pen to the panda’s eyes and white gel pen highlights to all of the images. Then I glued a couple of clay hearts from Twiddler’s Nook Sweethearts embellishment mix and my card is all finished and ready for treats!

Products used today:
Pawsome Stamps Coffee Besties stamps and dies
Pawsome Stamps Playful Pandas stamps and dies
Newton’s Nook Speech Bubbles dies
Newton’s Nook Frames & Flags dies
Newton’s Nook Sky Borders dies
Twiddler’s Nook Sweethearts embellishments

I appreciate you sharing your time with me. Have a fabulous day!

Jane’s Doodles – You’re So Weird

Hey crafty friends! I’m back with a pair of super fun cards featuring the Weird digital stamp set from Jane’s Doodles. I just love these images and had so much fun getting inky creating scenes for them.

I started by printing out the whole set of images and sentiments from the Weird digital stamp set. I used my copic markes to color them and the scan-n-cut to cut them out. Then I cut 2 of the sentiments out with sentiment banner dies and set it all aside while I made a horrendously awesome inky mess!

For my first card, I inked up 2 strips of white cardstock with distress oxides in various green colors. One was crushed olive and mowed lawn while the other had those colors plus twisted citron for some bright areas. Then I took an A2 panel and inked it with salty ocean and tumbled glass distress oxide. I spritzed this panel with water and blotted it dry. Then I flicked some watered down blueprint sketch on the whole panel for added texture and interest.

I cut the green panels with the Lawn Fawn tropical vines and tropical leaves dies and arranged them on my blue panel. The vines were longer than my panel so I cut them and inserted the smaller sections in different areas to fill in the scene more. Once everything was where I liked it, I used liquid glue to adhere them all down.

Next, I popped up my sentiment and sloth image with foam squares and added a little glossy accents to his nose. To help the eyes pop a little I added black glaze pen to those and my card is all finished.

But we’re not done yet. Let’s get a whole new set of colors out and have some more inky fun!

This time I inked up white cardstock strips with twisted citron and and crushed olive distress oxide inks and spritzed them with water. I flicked watered down mowed lawn distress oxide ink and gold watercolor on those panels too. Once they were dry I die cut them with the Lawn Fawn tropical leaves border die and set them aside.

For my background panel, I inked up seedless preserves and wilted violet distress oxide ink on an A2 panel. I spritzed it with water and flicked more gold watercolor on it too. It seemed a bit brighter than I wanted so I added a little tea dye distress oxide around the edges after the watercolor was dry.

For assembly, I added the purple panel to a card base and glued one strip of leaves to the top. Then I cut a white cardstock strip 1.5 inches wide and popped it up with foam tape. I added a strip of washi tape before popping my image and sentiment banner up with foam tape as well.

For finishing touches on this card I added glossy accents to the sloth’s nose and flower centers. Then I glued down a few red clay hearts for a little extra something. I think they are so sweet and love the touch they add.

I hope you enjoyed today’s cards and found some inspiration to create something wonderful!

Products used:
Jane’s Doodles Weird digital stamp set
Pink & Main Large Sentiment Strip dies
Lawn Fawn Tropical Leaves dies
Lawn Fawn Tropical Leaves Border die
Lawn Fawn Tropical Vines Border dies
Distress Oxide Ink – salty ocean, tumbled glass, blueprint sketch, twisted citron, mowed lawn, crushed olive, wilted violet, seedless preserves, tea dye
Foam tape and squares
Glossy accents
Twiddler’s Nook Sweethearts clay embellishments

I appreciate you sharing your time with me. Have a fabulous day!

Lawn Fawn – Bee Yourself

Welcome to a fresh new week everyone! I’m stopping by today to share that a couple of weeks ago I posted my first YouTube video…it was pretty horrible but I had to kick myself to stop making excuses and just try it.

From that I had a fantastic friend reach out and offer to help me. So today I’m sharing that I posted a second video of this adorable Bee Yourself card.

I know I still have a lot to learn but I would love it if you’d head over and check the video out when you get a chance.

My goal is to have weekly videos but I don’t want to promise anything yet. Haha. Feel free to leave comments if there is anything that you would like to see a video of versus regular blog posts or that you’ve seen me create before but would like the video version. I’m ready to try new things.

I would also really love to know if you’d like me to still write up the usual blog post when I share a video or not. I know everyone has different preferences so please let me know in the comments.

Here are the products I used to create this card:
Lawn Fawn Fox Costumes Before ‘n Afters stamps and dies
Lawn Fawn Lots of Hearts stencil
Distress Oxide Ink – peacock feathers and cracked pistachio
Bearly Art liquid glue
Thermoweb 3D foam tape
Scrapbook Adhesives foam squares
Stickles – unicorn
Twiddler’s Nook Sweethearts clay embellishments
Twiddler’s Nook Embellishment Tray – paw
Twiddler’s Nook Pressure Pal

I appreciate you sharing your time with me. Have a fabulous day!

Coffee Loving Cardmakers – Java Junkie Shaker

Hello there! Today I’m over on the Coffee Loving Cardmakers for the first Tuesday Tea of 2022!!! Can you even believe it?!? Time just flies by too fast. I hope you all had a wonderful New Year holiday and are ready to jump into fun crafting! I’ve got a shaker card today featuring so many companies and highlighting embellishments from the Twiddler’s Nook shop. We just had our mini Valentine release yesterday and I couldn’t wait to start creating with it!

I recently picked up these adorable unicorns from Heffy Doodle that I’ve been eyeing for an eternity and I’m so happy to color them up in Valentine colors! Aren’t they adorable!?! Then I used the Lawn Fawn stitched mug die sets to create a shaker and filled it with three embellishments from Twiddler’s Nook – sweethearts clay hearts, holographic hearts confetti and rosetta pixie dust micro beads. The whipped cream on my mug is from the Lawn Fawn cupcake die set.

To create the background for my card, I cut a white panel to 4×5.25 inches and inked the top and side edges with Lawn Fawn mermaid ink and a blending brush. Then I cut two layers of clouds used the Lawn Fawn cloudy border dies and inked the tops of those with the same color before adhering all the layers with liquid glue.

Next, I used my images as guides before stamping my sentiment in the top left sky area. Then I started adding everything with either foam squares or liquid glue, or a combo.

For finishing touches today, I added Wink of Stella glitter brush pen to the unicorn horns, sweetheart clay embellishments to the whipped cream and heart on the mug and a scattering of holographic hearts around the sky.

I probably had way too much fun creating this card but I’m just so happy with how it turned out and think it would make anyone smile when they opened it! Don’t you?!?

Products used today:
Heffy Doodle Fluffy Puffy Unicorn stamps and dies
Lawn Fawn Outside In Stitched Mug dies
Lawn Fawn Stitched Mug Frame dies
Lawn Fawn Puffy Cloud Border dies
Lawn Fawn mermaid ink
Trinity Stamps blending buddy brushes
Hero Arts 2018 My Monthly Hero Kit stamp set
Twiddler’s Nook Pixie Dust Micro Beads – rosetta
Twiddler’s Nook Sweethearts Clay Heart embellishments
Twiddler’s Nook Holographic Hearts embellishments
Wink of Stella glitter brush pen
Foam squares
Liquid glue

I appreciate you sharing your time with me. Have a fabulous day!

Miss Ink Stamps – I Like Big Mugs…

Happy Thursday everyone! I’m back with a little caffeinated inspiration from Miss Ink Stamps today! I had a little fun with one of my favorite gnome sets – Big Mugs and a new stencil – Lava Lamp. I also wanted to change things up a bit so I decided on a circular card today too!

I stamped my gnome out and colored him with copic markers before cutting him out with my scan-n-cut. Then I inked up a brown panel with the lava lamp stencil and white pigment ink using my blending buddy brush. I die cut the panel with an embossed edge circle from Trinity Stamps. Then I cut the next size up circle from kraft cardstock.

I created a white card base with the same circular die and adhered the kraft circle with liquid glue, then popped the stenciled circle up with foam tape. I felt like the gnome needed something behind him so I cut a smaller circle from vellum.

To hide my adhesive, I attached the gnome to the vellum with foam squares and hid tape runner on the back of the vellum behind the gnome only.

Last, I stamped a sentiment on a banner from Newton’s Nook Banner Trio set and popped it up with foam squares under the gnome’s feet.

For finishing touches I added some brown clay hearts from the Twiddler’s Nook Caffeinated Crafting embellishment mix and gave the image some white gel pen highlights.

Tomorrow is the last day to play along with the Coffee Lovers Fall | Winter Hop. Have you played along yet? I’m entering this cutie for sure!

Products used:
Miss Ink Stamps Big Mugs stamps
Miss Ink Stamps Lava Lamp stencil
Trinity Stamps Embossed Edge Circle Stack dies
Newton’s Nook Banner Trio dies
Twiddler’s Nook Caffeinated Crafting embellishment mix
Foam tape and squares

I appreciate you sharing your time with me. Have a fabulous day!

Coffee Loving Cardmakers – Fall | Winter Hop Sponsor

Hey friends! Twiddler’s Nook is super excited to be a sponsor of the Coffee Loving Cardmakers Fall | Winter Hop! We just love these hops and seeing everyone’s creations!

In case you’re new to us, let me show you just a few products that we offer and you can move along to hopping the rest of the fabulous sponsors! But I warn you…be sure to make it to the end of this post for the most fun part!

Our biggest seller is the wonderful Pressure Pal. It helps get even pressure when stamping with a stamp platform. Pictured here with the mini MISTI, but it works with all stamp platforms the same. It can give relief to your hands and wrists and keeps from getting smooshy spots in your impressions from pressing with fingertips.

Some other favorites are our magnetic products. Show here is the Paw Print Magnetic Die Stand and Magnetic Tray. These are both fabulous for holding your die cuts in between uses so that you don’t lose them. I’ve also been told that they work great for needlework accessories too! The die stands come in a variety of shapes such as a coffee mug, flower and skull. All of the colored parts of our products are customizable too. We offer a variety of colors!

Another fun product we offer are our Embellishment Trays. They are super fun to create so we just keep coming out with designs and it seems that I love the next one more and more each time. Here you see our cute cloud, original circle with the heart and the fabulous donut tray! We also offer honeycomb, skulls, stars and paws! Once again…so many color options too!

Now for my most favorite part of today’s post!!! We have a brand new embellishment release today!!!!!!!!! Twelve new embellishments have been added to the shop AND…WE’RE HAVING A SALE!!! Starting today through next Friday, Nov. 19 the entire shop is 15% off!

Happy shopping and happy crafting my friends!!! Click HERE if you’d like to take a look at what’s available.

Coffee Loving Cardmakers – National Coffee Day plus a GIVEAWAY

Hey friends! Twiddler’s Nook is a Super Sponsor for the Coffee Loving Cardmakers National Coffee Day celebration! They’re having a HOP full of inspiration and prizes to win!

In the Twiddler’s Nook Shop we offer a big selection of super fun embellishments to adorn your cards and fill your shakers, along with a wide variety of tools that help in the craft room too.

Here’s a look at our coffee mug magnetic die stand and a donut embellishment tray! The perfect set up for any coffee loving papercrafter! The die stands are great for holding your dies in between uses so that you don’t misplace or accidently stick them to something where they are lost forever. The embellishment trays are ideal for sorting through embellishments and pouring the extras back in the package, but these are also amazing for holding your die cut images while building your cards!

Then there’s the ever popular Pressure Pal! This is a very handy tool to help apply even pressure when stamping with a stamp platform like the MISTI. See it in action in this YouTube video a customer did to review it!

SALE

We’re running a sale from today through Sunday for 10% off the shop to celebrate National Coffee Day! We would love it if you headed over and had a look around. Click HERE to get there.

GIVEAWAY

We’re having a fun giveaway to celebrate the hop today. A $20 gift code to the Twiddler’s Nook shop for one random commenter on this post. Commenting closes on October 6 at noon PST.

You should have come to us from the Trinity Stamps blog. We’re last on the hop list but if you didn’t start at the beginning. Click HERE to get to the main post and catch anyone you missed!

Thanks so much for stopping by! I appreciate you sharing your time. Have a fabulous day and good luck!

Coffee Loving Cardmakers – Thanks a Latte Shaker

Welcome! It’s time for another Tuesday Tea with Twiddler’s Nook over on the Coffee Loving Cardmakers and today it’s extra special! We’re celebrating National Coffee Day all week leading up to it and there are giveaways on the blog each day. Click HERE to head over and check out the festivities.

I’m celebrating Thermoweb today with a super fun shaker card featuring stencils and dies from Newton’s Nook, the coffee shaker dies from Lawn Fawn and my shaker bits from the Twiddler’s Nook shop!

Head over and check out the post for all the details on this card plus a chance to win!

Thanks for stopping by. I appreciate you sharing your time with me. Have a fabulous day!