Thermoweb | Miss Ink Stamps Collaboration – Stenciling with Decofoil and Glitter Glitz Gel

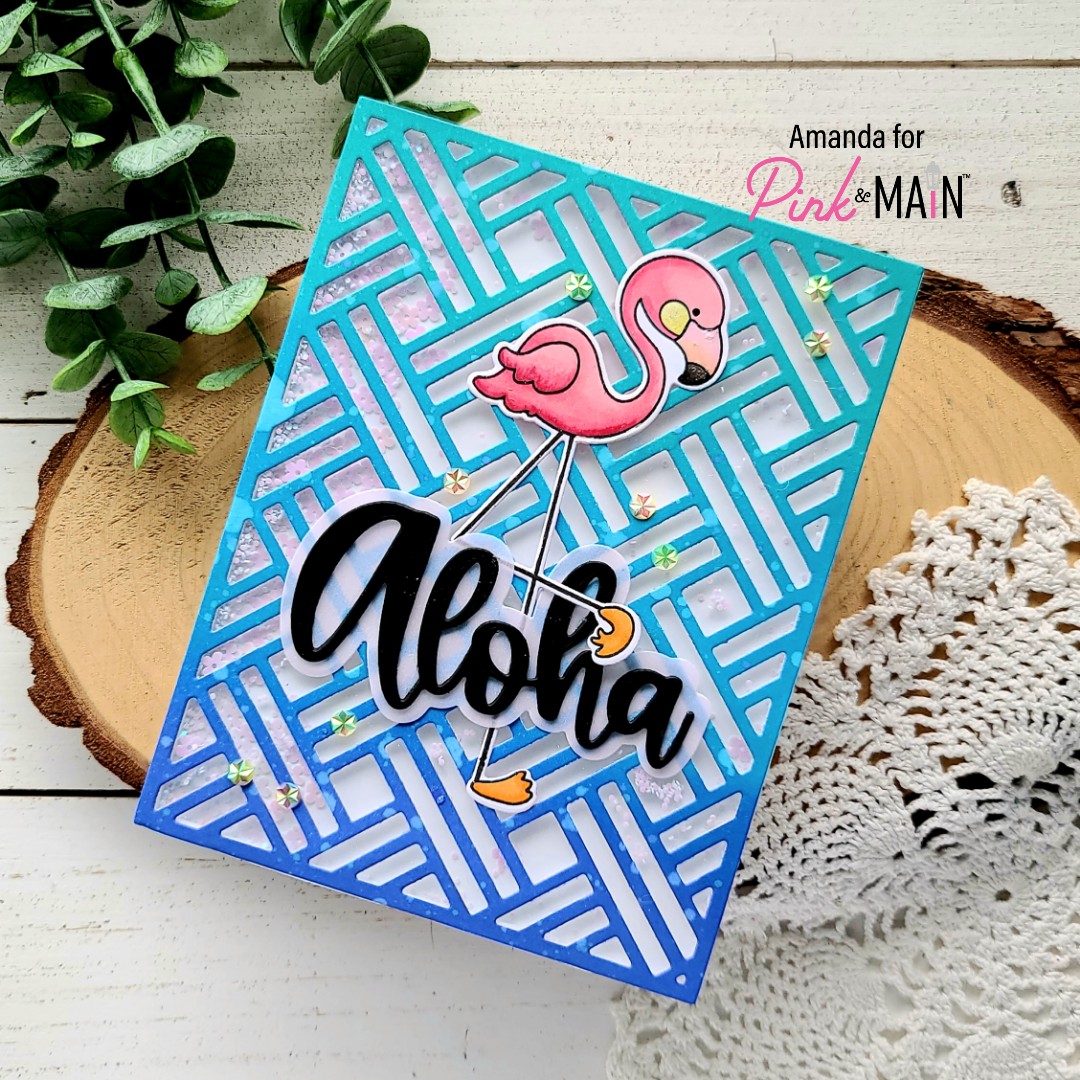
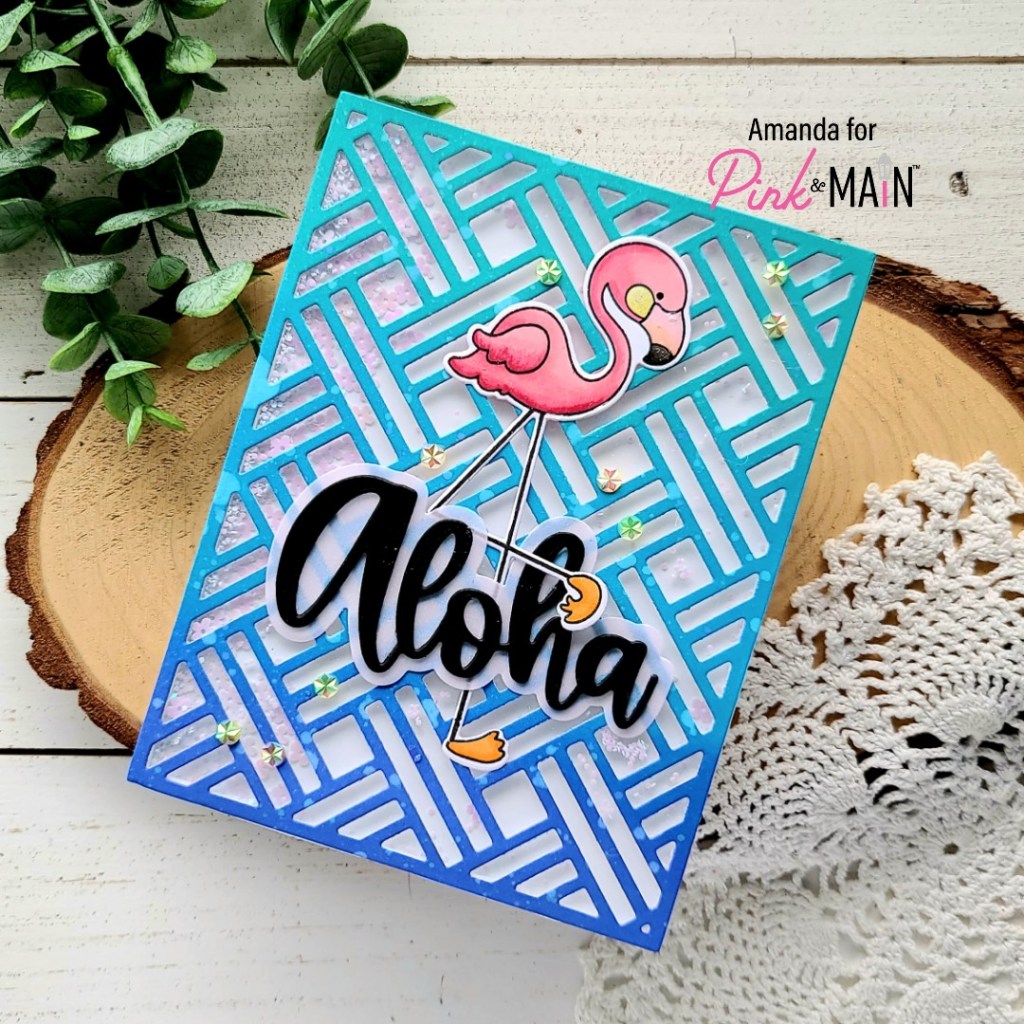
Hello everyone! Today I’m over on the Thermoweb blog for the collaboration with Miss Ink Stamps! This time I have a pair of cards I made using one inked background, cut in half and then stenciled completely different. It was super fun to play around with everything!

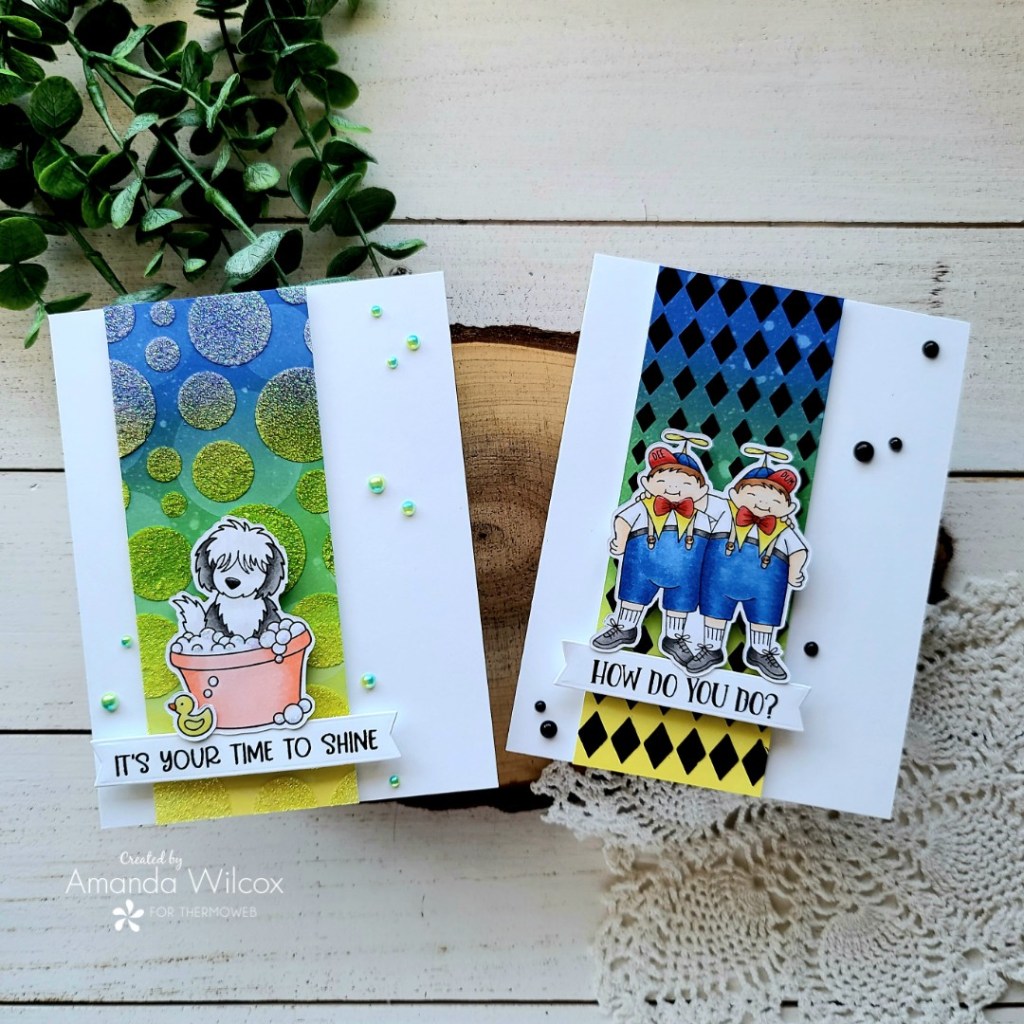
Here’s a look at both of the cards I created. One with the Dee and Dum stamp set paired with the Diamond Fade stencil. The other with my favorite pup from Rub-a-Dub Doggies stamp set paired with the Large Random Dot and Random Dot stencils. Those stencils are sold separately if you only want one but they work really awesome together too! (Here’s a pro-tip though…if you only have one you can ink it up and then rotate it to get a second layer of dots in different spots!)

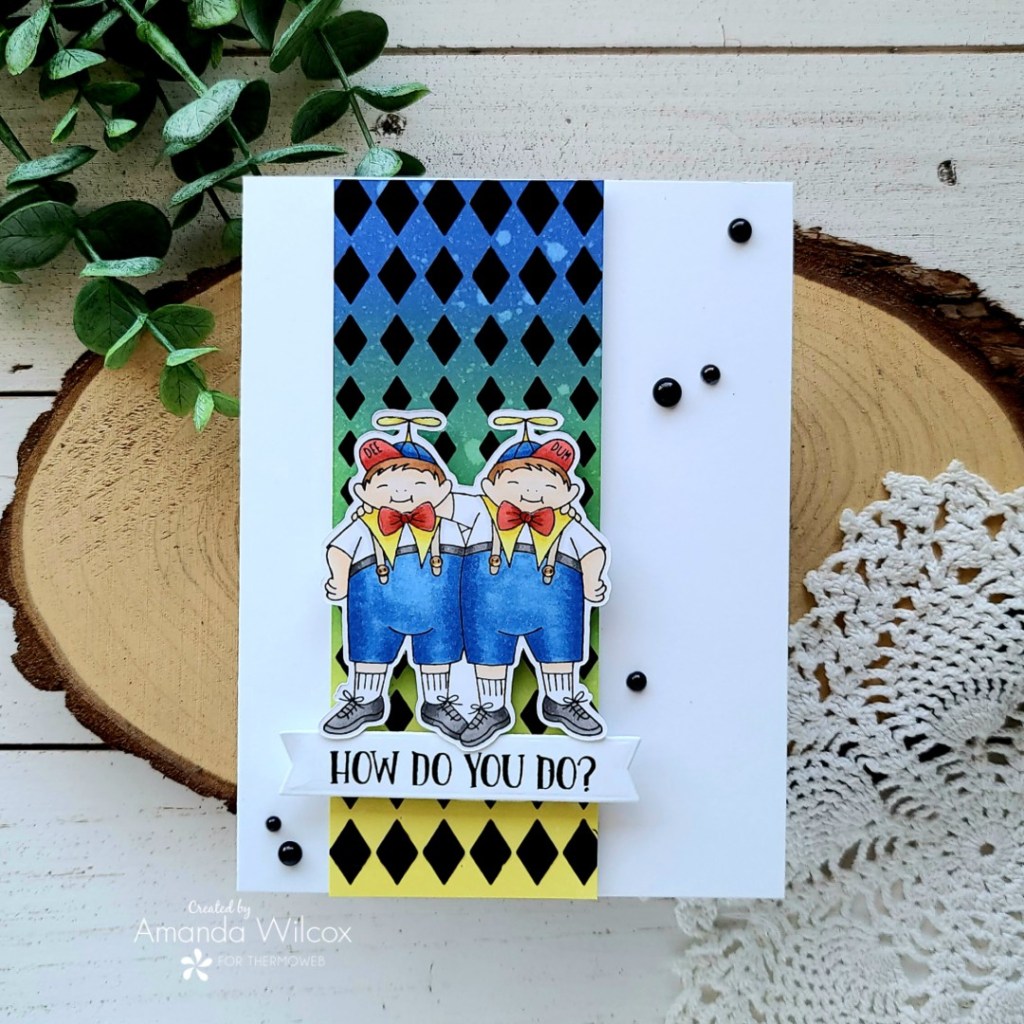
I used Pink & Main Large Sentiment Strip dies to cut out the sentiments for both cards. This one has a scattering of Trinity Stamps Black Eyed Baubles for embellishments along with glossy accents on Tweedle Dee and Dum.

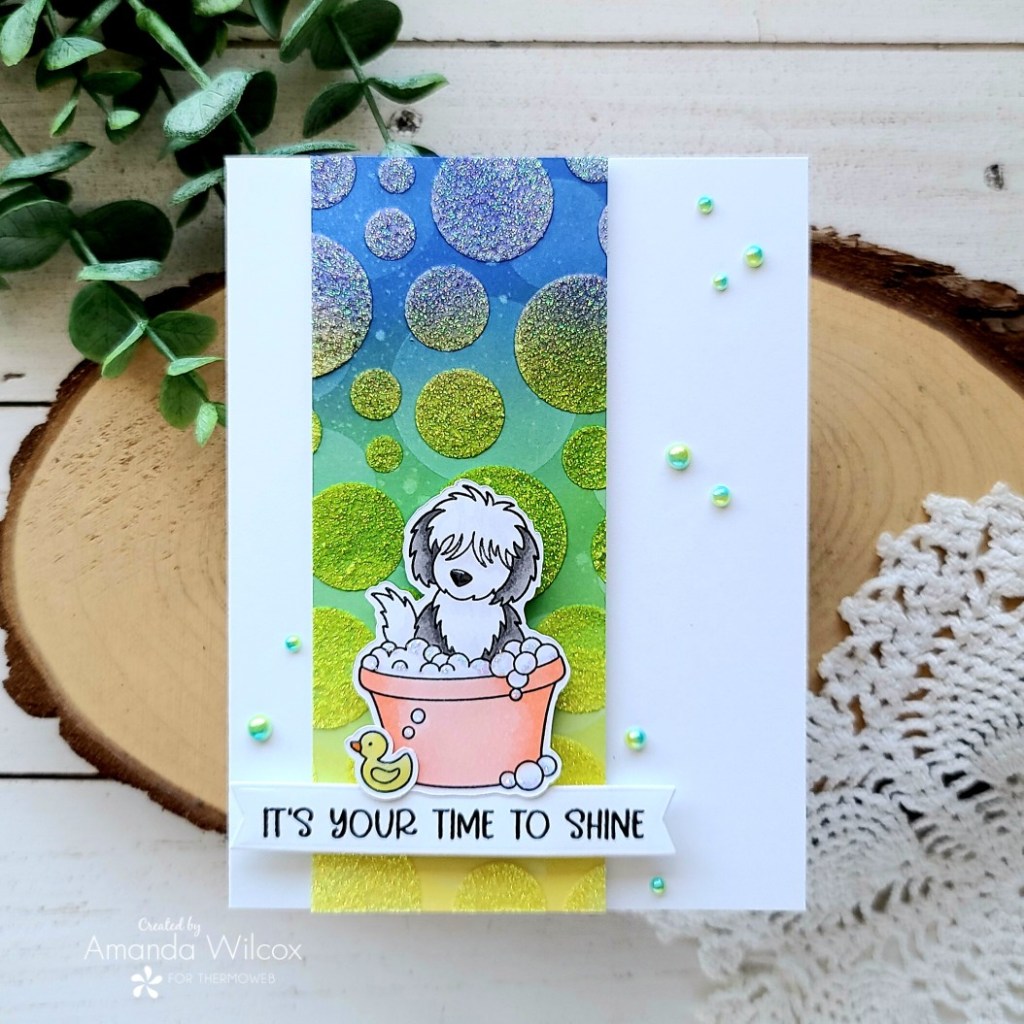
The embellishments on this one include glossy accents for the rubber ducky and dog’s nose. Then unicorn Stickles on the bubbles to help them time in with the background. Last I scattered Twiddler’s Nook half-tone pearls across the design.

Be sure to head over to the Thermoweb blog for all the details on these cards, links to the products and a chance to win prizes from Thermoweb and Miss Ink Stamps! Totally worth the click!

I appreciate you sharing your time with me. Have a fabulous day!

Twiddler’s Nook Shop – NEW RELEASE

Happy weekend my dear friends!!! I am truly excited to bring you a super fun release with a ton of new and amazing embellishments, along with some new crafty tools too!

I’m going to highlight just a few things here but make sure to head over to the shop because I’m not kidding when I saw there’s a lot…we’re talking over 20 new embellishments plus restocks on some of your favorites!!!

First up though, I want to highlight our new Pressure Pal. This is a fabulous tool to use with even pressure while stamping with any stamp platform. The felt bottom glides across the surface flawlessly. It keeps from friction burns on your hands or the possibility of smearing ink on your shirt sleeve.

Next up, is our Magnetic Tool Cup that coordinates with our single and double-wide platforms. I personally use mine to hold my Spellbinders Tool-in-One and Glimmer Hot Foil handle but it would be great for pens or brushes, anything you would like at your fingertips. It is sized perfectly to fit in the curve of both platform bases. Here it’s shown on the double wide platform base.

Let’s take a look at some of the fun embellishments waiting for you too…

This is seriously the teeniest taste of what we’ve got going on! I’m so excited for all of these new goodies and have so many ideas for crafting with them myself. I hope you’ll head over and check things out!

Click HERE to head to the Twiddler’s Nook shop!

I’d also love to hear what you’re excited about that we’re carrying now!

I appreciate you sharing your time with me. Happy shopping and have a fabulous day!

Pink & Main – Aloha June Release Sneak Peek

Happy Friday my friends!!! I’m so glad we’ve made it through another week! And bonus, today I get to share a super fun sneak peek with you of the upcoming June release with Pink & Main. It is absolutely fantastic and I can’t get enough of it!

Check out that fantastic new flamingo from the stamp set Stand Tall coming your way! Oh, and don’t miss that bold and beautiful Aloha die cut with a perfect shadow behind it! That die set is absolutely amazing!

To create my card today, I stamped my flamingo and colored it with copic markers. Then I used the coordinating die to cut it out and set it aside. Next, I die cut the word aloha from black cardstock three times and glued them together with EZ Squeeze liquid adhesive. I die cut the shadow from vellum and glued the two together.

For that fabulous background, I ink blended distress oxides in blueprint sketch, salty ocean and peacock feathers. Then spritzed it with water and let it dry. Once it was completely dry, I ran it though my die cut machine with the basket cover die. This immediately made me think of a shaker card so I cut a piece of acetate and glued it to the back, then lined the edges with foam strips.

I sprinkled in some white primrose confetti bits and sealed it up with a white cardstock backing. Moving on to assembly, I used EZ Squeeze liquid glue to adhere the shaker to a white card base, then also adhere my die cut sentiment and flamingo.

Moving on to finishing touches, I added glossy accents to the flamingo’s beak and Wink of Stella glitter brush pen to his cheek. Then I glued down a scattering of starlight gems in yellow and orange.

Oh, you guys…I really can’t wait for you to see all of the goodness this release holds! Stay tuned to the Pink & Main blog for more sneak peeks from other DT members. It’s all going to be wonderful to see!

Products used on today’s card:
Stand Tall stamps and dies
Aloha dies
Basket cover die
Starlight Gems
EZ Squeeze liquid adhesive
Distress oxide inks – blueprint sketch, salty ocean, peacock feathers
Twiddler’s Nook Primrose Confetti Bits – white
Glossy accents
Wink of Stella glitter brush pen

I appreciate you sharing your time with me. Have a fabulous day!

Coffee Loving Cardmakers – Jane’s Doodles card duo

Hi again! It’s Tuesday Tea with Twiddler’s Nook over on the Coffee Loving Cardmakers blog again today. This time I have a pair of really fun watercolor cards to share with you!

I recently ordered some new goodies from Jane’s Doodles and couldn’t wait to ink them up. I had originally planned to just share the tea card with you today but who knows what’s really in that coconut cup and I could really go for a giant coffee flavored ice cream cone, how about you?!?

To create these cards, I started by stamping and heat embossing the images on bristol smooth cardstock. Then I watercolored them with my zig clean color real brush markers. I used the scan-n-cut to cut the images out and separated them so I could focus on one card at a time.

For the tea card, I used the new Brew-tea-ful stamp set. I smooshed some dye inks on my glass mat and spritzed them with water. Then I blotted it up with a piece of watercolor paper, drying in between layers for extra texture. I trimmed the ink smooshed panel down to 3.75×5 inches and stamped my sentiment on the bottom left, then added foam tape to the back. Next, I trimmed a piece of textured yellow cardstock to 4×5.25 inches and also added foam tape to the back of that. I wrapped a piece of pink ribbon around these panels and placed them on a white card base. I added foam squares to the back of the images and adhered them above the ribbon. For finishing touches, I glued some flat back rhinestones to the design from the Twiddler’s Nook Midnight Stroll embellishment mix.

Next, I tried some ink smooshing that I hadn’t done before…with distress oxides. These inks give a much more thorough coverage and layer in a different way than dye inks so it was cool to play with it.

For this card, I used images from the Summer Icons stamp set. For the background I smooshed distress oxide inks on a couple of watercolor panels and then came in with my Trinity Stamps mini slimline dies to cut the panels and the circle windows. I layered the two panels together with foam strips and then a combination of foam squares and liquid glue for the images. I stamped and heat embossed a sentiment on black cardstock and die cut it with a banner die included in the original Trinity Stamps mini slimline card and envelope die set. I adhered it with a combination of foam strip and liquid glue. Then the whole thing is adhered to a white mini slimline card base with liquid glue.

I’m craving sunshine and all things summer these days so this card really speaks to me and let me escape the rain while I was creating it.

Products used on today’s projects:
Jane’s Doodles Brew-TEA-Ful stamps
Jane’s Doodles Summer Icons stamps
Trinity Stamps Mini Slimline Card and Envelope dies
Trinity Stamps Mini Modern Embossed Slimline dies
Twiddler’s Nook Midnight Stroll embellishment mix

I appreciate you sharing your time with me. Have a fabulous day!

Pretty Pink Posh – Celebrate America

Hey friends! I’m stopping in today to share a really fun shaker card I made using some new Pretty Pink Posh goodies. I just fell in love with this 4th of July stamp set the moment I saw it and was quite happy to color it up recently!

I ink blended a couple of panels using distress oxide inks – one in blueprint sketch and the other in candied apple. I spritzed them both with water and set them aside to dry. Then I stamped and colored the images I wanted to use from 4th of July with my copic markers. I used the coordinating dies to cut them out and started working on my shaker.

I used the Celebrate shaker die to cut a window from the blue panel, then cut the same die from white cardstock to use as an inlay. I lined the window with acetate and cover the back of the blue panel with foam tape. I poured some Trinity Stamps Sugared Stars and Stripes clay embellishments along with a small pile of Twiddler’s Nook Pixie Dust micro beads to help the pieces move around in the middle of the red panel, removed the release paper and sealed the shaker up.

Next, I used liquid glue to adhere the frame inlay and all of my images to the card front. That finishes this festively fun card off for the day!

For some reason I really enjoy creating Americana cards and decor so this card was extra fun to create!

Products used on today’s card:
PPP 4th of July stamps and dies
PPP Celebrate shaker die
Trinity Stamps Sugared Stars and Stripes embellishments
Twiddler’s Nook Pixie Dust Micro Beads – Silvermist color choice
Thermoweb foam strips
Distress Oxide Ink – blueprint sketch and candied apple

I appreciate you sharing your time with me. Have a fabulous day!

(This blog uses affiliate links whenever possible, at no additional cost to you.)

MFT Stamps – Sending You Hugs

Hello everyone! I’m popping in today with a really fun card share featuring some MFT Stamps products that I just love! These Super Friend critters are just too cute and so fun to create with! I have had this Sending You Hugs die for a while and was excited to finally put it to use too!

To create this fun card, I started by inking up a panel with distress oxide inks in chipped sapphire, blueprint sketch and cracked pistachio. Once that was blended, I spritzed it with water. Then I came back and flicked some gold watercolor over the panel. I set it aside to dry before die cutting it with the sending you hugs die.

Next, I stamped a couple of the critters from Super Friends and colored them with my copic markers. I used the coordinating dies to cut them out and went back to my background panel to create the shaker mechanism. For that, I trimmed down some acetate and adhered it to the back of the die cut area with scrappy tape. Then I lined the panel with thick foam tape, creating a well in the center for my shaker bits. I piled some Twiddler’s Nook Wishing on Rainbow Stars confetti in the center of my white card base, removed the backing paper from the foam tape and adhered my panel to it. Voila! All sealed up and ready to shake, shake, shake!

I added foam squares to the back of the super friends and popped them in place. Then I took a sentiment from their set, stamped and heat embossed it in white. I trimmed that into a strip and popped it up with foam strips. This is when I remember those cute love speech bubbles that I had in my stash and thought they would be a great addition. So I die cut them from white cardstock, colored the hearts with red copics and glued them down with liquid glue.

Moving on to finishing touches, I simply added glossy accents to the koala’s nose and lion’s shirt emblem.

This card is so happy and so much fun too! Wouldn’t you just smile pulling it out of an envelope? I sure would!

I appreciate you sharing your time with me. Have a fabulous day!

Birch Press Design – Birthday Shaker Bundle

Hey friends! It’s been a while but I’m back on the Birch Press Design blog today featuring a fun set of birthday shaker cards. All of a sudden I needed multiple and I thought this was a fun way to get them done.

For these cards, I did some fun ink blending combos with distress oxides on each panel. Then chose a different embellishment mix from the Twiddler’s Nook shop to go with each. I cut the same front panel and sentiment set for each one.

I doubled up the foam tape on the back, added the shaker bits and closed them up. Then I glued some of the shaker bits on the front of the card design to round things out at the end.

This first one is a mix of walnut stain, crackling campfire and wild honey distress oxide inks and Burning Embers embellishment mix.

This one is so sweet. It has antique linen, spun sugar and worn lipstick distress oxide colors and the embellishment mix is Mermaid Wishes.

And this one might be my favorite with those bold colors and the fun stars! The distress oxide colors here are chipped sapphire, seedless preserves and milled lavender. The embellishments are called Wishing on Rainbow Stars.

Then, for the final card we have scattered straw, cracked pistachio and peacock feathers distress oxide inks with Princess Rings embellishments in the Tiana color choice.

I had fun getting super inky and trying out new color blends. If you’d like to see a step-by-step head over to the Birch Press Design blog and I’ll walk you through the steps.

I appreciate you sharing your time with me. Have a fabulous day!

Build Your Stash Holiday Cardmakers Hop

Hey friends! I’m popping in today to share that we’re a sponsor of a really fun hop going on to help build your Christmas card stash through the year instead of cramming in November! It’s called Build Your Stash Holiday Cardmakers. There is also a Facebook Group with challenges to keep you motivated the whole year through!

If you’ve never played along before, the hop starts today and goes through April 30. All you need to do is create a holiday/winter themed card and link it up on their blog linky tool. Click HERE to get there.

As a sponsor, we’ve donated a couple of great prizes and are also having a sale in the Twiddler’s Nook shop during the entire event so click HERE to go check that out!

Here are some examples of fun holiday products we have available, but there really is so much more so you’ll want to go check it out, I promise!

Thanks so much for hopping along. I hope you’ll take a moment to check out our store and also play along with the hop for chances to win awesome prizes from lots of fun sponsors!

I appreciate you sharing your time! Have a fabulous day!

Rubbernecker Stamps – Coffee Rainbow

Hi again! Welcome to a bright new week! It’s spring break here so there is extra time for morning coffee, crafting and all the fun things! Today I have a clean and simple card to share with you featuring the coffee cup die cut from Rubbernecker Stamps and a Studio Katia script coffee die, along with a couple of embellishments from Twiddler’s Nook.

I started by cutting my coffee cups from white cardstock, the tops from black and then I cut a rainbow of sleeves…not completely sure what I was going to do but wanted all the options. I used liquid glue to adhere all the pieces to my cups and started playing around. That’s when I thought of the coffee script die and finally had an idea. I cut that from white cardstock 4 times and glued them to a white panel. I ran than panel through my die cutter with a Trinity Stamps slimline modern embossed panel die. Then I glued my cups in place and trimmed off the excess.

I finished the card off with 2 coffee beans from the Twiddler’s Nook caffeinated crafting embellishment mix and tried to decide what to do with those extra cups I had left over. Duh, silly. A tag to go with my fun card!

I had the red and orange cups left so I cut a piece of yellow bakers twine, sandwiched it between the two and adhered them with liquid glue. Then I cut the coffee script and it’s shadow from white cardstock again and glued it to one side.

It’s so cute how they match but you have room on the back of the tag to write if you’d like, too!

I’m linking this beauty up to the Coffee Lovers Spring|Summer hop HERE. I hope you’ll play along with us! It’s great fun and there are SOOOO many prizes up for grabs!

I appreciate you sharing your time with me. Have a fabulous day!

Lawn Fawn – For You Thanks a Latte

Hello everyone! I’m back today with another fun caffeinated creation for the Spring|Summer Coffee Lovers Hop! Today I’m featuring some adorable Lawn Fawn goodies along with the Caffeinated Crafting embellishment mix for my shaker from the Twiddler’s Nook shop. This mix is part of the special that we have going on this week. Head HERE to check that out!

I started my card by die cutting the outside in stitched mug from white cardstock and inked up the center with mermaid ink and a blending brush. Then I cut the frame 8 times from white cardstock and once from teal. Next I cut the mug again from acetate. I used liquid glue to adhere my layers together, leaving the teal and acetate off until I filled the mechanism with my shaker bits. For those I die cut the beans from the mug die set from gold cardstock and also added some of the bits from the Caffeinated Crafting mix. Once it was all sealed up, I adhered a pink heart to the center and die cut the spoon from gray cardstock, adding it with liquid glue too.

To set my scene, I cut a piece of Perfectly Plaid paper to A2 size and trimmed down a piece of card gray cardstock for a table to sit my mug on. I used the simple stitched hillside border to trim the top of that. I stamped and heat embossed a sentiment from Thanks a Latte and used liquid glue to adhere my layers together, then I added those to a white card base.

Next, I die cut the scripty For You die 3 times from white cardstock and once from the same pink as the heart and used liquid glue to adhere them together. I wasn’t positive on my placement of this piece so I die cut the steam from vellum and glued it down. It ended up being mostly covered but it’s there for what it’s worth. Haha. Last, I added my mug and spoon and my card is all finished.

Are you playing along with the Coffee Lovers Hop? Be sure to head HERE to link up your caffeinated creations for chances to win tons of awesome prizes!

I appreciate you sharing your time with me! Have a fabulous day!