Oh my goodness my friends! I am BEYOND excited to share Trinity Stamps new release with you! Today I have 5 projects featuring the new pillow box die set and other products too! Here’s a peek at a couple of them and then we’ll take a look at each one on its own.

These first 3 that I’m sharing are like the Thermoweb trifecta! We’ve got flocked roses, glitzed snow and foiled coffee beans! How could you go wrong?!? Aren’t they fantastic!?! I love them all! Let’s look at some more, shall we?
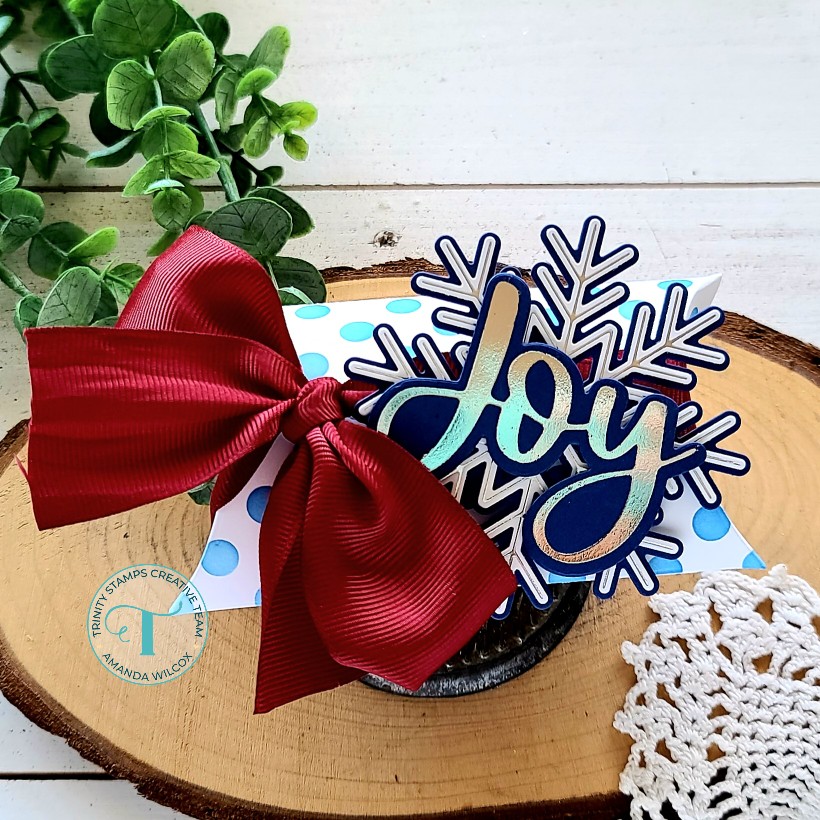
For this beauty, I foiled the big cut and foil snowflake and layered it on dark blue cardstock. Then foiled the cut and foil joy with the same silver foil on the same dark blue cardstock and adhered them with foam squares. I inked up the pillow box with the polka dot stencil and tied it with a fat red ribbon. Isn’t it stunning?!?

For this fun, lovey feeling box, I used the heart in the set to cut out a window and lined the inside with recycled packaging. I cut 2 additional hearts – one from white glitter cardstock and the second from plain white and used the new Holiday Tag Helper stamps to add a to and from.

Heading back to the trifecta at the beginning, I cut the pillow box for this one from green cardstock and inked one layer of the snowfall stencil with white pigment ink. Then I spread gold glitz glitter gel through the second layer and set it aside to dry. While I was waiting I cut 2 stars using the die in the set and adhered them together. Then I stamped another sentiment in the Holiday Tag Helpers stamp set and cut it out with the stitched banner from the Slimline Scalloped Card Panels and Banners die set. After assembling my box, I tied it lengthwise with white ribbon and adhered the star to that with foam squares.

For this sweet box, I inked up the leaf layer of the Bed of Roses stencil with green dye ink and then spread transfer gel blanco through the flower layer. Once it was dry, I ran it though my laminator with ruby red deco foil flock. I assembled the box, wrapped it with green baker’s twine and hid the twine connection with a white bow using the Bunch of Bows die set.

Last, but not least, I cut a teal pillow box and inked up the coffee bean stencil with brown ink for one layer and transfer gel for the second. After that was dry I ran it through my laminator with bronze deco foil for a fantastic shiny caffeinated treat box! Then I cut the coffee cup tag from the pillow box die set twice – one for a decoration with all the details and the second with another to and from included in the Holiday Tag Helper stamps.
Now, before I go and leave you to your fabulous Thursday. I have a couple of helpful hints if you’re interested in creating wonderful gift boxes this holiday season.
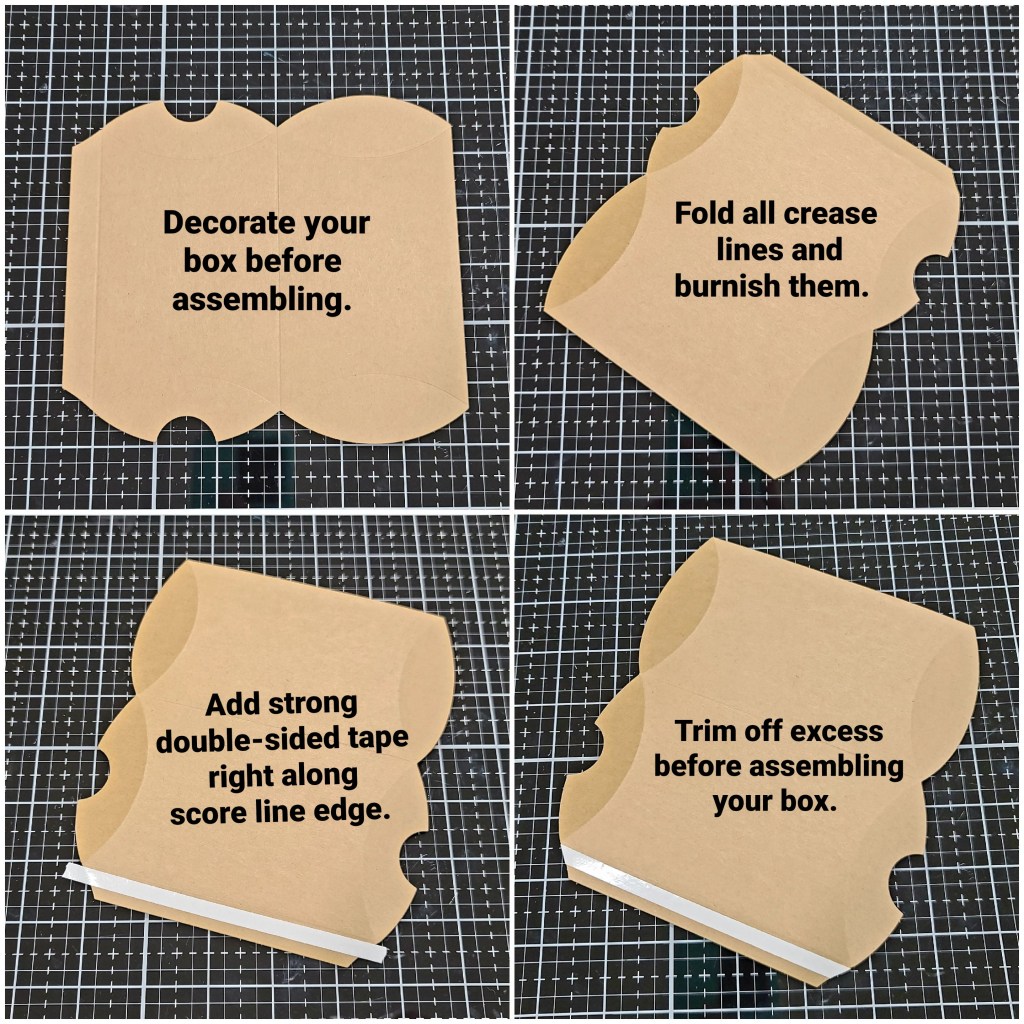
Starting in the top left and going clockwise, this is the process I found most helpful. And, honestly, the biggest part of this simple step-by-step is the way you add your adhesive to the tab that closes your box. Taking completely from one edge to another is very helpful in keeping the box closed when it’s got something inside, possibly pushing at the seam.

Next is simply a preference thing. I made this red box very first cutting the dies apart straight out of my package. When I folded it I though, darn it! So, here I am sharing in case you like to hide the closure of the box too. I make a point now to decorate the side with no finger notches as if it’s going to be the front of my box. The stenciling may go all the way around but my tag and such go on that side.
I hope those help you out a little and you have a total blast creating this fun boxes!
Products used today:
Pillow Box die set
Lots of Dots stencils
Layered Coffee Bean stencils
Bed of Roses stencils
Snowfall stencils
Bunch of Bows dies
Cut and Foil Big Snowflake dies
Cut and Foil Joy dies
Slimline Scalloped Card Panels and Banners dies
Blending Buddy brushes
Thermoweb Transfer Gel Blanco
Stencil Pal
Deco Foil – bronze
Deco Foil Flock – ruby red
Glitz Glitter Gel – gold
Liquid adhesive
Foam tape and squares
Now, that you’ve stuck with me through this huge post, which I appreciate more than you know! You can head to the Trinity Stamps shop and snag some new goodies HERE or you can head to Instagram and hop along for even more inspiration HERE.
I appreciate you sharing your time with me. Have a fabulous day!

Fabulous idea and I love them ! x
LikeLike