YIPPEE!!! It’s time for another fantastic release from Trinity Stamps! I was fortunate enough to be gifted this sweet rainbow snail stamp and die set early and be able to share some cute projects with you today! I have two cards and a pillow box – all birthday themed – with this adorable rainbow snail.

I had so much fun creating with this stamp set that I made all three of these snails straight away and then decided what to do with them later on! I created a jig to help mass stamping this guy, which is so helpful and really simple too.
I took a scrap of cardstock and die cut the main image from the center of it. I used white so I actually used this cut out but you wouldn’t have to, you mainly want the negative space left over. I placed the negative in my MISTI and held it down with magnets. I started with the body stamp first, lining it up in the space so it was even all around, used the lid of the MISTI to pick it up and placed my die cut in the space. I inked up the stamp and stamped it down. With this jig in place, you can add your same image and double-stamp if you need to and it will be in the same place, or you can place another blank cutout in the opening and keep creating bunches of snails at a time. I just wiped the stamp off between each color and did the same part of the image on all the die cuts before moving on to the next one.

With my snails created, I glued the hats on each one and started playing with designs. Originally I thought I would put all 3 on a slimline card but didn’t love it so I scrapped that idea and went to my stash for inspiration.
For this card, I cut 3 balloons from the Bunch of Balloons die set and tied thread to each one leaving it extra long because I wanted to make sure it was long enough to extend the whole card length. I inked blended blue and teal on a white panel for my background but thought it was a little plain.

To make things more fun, I created a shaker instead of just an ink blended background. For that I die cut a white panel with the largest slimline stitched panel and then cut the middle out with a slimline dainty scallop die to create a wide frame. I lined it with acetate and then foam tape around the edge.
I poured some shaker bits in the center and sealed it up. I added the shake mechanism to a white card base and then added my snail and balloons with foam squares. I hid the end of the thread behind the snail and secured them in place with the foam squares. The sentiment in the set has a coordinating die so I added it to a balloon with foam squares as well.
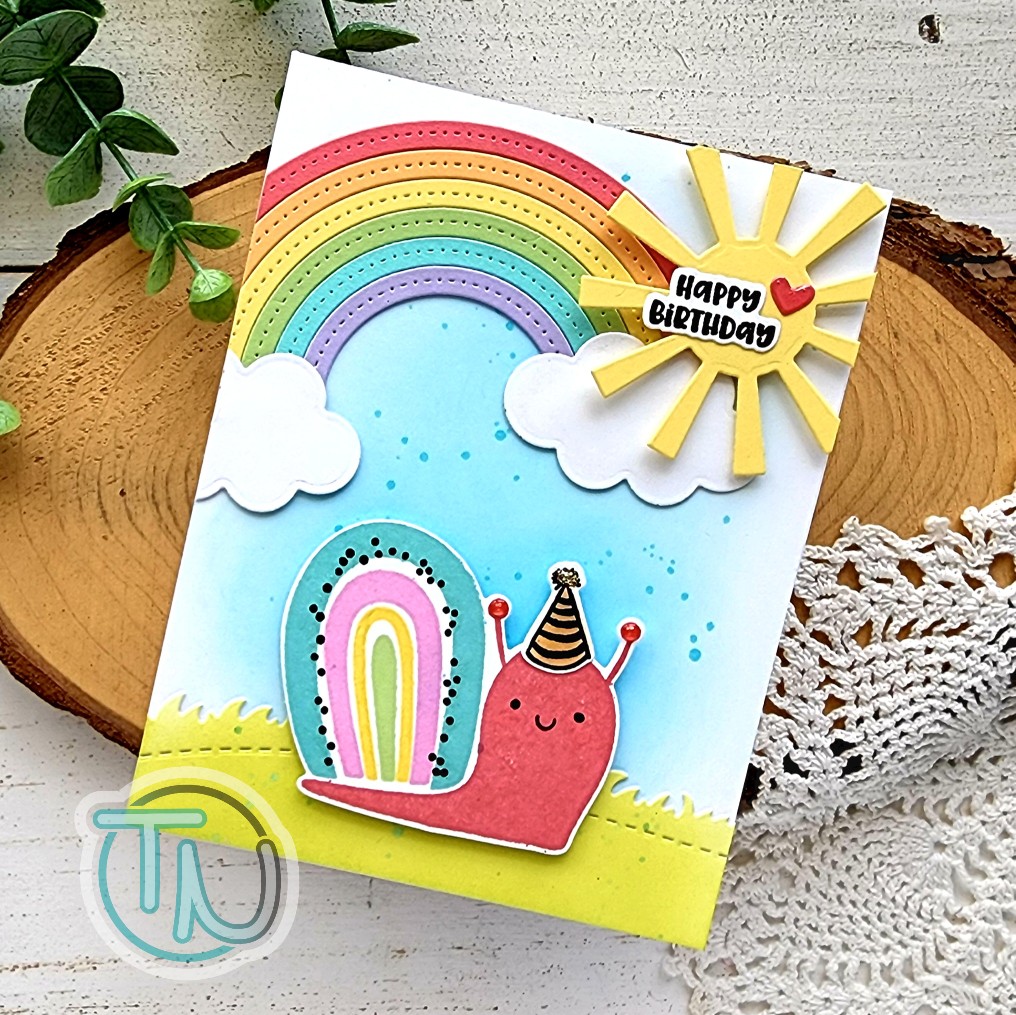
With my second snail, I really wanted to create a little scene so I pulled out the Rainbow Funshine dies to cut the rainbow, clouds and sun. For the grass I used a slimline great outdoors border die.
I adhered the elements of my rainbow with liquid glue, blended some blue ink for my sky and green ink for my grass panel. I splattered the sky and grass for some fun texture and started adhering everything together.
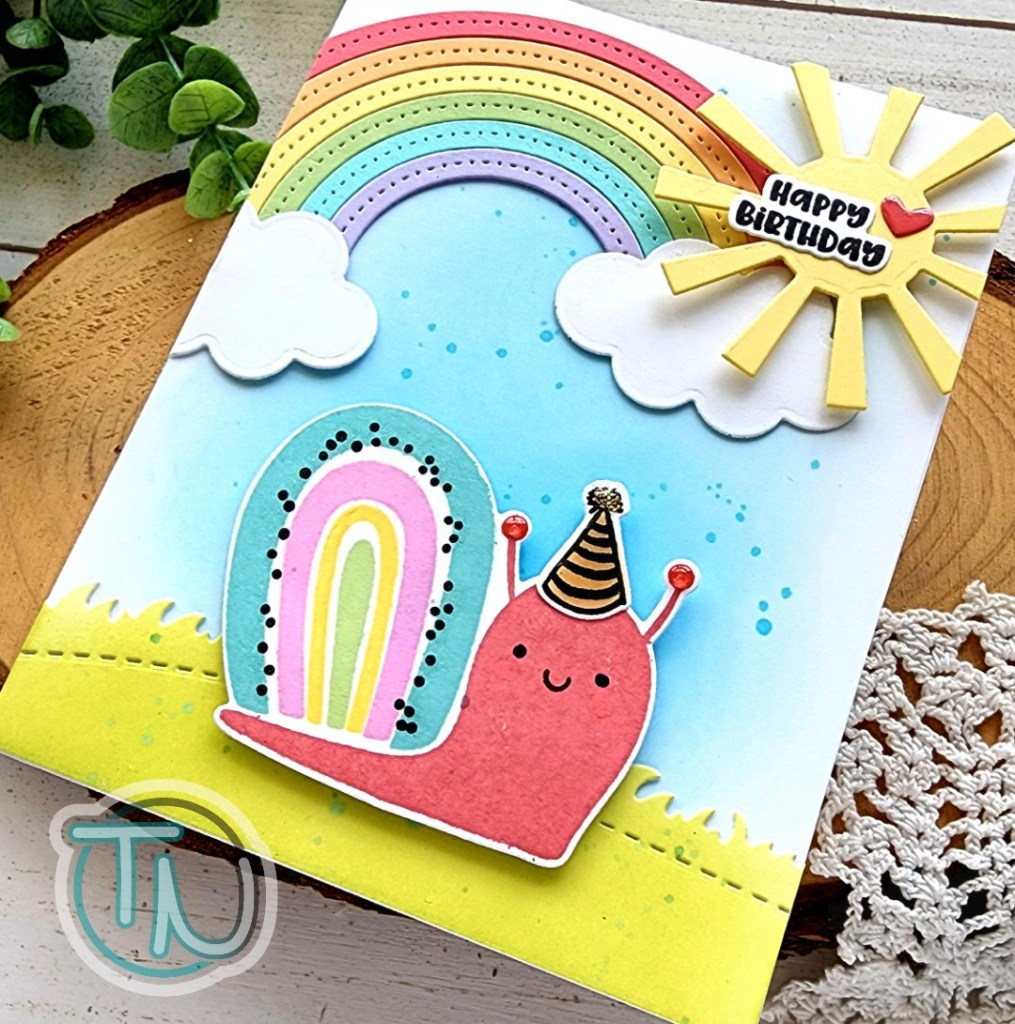
The rainbow and grass are adhered the the sky panel with liquid glue. Then The snail and sun are popped up with foam squares. I was playing around with placement for the sentiment and absolutely love how it looks on the sun. Then I found the little heart die in the Rainbow Funshine set and cut one from the same cardstock as the rainbow and added it for a sweet touch too!
For finishing touches on this card, I did pull out the glossy accents and unicorn Stickles. I added glossy accents to the tops of the snails little antennae and his party hat, then I went ahead and put some on the heart too. For just a dab of sparkle I added the Stickles to the top of the party hat.
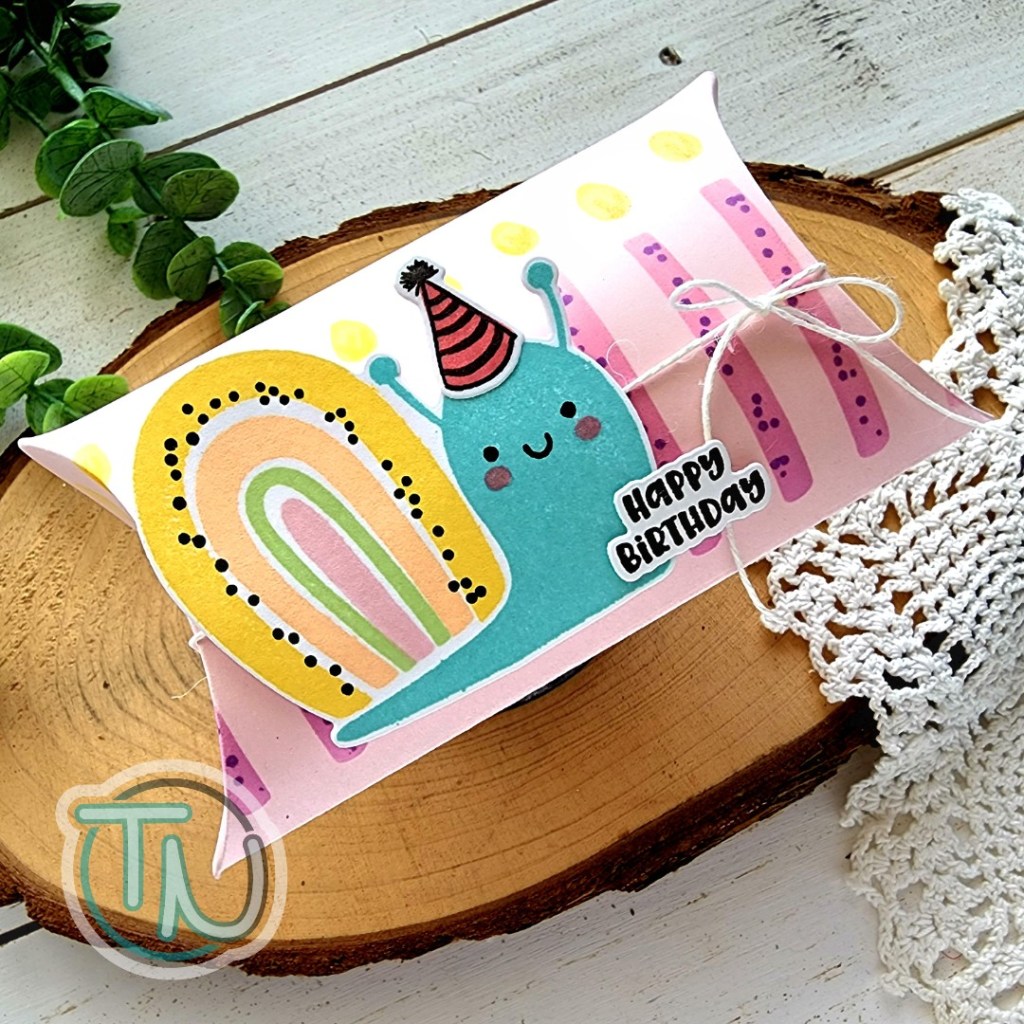
For my final project I pulled out my favorite pillow box dies and created a pink box base. I used the candle half of the cake and candles slimline stencil to decorate it. With the stencil in place, I took the dotted layer from the rainbow snail and stamped some texture in each candle for fun too.
I removed the stencil and adhered my box together. I adhered the sentiment to the edge of my snail with liquid glue and added foam squares to the bottom half of him. I tied some twine around the box and added the snail over the top. The snail keeps the twine in place so the bow can be untied and retied easily.
For finishing touches I added Wink of Stella glitter brush pen to the candle flames, the cheeks on my snail and also his hat.
I know this was a super long post and I truly appreciate you sticking with me to the end. Click HERE to check out the Trinity Stamps new release.
Products used today:
Rainbow Snail stamps and dies
Slimline Stitched Panel dies
Slimline Dainty Scallop dies
Slimline Scenic Borders dies
Slimline Cake and Candles stencil
Bunch of Balloons dies
Rainbow Funshine dies
Foam tape and squares
Blending Buddy brushes
Bearly Art liquid glue
Glossy accents
Stickles – unicorn
Twiddler’s Nook shaker bits – Holographic Hearts, Silver Seed Beads and Wish Upon a Star confetti
I appreciate you sharing your time with me. Have a fabulous day!
