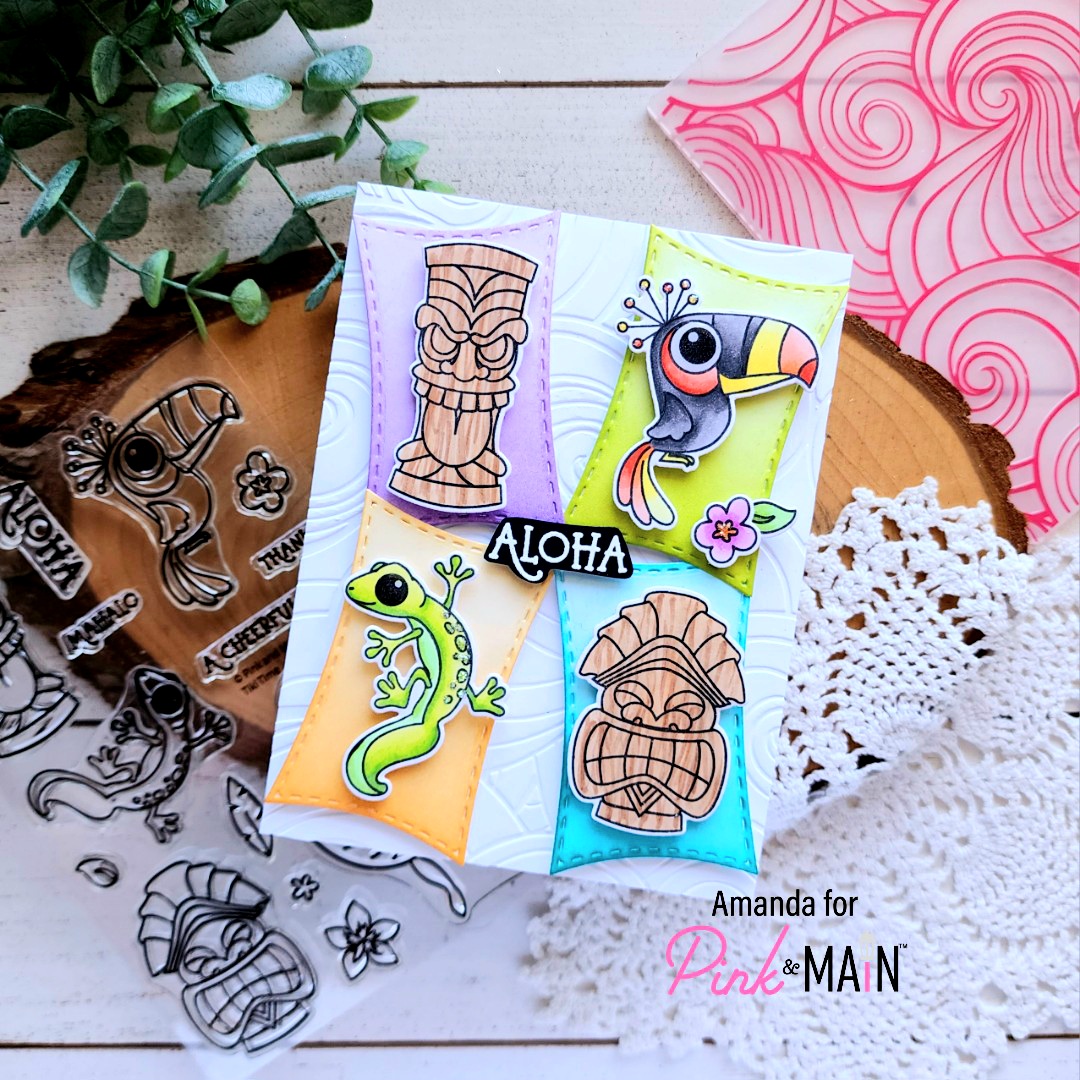
Hello everyone. I’m so glad you stopped by. Today I have a tropical tiki card featuring a new stamp and die set from Pink & Main called Tiki Time. I’m always drawn to these sort of tropical themes, they make me want to go on vacation.
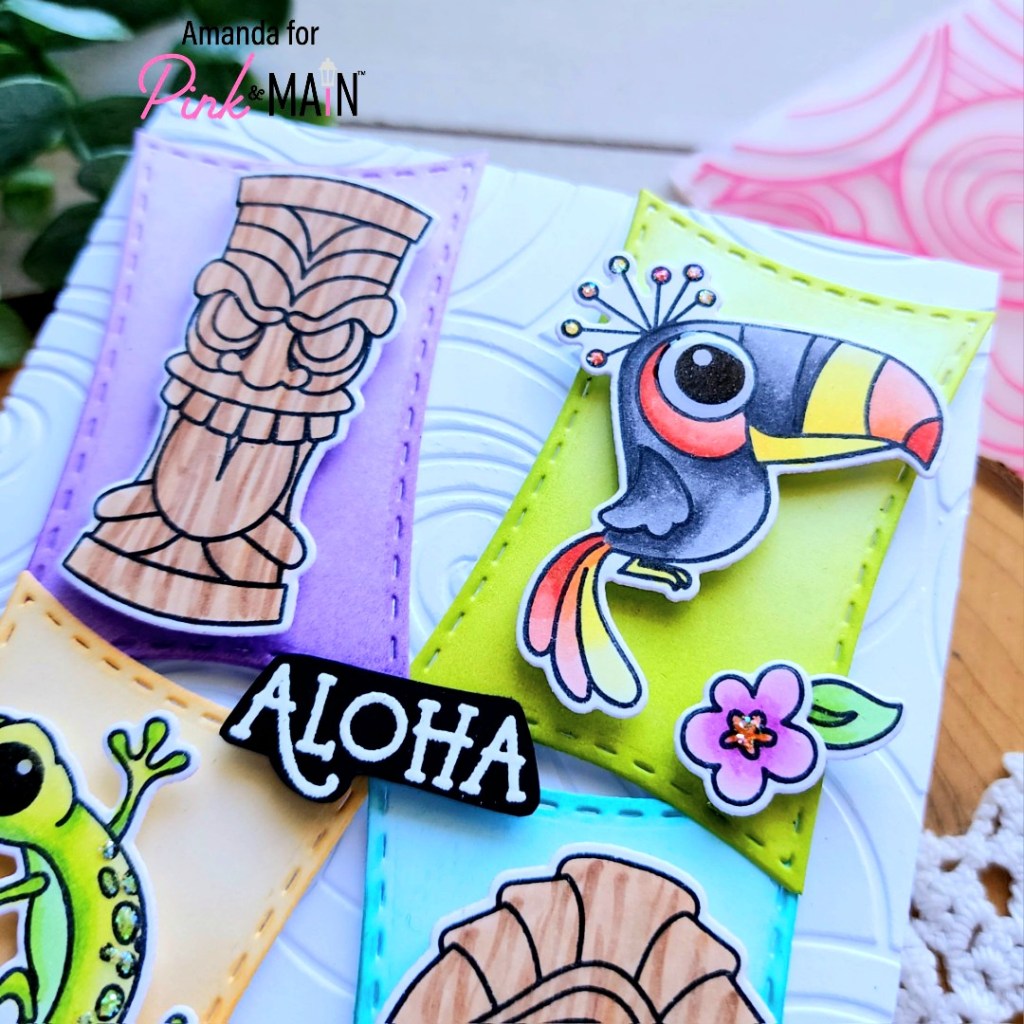
I stamped and colored my images with copic markers before using the coordinating dies to cut everything out. Then I cut 4 concave rectangles from white cardstock and ink blended each in a gradient with different Pink & Main dye inks. I wanted things bright and fun so I chose construction, night sky, lakeside and the park.
Next, I used an embossing folder to add texture to my background panel and adhered it to a card base. I added foam tape to the back of the concave rectangles and popped them up at an angle, leaning toward the center of the panel.
Then I popped my images up on those with foam squares. I kept the tiki guys opposite each other and made sure the lizard and toucan were on contrasting colored panels.
I stamped and heat embossed aloha on black cardstock and trimmed it out with my scissors. Then I popped it up in the center with foam squares as well. For finishing touches I added Touch of Gloss to the critters’ eyes and stardust Stickles to their spots and dots for a little sparkle too.
Anyone else ready to run away to a tropical island with me? I promise I can pack really fast!
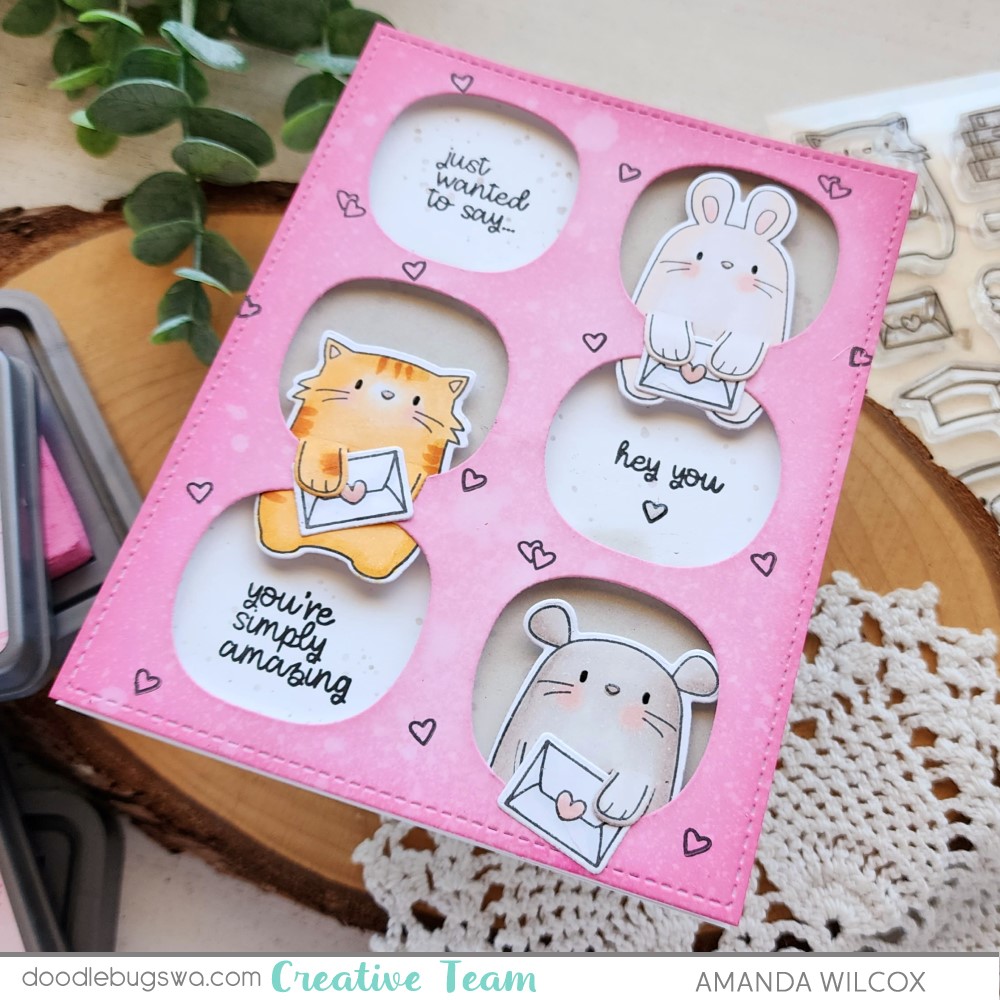
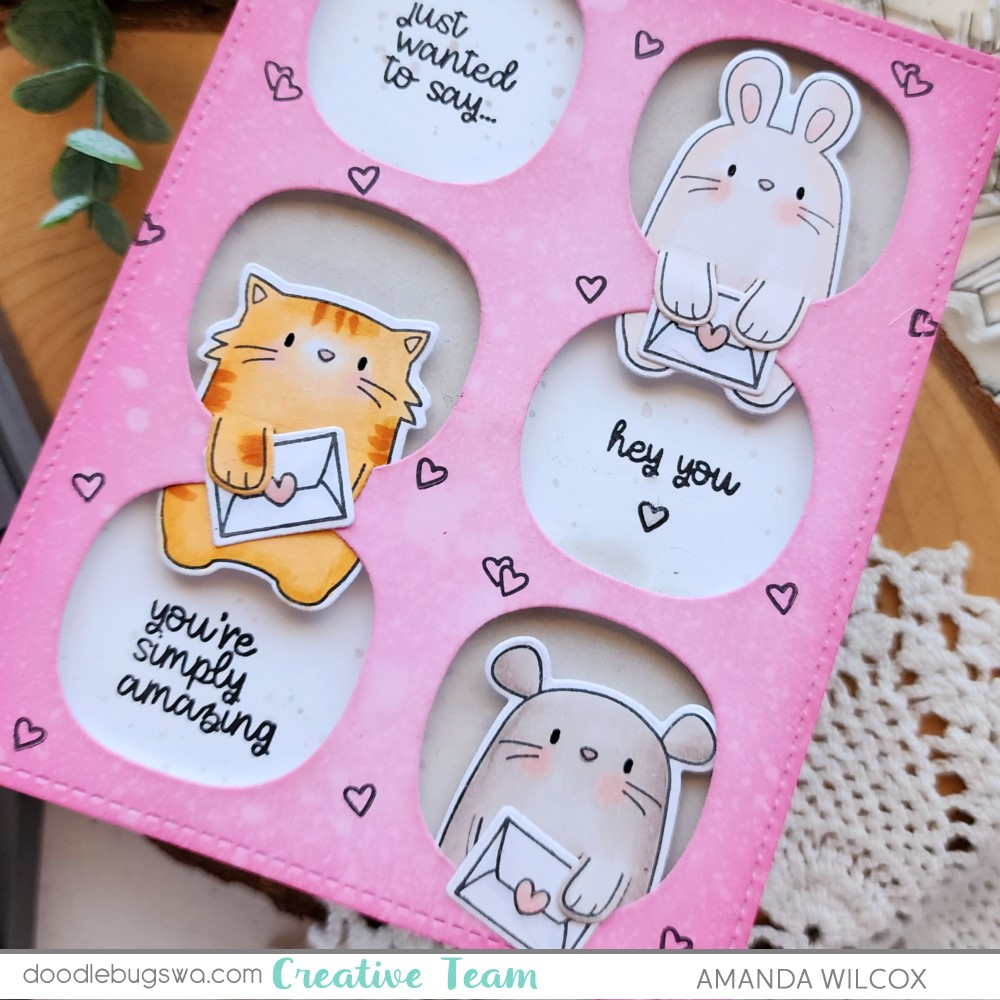
Happy Hump Day everyone! I’m thrilled to be on the Doodlebugs blog again today with another sweet card using Mama Elephant stamps and dies. These Page Huggers released quite a while ago but are so adorable and very fun to create with!
Today I chose three out of the four critters in the set to stamp and color with my copic markers. At first I was going to have them each hold something different in their hands but that envelope is just so sweet, I went with happy mail from each of them instead. After coloring everything, I used the coordinating dies to cut them out.
Full transparency, I die cut the Six Window cover plate from white cardstock and then used distress oxide ink to add color. Highly recommend learning from me and inking your paper before die cutting. Lol! It’s doable but it was a pain trying not to bend and fold the skinny parts between the windows.
I went with picked raspberry on the outer edge and kitsch flamingo for the center. Then I spritzed it with water and blotted it dry.
Then, I took a white piece of cardstock and inked up lost shadow distress oxide behind the windows I wanted critters in. I mocked up my critters in the windows to see how things were looking and wanted more texture. So that’s where I flicked lost shadow ink on the white panel before stamping sentiments in the open windows from To My Dearest stamp set.
Another funny for you and a way to salvage what might be lost. I had the tiny heart below “hey you” at the same time I was stamping the sentiments and I also had the grid window in place in my MISTI to make sure things lined up. Between inking the stamps and closing the lid, the heart fell and stamped on my pink panel. I almost lost it. But I took a breath and stared at it for a minute before thinking this could work. And now we have tiny hearts all over the cover panel.
Now we’re finally ready for assembly. Glue the sentiment panel to a card base and add your critters to the open windows with liquid glue where you can. Then flip the window panel over and line it with foam strips and squares. Pop that in place on the card front and you’re ready for finishing touches.
This is one of my favorite parts of creating a card. Things really come to life here. I added black glaze pen to all of their eyes and glossy accents to the critter noses and the hearts on the envelopes. Then at the very end I also added it to the heart under “hey you.” It was the problem child after all so I thought it needed some extra attention.
I hope you enjoyed this creation and find some humor and comradery in my flubs. We all make them. You’re not alone. Message me if you’re ever having a moment. I’m happy to chat!
I appreciate you sharing your time with me. Have a fabulous day!
Remember that if you use my link to make your first purchase with Doodlebugs, you get 15% off. Plus she’s got crazy awesome free shipping thresholds, rewards program and AMAZING customer service! Click HERE to shop your heart out!
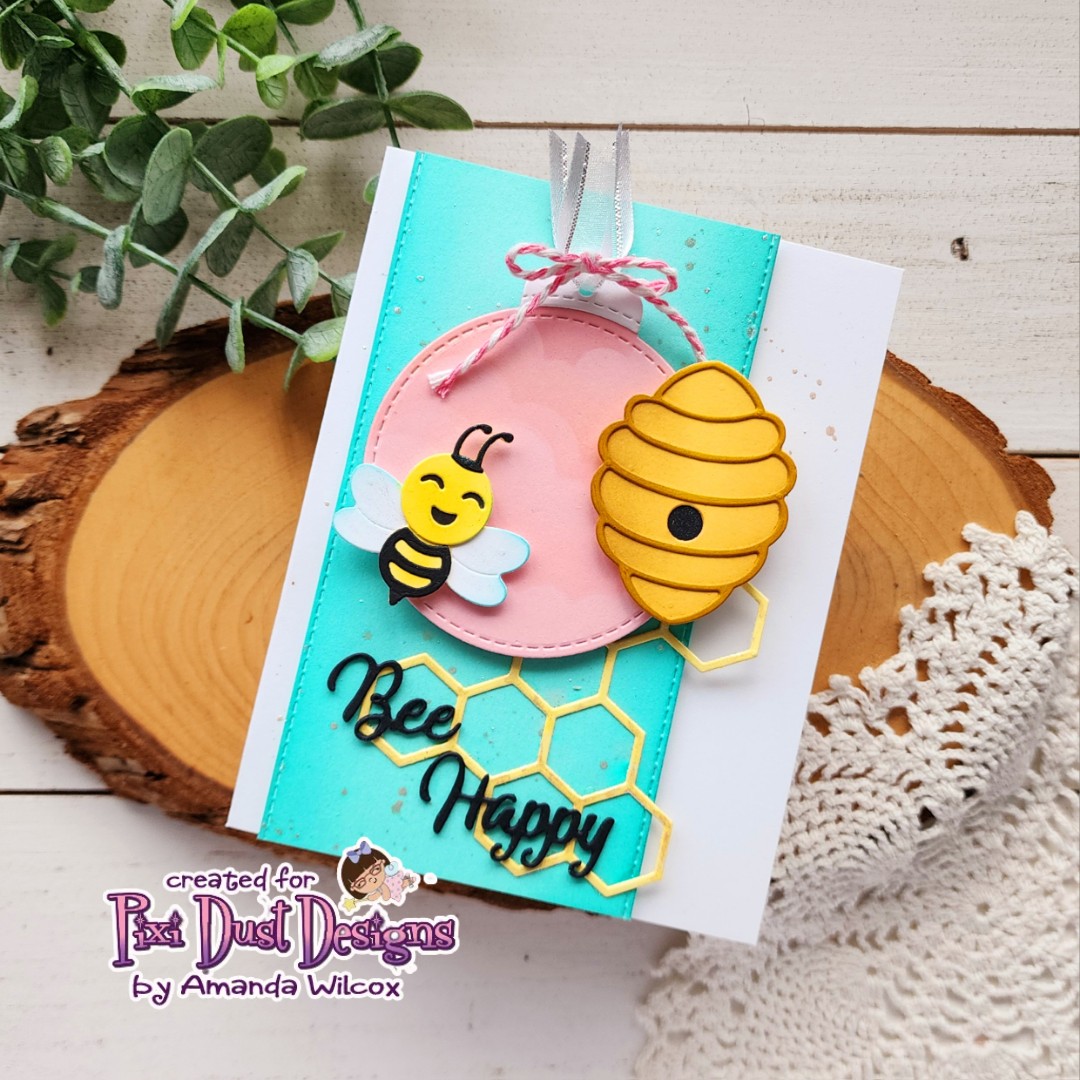
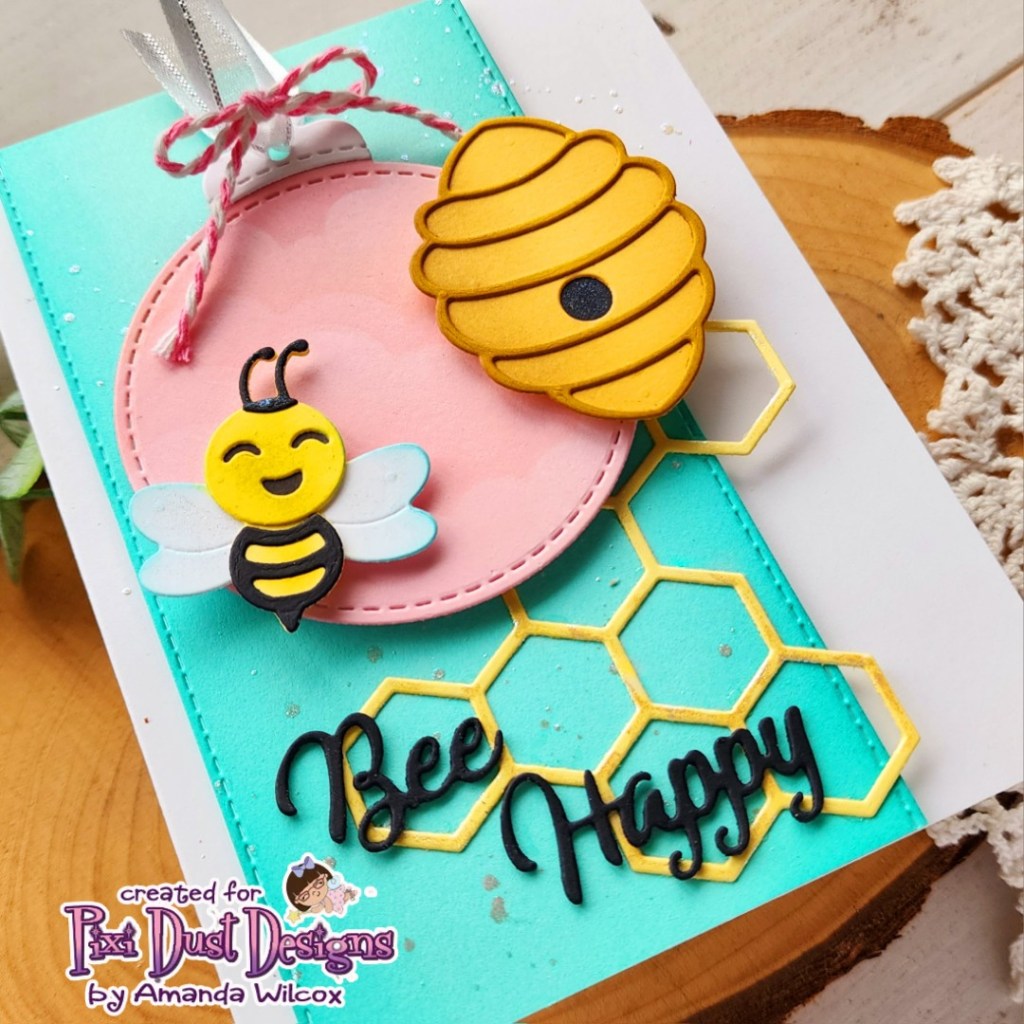
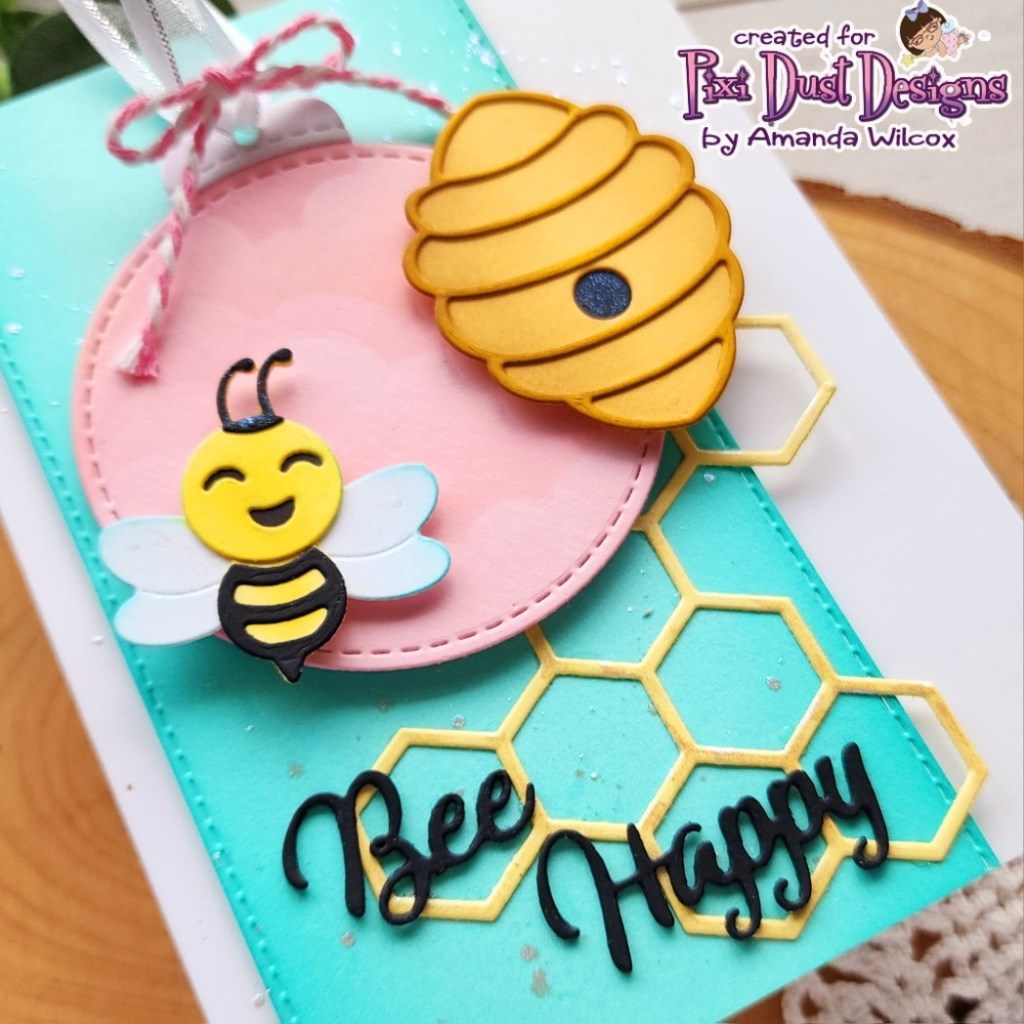
Welcome everyone. I’m so happy you’re here today. I’m back with a second card featuring the Pixi Dust Designs Bee Happy die set. Today I’m pairing it with one of their awesome tag dies and finding A2 uses for my slimline dies as well!
I started my card by cutting the pieces to my bee and bee hive from colored cardstock. Then I used blending brushes and dye inks to add depth to them. I always use liquid glue to adhere the layers because it gives me a second to wiggle things into perfect placement and it holds strong when it’s dry.
Next, I die cut the main tag shape and topper from the Tag B dies and then used the Slimline Clouds die to cut a stencil. I used the cloudy border to ink pink clouds on my pink tag. It’s subtle but adds interest instead of the flat cardstock. Then I added ribbon through the hole in the tag and popped my bee and hive up with foam squares.
I used the third largest Stitched Rectangle Slimline die to cut a strip of teal cardstock for my card front. After inking the edges for some shading, I popped it up on a card base with foam tape. Then I splattered it with iridescent watercolor. While that was drying I die cut the “Bee Happy” sentiment from black cardstock three times and glued the layers together.
Deciding on final placement for the sentiment and tag, I thought it would be fun to add texture so I cut the honeycomb from yellow cardstock and used the same watercolor to paint random spots for shine and shimmer.
Finally, I glued the honeycomb and sentiment down with liquid glue. Then I popped the tag up with foam squares. I hadn’t washed my watercolor brush out yet so I went ahead and added some shimmer to the bee antennae and wings and the hole in the beehive too. It’s subtle but fun.
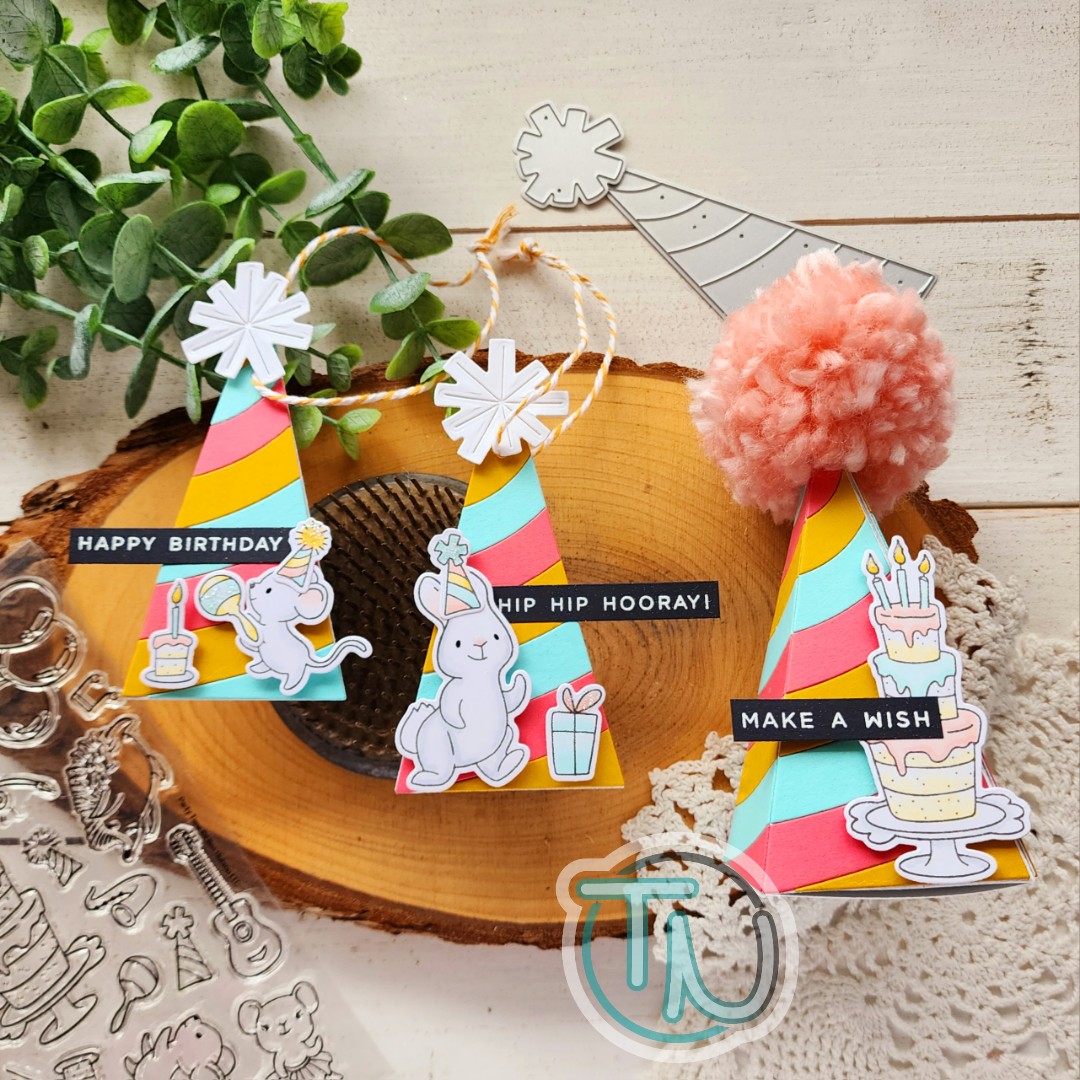
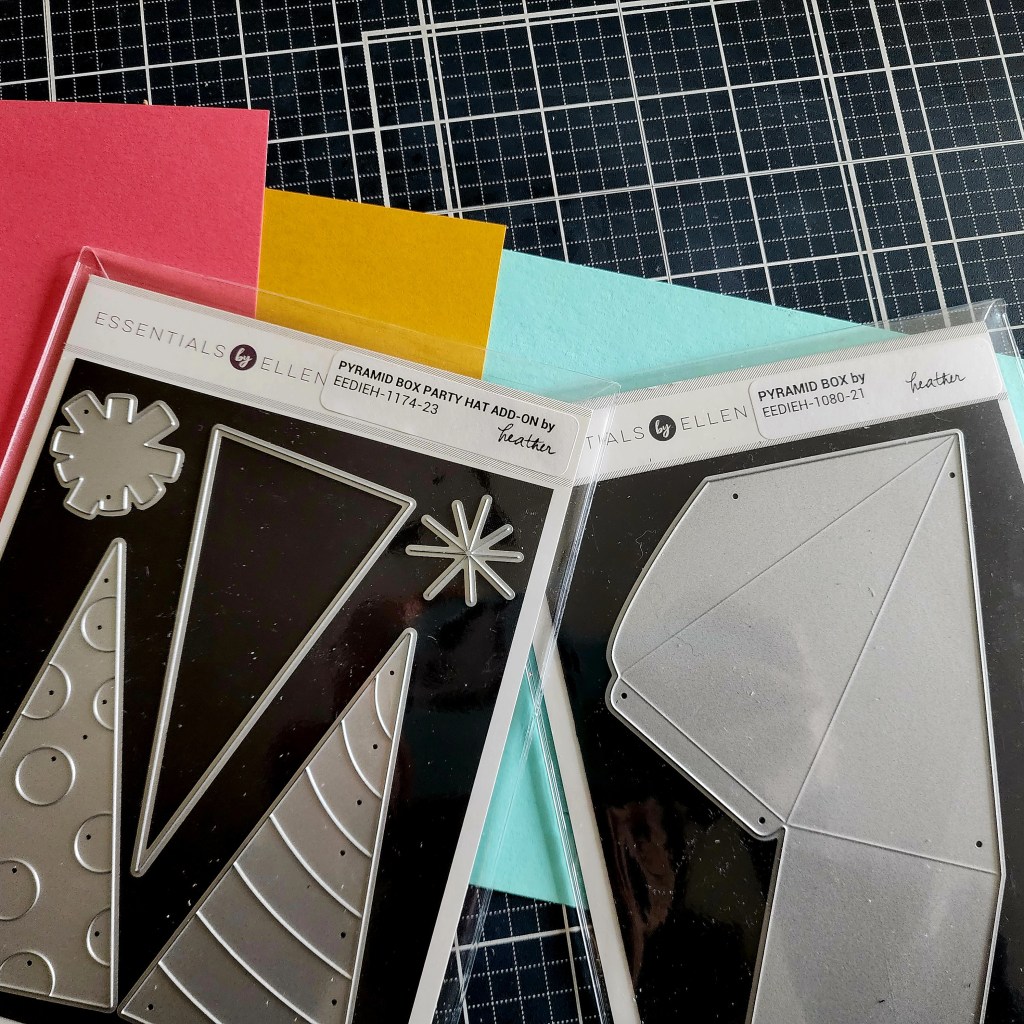
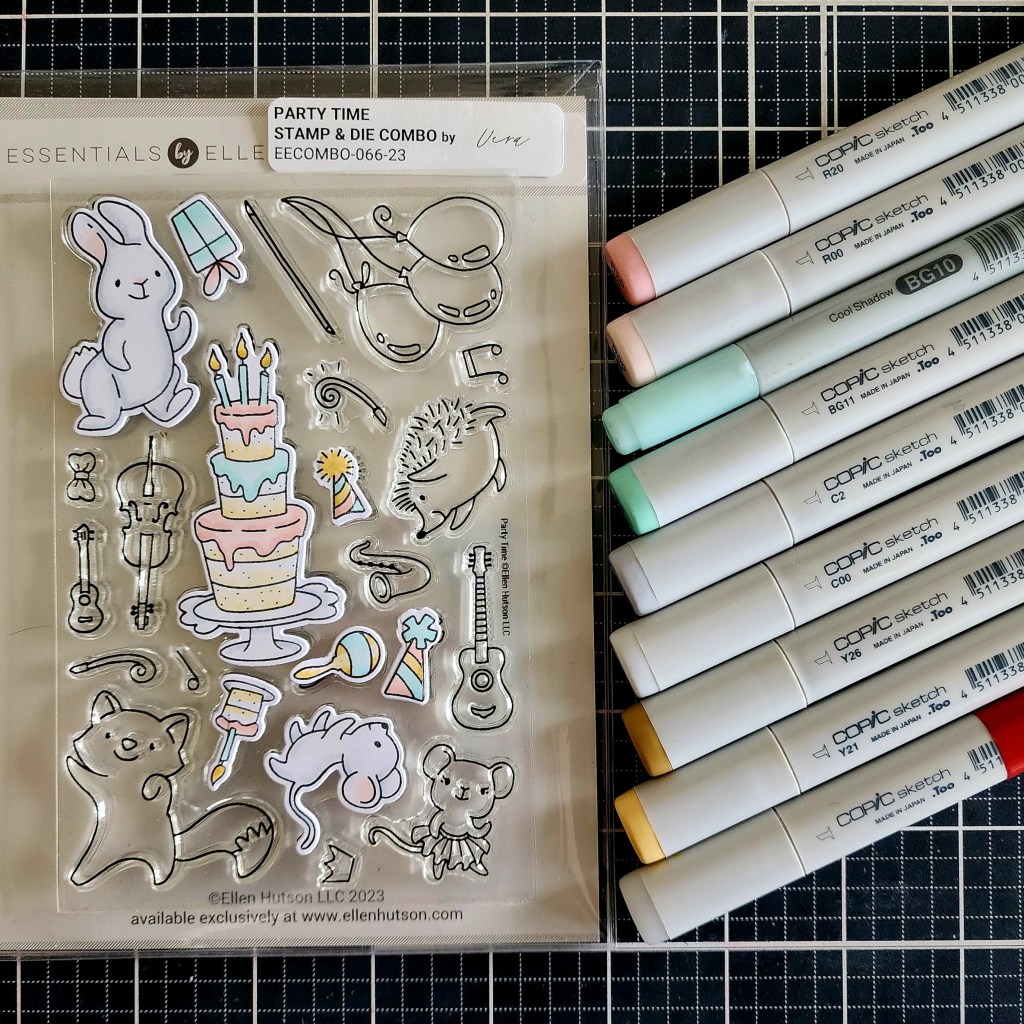
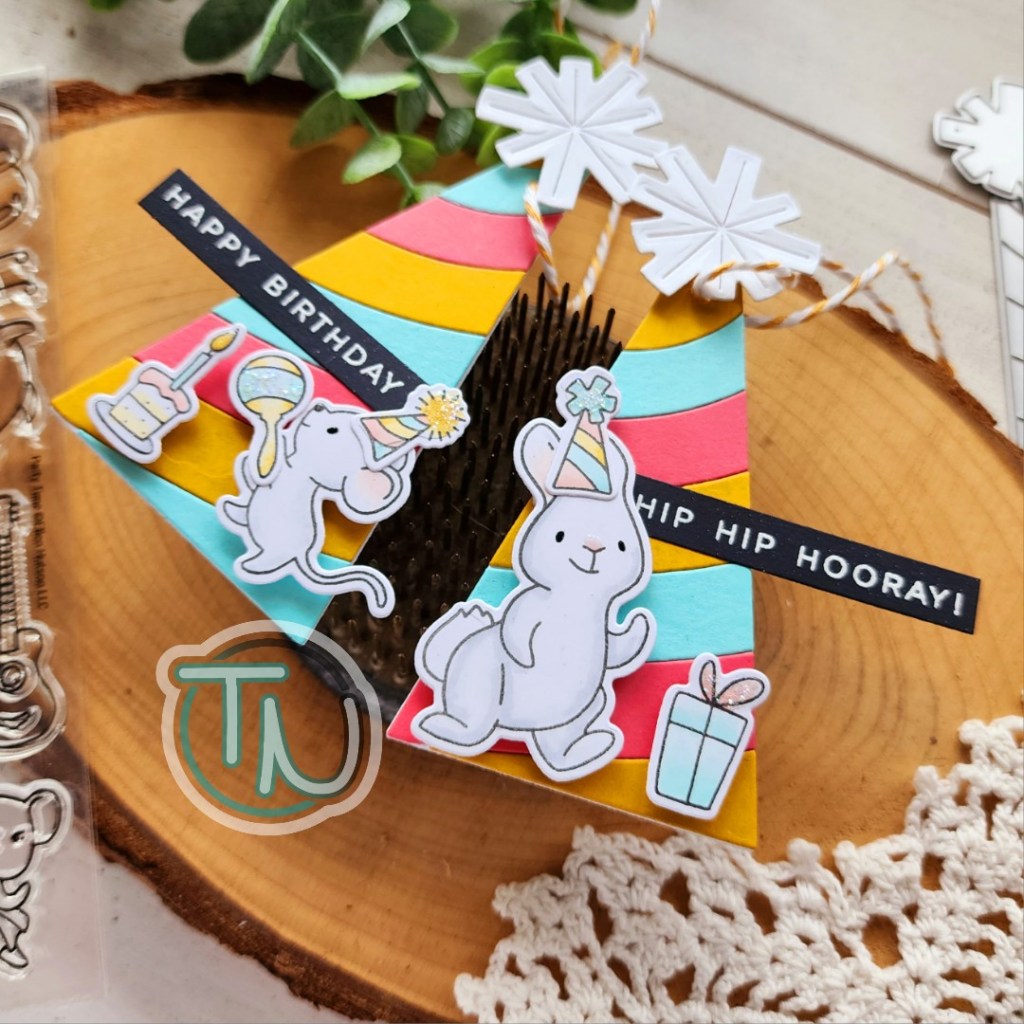
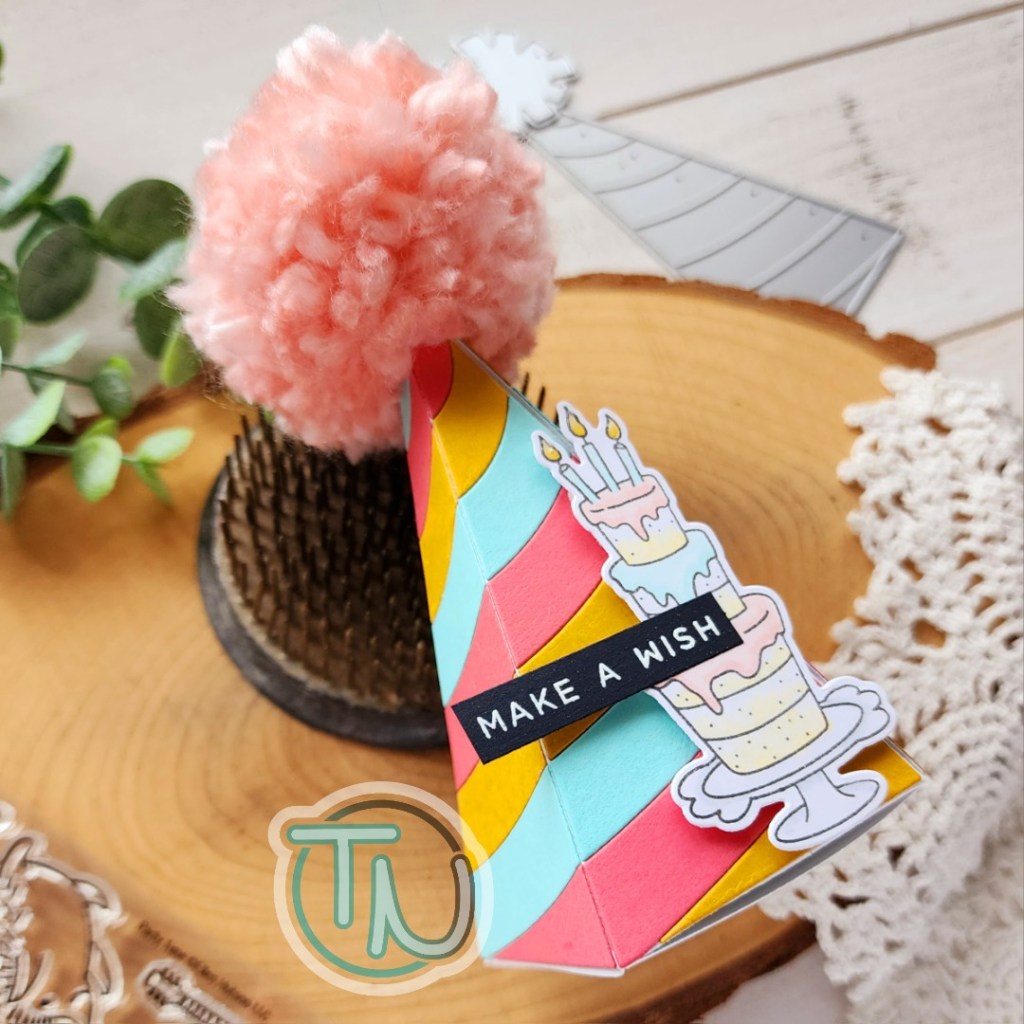
Oh my goodness everyone! I am SO EXCITED to be guest designing over on the Ellen Hutson blog today with goodies from the most recent birthday release. There was so many amazing products but I absolutely had to use the new party hat add on dies to the pyramid box and those sweet new birthday critters too. They’re my favorite!
I’ve got a fun box and a pair of gift tags to share with you today. As we go through the process you’ll see how I literally fell into the tags while creating the gift box. It was so perfect and really fun!
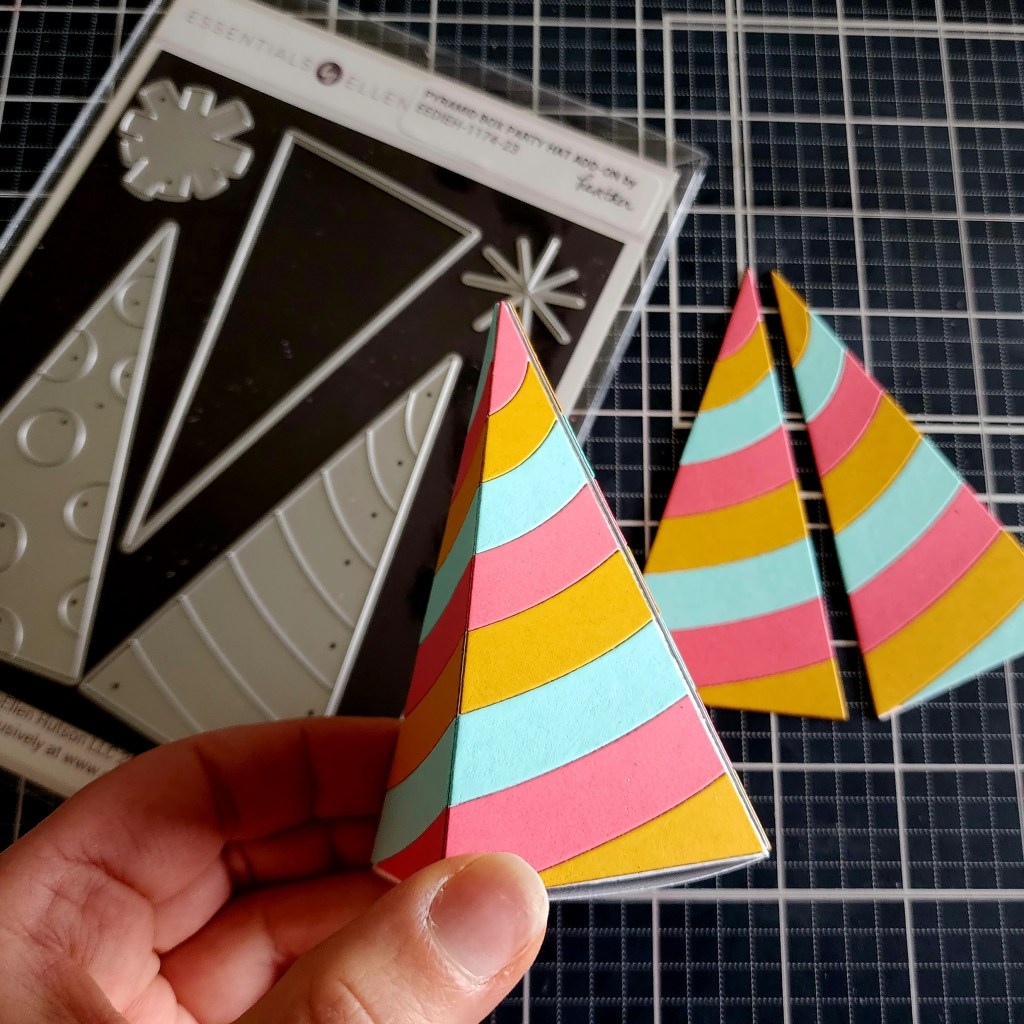
First, I chose a color palette that struck me in the moment and grabbed my dies. I cut the box pieces (2) and base for the sides (6) from white cardstock. Then I decided to try the striped hat first so I cut the stripes from each color twice.
I started at the top of each triangle and just followed the same color pattern down, starting with the next in the order for each side. It worked perfectly and the stripes spiral around the box. It’s soooo cool! This also meant that I had two extra panels at the end…perfect for tags!!!
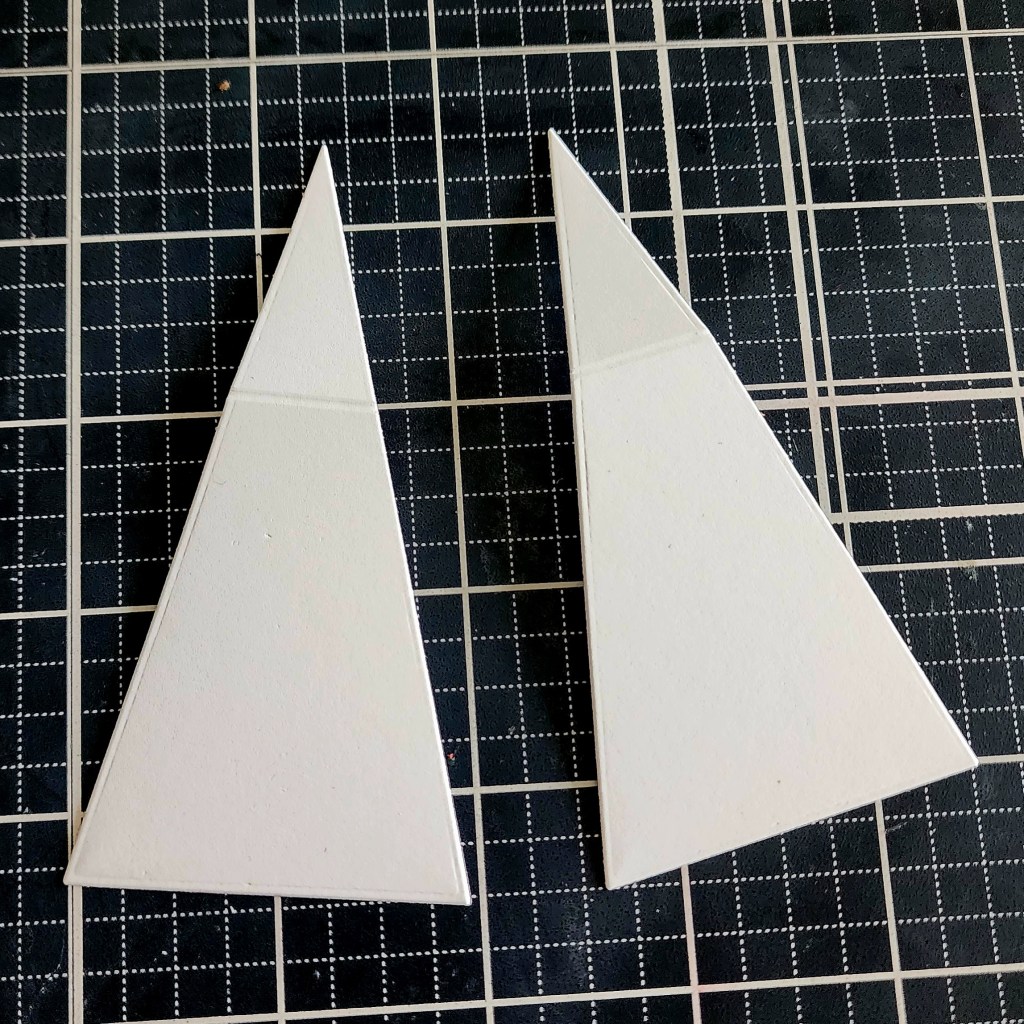
I cut two additional bases from white cardstock and used my scoring board to score them 1 1/2″ down from the point. This gave a good size area to glue the pieces to the striped panels but also left enough area to write to, from and a small message. I prefer liquid glue to adhere things like this but you could use tear tape or tape runner if you prefer.
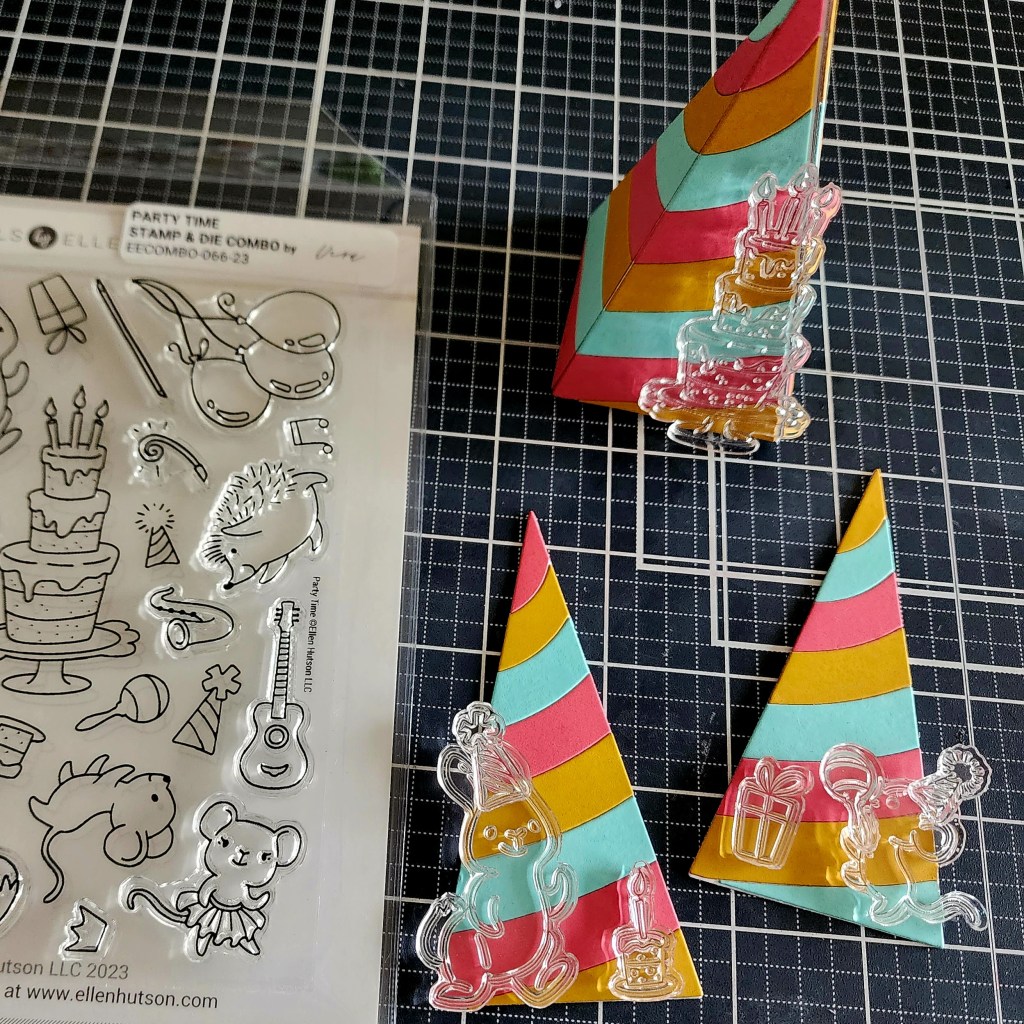
With all of my pieces assembled, it was time to decorate them! I often play with my stamps like this before actually stamping and coloring. It gives an idea for how things will fit and if I’ll need duplicates of an image. Remember, it’s not a guarantee for not needing to go back and stamp more or switch things out in the end but it really helps the process for me.
Next, I used my copic swatch chart to find colors that matched my cardstock, then I toned them all down to the pastel shade of those. This way my images were soft and popped off the bright tags and gift box. I colored everything and used the coordinating dies to cut them all out. Aren’t they the cutest!?!
For my gift tags, I punched a hole in the top and threaded twine through the hole. Then I cut the pom pom shape in the die set and added it with a foam square so I let the twine move freely. I added my images with foam squares as well and finished them off with stardust Stickles.
Something was missing not having a sentiment though so I stamped and heat embossed the new Birthday Vibes stamp set and used the sentiment strips die to cut them all out. This is totally genius and so wonderful to have all of these sentiments at my fingertips so quickly! I trimmed the strips down and added them to the tags with liquid glue.
Now, you can totally use the paper pom pom in the die set to add fun to the top of your pyramid box as well but I just couldn’t resist adding a yarn version to my box for that something extra. Isn’t it silly and so fun!?! I love it!
There are lots of pom pom makers out there, which is what I use, but you can also just create your own with cardboard or a fork too. Just search “diy pom pom maker” on google, pinterest or youtube and you’ll see lots of ideas.
I prefer instant adhesion with things like this so I used hot glue to add mine to my box and then foam squares to add the cake and sentiment strip to the side. I finished the candles off with glossy accents for a little shine.
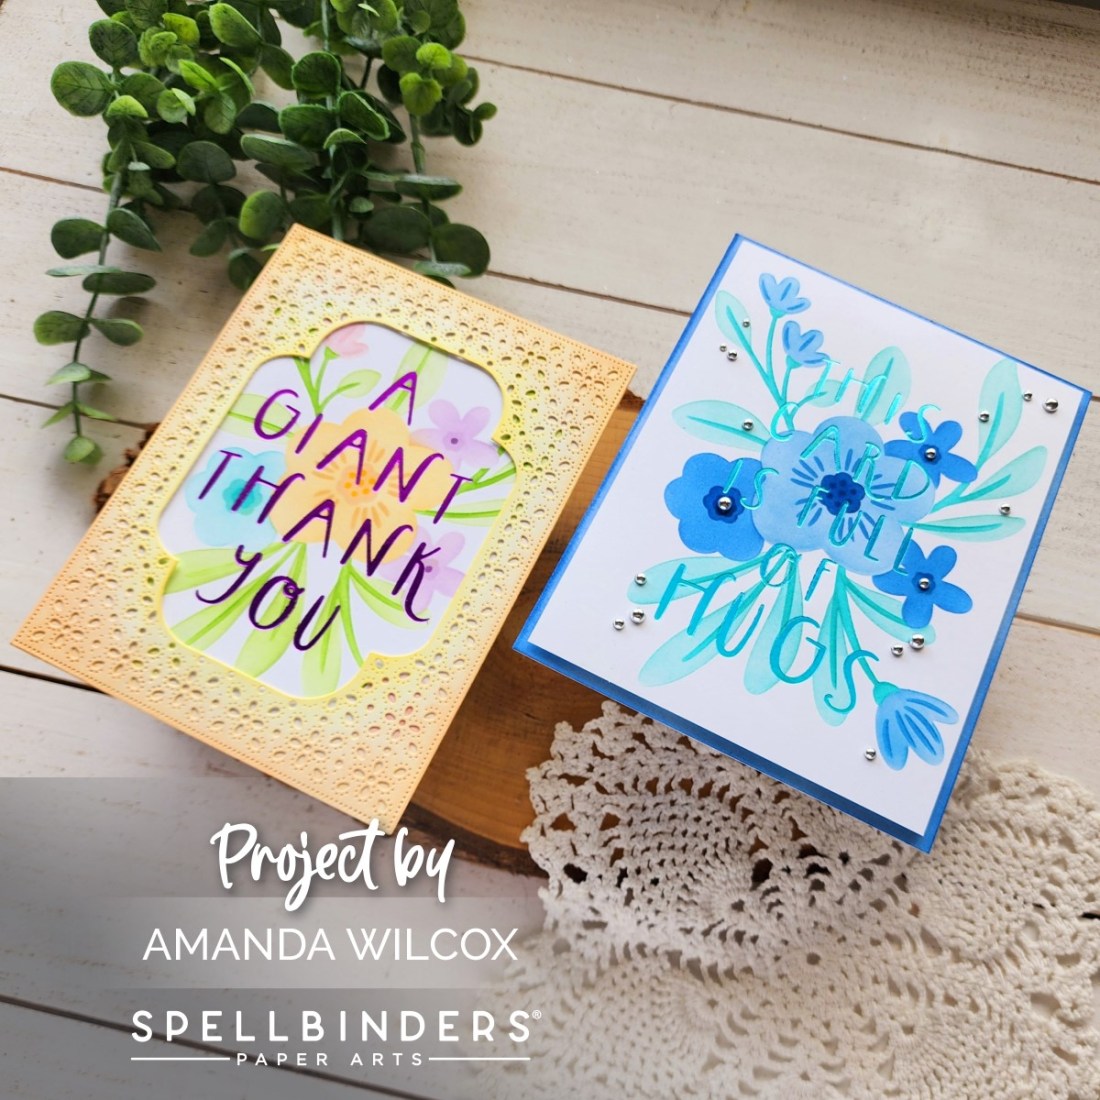
Hi crafty friends. Today I have a pair of cards using the Spellbinders Glimmer Cardfront Collection. This is a small collection with large hot foil sentiments and a beautiful layering stencil. The stencil also has a coordinating die available if you weren’t going to hot foil sentiments over the top. I used it in my card earlier this month. Today I have two cards featuring the hot foil sentiments though.
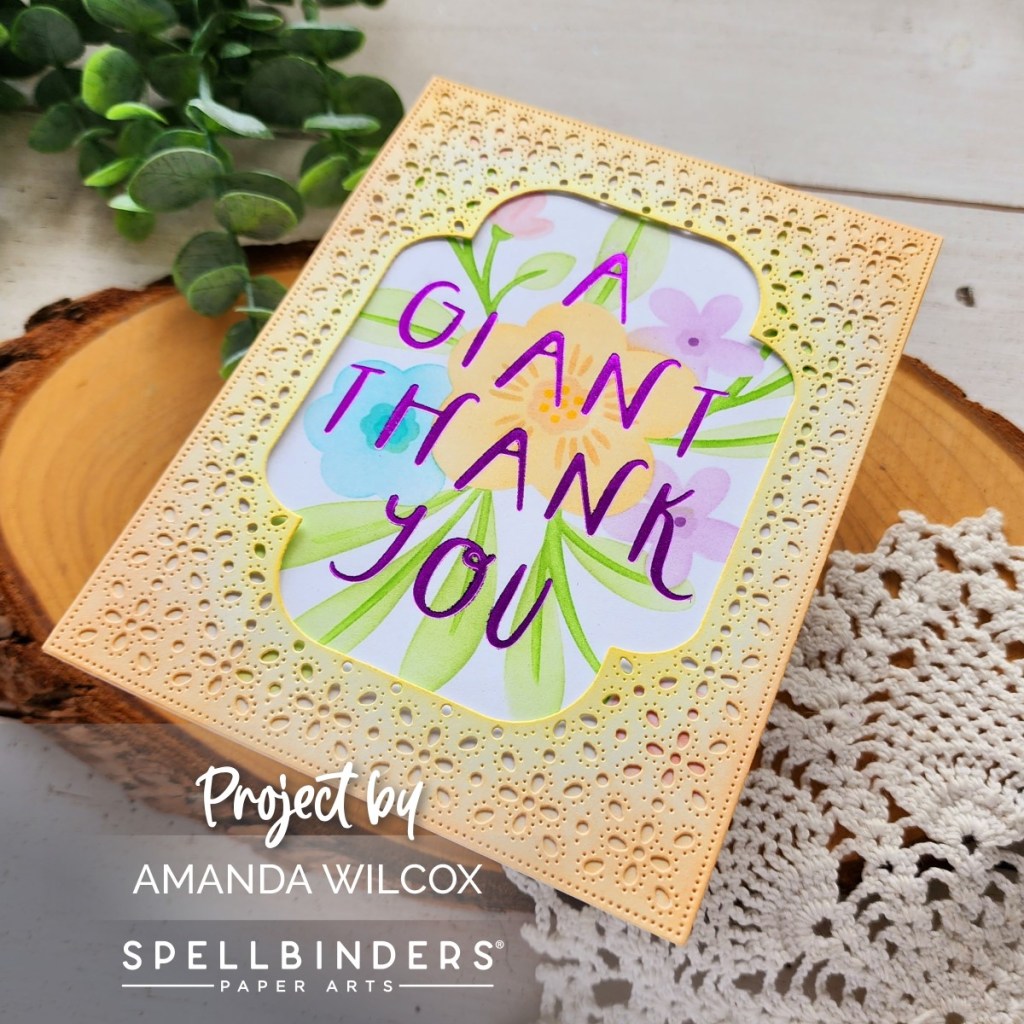
I started with the card on the left because I wanted to pair the stenciled panel with the die cut frame you see and that sentiment fit so perfectly, I couldn’t ignore it.
So, I inked up the Hello Blooms stencil on a piece of white cardstock and then used my Glimmer Foil Press to hot foil the Giant Thank You sentiment over the top of the stenciling. Then I die cut the Scrolled Punch and Pierce Plate from white cardstock. I inked up the inside edge of the largest frame with yellow ink and then glued it to the foiled panel. I didn’t like how much white there was so I went around the outer edge with the same orange ink I used on the flower in the stenciling.
Once that was how I liked it, I just glue the panel to a card base and my card was all finished. I really couldn’t believe how cool this looks and how easy it was to create.
So I couldn’t stop at just one and wanted to try some non-traditional colored flowers next. Why not?!?
This one turned out so pretty! After stenciling the flowers, I hot foiled my sentiment and trimmed the panel down to 4×5.25 inches. I was going to pop it up on a white card base but there was too much white for me. So I simply took the same blending brush I used for all the blue flowers and inked up the edge of a white card base with whatever ink was left.
Then I popped the panel up with foam tape for a little dimension. For this card, I thought it would be fun to add some silver baubles for added shine and interest. I seriously love it! Don’t you?!?
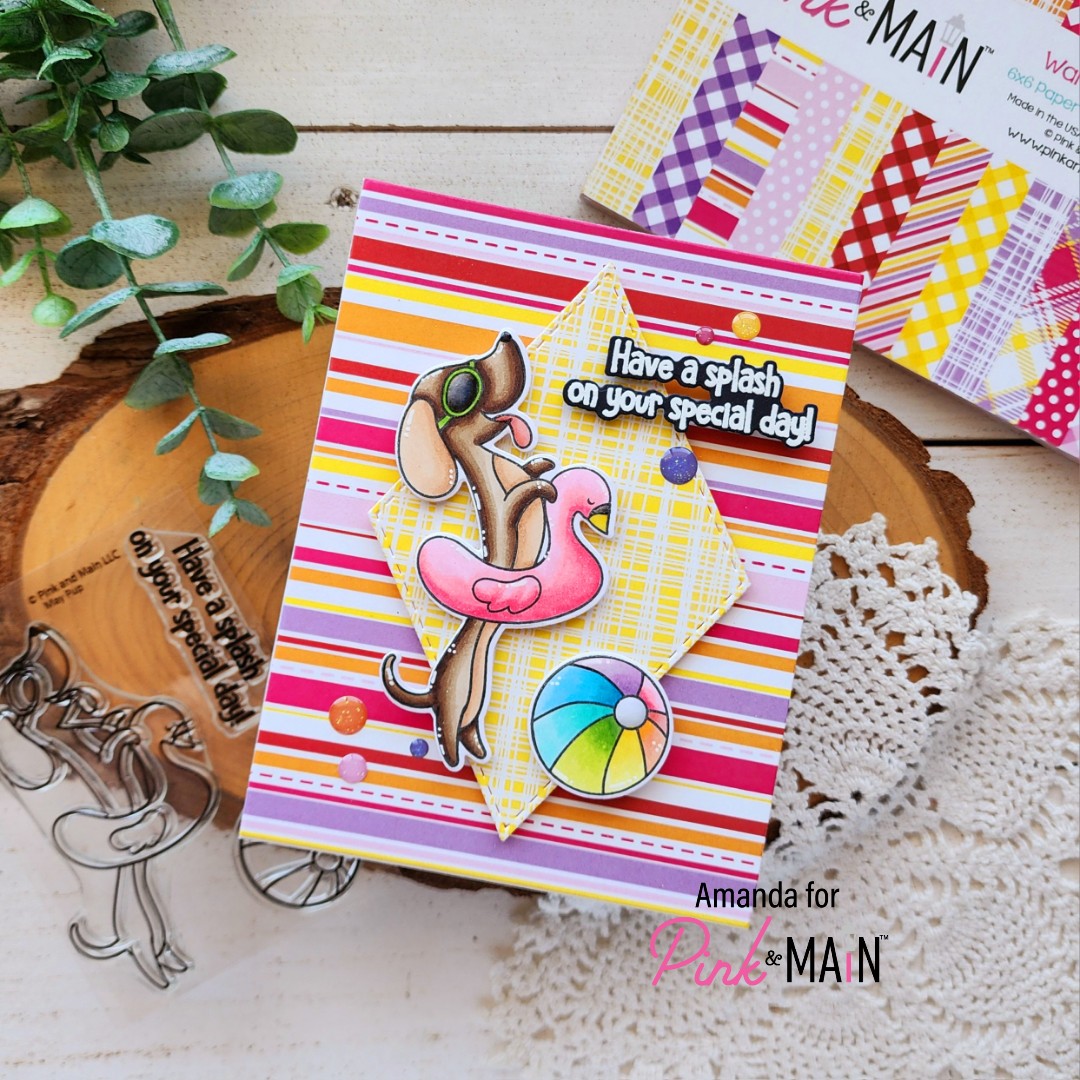
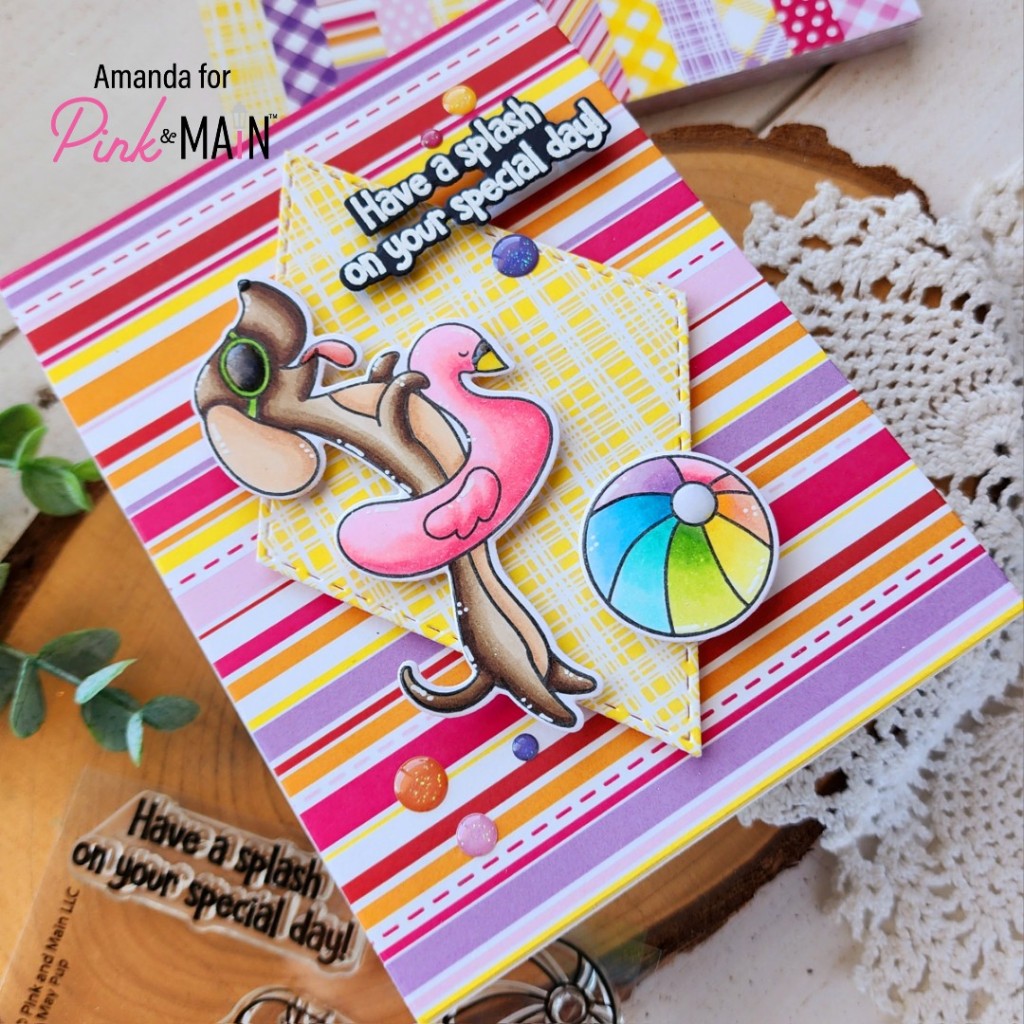
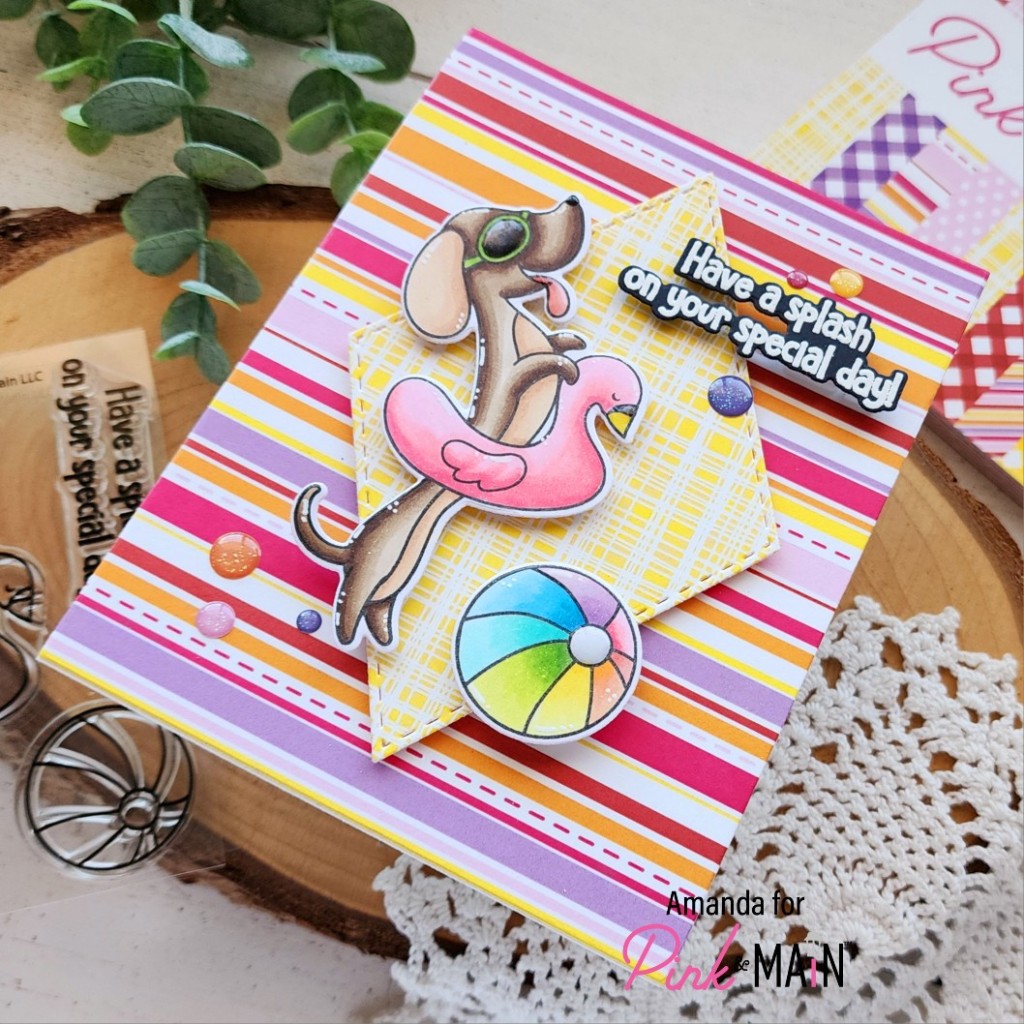
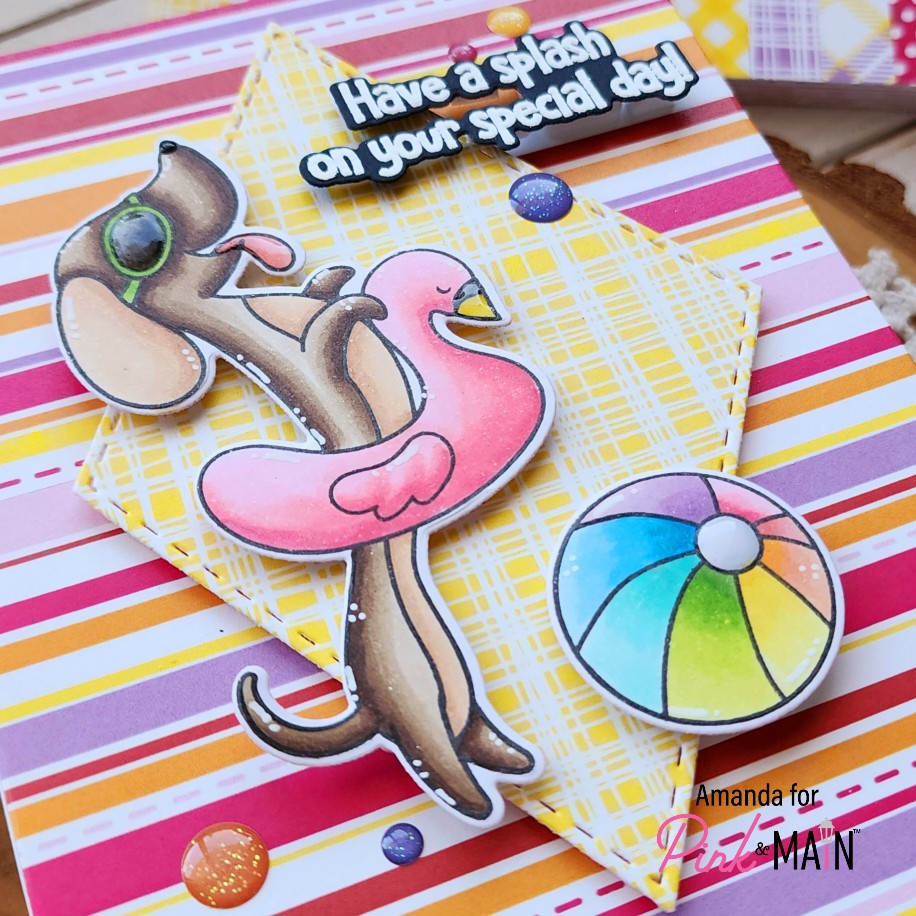
Hey friends! I’m over on the Pink & Main blog today with some sweet doggo inspiration featuring the May Pup stamps and dies. If you’ve followed since January, you’ll know that this set is a gift with minimum purchase for a short time after each release and then it’s also available in the shop if you just want to pick it up. They are themed for each month and are absolutely adorable!
I stamped and colored the pup and his beach ball with copic markers before using the coordinating dies to cut them out. Then I grabbed the new Warm Basics paper pad and chose a couple of fun patterns for my background. I cut the yellow from the third-to-largest Stitched Diamond die and used the largest Layered Rectangle on the stripes.
Next, I stamped and heat embossed the sentiment from May Pup and used the coordinating die to cut it out as well. Can we just take a moment to say how AWESOME it is when die sets also have the match for sentiments?!? I love it so much! It seriously makes my day.
Now that everything is ready I started assembling my pieces. I glued the stripes to a white card base with EZ Squeeze liquid glue. Then I popped the diamond up with foam tape. Next I added the pup, beach ball and sentiment with foam squares. Be sure to double your foam where they overhang the diamond so they still lay nice and flat. This only equaled like 2 1/2 extra foam squares and it’s totally worth it!
Now that this pup is ready for fun in the sun, I moved on to finishing touches. Today I added Touch of Gloss to the sunglasses, beak on the floaty and center of the beach ball. It just gives a little shine to everything which catches your eye in the light. Then I added white gel pen highlights to all the images. Finally, I added a scattering of Pretty Posies glitter enamel dots. I love that they match the paper pad so perfectly!
Are you ready for fun in the sun? I really am! We’re taking the longest camping trip ever (I think) for July 4th and I’m so excited I think about it every day and it’s a month and a half away still!
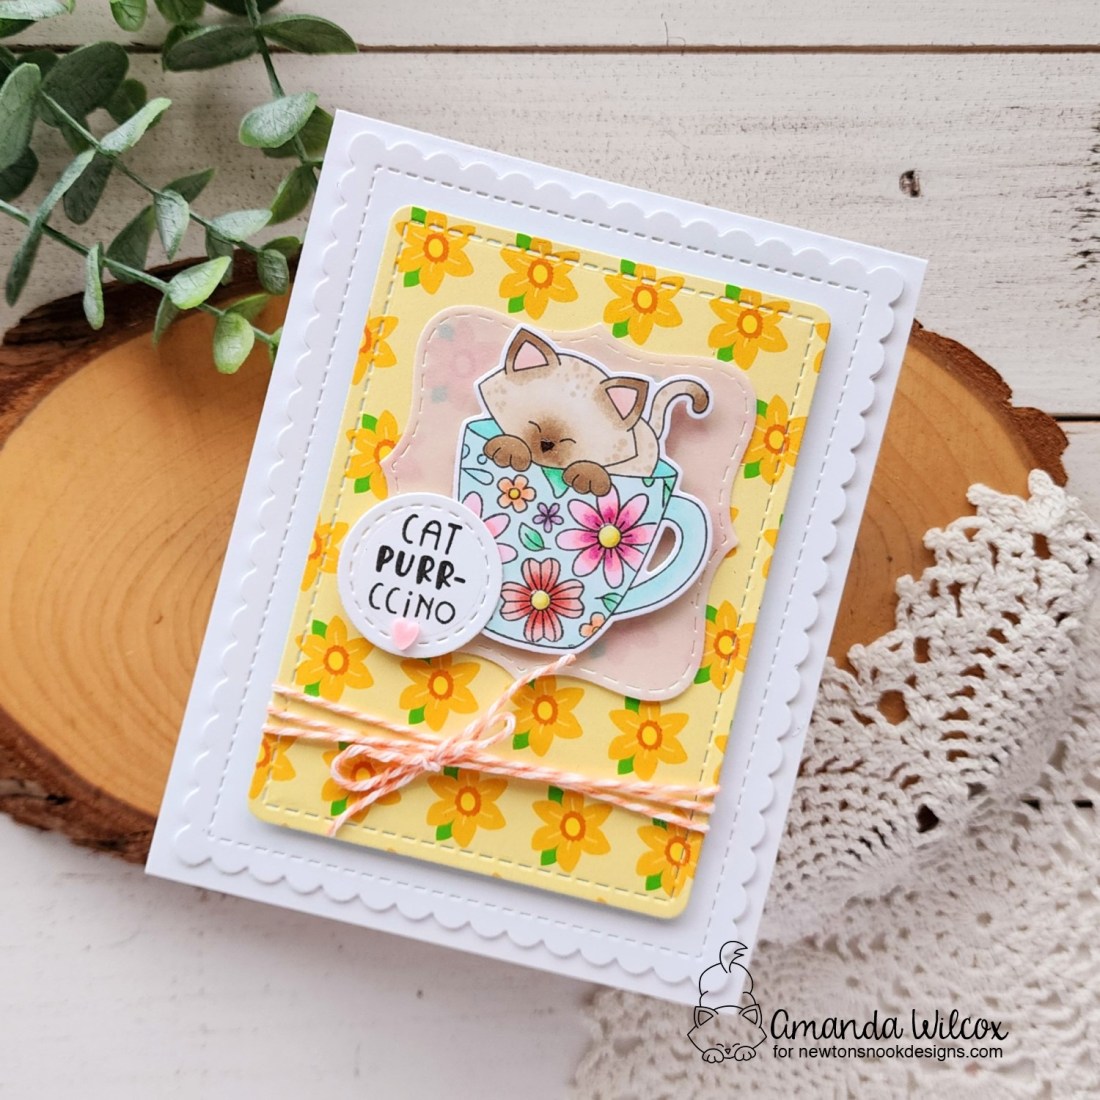
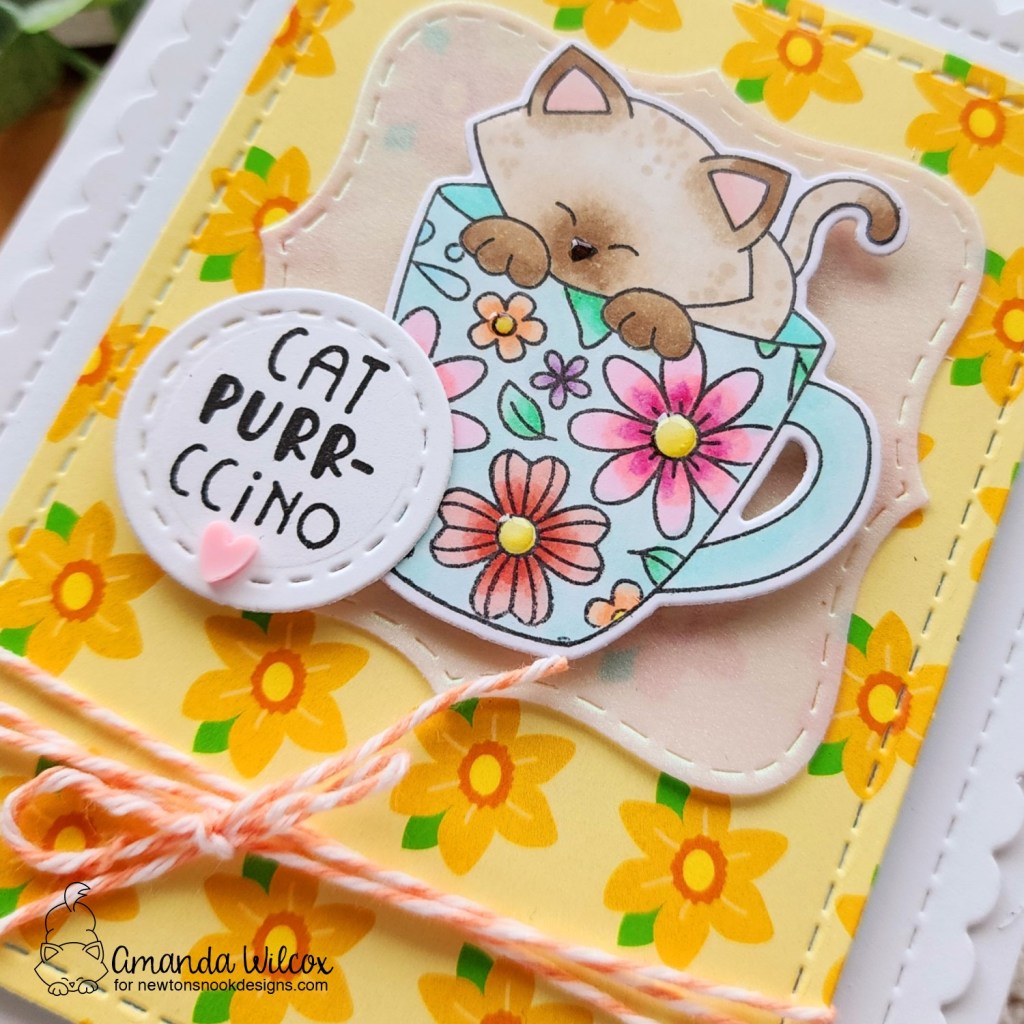
Hello everyone. I’m so happy to be on the Newton’s Nook blog again. This time I’ve been in the mood for coffee themed cuteness so I pulled out Newton’s Mug and decided to play around with it.
I started by stamping the main image from Newton’s Mug. Then I used masking paper to mask off everything except the main part of the mug. Then I stamped the Floral Roundabout on that to create a gorgeous floral coffee mug. Wouldn’t you just love to have this in your cupboard?!? I would! Next, I used my copic markers to color everything in before cutting it out with the coordinating die.
I used the smallest circle die in the Frames Squared set for my sentiment and then the cool label shape from iridescent vellum for a base under my Newton image. Next, I pulled out the Frames & Flags dies to cut the rounded rectangle from a piece of paper in the Spring Blooms paper pad and a white scalloped rectangle to go under that.
Assembling my layers was simple. I worked top down. Foam squares attach the sentiment and Newton to the vellum label. Then I knew where I could hide tape runner to attach that to the floral panel. I tied peach twine around the bottom part of that and tied it in a bow before adding foam tape to the back, avoiding the twine area so it lays flat. That is attached to the white scalloped rectangle with the foam tape and the whole thing is glued to a white card base with liquid glue.
For finishing touches I used Touch of Gloss on the flower centers and Newton’s nose. Then I glued one pink clay heart under the sentiment from the Twiddler’s Nook sweethearts mix.
I would love to know what you think about the masking on the mug and if you’ve ever tried anything like that before. Share your ideas below!
Hello everyone! I’m excited to share but sad at the same time that this is my last week guest designing for Doodlebugs. It’s been really fun creating with Mama Elephant goodies to share with you and I always love shopping at Doodlebugs, so I’d say that’s a win!
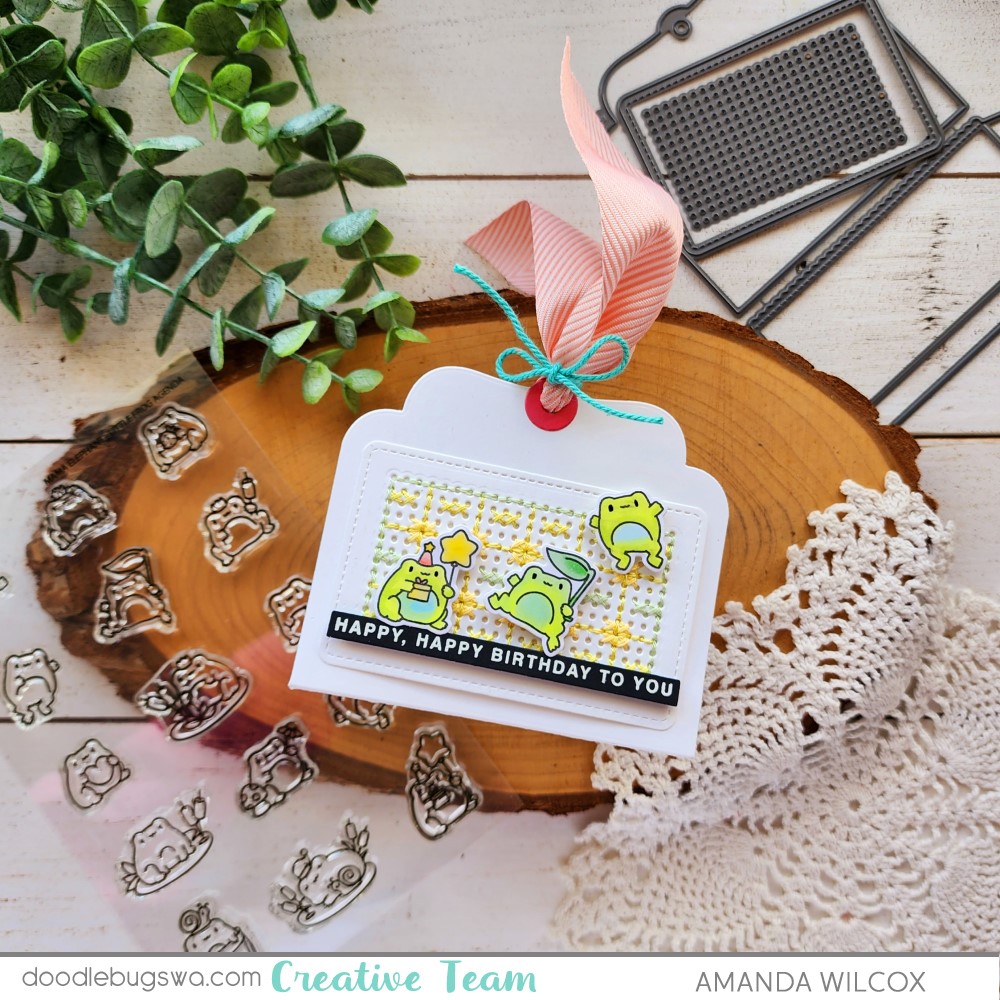
Today I’m sharing a fun gift card holder featuring the Little Agenda Froggy, Gift Pocket Tag dies and Easy Sentiments. I love that the gift pocket tag has a panel you can optionally add stitching holes to if that’s your thing. I love stitching on these small areas for a bit of relaxation in front of the TV.
The first thing I did was die cut the card and stitching holes, then chose some embroidery floss and started playing. After having to undo what I stitched because the math wasn’t right, I drew out a grid and started playing to make sure my pattern would work. Once that was decided, I stitched the panel up and glued it to my gift card holder tag.
Then I stamped and colored a few frogs from the Little Agenda Froggy stamp set and used the coordinating dies to cut them out. Next, I stamped and heat embossed a set of sentiments from Easy Sentiments and used the coordinating die to cut them out. This set is fun because you stamp and cut three sentiments at once.
I added everything with foam squares and flipped my project over to decorate the other side next!
On this side, I inked the white panel with yellow ink and a blending brush before popping more cute froggies up with foam squares. Then I glued another sentiment down with liquid glue. I did this so the card won’t get caught going in and out of the slot.
Next, I cut a hole reinforcer for both sides and glued them in place. I threaded ribbon through the hole and tied it with twine.
For finishing touches, I added black glaze pen to all the frog’s eyes and glossy accents to parts of the images like the heart, flower center, strawberry and balloon.
In case you like the idea of stitching on this panel but aren’t sure where to start, I created an idea sheet with six different patterns that are sized perfectly for this Gift Pocket Tag die set. Click HERE to download it.
Products used today: Mama Elephant Little Agenda Froggy stamps and dies Mama Elephant Gift Pocket Tag dies Mama Elephant Simple Sentiments stamps and dies Lawn Fawn butter ink Blending brush Foam squares Double-sided adhesive – 1/4″ Sakura black glaze pen Glossy accents Copic markers
I hope you enjoyed these projects and found some inspiration to create something wonderful to share with someone! I appreciate you sharing your time with me. Have a fabulous day!
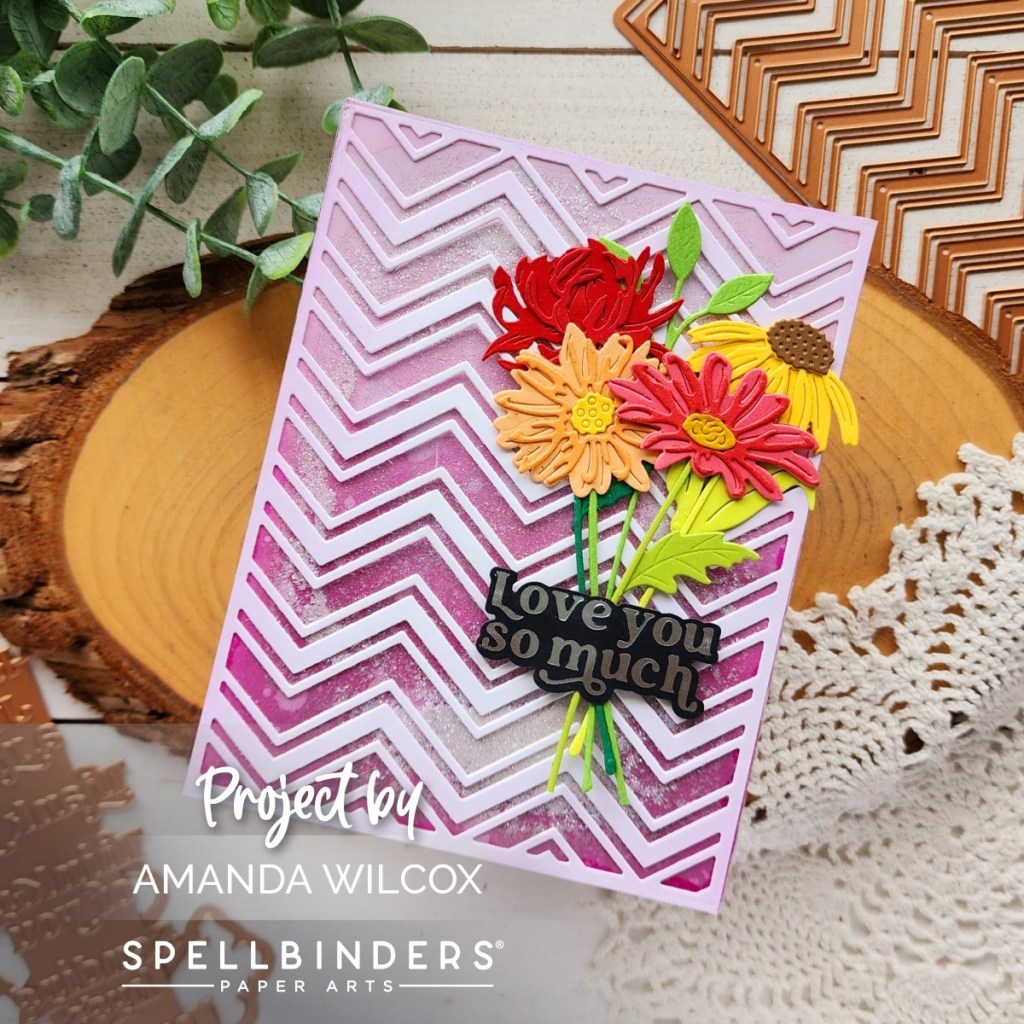
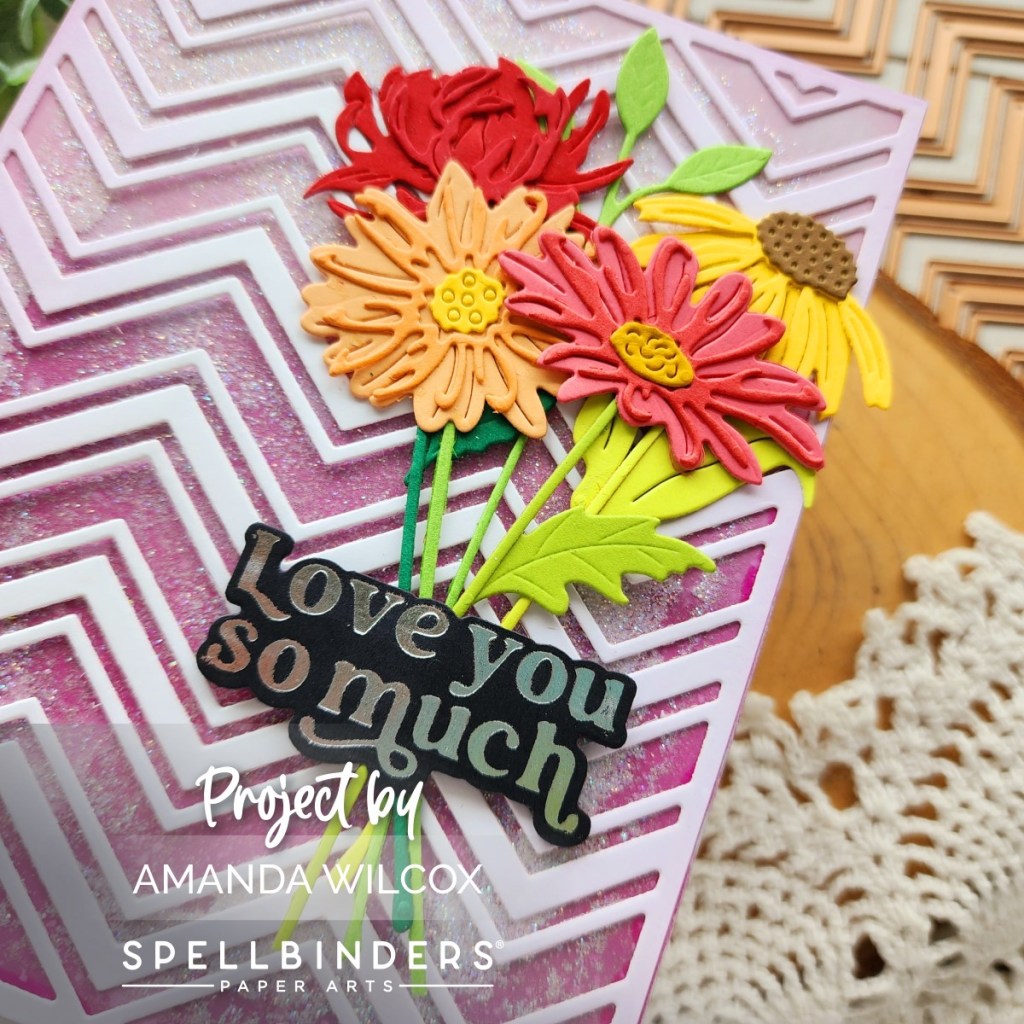
Hello everyone. I’m back with another card featuring products from the Spellbinders Photosynthesis Collection from Simon Hurley. The products are so different but work amazing together. Today I used a background die, floral dies and a hot foil sentiment. I even made it a flat shaker with super fine glitter that moves around behind the chevrons.
I started by inking up an A2 piece of white cardstock with light purple ink around the edges. Then I cut it with the Zig Zag Chevron cover plate. I added a piece of acetate to the back with liquid glue. Then I inked another piece of cardstock with seedless preserves and milled lavender distress oxide ink. I spritzed the panel with water and blotted it dry. Next, I sprinkled some super fine glitter on the panel and sealed it up with liquid glue adhering the chevron panel on top.
I chose some colors and started die cutting florals from the Floral Stems die set and used liquid glue to adhere the layers together, and then added them to stems with leaves. I gathered them together in an arrangement so you could see them all and glued them to the card front.
Finally, I added a hot foiled sentiment from the Must-Have Sentiments glimmer hot foil plate and die set. This set is top on my favorites because it hot foils and die cuts multiple fantastic sentiments all at once. I love having a stash to choose from when I’m running out of time and need something extra to add to my card.
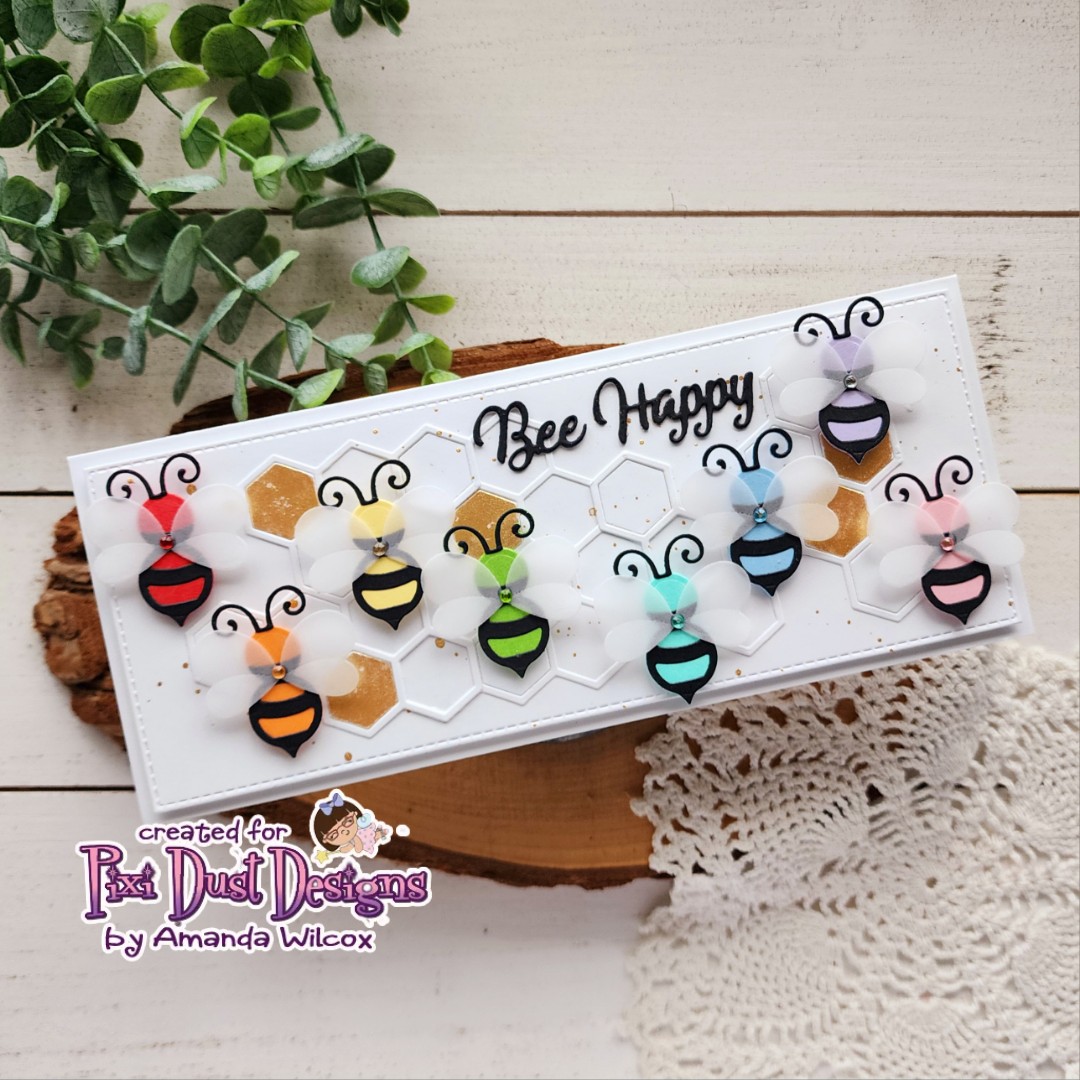
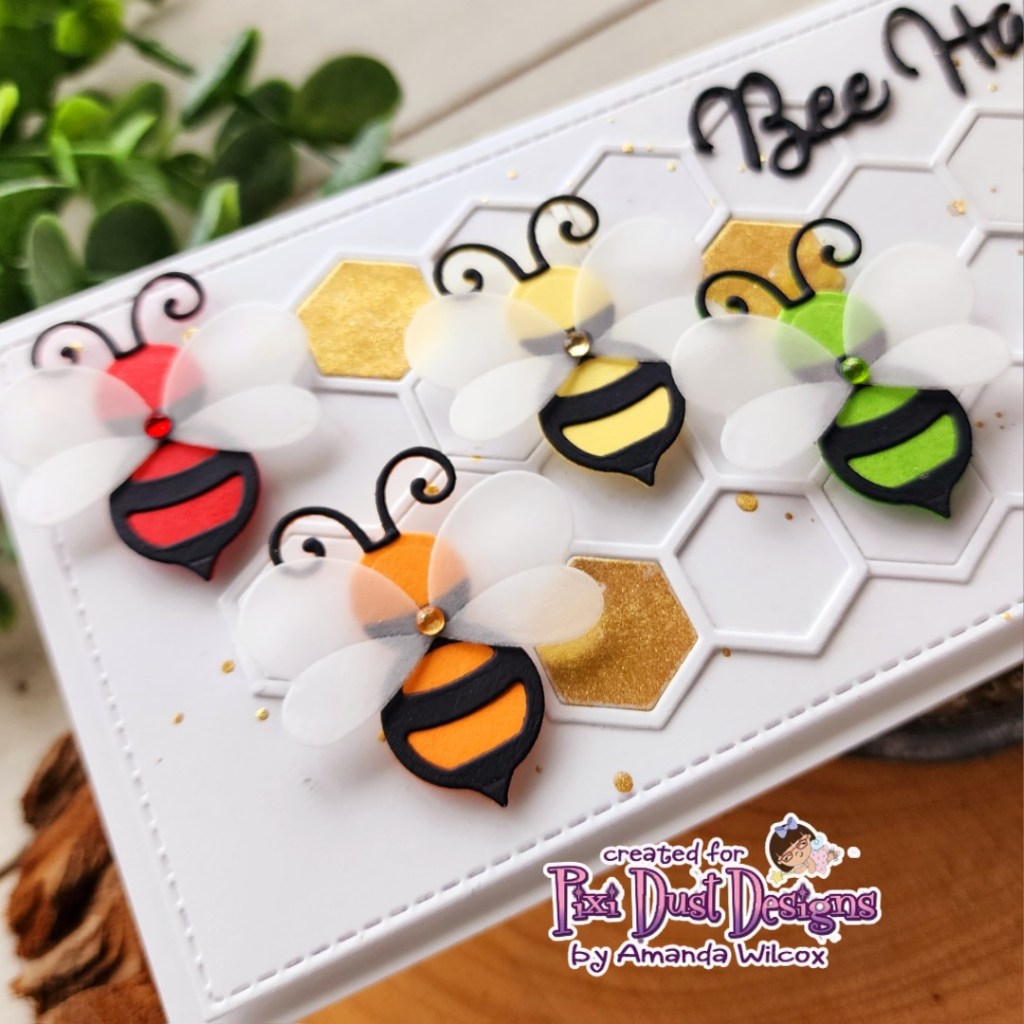
Hey there crafty friends!!! It’s release day for Pixi Dust Designs and I have a SUPER fun slimline card to share with you today using the new Bee Happy die set. These guys are so fun and this die set is packed with lots of options to play around with too.
I started by cutting out all the pieces to my rainbow bees. The wings are cut from vellum and everything else from cardstock. Then I used liquid glue to adhere the cardstock pieces together. I added the wings with glue dots and then covered the glue dot up with a color coordinating gem. I absolutely LOVE how these turned out!
For my background, I cut a slimline stitched panel using the next-to-largest die in the Stitched Rectangle Slimline die set. Then I cut the honeycomb piece in Bee Happy three times. I arranged them different ways and glued them together where they overlapped. This way I had one long piece of honeycomb for my background. I glued that down with liquid glue and then added some of the hexagon pieces that pop out of the frame inside random openings. Next, I splattered the panel with gold watercolor.
While I was doing that I thought it would be cool to paint some of the leftover hexagons with the same paint and insert those too. This turned out so cool. I couldn’t love it more!
The die set also comes with a “Bee Happy” sentiment that is so punny and fun. I cut it from black cardstock three times and glued the layers together with liquid glue. I set it where I thought I wanted it to go while I decided final placement of the bees. Once it was laid out, I glued the sentiment down with liquid glue.
Then I added my cute bees with foam squares one at a time…enjoying that sweet bee rainbow so much! Last, I added the stitched panel to a white card base with foam tape for even more dimension and interest.