Pink & Main – You Party Animal with Flock and Glitter

Welcome everyone! Thanks for stopping by. Today I’m over on the Pink & Main blog with a fun birthday card featuring the super fine glitter, flock and sparkling flock too! It’s definitely got bling and texture everywhere!

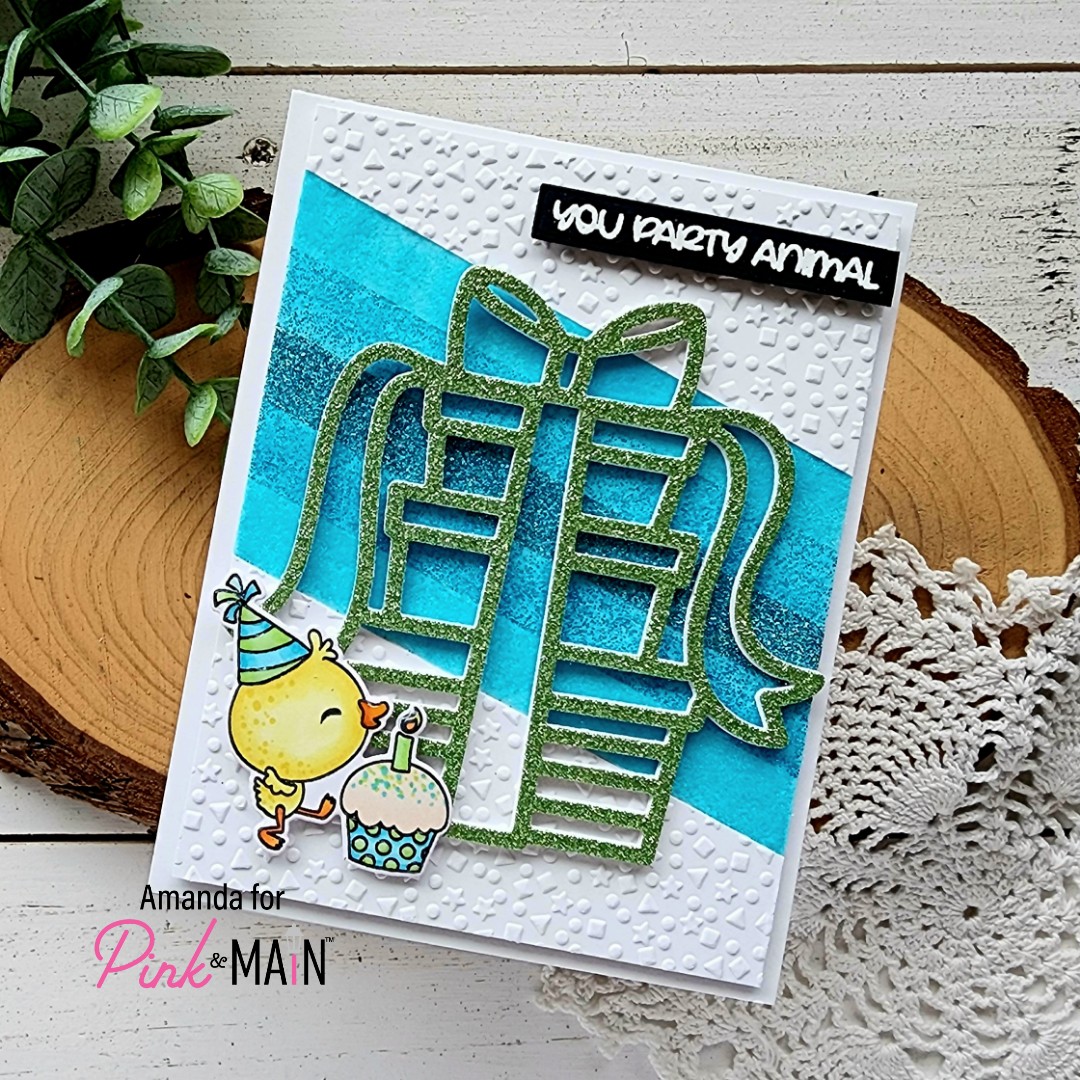
I started my card wanting to play with that really fun stack of gifts die cut from a few releases ago. I hadn’t gotten a chance and today a fun idea struck me. So I cut the stack from white cardstock 3 times and glued them together with EZ Squeeze liquid glue.

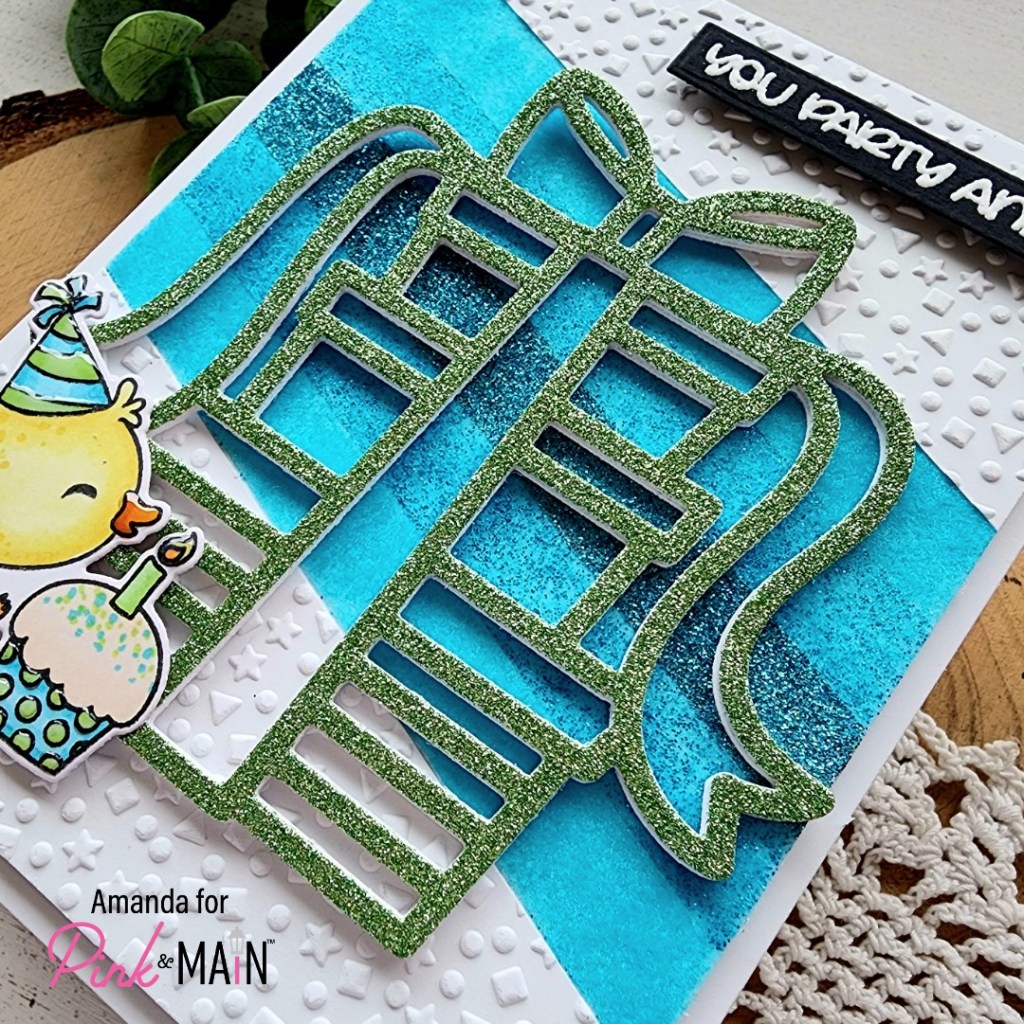
Next, I took a white panel cut down to 4×5.25 inches and the EZ Tear Tape that is 1/2 inch wide. I added strips of the tape at an angle across a few inches of the panel. I used my bone folder to really burnish the adhesive tape down and then removed the release paper one strip at a time starting with the center and working my way out. First, I added ocean wave super fine glitter, then I switched to sparkling fuzzy monster flock with glitter and finished the outside strips with fuzzy monster flock.

Next, I took another white panel and embossed it with the confetti embossing folder. I cut it in half at an angle and adhered it on either side of the flocked strips with liquid glue. After the glue was dry, I trimmed off anything hanging over the edge. This panel was so cool on it’s own, I was tempted not to cover it with anything! Haha.

However, there was the matter of that fun stack of gifts. So I started playing with placement and digging in my stash to see what I wanted to pair with it. That was so much fun! I ended up landing on this sweet duck from Party Animal. I stamped and colored him with copic markers, then used the coordinating die to cut him out. Next, I stamped and heat embossed a sentiment from the same set and used the cool sentiment strip dies in the Sunny Greetings die set to cut it out.

When I started laying out my design I thought the white stack of gifts was lacking. So I went digging again and found this awesome green glitter paper from the Spring Glitter paper pad, cut it out and added it to the top. Perfection! I added the gifts to the panel with liquid glue and put a giant acrylic block on top while it dried because of all the texture underneath.

Then I added the sentiment strip with foam and the duck with a combo of foam and liquid glue. Finally, I popped the whole thing up on a white card base with foam strips and added a little touch of glossy accents to the image for some shine.

Products used today:
Party Animal stamps and dies
Sunny Greetings dies
Confetti embossing folder
Stack of Gifts die
Super Fine Glitter – ocean wave
Flock – fuzzy monster
Flock with Glitter – fuzzy monster

Spring Glitter Paper Pad
EZ Squeeze liquid glue
EZ Tear Tape – 1/2 inch
Foam tape and squares
Glossy accents

I appreciate you sharing your time with me. Have a fabulous day!

Newton’s Nook – National Scrapbook Day

Happy National Scrapbook Day! Today Newton’s Nook Designs is celebrating with NEW dog and cat themed papers and dies! These new products are available NOW in their shop! Plus, there is a FLASH SALE TODAY! Save 20% off today only with code SCRAP22 at newtonsnookdesigns.com.

About a month ago now, we lost our beloved pup, Bailey. It was quite unexpected and I’ve been devastated to say the least. Having this event come up gave me a great time to sit on my own and go through pictures of him, remembering to awesome adventures we had. I am not a scrapbooker at all but I was able to create a fun 12×12 page using the new A Dog’s Life paper and the new dies too. I hope you like it.

These photos are from a little evening trip to the park across the street from our house last summer. He was so happy to be anywhere as long as his humans were with him. We were taking turns playing volleyball and laying in the grass with him. It was a fun night.

For my design I used the fancy edges tags to create some visual texture to go with the silhouette images on the left. Then I cut a couple strips of kraft cardstock and inked them up with the petite paws stencil for a tone-on-tone texture there. I also used the grass die in the land borders die set to cut a strip of grass which seemed fitting.

I framed the photos with some of the paper from the pad and couldn’t resist using the speech bubble sheet as a background panel too! It’s so much fun!

I pulled out the paw shaker die set and used it for a few elements – the large paw here, those fun little bones and the woof die cut too. I used the essential alphabet dies to cut his name from black cardstock and added it to the grass border.

After everything was assembled, the page looked too flat for my general taste so I took a blending brush and shaded the edge of the whole page with gray ink.

I’m really happy with how this turned out and hope to be ready to display it somewhere soon.

Products used today:
A Dog’s Life paper pad
Dog Silhouette dies
Pawprint Shaker dies
Essential Alphabet dies
Land Border dies
Petite Paw Prints stencil
Fancy Edges Tag dies
Bearly Art liquid glue
Blending Brush
Lawn Fawn narwhal ink

Remember there is a flash sale going on today only. Don’t miss out!

Check out the blogs of these Design Team Members for more inspiration:

Newton’s Nook Designs
Donna Idlet
Ellen Haxelmans
Farhana Sarker
Larissa Heskett
Samantha Mann
Zsofia Molnar
Tatiana Trafimovich
Amanda Wilcox

I appreciate you sharing your time with me. Have a fabulous day!

Coffee Loving Cardmakers – Spring | Summer Coffee Lovers Blog Hop

Hey friends! We are very excited to be a super sponsor of the Coffee Loving Cardmakers Spring | Summer Hop! Here’s a little overview of some of the crafty products that we sell. Be sure to check out the shop to see everything available and check out the sale we have going on as well!

Pressure Pal

Magnetic Die Stands and Trays

Embellishment Trays

Embellishments

And lots, lots more too! We also have a few new products in the works that we hope to release this year. Be sure to subscribe to the blog and follow us on social media – Instagram and Facebook.

For today’s giveaway, you have multiple entry possibilities.

  1. Leave us a comment. Anything you want.
  2. Follow us on Instagram and leave a comment that you do.
  3. Follow us on Facebook and leave a comment that you do that too.
  4. Share an idea for a craft tool that we could create or embellishments that you would like to see us carry.

Don’t forget we’re having a sale during the hop too!

Commenting is closed for the giveaway.

Next in the hop line up is InkOn3! Click HERE to head to their hop post! If you get lost, click HERE to head to the CLC page and reorient yourself.

Miss Ink Stamps – To Perk You Up

Welcome friends! Today I have a bit of caffeinated inspiration featuring stamps and stencils from Miss Ink Stamps. Tomorrow is the start of the Coffee Loving Cardmakers Spring | Summer Hop and I wanted to get you warmed up today!

To start this card, I had an idea in my head, so I pulled out my stamps and laid them on a card from to see if things would fit the way I was hoping. It seemed to work out so I stamped everything and colored the images with my copic markers. I used the scan-n-cut to cut them all out and arranged them in layers, using liquid glue to adhere small bits together at a time.

Once I had the general shape of my images together I pulled out an A2 panel and inked it up with cracked pistachio and mermaid lagoon distress oxide inks. Then I layered the Springtime Lace stencil over the top and added another layer of the same colors over the top. I spritzed the panel with water and then gold watercolor and set it aside to dry.

Once the panle was dry, I trimmed it down to 4×5.25 inches and added it to a white card base with liquid glue. I added the images with a combo of liquid glue and foam squares next. Finally, I put the whole card in my MISTI and carefully stamped my sentiment nestled in beneath the banner.

For finishing touches I added some glossy accents to parts of the coffee beans and berries on the branch. Then I added unicorn Stickles to the flowers and leaves.

Be sure to start at the Coffee Loving Cardmakers blog tomorrow and hop along for chances to win prizes at lost of stops, including Miss Ink Stamps and back here too!

Products used today:
Springtime Banners stamps
Springtime Lace stencil
Brewetiful stamps
Bubbles stamps
Distress Oxide – cracked pistachio and mermaid lagoon
Glossy accents
Stickles – unicorn

I appreciate you sharing your time with me. Have a fabulous day!

Jane’s Doodles – Scentsational Shadow Box Card

Hello everyone! Thanks for stopping by. Today I have a fun little shadow box featuring the Jane’s Doodles Stinks digital stamp set. These skunks are some of my favorites from Jane and I was all too happy to color them up for a spring themed card to share.

I printed my images and sentiment on white cardstock and colored them with my copic markers. I used a Pink & Main large sentiment banner die to cut out the sentiment and the scan-n-cut the cut out my images.

Then I used the Lawn Fawn shadow box die set along with the spring add on for the flower row in the back and park add on for the grass border and trees on the front. I used 1/8″ scrappy tape to adhere the box pieces and liquid glue for the images and details.

I always write my message on the back of these cards and thought it would be fun to continue the scene on the back this time too. I added another grass border by trimming off the tabs and that cute skunk!

I’m excited to share this card with someone for a fun, unexpected smile!

Products used:
Jane’s Doodles Stinks digital stamps
Pink & Main Large Sentiment Strip dies
Lawn Fawn Shadow Box Card dies
Lawn Fawn Shadow Box Card Spring Add-on dies
Lawn Fawn Shadow Box Card Park Add-on dies
Bearly Arts liquid glue
Scrappy Tape 1/8 inch

I appreciate you sharing your time with me. Have a fabulous day!

Coffee Loving Cardmakers – Hi Cutie

Happy Tuesday everyone! It’s time for tea over on the Coffee Loving Cardmakers blog today! I finally took a moment to ink up the adorable My Favorite Person stamp set from the last Mama Elephant release and it did not disappoint! SOOOOO CUTE!

I colored my critters first and then went in to the mugs and hearts with a bit of a muted rainbow palette just for something different. Then I chose a variety of the small sentiments in the set and heat embossed each heart with a different one.

Next, I stamped and heat embossed one of the regular strip sentiment on black cardstock and die cut it with a sentiment strip from my stash.

When it came to arranging my images, I kind of wanted the sentiments to read left and down to the right…so that’s what I did. I added that cute bear to the sentiment strip with a little liquid glue on his feet and popped them up with foam squares. Then I added the stack of mugs to the center and finished things off with the sweet fox and mouse on the right.

I added some teal strips to the top and bottom of my yellow dotted background and popped them up on a white card base. Then to finish things off and tie in the white card base I added some white clay hearts from the Twiddler’s Nook Sweethearts embellishment mix.

Products used today:
Mama Elephant My Favorite Person stamps and dies
Pink & Main Sunny Greetings dies (sentiment strip)
Bearly Art liquid glue
Twiddler’s Nook Sweethearts embellishment mix
Foam tape

I appreciate you sharing your time with me. Have a fabulous day!

Newton’s Nook – Designer’s Nook Newsletter Sneak Peek

Hello everyone! If you’re new here I want to make sure you have a chance to sign up for the Newton’s Nook Designer’s Nook Newsletter before tomorrow!

This is a subscriber only project that is sent directly to your inbox every Tuesday from the Newton’s Nook design team. Tomorrow is my turn and I’m super excited to share tips and ideas with you!

It’s really fun and even more adorable! So click HERE to subscribe if you haven’t already and I’ll see you tomorrow!

I appreciate you sharing your time with me. Have a fabulous day!

Pink & Main – Something Beautiful in Each Day

Welcome, welcome everyone! Thanks so much for stopping by today. I’m over on the Pink & Main blog playing with the latest release – mostly the new gorgeous heat embossing powders because these colors are everything!!! Oh my word, I love them!

Today I chose a sentiment from the new Here For You stamp set and heat embossed it in Grape Soda embossing powder on a tag. I cut a second tag from teal textured cardstock and tied them together with orange ribbon. I tied a bow and added to the top of the tag for a little decoration with EZ Squeeze liquid glue.

For my background, I just had to play with the new Ornate Tile embossing folder! It’s beautiful too! I embossed orange cardstock and used my blending brush to deepen the edge of the embossing with orange ink. I popped the panel up on a white card base and glued my tags in place next.

Wanting to add more color to my card and play with the embossing powders more, I smeared the embossing ink pad across a scrap of white cardstock and sprinkled the Bubblegum color of powder on it. I heated it up for a gorgeous swatch of the color. Then I used the small heart in the tag die set to create my own shiny embellishments for my card!

I added all of them with foam squares for some dimension and now my card is all finished. Isn’t it so pretty?!? I just love all these bright colors!

Products used today:
Here For You stamps
Ornate Tile embossing folder
Fancy Tag dies
Embossing Powder – bubblegum and grape soda
Embossing Ink
Ergonomic Blending Brush
EZ Squeeze liquid glue
Foam tape

I appreciate you sharing your time with me. Have a fabulous day!

Miss Ink Stamps – Wishing You a Magical Day

Hello there! Thanks so much for stopping by. Today I have a little inspiration featuring some magical products from Miss Ink Stamps. I pulled out the Lovely Unicorns because it had been a minute since I colored these beauties up and decided to pair some beautiful stencils together too!

I started by stamping my images out and coloring them with my lightest copic markers. I wanted to keep things soft and sweet for this card. Then I used the scan-n-cut to cut them all out.

Knowing the general design direction I was going, I trimmed a piece of white cardstock down to 2×4.25 inches and stamped my sentiment on the upper right side. I added 1/8″ scrappy tape to the edge and adhere a strip of silver cardstock to it. Then, I set this aside with my images while I worked on the stencil panel.

I have really been itching to try out the new On the Vine stencil to see how it was in person and I can’t even tell you how much I love it. It’s beautiful and is going to be so versatile with any images you try it with! Today I inked up a white piece of cardstock with light blue ink. Then I sprayed the stencil with Pixie Spray and stuck it down before adding another layer of the same color blue ink over the top. The moment I peeled the stencil away I was in love!

But thanks to my friend Lynnea, I just can’t leave these alone without trying to layer a little something over the top. Today for that added magical feel, I used the Sparkles stencil with iridescent Glitz Glitter Gel from Thermoweb for the perfect amount of magic!

Once the glitz gel was dry, I lined everything up to figure out final spacing and decided to trim the sentiment panel down to 1.5 inches and pop it up with foam tape. Then I added foam squares to the images and added them next.

For finishing touches I added unicorn Stickles to the unicorn horn and hooves and also the butterfly wings. Then I took my Wink of Stella glitter brush pen and added a little shimmer to the unicorn mane and tail too. You can’t have too much sparkle on a card like this, ever!

Products used today:
Lovely Unicorns stamps
Sparkles stencil
On the Vine stencil
Glitz Glitter Gel – iridescent
Stencil Pal
Pixie Spray
Foam squares
Foam tape
Wink of Stella glitter brush pen
Stickles – unicorn
Scrappy Tape – 1/8″

I appreciate you sharing your time with me. Have a fabulous day!

Lawn Fawn – Hay There Tiny Farm

Hi there! I’m popping in this afternoon to share a card I created last night with the Lawn Fawn Tiny Farm cuties and the Build-a-Barn dies. I just added these to my stash and had so much fun playing with them! I can’t wait to make a reveal wheel card with them next.

I stamped and colored all 4 characters from the Tiny Farm set with my copic markers. Then I used the coordinating dies to cut them all out. Next, I cut the pieces for the Build-a-barn and used liquid glue to put it all together.

I wanted to try something different for the background of my card so I chose 3 different scraps of yellow cardstock and one green and cut the strips for the Simple Stripes Portrait die. I adhered them to a panel with liquid glue two strips of each yellow and ending with the green on the bottom for my ground. I wasn’t a huge fan of how flat it all looked so I took my distress oxide blender for spiced marmalade and lightly inked up the edges of the yellow with just the ink left on it from last time I used it. Then I did the same for the green area with rustic wilderness. Then I splattered gold watercolor all over the panel.

I added the chicken to the window opening in the top and replaced the red cardstock that cut out of it behind him to help secure him in place. Then I added the cow with liquid glue, added foam tape to the back of the barn and popped it in place. I added foam squares behind the farmer and pig and added them next.

I wanted a larger sentiment than the one in the Tiny Farm set so I pulled out Hay There and used the same one from that set to stamp and heat emboss on black cardstock. I trimmed it into a strip and added it to the top left with foam squares.

For finishing touches I came in with the same gold watercolor as the splatters and painted the star decoration on the barn. Then I thought it would be fun to add a little speech bubble by the chicken in the top to make sure the recipient’s eye is drawn that direction to see the hiding critter.

I stamped and heat embossed that and the heart inside from Hay There and cut it out with the coordinating die. After popping it up with a foam square I also painted that heart with the gold watercolor to tie everything together.

Isn’t this adorable?!? I’m so tickled with the way it turned out. I just makes me smile!

Products used:
Lawn Fawn Simple Stripes Portrait die
Lawn Fawn Tiny Farm stamps and dies
Lawn Fawn Build-a-Barn dies
Lawn Fawn Hay There stamps and dies
Scrapbook Adhesives foam squares
Thermoweb foam tape
Bearly Art liquid glue
Distress Oxide – spiced marmalade and rustic wilderness

I appreciate you sharing your time with me. Have a fabulous day!