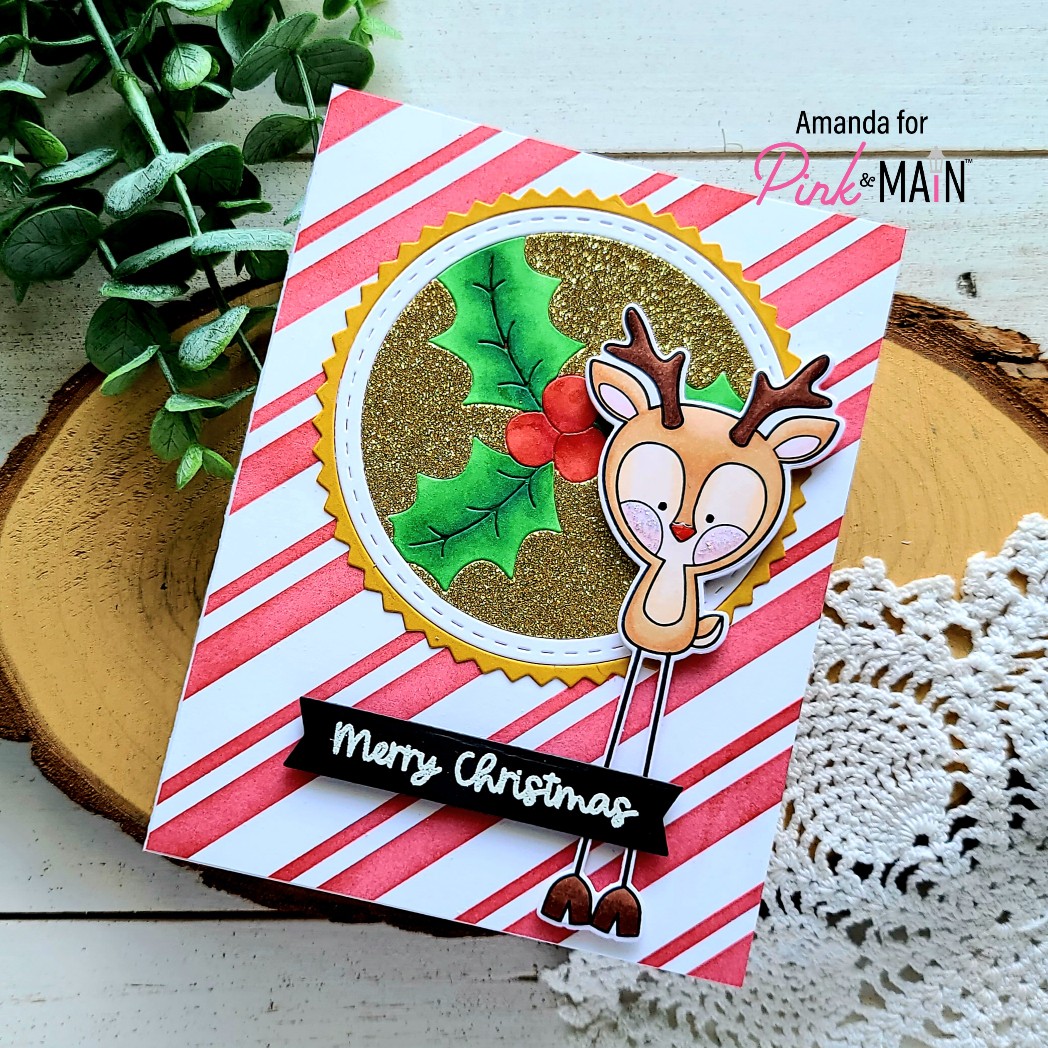
Hey friends! I’m over on the Pink & Main blog today sharing a fun sneak peek of multiple products coming in with the September release! You’re going to love it! This release is packed full! Like seriously, someone had to sit on that suitcase to zip it up for sure!
Okay seriously…more cute long legged critters!?! I’m dying! I just love them so much! This reindeer is perfect to add to the line up! And another paper piecing die that is just too fun to resist!
And don’t even think about skipping over that new stenciled background! Are we singing Christmas carols yet? This is so much fun!
Stay tuned to the blog for more sneak peeks and get ready because the release is available on Monday, Sept. 20!
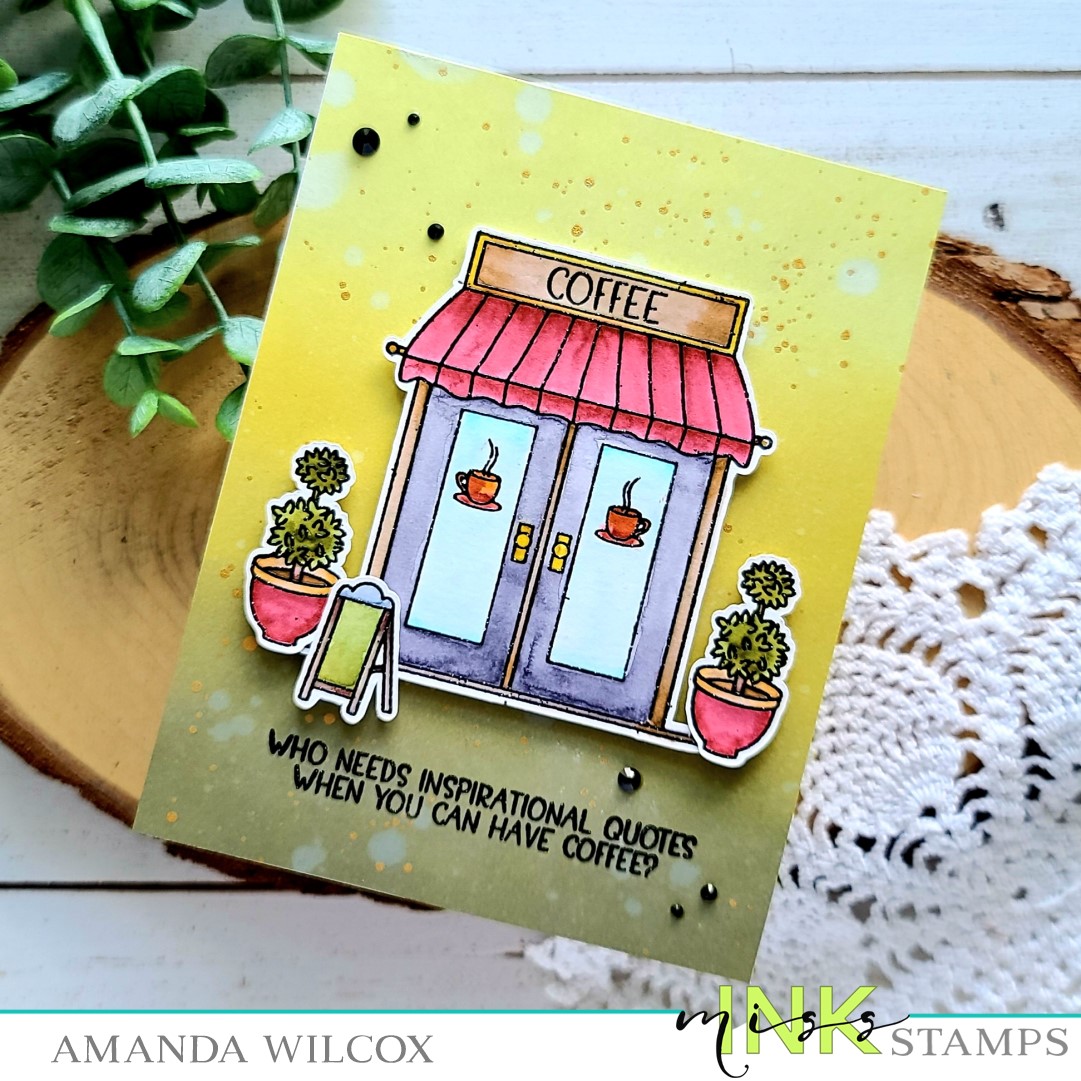
Hi there! I’ve got a fun Miss Ink Stamps card to share with you today featuring a mini scene from the Java Joe stamp set. I’m always drawn to using the main images in a set but sometimes I remember to look at it differently and use other bits and pieces too. That’s how today’s card came about.
I stamped and heat embossed images from Java Joe’s on Bristol Smooth cardstock and watercolored them with my copic markers. Then I used the scan-n-cut to cut them all out.
Next, I blended distress oxide inks on a panel and spritzed it with water. I flicked some gold watercolor across it and left it to dry.
Once it was dry, I trimmed it to A2 size and used my images as a guide where to stamp my sentiment. I used the MISTI to stamp it with VersaFine ink so it gave a really good impression over the distress oxides. Then I added foam squares to my images and plopped them in place.
For finishing touches I just glued down a scattering of black rhinestones from the Twiddler’s Nook shop.
I just love all the texture this card has between the watercolor and ink blending. It’s so great!
Welcome back to Day 2 of our Stampede Celebration! Today we are celebrating with the wonderful and inspirational winners from our Guest Design Call! We were totally blown away with all their projects and we are so very happy they can share their creativity again with us today! Not everyone has a blog so remember to also check our Instagram also!
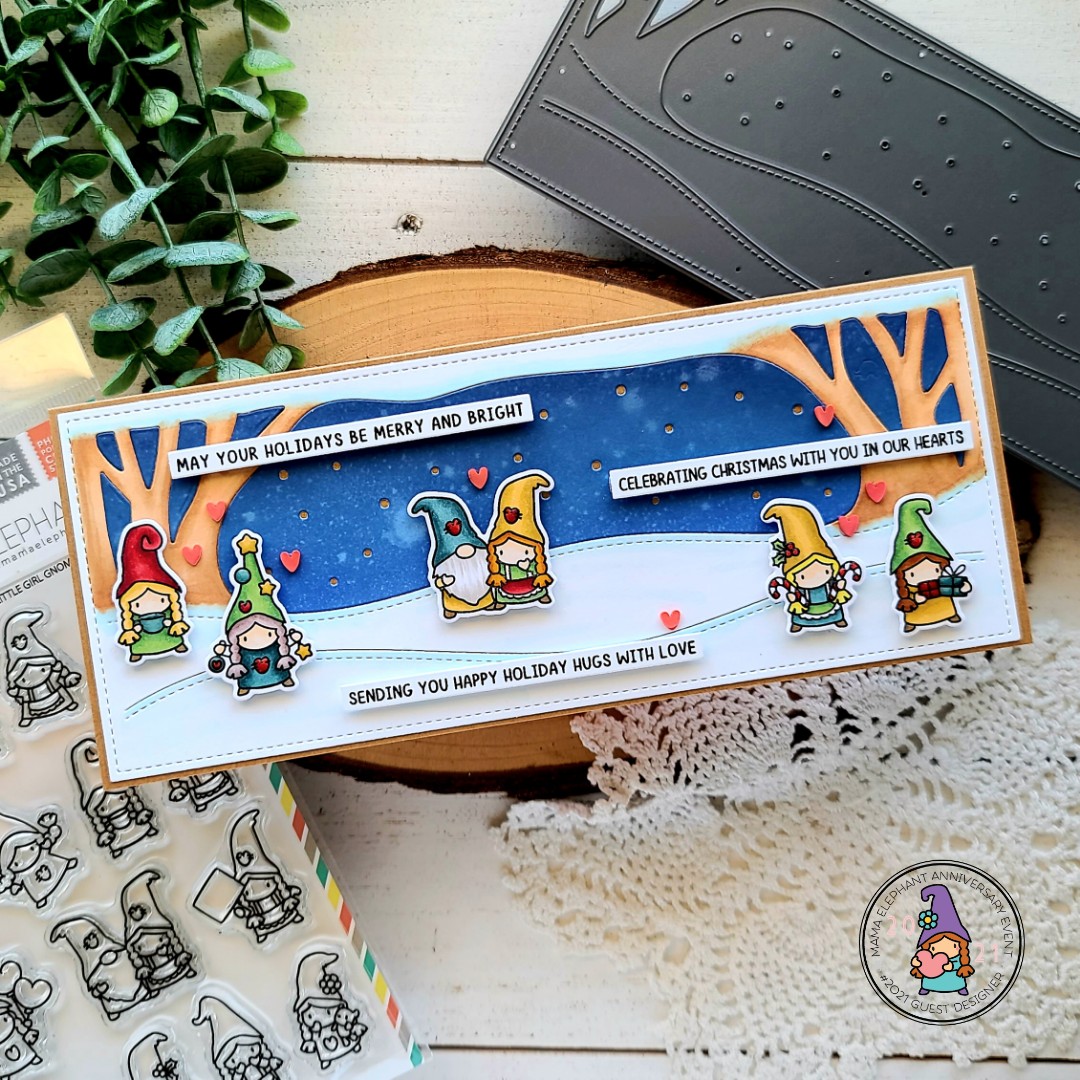
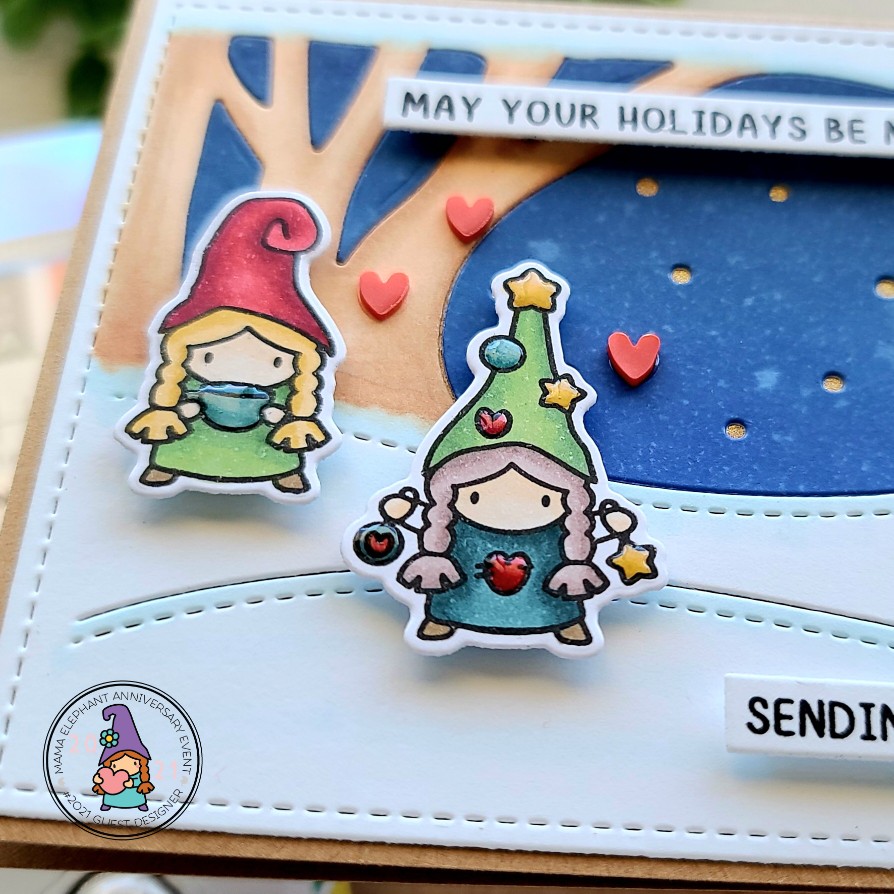
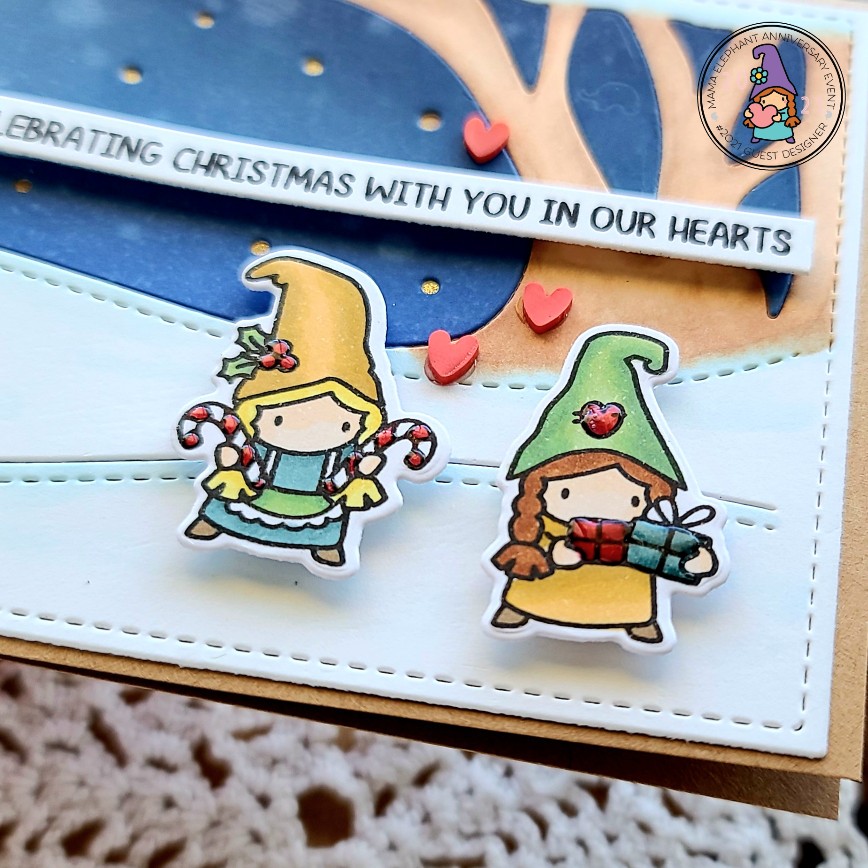
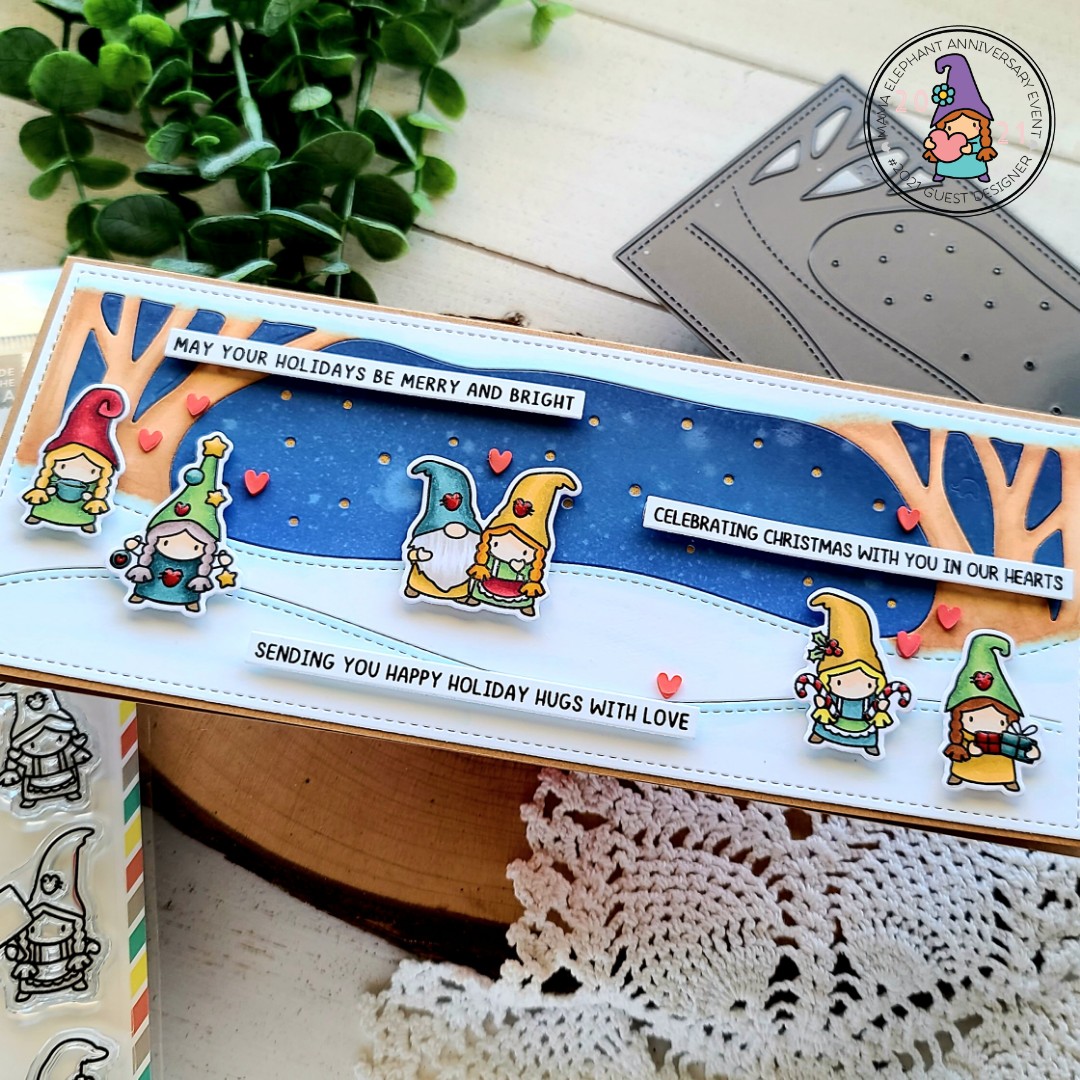
For my card today, I stamped and colored a variety of the sweet Little Girl Gnome Agenda images with my copic markers. I used the coordinating dies to cut them out. Then I stamped a couple of the new Easy Christmas Greetings and cut those out as well.
Next, I switched to die cutting the background from the Slim Woodland die. I cut it first from white cardstock and then I inked up a strip of white cardstock with Distress Oxide Ink in blueprint sketch, faded jeans and chipped sapphire. I spritzed it with a distress sprayer and cut the sky portion again.
Then I took the white background panel and colored it in with my copic markers, giving the snow a little glow and the trees some definition too. After creating a slimline card base from kraft cardstock I adhered the colored panel with liquid adhesive and then I paper pieces the night sky pieces in place.
To finish off my card, I added foam squares to the images and sentiments and popped them in place. I added some glossy accents details to all of the gnomes and also glued a scattering of red clay hearts around the design.
To celebrate the new release, Mama Elephant is picking a few winners to win their choice of stamp set!
Here is how you can win!
» 1. Leave a comment on the collective Design Team’s Instagram Stampede post » 2. Leave a comment on our Facebook Stampede post
» 3. React and enter the giveaway in the #giveaway channel on Discord
» 4. Leave a comment on any of the Introduction videos on YouTube
Each action qualifies for one entry, max 4 entries per stampeder please and good luck!
Stampede through here for more inspiration from our Guest Designers!
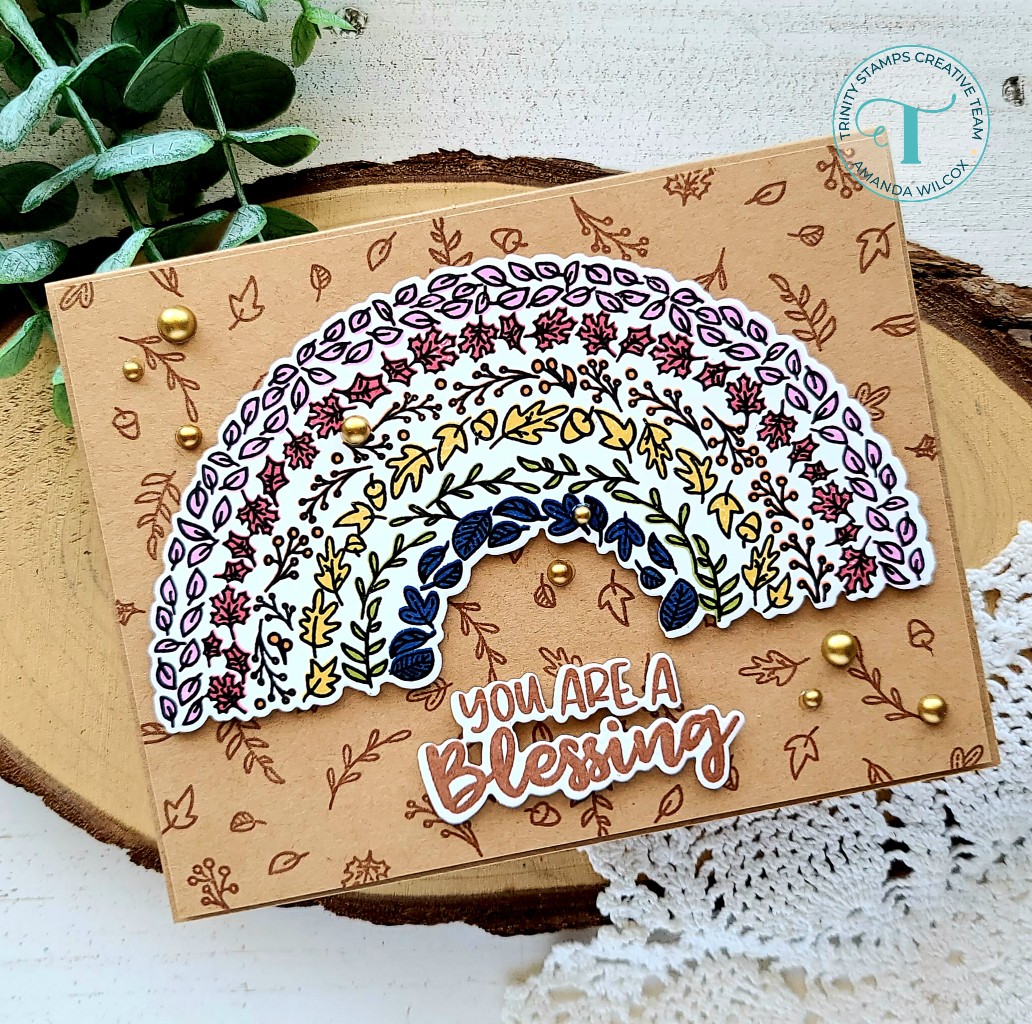
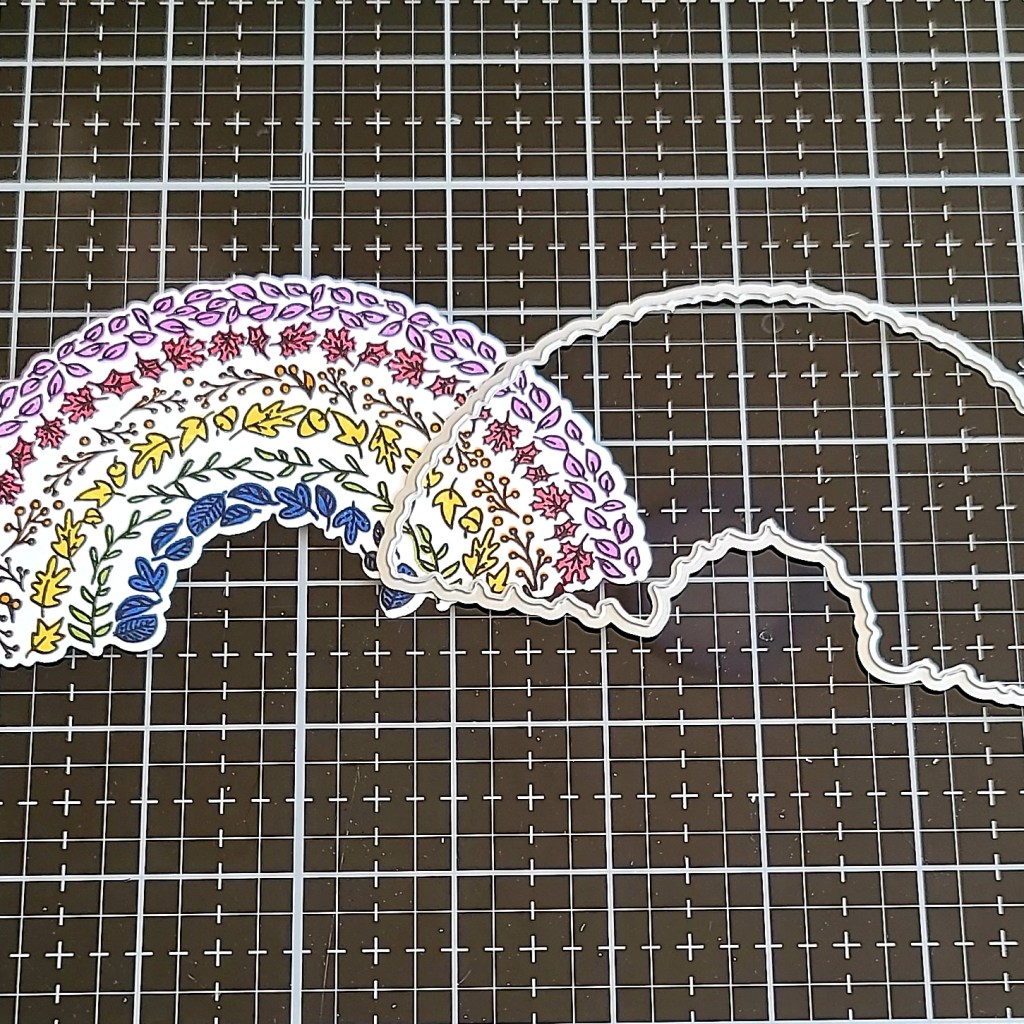
Thanks for stopping in today. I have a short tutorial for you featuring the recently released Harvest Rainbow stamp and die set from Trinity Stamps. The idea of this set is just beautiful and when you put the color to paper it just doesn’t disappoint at all! So many variations are possible too! Practically endless!
Here’s a peek at the finished card before we dive in. I specifically chose a muted ink palette because I knew I wanted it to feel like fall and also mat it on a kraft card base. I think they work well together. Let’s get started, shall we?
I used my MISTI for all of the stamping today but you really don’t have to, it just makes life a little easier. I started by stamping the outline image in black. Then, working from the smallest rainbow band outward, I lined up and inked the solid images that fill the layers in. Super simple.
Then I used the coordinating dies to cut the rainbow out. Aren’t those colors so pretty together? This just makes me happy!
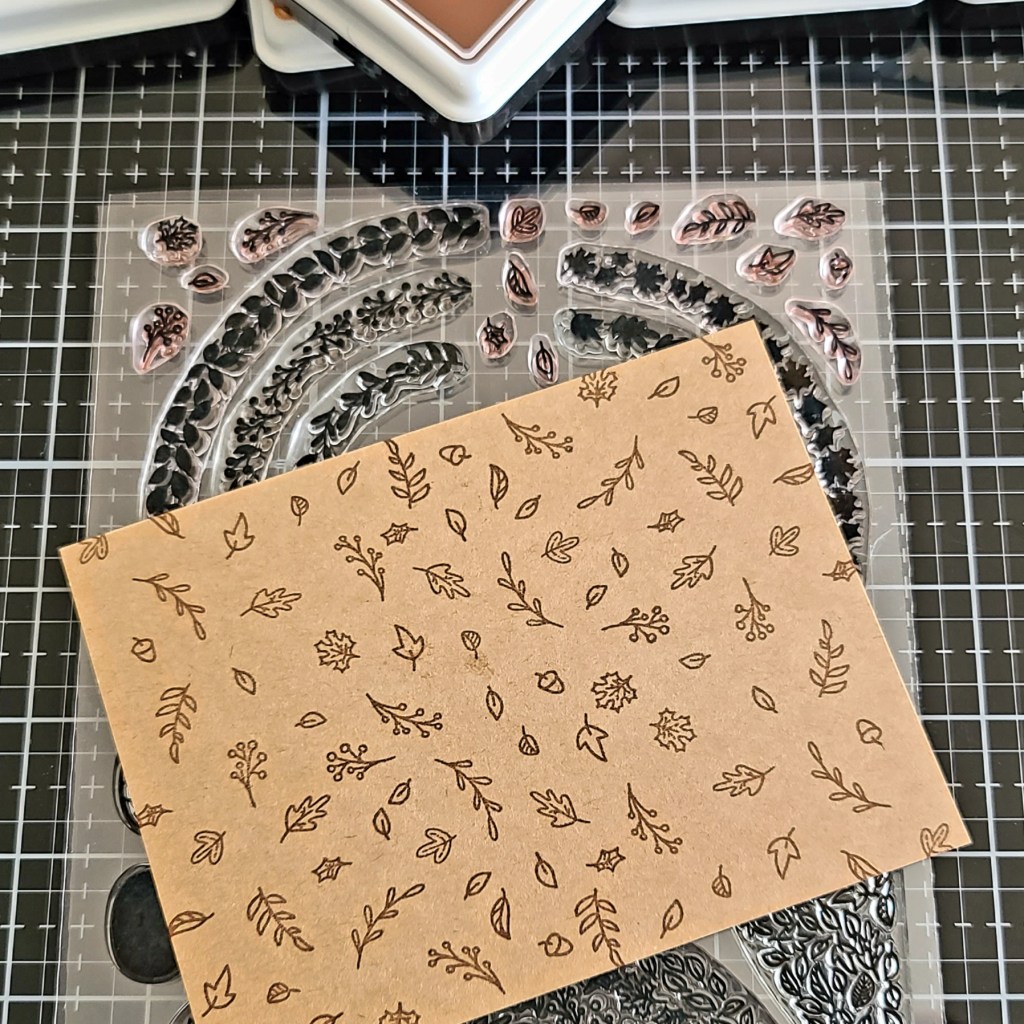
Next, I took a kraft panel and placed it in my MISTI. I pulled out all of the individual leaf stamps from the set and created a cluster. I stamped it and then rotated my paper and stamped it again. I rearranged the stamps and did it again. This left the center with a few gaps which I filled in individually. Then I trimmed this panel down to 4×5.25 inches and added foam tape to the back.
After popping the background panel up on a kraft card base, I added foam to the rainbow and placed it on my card too. I stamped the sentiment in the set and used the coordinating dies to cut it out next and popped it up with foam squares.
To finish things off I glued down a scattering of gold satin baubles across the design. I love the matte finish on these and how it gives a little shine without being overbearing on a more toned down color palette.
I am SO EXCITED to share today’s projects with you celebrating the Newton’s Nook release for Simons Says Stamp’s Stamptember extravaganza! This event is always so exciting and it’s just gotten better the last couple of years being able to participate from a designer point of view too!
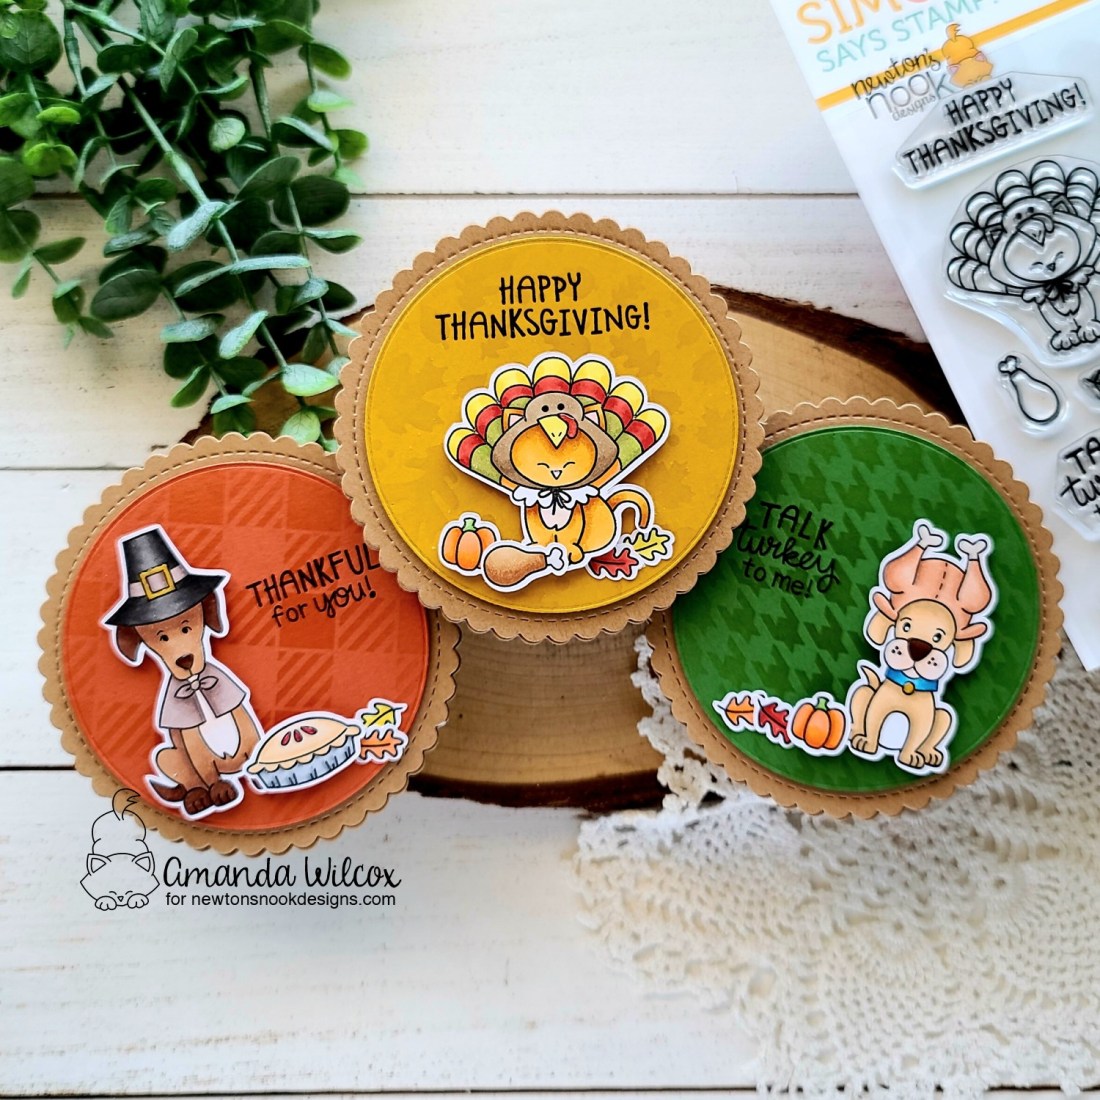
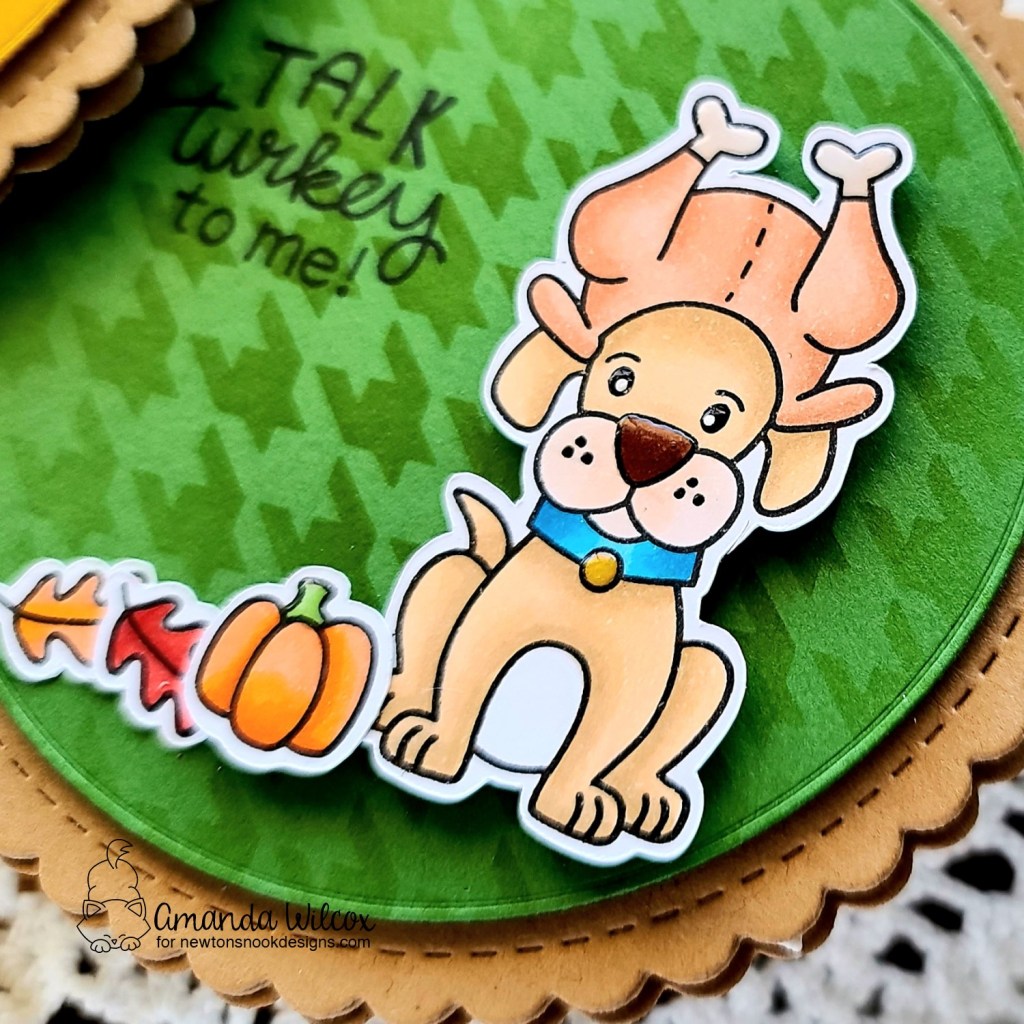
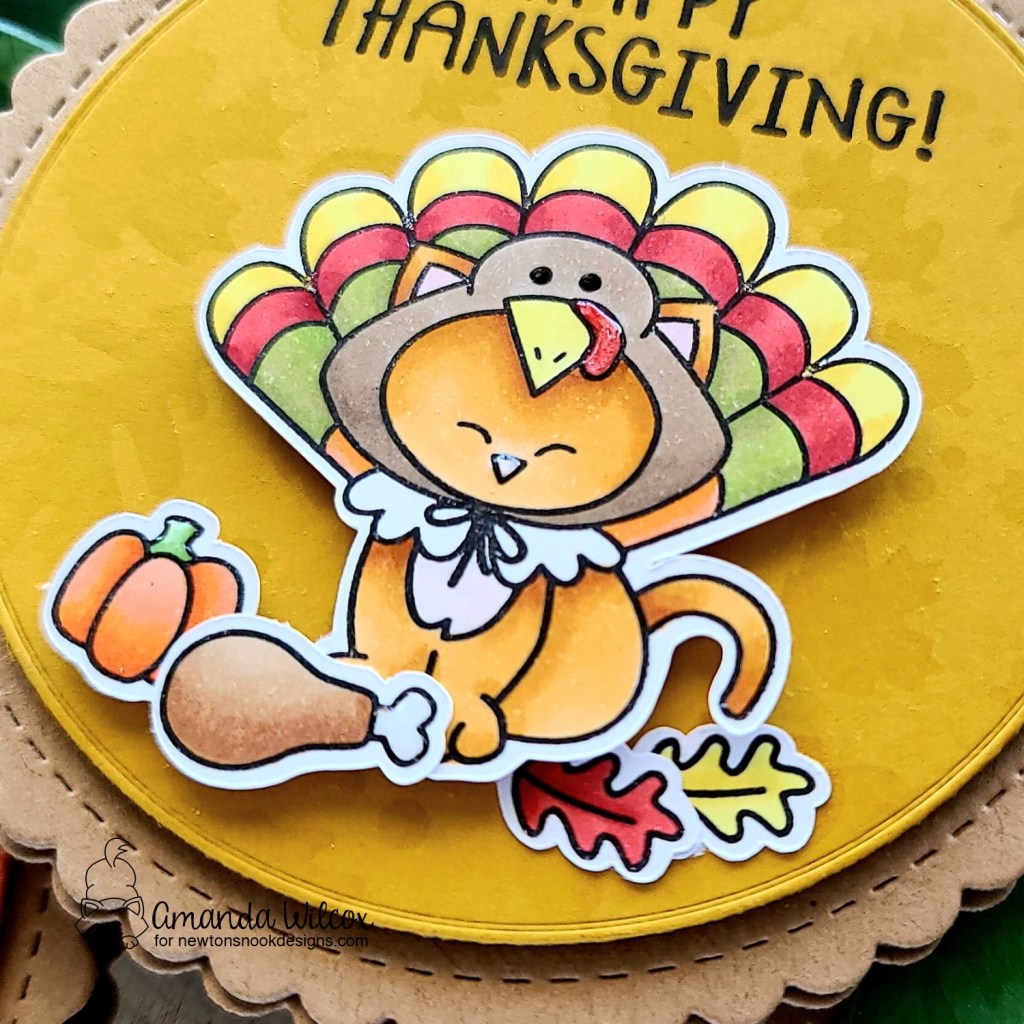
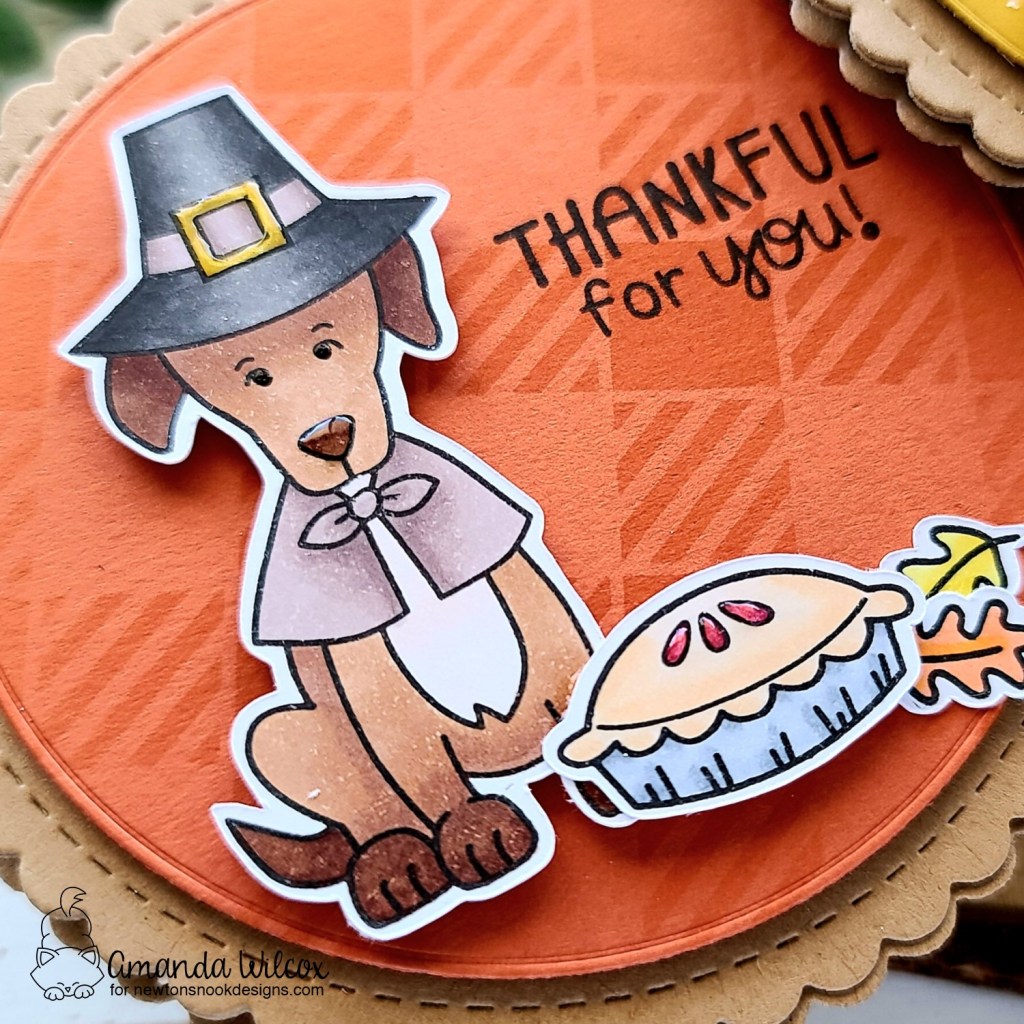
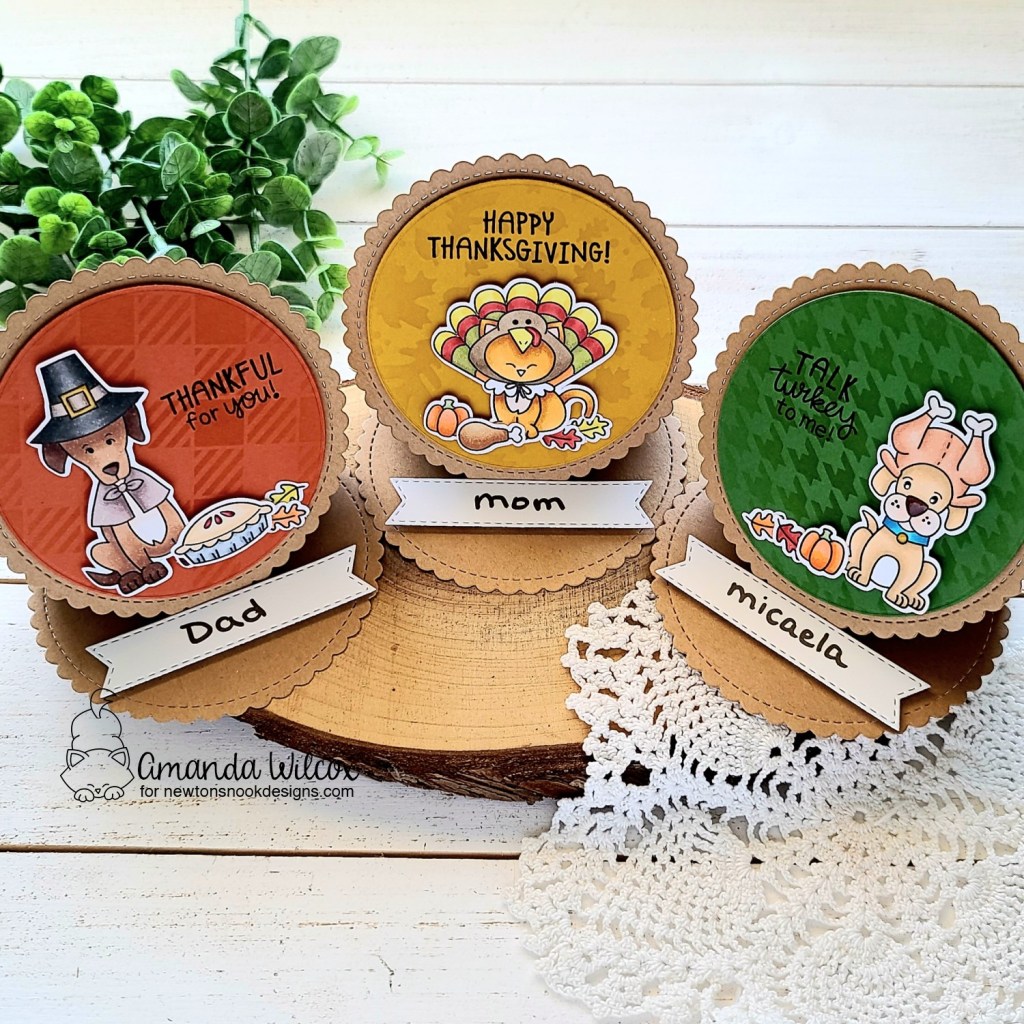
Today we’re sharing an adorable Thanksgiving themed stamp set – Talk Turkey – where I immediately saw place cards for our Thanksgiving table! For added fun, instead of just a tent fold card, I made circular easel cards for each one!
Here’s a look at all of them folded flat and looking super adorable! I used a combo of the circle frames die sets, banner trio dies and stencils – gingham, houndstooth and falling leaves.
I came in with glossy accents on things like noses, stems and this pup’s tag. Then I used black glaze pen on the eyes and came back with a white gel pen accent if it needed it.
This Newton just cracks me up with his turkey hat and hoarding his turkey leg! No sharing going on here!
This pilgrim pup was just too adorable and definitely needed to bring home the pie!
Here’s a look at all of them popped up and ready for Thanksgiving!
I added the banners to the inside with foam squares so they work as a great stopper for the easel and show who sits there. Plus, my daughter and I thought we could write personal messages inside the cards to share why we’re thankful.
Don’t forget these Stamptember sets are limited edition so head over and snatch yours up straight away! You won’t want to miss out!
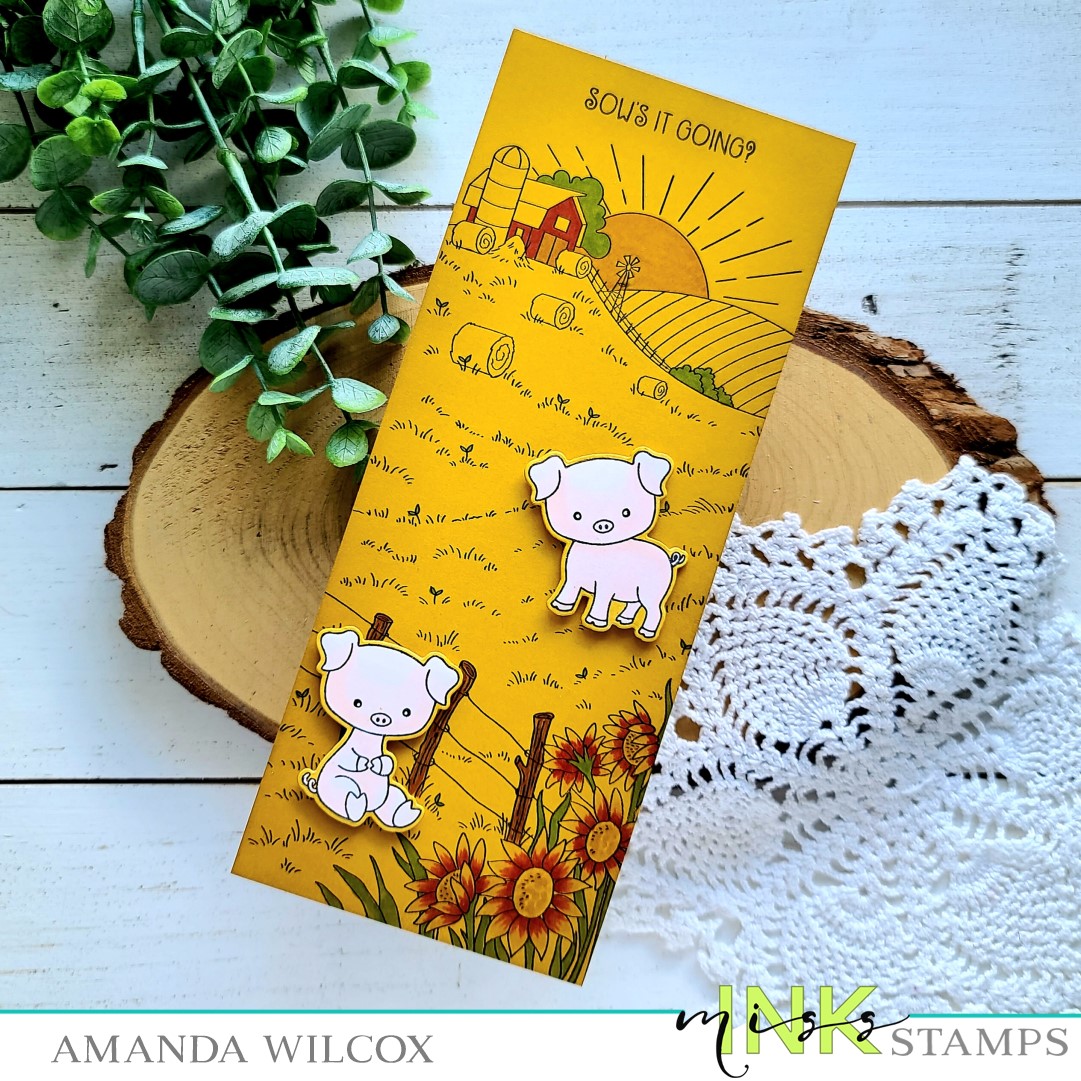
Hey friends! I’m over on the Miss Ink Stamps blog today with a fun slimline featuring some of my favorite piggies around! I have a little cheater technique for a great card with little coloring on a huge detailed background too.
I started by stamping the Hay Daze scene image on a piece of golden cardstock with copic friendly ink. Then I came in with darker copics and gave selective color to my background scenes. Things that were green and red were easy to choose and then I used an orange on the sun so it wasn’t totally lost. Then I used a blending brush and light brown ink to ink up the edges of the whole panel.
Next, I stamped two piggies from Punny Farm Pigs and colored them with copics. I used the coordinating dies to cut them out. Then, so they didn’t stand out too much with their white border, I used a copic the same color as the cardstock to color in the edges of them. I used foam squares and popped them up on my scene panel.
Next, I placed the panel in my MISTI and stamped a sentiment from Punny Farm Pigs at the top. Then I added black glaze pen to the pigs’ eyes. Once that way dry I came back in with a white gel pen highlight. This gives the eyes a little shine and helps them stand out and bring the critters to life.
Last, I used liquid adhesive to adhered my panel to a slimline card base measuring 3.5×8.5 inches. I didn’t add any sparkle or shine to this card because I just loved how the muted tones really felt like fall. I didn’t want to detract from that, but if you prefer, you totally could add all the usual glitz and glam!
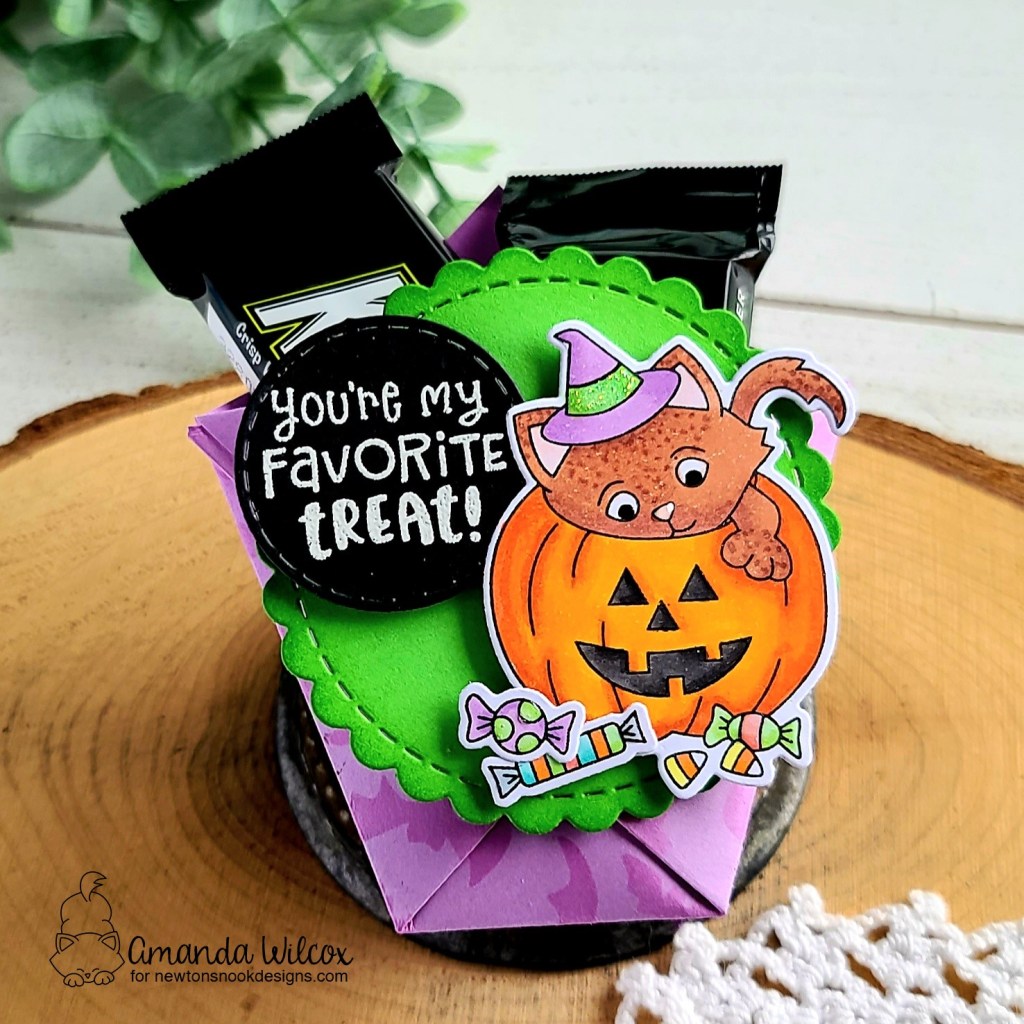
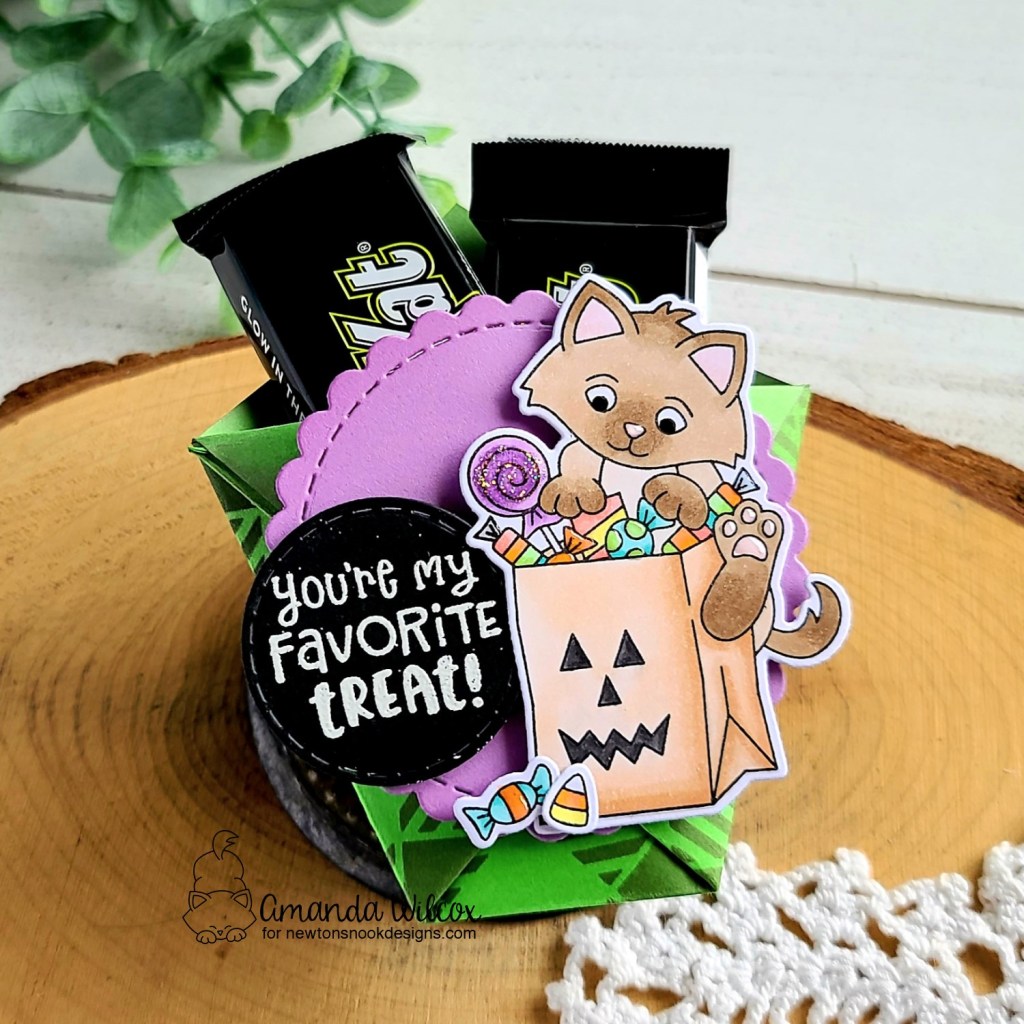
This week Newton’s Nook Designs is getting ready for Halloween with a fun Inspiration week! All week the NND Design Team will be sharing inspiration using some of their favorite Halloween products to get you in the mood for tricks and treats! Check out what I created today and don’t forget to check the NND Blog each day this week for more fun inspiration!
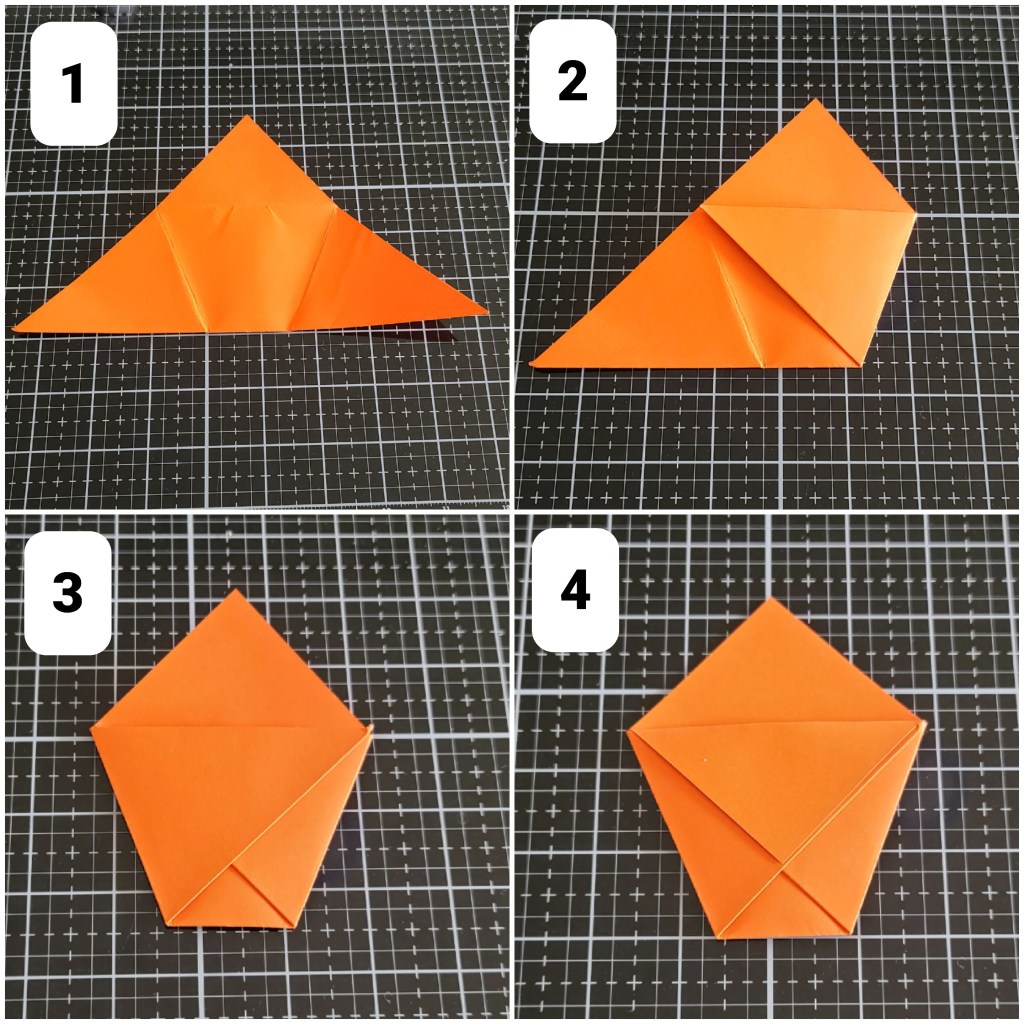
I created a little photo tutorial on how I folded these fun treat holders up. They just take a 6×6 sheet of cardstock or patterned paper and a bone folder does help but it’s not required.
Here’s a quick step-by-step. 1. Fold your paper in half to make a triangle. 2. Take one corner and fold it up toward the opposite side. 3. Do the same thing with the other corner. 4. Fold the front flap down.
I take my bone folder to each crease as I go along which helps make the next fold a little easier. Then I stick my fingers inside the holder at the end and puff it out. This seems to help the flap hold the criss-cross folds in place. I hope this helps!
For my treat holders today I chose the Trick or Treat Kittens to stamp and color with my copics. I used the coordinating dies to cut them out and then pulled fun colors from there to use for my treat holder and background circles.
For this cutie, I used the flying bats stencil with purple ink on the purple cardstock before folding it. Then I die cut a green circle with the circle frames dies and inked the edge for a little depth. I used liquid adhesive and foam squares to adhere the pieces. Then stamped and heat embossed a sentiment on a black circle (also from the circle frames set) and added it with foam squares too.
For this treat holder I switched the colors and used the gingham stencil with gray ink before folding it up. I used the same foam squares and liquid adhesive to adhere all my pieces and popped it on the front.
I stuff them each with two mini kit-kat bars but there are a million possibilities for the treats yours could hold!
Here’s a look at them both without treats when I added glossy accents and unicorn Stickles for extra shine and fun!
I hope you enjoyed these and found some inspiration to create something fun for Halloween.
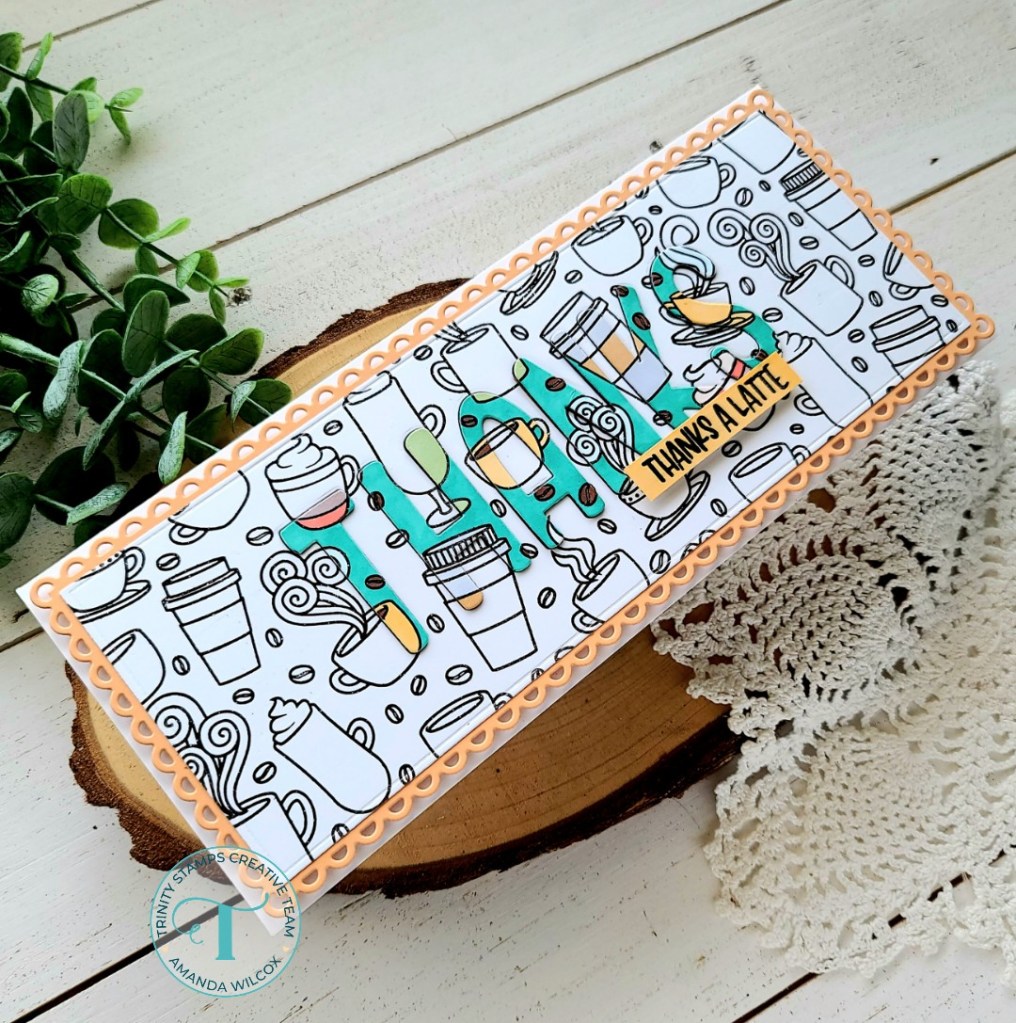
Happy Tuesday everyone! Grab a cuppa because it’s Tuesday Tea over on the Coffee Loving Cardmakers blog today. I’m still having a blast with the latest Trinity Stamps release. Today I took a stab at creating a shadow sentiment in my slimline image. It was really fun to create and the end result is pretty cool too.
To create this card, I stamped the Fa-BREW-lous image in black on white cardstock. I die cut the panel with a Slimline Modern Embossed Panel die so it would fit inside the dainty scallop panel. Then I took the Marshmallow alphabet die set and cut “thanks” from the center of it. To do this I lined the letters up on my craft mat and picked them up with post-it tape, then positioned them where I wanted them a cut. It helped that the letters in thanks are all different. Next, I cut the same letters from white cardstock 3 more times and adhered all the layers together with liquid adhesive.
I used my copic markers to color the images on the letters only. Next, I stamped a sentiment on white cardstock, cut it into a strip and colored it to match some of the cups in the letters.
I die cut a peachy-orange dainty scallop panel and adhered my stamped panel to that. Then I inlaid my letters and used foam strips to pop up my sentiment. Next, I added foam tape to the back of the scalloped panel and adhered it to a slimline card base.
I had a lot of fun taking this card from an idea to reality and think it turned out pretty cool. I hope you enjoyed it too.
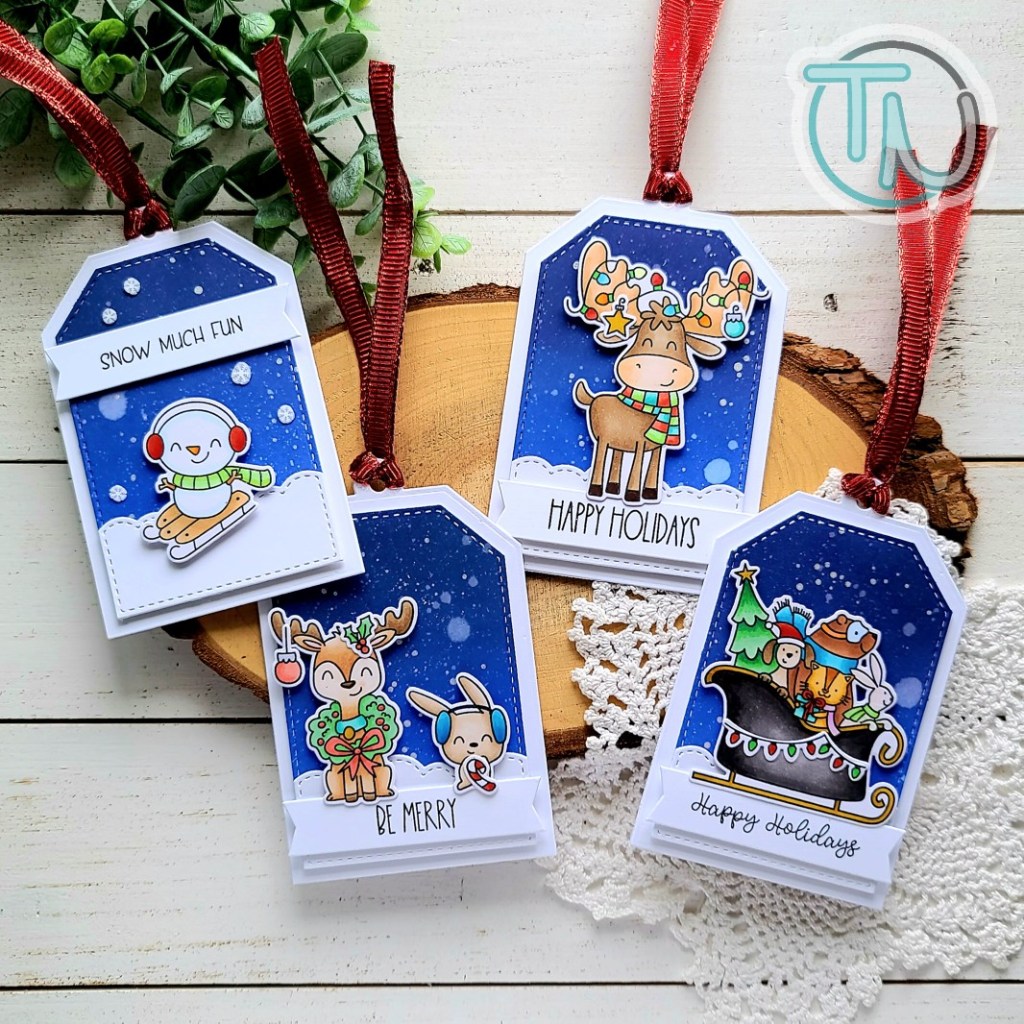
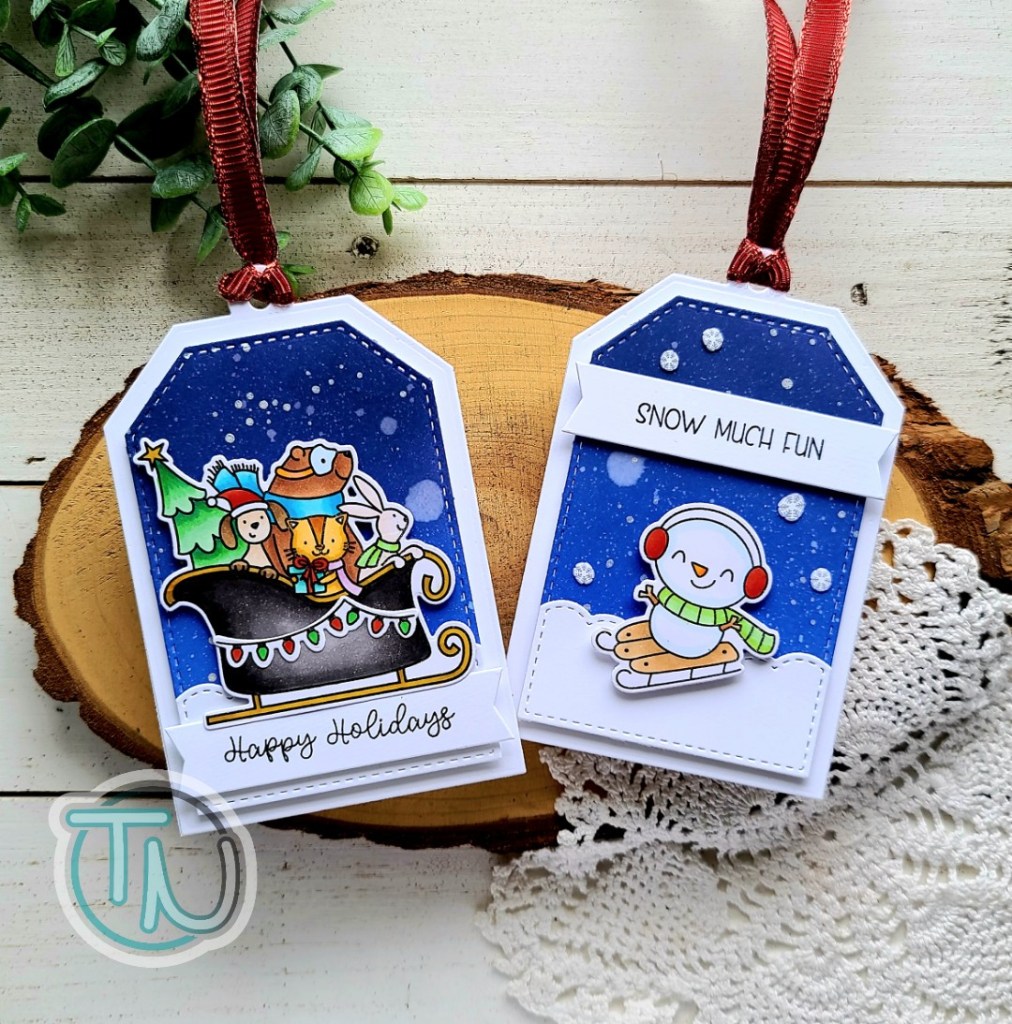
Hi there! It’s Amanda from Twiddler’s Nook with a super fun set of Christmas tags featuring Avery Elle goodies – some from the most recent release and some from years ago. Let’s get started.
To create these tags, I started by die cutting the pieces from the Easy Layer Tags die set. I cut 2 of the largest layer from white cardstock for each tag and adhered them together. This makes it more sturdy and hides any marks from my die cutting plates too. Then I cut the inside layer and inked them all up with distress oxide ink in chipped sapphire and blueprint sketch. I spritzed those with water, flicked pearl watercolor and set them aside. Next, I cut the snowy border and banners for each from white cardstock as well.
For these two tags, I chose images from the Christmas Critters stamp set. I inked them up and colored them with my copics before using the coordinating dies to cut them all out. I also used sentiments from this set to stamp on the banners.
For assembly, I used liquid glue to adhere the snow bank to the inked panel. Added foam tape to that panel and adhered it to the white tag base. Then I added foam squares to the images and banners and popped up. I strung some red ribbon through the hole and pulled out my glossy accents to finish things off.
For these two tags I chose some cute images from Avery Elle sets that released previously. The snowman and sentiment are from Snow Fun and the sleigh full of cuteness is from Sledding Critters. These tags were adhered the same way and just a little added inspiration to dig in your stash and see what you have that might word.
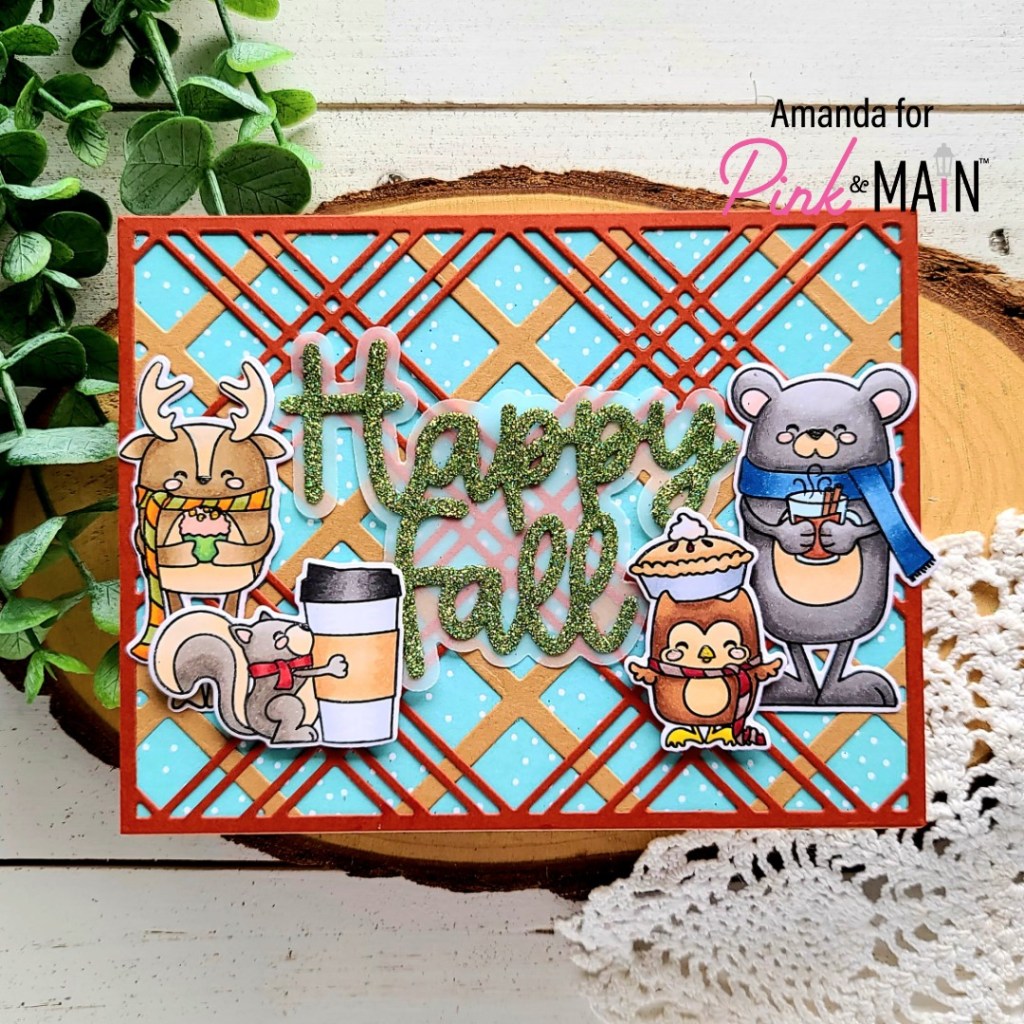
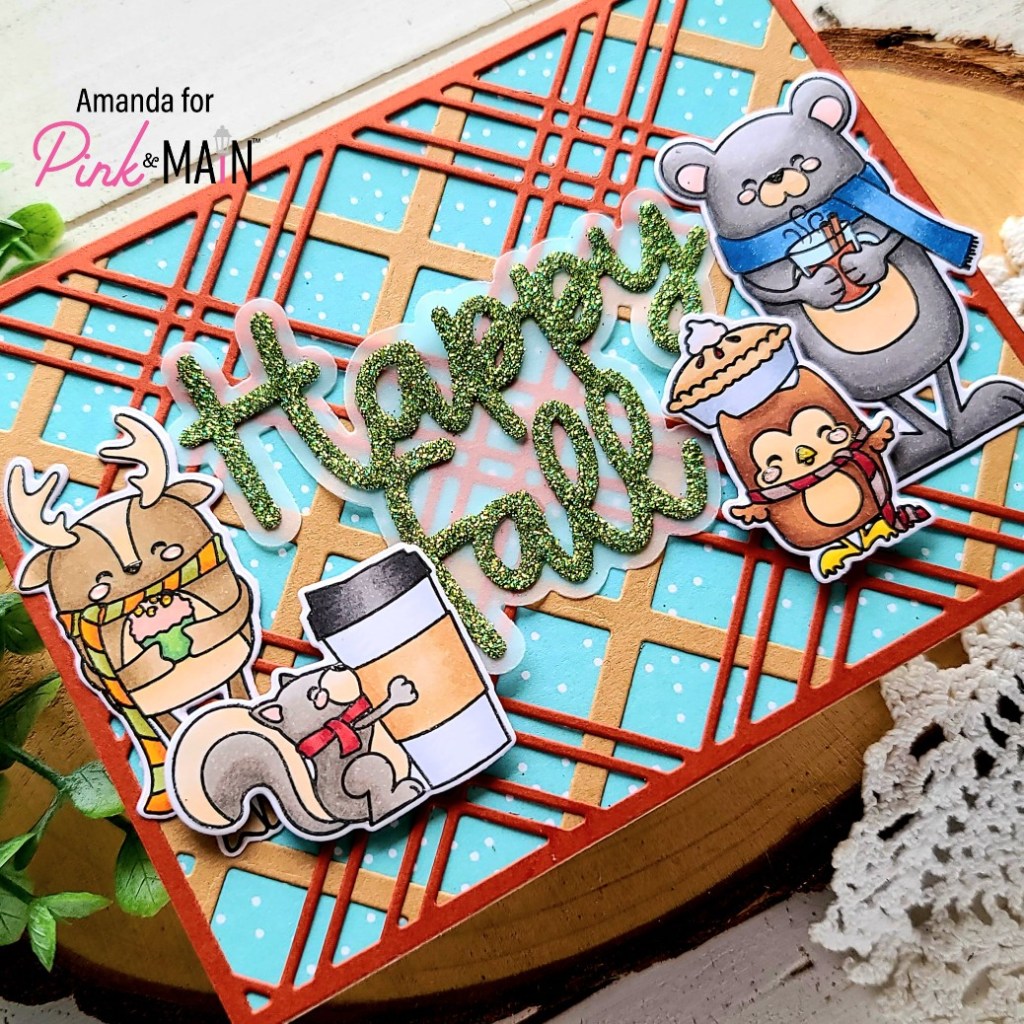
Welcome everyone! Today I’m over on the Pink & Main blog sharing a super fun fall themed card that is just packed full of all the fall feels! I hope you like it!
I started by stamping a variety of images from Cozy Critters and colored them with my copic markers. These guys are just too cute, it was super hard to choose just a few of them! Once they were colored, I used the coordinating dies to cut them out. For my sentiment, I used a bunch of new goodies including the Happy Fall word dies with the adhesive sheets and super fine glitter!
To create the words, I cut a piece of adhesive sheet and adhered one side to a piece of white cardstock. Then I used the happy fall die cut to cut it out. I removed the release paper from the top of the adhesive and sprinkled foliage super fine glitter on it. I used the finger to press the glitter into the adhesive and it created this gorgeous sentiment! After that I cut the shadow from vellum and adhered them together.
For the background I chose the blue spotted paper from Pumpkin Season, cut it to A2 size and adhered it to a white card base. Then I used the Plaid Cover Plate bundle to cut my plaid overlay. One layer is kraft and the other is a burnt orange cardstock from my stash. I love the fall color palette! It just makes me so happy!
Moving on to assembly, I used EZ Squeeze liquid adhesive to attach my background layers together, the sentiment dies and my two larger critters. Then I added foam squares to the smaller ones and popped them up. For finishing touches I added glossy accents to all the cheeks and noses but didn’t want to distract too much from that awesome glittered sentiment!