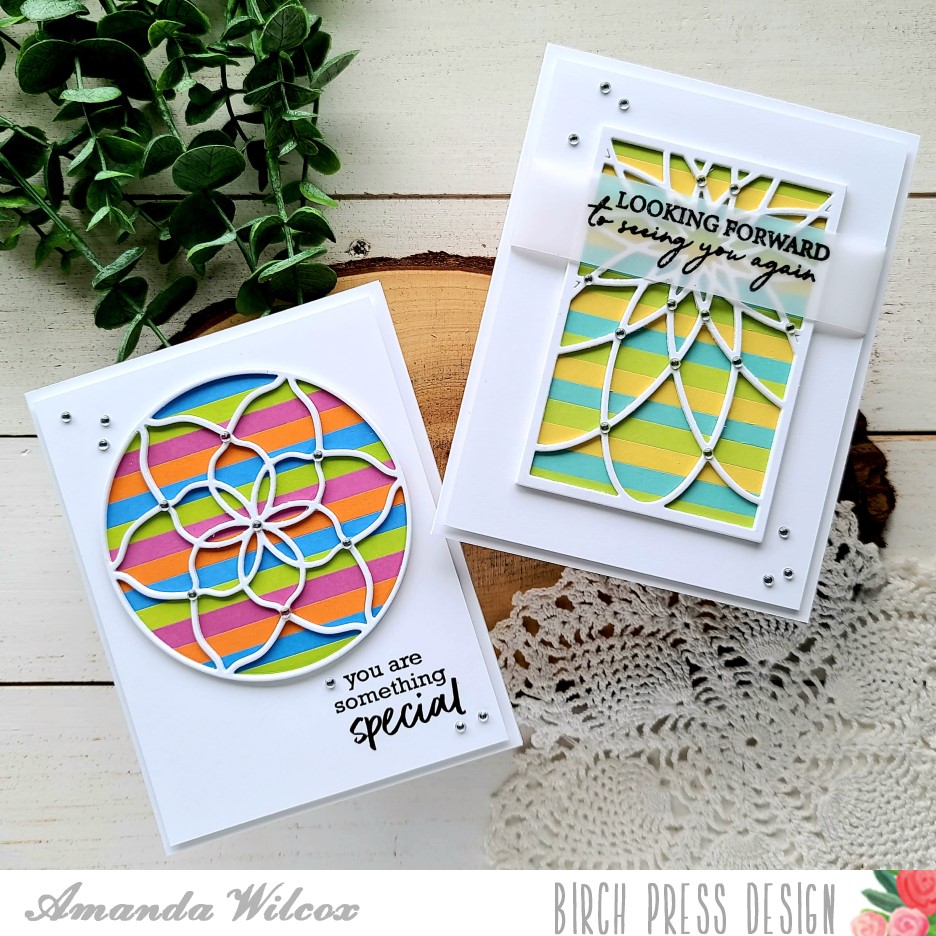
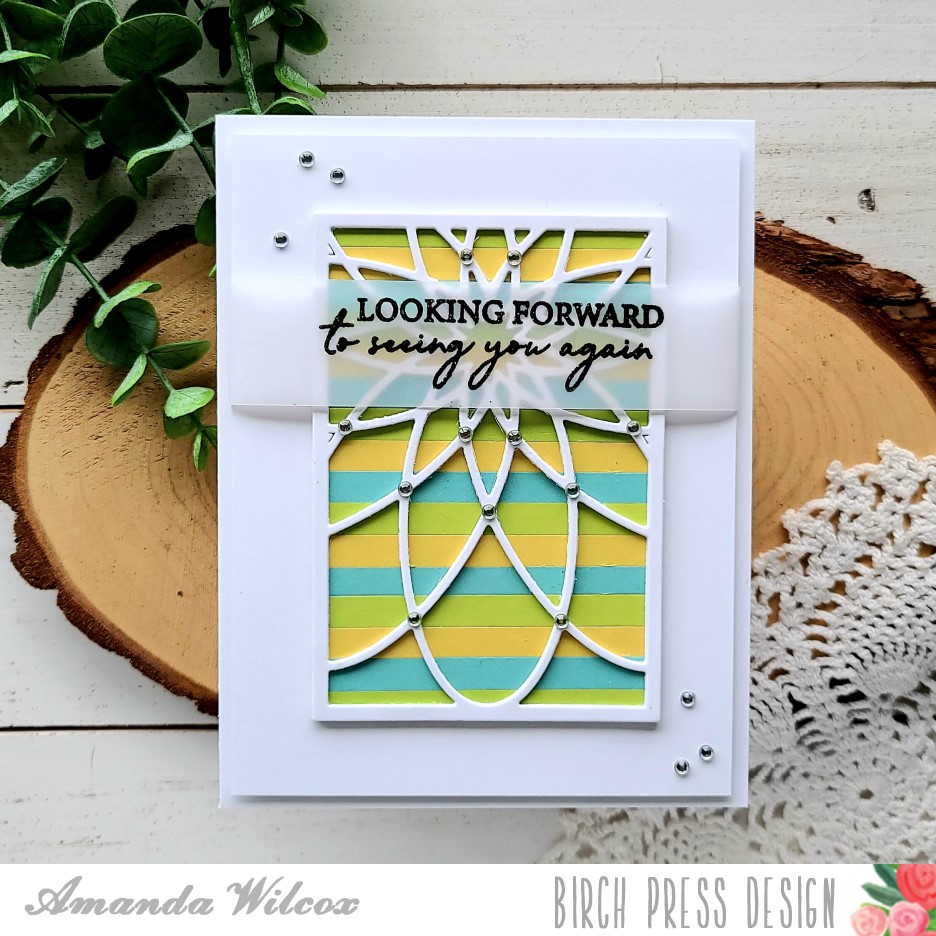
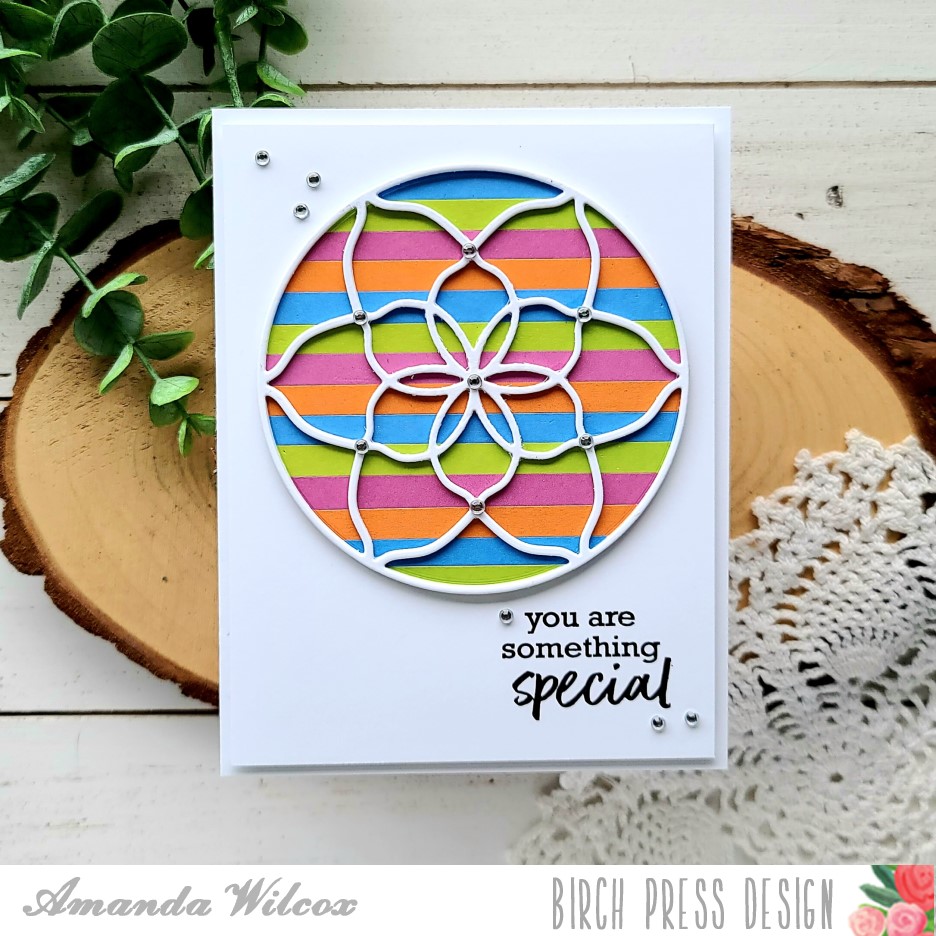
Hello everyone! I’m over on the Birch Press Design blog today with another pair of cards to share because I couldn’t just stop at one of these. They were really fun to create! I highly recommend trying today’s technique.
For these cards, I chose the layer A plate for a couple of layering die sets and cut them from white cardstock. I like thick layers for this so I cut them 4 times and glued them together.
Then I chose a couple of fun color palettes and cut 1/4 inch strips. I glued them together on another piece of cardstock and trimmed them down to fit behind the frames.
For this card, I chose a sentiment and heat embossed it on a long vellum strip. I used liquid glue to adhere the striped frame to a white piece of cardstock measuring 4×5.25 inches and wrapped the vellum around it, gluing it down with tape runner. I added foam tape to the back and popped it on a white card base. Then I finished it off with some fairy jewels from Birch Press.
For this card, I trimmed a white panel to 4×5.25 inches again, glued my striped frame down and stamped a sentiment on the bottom right corner. I added foam tape to the back and added it to a white card base as well. I couldn’t resist those fairy jewels so I used them again on this card.
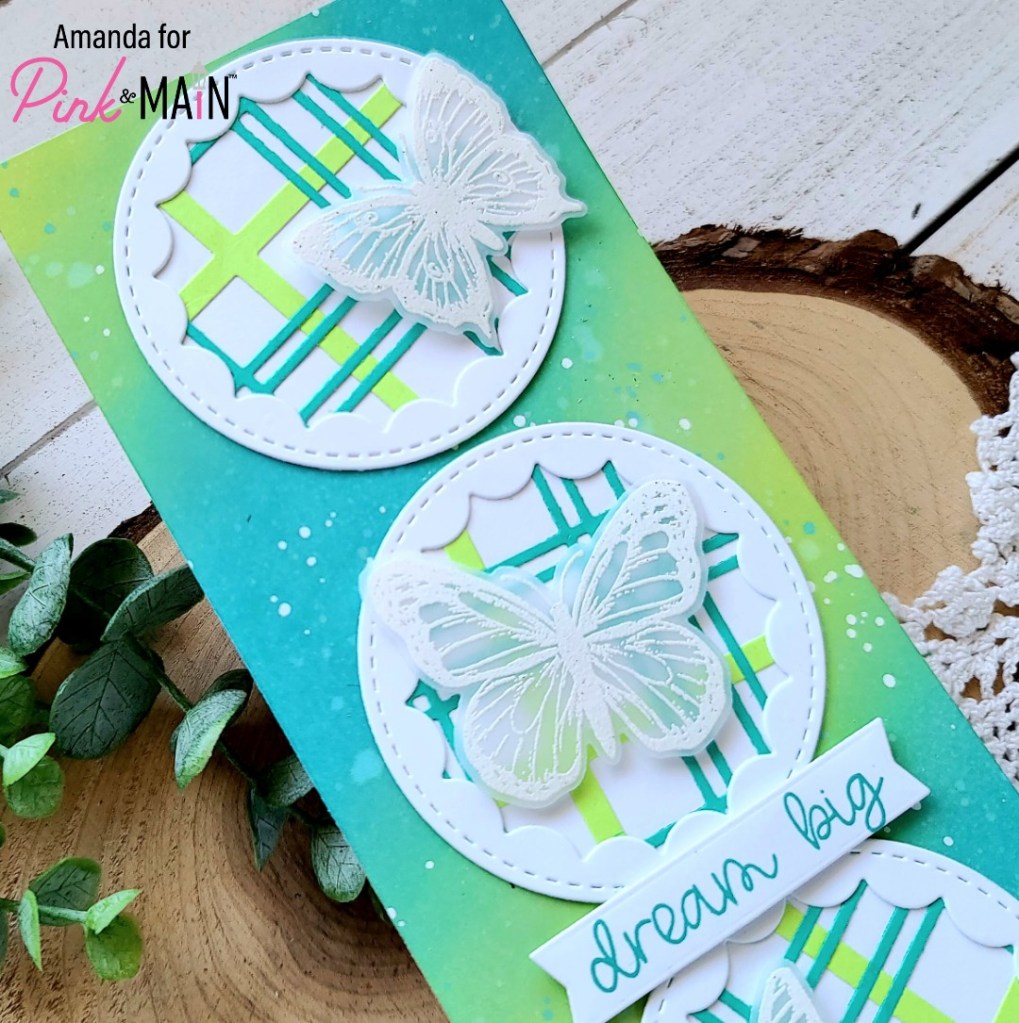
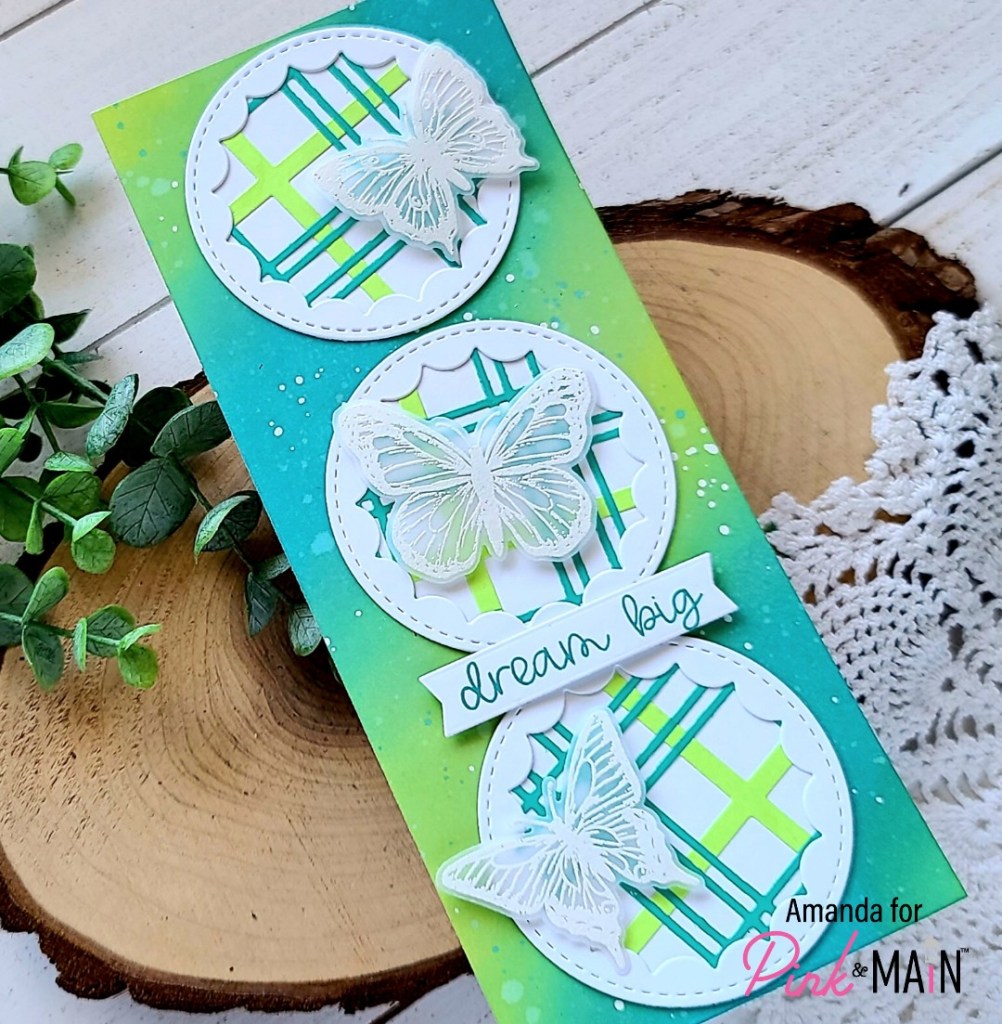
Happy Friday crafty friends! Today I have a really fun, no coloring needed slimline card to share with you featuring the recent Pink & Main May release! I love these products so much and had a blast die cutting and gluing all sorts of things to make today’s creation!
I started by choosing a color palette that seemed bright and happy – distress oxide colors in twisted citron and peacock feathers. I inked up a slimline panel with both colors in sort of an angled stripe pattern but I wasn’t too careful with it at all. Then I spritzed it with water and flicked white acrylic paint on the panel. Once it was dry, I die cut it with the largest layered slim line die. Then, I chose some cardstock from my stash that was close to those ink colors and used the new plaid layering dies on them. I cut each panel twice and glued them together. Then I glued those to a white panel and set them aside to dry for a minute.
While those were drying under acrylic blocks I stamped and heat embossed 3 butterflies from the new Butterfly Sketches stamp set on vellum. Then I used the coordinating dies to cut them out. Next, I die cut 3 reverse scalloped circle frames from white cardstock. Then I found a circle die the same size as the frame and die cut 3 circles from my plaid panels. I used liquid glue to adhere the frames to the plaid and now it’s time to assemble our card!
I adhered the ink blended panel to a white card base. Then the plaid circles directly to that. Next, I hid a thin foam strip behind the body portion of each butterfly and popped it in place on each circle. Finally for my sentiment, I stamped it in peacock feathers distress oxide ink to match the background and die cut it with a large sentiment strip die. I popped it up with foam squares and my card is finished.
I just think this design is so bright and fun! These are some of the brightest colors I think I’ve ever used and it’s just beautiful to look at!
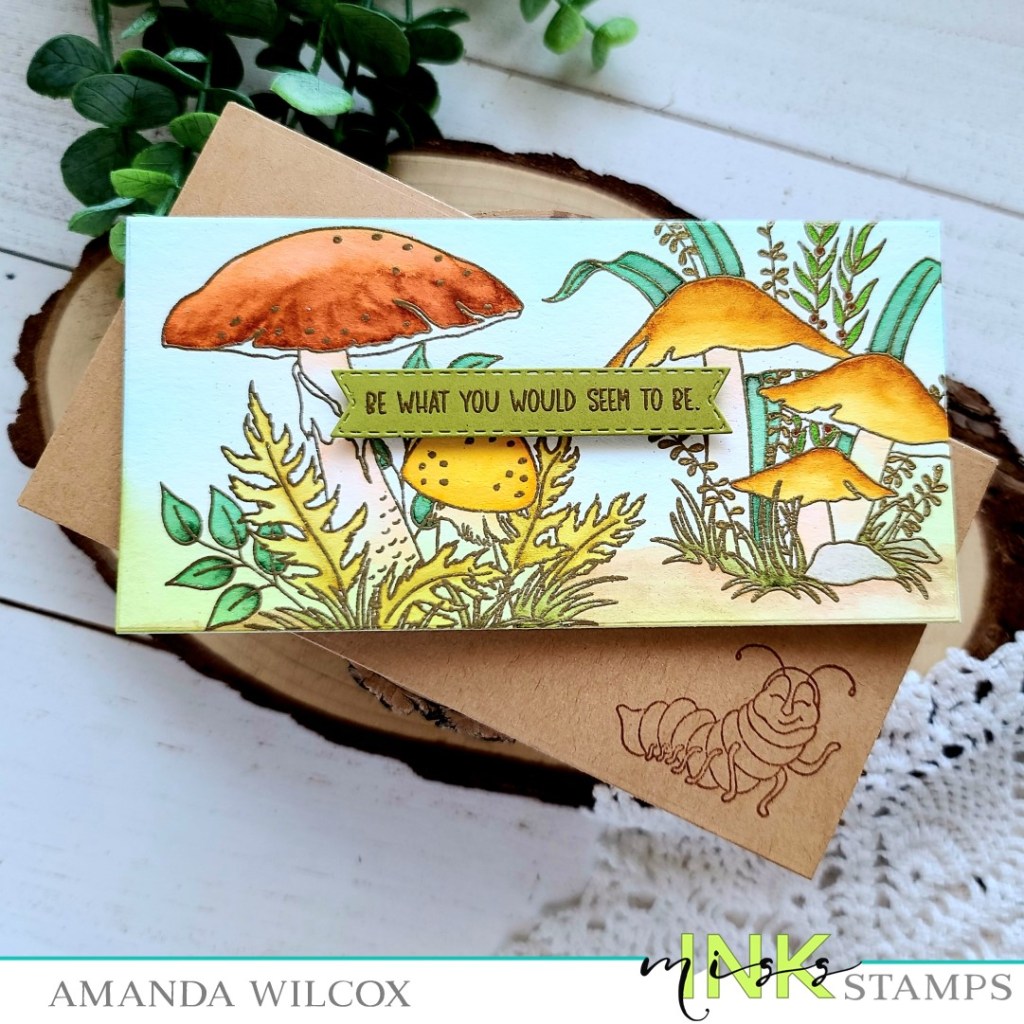
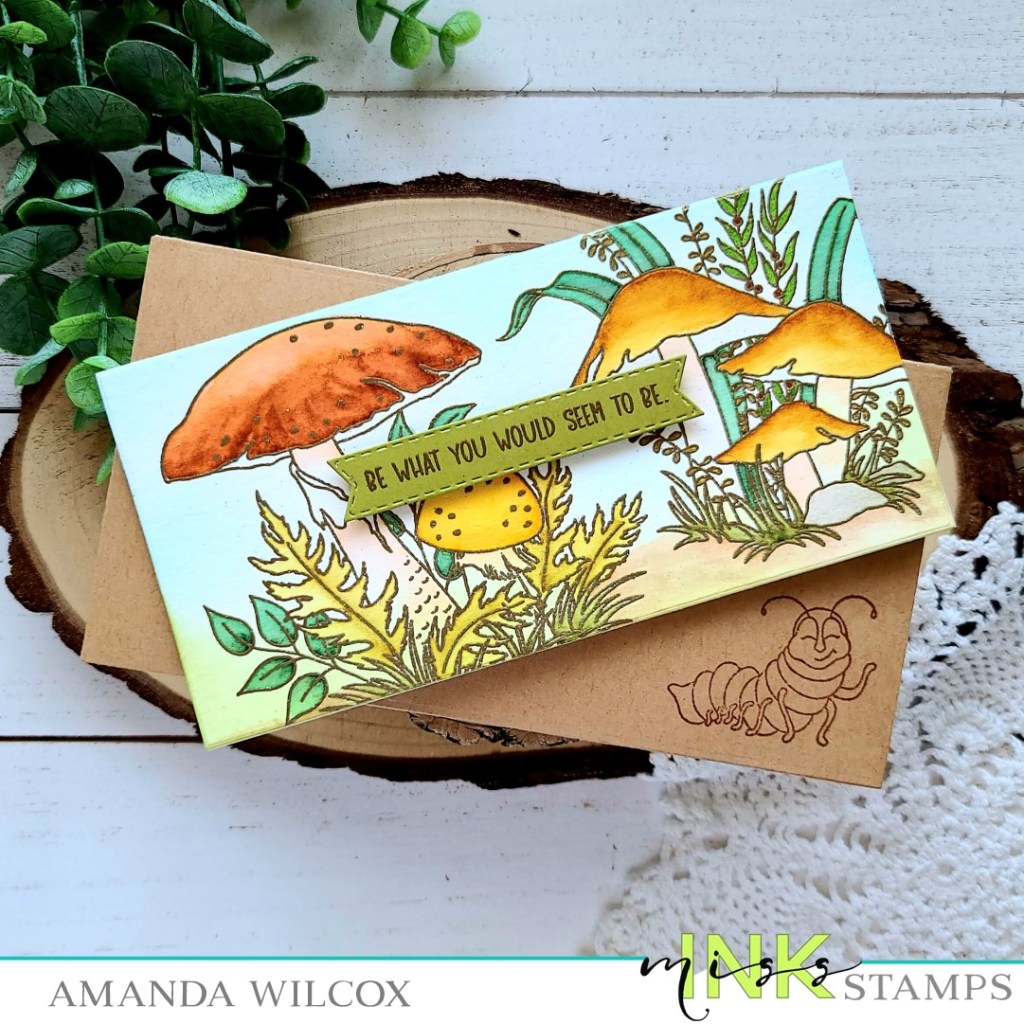
To create my card, I stamped and heat embossed the two main images in Smokin’ Caterpillars with gold embossing powder on watercolor paper. Then I watercolored the whole scene with my Zig Clean Color Real Brush markers. After the panel was dry, I die cut it with the new Trinity Stamps Clean and Simple Mini Slimline Panels. I created a 3×6 inch card base and adhered my scene to it. Then I stamped and heat embossed a sentiment from Wonderland Wisdom on a green cardstock strip that went with the tones of the watercolor. Then I used the banner die cut in the Trinity Stamps Mini Slimline Card and Envelope die set. I popped it up on the scene with foam strips.
Next, I used the envelope dies in the same set to create a custom envelope for my card. I die cut the pieces from kraft cardstock and stamped the caterpillar on the front. I adhered it all together with scrappy tape and my project is complete.
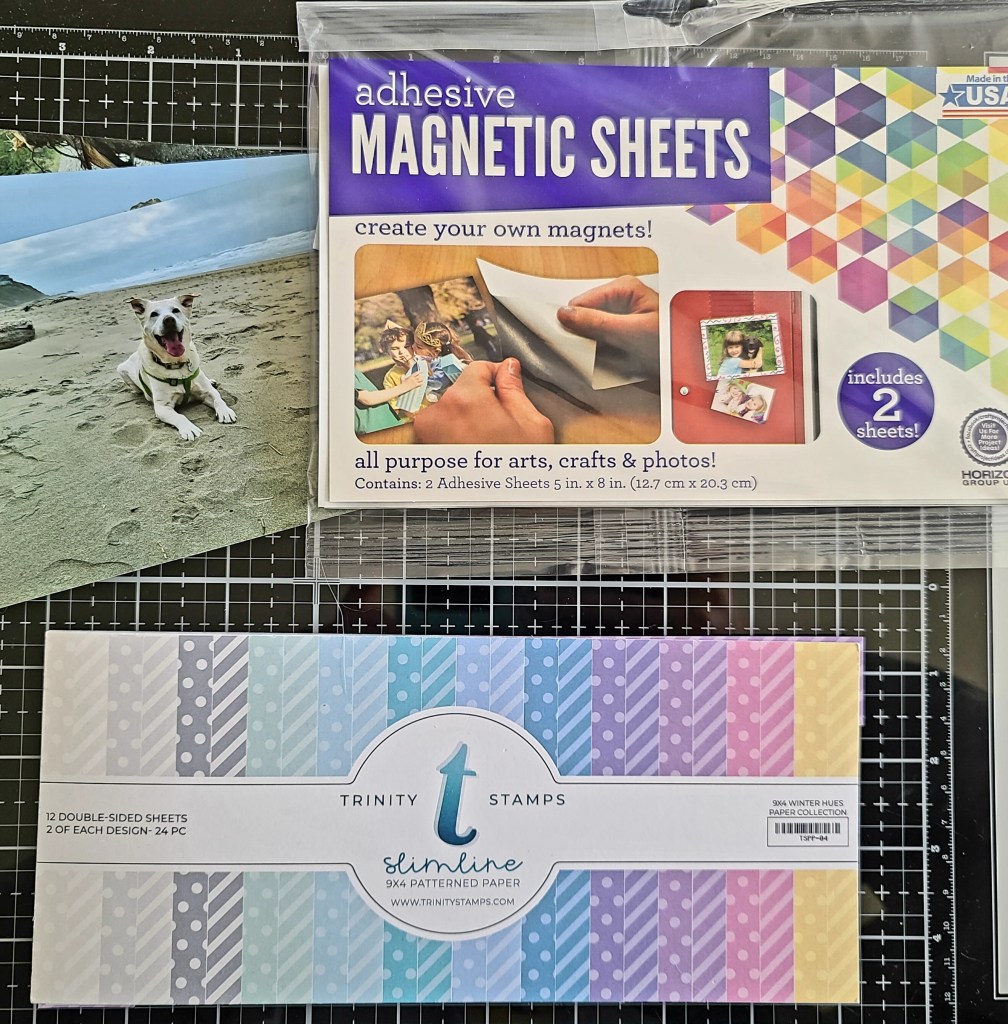
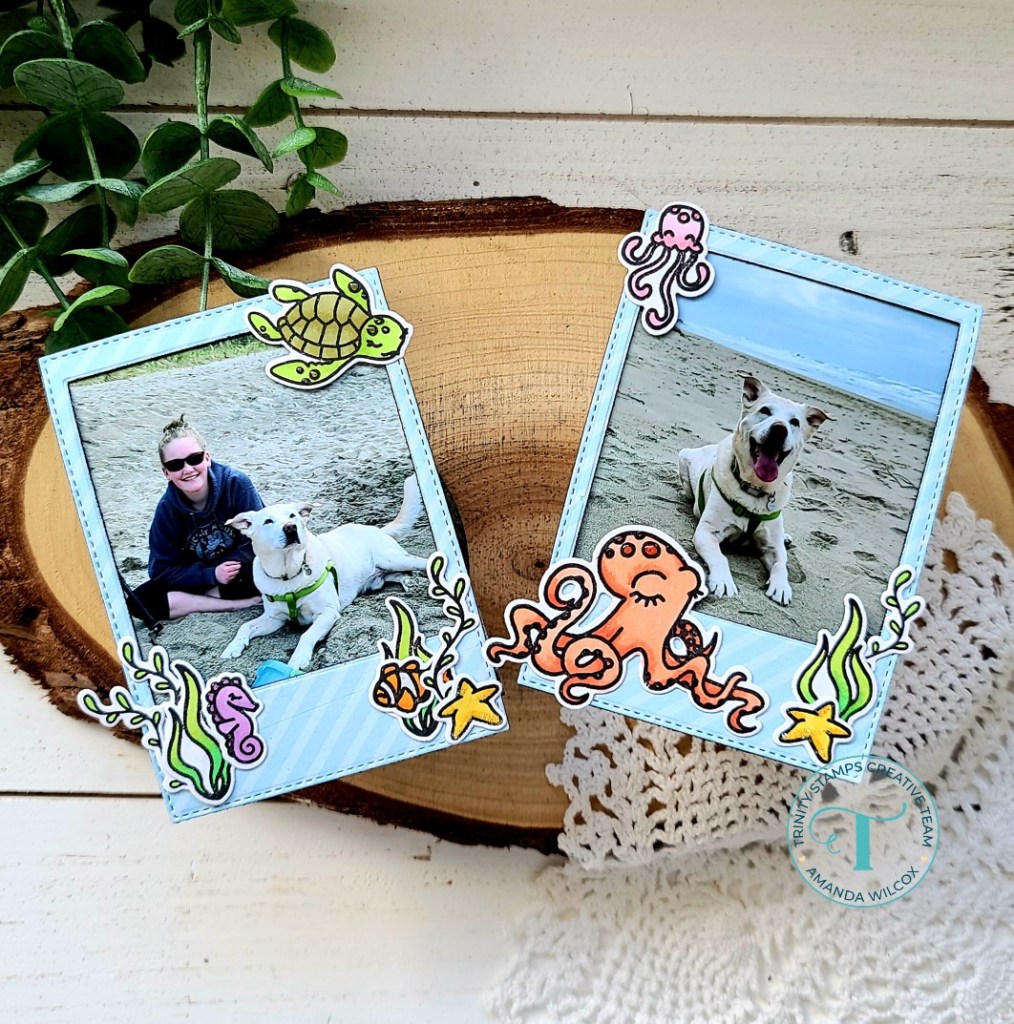
Hey friends! I’m over on the Trinity Stamps blog today with NOT a card project! Haha! Instead, today I’m making magnetic picture frames with an ocean theme to go with the photos that I want to put in them.
I made some like this around Christmas time years ago and they were so fun! Everyone seemed to enjoy them so I thought it would be great to bring them back and share how I made them.
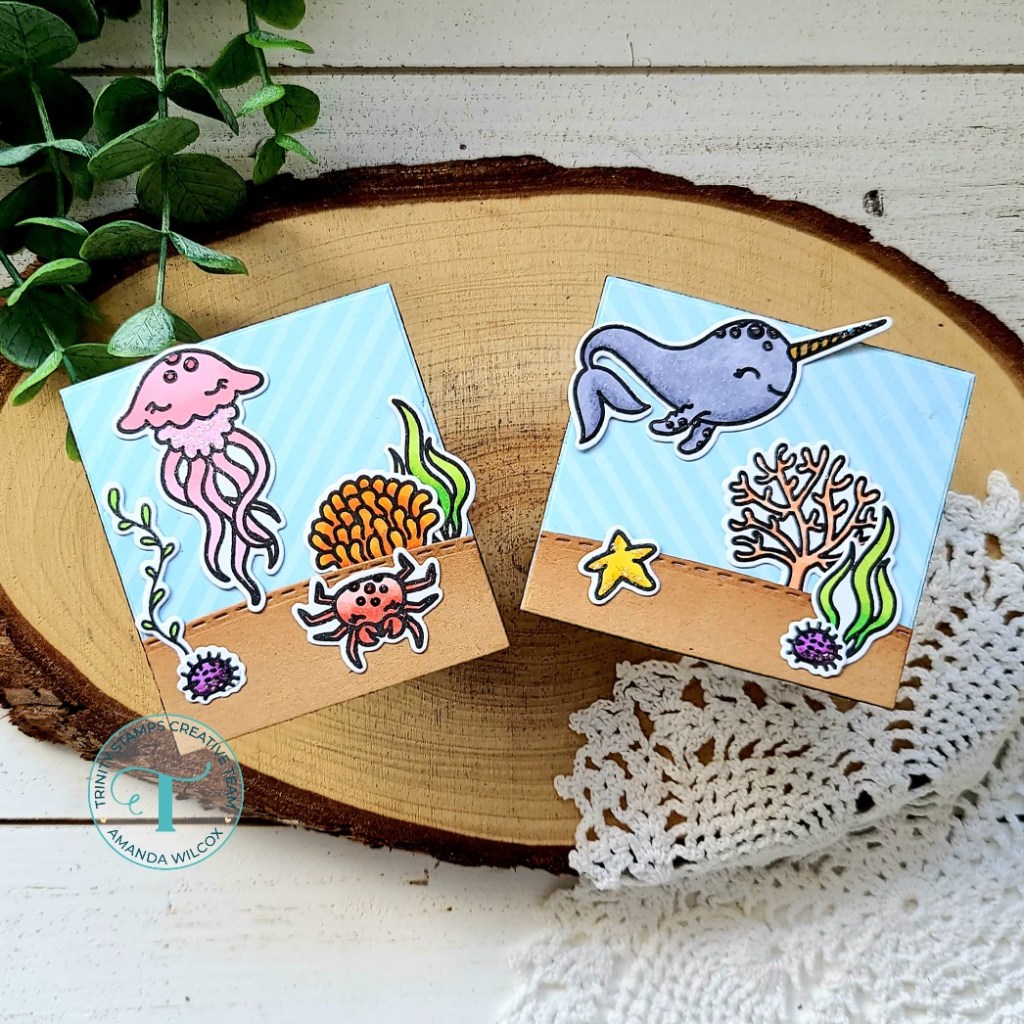
These are kind of a two-for-one project because you get the frame portion but I always decorate the part that comes out of the middle too. Let’s get started!
I gathered some basic supplies, starting with the photos that I wanted to frame so I could choose images/colors accordingly. I chose the Trinity Stamps winter hues slimline paper pad for my paper and you can find the magnet sheets for less than $2 at Walmart. You may even be able to get something that would work at the dollar store. This isn’t a costly project at all. Moving on…
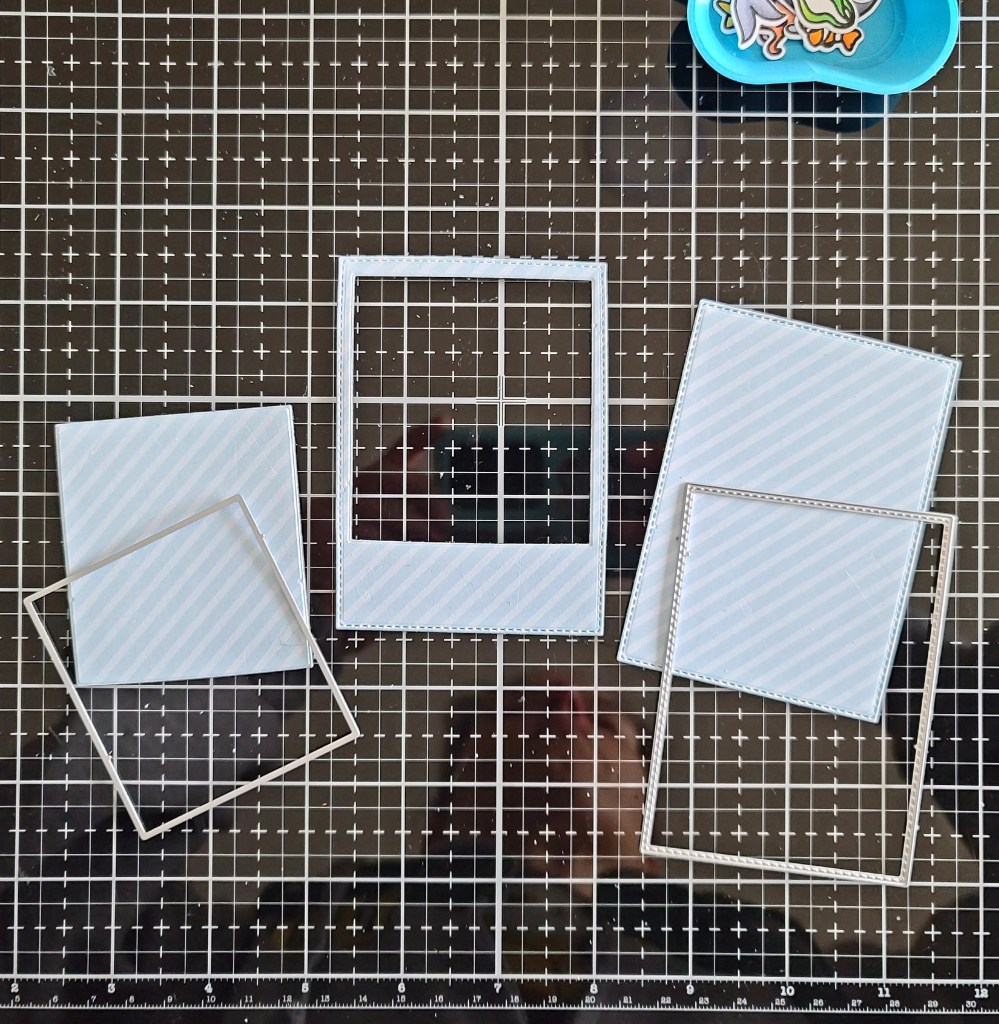
You need the stitched rectangle and smaller square dies from the Trinity Stamps Slimline Frame and Fold die set and whatever images you want to use to decorate. I chose Turtley Awesome and Ocean Reef Builder stamp sets.
I inked them up and colored them with my copic markers. Then I used the coordinating dies for each set to cut them out and set them aside. Now for the magnet portion of the project.
I trimmed the magnetic sheet down to 4 inches wide, removed the backing paper and smoothed down a piece of striped paper from the winter hues paper pad. Then I die cut 2 of the stitched rectangles from it, positioned the square die and ran them through again. I prefer to do this in two steps because you can get funny warping on the thinner sides if you do them at the same time.
Now it’s time to decorate all of our pieces! I just used liquid glue to adhere the images wherever they touched the frames. Nothing special needed.
When I was finished, I trimmed down my photos and adhered them to the back of the magnet with a little washi tape. It’s not totally necessary but ensures they stay where I want them. Then I went over the images with some unicorn Stickles and glossy accents in various places.
And here are the rectangles that were cut out when I created the frames. I used the Slimline Great Outdoor Border dies to cut a little kraft cardstock and create a sandy ocean bottom for my mini scenes. I use these to hold photos that are too big to fit in the frames. They also have glossy accents and unicorn Stickles for added shine and sparkle.
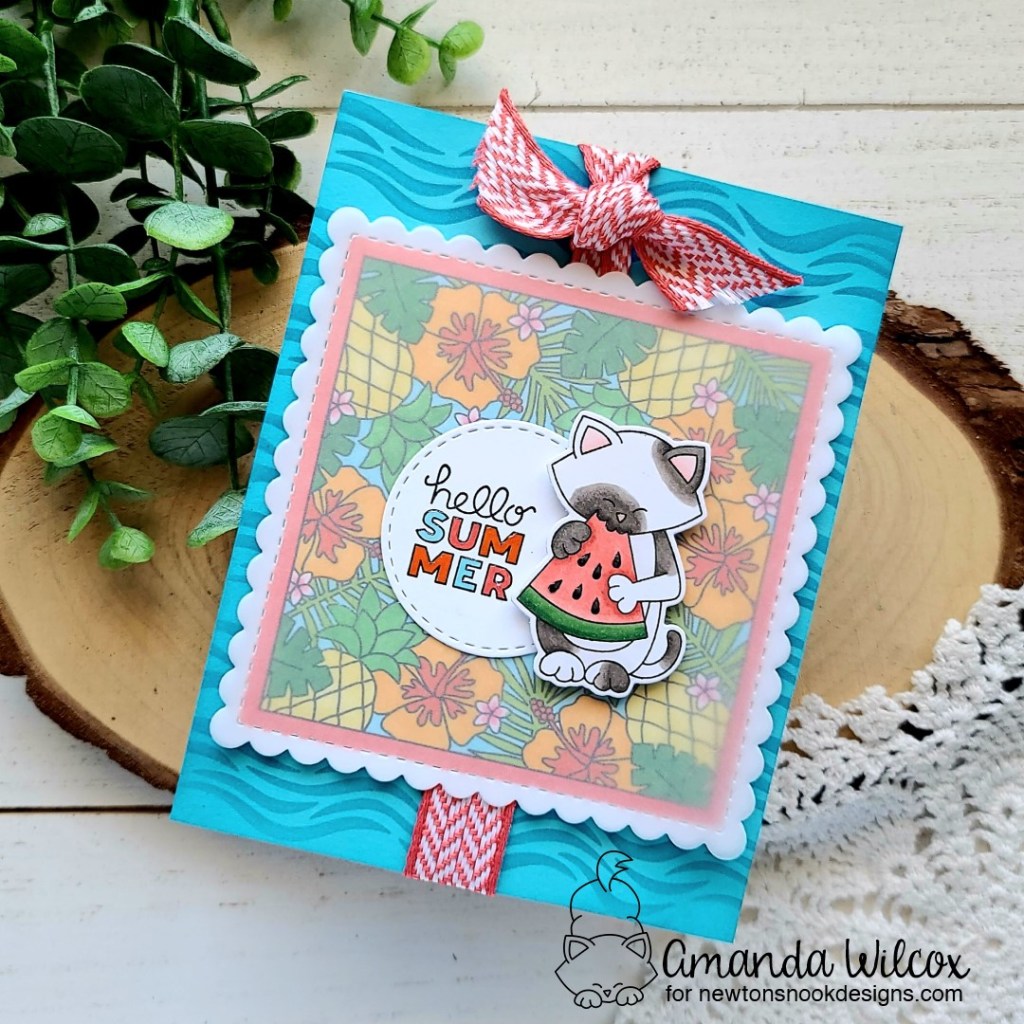
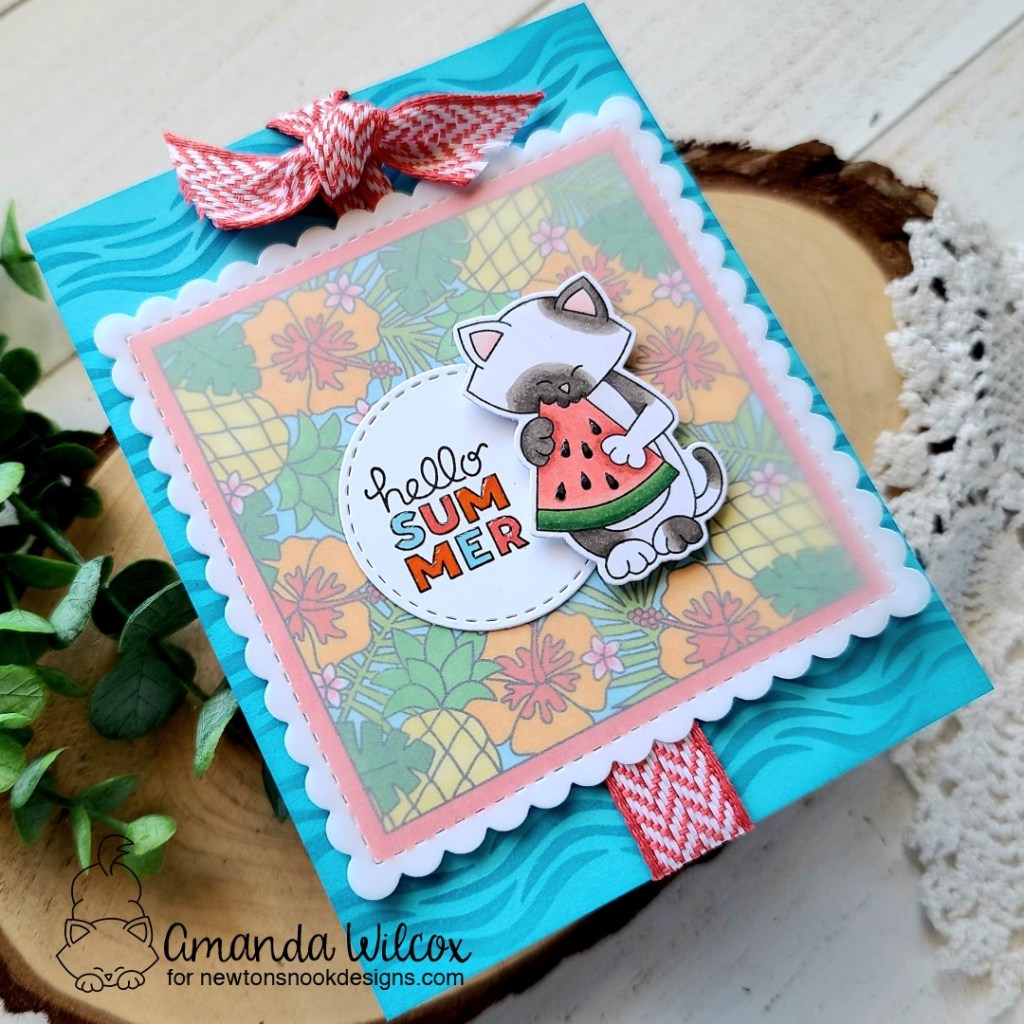
Hello again everyone! I hope your week is going well. I’m over on the Newton’s Nook blog today sharing a fun, bright taste of summer! I’m so ready for bbqs, sprinklers and soaking up the sunshine! So I channeled all those things into my card for today. I hope you like it!
I started by stamping and coloring the Newton’s Melon image with my copics. Then I cut him out with the coordinating die. Next, I die cut the scalloped square in the Frames Squared die set and stamped the Tropical Fringe image on it. I used my copics to color the image in and then die cut a second scalloped square from vellum.
I chose a sentiment from Tropical Fringe and stamped it on a scrap of white cardstock. Then, using my Newton image as a guide die cut it with a stitched circle in the Framed Squared die set so that I could layer them together.
I took a turquoise panel and inked up the waves stencil with a slightly darker ink. Then I trimmed the panel down to A2 size and blended a little extra ink on the edges for some depth. When I layered everything together for a “test fit” I thought things were a little sparse so I dug in my stash and found this super fun melon colored ribbon and decided to add it. I cut a strip and adhered it to the back of my stenciled panel. Then I cut another piece and tied it around the strip.
To assemble the rest of the card, I worked from the top down. I adhered Newton to the circle. Then, holding the Tropical Fringe image behind the vellum, I figured out where to place Newton and used some tape runner to adhere him. (Pro-tip: I learned that liquid glue can make your vellum buckle from the moisture so I try to use dry adhesive whenever I can now.) Hiding adhesive behind the image I added tape runner to the back of the vellum and adhered it to the colored panel. Then I added foam tape to the back of the square, but only on the sides so it doesn’t get wonky from the ribbon and popped it in place.
For finishign touches, I added glossy accents to Newton’s nose, the watermelon seeds and the letters in SUMMER.
Hey friends! I’m super excited to be over on the Heffy Doodle blog again today for my second card guest designing for them! I had so much fun creating today’s project; I hope you enjoy it too!
I love making interactive cards and today’s is so cute and was easy to pull together. Here’s how I did it.
I started by stamping images from Popping By and colored them with my copic markers. Then I used the coordinating dies to cut them out. I used liquid glue to adhered the mouse, cake, candle and balloons together and set them aside to work on the rest of the card.
Pulling from the color palette in the balloons, I inked up the Lots of Happy stencil on a white panel. Then I used the second largest Stitched Rounded Imperial Rectangle dies to cut it out. Next, I used the largest to cut a teal panel which will be my card front.
I took out the Slimline Pull Tab dies and cut the mechanism pieces from white cardstock. I lined up the notch die and cut it from the top of my stenciled panel, careful to keep the tab because I wanted to use it. I built my mechanism without using the stabilizer piece because there wasn’t enough room. This isn’t really an issue because the pull tab doesn’t go up very far so I’m not worried about it wobbling too much. I added foam tape to the back of the stenciled panel, placing strips right next to the pull tab which almost acts as a stabilizer to help guide it anyway, removed the backing paper and popped it on the teal panel.
Then I added foam squares to the back of my mouse, cake and balloons, careful to avoid where the fox will be moving and added it on the card front. Last, I stamped the sentiment on a white scrap of cardstock and carefully used the smallest Stitched Rounded Imperial Rectangle die to cut half of it, I slid it over and taped it back down and die cut the other half to create a longer sentiment strip. Then with a combo of liquid glue and foam squares on the end I added it across the bottom of the cake.
For finishing touches, I die cut the pull tab from teal cardstock and just glued the arrow to the notch and saved the other piece for another project. Then I added white gel pen accents to the balloons and star dust stickles to the candle and cake frosting. I pulled the tab up and added glossy accents to both critter noses and set my card front aside to dry completely before I pushed the tab back in.
To create my card base, I took a 4.25×11 inch piece of cardstock and folded it in half. Then I placed the largest Stitched Rounded Imperial Rectangle die just over the fold line and die cut it to create a shaped card base. I used liquid glue to adhere my card front to the base.
Instead of leaving the inside blank for a message, I decided to stamp two sentiments from Popping By on the inside for fun. I used the same inks that are blended on the Lots of Happy stenciling so it all ties in together.
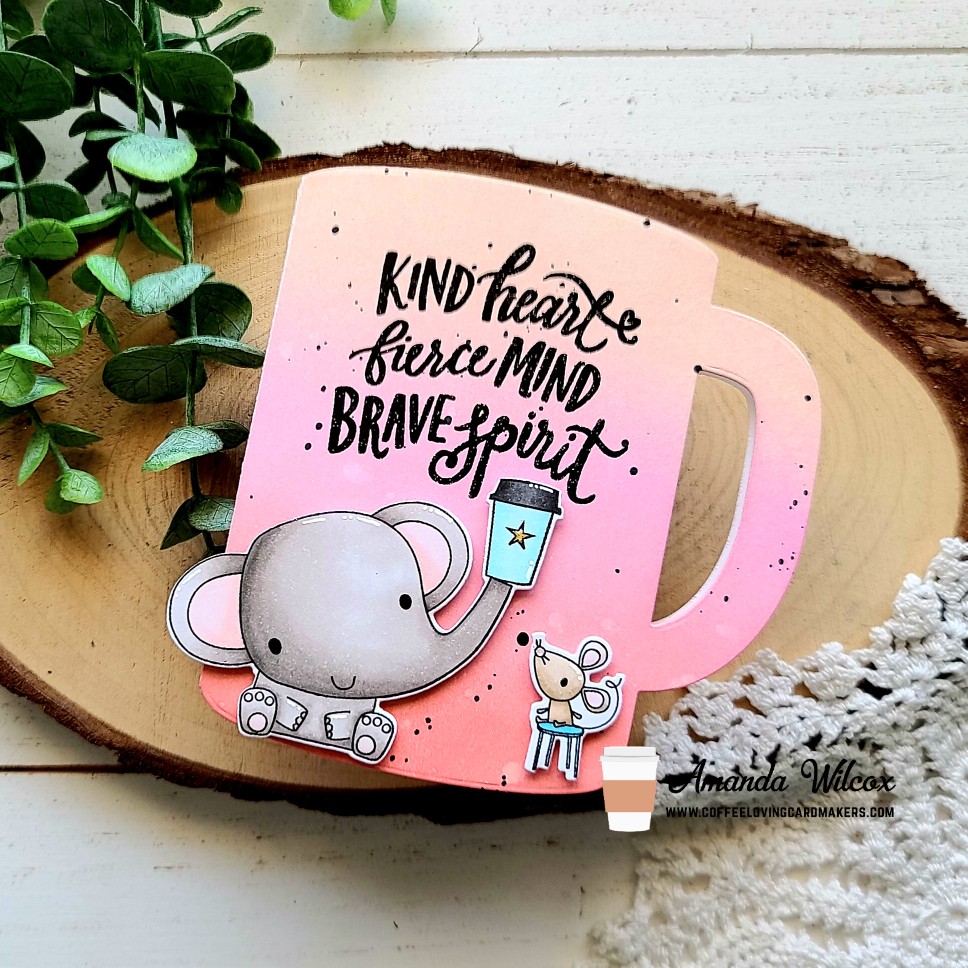
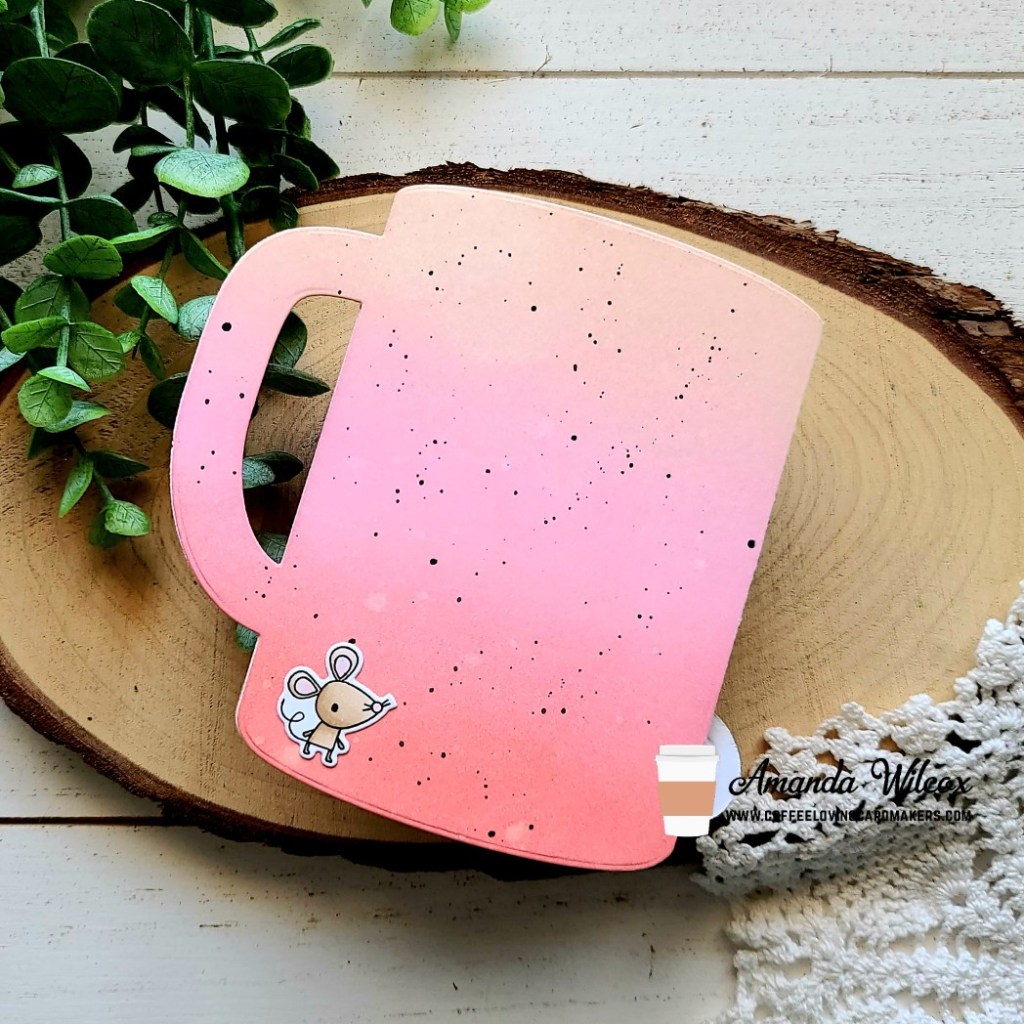
Hey friends! It’s Tuesday Tea with Twiddler’s Nook on the Coffee Loving Cardmakers blog today. I have a fun coffee mug shaped card to share with you featuring a new distress oxide ink blend combo that I LOVE paired with some Reverse Confetti cuties!
Most of the time I ink blend and then die cut but today I cut out my coffee mug first and blended distress oxide inks in abandoned coral, kitsch flamingo and tattered rose. Isn’t this mix just amazing?!? I love it! Then I splattered some black acrylic paint on the whole panel and set it aside to dry.
I stamped and colored images from the Reverse Confetti Coffee and You stamp set. I used the coordinating dies to cut them out and set them aside. Now that my panel was dry, I stamped and heat embossed a sentiment from My Tribe in black. I added foam squares to the elephant and mouse on the stool and added them to the front.
And then, for grins, I added the other mouse directly to the back of the card. It makes me giggle.
For finishing touches, I added white gel pen accents to the images, black glaze pen to their eyes and glossy accents to things like the mouse’s nose, elephants feet and the star on the coffee cup.
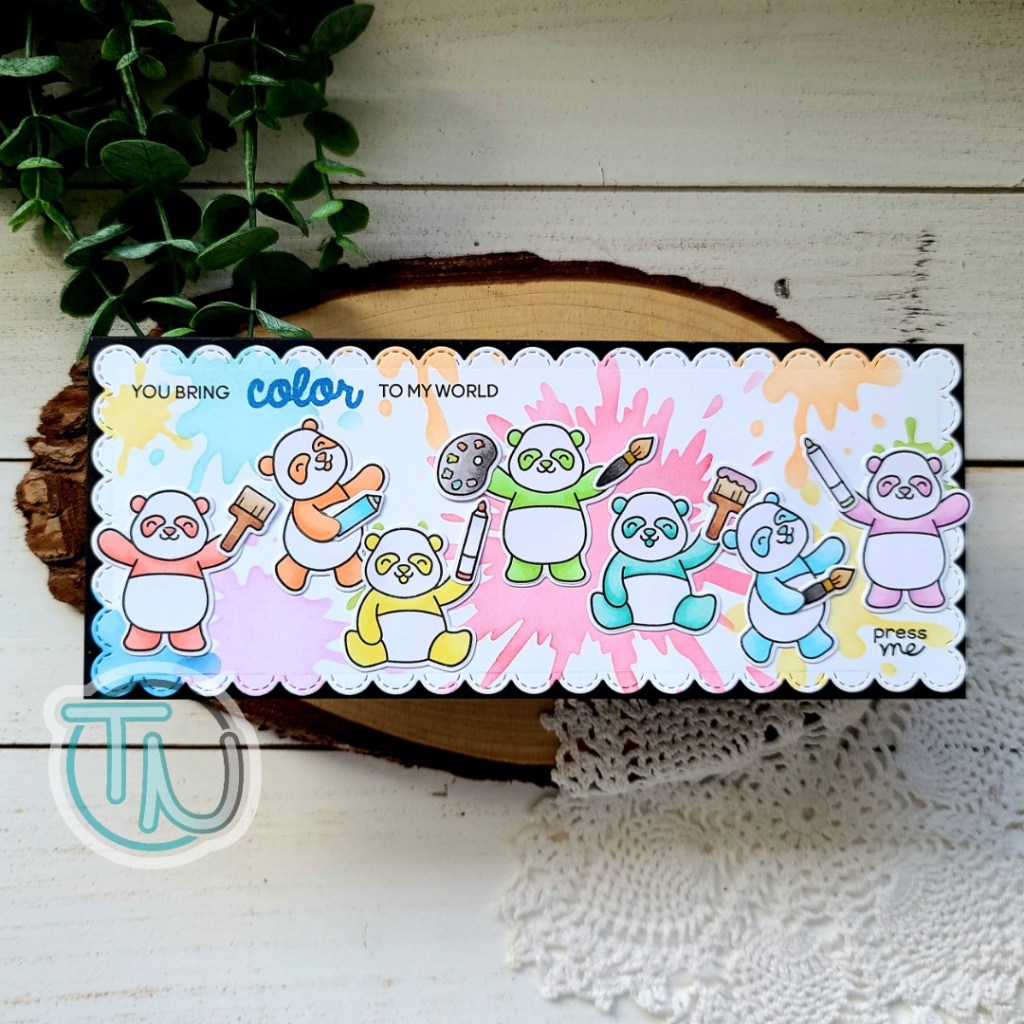
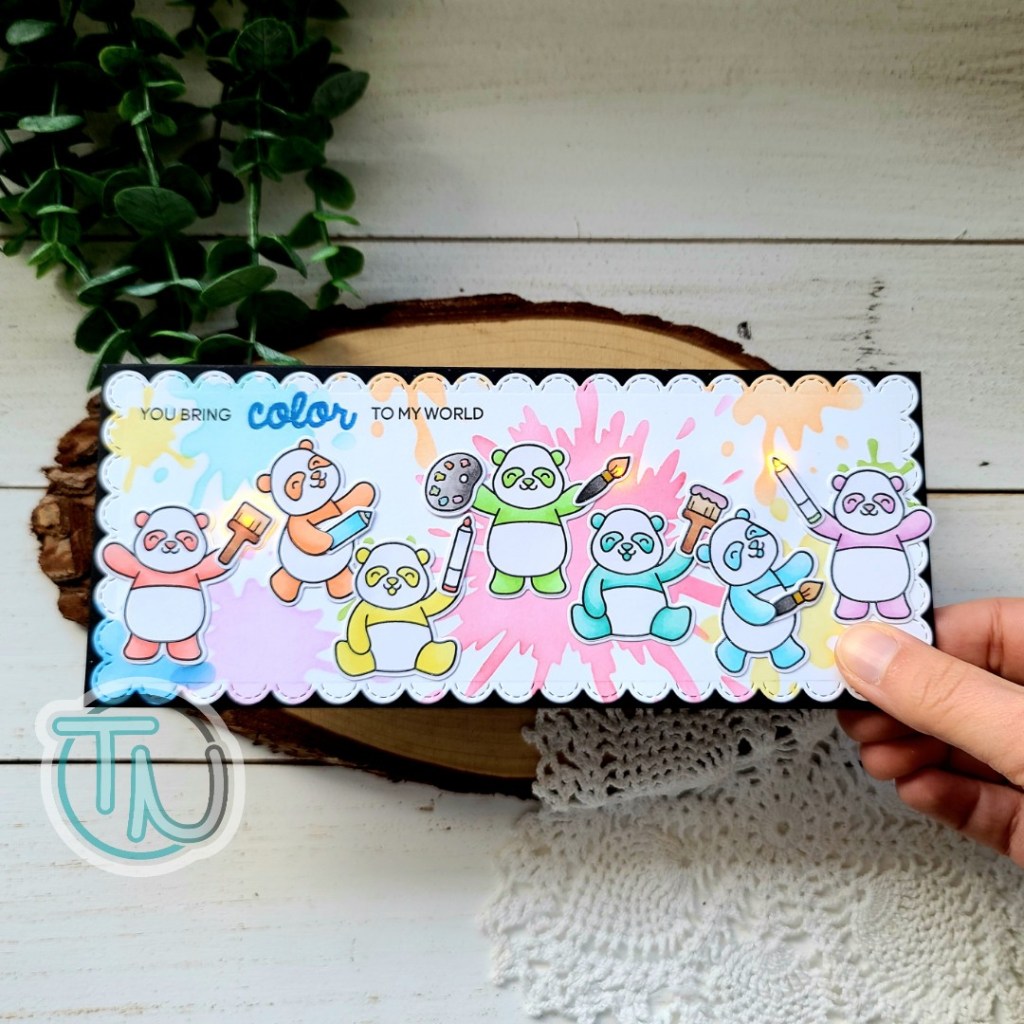
Hello there everyone! Thanks so much for stopping by! Today I have an adorable light up card to share with you featuring a bunch of great new products from the most recent Heffy Doodle release. Today’s card was inspired by their monthly challenge over in the Heffy Doodlers Facebook group – Bright Ideas.
I had this idea to create a rainbow of pandas as soon as I saw this set and as my thoughts progressed, I decided it would also be really cool if their paint brushes and markers lit up like they were magic! So I combined the ideas and we have today’s card!
To start today’s card, I stamped and colored the images I wanted to use. I used the coordinating dies to cut the images out and then laid them out how I wanted to arrange them. This was I could “assign” the accessories to each panda and glue them in place. Next I moved on to the background panel so I could get started on the light up portion. For that, I die cut the slimline scalloped panel from Heffy Doodle pull tab die set and inked it up with the messy desk stencil. I put my pandas in place and then used a long strip of post-it tape to tape them all together. I carefully marked with a pencil behind each brush or marker I wanted to light up so I could punch out a circle for the light to shine through.
Above you can see the pandas all taped together so nothing moves between punching holes and gluing things in place. On the stenciled panel you can see the larger hole on the left was a random circle die I found in a set I had on hand. (Guaranteed you have something that will work.) The other two holes are really small from a Fiskars hole punch I had in my stash that is the perfect size for the lights to shine. You can also see that I stamped my sentiments already in preparation for adding the lighting mechanism to the back of this panel. Let’s look at that next.
I am using the Pear Blossom Press EZ Lights today. The name says it all. It’s so simple! No copper tape, no guess work. Pretty much plug-n-play. 😉 I added scrappy tape to the back of the battery pack and popped it in place (where I stamped the “press me” sentiment on the front). Then taped each light in place with some more scrappy tape. (Here I just don’t remove the release paper on the back and it holds them perfectly in place! Once this was done, I added double-layer foam tape to the back of the panel excluding the battery pack and popped it on a black slimline card base.
Adding liquid glue to the line of pandas I had on my post-it tape, I put them in place next. Then I moved on to some simple finishing touches of just adding glossy accents to the panda noses, paint and marker tips.
Here’s a look at the card lit up!
I had so much fun creating this scene! I hope you like it and found some inspiration to create something fun and share it with someone! My daughter has chosen to steal this card from me so it won’t be going in the mail. But she’s super excited about it so it’s all worth it.
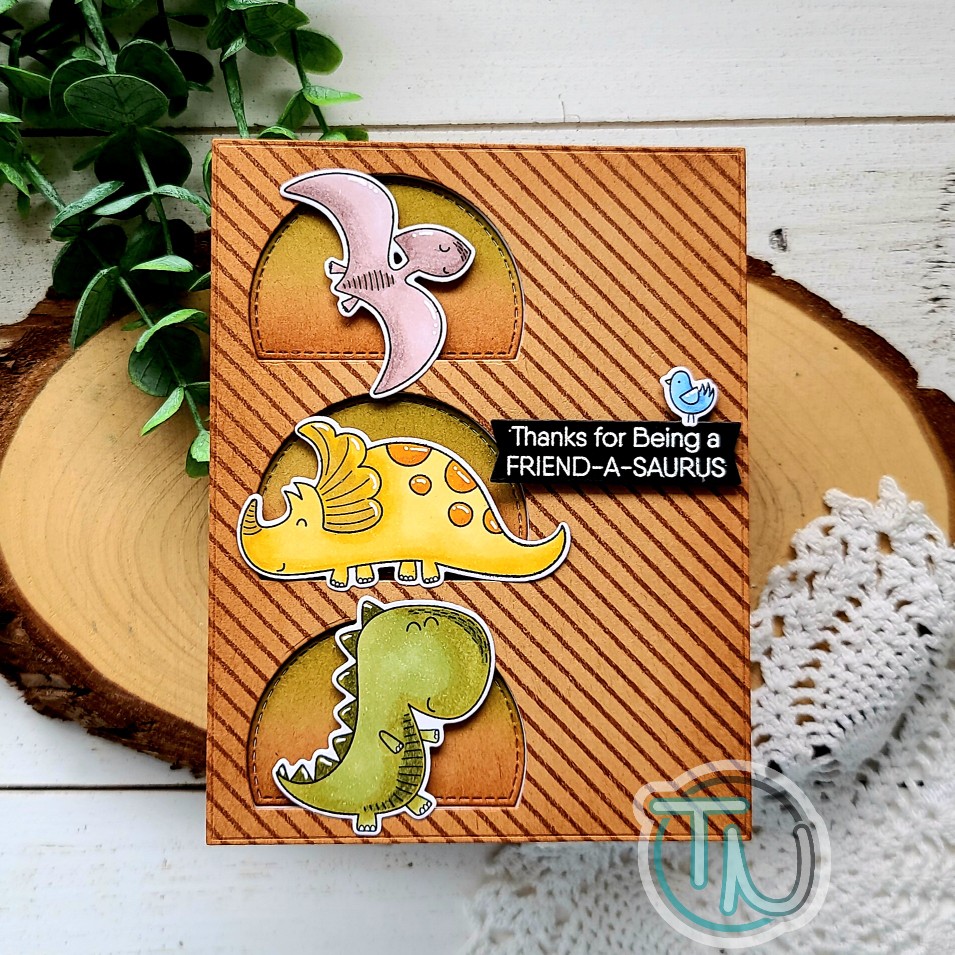
Hi again! I’m back with my second entry into the MFT Stamps Wednesday Sketch Challenge and it’s SO CUTE! I just had to pull out these sweet dinos that I got for Christmas! I’ve only used them one other time and was so happy to ink them up again!
To create my card, I started by choosing the image I wanted to use out of the set, stamped and colored them with my copics. Then I used the coordinating dies to cut them out and set them all aside. Next, I stamped and heat embossed a sentiment on black cardstock, then cut it out with a Pink & Main large sentiment strip.
For my background, I die cut the largest Trinity Stamps embossed edge rectangle from kraft cardstock. I pulled out a retired MFT Stamps arch stax die set and cut 3 of those from the left side. Next, I stamped the MFT STamps diagonal stripes background stamp on the panel in brown ink. Then I used a blending brush to ink up the edges for a little dimension. While I had the blending brushes out, I added some of the brown ink to the bottom of the arch cutouts and then went back with an olive green ink on the tops.
I added foam tape to the back of the striped panel and adhered it to a white card base. Then I used liquid glue to add the arches back in to their windows. Next, I added foam squares to the back of the dinos and popped them in place. I added foam strips to the back of the sentiment and bird and added them last.
For finishing touches, I just added some fun white gel pen highlights to all the images. I just love the earthy tones of this card! It’s super fun and would be great for a girl or a guy!
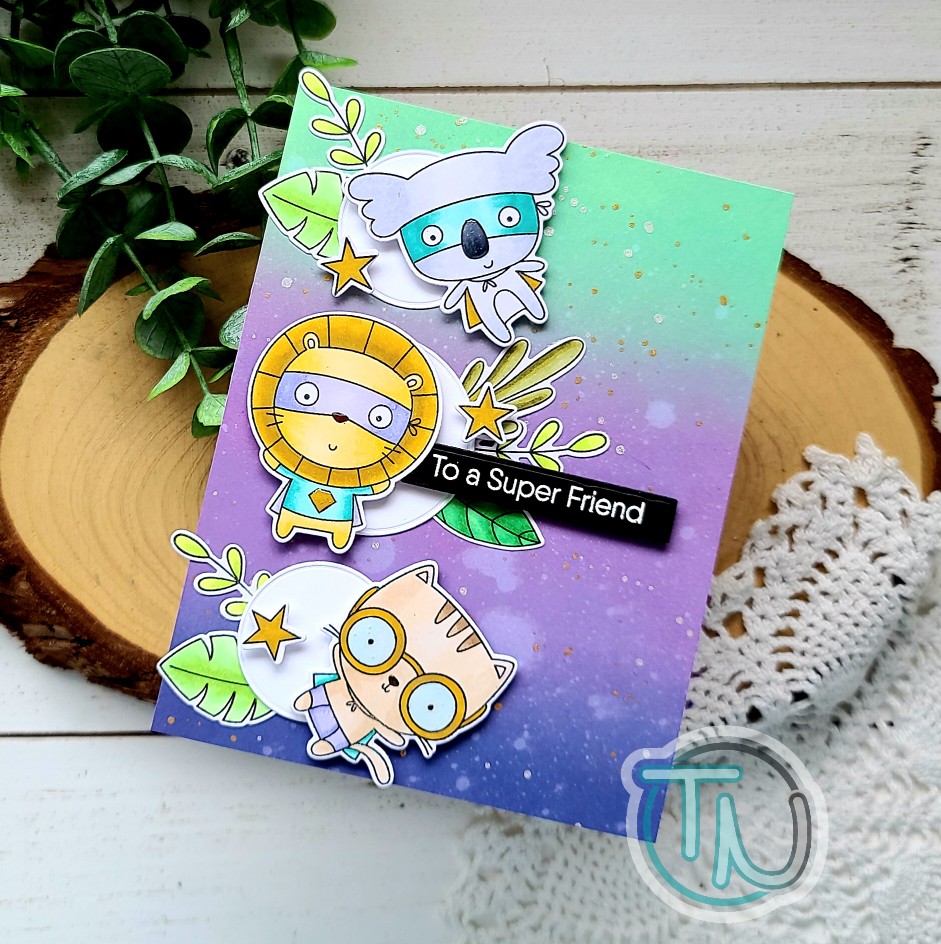
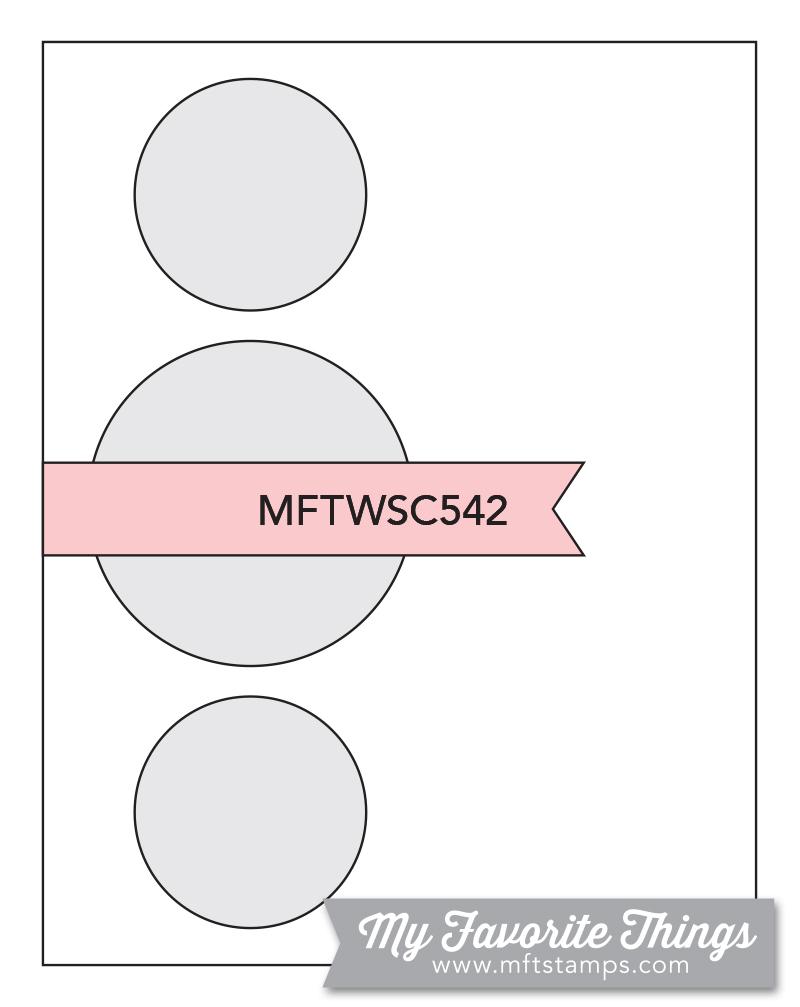
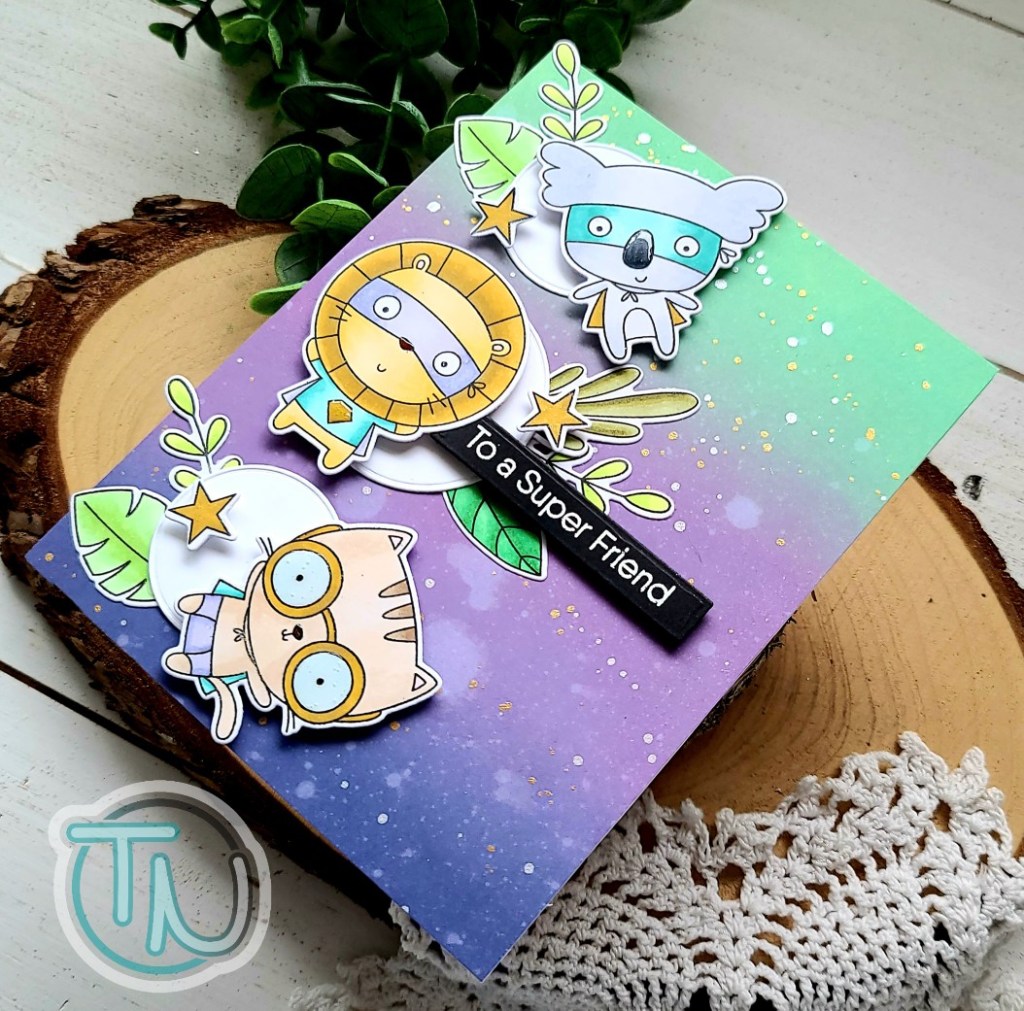
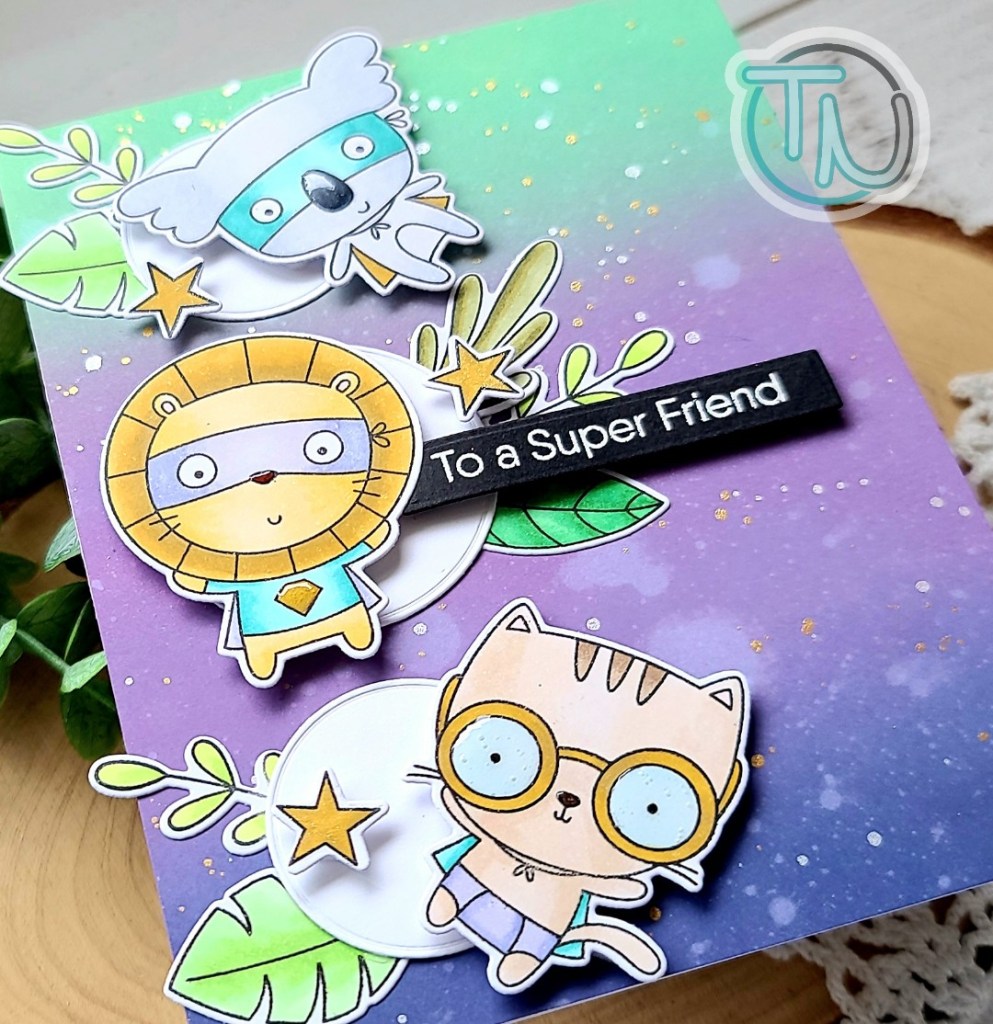
Hey friends! I’m stopping by this weekend with a couple of really fun cards I created using the MFT Stamps Wednesday Sketch Challenge sketch. Here’s a look at the sketch.
For some reason this one really inspired me and I immediately pulled my stamps out and started coloring. Today we have another Super Friend card because I’m so in love with those critters!
I started my card by stamping and coloring the images from Super Friend. Then I used the coordinating dies to cut them out. Using the colors of their outfits, I found a few distress oxide colors to blend for my background. Today I tried cracked pistachio, dusty concord and chipped sapphire. Then I spritzed the panel with water and also flicked some pearl and gold watercolor on it.
I used my Trinity Stamps embossed edge circle stack to die cut 3 white circles and glued the foliage images on the back side of them. Then I glued those to my inked panel. I added foam squares to my critters and popped them in place next.
I stamped and heat embossed a sentiment from the set on black cardstock and used a Pink & Main Sunny Greetings sentiment strip die to cut it out. I added it with foam strips and moved on to finishing touches.
For those I started with glossy accents on the critter noses, chest emblem and glasses. Then I used my Wink of Stella glitter brush pen on the stars and decided this card was finished.
It’s SUPER adorable and will be fabulous to send to a great friend for a pick me up!