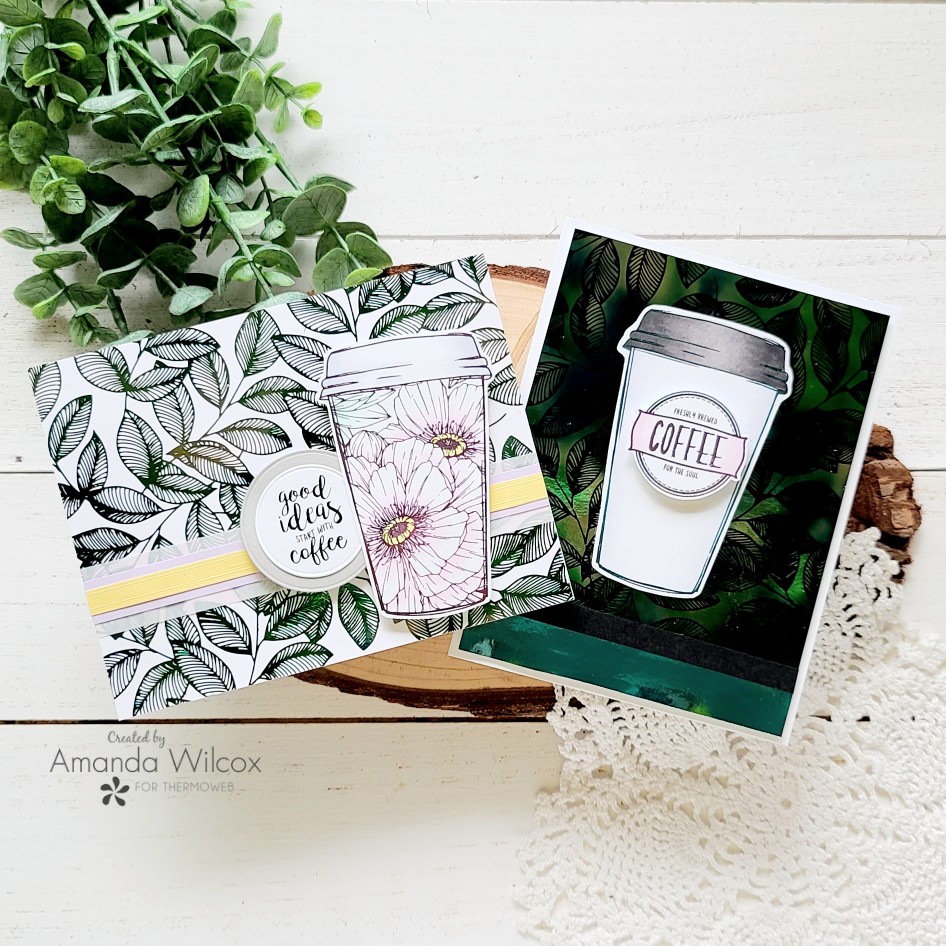
Hey friends! I’m over on the Thermoweb blog today featuring one of the new Unity Toner Card Front designs. These are beautiful and are so fun to create with already!
I did a two-for-one technique by foiling the card front and then using the negative on a toner sheet to create the darker card front. I love how it turned out!
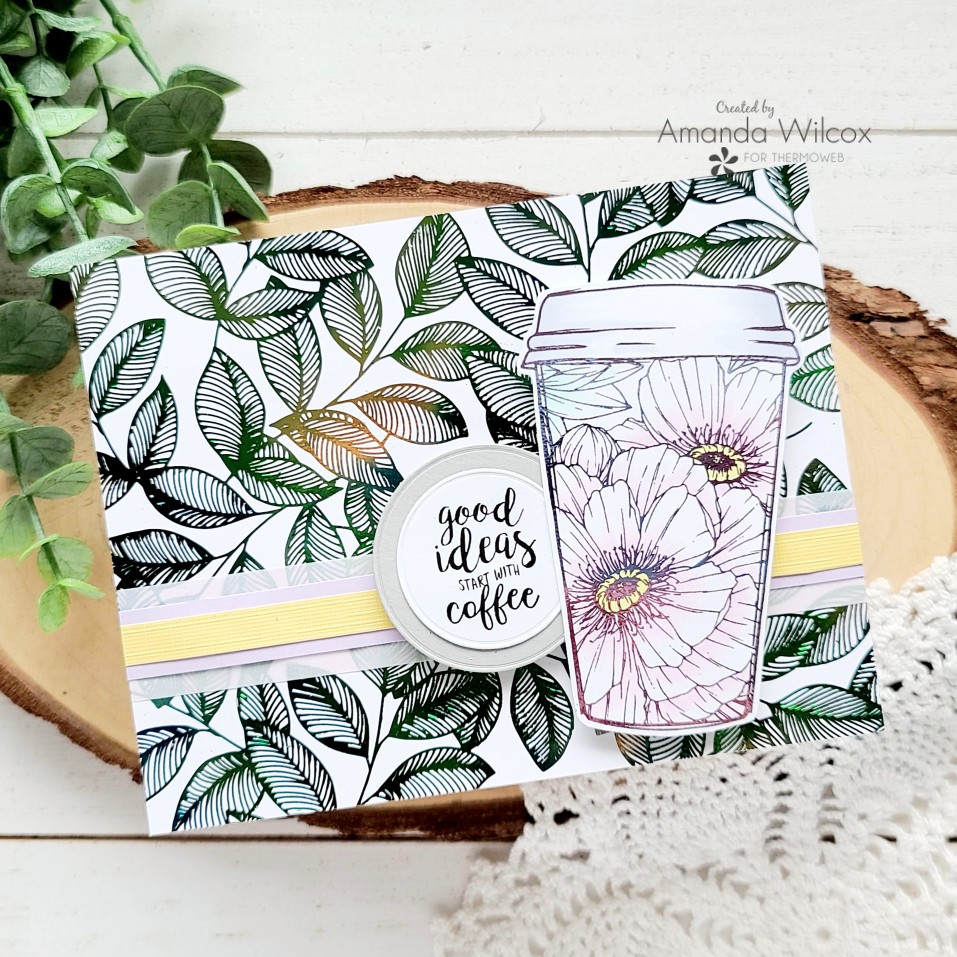
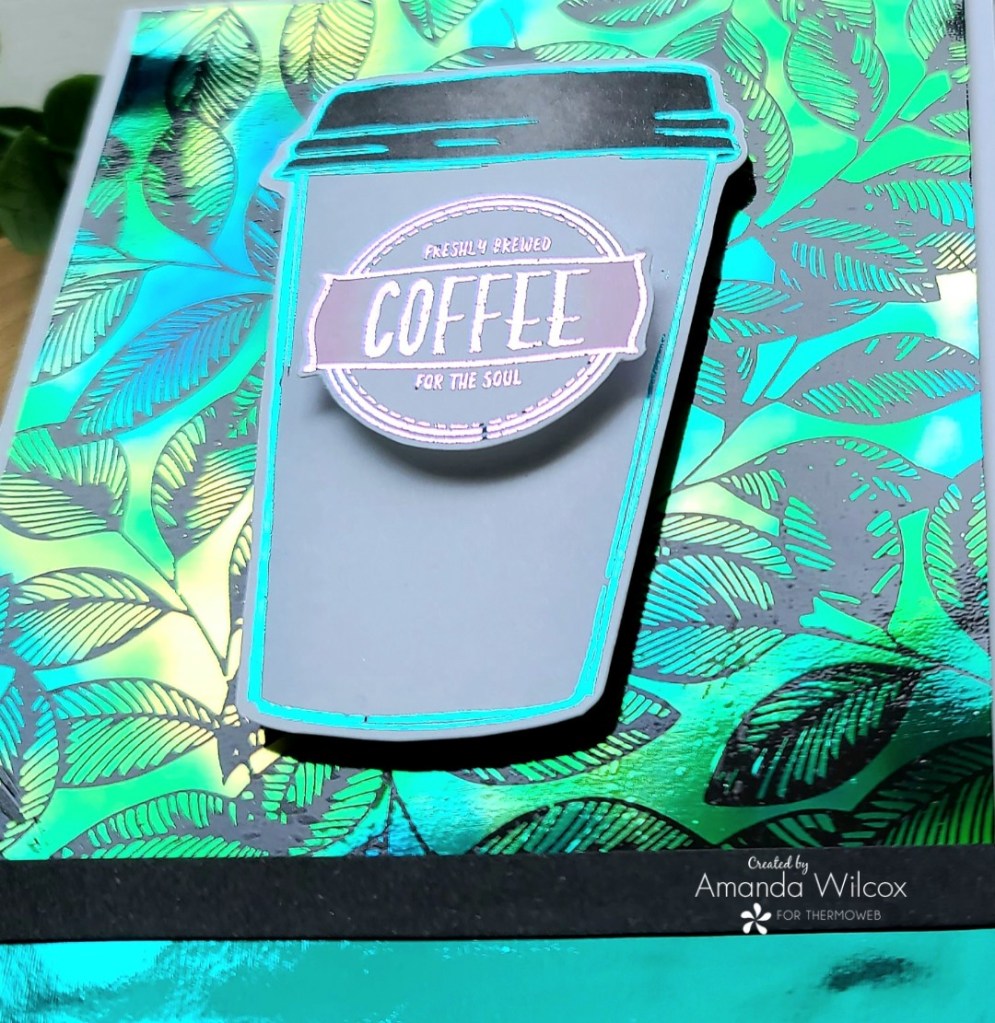
I paired the tranquil leaves card front with spring coffee stamps to create both cards. The backgrounds feature emerald watercolor decofoil and this first cup is foiled with wild lilac because it was a digital stamp. I love that you can copic color over foiling. It’s so cool!
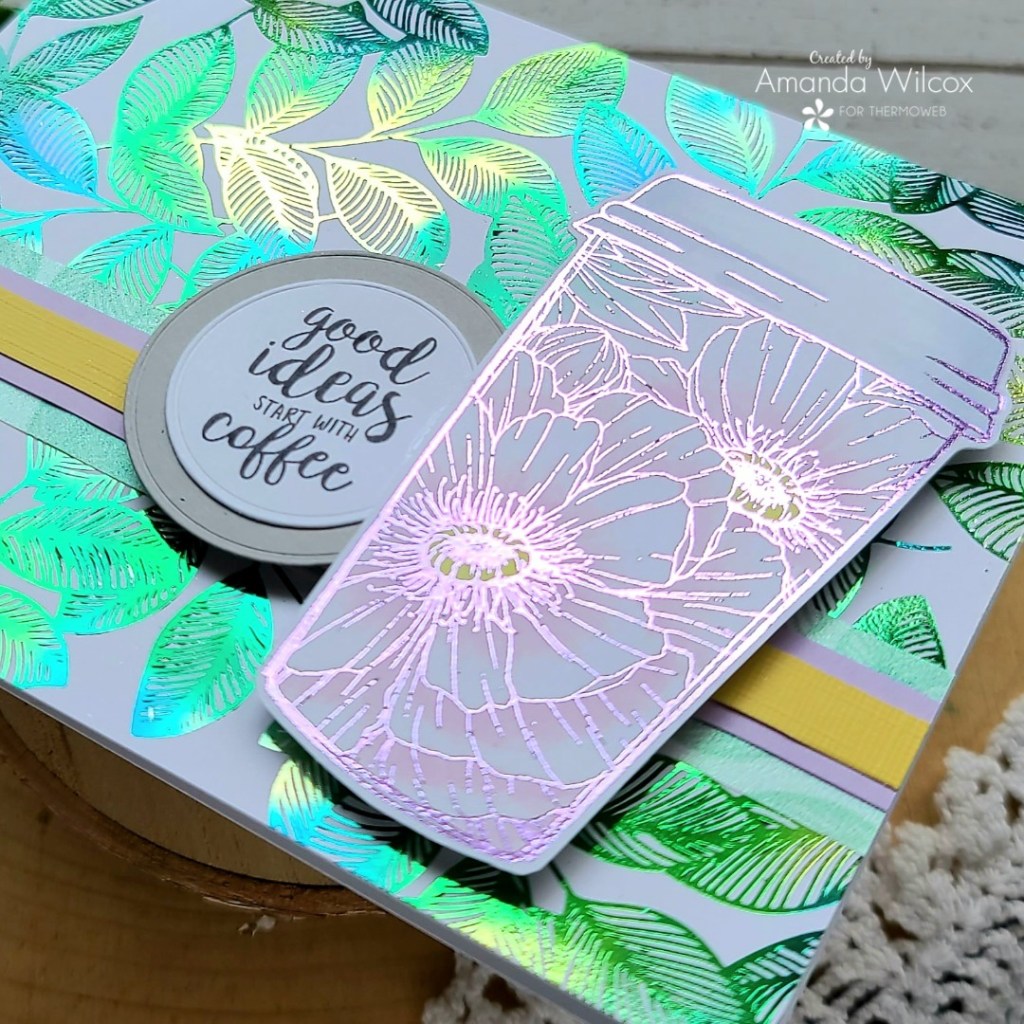
Here’s a look a the card front close up and in the light. Isn’t is so pretty!?! I am having so much fun playing with foils and different techniques. I definitely recommend it.
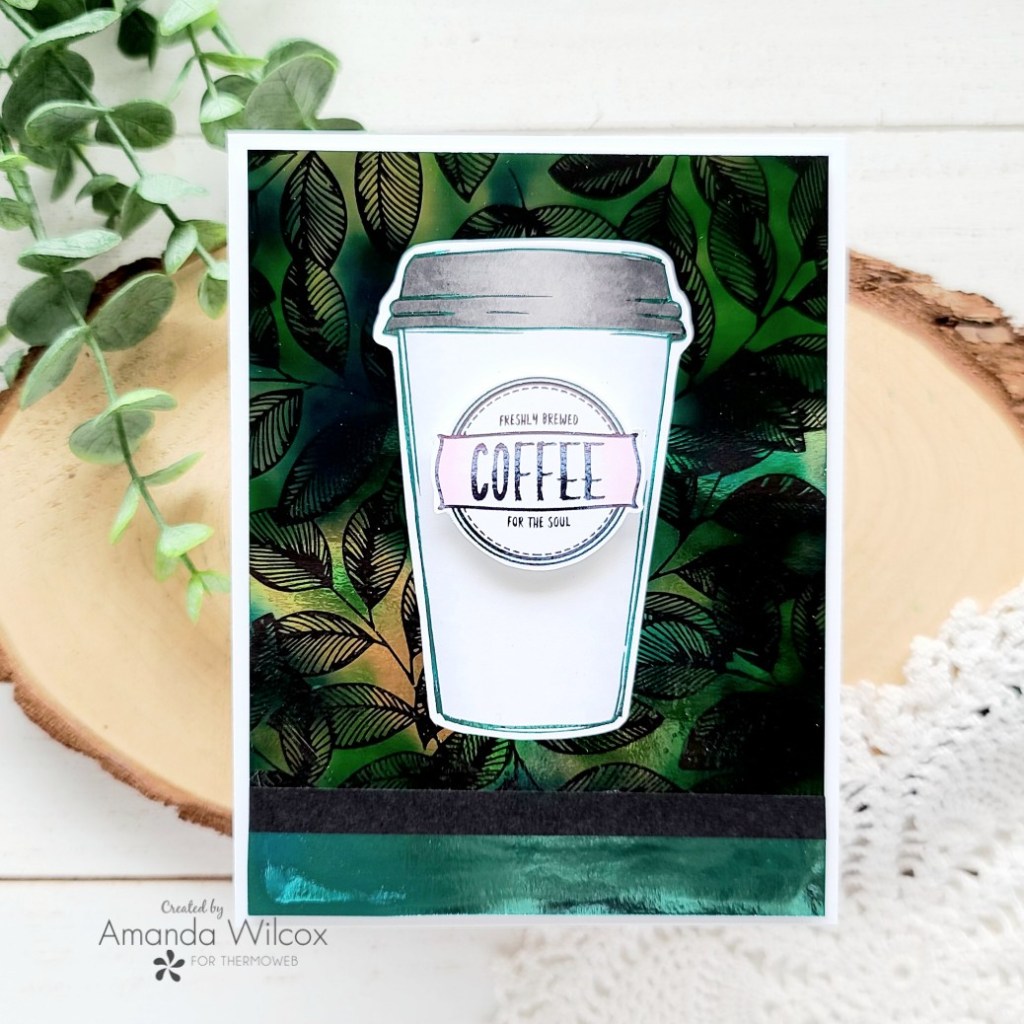
And here is the second card I created with that negative sheet. Isn’t it awesome!?! The fact that there was no foil waste and getting two cards done at the same time were huge bonuses!
Here’s a close up of this one too. I used turquoise sea for the accents on this card and the wild lilac for the cup badge.
Be sure to head over to the Thermoweb blog for the step-by-step process how I created both of these cards.
I appreciate you sharing your time with me. Have a fabulous day!
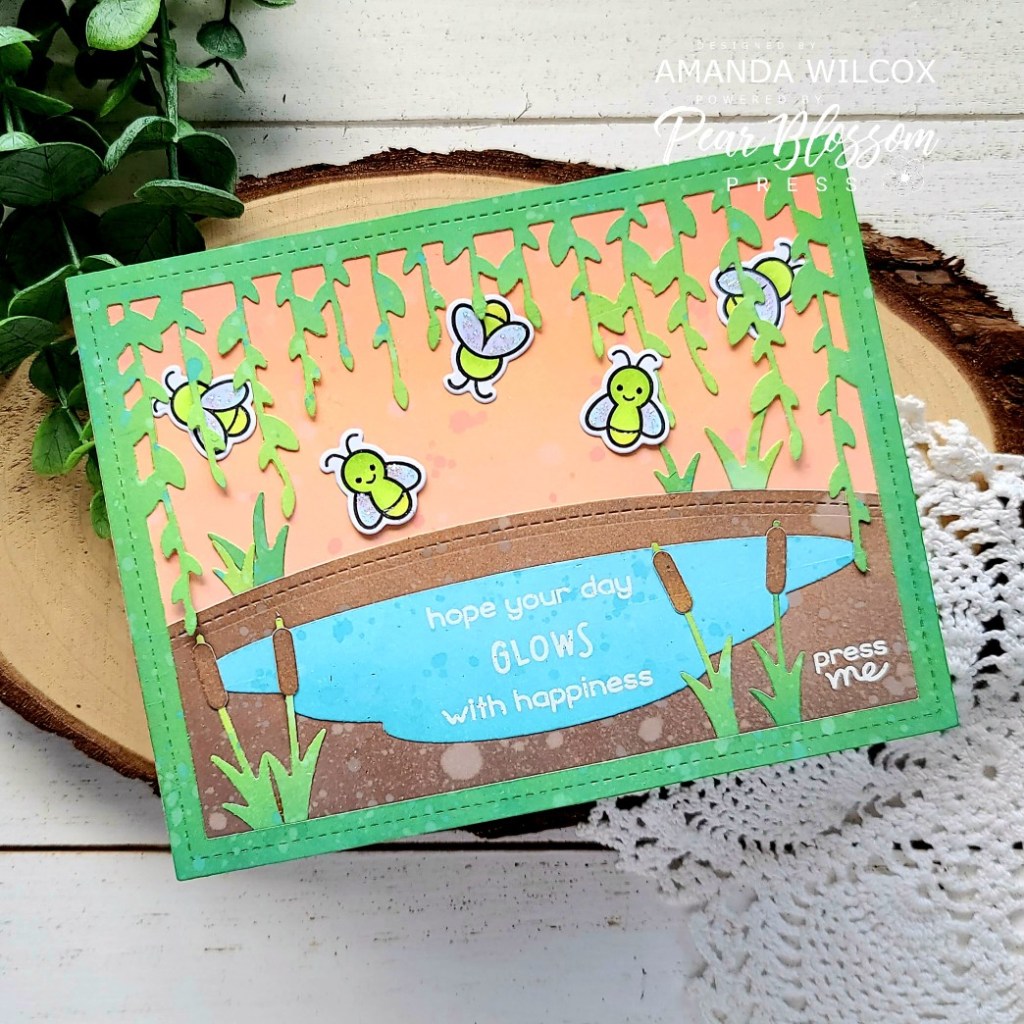
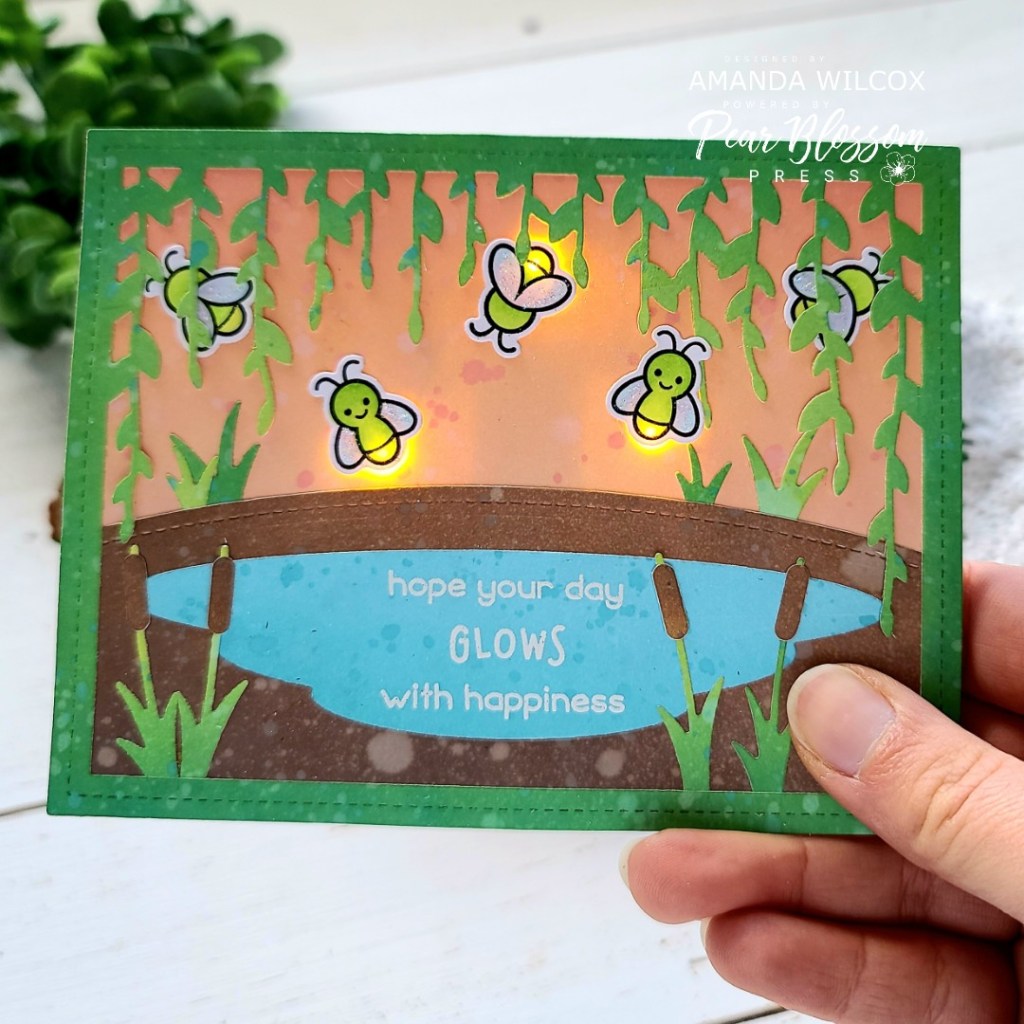
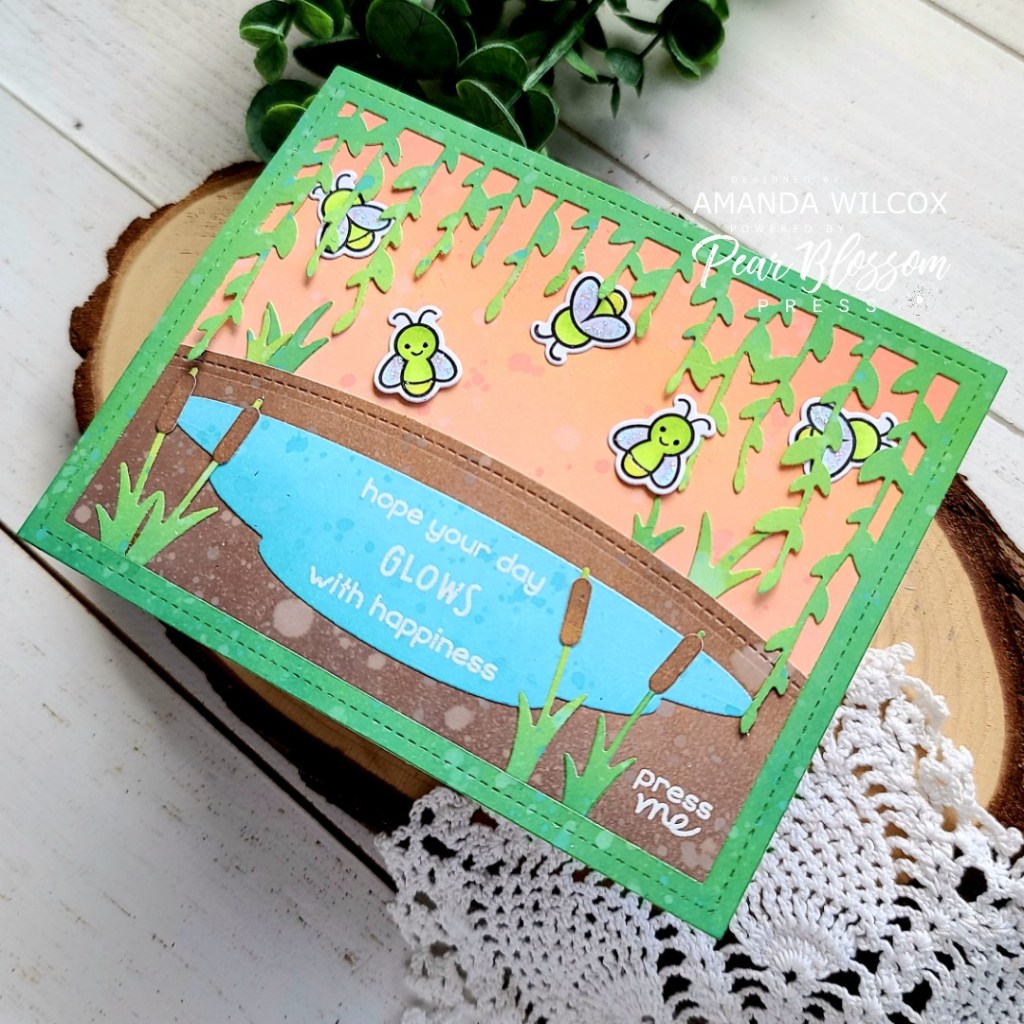
Hey friends! I’m super excited to be back with a second card guest designing for Pear Blossom Press! Today I have a card featuring some awesome Lawn Fawn products and the Pear Blossom Press EZ Lights!
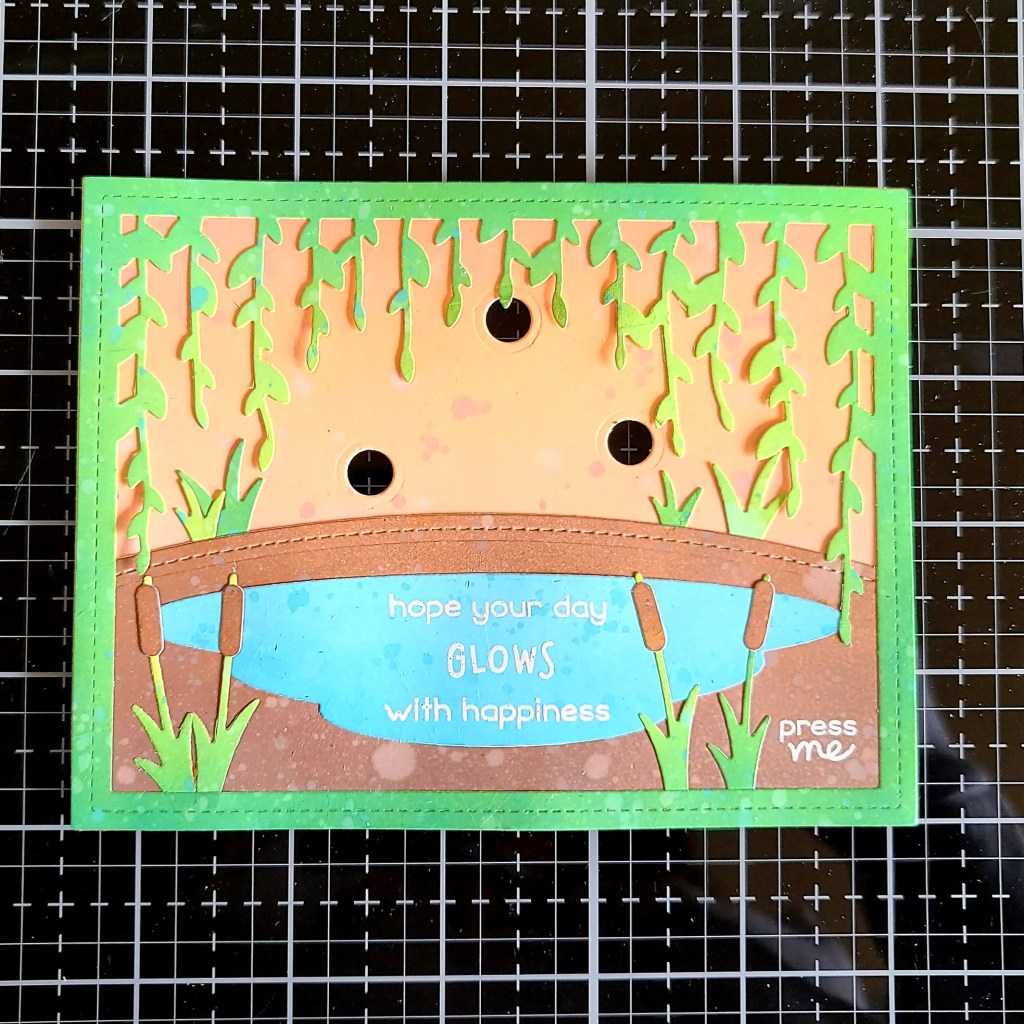
Here’s a look at the finished card before we dive into the process of creating it. Isn’t it just too cute! We don’t have fireflies where I live but I always thought it would be a really cool thing to be able to sit outside and watch them at night. So, I made a card thinking of that while I got inky. Let’s get started!
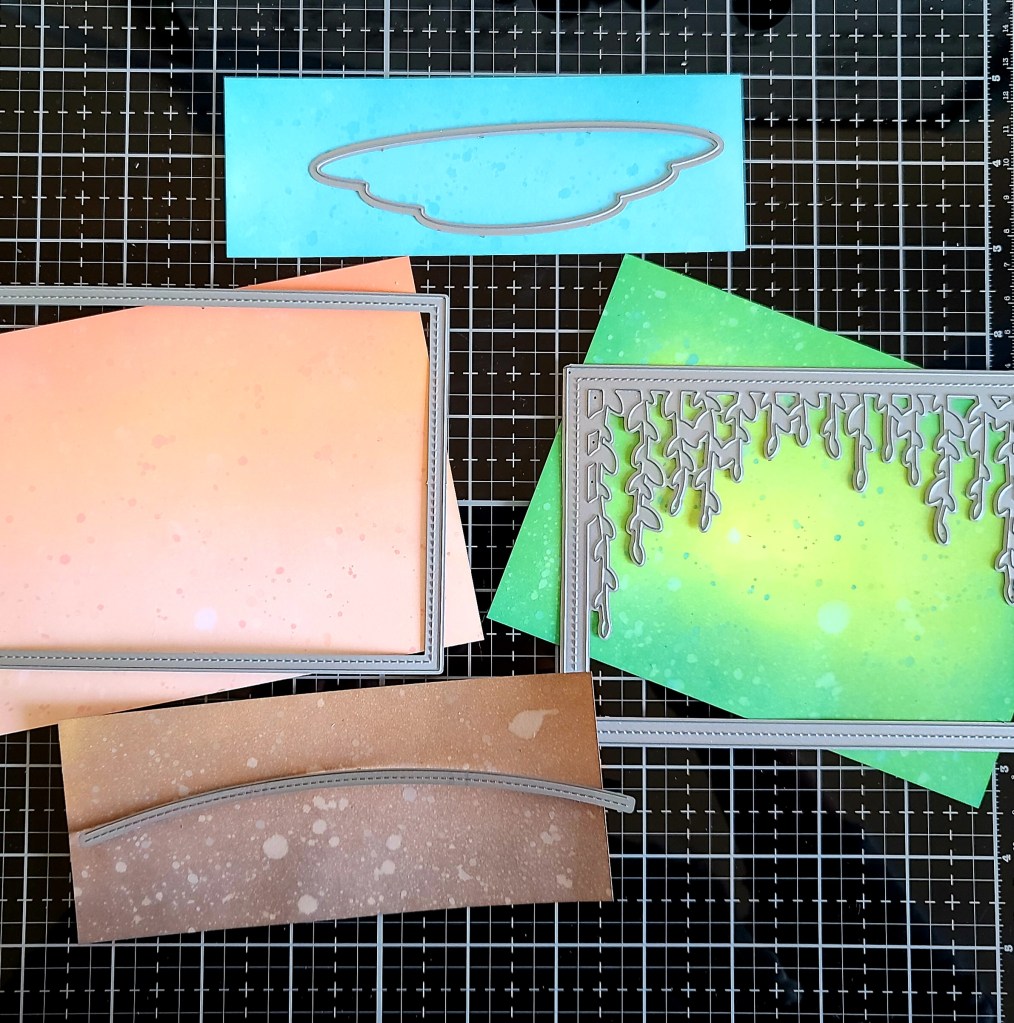
To make things simple, I inked up all my panels at once with my distress oxide inks. After each panel was inked I smooshed the ink pads on my glass mat, spritzed it with water and then flicked the watered down ink on the panel for extra texture. this is a new favorite technique that I do pretty much every time I pull out distress inks to play with.
Once the panels were dry, here are the dies I used to cut each panel. The green from the bayou backdrop die, saving that large portion in the center to come back and cut the grass and cattails from later on. The brown was cut from a hillside border first and the same stitched rectangle as the peach panel after so they layered nicely. And last, the little pond die comes from the bayou backdrop set.
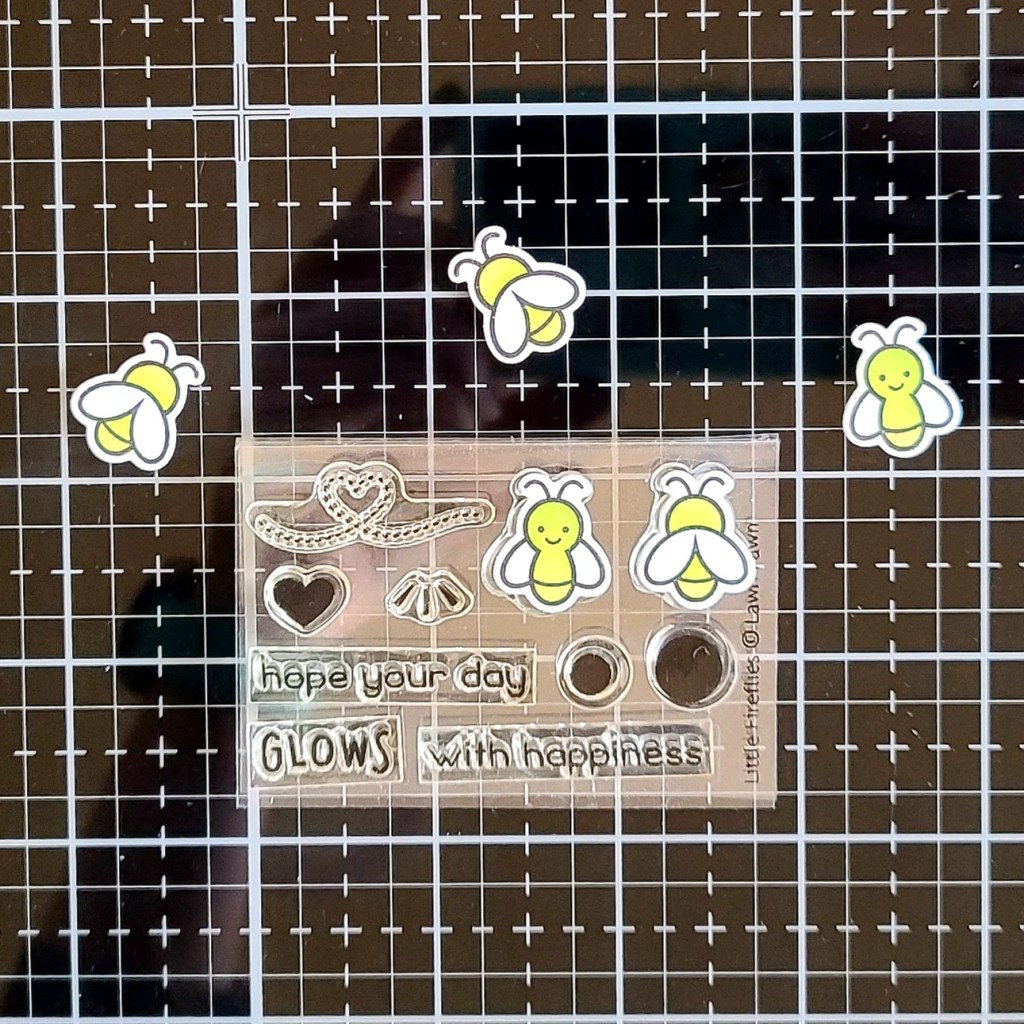
Next, I stamped, colored and die cut some cute fireflies from the Lawn Fawn Little Fireflies set. I thought it would be fun to have front-facing and not so I did a combination of both images.
Next, I stamped and heat embossed the sentiment from Little Fireflies on the lake piece. Then, using the frame and lake as guides, I stamped and heat embossed “press me” on the dirt hill where I want my button to be. This word stamp comes from the Lawn Fawn Push Here stamp set. It’s great for lots of different types of interactive cards. Then I used liquid glue to adhere all of my layers together. Then I took a circle die that happens to come in the Little Fireflies set (for their glowing bottoms if you use that stamp) and cut 3 circles out of the background so the lights could shine through.
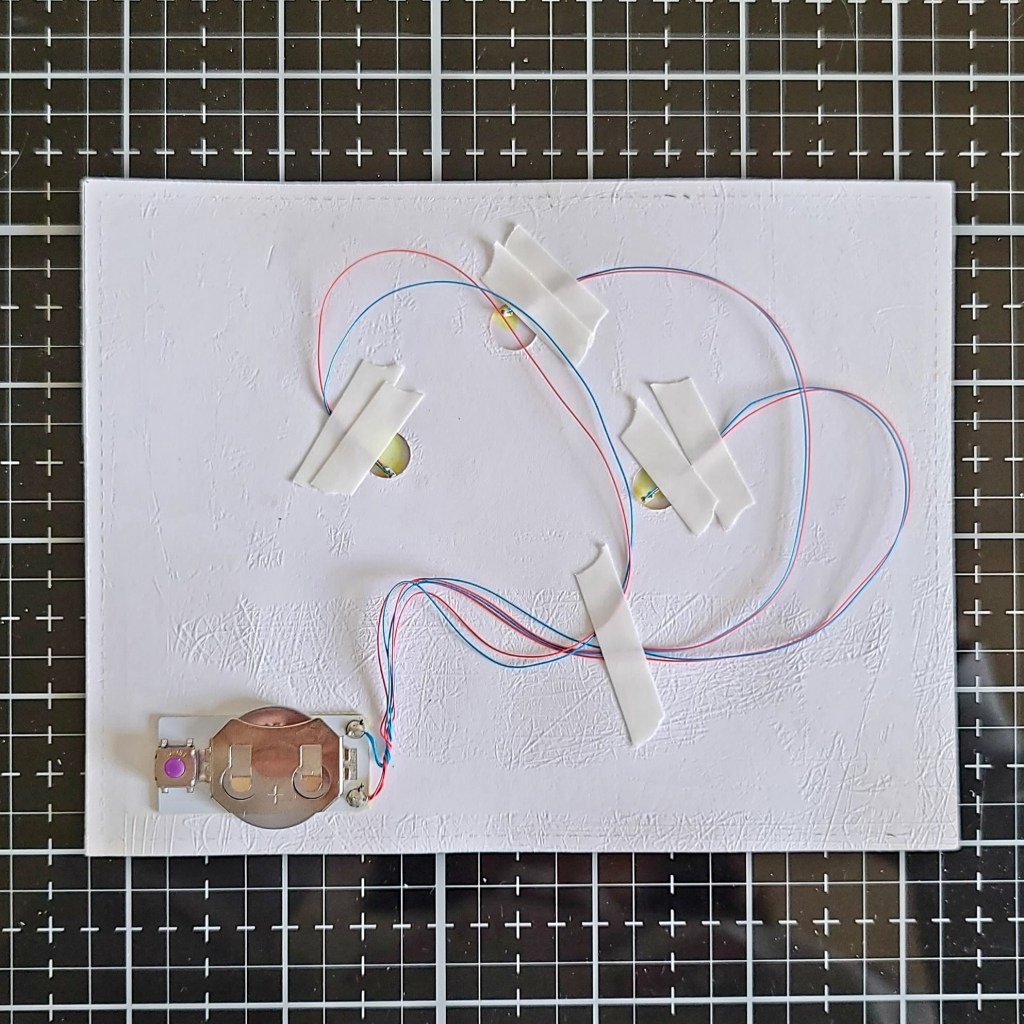
Next, using scrappy tape, I adhered the battery pack to the back of my card front so it lines up with the “press me” on the front. Then I used the same tape to adhere the lights in place over the holes. I flipped my card over, added the fireflies and then adjusted the lights a bit until they lit the fireflies up how I liked. Once there were perfect, I added a few more strips of tape to securely hold everything in place.
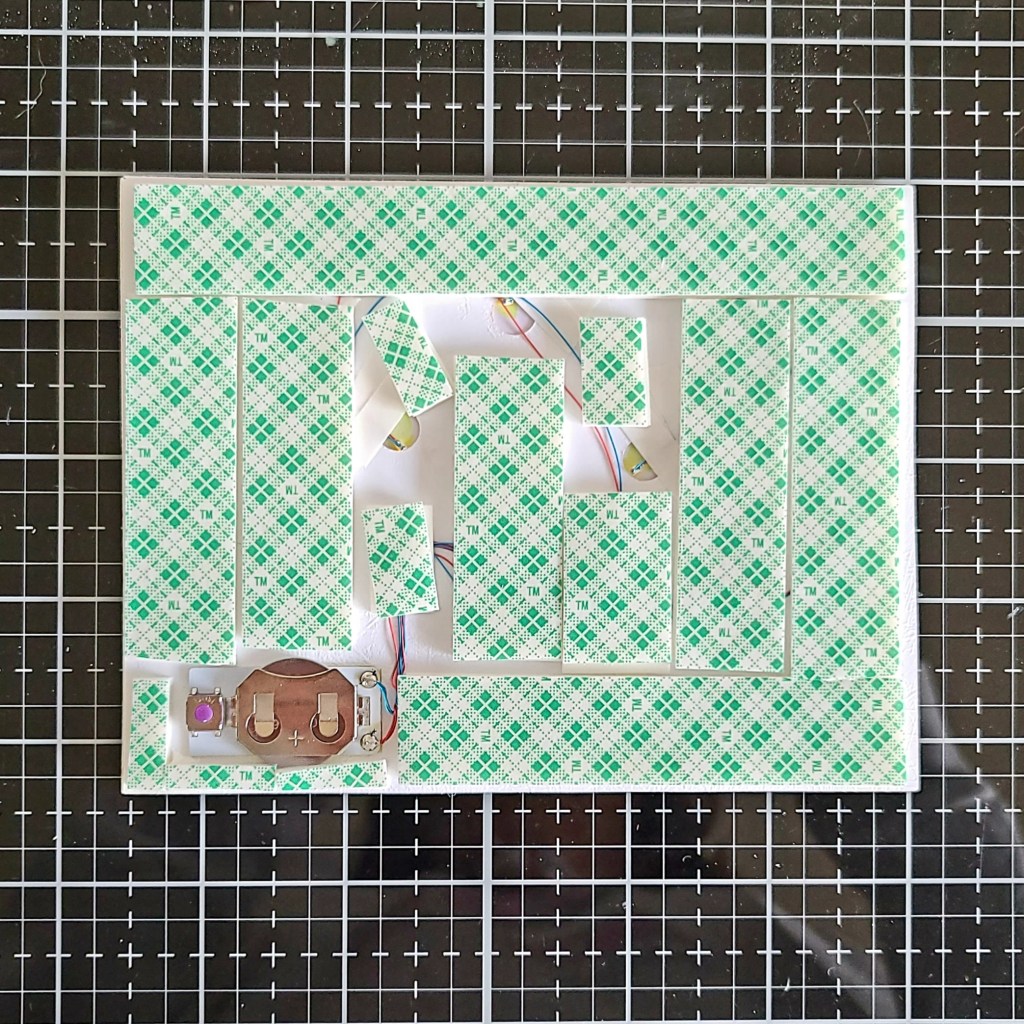
Finally, I added a double layer of foam tape to the back of my whole panel and added it to a white card base.
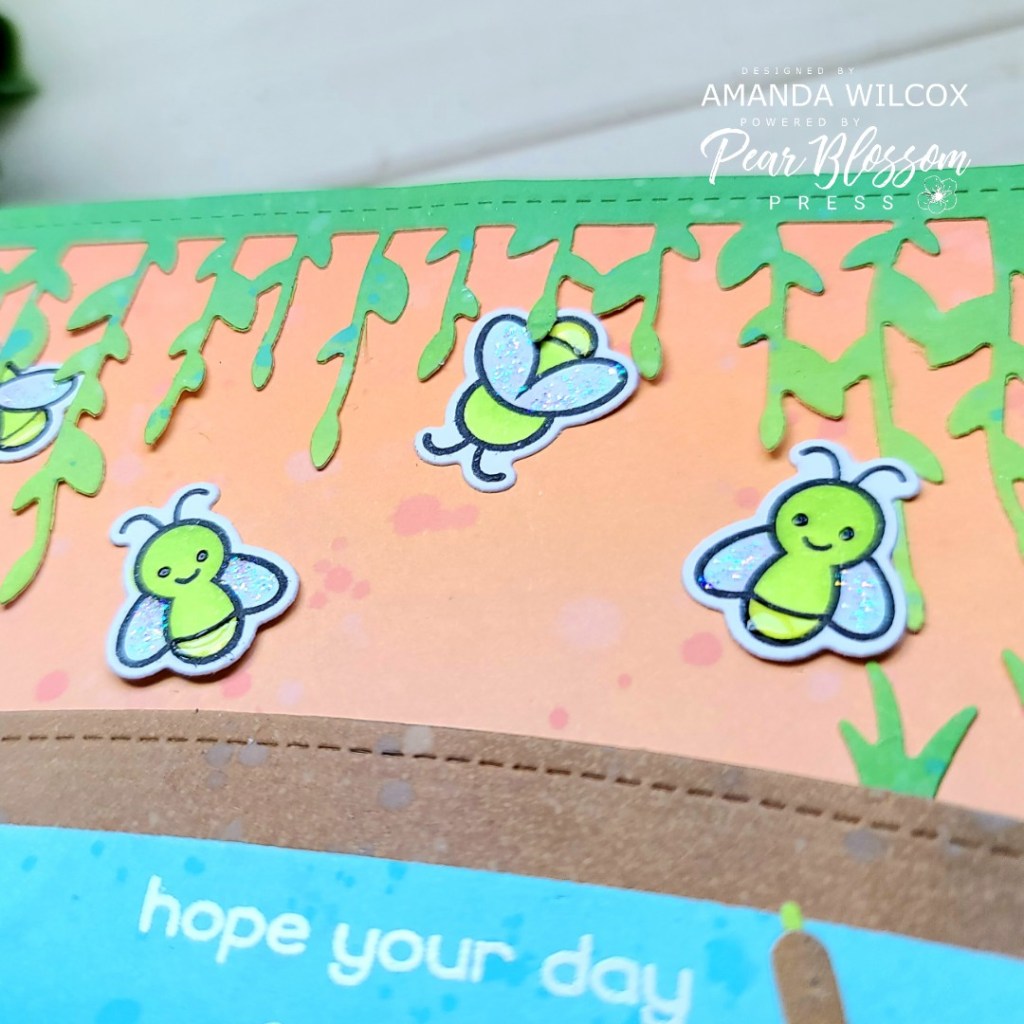
I know there is a lot going on but I just couldn’t leave things the way they were. For finishing touches, I added black glaze pen to the eyes, unicorn Stickles to the wings and glossy accents to their bums! I just think this is too funny and makes me smile!
Ta-da!!! Isn’t this just the cutest ever?!? I am so extremely happy with how this fun card turned out! It’s a good thing these batteries last a while because I keep playing with it on my craft desk.
I hope you found some inspiration to create something wonderful and don’t be afraid to try light up cards. They are so much fun and Pear Blossom Press has taken any difficulties away with their amazing products!
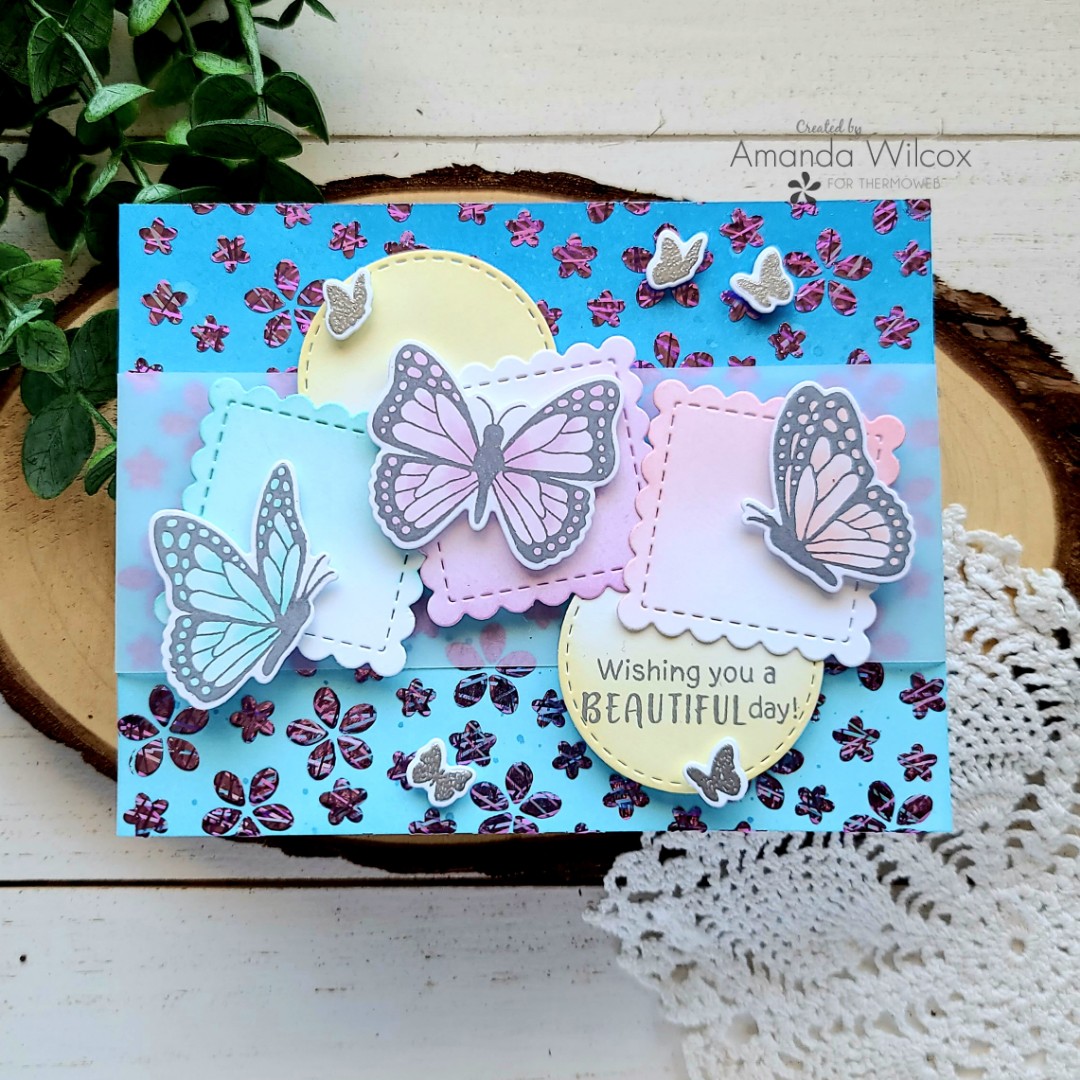
Hi everyone! I’m having a little fun with a scrapbook sketch today in celebration of International Scrapbook Day with Thermoweb! I’m absolutely not a scrapbooker at all…tried, failed, moved on to cards and never looked back. Lol! So I decided to take a sketch for a 12×12 scrapbook page and see if I could turn it into a card. I’m pretty happy with the outcome and it was really fun to push myself.
When I’m getting messy, I like to start with that part first if at all possible so it had time to dry while I work on other parts. So today I inked up a panel with tumbled glass and mermaid lagoon distress oxide inks. Then I splattered it with watered down ink of both colors. Once it was dry, I used the Newton’s Nook petite flowers stencil and decofoil transfer gel over the whole panel.
While that was drying I stamped and colored images from the Newton’s Nook Monarchs stamp set. Then I used the coordinating dies to cut them out. Thinking ahead to filling in my card a little, I stamped and heat embossed the smaller images from the set in silver and cut them out as well.
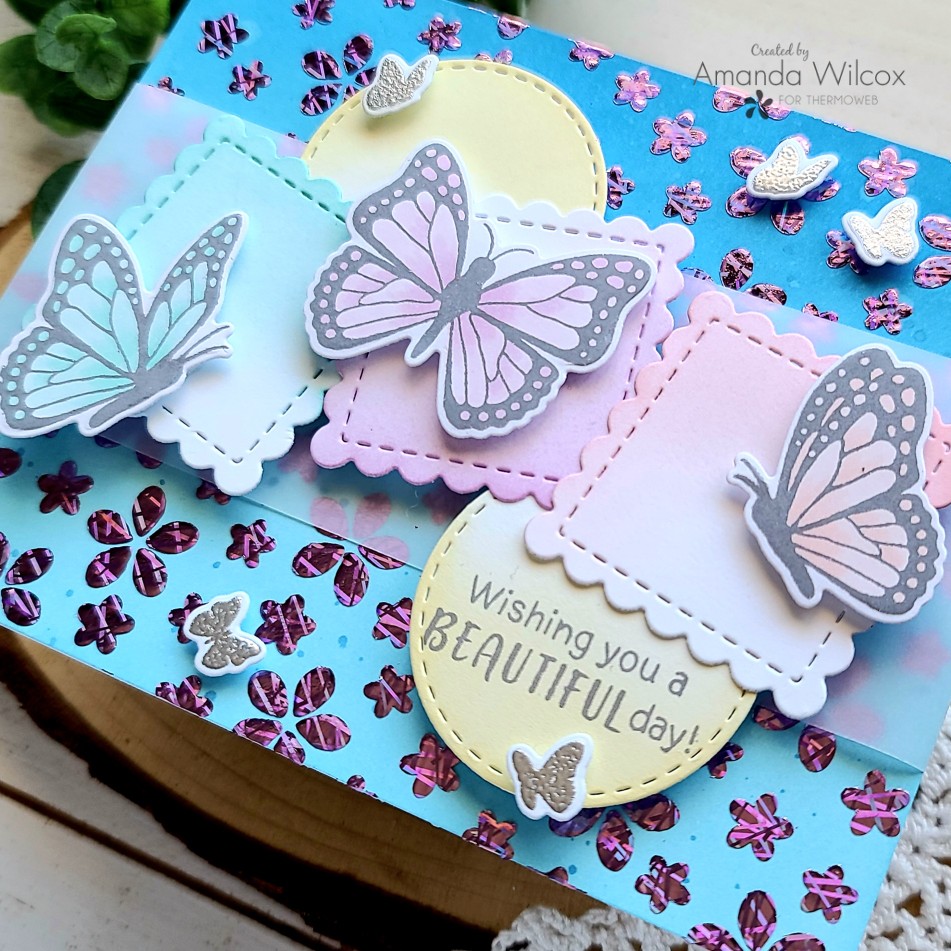
Next, I die cut 3 scalloped squares from the Newton’s Nook slimline frames and windows die set and inked them up with colors to coordinate with the butterflies. Last, I die cut two circles from the slimline frames and portholes and inked them up with soft yellow. Then I stamped a sentiment on the bottom half of one in the same gray ink I used on the butterflies.
Once the transfer gel was dry and my laminator was heated up, I ran the flower panel through with purple sketch decofoil. It’s so beautiful and I just love the sketch line detail in this foil! I trimmed the panel down A2 size and wrapped a 2 inch strip of vellum around it before adhering the panel to a white card base. Next, I arranged the scalloped squares and circles how I wanted them and glued them together with liquid glue. Then I added foam squares to the back and placed them on the card front. Last, I added foam squares to the heat embossed butterflies and added them to my scene as well.
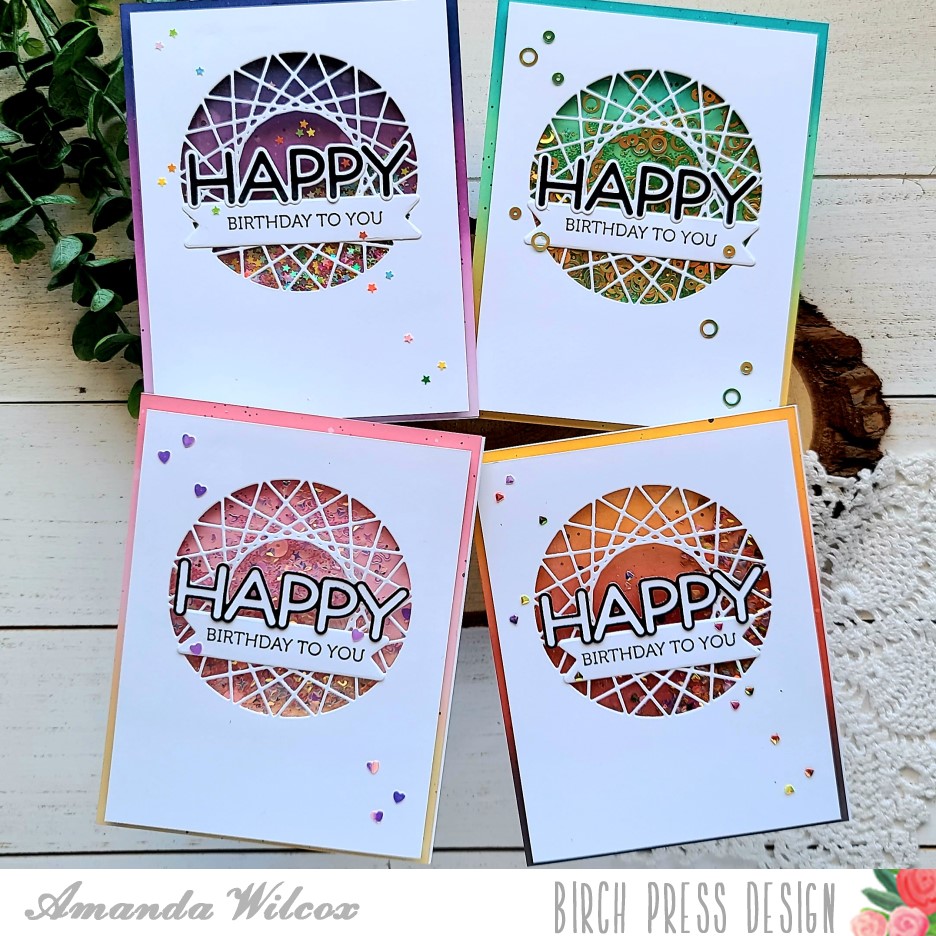
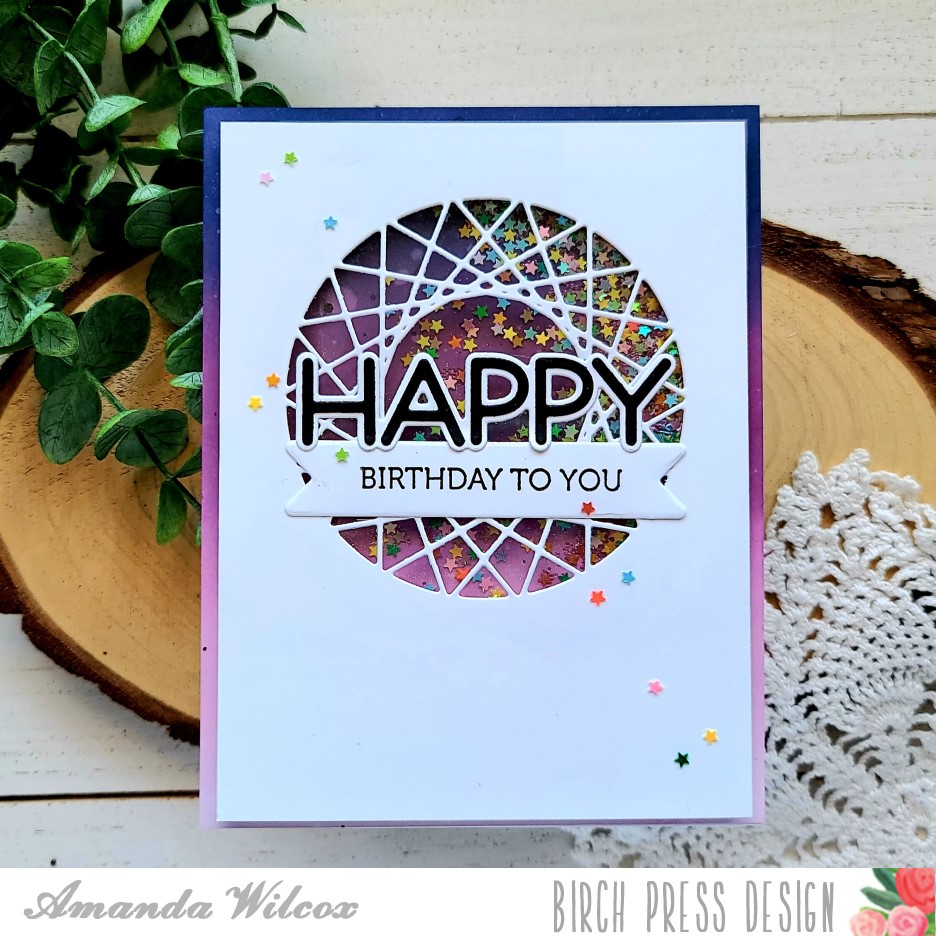
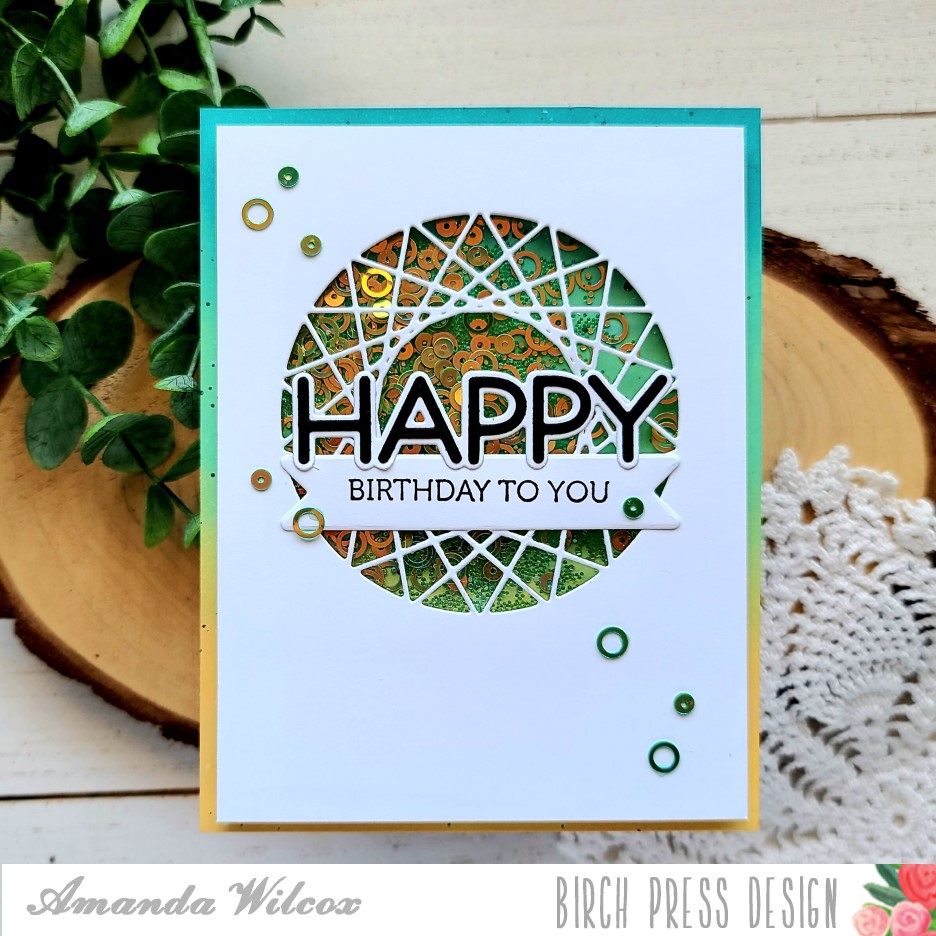
Hey friends! It’s been a while but I’m back on the Birch Press Design blog today featuring a fun set of birthday shaker cards. All of a sudden I needed multiple and I thought this was a fun way to get them done.
For these cards, I did some fun ink blending combos with distress oxides on each panel. Then chose a different embellishment mix from the Twiddler’s Nook shop to go with each. I cut the same front panel and sentiment set for each one.
I doubled up the foam tape on the back, added the shaker bits and closed them up. Then I glued some of the shaker bits on the front of the card design to round things out at the end.
This first one is a mix of walnut stain, crackling campfire and wild honey distress oxide inks and Burning Embers embellishment mix.
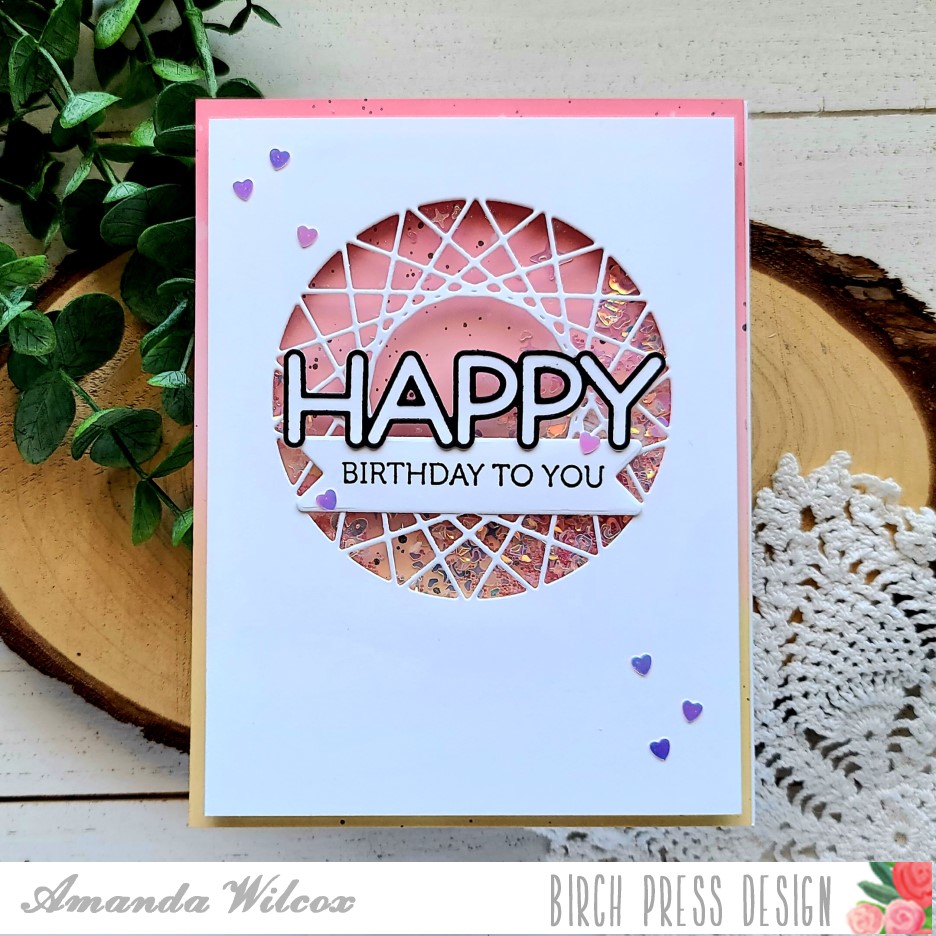
This one is so sweet. It has antique linen, spun sugar and worn lipstick distress oxide colors and the embellishment mix is Mermaid Wishes.
And this one might be my favorite with those bold colors and the fun stars! The distress oxide colors here are chipped sapphire, seedless preserves and milled lavender. The embellishments are called Wishing on Rainbow Stars.
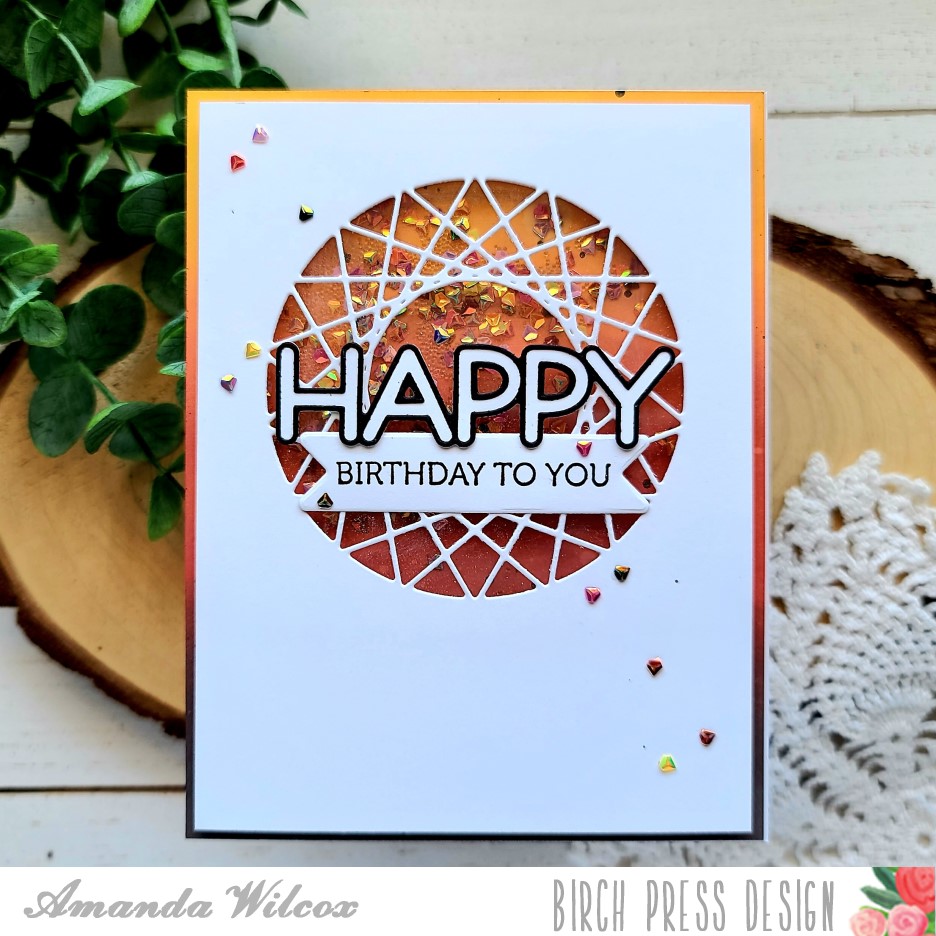
Then, for the final card we have scattered straw, cracked pistachio and peacock feathers distress oxide inks with Princess Rings embellishments in the Tiana color choice.
I had fun getting super inky and trying out new color blends. If you’d like to see a step-by-step head over to the Birch Press Design blog and I’ll walk you through the steps.
I appreciate you sharing your time with me. Have a fabulous day!
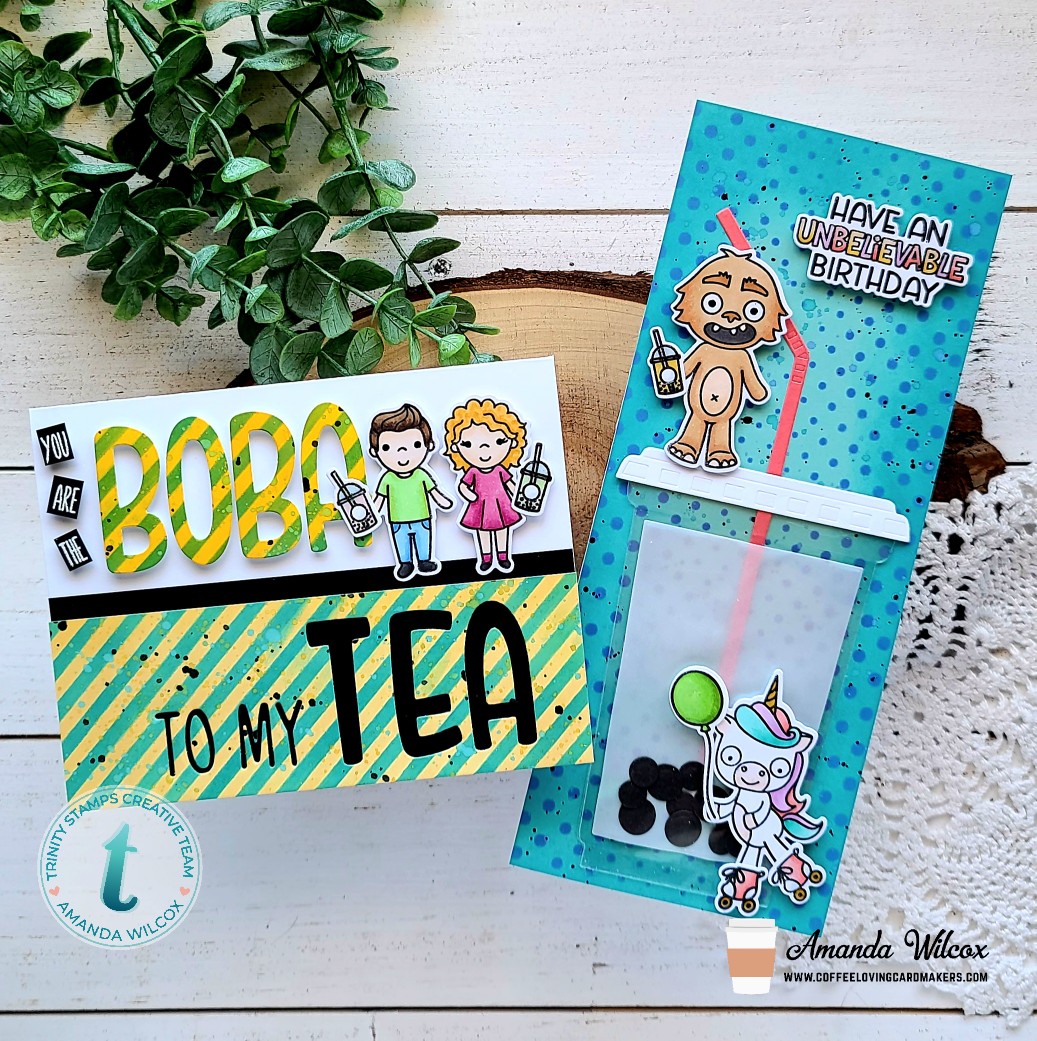
Yippee!!! Today is National Bubble Tea Day and the Coffee Loving Cardmakers are celebrating along with Trinity Stamps with a fun blog hop full of inspiration and a chance to win a $25 gift code to the Trinity Stamps store!!! I made two fun cards to share with you today. I hope you like them.
I had so many fun ideas that it was hard to narrow it down. I had a blast getting inky, coloring stamp sets I haven’t been able to use much and playing with dies in different ways. Let’s jump in and I’ll run through how I made each card. Then at the end of this post I’ll give you a list of linked products so you can easily find them.
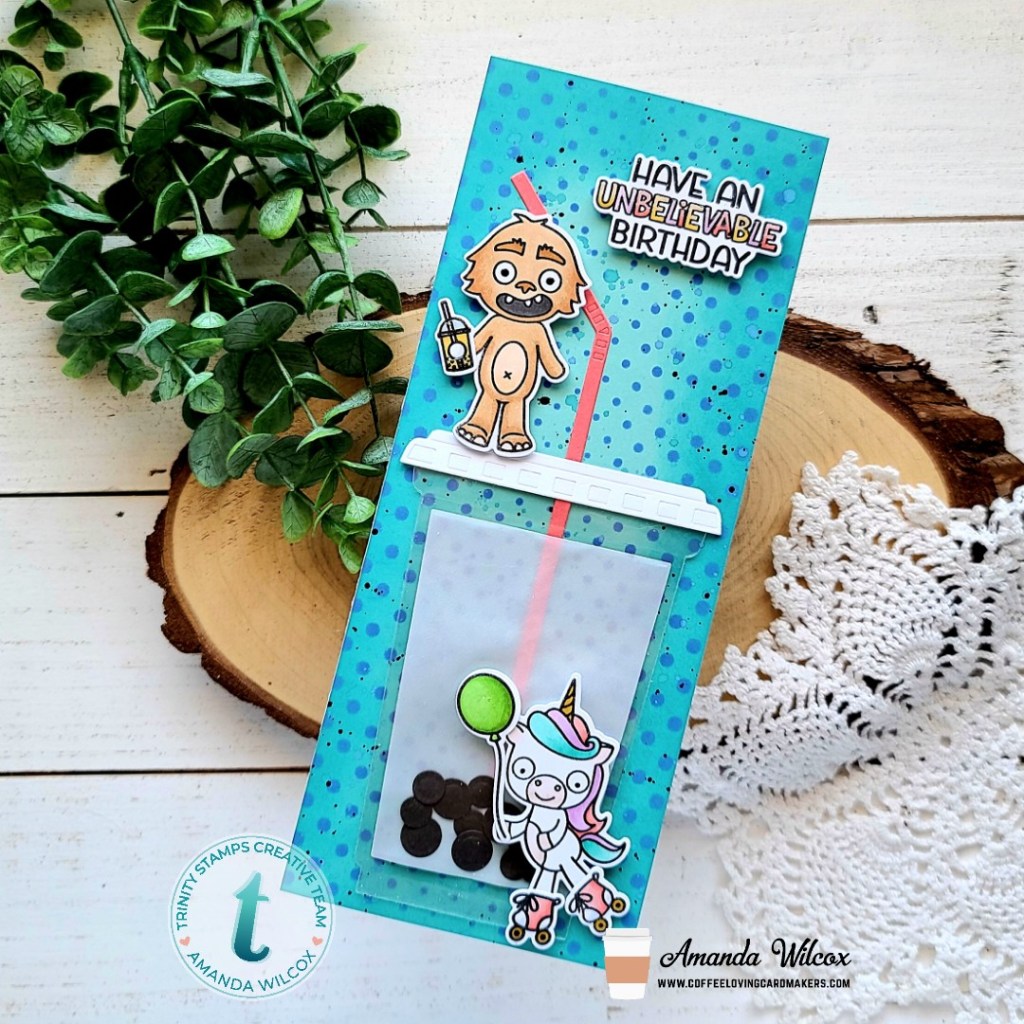
For this super fun slimline card, I started by inking up a light teal panel with mermaid lagoon distress oxide on the edges. Then I used the slimline halftone dots stencil with blueprint sketch ink. For more texture, I flicked watered down ink from both oxide colors and also watered down black acrylic paint. I set it aside to dry while I die cut all the parts to my boba tea cup, using Summertime Sips die set. I cut 2 cups from acetate so I could sandwich the vellum “drink” and boba inside. Then it ended up being helpful to die cut the lid twice and glue one on each side to help keep the top together too.
Next, I stamped images from Let the Good Times Roll, Unbelievable and Classroom Cuties, and colored them with my copic markers. I used the coordinating dies from each set to cut them all out. It was helpful at this point to use some liquid glue and adhere things like the balloon, roller skates and boba cup in place.
I adhered the stenciled panel to a white card base measuring 3.5×8.5 inches. Then I carefully adhered parts of my cup where I could hide the glue like the lid and straw, behind the boba, and eventually behind the unicorn too. Then I added foam squares to the images and sentiment and put them in place last.
For finishing touches on this fun card, I added glossy accents to the balloon, roller skate wheels, small boba cup and the open letters on the sentiment. The last thing I did was added black glaze pen to the critter’s eyes.
Isn’t this just so much fun!?! I love it!
For this second card, I also started with inking up my background. This time I took an oversized panel measuring 4.5×6 and inked it up with mustard seed and scattered straw distress oxide inks. Then I added the slimline diagonal stripes stencil and inked it up with mermaid lagoon distress oxide. Once I removed the stencil, I flicked some watered down mustard seed, mermaid lagoon and black acrylic paint on the panel. I set it aside to dry and stamped some images from Classroom Cuties. I colored those with copic markers and used the coordinating dies to cut them out.
While my panel was still drying, I dug through my stash to find the words to complete the sentiment I was going for. I found them in the hello and sweet senti-mini sets. So I stamped and heat embossed them in white on black cardstock and trimmed them into little word blocks.
Finally, I pulled out the Marshmallow and Graham Cracker alphabet die sets and cut the letters for the rest of my sentiment, being sure to keep all the inside pieces because I wasn’t 100% sure what I would need.
Moving on to assembly, I adhered a black panel measuring 2.25×5.5 inches to the bottom of a white card base. Then I trimmed the stenciled panel down to 2×5.5 inches, where the words “to my tea” were cut from and added foam squares to the back. I adhered it in place next. To keep spacing simple, I added foam squares to the back of everything else and adhered the left and right sides first, finishing with the word “boba” last.
For finishing touches on this card, I added glossy accents to the boba cups and black glaze pen to the people’s eyes.
Now onto the super important hop information! You should have come from my friend Silvia and will be heading next to the amazing Christine! If you happen to get lost along the way, head back to the Coffee Loving Cardmakers blog and you’ll find your way from there.
Commenting will be open until May 7 at 11:59 PM PDT. Winner of a $25 Trinity Gift Code will be selected randomly across all participating blogs.
Thanks for hopping along! I hope you have a blast and find some fun boba inspiration! I appreciate you sharing your time with me. Have a fabulous day!
Hey friends! I’m back with a fun set of cards today for the Thermoweb | Newton’s Nook collaboration. Today I have a detailed how-to post over on the Thermoweb blog. So head there for all the true details for both of these fun cards.
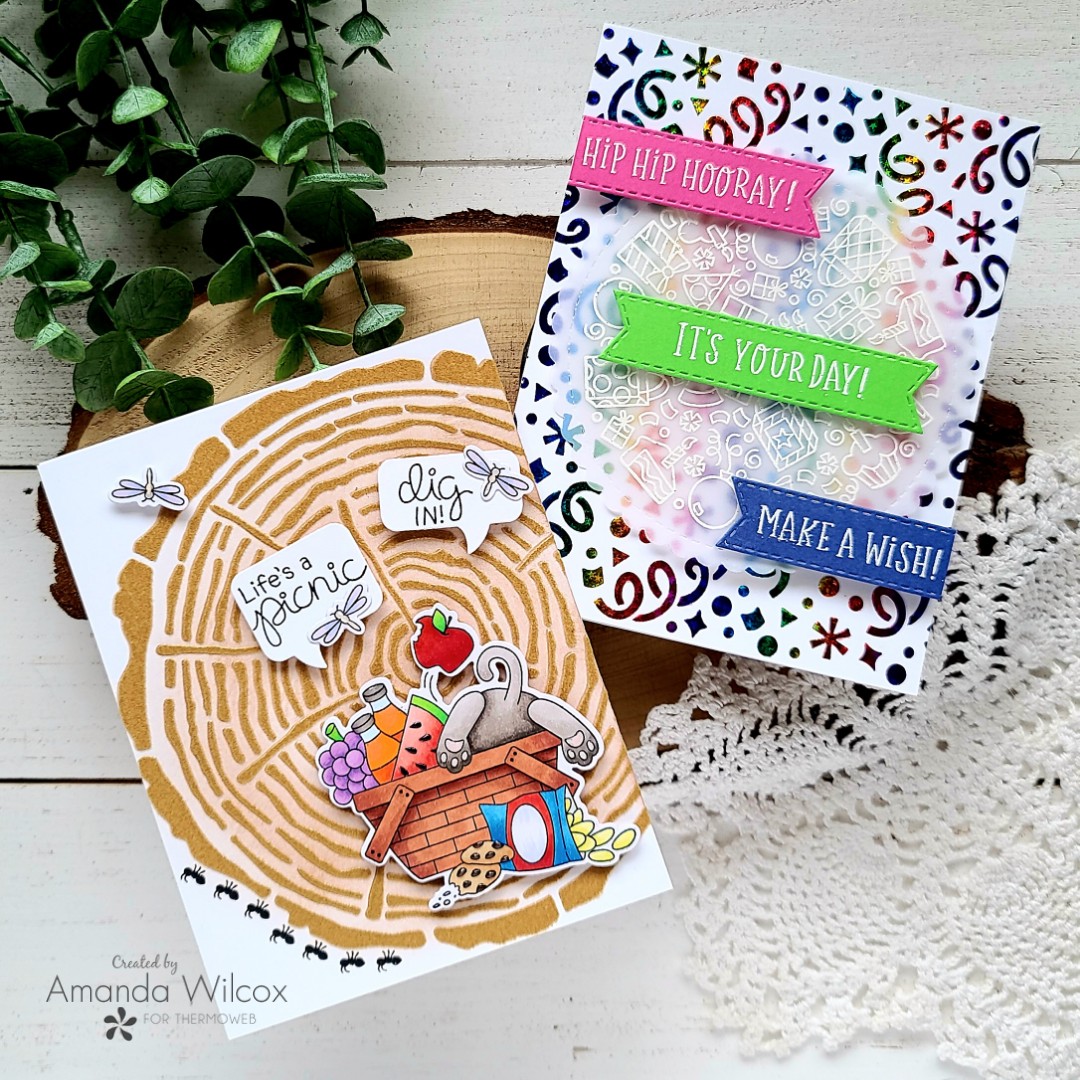
On Tuesday I shared a little flocking with glitz gel and today I’ve gone back to my favorite flocking but also played with some fabulous confetti foil too!
I used the confetti stencil and foiled it with Rainglow decofoil. I kept the rest of the card simple with heat embossing for the birthday roundabout image and the sentiments on banners too.
I love the rainbow foil and the star pattern in the foil just goes perfect with the confetti stencil too! It’s so happy and fun!
Here’s a look at the adorable picnic flocked card that I created as well.
I did a little inking with the tree rings stencil before adding the transfer gel and flocking it. And aren’t those ants marching along just hilarious?!? I love that part the most I think.
Here’s a close up of the fuzzy tree rings and the glossy accents that I always love to add to the detail elements.
Be sure to head to the Thermoweb blog and Newton’s Nook blog all week long for inspiration from different design team members each day and a chance to win prizes from both companies too!
I appreciate you sharing your time with me. Have a fabulous day!
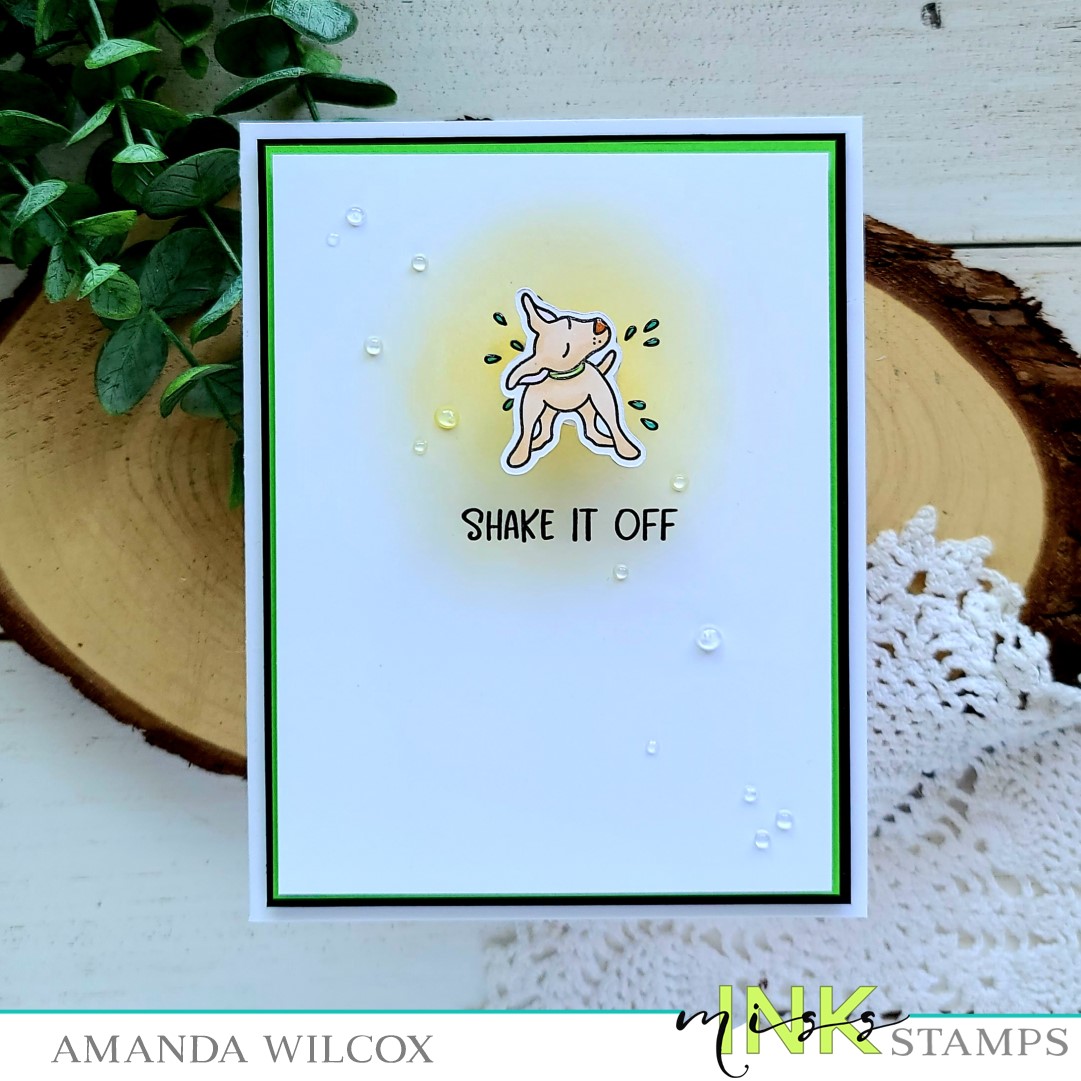
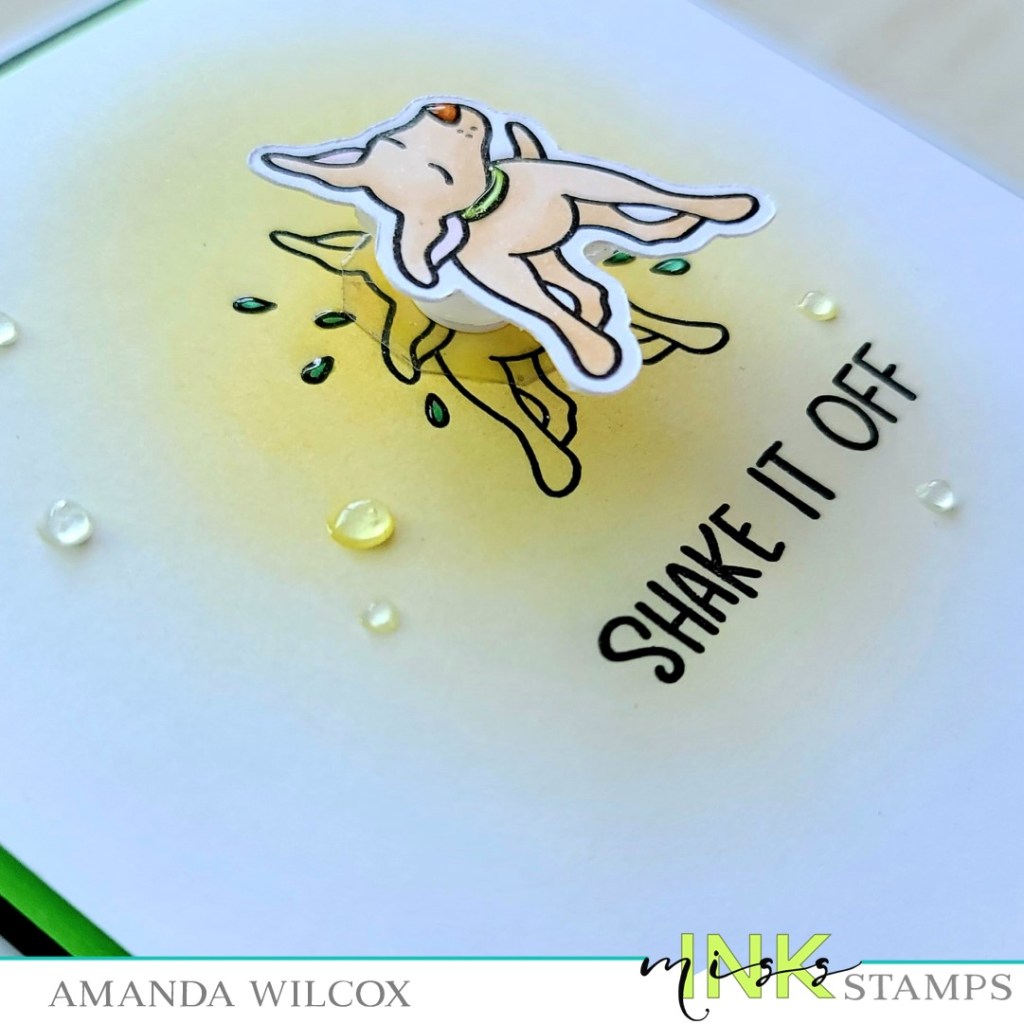
Hello everyone! I have a super fun interactive card to share with you featuring the newly release Rub-a-Dub Doggies from Miss Ink Stamps. This was a quick, clean and simple card to create but it’s so fun to play with!
I stamped and colored that silly pup from Miss Ink Stamps Rub-a-Dub Doggies and used the scan-n-cut to cut him out. Next, I took a white panel measuring 3.75×5 inches and stamped him again, along with the sentiment below. I used a blending brush and inked up the area with a little yellow ink and colored the water drops with a blue marker. I trimmed down an action wobbler and adhered it to the image and then the panel.
Now for assembling the layers on the card front, I took a white card base, added a black panel measuring 4×5.25 inches with foam tape. Then a green panel measuring 3 7/8×5 1/8 inches with liquid glue. Last, I added the puppy panel with foam tape.
For finishing touches, I added glossy accents to the puppy’s nose and collar and the water drops. Then I scattered some Nuvo Crystal Drops in morning dew across the design for that water drop look.
It’s so much fun to flick him and make him shake off all that water. Haha!
I appreciate you sharing your time with me. Have a fabulous day!
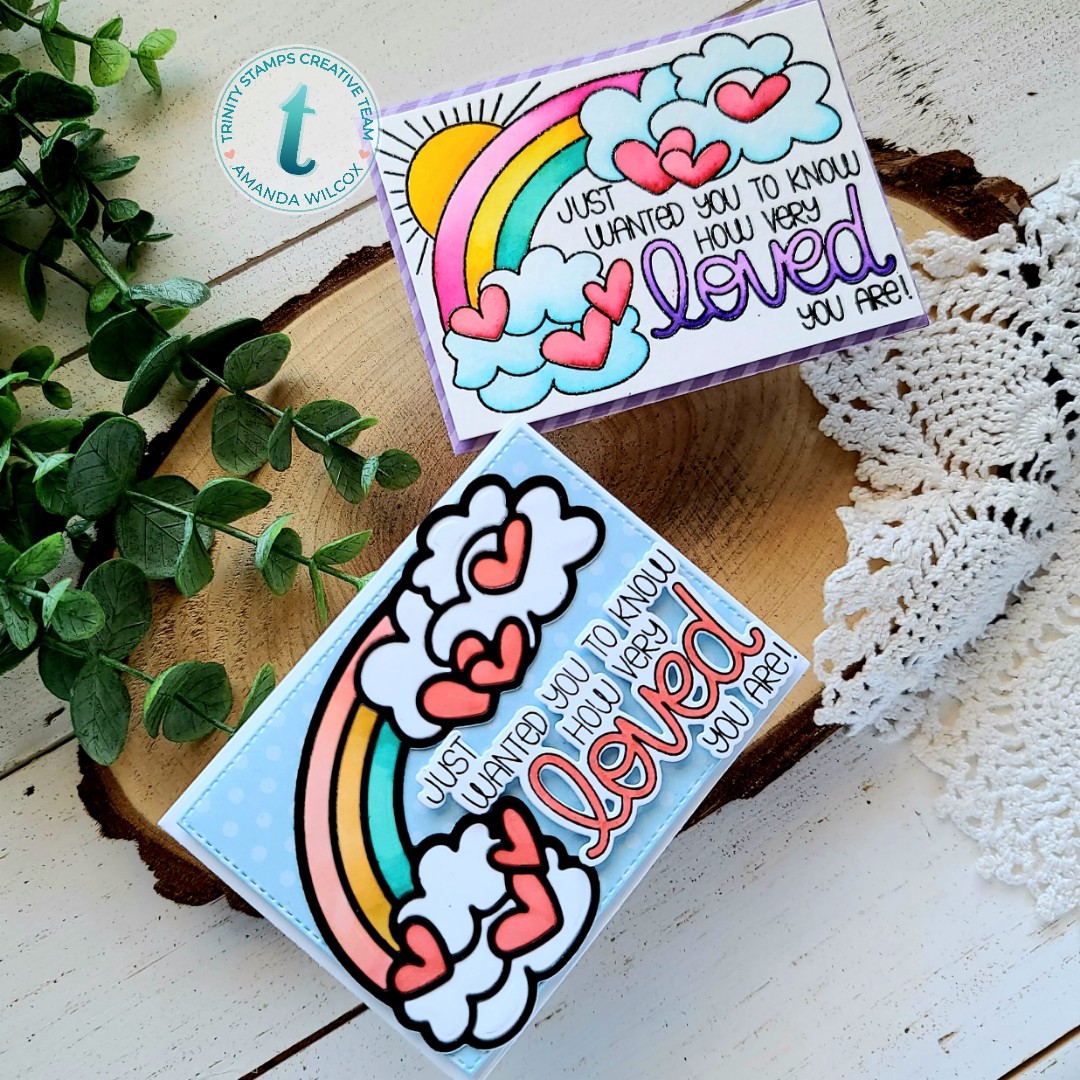
Hello everyone! Today I’m over on the Trinity Stamps blog sharing a super fun sneak peek of the So Very Loved stamps and dies that will be in the next release coming up on Friday!!! Super exciting, with so much in store for you all!
For this first card, I stamped and heat embossed the image on watercolor paper and used my Zig Clean Color Real Brush markers with a water brush pen to color everything in. I trimmed the panel down and added foam tape to the back. I die cut a mini card using the Frame and Fold set from purple striped paper found in the Winter Hues slimline paper pad and popped the watercolor panel on top. Since the paper is double-sided, I die cut a stitched rectangle, also in the Frame and Fold set and adhered it inside for a place to write my message.
For this second card, I used the coordinating dies by stamping the image, cutting out the words and coloring in that open “loved” part of the sentiment with a copic marker. Then I used the other half of the dies to cut and paper piece the clouds and rainbow together. I cut it once from white, using copic markers to color the portions I wanted to. Then I cut it again from black, just to glue the frame over the top of the white. I used the stitched rectangle from the Frame and Fold set to cut out blue polka dot paper from the same stack and adhered the rainbow with liquid glue. Then I added foam squares to the back of the sentiment and popped it in place next. Last, I die cut a white mini card and put the polka dot panel in place with foam tape.
These cards are just so happy and fun! I can’t wait to share them with people! And I REALLY can’t wait for you all to see the whole new release on Friday! Be sure to pop on Instagram on release day to hop along and comment for chances to win. I think I also heard there will be a separate hop on YouTube for more prizes too!
I appreciate you sharing your time with me. Have a fabulous day!
This week Newton’s Nook Designs and Therm O Web are partnering for a fabulous inspiration week! All week long both design teams will be sharing ways to add use Therm O Web products with Newton’s Nook Designs stamps! There are prizes too! Read all the way to the end of this post to find out how you can win!
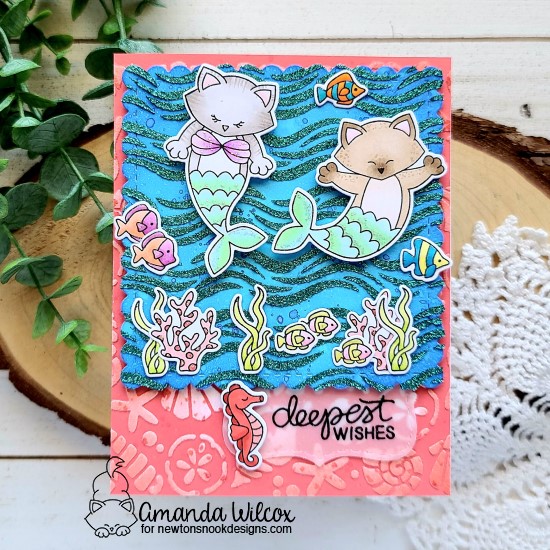
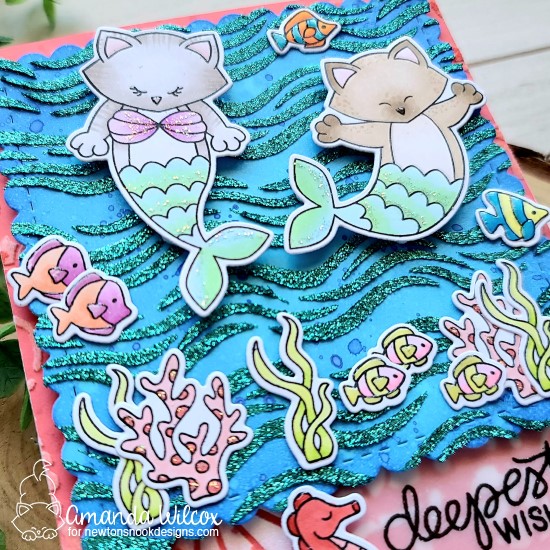
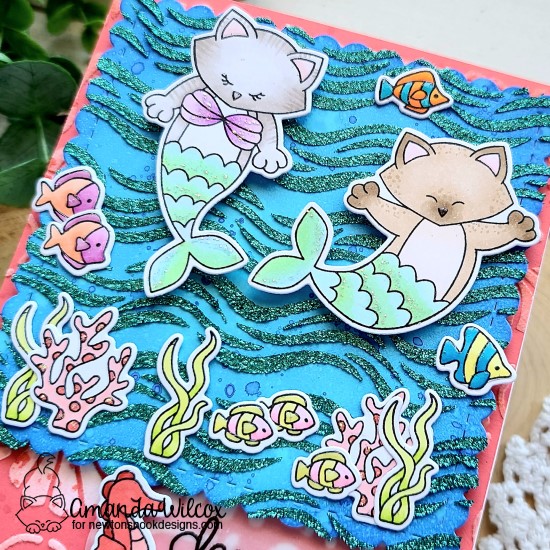
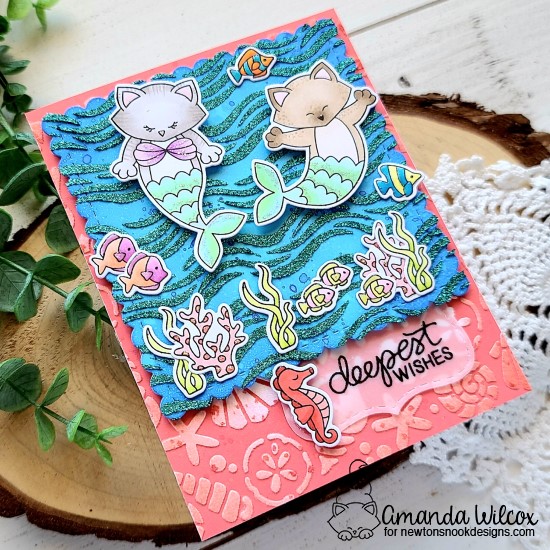
For today’s project, I started with the messy stuff first so it had time to dry while I was stamping and coloring. I applied Thermoweb Transfer Gel Blanco over a piece of melon cardstock and the Newton’s Nook seashells stencil. Then I set it aside to dry and cleaned off my tools. Next, I die cut the scalloped square from Frames Squared out of a light blue cardstock. I inked up the edges with peacock feathers and blueprint sketch distress oxide inks. Then I splatter the panel with watered down blueprint sketch. I hit this with my heat gun for just a second to dry the ink. Then I adhered the Newton’s Nook waves stencil and applied a layer of Glitz Gel in turquoise sea. I removed the stencil, set the panel aside to dry and cleaned my tools and work surface one more time.
Before moving on too far, I turned my laminator on to heat up nice and hot while I was waiting for things to dry. Then, I stamped images from Scuba Newton and Purr-maids stamp sets and colored them all with my copic markers. I used the coordinating dies to cut the images out. Then I die cut the label shape from Frames Squared and heat embossed a sentiment from Scuba Newton in black.
Finally, my panels were dry so I ran the seashells through the laminator with Deco Foil Flock in white latte. I love all the glitter and shiny things but this flock really gets me every time! I love using it and the feel of it when you have your final product. But, I digress. I took the seashell panel and went around the edges with abandoned coral distress oxide ink, then flicked watered down festive berries all over for extra texture. I also love that this ink doesn’t take away the fun fuzzy feeling of the flock at all! It just gives extra visual texture to your panel.
Now moving on to assembly. I adhered the seashell panel to a white card base with the iCraft Ultra Bond liquid adhesive. I added foam tape to the back of the square glitz gel panel and adhered the sentiment label to the bottom, then popped it in place on my card. I added some of the images with liquid glue and placed acrylic blocks on top to help them dry on the glitz gel. While that was sitting, I added foam squares to the back of the other images. I removed the blocks, popped the final images in place and switched gears to finishing touches.
I started with glossy accents on different parts of each fish and the seahorse, as well as the kitty noses. Then I came back through with unicorn Stickles on the purr-maid tails, seashell bra and the coral at the bottom of the scene.
I appreciate you sharing your time with me. There are more amazing projects today over on the Therm O Web blog so pop over there for more inspiration!
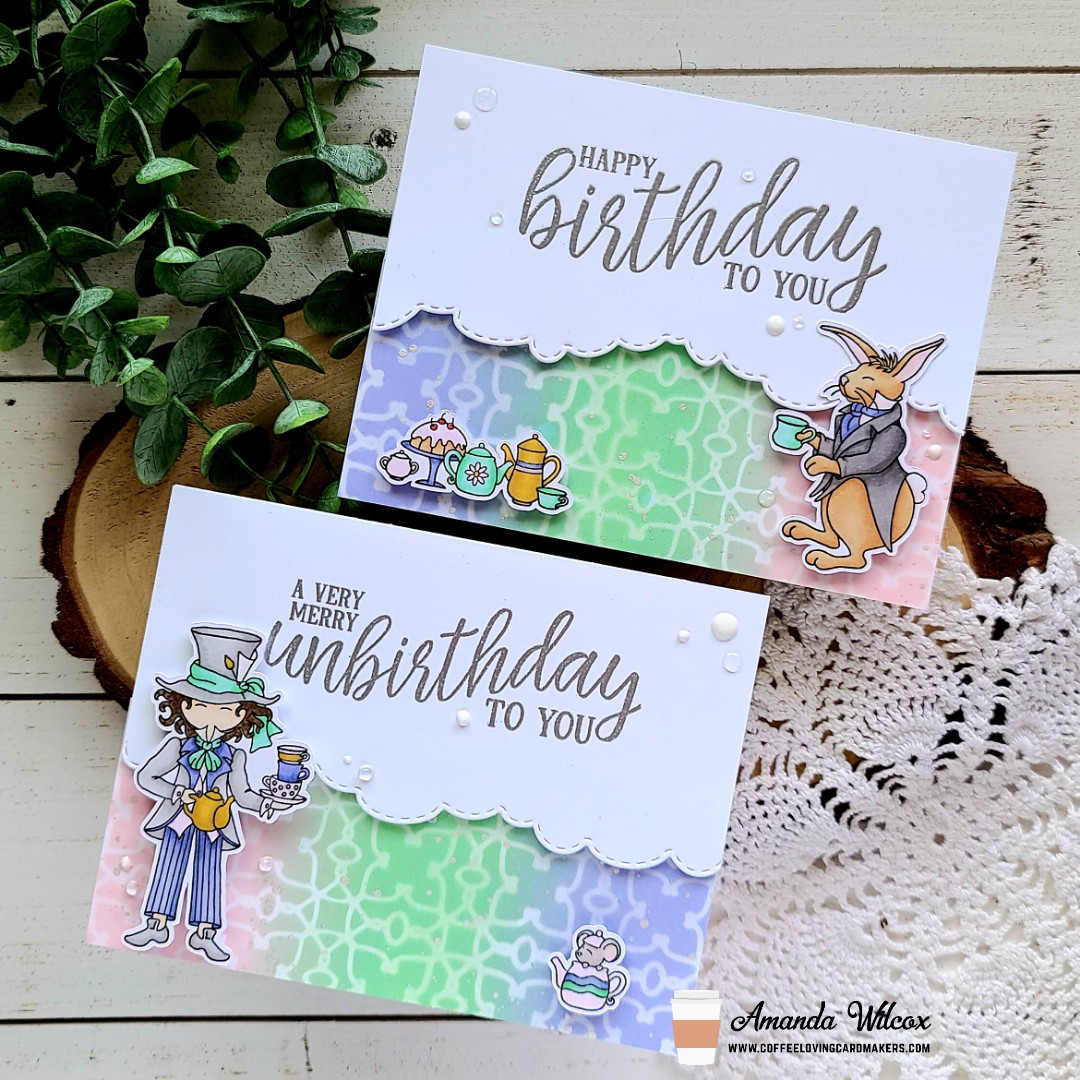
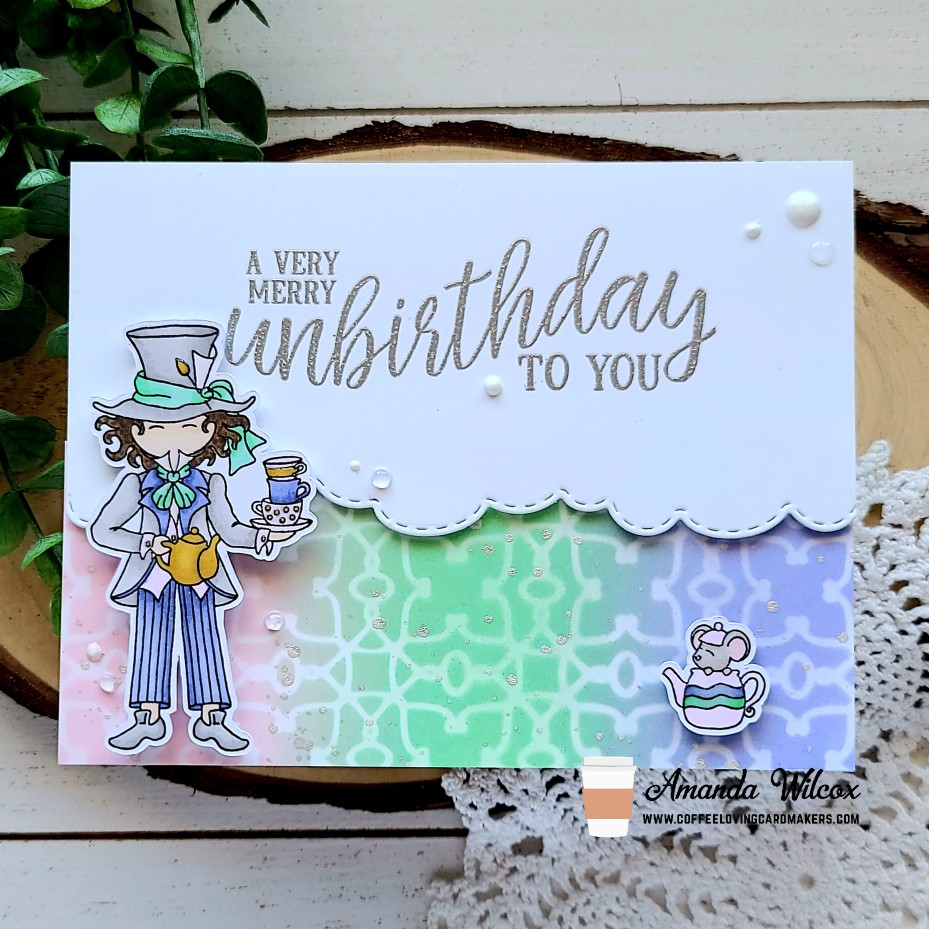
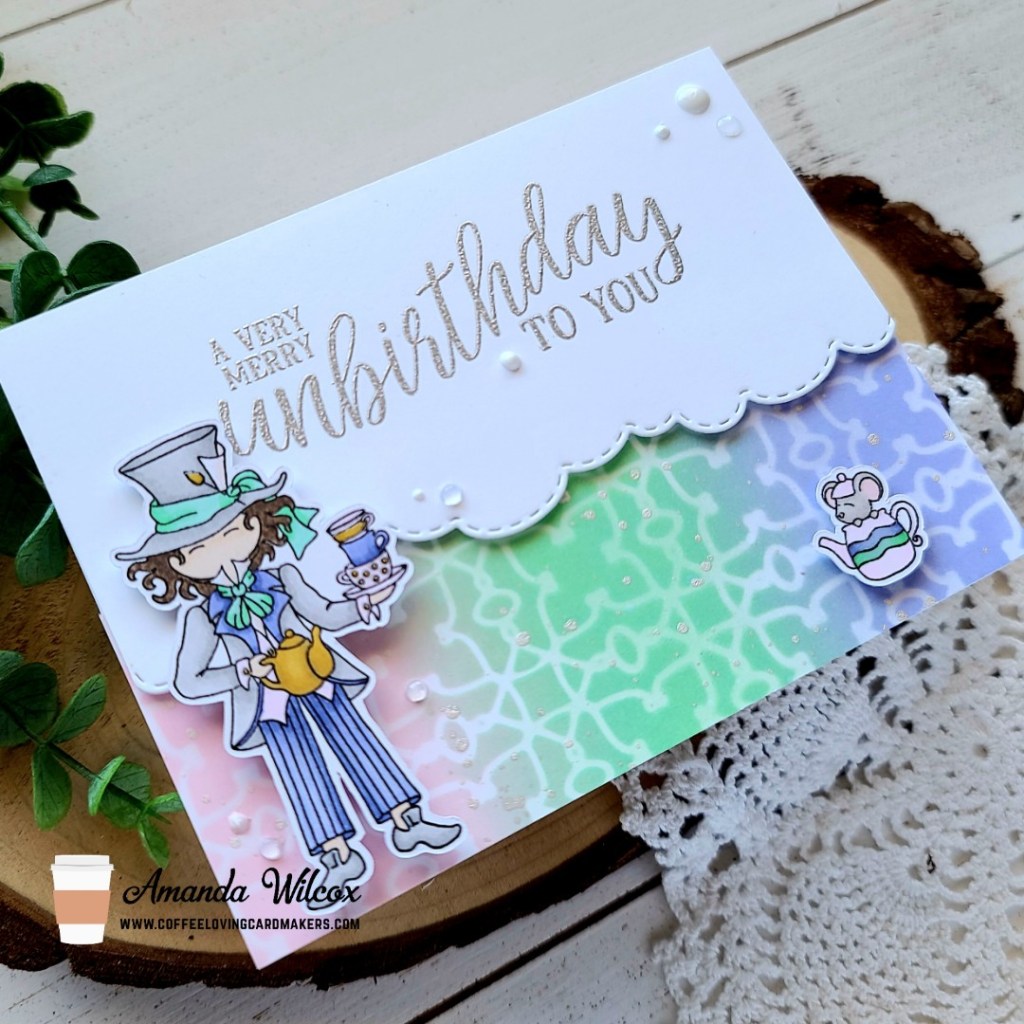
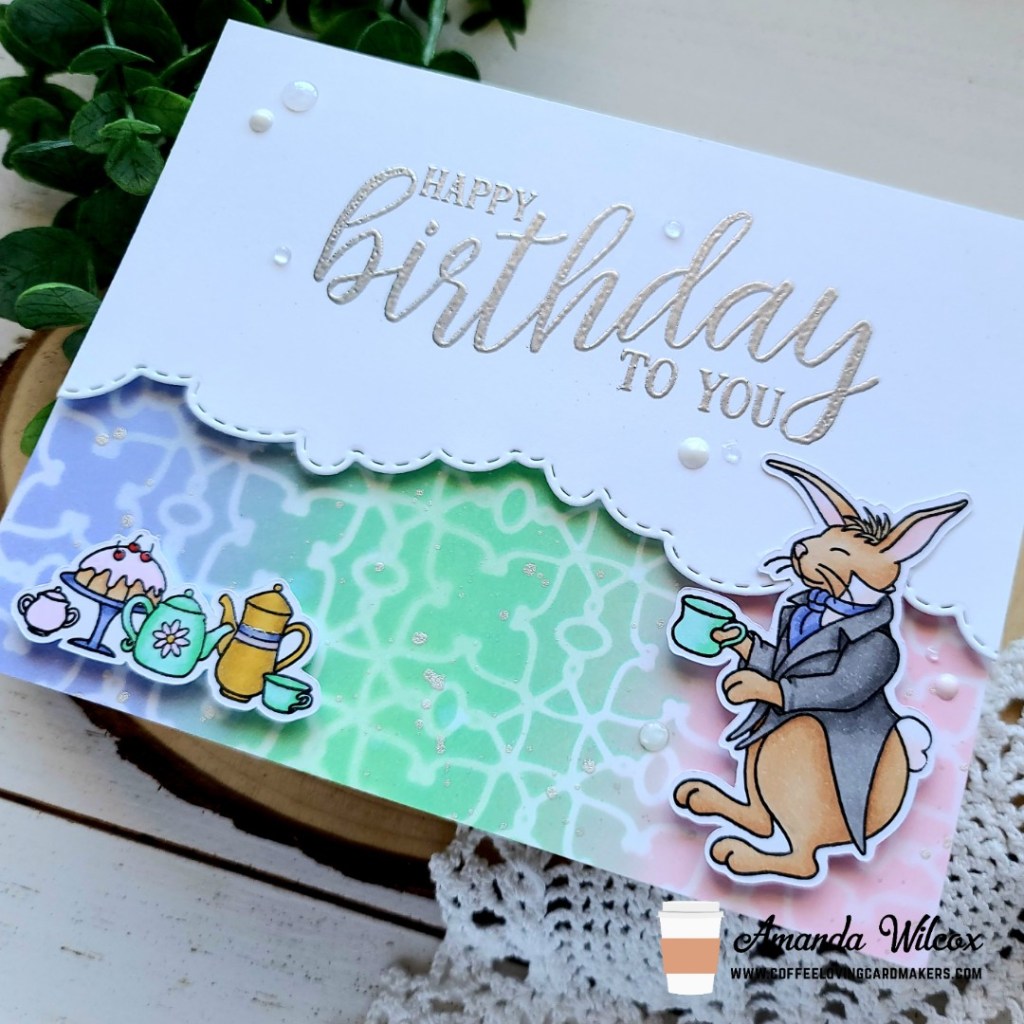
Hi there! It’s time for another Tuesday Tea over on the Coffee Loving Cardmakers blog today. I’ve pulled out some of my favorite Miss Ink Stamps goodies to play with for today’s pair of cards too!
Do you ever create an awesome background, only to cover most of it up with elements and feel like you’re wasting it? That’s what was going to happen with the design in my head today so I turned one card into two by cutting my inked background in half!
I inked up the Enchanted stencil with spun sugar, cracked pistachio and wilted violet distress inks, then to soften the white lines from the stencil, I went over everything a second time very lightly. It gives a hazy look which I thought was really cool. Then I splattered it with pearl watercolor and left it to dry.
I pulled out the Unbirthday sentiment set and stamped and heat embossed each one in silver on white cardstock panels. Then I came back with the Trinity Stamps scenic border cloud die and cut off the bottom. I added foam tape to the back of these panels and set them aside too. Next, I stamped images from Tea Party and colored them with my copics. Then I used the scan-n-cut to cut them out and started assembling my cards.
I cut the stenciled panel in half and used liquid glue to adhere each half to card bases. Then I popped the sentiment panels on with their foam tape and added foam squares to the back of my images. After popping those in place, I moved on to finishing touches for each card.
I added Nuvo Crystal Drops in simply white and morning dew across both card designs. Then I added glossy accents to different parts of the images on both cards as well.
These cards are just so fun and between the two different sentiments, you have birthday and just because cards at the same time! How great is that!?!
I appreciate you sharing your time with me. Have a fabulous day!