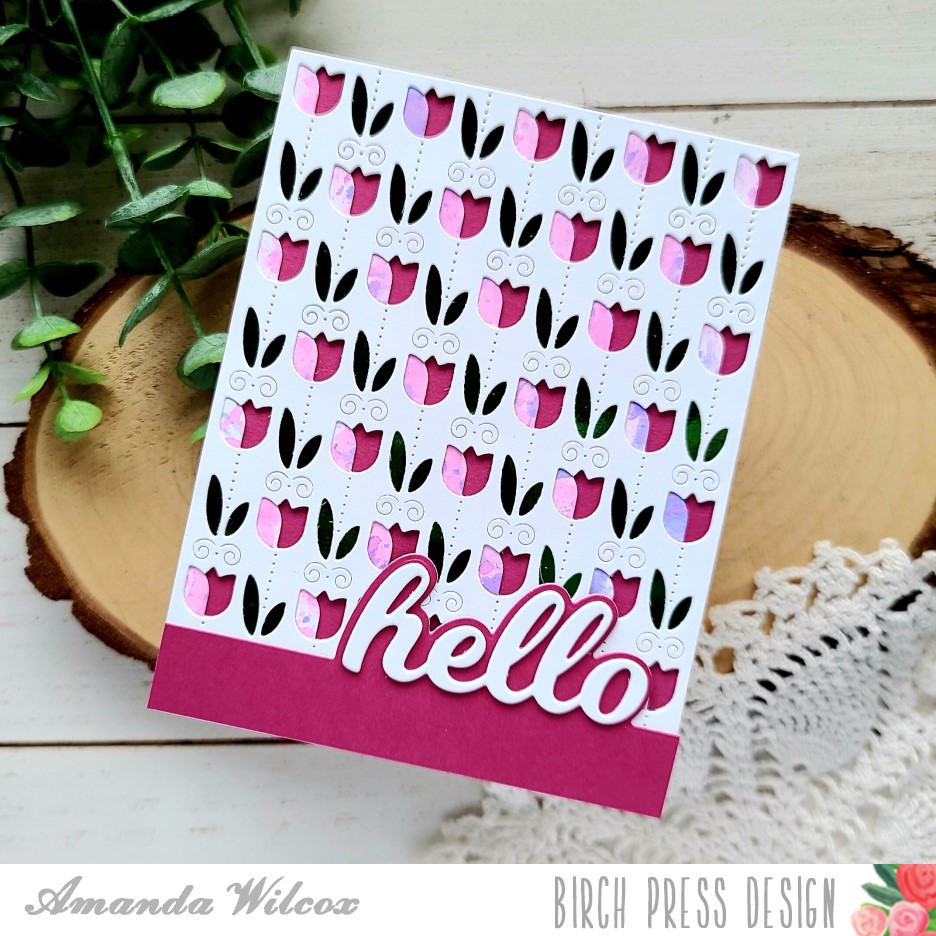
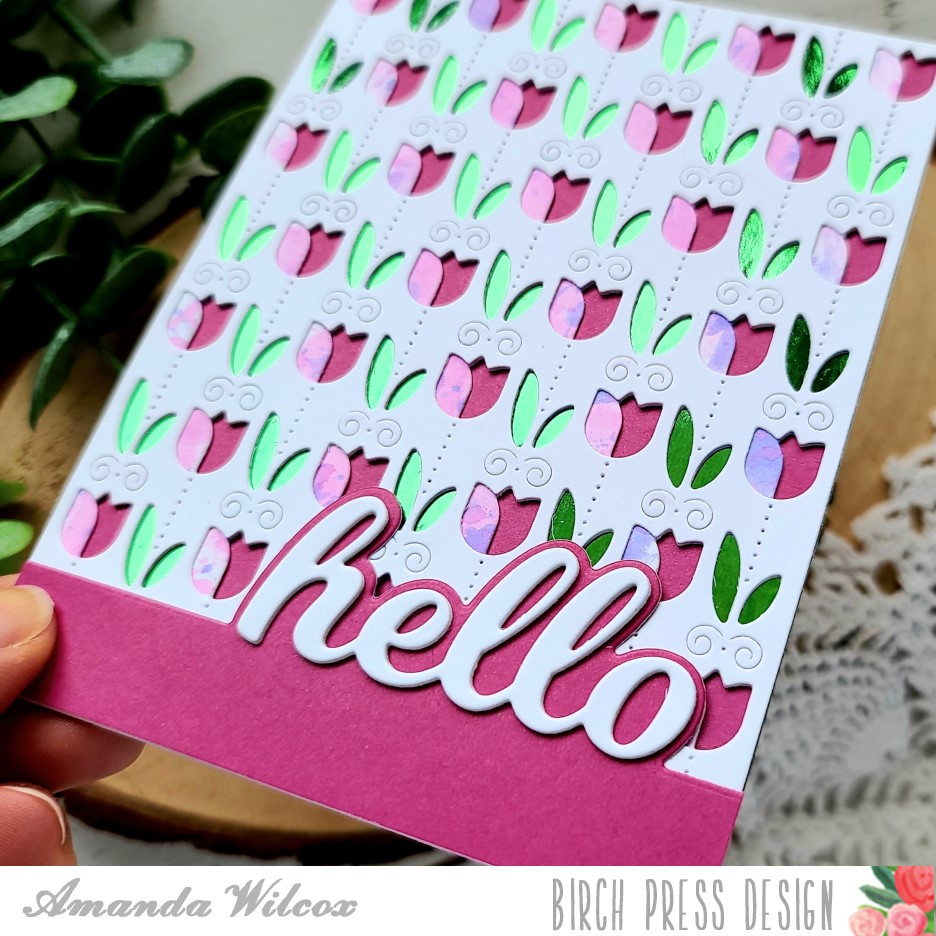
Hi there everyone! Happy Sunday! I hope your weekend is going splendid. I am over on the Birch Press Design blog today sharing a happy, springy tulip card featuring the field of blooms layering dies and the hello topper.
I pulled out some fun green foiled paper for the leaves and did a little ink smooshing for one of the flower layers. It was inky, messy fun. Just how I like it.
Here’s a better angle of the cool green foiled paper. And isn’t that hello topper die at the bottom a neat touch for a sentiment. I love it.
If you’d like to see a tutorial how I created this card, head over to the Birch Press Design blog and check it out.
I appreciate you sharing your time with me. Have a fabulous day!
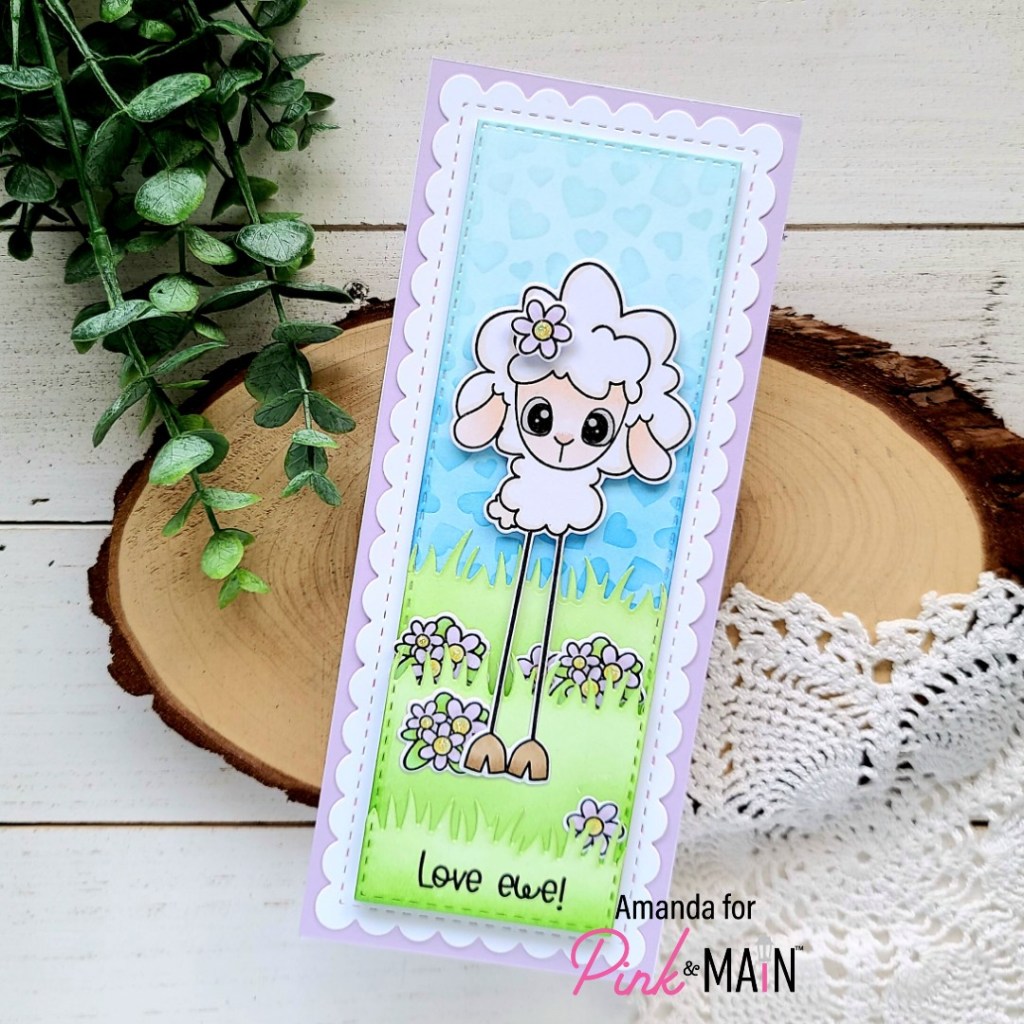
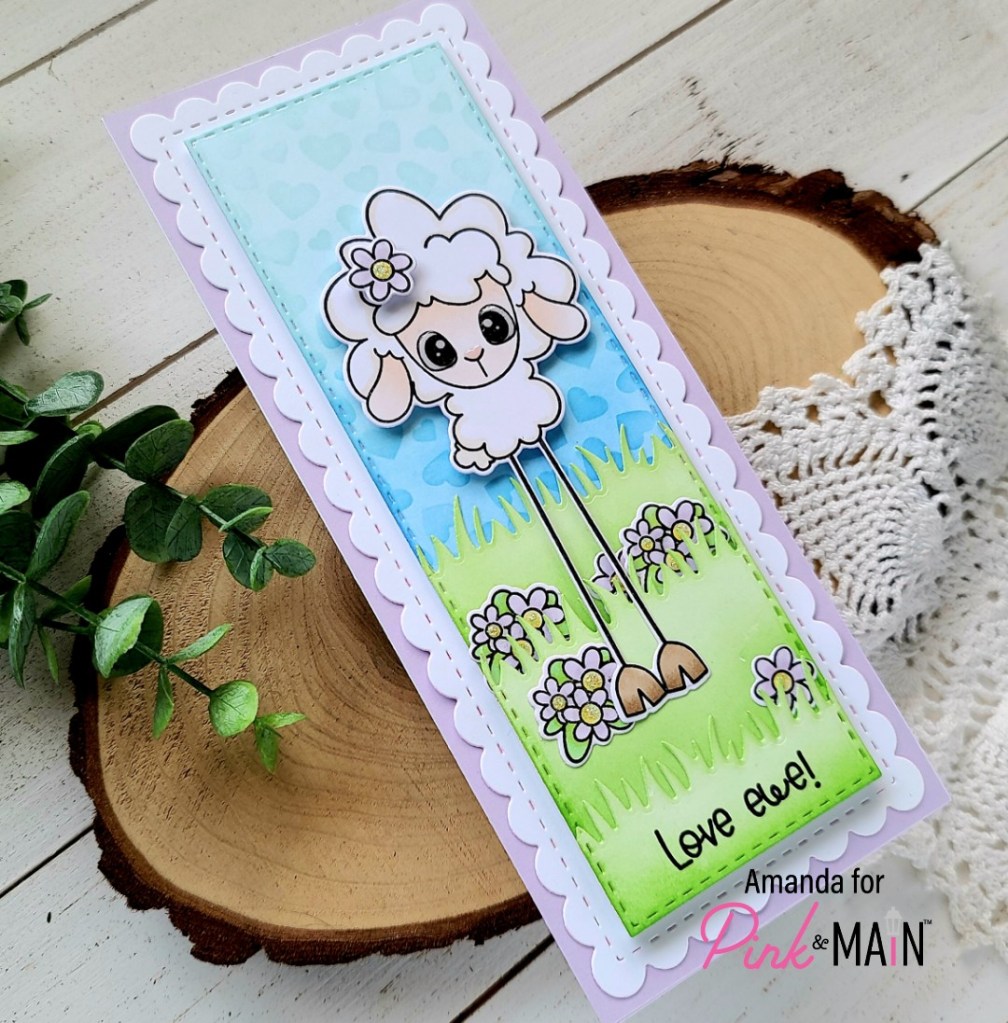
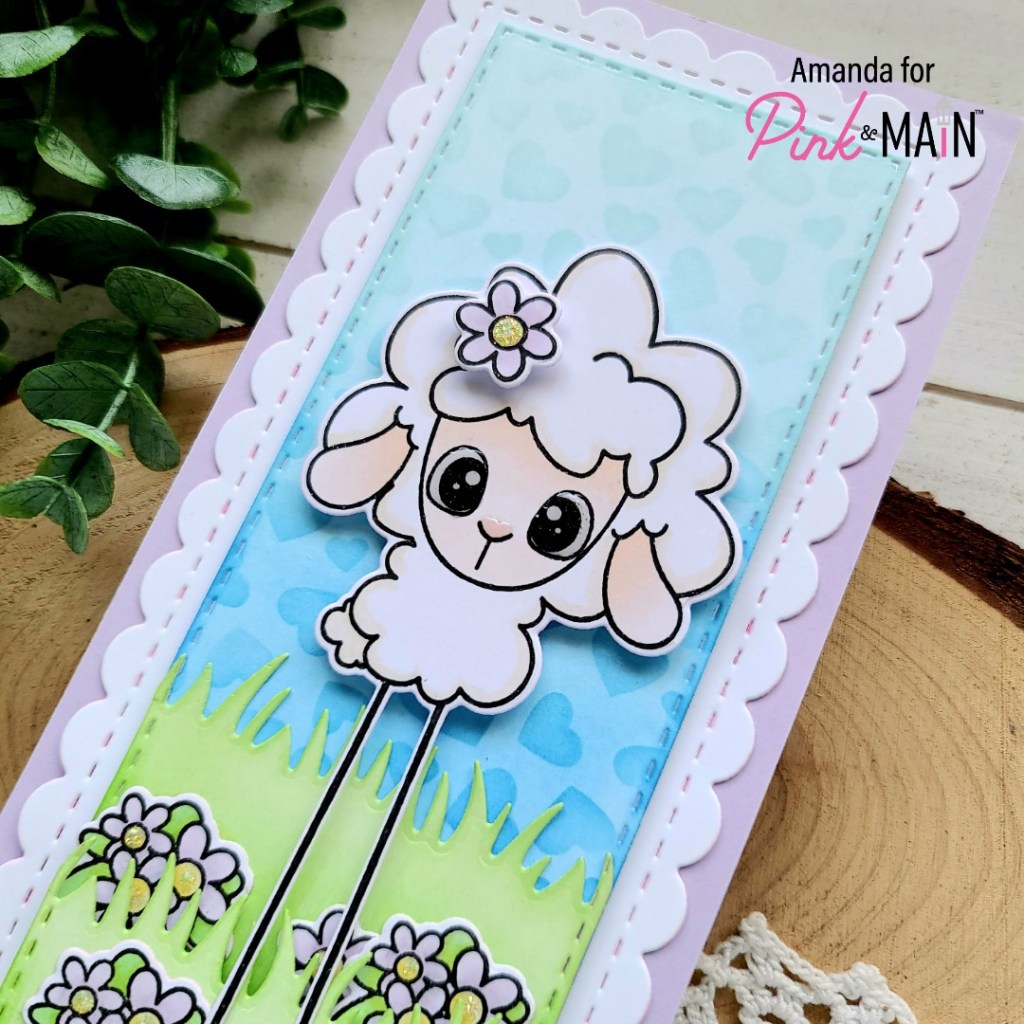
Welcome back everyone! I’m over on the Pink & Main blog today sharing a non-holiday card featuring the Love Ewe stamps and dies. I absolutely adore these sweet critters with their silly long legs and love that they can be used all year round for lots of different types of cards. Today I’m sharing more of a “thinking of you” type love card.
I started by stamping the sheep from Love Ewe and colored it with my copics. Then I used the coordinating dies to cut it out, along with a few of the flowers and flower bundles in the same set. I set them aside and started on my background scene. I cut a scalloped rectangle from Sympathy Slim Line die set and then found a Stitched Slim Line rectangle that would fit within the stitching lines on the scalloped panel. I actually cut that panel three times – 2 full panels and one from a scrap.
One full panel was inked up with two different colors of blue, then I put the scattered hearts stencil over the top and added another layer of the same blues to give a tone-on-tone heart sky for my background. I took another full panel and cut grass from both ends – kind of a two-for-one deal. Then cut grass from the scrap piece too. Now I have sky and 3 layers of grass. I inked up the grass panels with a couple colors of green and started assembling my scene.
The sky panel is popped up with foam tape on the scalloped panel. The tallest layer of grass is adhered with liquid glue, then second layer is popped up with foam tape. Before I adhered the bottom layer with liquid glue I stamped my sentiment on it. Finally the sheep and flowers were adhered with a combination of liquid glue and foam squares.
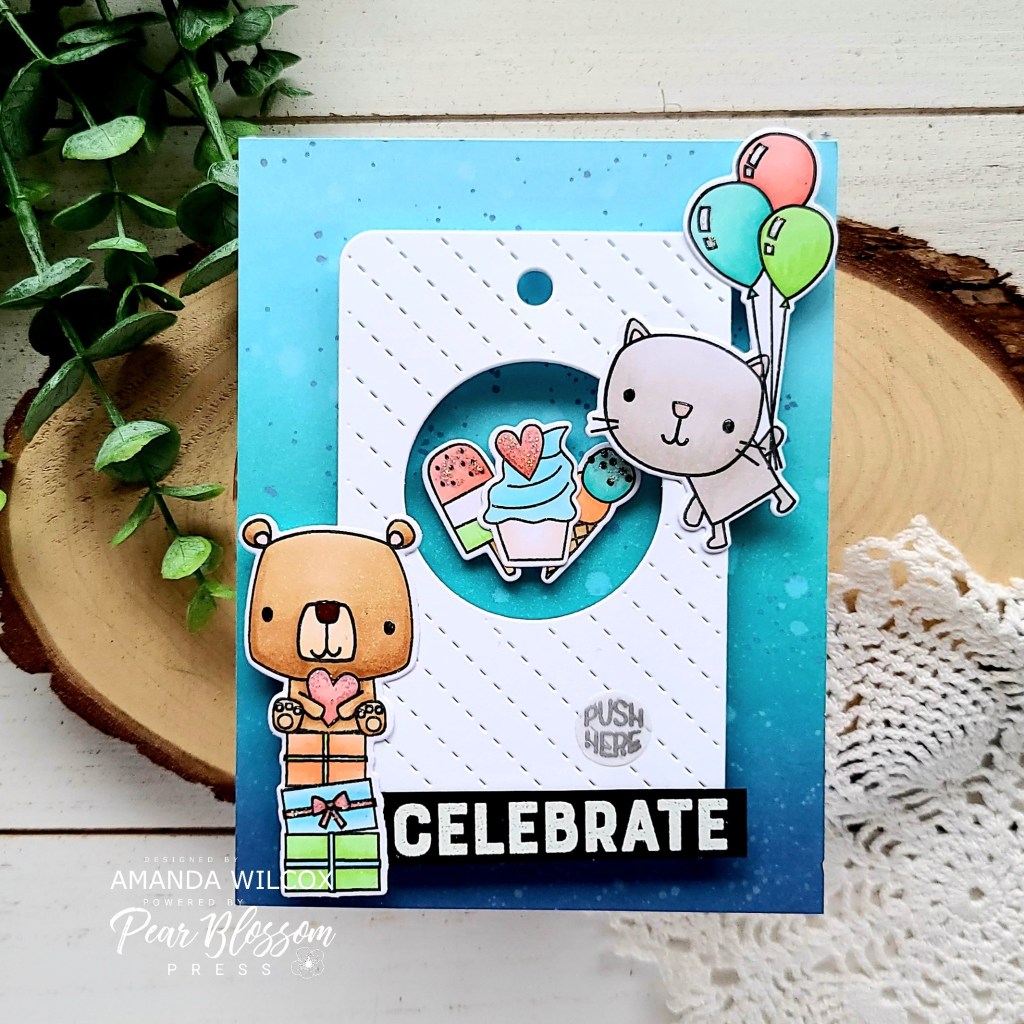
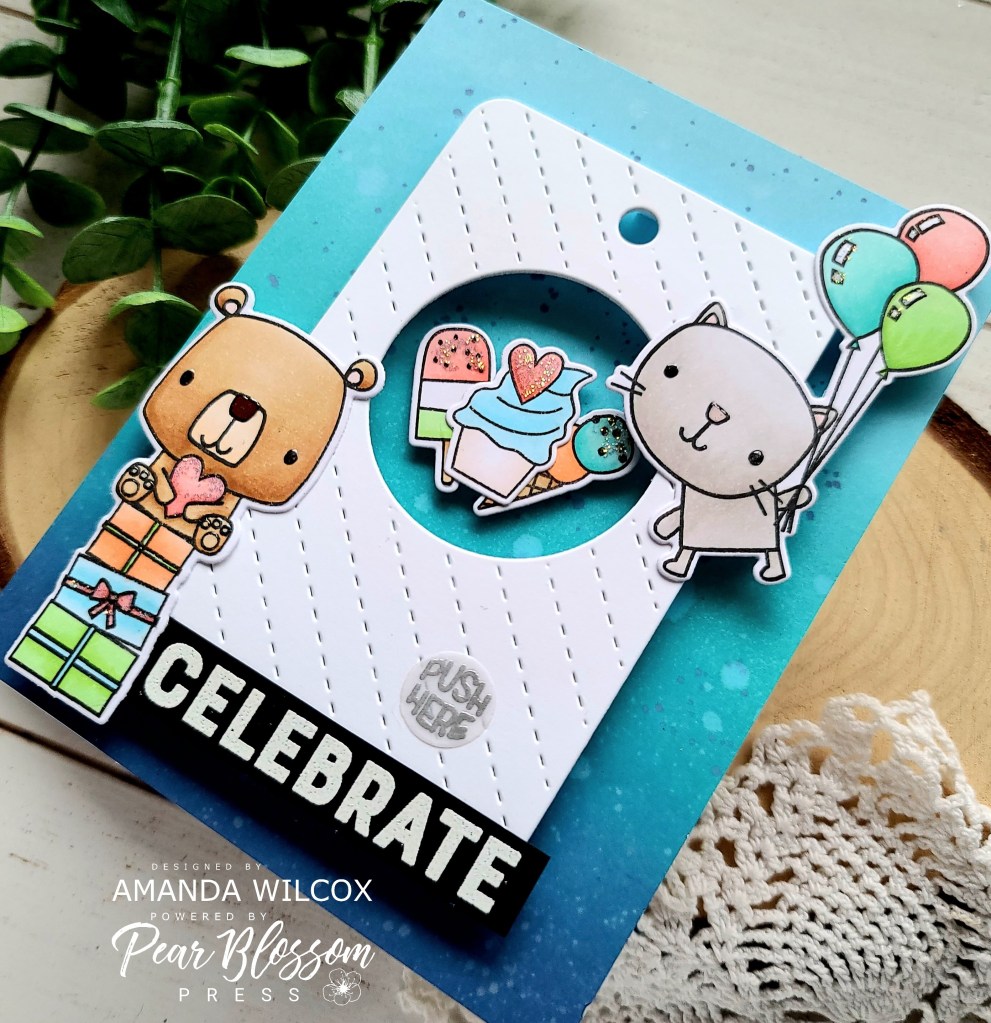
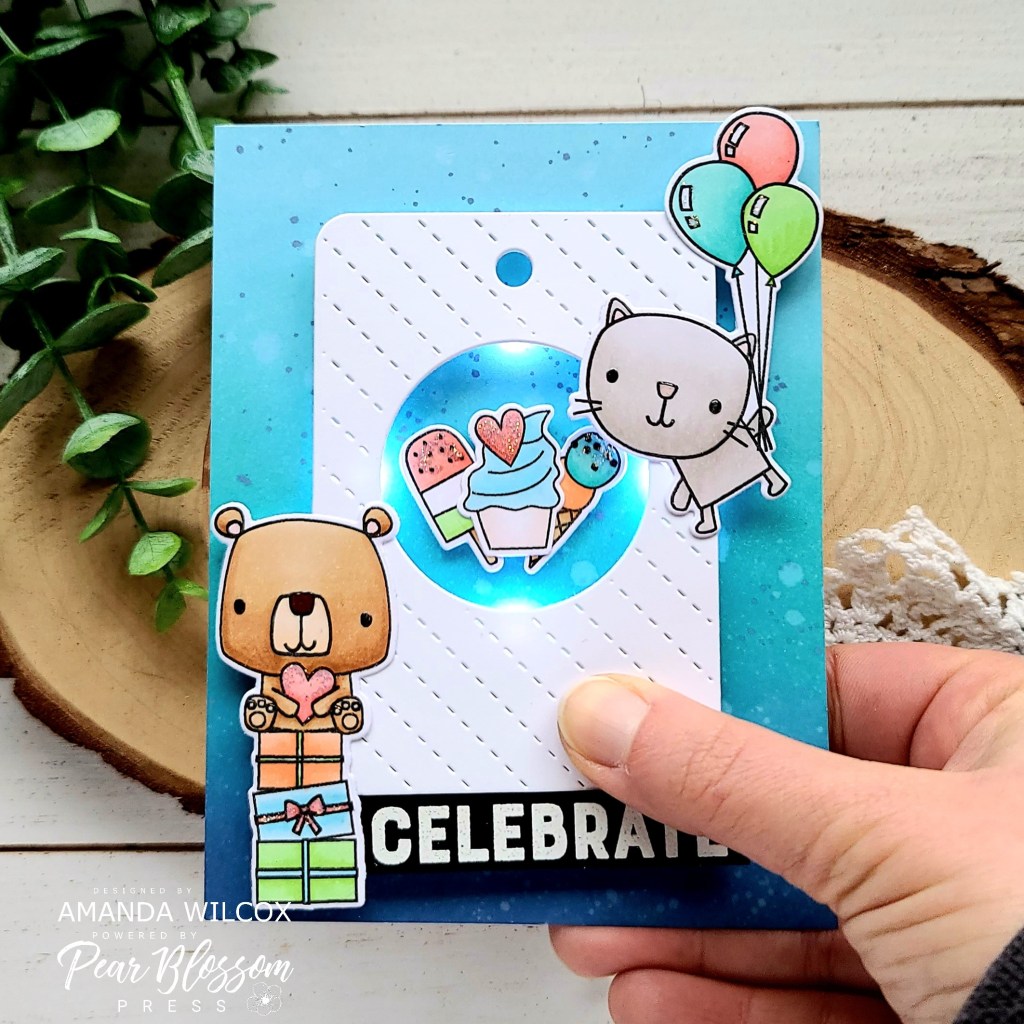
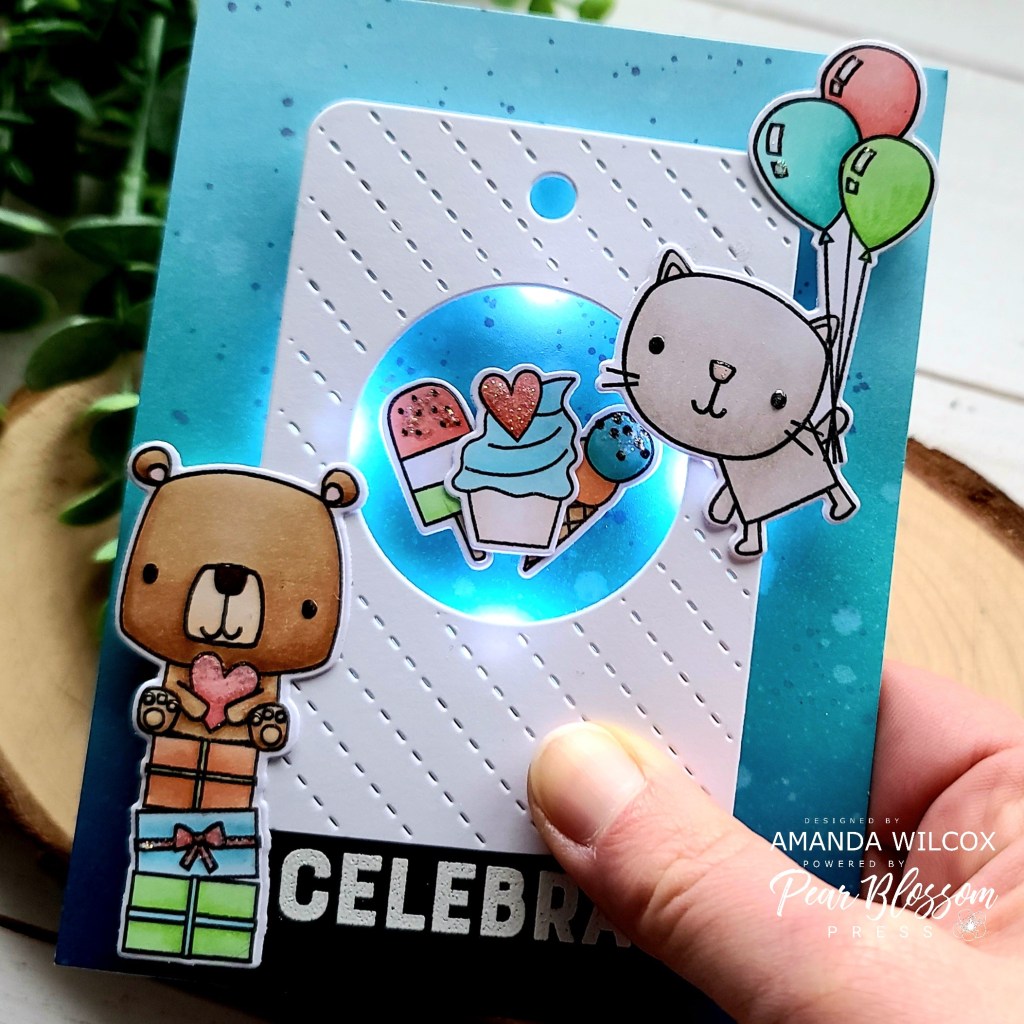
Hi everyone!!! I’m so excited to be featured as a guest designer for Pear Blossom Press today. I have always loved their products but they just keep getting better! Today I’m sharing a fun way to use the new halo lights.
Here’s a look at my finished card. I have broken things down just a bit to show just how easy these lights are to use! Let’s get started!
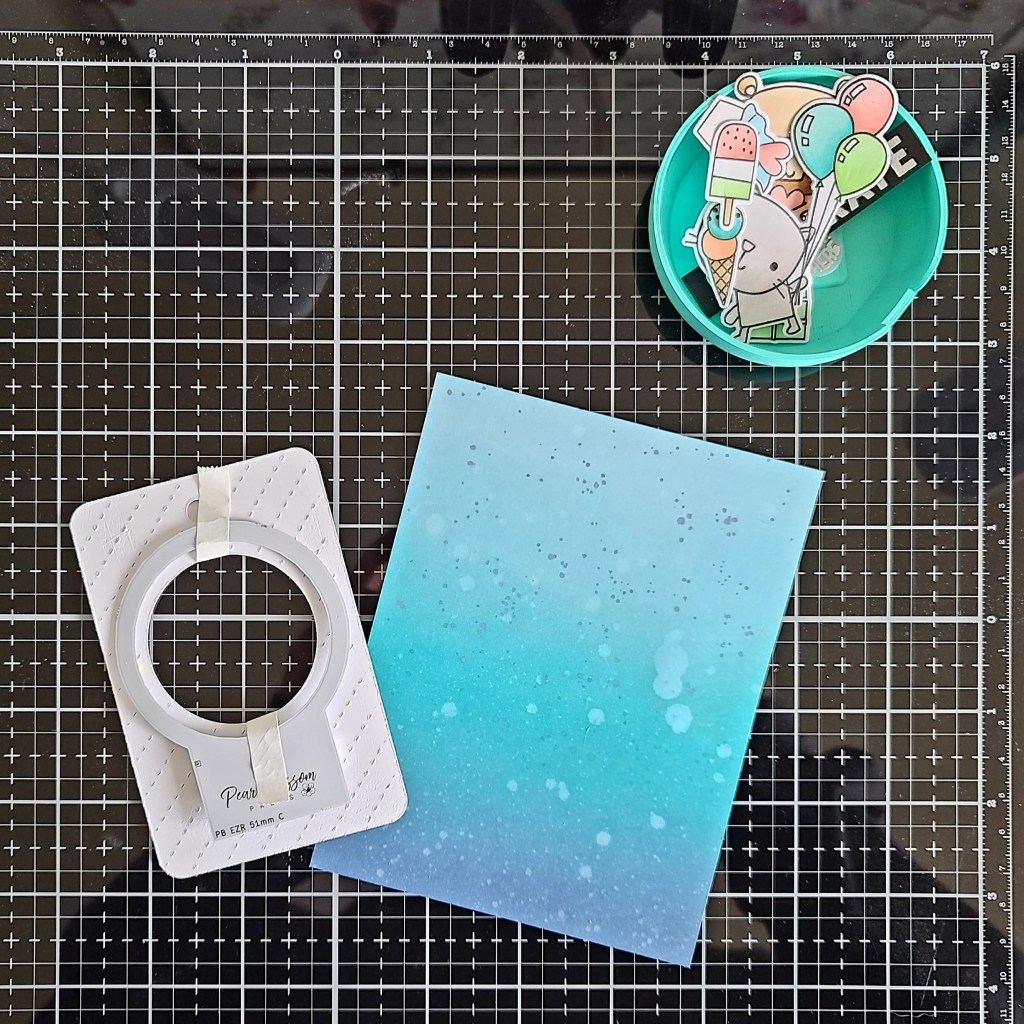
I stamped and colored images from Reverse Confetti Ice Cream Social and Party Pals stamp sets. Then I used the coordinating dies to cut them out. I also stamped and heat embossed a sentiment from Party Pals and trimmed it into a strip.
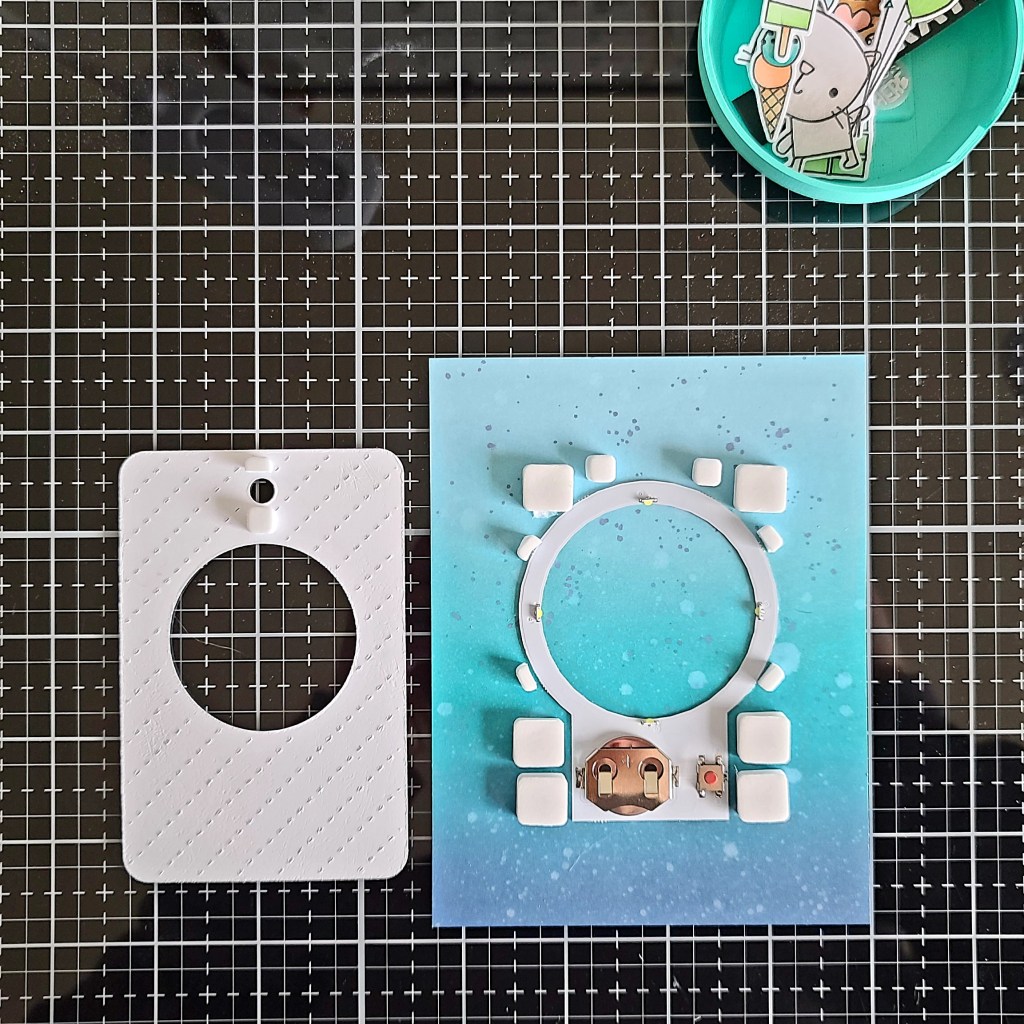
With my light in place, I added a double layer of foam squares all around it and then adhered my tag on top. Next, I used a combination of liquid glue and foam squares to adhere my images and sentiment strip.
Before moving on to my finishing touches, I stamped and heat embossed a push here sentiment from Lawn Fawn on vellum and die cut it with a small circle die. I added it with a dab of liquid glue.
For finishing touches on my card, I added unicorn Stickles to the hearts, sprinkles, bow on the gift and balloons. Then I added glossy accents to the critter noses and eyes.
Check out how cute this little scene is and how much extra fun it is all lit up!!! These lights are absolutely the EASIEST product to use and add so much to your card! It’s just so much fun!
I can’t get over how simple this was to create! It was so much fun and I just love how perfect the Reverse Confetti see through tag worked with the size of the halo lights! They were practically meant to be together. Lol!
Pear Blossom Press has a variety of products available, regular lights for your cards along with the halo style, plus other things like awesome marker bags! Head over there and check things out for yourself!
I appreciate you sharing your time with me. Have a fabulous day!
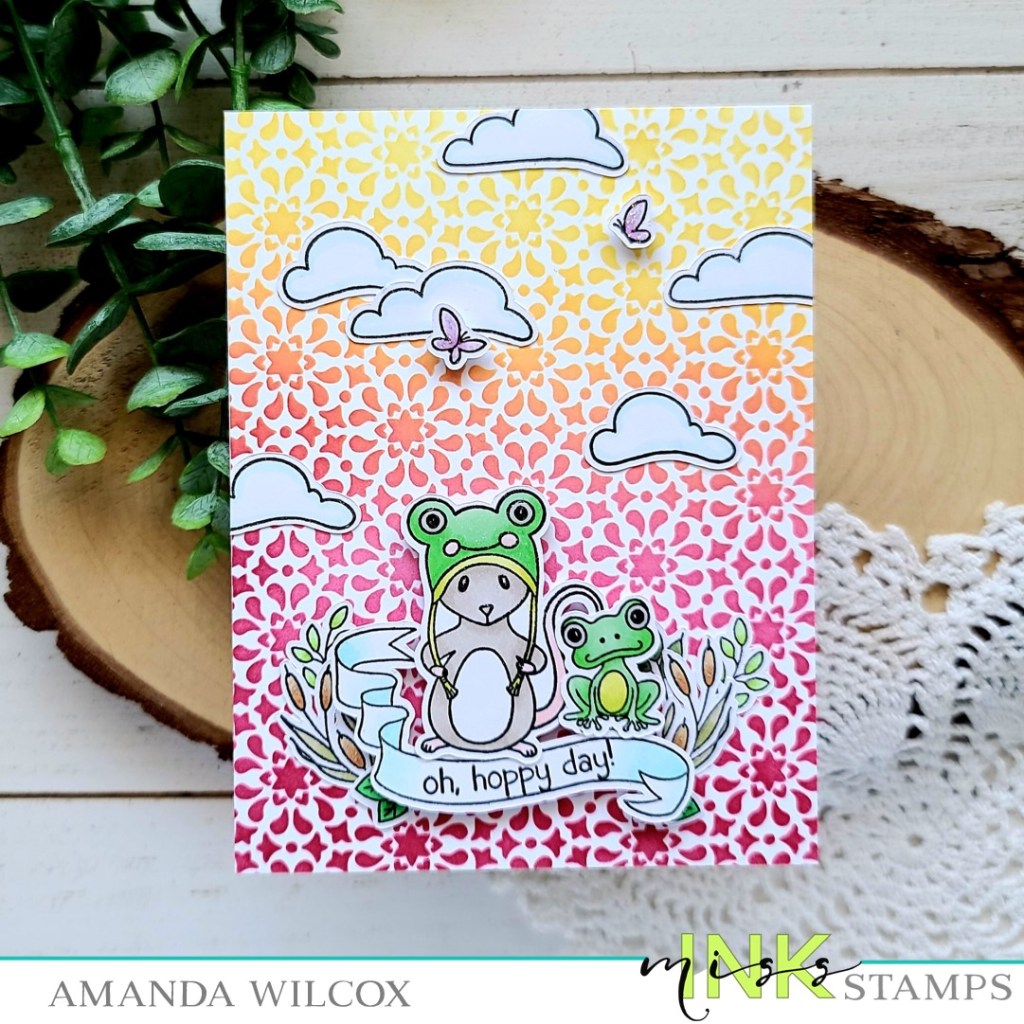
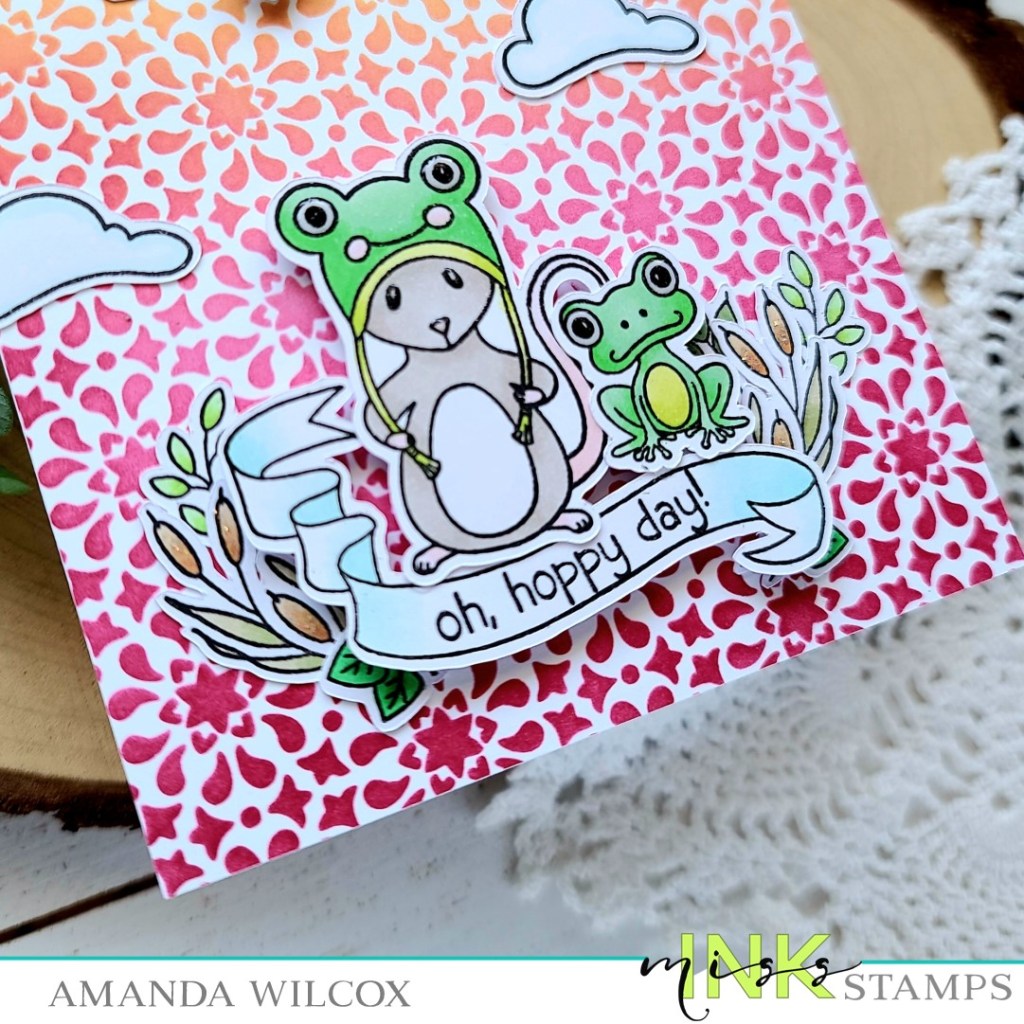
Hi everyone! I’m popping in today with a springy, bright Miss Ink Stamps card to share with you. I have been playing with the newly release stencils again, today it’s Kaleidescope and I’ve paired it with the super cute critters from Say Cheese!
I started my card today by inking up the stencil on a white panel using Trinity Stamps blending brushes and Lawn Fawn dye inks. Then I trimmed my panel down to 5.5×4.25 inches and adhered it to a white card base with liquid glue.
I stamped out a bundle of images from Say Cheese! and Springtime Banners, and colored them all with my copic markers. Next, I ran them through the scan-n-cut to cut them all out. I laid the images out on the card front to decide on final placement, what would be popped up and what would be glued directly down.
For the foliage behind the banner, I used post it tape to hold them together how I wanted, added liquid glue and put them in place. I left the tape on them for a minute to let the glue dry a bit and then removed it. This worked like a charm and made the process so much easier than normal. After that part was done I finished adhering the rest of the images and trimmed off anything hanging over the edge.
Moving on to finishing touches, I added glossy accents to the eyes and a little unicorn Stickles to the cattails and butterflies in the sky.
I love the contrast of colors in this fun card! As for the Say Cheese! stamp set, it’s sooo much fun and I can’t wait to play with more of the sweet critter combos it has!
I appreciate you sharing your time with me. Have a fabulous day!
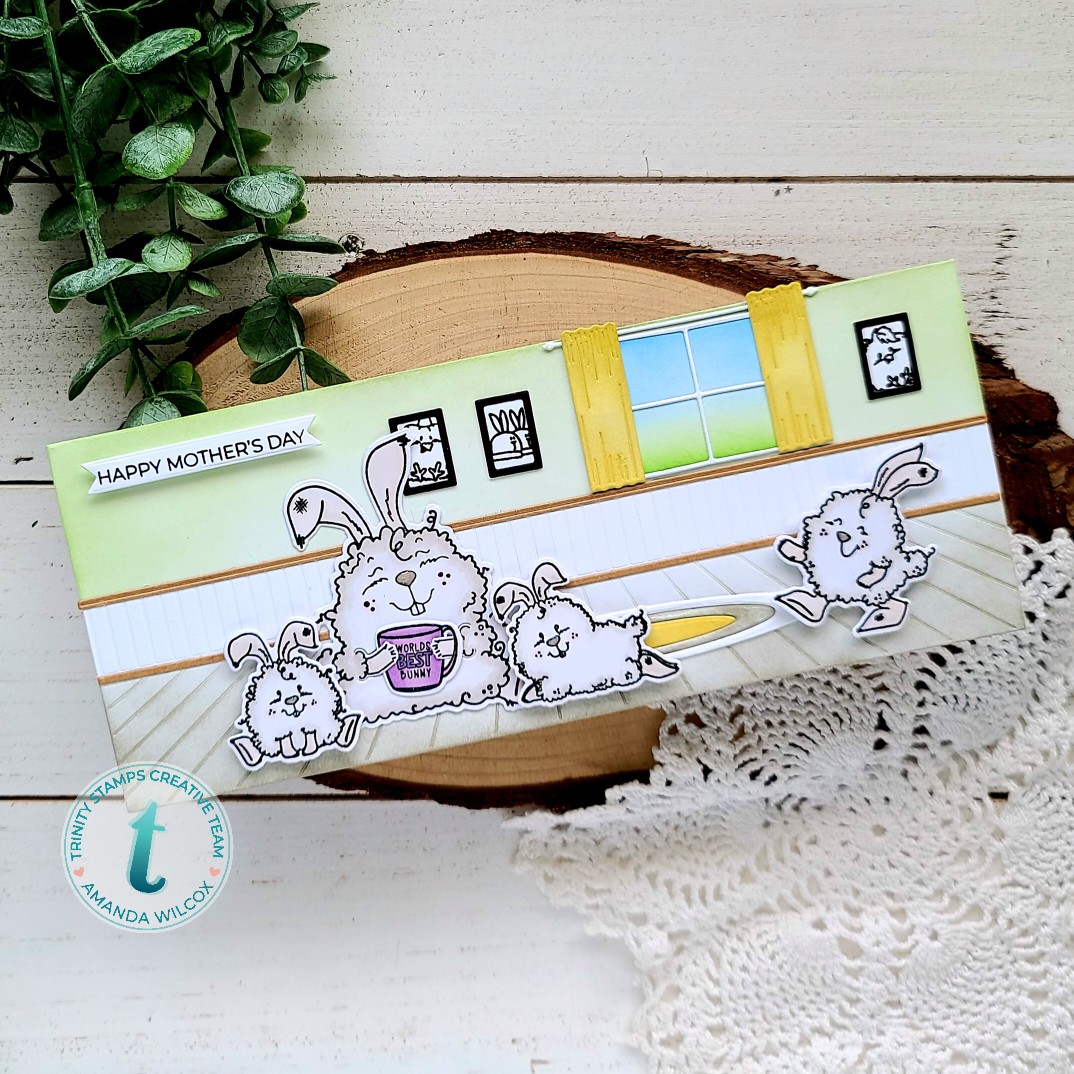
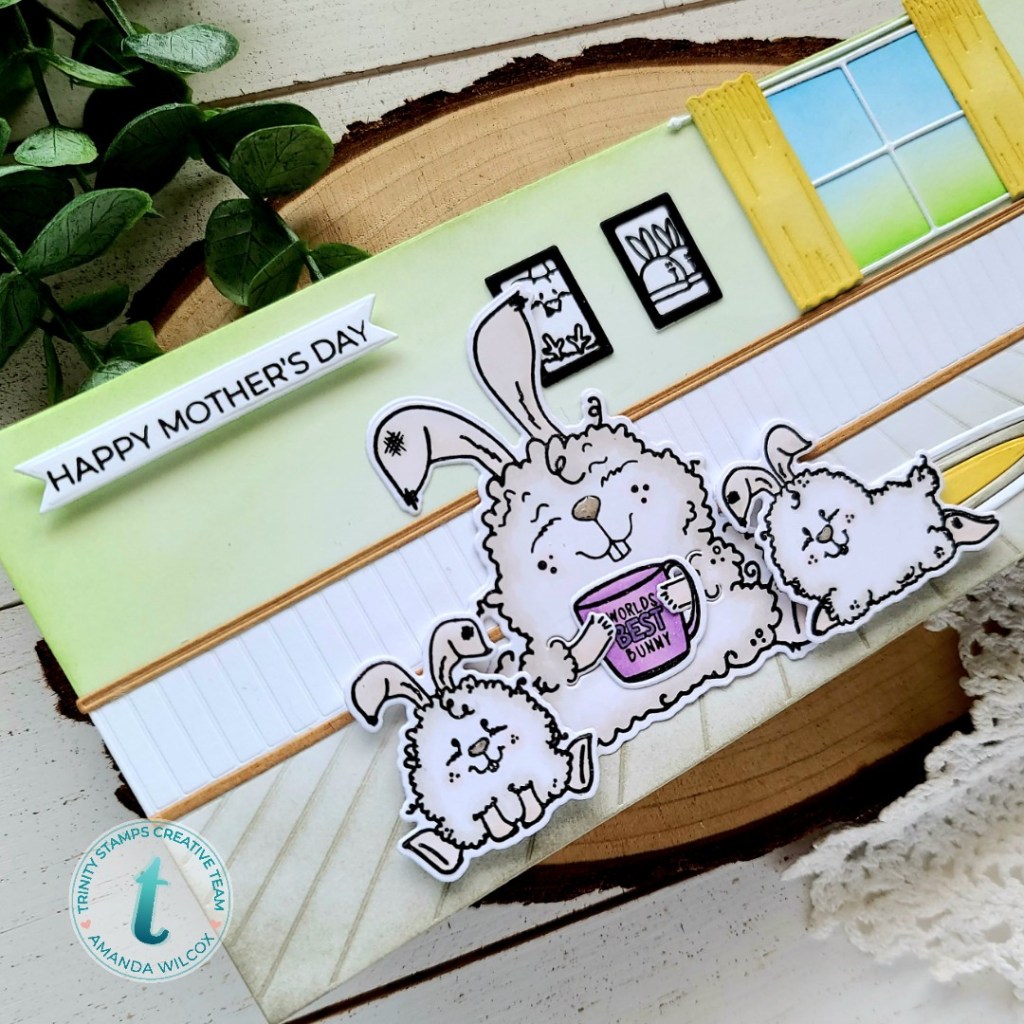
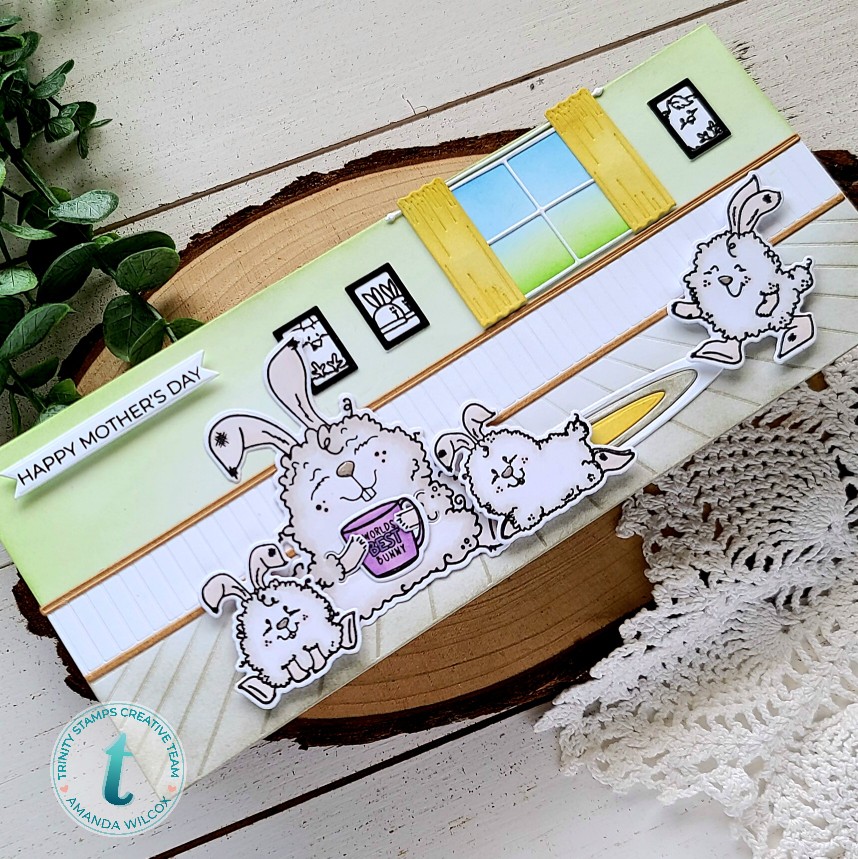
Hello everyone! I have a really fun card to share with you today featuring Trinity Stamps products. I had a blast creating a sweet slimline scene filled with some of my favorite bunnies for a great Mother’s Day card.
For cards like this I like to die cut my room pieces from white and use my blending brushes to ink them up in the colors I like. The exception to this thought are the chair rail and base board which I cut from kraft cardstock this time. They are really skinny pieces and easier to cut from the color you want.
I stamped and colored images from Dust Bunnies and Dir-tea Bunny for my characters in the scene and then decided to use smaller images from the Dust Bunnies set to fill in the “pictures” in the frames for the wall.
I used liquid glue to adhere the pieces to my scene and then a combination of liquid glue and foam squares to adhere my bunnies down. I chose a sentiment from the A Sentiment For (almost) Everything set and cut it out with a banner from the 4-bar Card die set and popped it up with a foam strip.
I did finish things off with glossy accents on all of the bunnies noses. I think this scene is just so sweet and it was really fun to build and customize too! You could change the number of little bunnies you use based on the mom that the card is for and everything. There are so many possibilities.
To make things easier, for those looking for the products I used, I will link them below.
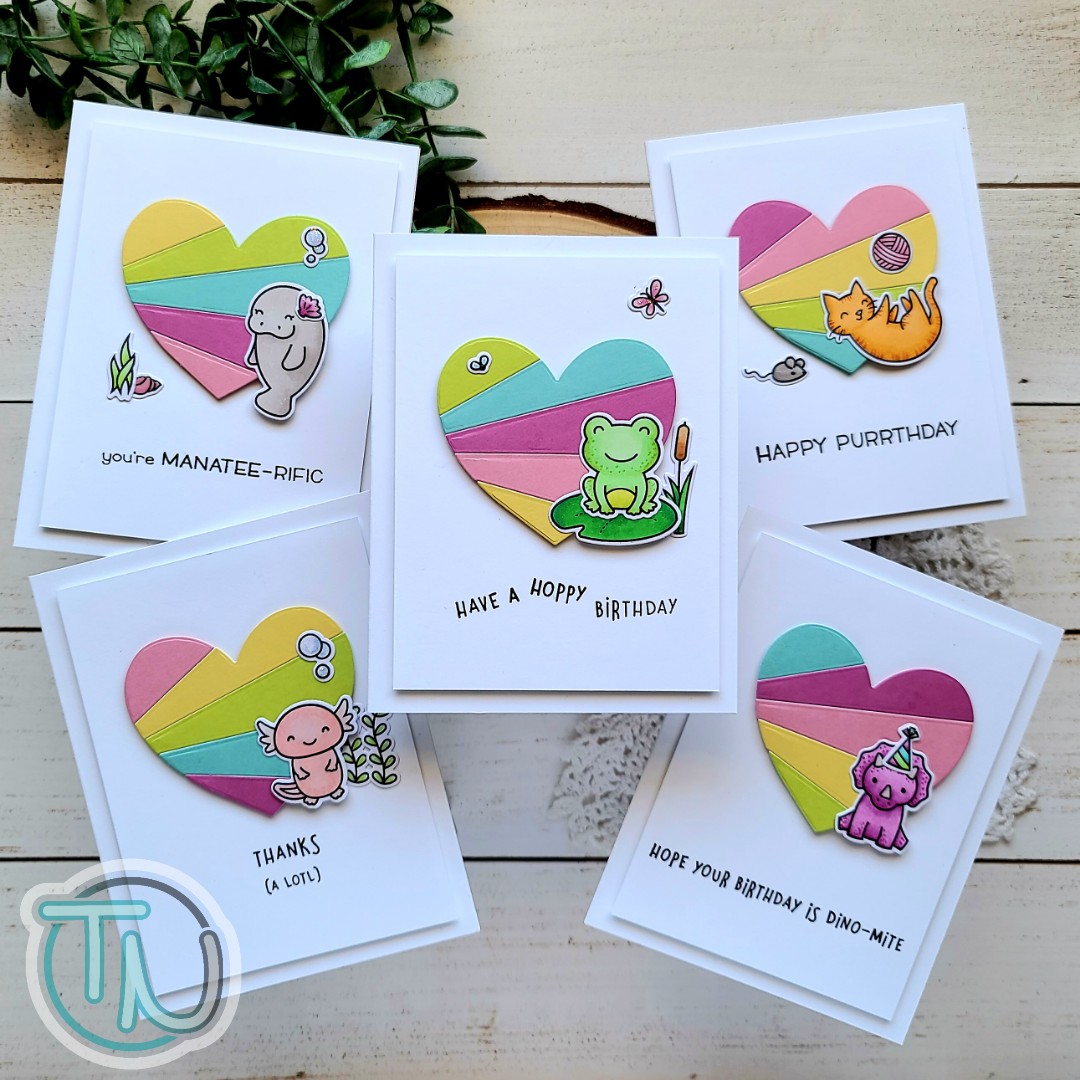
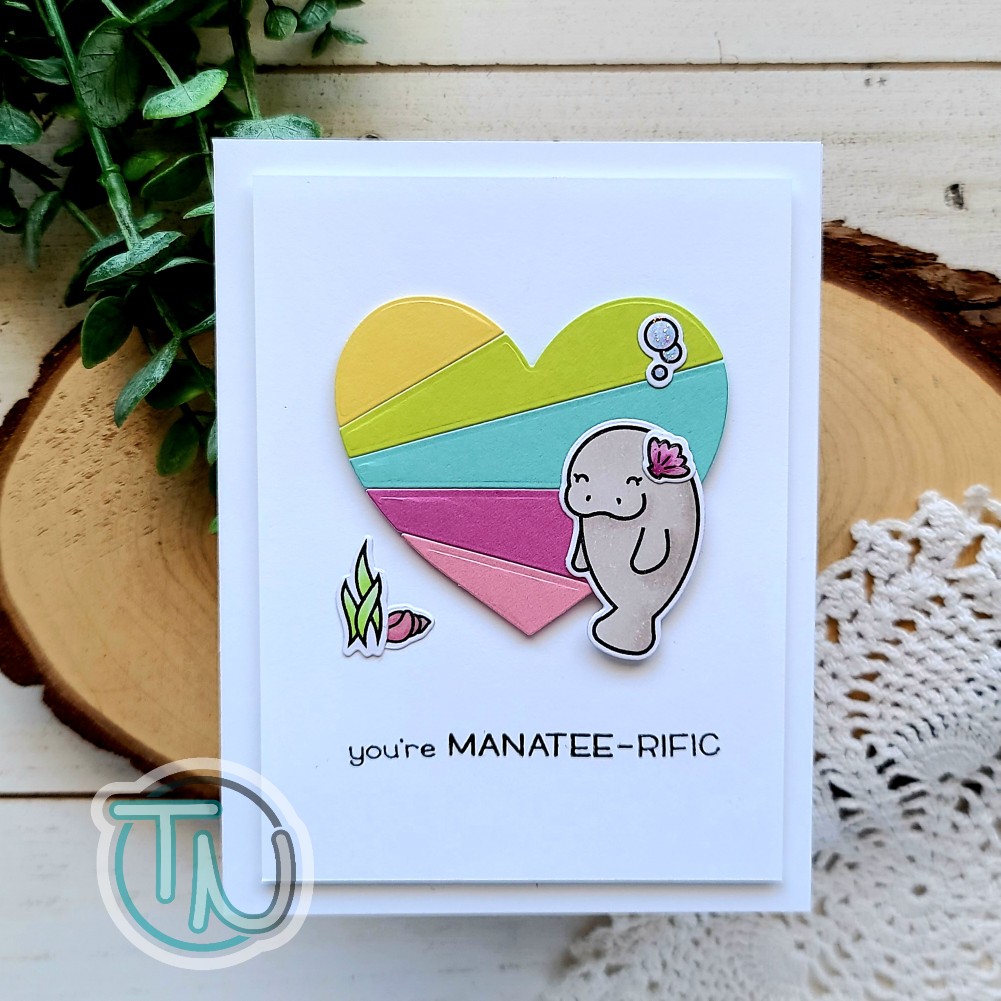
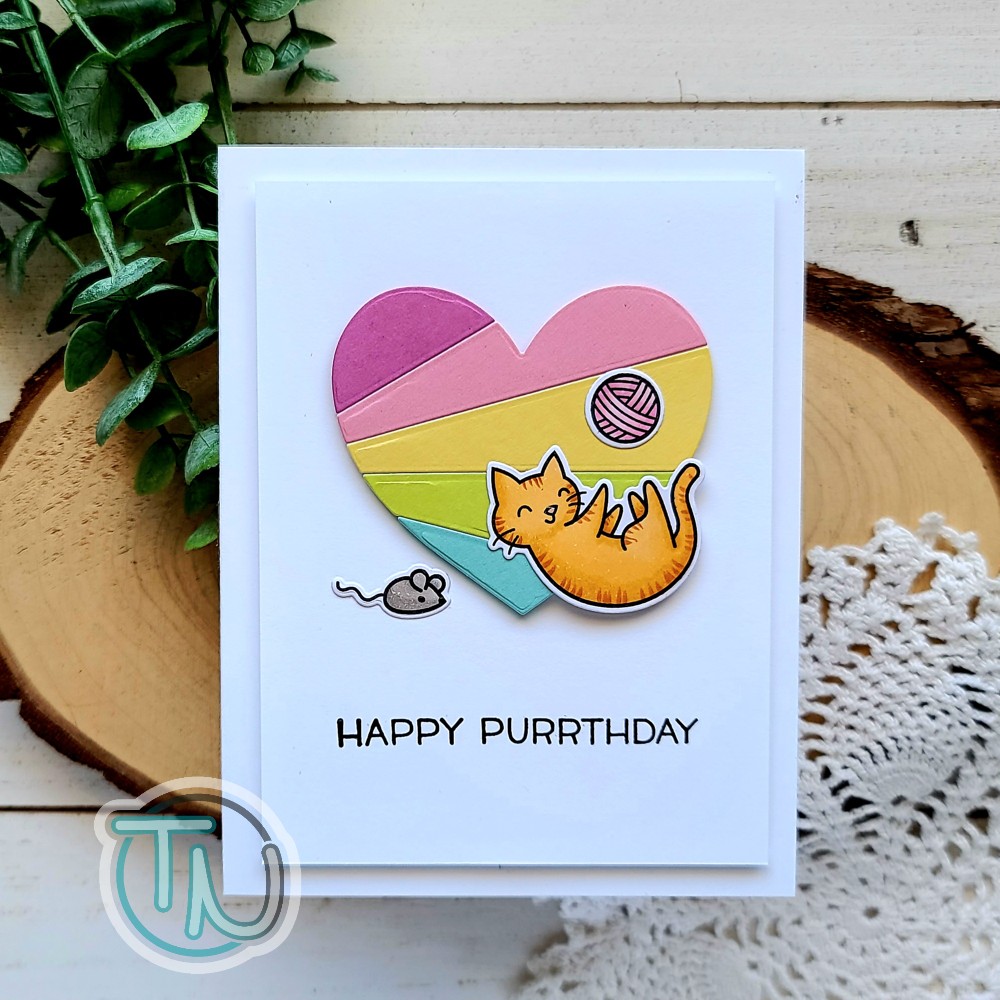
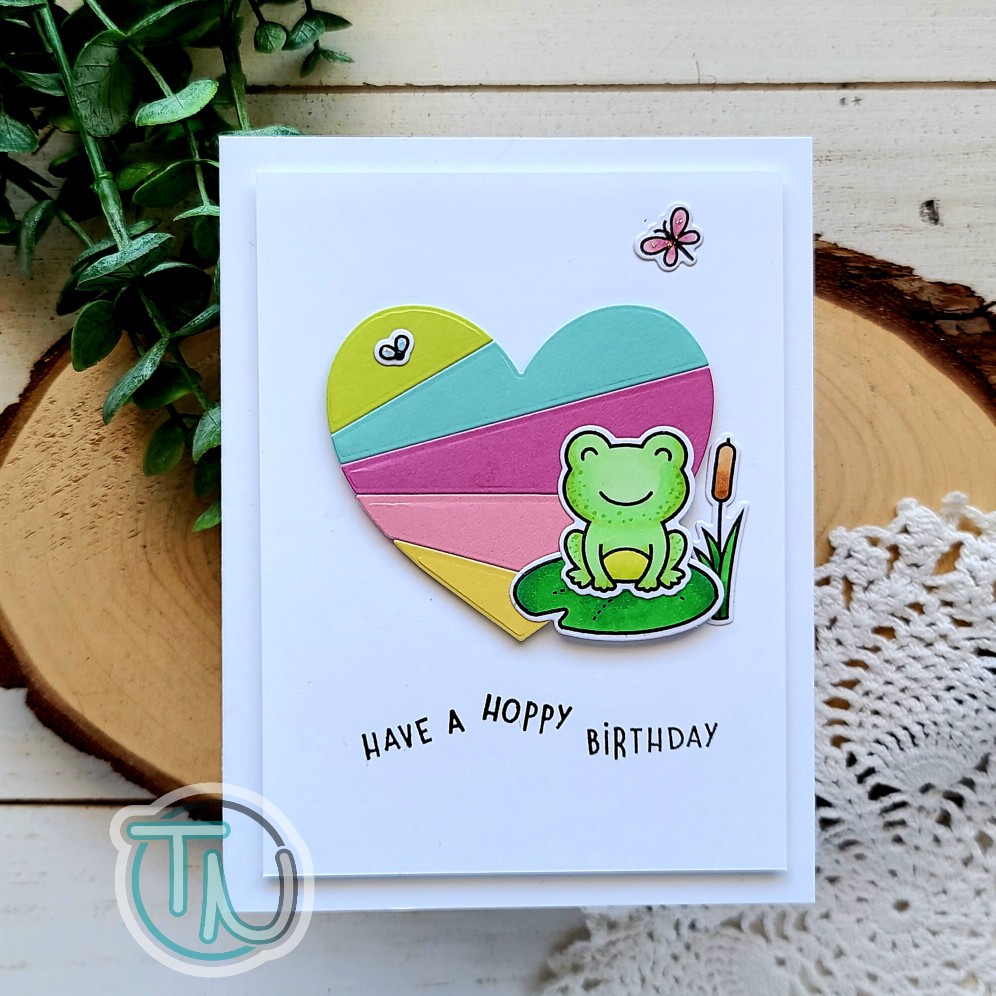
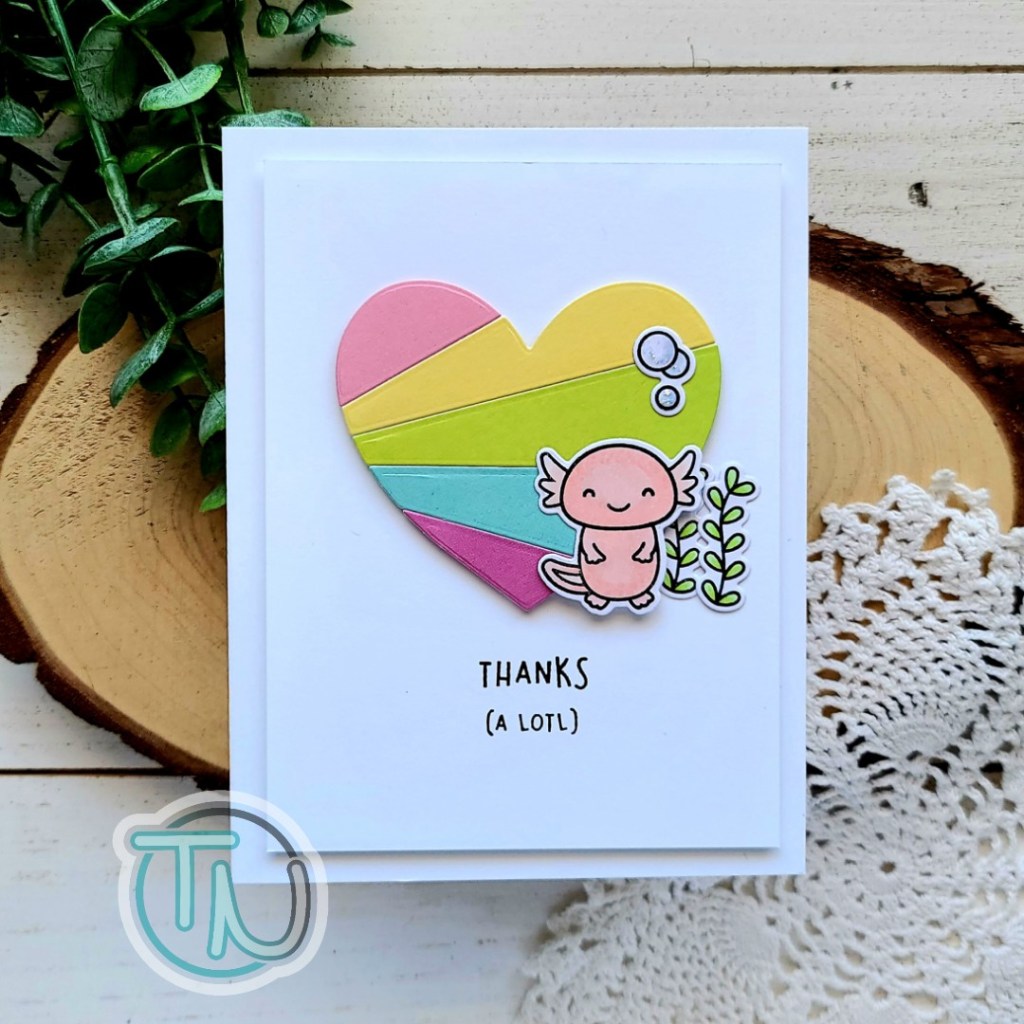
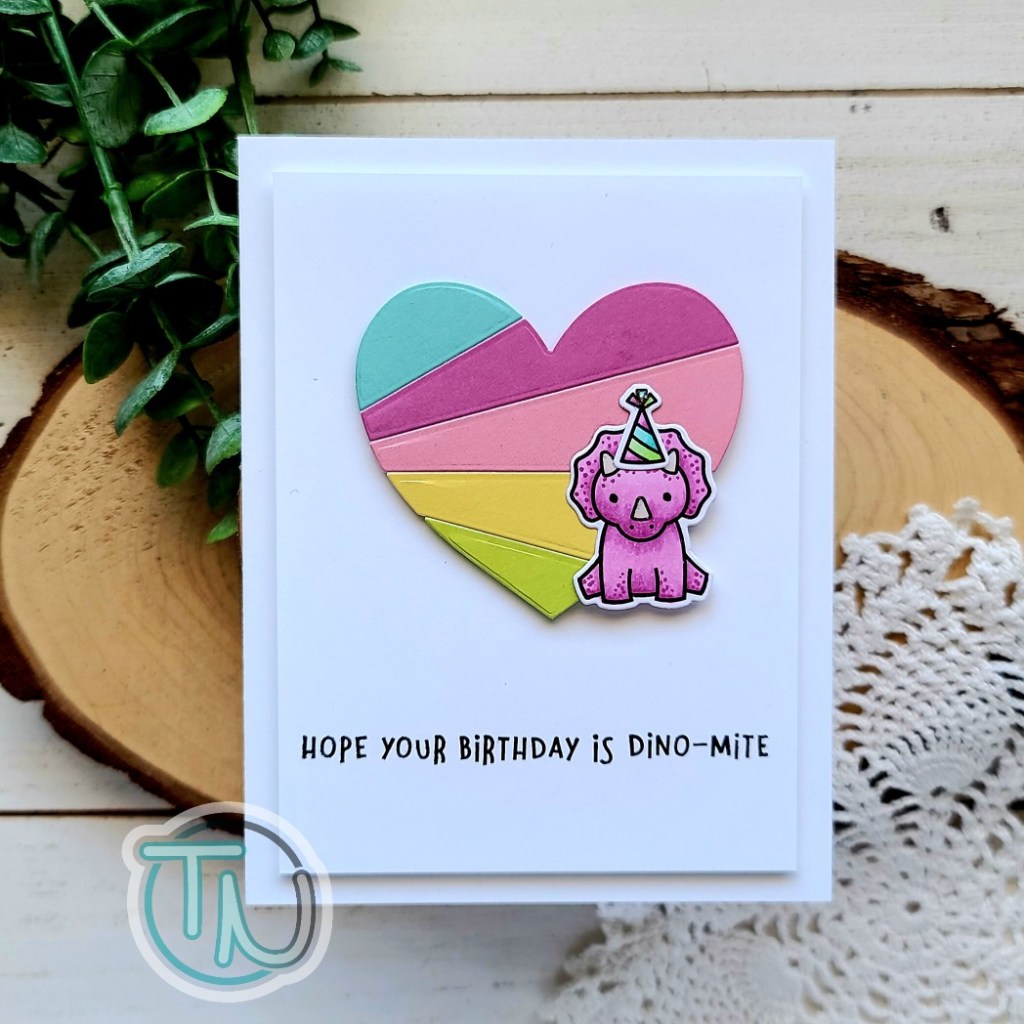
Hey friends! I hope everyone enjoyed their weekend and has a great start on the new week already! I’m popping in with a super fun set of 5 cards that I made with goodies from ScrapbookPal. I used the new MFT Stamps Heart Rays die and paired it with some fun Lawn Fawn sets to create a set of 5 cards. Here’s a look at all of them.
To create these cards I started by die cutting the MFT Stamps Heart Rays die 5 times from different colors of cardstock. Then I mixed them all up and used a little scotch tape on the back to hold the pieces together. Then I added foam tape to the back and set them aside.
I knew I wanted a fairly clean and simple design so I cut 5 white card bases and 5 – 3.75×5 inch white panels and lined the back of those with foam tape as well.
Next I pulled out my Lawn Fawn stamp sets and picked a variety to play with. I decided on images and colored them all with my copics, then used the coordinating dies for the sets to cut the images out. I used a combination of liquid glue and foam squares to adhere the images to the hearts and the white panels. I adhered the panels to the card bases and then used my MISTI to stamp sentiments on the bottom portion of each card front.
This card features images from the Meow You Doin? set. I love that playful kitty! I finished things off here with just a little glossy accents on the kitty’s nose.
I think this card is super fun and playful with the wonky sentiment and those cute images from Toadally Awesome. I finished this card off with unicorn Stickles on the wings of the fly and dragonfly.
I absolutely LOVE this cute little axolotl and couldn’t believe I hadn’t inked him up yet! Therefore, I knew I had to add him to one of these cards. This set is called I Like You (a lotl) and I love it (a lotl!). I finished things off here with unicorn Stickles on the bubbles.
Last but not least, I had a little dino fun with Rawrsome and added this sweet triceratops with a party hat to the last card. I added black glaze pen to the eyes, glossy accents to the horn and unicorn Stickles to the top of the party hat.
This is such a fun set of cards and could be customized with any sets you have in your stash, for any occasion you might need cards for. I hope you found some inspiration in today’s post to create something wonderful.
I appreciate you sharing your time with me. Have a fabulous day!
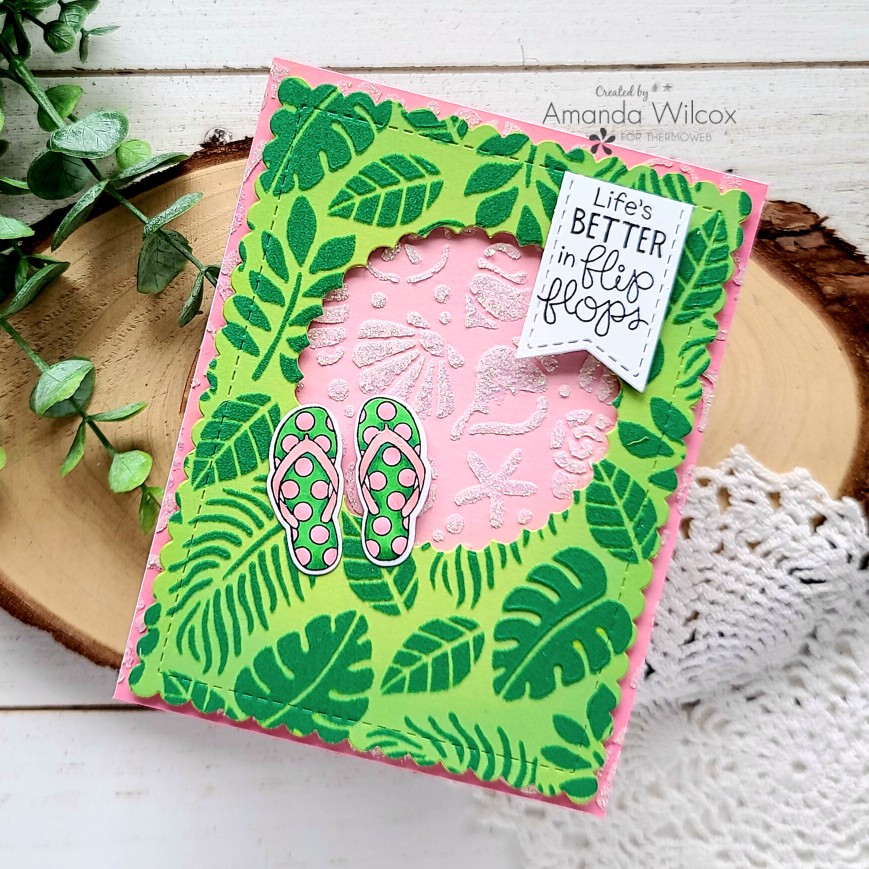
Hey friends! It’s a busy day on here so I appreciate you bearing with me. I’m over on the Thermoweb blog today sharing a pair of cards I made featuring glitz gel and deco flock backgrounds. I paired these awesome products with Newton’s Nook stamps, dies and stencils for some really fun results!
These cards started with the pink and green one but as soon as I die cut the scalloped circle from the center, I knew I couldn’t just throw it out so I started designing a second card to compliment it.
I have a full tutorial available over on the Thermoweb blog today if you’d like to take a peek at how I created this pair of super fun, summer-loving cards!
Any time there’s a chance for a make-one, make-two instead, I’m going to take it and you should too! Your future self with thank you. First, it’s extra crafting time which is always good for us! And second, you immediately have two cards for the mess of one. Hahaha!
I appreciate you sharing your time with me. Have a fabulous day!
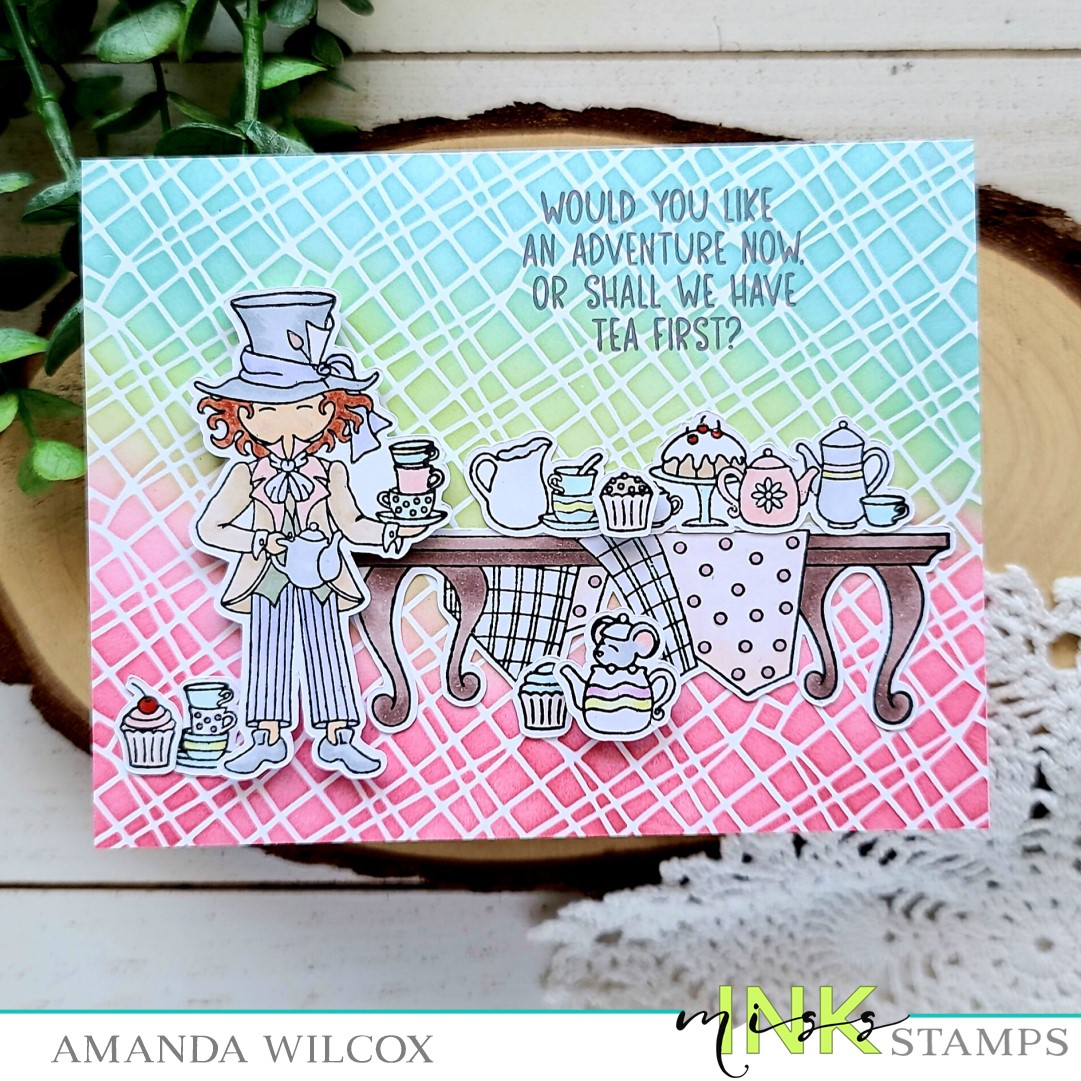
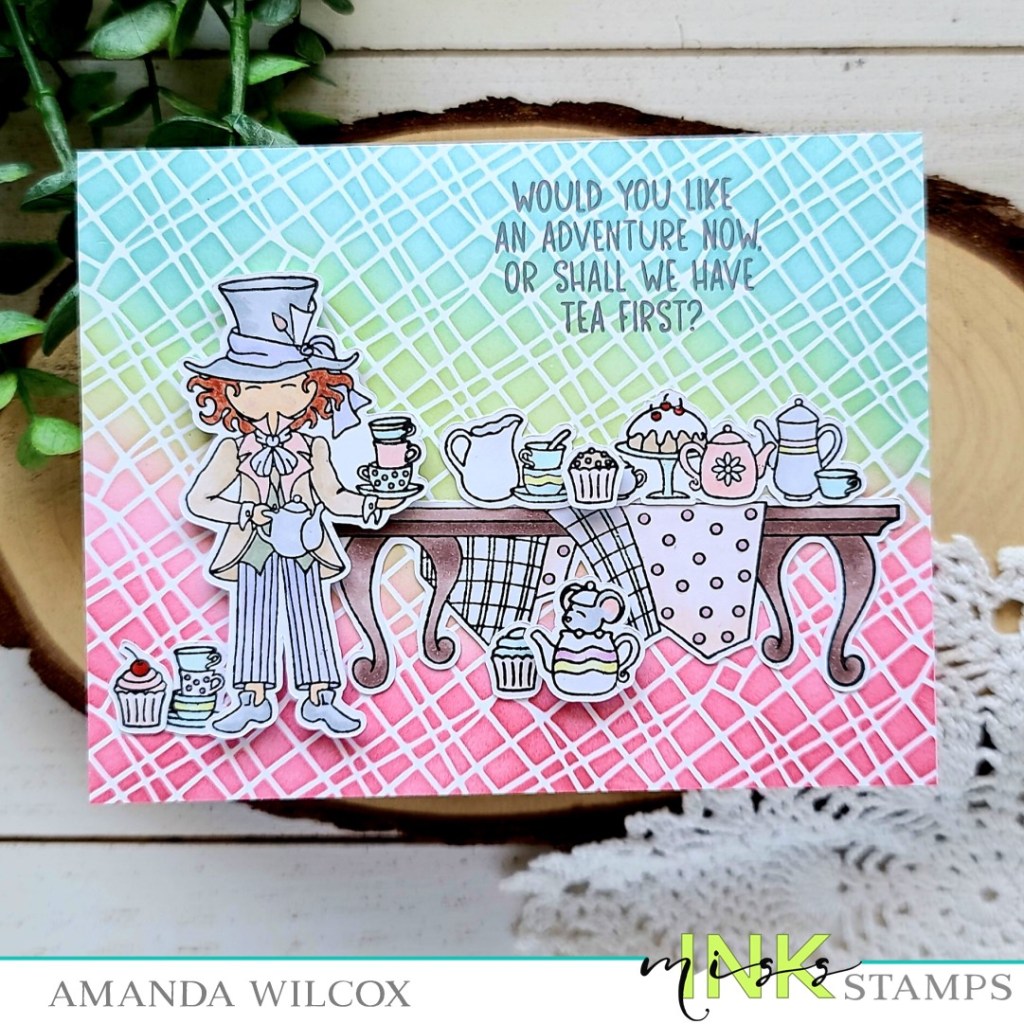
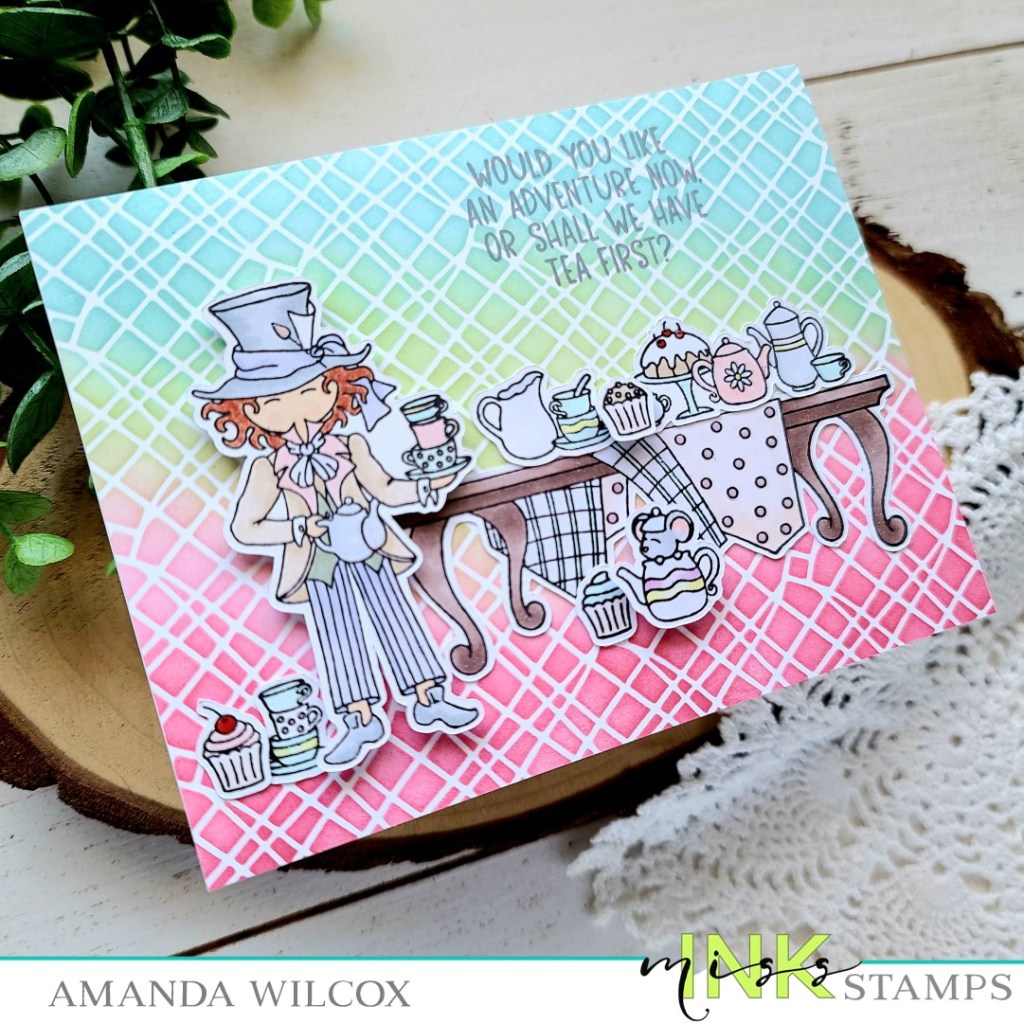
I inked up my square dance stencil using Trinity Stamps blending brushes and Lawn Fawn dye inks on a white panel. Then I trimmed it down to 5.5×4.25 inches and adhered it to a white card base. Next, I stamped images from Tea Party and colored them with my copics. I used the scan-n-cut to cut them all out and started playing with final placement. The images are adhered with a combination of foam squares and liquid glue.
Then I chose a sentiment from the same Tea Party set and stamped it in a soft gray ink to keep with the lighter feel of the overall card.
For finishing touches, I added glossy accents to various parts like polka dots and cherries. Then I came in with my Wink of Stella glitter brush pen and added a little here and there on the teapot stripes and flower.
Isn’t this a fabulous card?!? I just love the Hatter so much! This is definitely my favorite set from the series and I love playing with it and thinking of new color combinations to try.
I appreciate you sharing your time with me. Have a fabulous day!
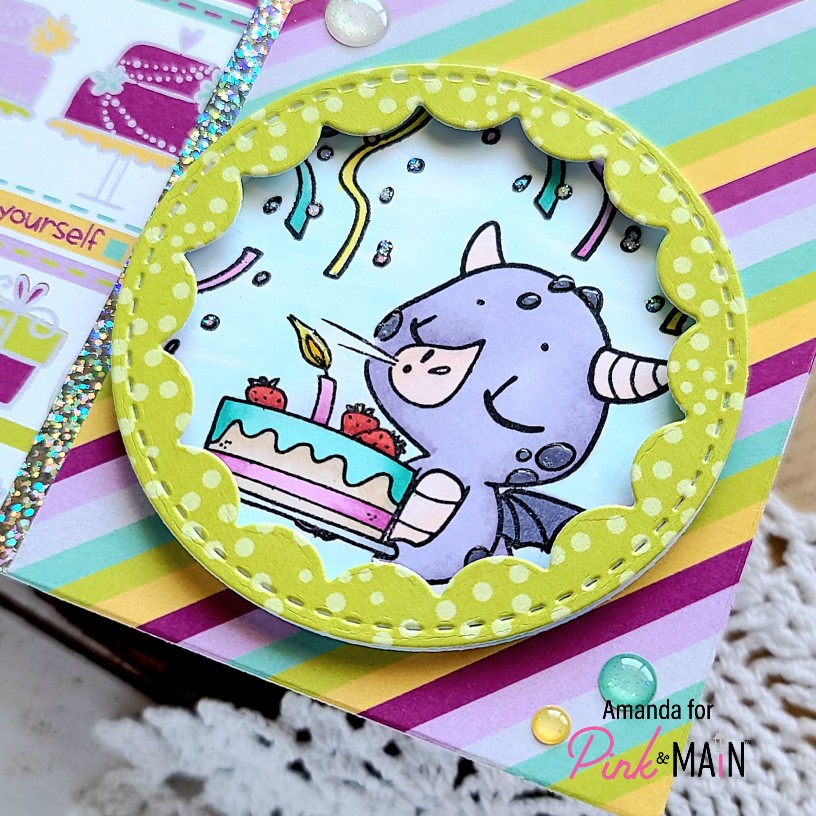
Good morning friends! I’m over on the Pink & Main blog today sharing a super fun card featuring a new, awesome stamp set. But there’s something special about this one…
Pink & Main has started a special stamp and die of the month subscription box! Their starting set is absolutely adorable and is definitely going to be something you reach for often!
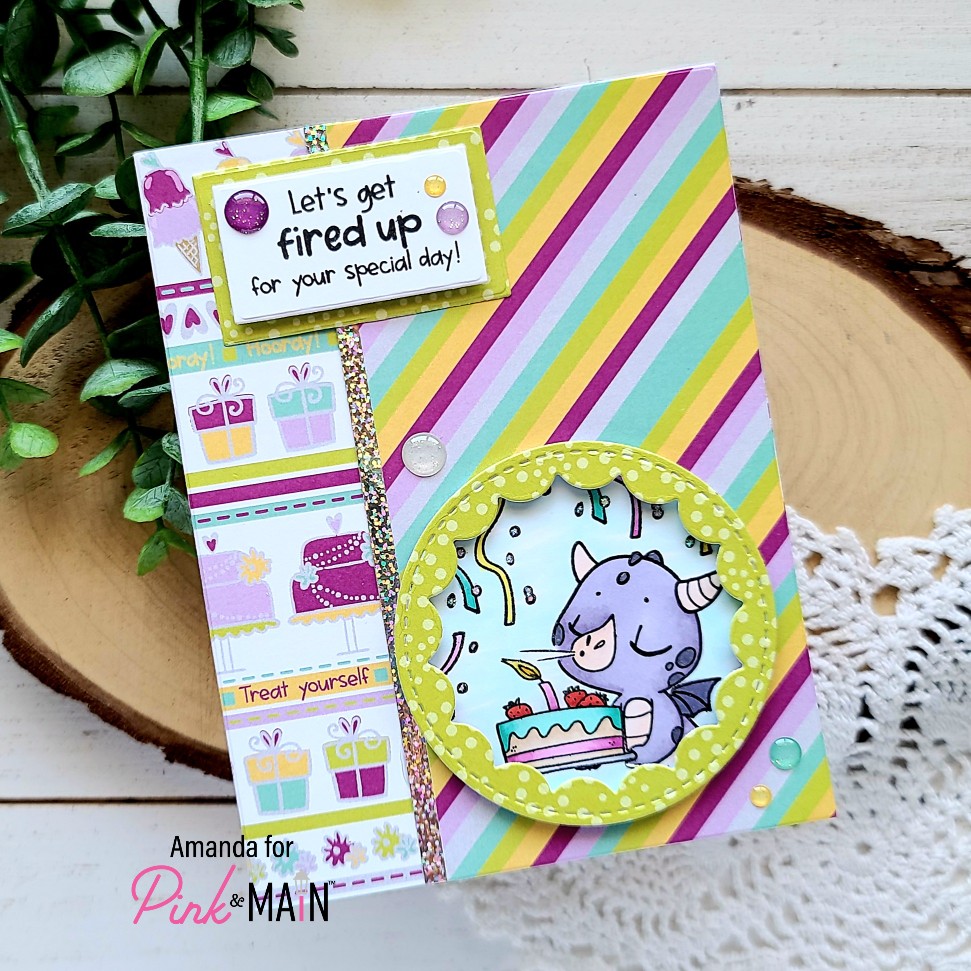
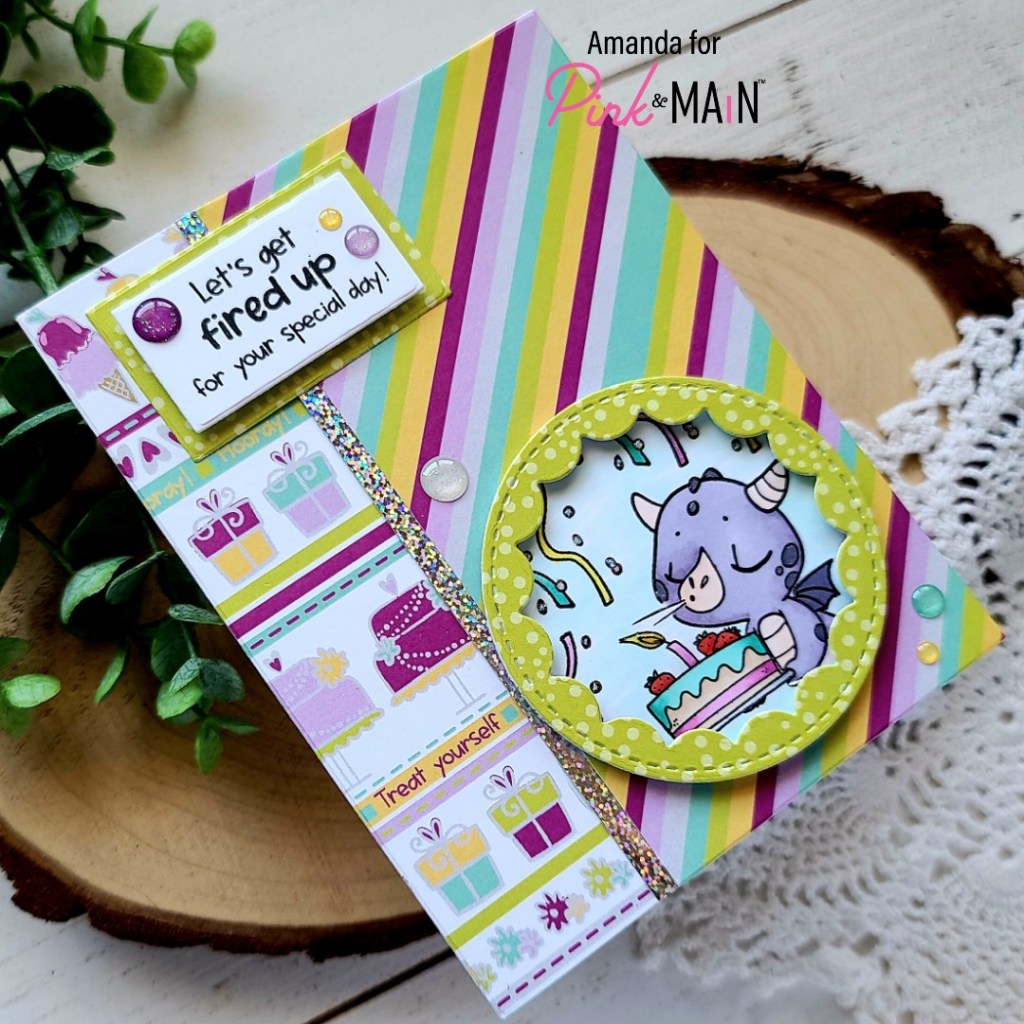
For today’s card, I pulled the elements out that I thought I wanted to use and laid everything in the general design I was thinking. Once I had that figured out, I die cut a circle that would fit under the reverse scalloped circle I was using and stamped my dragon image on it. I colored the image with copic markers and set it aside to get my paper layers finalized.
For those, I chose the patterned papers from Hooray paper pad that I wanted to use and started die cutting. I cut stripes and birthday images from the largest Layered Rectangle dies. I trimmed off part of the stripes and adhered the two together with EZ Squeeze liquid glue. Then I adhered this to a white card base. I cut a thin strip of the glittery pattern in the Holographic 2 paper pad and glued it down next.
I cut a Reverse Scalloped Circle from green dot paper and popped it up on my image circle with foam strips. Then I glued it to the card base. Finally, I stamped my sentiment and used the Layered Slim Line dies to cut custom rectangles from the sentiment panel and another slightly larger one from the same green paper as the circle. The sentiment is popped up on the green and they are adhered down with liquid glue as well.
Moving on to finishing touches for my card today, I added a scattering of Hooray glitter enamel dots to the sentiment and around the circle. Then I came in to the image with glossy accents on parts of the dragon and the candle flame, and finished everything off with some star dust Stickles on the confetti in the air.
I hope you’re all as excited as we are about the new stamp of the month box! Head HERE to subscribe and get this first adorable set!
I appreciate you sharing your time with me. Have a fabulous day!
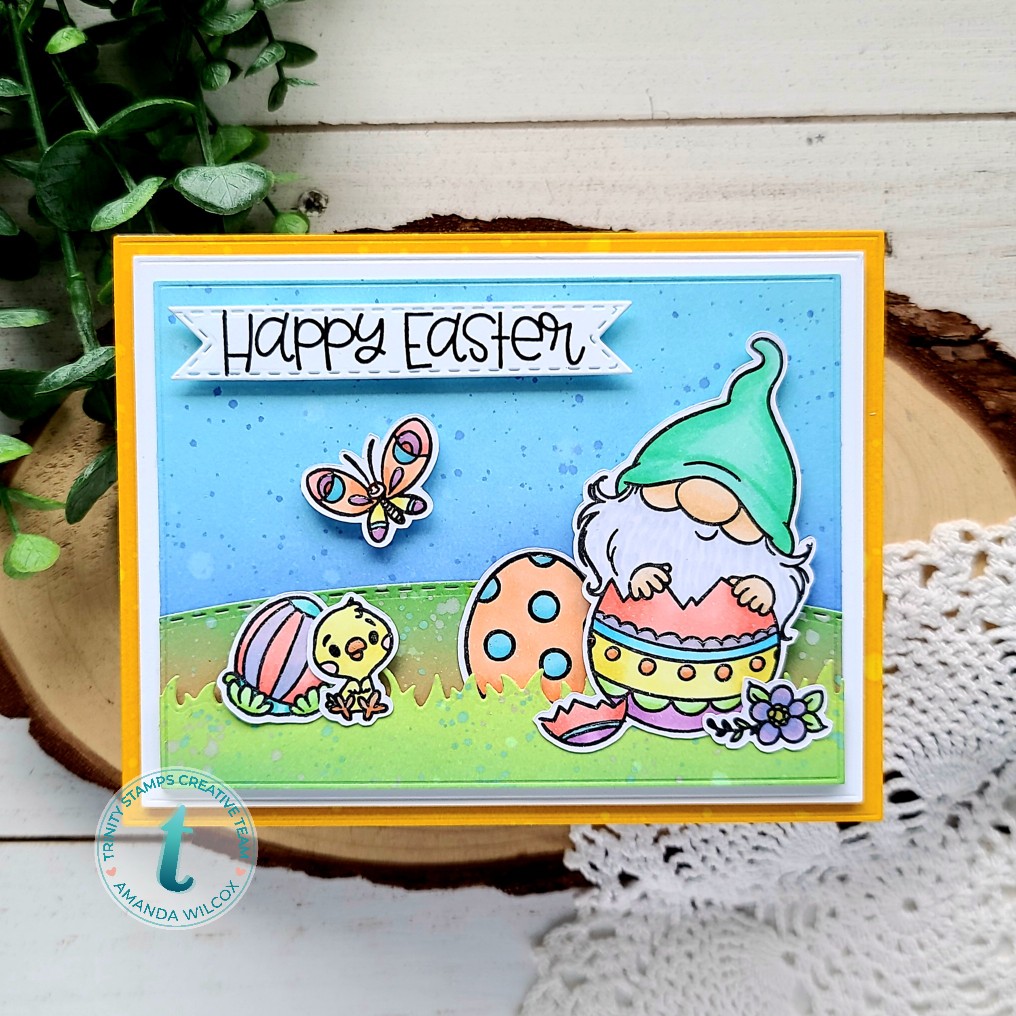
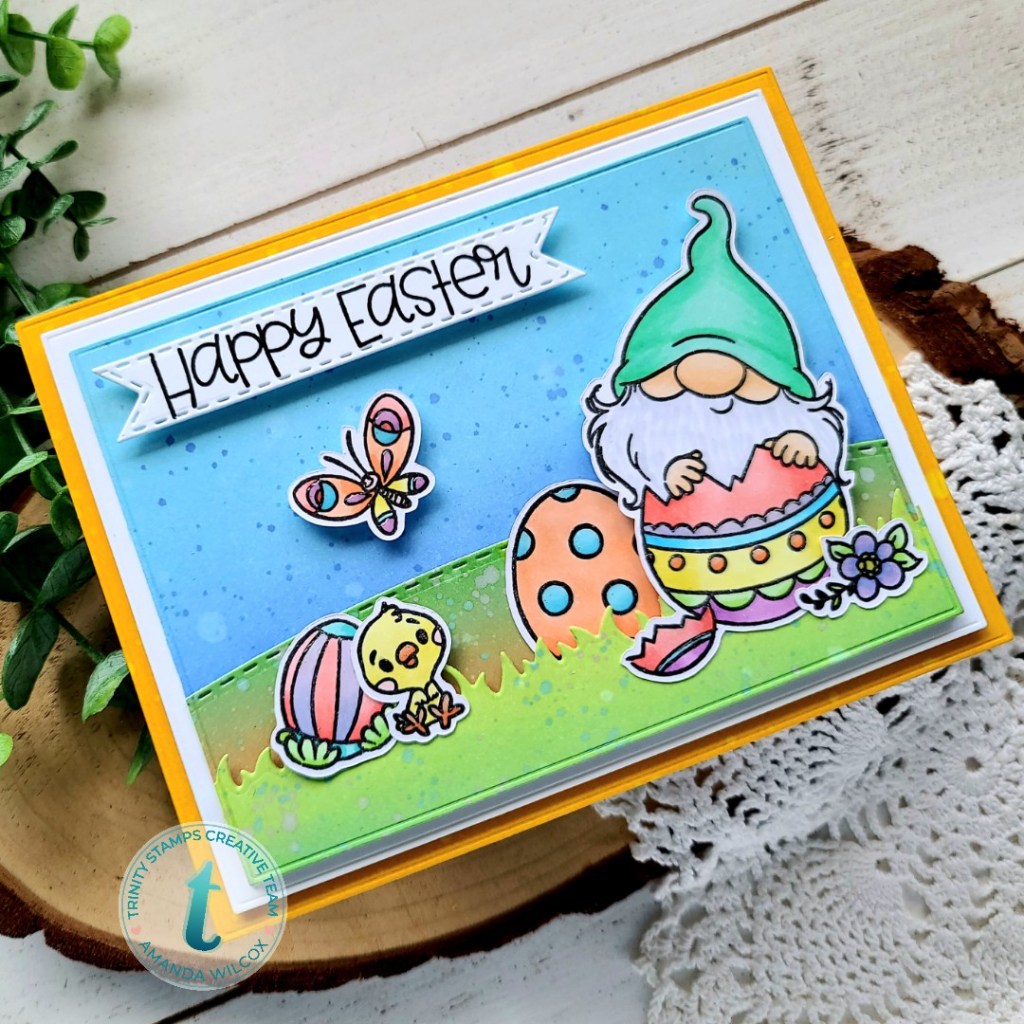
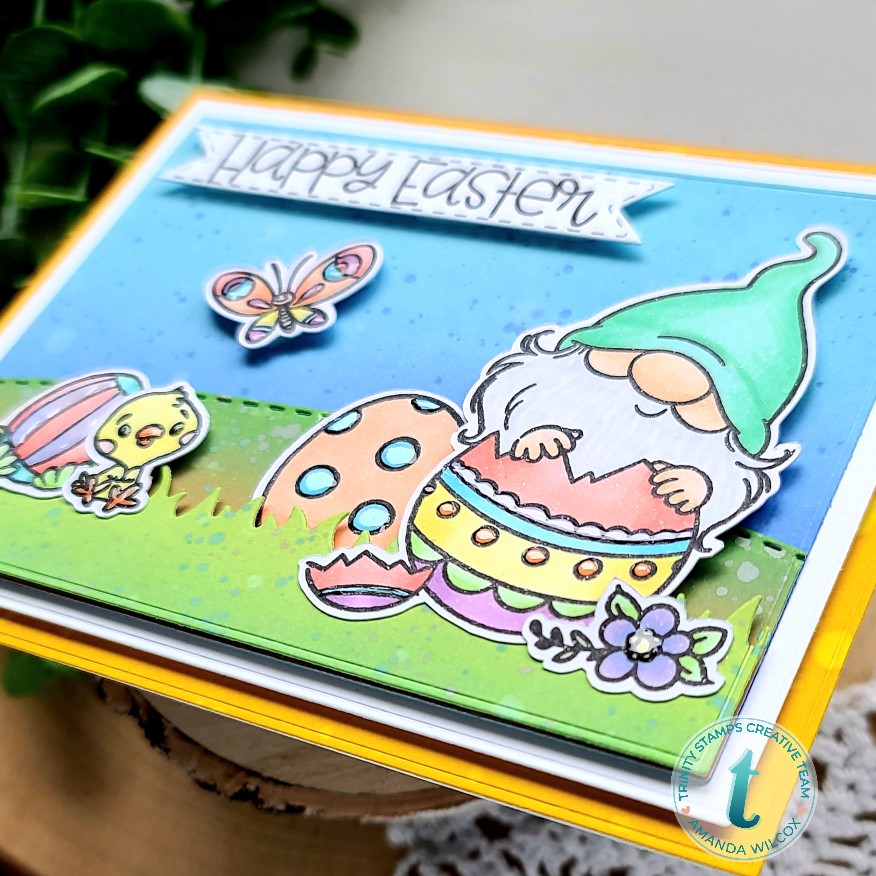
Hello again! Today I’m over on the Trinity Stamps blog sharing this really bright and fun Easter card featuring come products from the most recent release. I love how these sets work so well together and had a blast putting this fun card together. I hope you enjoy it!
I glued the yellow panel to a white card base and popped the white panel up with foam tape. I glued the sky and hill with liquid glue and popped the grass panel up with foam tape as well. I used a combination of foam squares and liquid glue to adhere my images. Then I stamped a sentiment a cut it out with a Slimline Banner and placed it with foam squares.
For finishing touches, I added glossy accents to the flower centers, chick’s beak and legs, parts of the butterfly and parts of the Easter eggs too!
I just love this sweet scene and had so much fun playing with all that rainbow color!!!
I appreciate you sharing your time with me. Have a fabulous day!