Blog

Trinity Stamps – Guest Designer

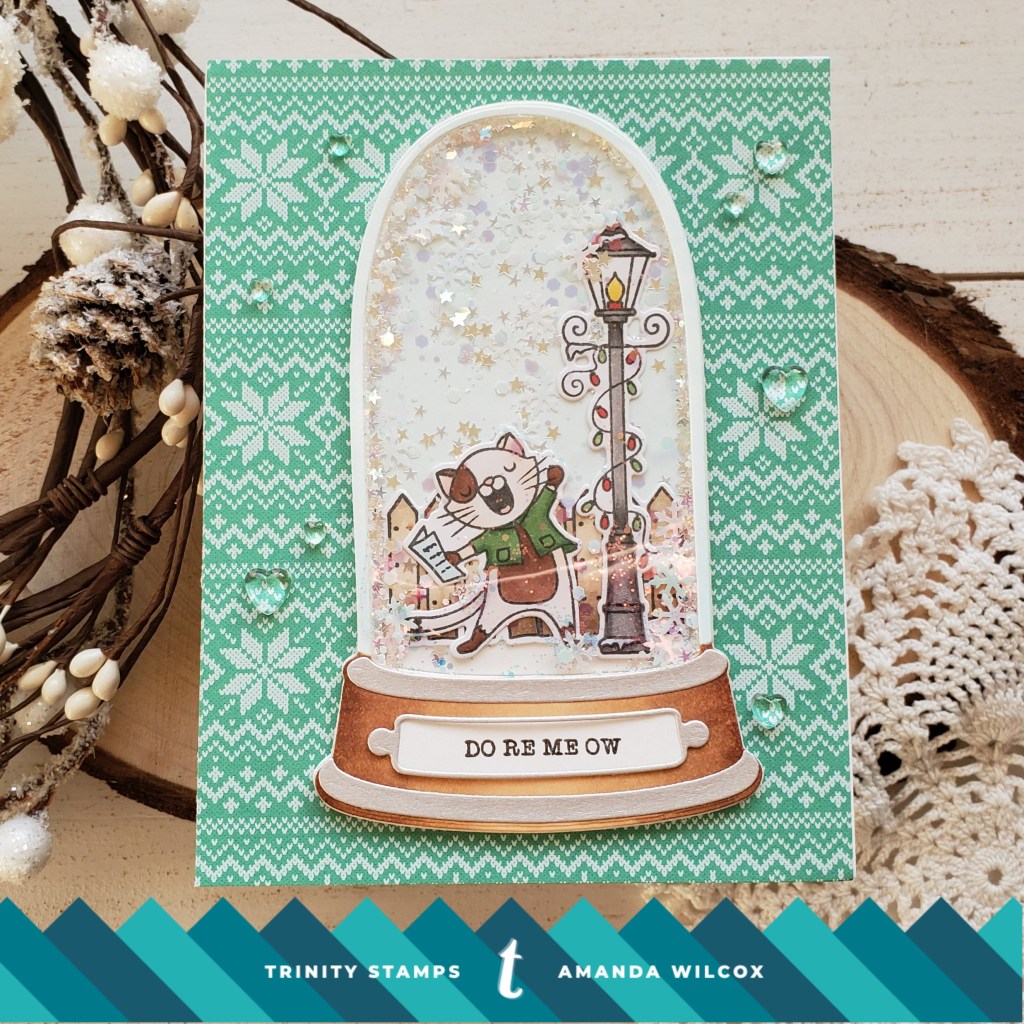
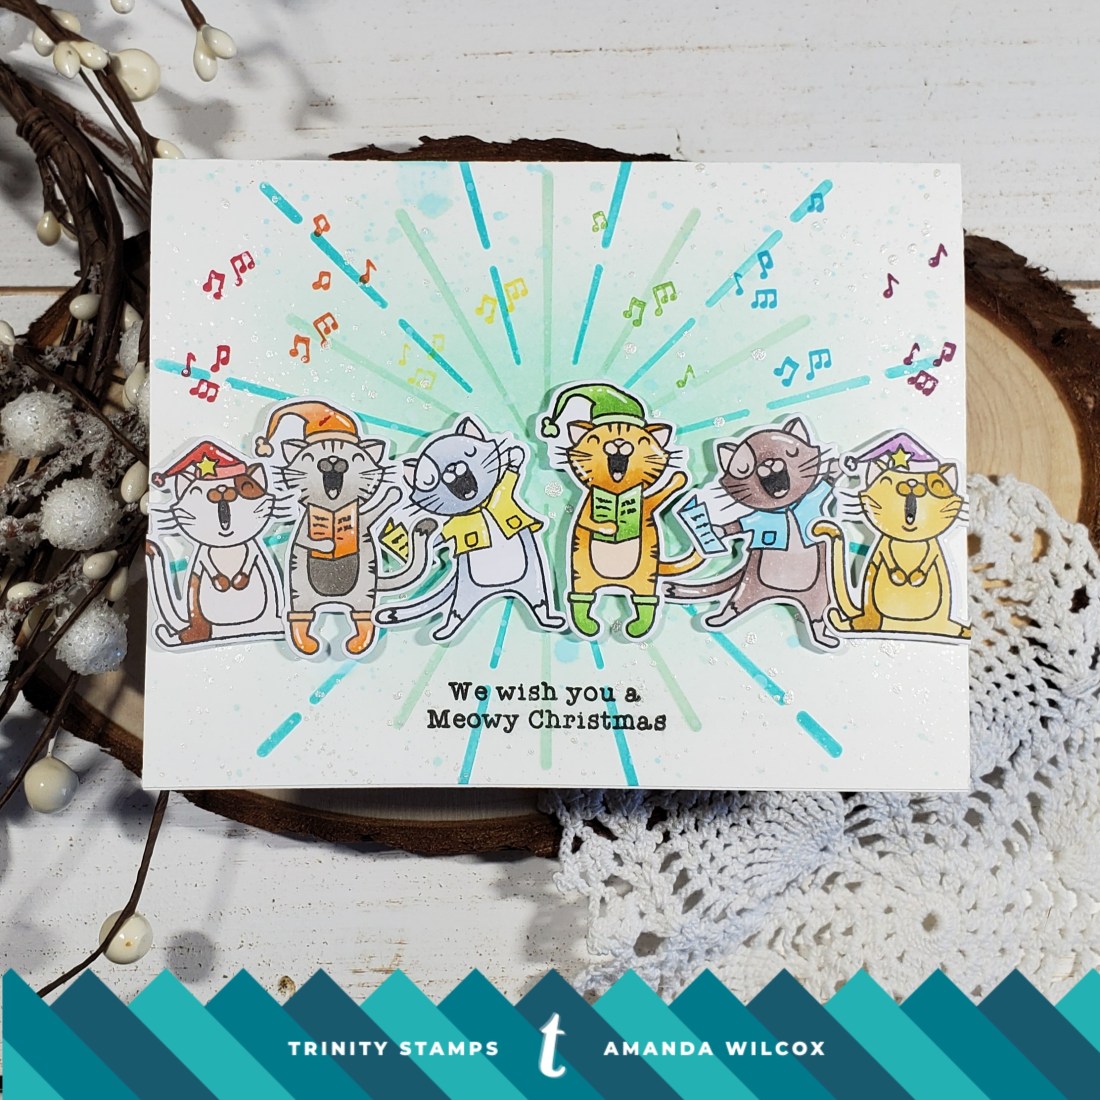
Welcome back everyone! I’m so excited to be featured on the Trinity Stamps blog today guest designing this fun rainbow Do Re ME OW card! I’ve learned a secret from many crafters: When you don’t know what color to choose, rainbow is the best option! This theory has never failed me and is what inspired today’s card.

I started by stamping each kitty from the Do Re ME OW set twice, coloring them in and die cutting them so I could figure out my arrangement.

I seriously went through about 4 different layouts before deciding on this one and then everything clicked! I took out my new shine brighter stencil and started inking my background with distress inks and the blending buddy brushes. Then I took the same distress inks and splattered them on the background as well. Next, I took pearl watercolor and splattered it all over for some added interest.

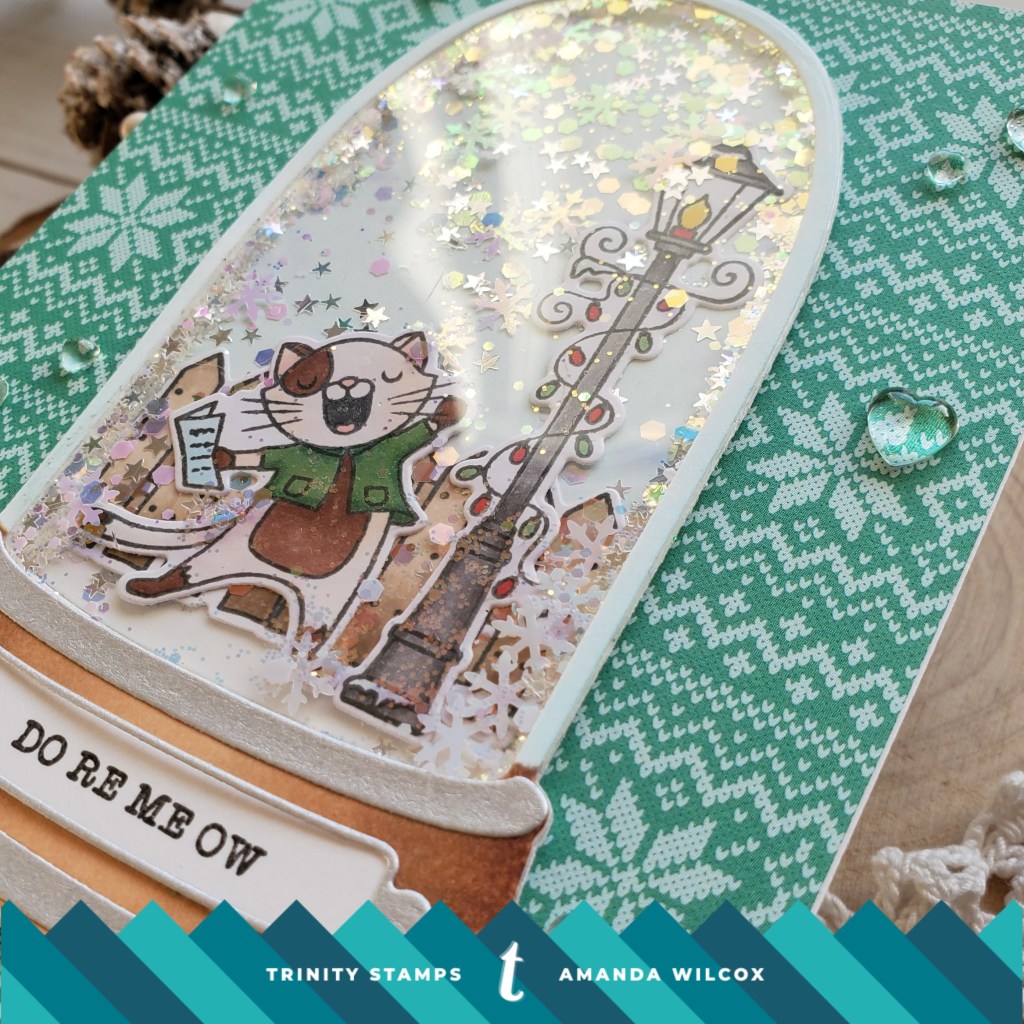
Then I popped my kitties up with foam squares, stamped my sentiment underneath and then decided to add rainbow music notes above them coordinating with their clothing colors. So much fun!

For finishing touches I added white gel pen accents and then glossy accents to their noses, tongues and stars.

Eeek! I love how this card turned out, don’t you?!? It’s super fun and sure to make the recipient smile.

Thank you so much for stopping by today! I appreciate your time.

Newton’s Nook – Snowmen Everywhere

Thanks for stopping by today. I’m sharing my first entry into the current Inky Paws Challenge with Newton’s Nook. It’s a color challenge this time and I had a blast with it!

For my first card I immediately grabbed the Frozen Fellowship set and chose my markers. I love coloring this large image with a limited color palette. It’s the most fun for me.

After I had it colored, I made a pink card base and grabbed a teal panel to stencil on. I chose the bubbly stencil and used clear glitter glitz gel on it. When I assembled my card I offset the stenciled and stamped panels just a bit, popped up my stamped image and wrapped green twine around the teal one for a little extra something.

For finishing touches on this card, I added black glaze pen to all of the eyes, Nuvo Crystal Drops to the buttons, Stickles to some of the hats and white gel pen accents to all of the clothing.

I will stamp my sentiment on the inside once I decide exactly who this card will go to. That way it can be more personalized.

Thanks for stopping by. I appreciate you sharing your time with me. Have a fabulous day!

Merry Pigmas

Hello there! Thanks for joining me today. I’m up on The Rabbit Hole Designs blog with this fun and funny Merry Pigmas card. The Rabbit Hole Designs just released their Christmas stamps and this was one of two piggy themed sets in that release.

For this card I took a red panel and embossed it with a snowflake embossing folder and then used Wink of Stella glitter brush on top of the raised snowflakes. Then I added a strip of plaid paper down the middle and edged it with silver strips to offset it. I stamped, colored and cut out my piggy, popping him up on a teal circle and also popped the circle up on the plaid panel. I stamped and heat embossed my sentiment and cut it into a banner shape popping it up as well. I love what interest all the dimension gives cards.

Finishing touches on this card were very simple, just adding more Wink of Stella on the white parts of the hat and Santa suit. You can see in this close up picture how much glimmer that really gives him. It’s super fun!

Here are the products I used:

Merry Pigmas

For more inspiration, ideas and news check out these links:

Thanks for stopping by. Have a fabulous day!

Newton’s Nook Guest Design – Festive Fawns

Welcome back to my second week of guest designing for Newton’s Nook. Thank you for stopping by. Today I’m sharing this sweet, soft card featuring Festive Fawns stamps and dies and the Snowfall stencil.

This card was inspired by a quilt my coworker is sewing and I loved the color palette so much I had to make a card using it. Be sure to head over to the Newton’s Nook blog for a full view of the card and all the details how I created it.

I love the images in the Festive Fawns set. They are the perfect size to stand alone on a card but also small enough to put together or even mix with other stamp sets. And they are so fun to color!

I appreciate you sharing your time with me. Have a fabulous day!

Newton’s Nook – Holiday Wishes

Hello again! Thanks for stopping by today for this sweet Newton’s Nook card featuring on of the Festive Fawns stamps and dies, and the gingham stencil.

I’ve had this cute little fawn colored and cut out for weeks now just trying to decide what to do with it. All of a sudden this idea popped into my head and it all came together perfectly.

I used blending buddy brushes from Trinity Stamps for the background, using red ink and then adding the stencil on top and went over it all again. I love the tone-on-tone look and this stencil pattern is so much fun! Then I splattered the background with gold watercolor and set it aside to dry while I heat embossed my sentiment. I popped my image and the sentiment strip up with foam squares and added a little washi tape accent below that.

For finishing touches I added glossy accents to the deer’s nose and spots and Nuvo Crystal Drops to the wreath’s berries. Then I added white gel pen accents throughout the image.

This is such a fun card and would be a great one to mass produce for the holidays too. I have some tag ideas with this stamp set so stay tuned the beginning of December for that fun!

I appreciate you sharing your time with me. Have a fabulous day!

Trinity Stamps – Do Re Me Ow Snowglobe

Thanks for stopping by today! It’s been one crazy week in our house and I haven’t got much crafting done but things should settle down now for a short bit, until the holiday rush that is. 😉

Today I’m sharing this fun snow globe shaker card featuring Trinity Stamps products. I can’t get enough of these kitties and the snow globe dies were just asking to be made into a shaker card.

To create the shaker piece, I die cut the main elements of the tall shaker dome set from white cardstock 6 times and once from acetate. I colored the top and bottom pieces with copics for some added dimension. Then I stamped, colored and die cut my Do Re Me Ow kitty, fence and lamp. The accents were cut from silver cardstock.

I cut down a piece of patterned paper and adhered it to a card front. Next, I adhered my completed shaker window with the images and some fun snowflake soup glitter confetti inside.

I stamped a sentiment from the Do Re Me Ow set on the label that fits the snow globe and adhered it. I also stamped the “We Wish You a Meowy Christmas” on the inside. To finish this fun card off, I added boiled sugar jelly drop hearts in various sizes across the background.

Shaker cards are so fun to make and to give! This kitty belting out his Christmas carols in the snow just makes me smile!

I appreciate you sharing your time with me. Have a fabulous day!

Trinity Stamps – Beary Special Coffee Mug

Thanks for joining me again today! I’m excited to share a fun shaped card featuring Trinity Stamps stencils, stamps and dies. The coffee mug card die is from the previous release but the layered pine tree stencil, bear tree and have an ice day stamps are from the most recent release that went live last Friday. It’s chock full of amazing product that is so fun to create with!

To make this cute card, I started by die cutting my mug and then used the layered pine tree stencil on the background. Then I stamped, colored and popped up my bear with foam squares. For the coffee part of the mug I took vellum and colored it with brown copics, then adhered it to the inside. To cover that up I took the gift card holder from the mug die set and adhered it over the vellum hiding it and making this card dual purpose.

To finish this cute card off I stamped my sentiment from the have an ice day set, then added jelly drop hearts to the background, white gel pen detail and glossy accents to the bear’s nose.

I’m new to using layered stencils and this was so fun! I can’t wait to try it with other ideas like glittery snow on the trees and playing with the other new shine brighter stencil that was released too!

I appreciate you sharing your time with me. Have a fabulous day!

Newton’s Nook – Festive Fawns

Welcome back! I’m sharing another Newton’s Nook card today featuring the Festive Fawns stamps and the new Ornaments stencil.

I can’t get enough of these sweet fawns. They are so fun to color and the possibilities are endless for card design.

For today’s card I used texture paste with the Ornaments stencil on red cardstock and set it aside to dry. Then I stamped, colored and die cut my images from Festive Fawns. I die cut a glittery hilly snow ground for my critters and snowman and started assembling.

I glued the red background to a card from and then the snow ground to that. I popped up my images, included my heat embossed sentiment banner with foam squares. Then I took ribbon and tied it across the top to finish it off.

For finishing touches I added Wink of Stella to the snowman’s scarf and the sentiment. Then glossy accents to the buttons, holly berries, and everyone’s noses and beak.

I love the dimension and different textures I was able to achieve on this card. It’s so cute and sweet with the Newton’s Nook images.

I appreciate you sharing your time with me. Have a fabulous day!

Newton’s Nook Guest Designer – Main Street

This is a serious Happy Birthday to me!!! I’m so excited to be guest designing with Newton’s Nook for the month of November and today is my first post, on my birthday! This couldn’t have come at a more perfect time than to be able to dive into their brand new Christmas release and start creating!

When I saw all of these great images, there was no way I could choose, I wanted it all. This whole release is out of this world! Today I’m sharing a beautiful card using the Main Street stamps and dies and the Snowfall stencil.

Here’s a sneak peek of the card I made. Be sure to head over to the Newton’s Nook Blog for the full scoop and lots of great pictures! Do me a birthday favor and leave me a comment over there too! I would really appreciate it! And stay tuned throughout the month for more Newton’s Nook awesomeness.

I appreciate you sharing your time with me. Have a fabulous day!

Caffeine Gives Me the Jingles – Coffee Lovers Blog Hop

Hi there! I am so excited to be entering today’s card at the Coffee Loving Cardmakers for their Fall/Winter Coffee Lovers Blog Hop. I am joining in as part of The Rabbit Hole Designs. This is their second time joining them and are Super Sponsors for the event. For the duration of the Coffee Lovers Blog Hop,The Rabbit Hole Designs will be offering specials. Head over to their blog for discount codes!

Today I’m sharing this super fun interactive caffeinated reindeer card! I used the candy twist stencil on the background, assembled my card, stamping and heat embossing my sentiment at the bottom. Then I built my wreath, added a vellum circle behind it and adhered my reindeer. Then gluing just the bottom part to the card front so the mechanism still moves I lined up my stamp and added a sentiment to the inside too.

For finishing touches I added Nuvo Crystal Drops to the reindeer’s nose and glossy accents to his cup and slipper’s noses. I plan to add a Starbucks gift card to the inside of this, which fits perfectly inside the opening.  

Make sure you also head over to CLC Fall/Winter Blog Hop to link up to win some awesome prizes. The hop goes through November 8.

I appreciate you sharing your time! Have a fabulous day!