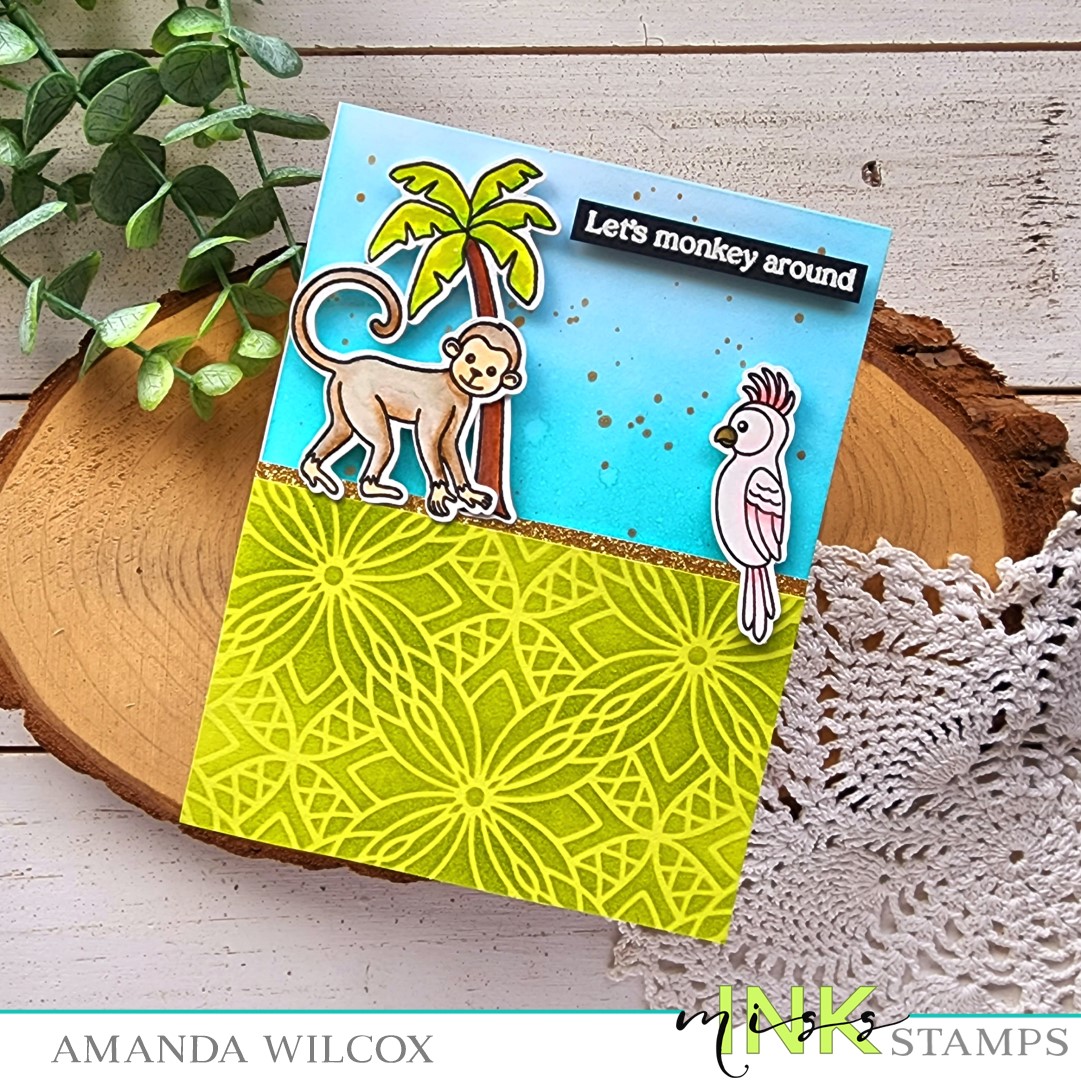
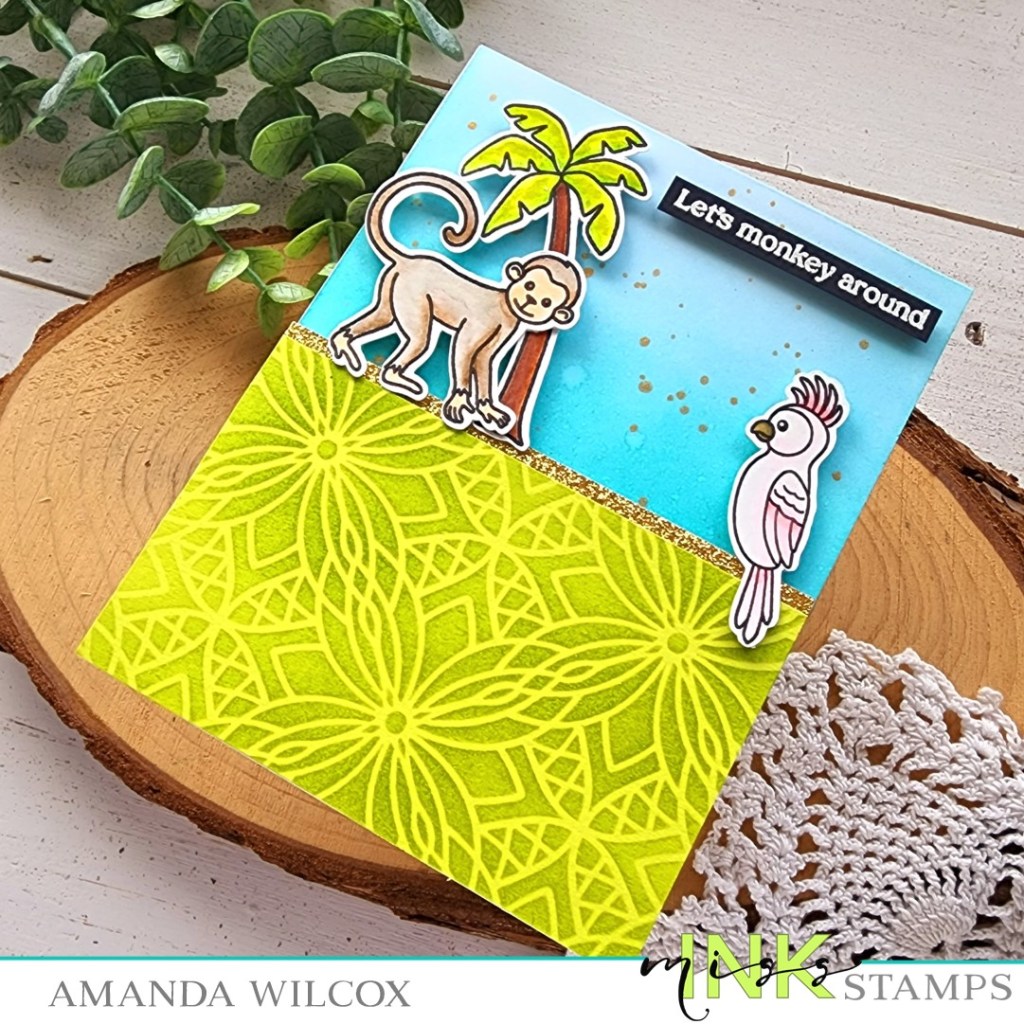
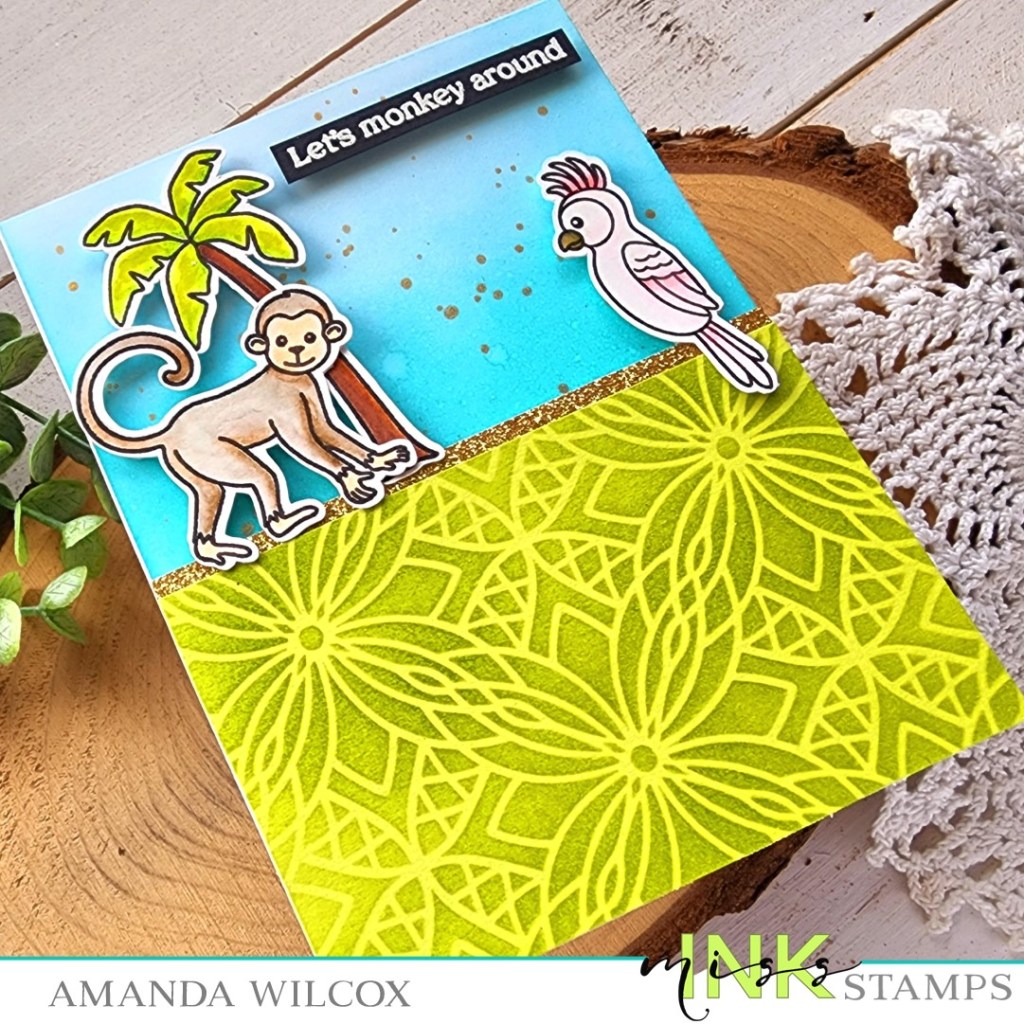
Hello friends! Today I’m back with a bit more inspiration featuring a new stencil from Tuesday’s release called Bluet Burst. It’s so pretty and has lots of potential, especially with the recent jungle release of stamps.
To create my card, I stamped some images from various sets – Go Bananas, Jungle Ruins and Pretty Bird – and colored them all with my Zig Clean Color Real Brush markers. I used the scan-n-cut to cut them out and set everything aside to get inky for the rest of my card.
First I took a green panel of cardstock and inked up the Bluet Burst stencil with Lawn Fawn cilantro ink and a blending brush. I cut the panel down to 3×4 1/4 inches and then added a strip of gold glitter cardstock to the top. I added foam tape to the back and set it aside.
Next I inked up an A2 panel of white cardstock with peacock feathers and tumbled glass distress oxide inks. I spritzed that with water and blotted it dry. Then, I splattered gold watercolor over the panel to tie it in with the strip I already had going on.
Finally, I added splattered panel to a card base and popped the stenciled panel up. Last, I added foam squares to my images and adhered them too. I looked through a bunch of my stamp sets to choose a sentiment and finally decided to emphasize the fun monkey theme with this one from Go Bananas. I stamped and heat embossed it on a black cardstock scrap and trimmed it into a strip before popping it up with a foam strip too.
I think it’s fun to mix and match unlikely images from different sets and play around a little. I hope you enjoyed today’s card and found some inspiration to create something wonderful to share with someone.
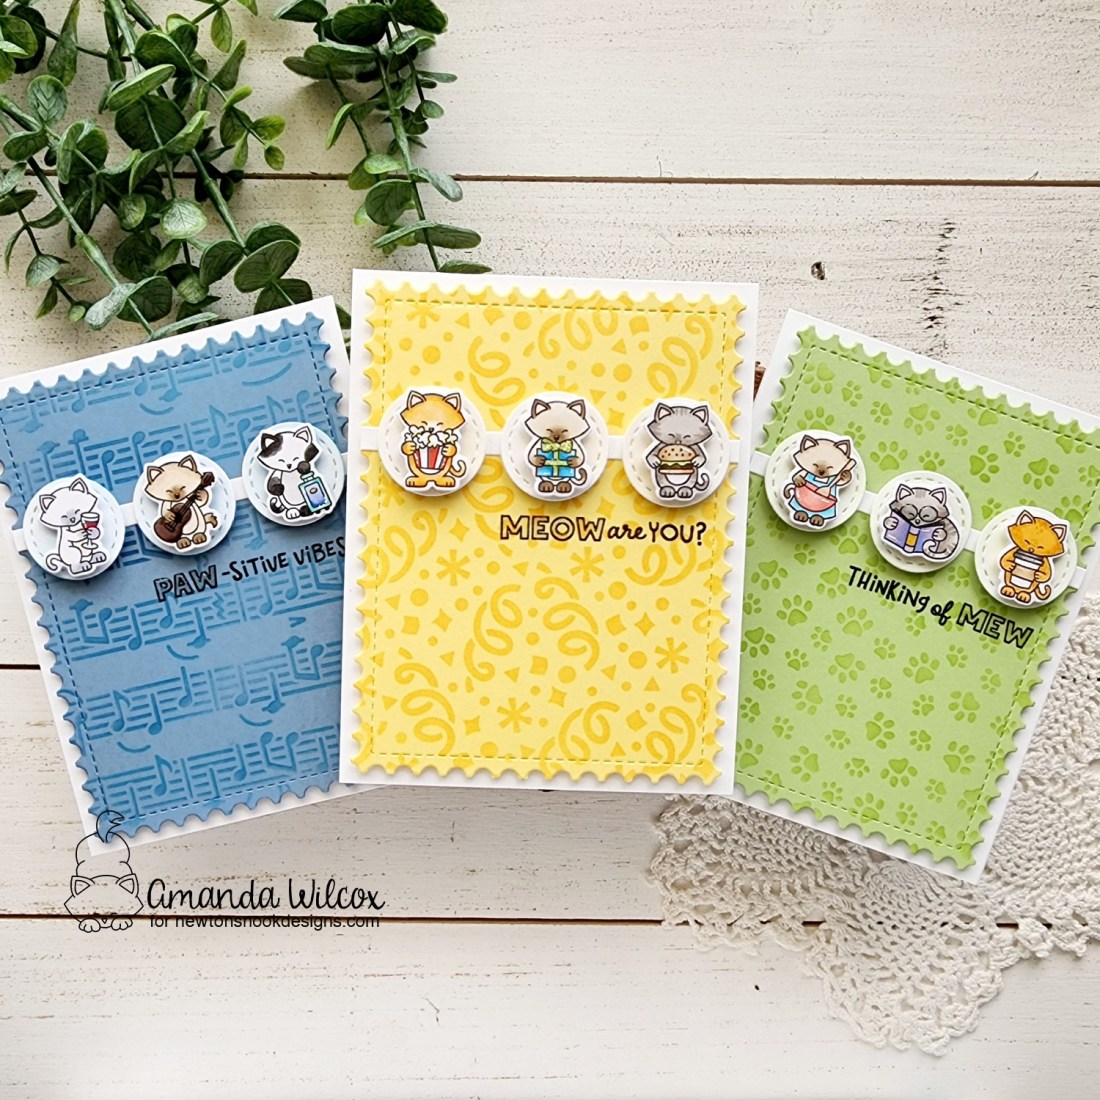
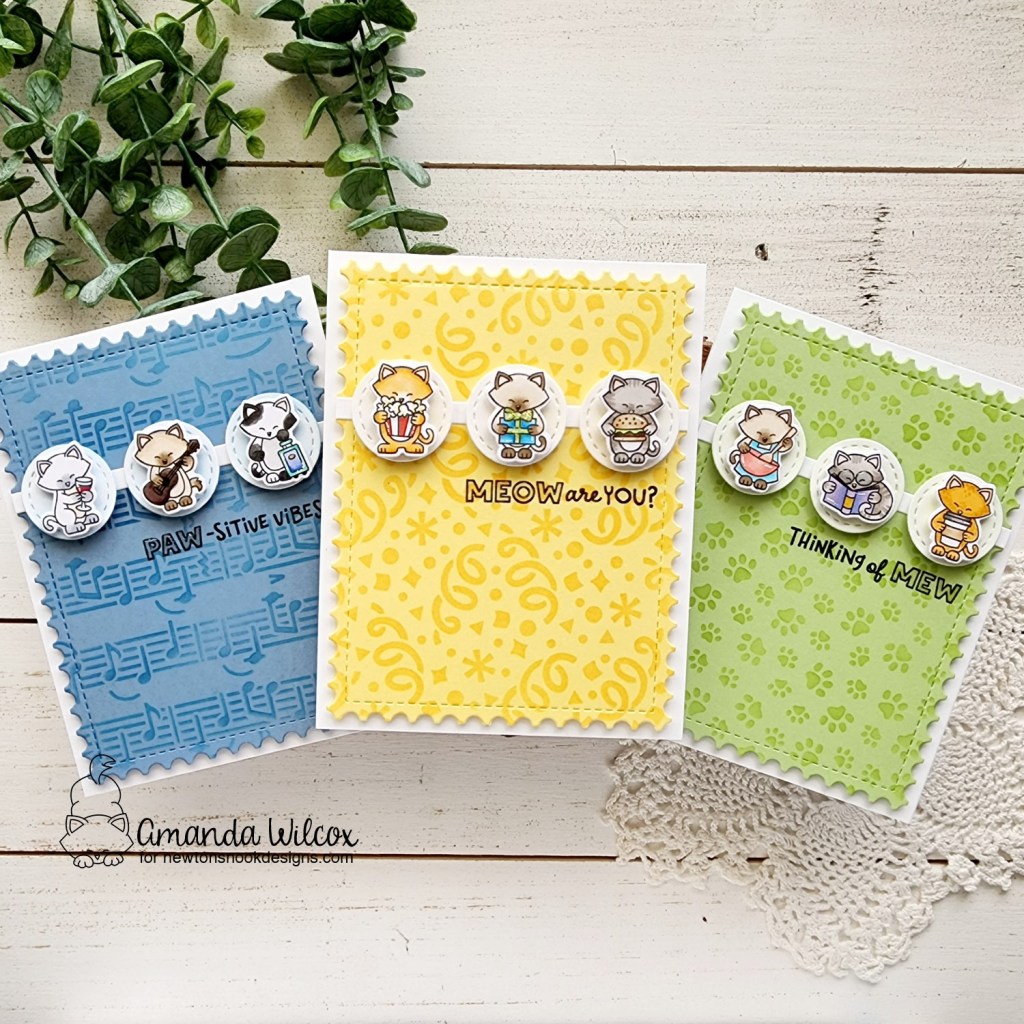
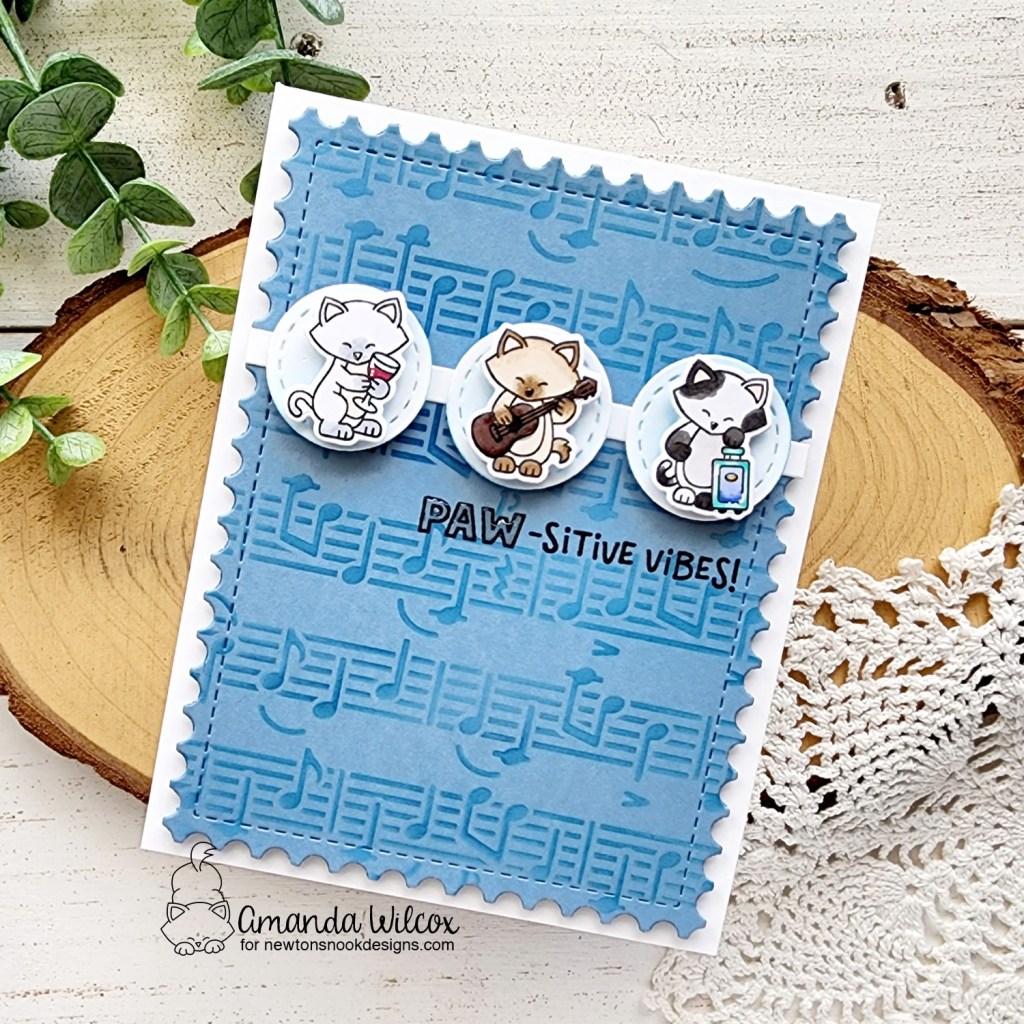
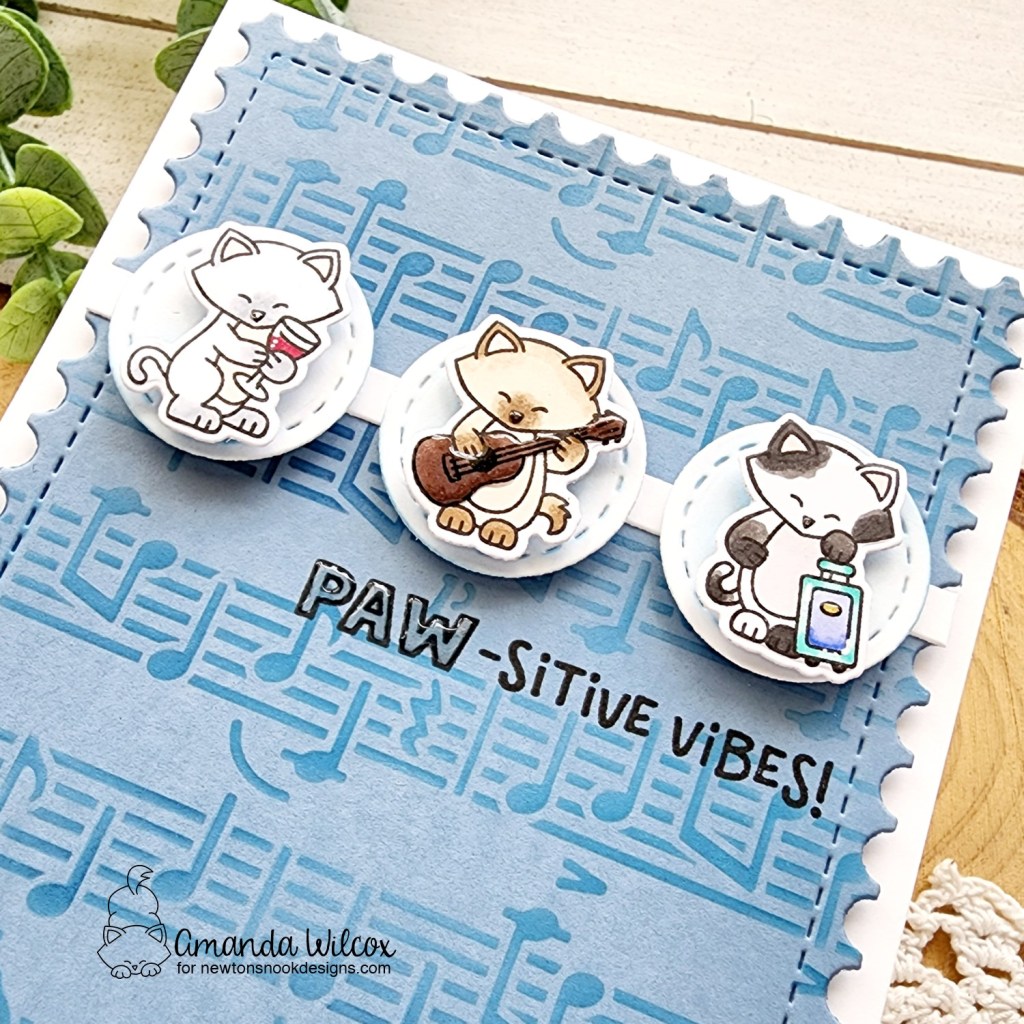
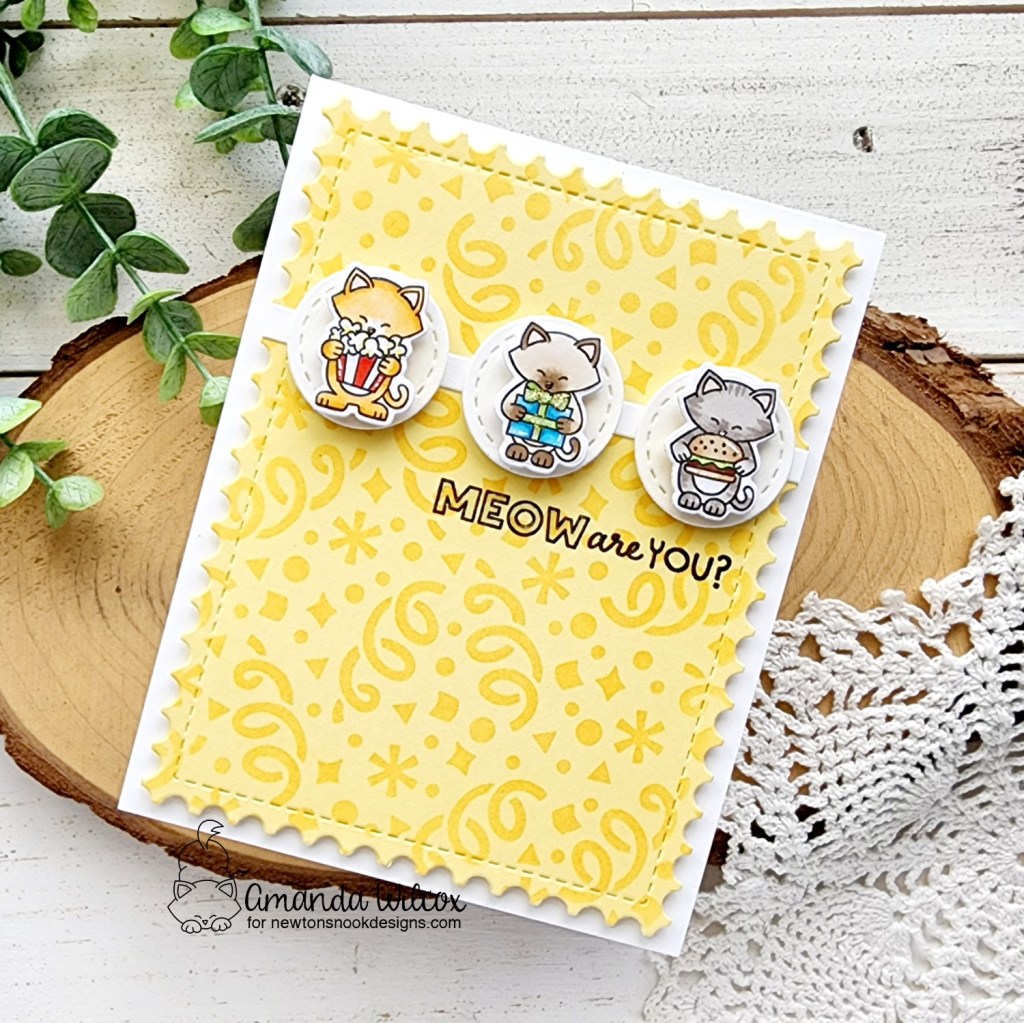
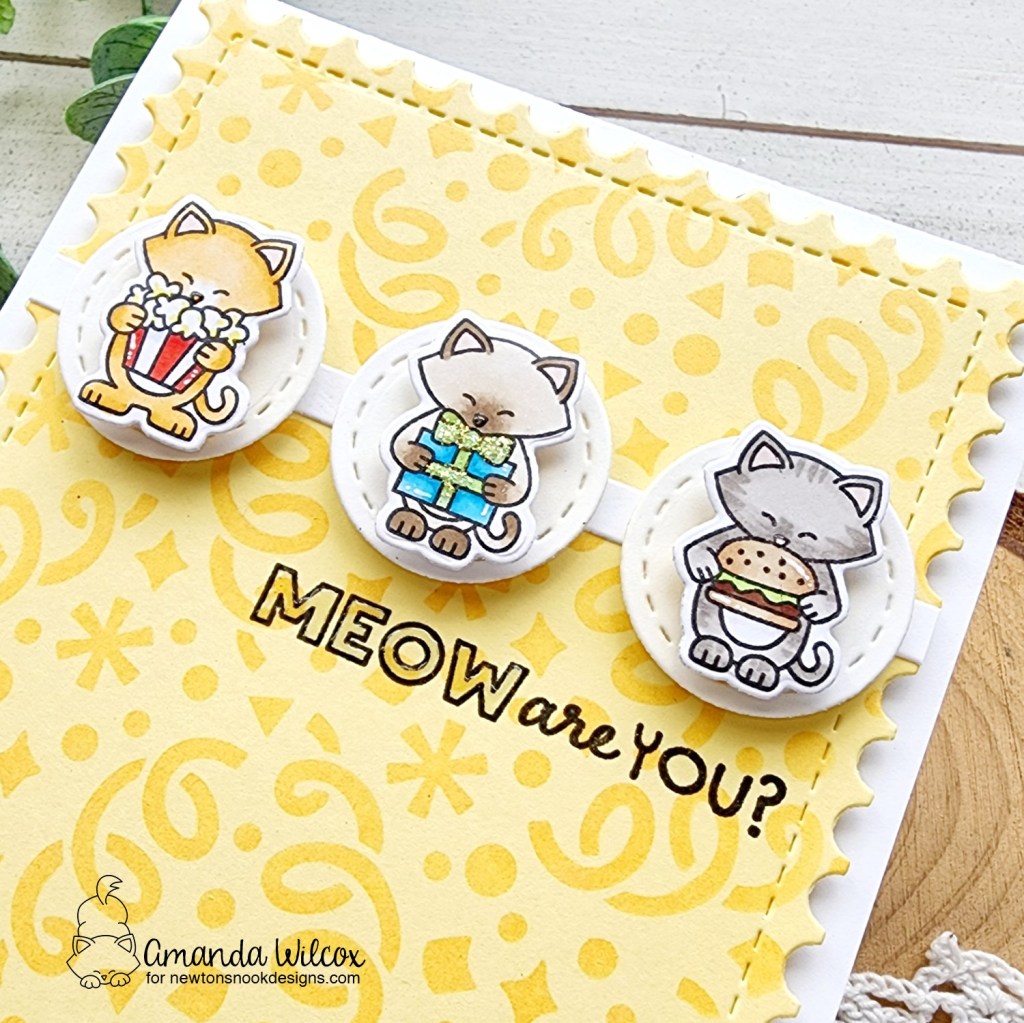
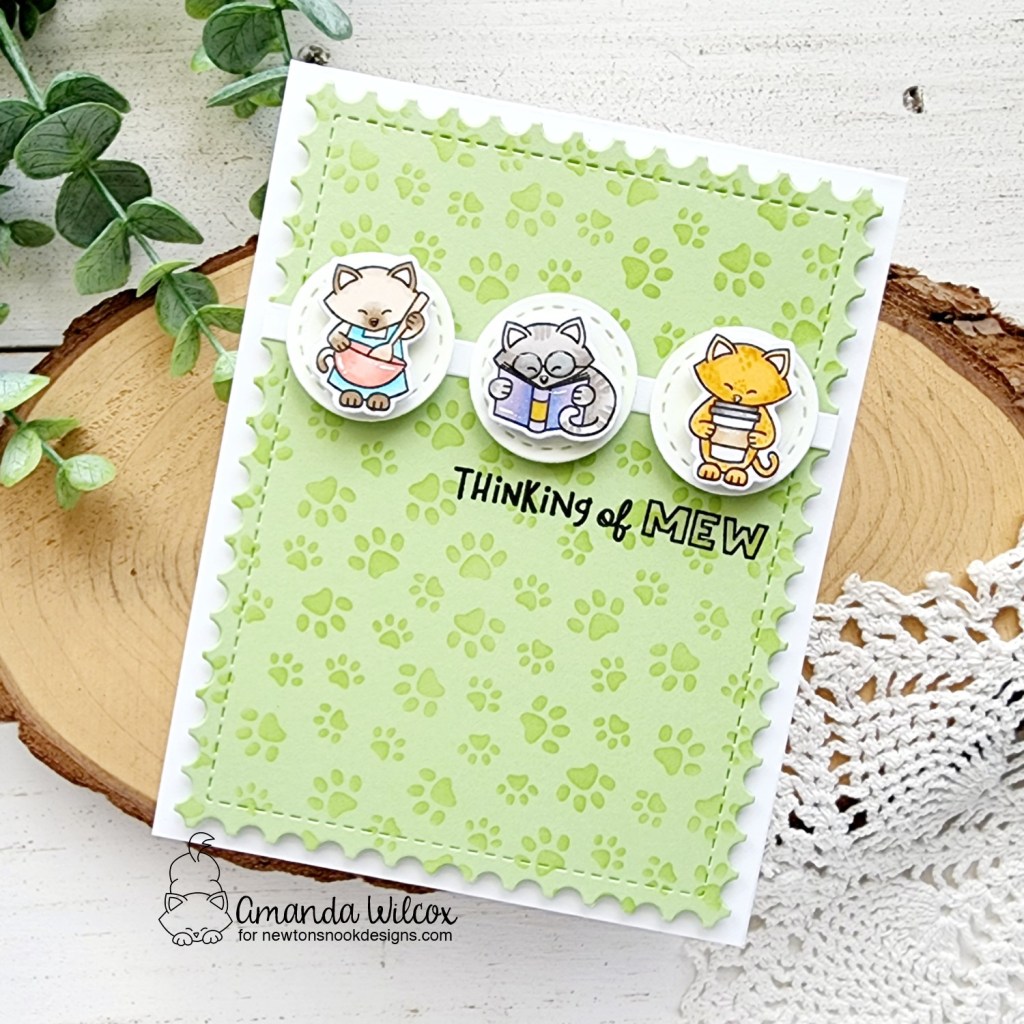
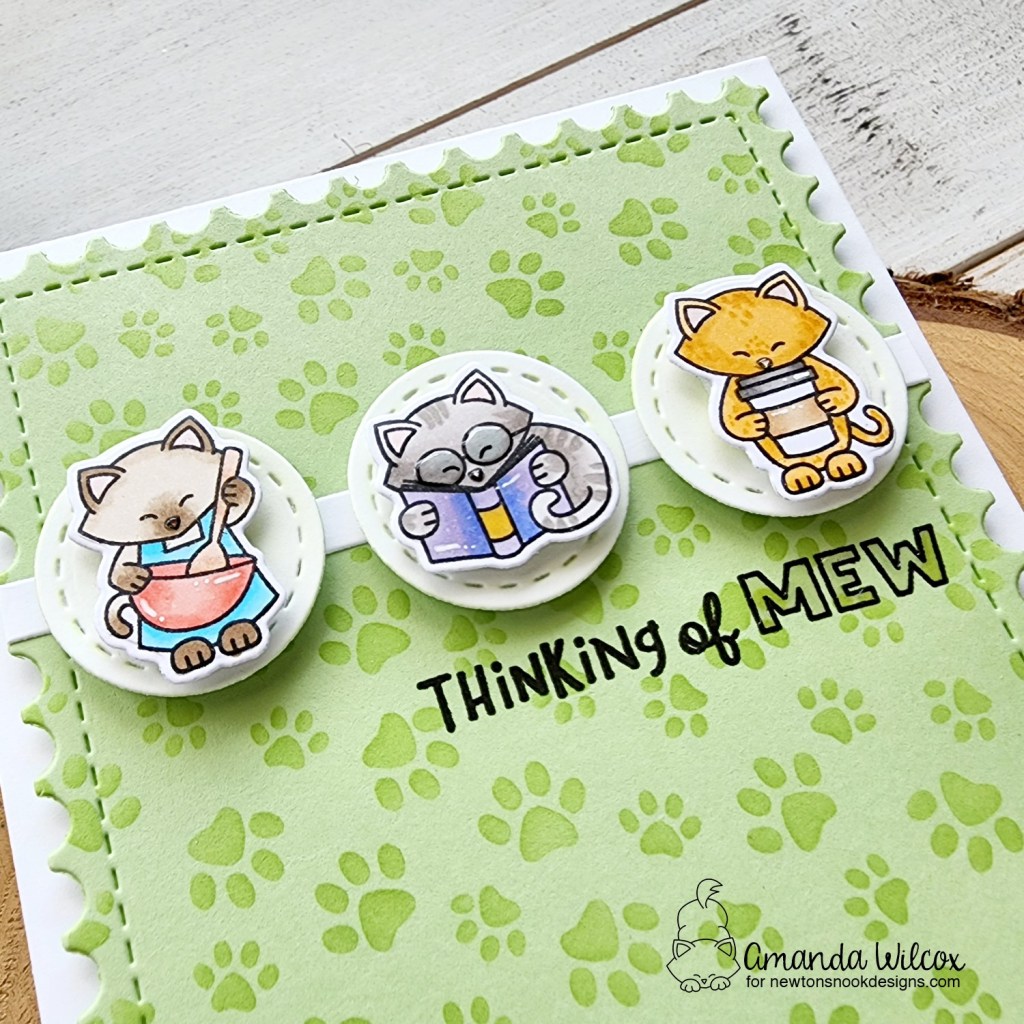
Hey friends! I’m over on the Newton’s Nook blog today with a trio of cards featuring the sweet mini images from Newton Makes Plans. I absolutely adore this set and was so happy to finally ink it up.
I had a design in mind but when it came time to choose, I couldn’t choose just three images so I ended up with nine and made three cards to share today.
The design is the same for all of the cards. I chose a trio of images from Newton Makes Plans, that kind of told a mini story to me. I chose a stencil that went with that story and paired them together. I chose a background color of cardstock to cut from the largest Framework stencil and did tone-on-tone inking for the stencils. This card has the music stencil with a trio of Newton’s that must be world travelers.
I cut the smallest circle from Frames Squared three times for each card out of white cardstock and inked them up wtih the same ink used on the stenciling. There is a 1/4″ strip of white cardstock adhered to each stenciled panel and then the circles and images are each popped up with foam squares.
They guys are all ready for a party of some degree so I used the fun confetti stencil for this background. I tend to gravitate toward the sentiments in all of the Heartfelt and Roundabout stamp sets because they are so perfect for a huge variety of occasions. These all came from Heartfelt Meows which work perfect with all of those cute Newtons.
The finishing touches on each card are also different. Most have some sort of glossy accents or Stickles on the center image because they happened to fit perfectly. Each of the Newton noses has a little dot of glossy accents as well. Then I did add white gel pen highlights to the other images for fun.
Aren’t these guys just the cutest? Everyone enjoying their different hobbies! The background for this card uses the petite paw prints stencil to round out that adorable kitty feel. I just love the glossy accents on his glasses in the center of this one.
Well, there’s a little description and look at each of the cards I had to share today. I hope you enjoyed them!
Hey there! Today is a fun stencil release day for Miss Ink Stamps. I wanted to share one of a billion ways to use the new wonky scallop stencil. I inked it up horizontally today on a portrait card front in rainbow colors!
The design of this stencil makes masking super quick and easy to get these rainbow lines. I seriously want to make 100 of these cards and give them to everyone! It’s just so happy!
After I inked up my rainbow, I layered the starry night stencil over the top and spread iridescent glitz glitter gel through that. I just love stencil layering like this where it’s subtle but adds so much interest to the design.
Once that was dry I trimmed the panel down to 4×5 1/2 inches and layered it on a piece of gray cardstock that is 4 1/8×5 3/8. Then I added that to a white card base.
For my sentiment, I die cut “hello” using the Ei-ei-o word dies three times from white cardstock and once from white glitter cardstock and used liquid glue to adhere the layers together. I used my grid mat and post-it tape to line them up how I wanted, added liquid glue to the back and placed them on the card front.
Last, I stamped and heat embossed a sentiment from Sunshine and Rainbows in white on black cardstock, trimmed it into a strip and popped it up with a foam strip. Then my card is all finished. The glitz background and glittery letters add so much that I didn’t think any “finishing touches” were needed.
I call this a sherbet rainbow and it is my absolute most favorite thing ever! These colors make me so happy. I hope you like them too!
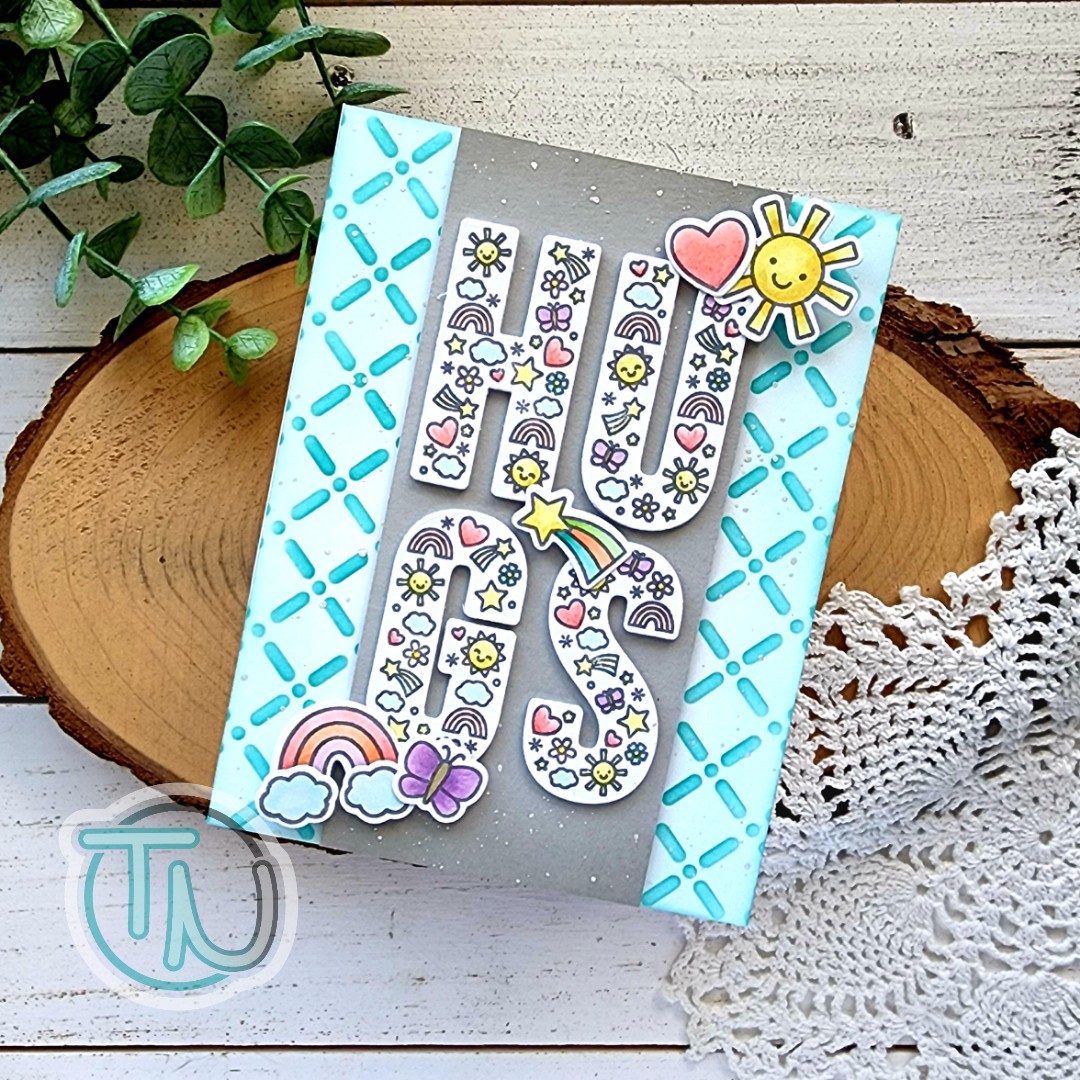
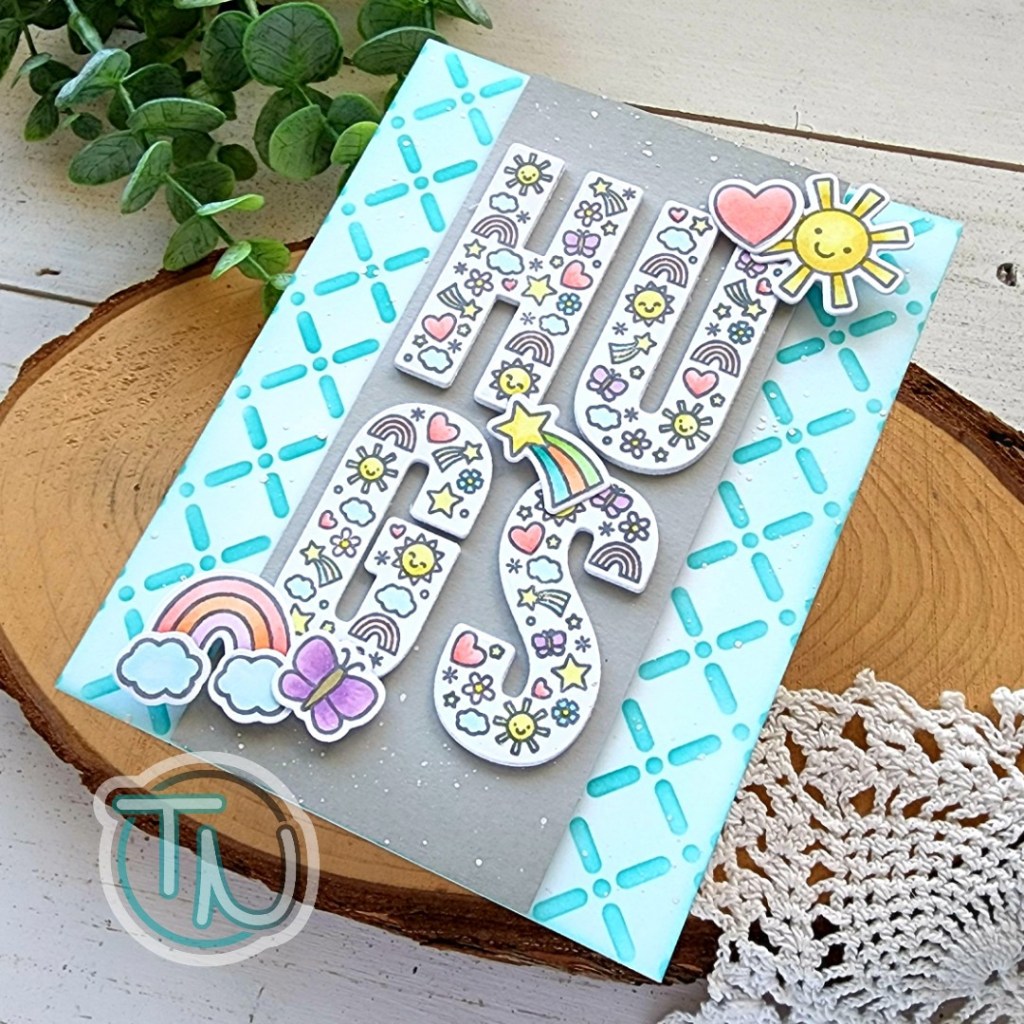
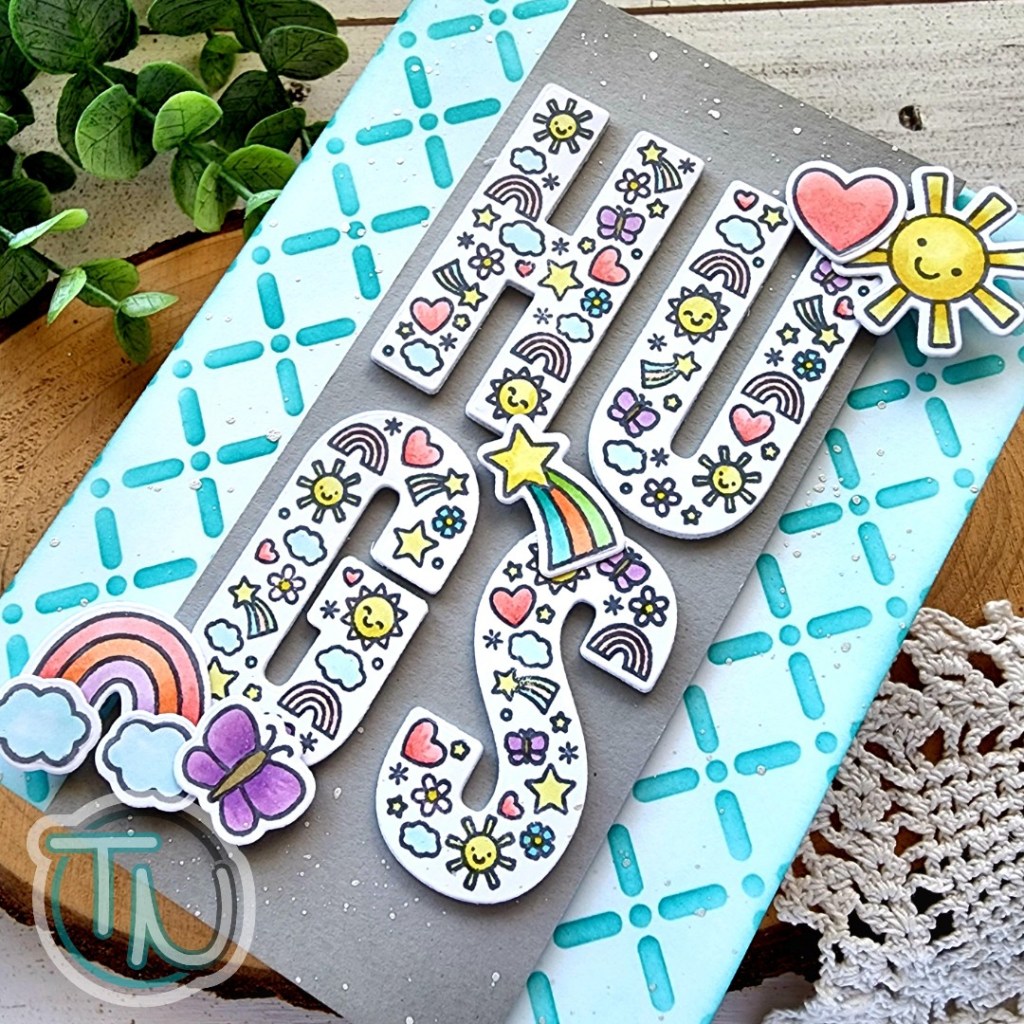
Hello crafty friends! Today I am excited to share a card featuring the Pretty Pink Posh Hugs stamps and dies. I just fell in love with this set from the moment I saw the sneak peek. It’s so fun and happy! It’s also got a million variations of how you can use it.
Today I stamped the main “hugs” sentiment and some supporting images in gray ink for a softer look. I used copic markers to color everything and then the coordinating dies to cut it all out. Then, for fun I played around with the letters and decided to try arranging them in a grid instead of a line. I think this is a fun, different look.
For the background, I took a white panel and inked up the Trellis stencil with teal ink. I removed the stencil and used the leftover ink on my brush to lightly ink the edges of the panel. Then I cut a gray strip 5.5 x 3 inches and inked the edges with gray for a little dimension. I flicked pearl watercolor over the trellis panel and the top and bottom edges of the gray panel before adhering them together with foam tape.
Next, I cut the hugs letters from white cardstock 4 more times and adhered the layers together before adding them to the gray panel. Then I added the extra images with a combination of foam squares and liquid glue.
I am completely smitten with the way this whole design turned out. From the block of letters to the softer gray tones instead of black. There is so many small changes that made a big impact and I just love it!
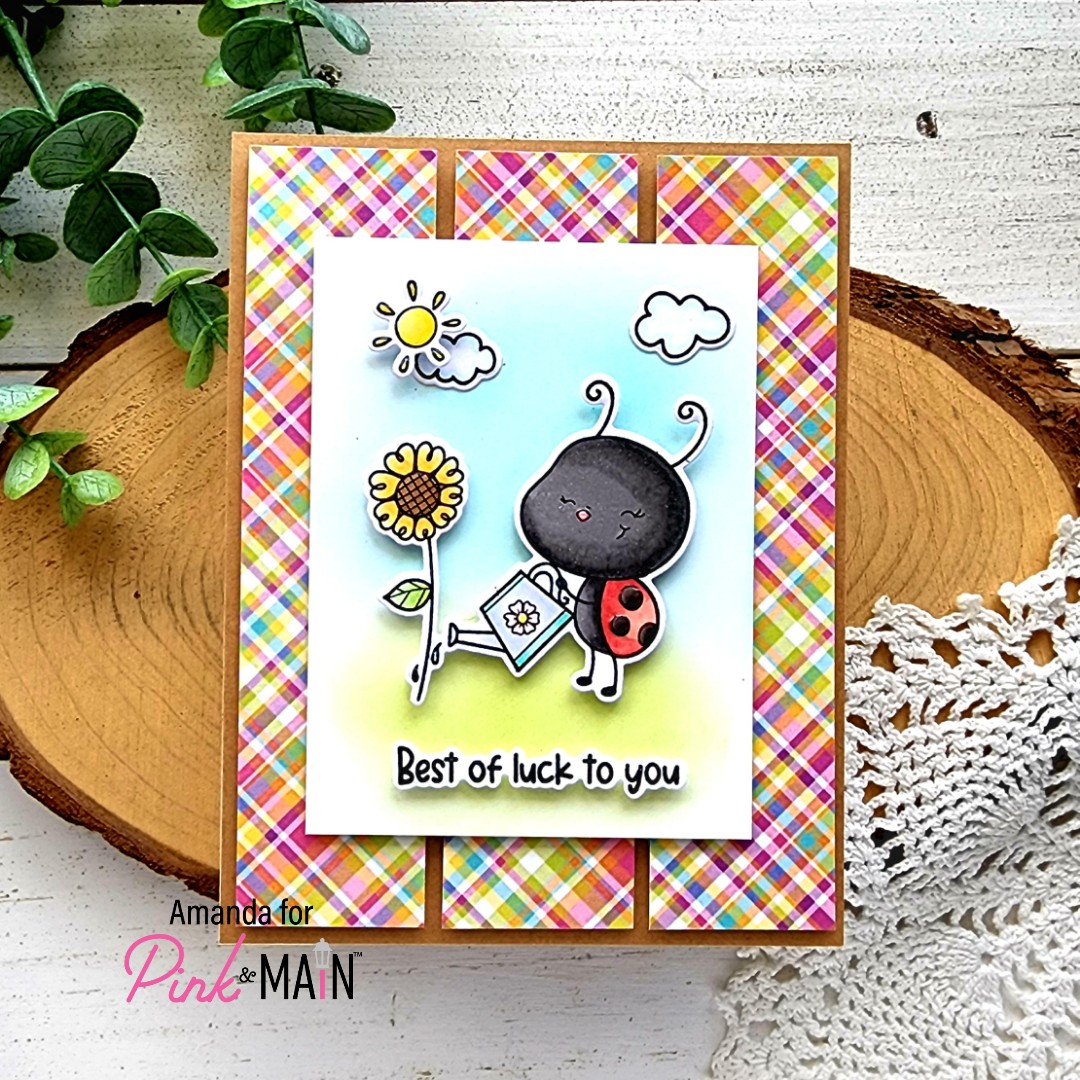
Welcome friends! Today I’m over on the Pink & Main blog with a new, fun card featuring the May Stamp and Die of the Month – Lady Luck! It is super cute and has some great sentiments in it too!
To create my card, I stamped images from Lady Luck and colored them with my copic markers. Next, I used the coordinating dies to cut them out and arranged them to see how big of a panel I needed to create my little scene. I decided 3×4 inches worked really well so I cut a piece of white cardstock and blended a little ground and sky with my blending brushes.
I added my images and sentiment with foam squares and set the panel aside. Next, I cut an A2 panel from kraft cardstock. Then I chose a fun plaid paper from the new Year Round Plaids paper pack and cut three strips measuring 1.25×5.25 inches each. I added those to the kraft panel with foam tape and then added my scene panel with foam tape as well.
Finally, I added the whole thing to a white card base with EZ Squeeze liquid glue and switched gears to finishing touches. For that I kept it simple with glossy accents on the ladybug spots, flower centers and sunshine in the sky.
I am so happy with how this card came together and just love the strips of plaid instead of a solid panel in the background. Isn’t that cool?!?
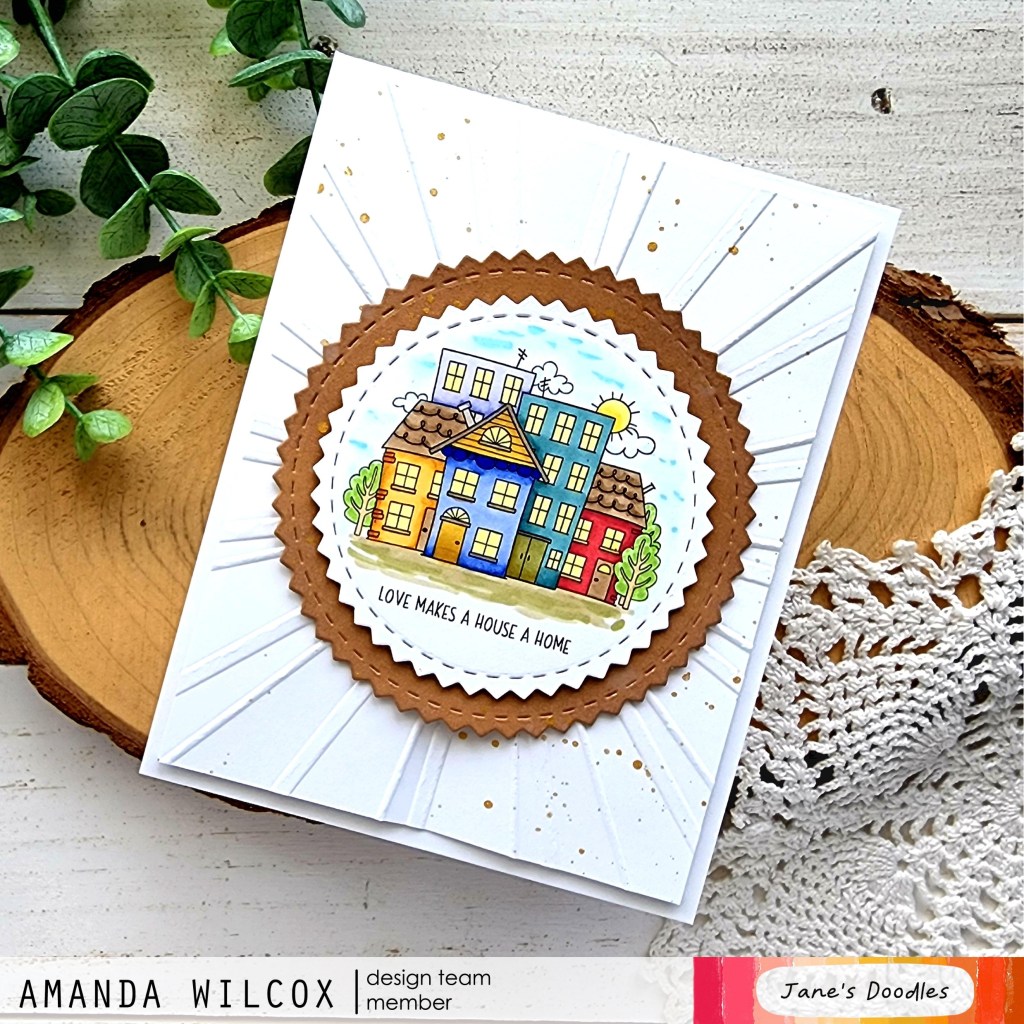
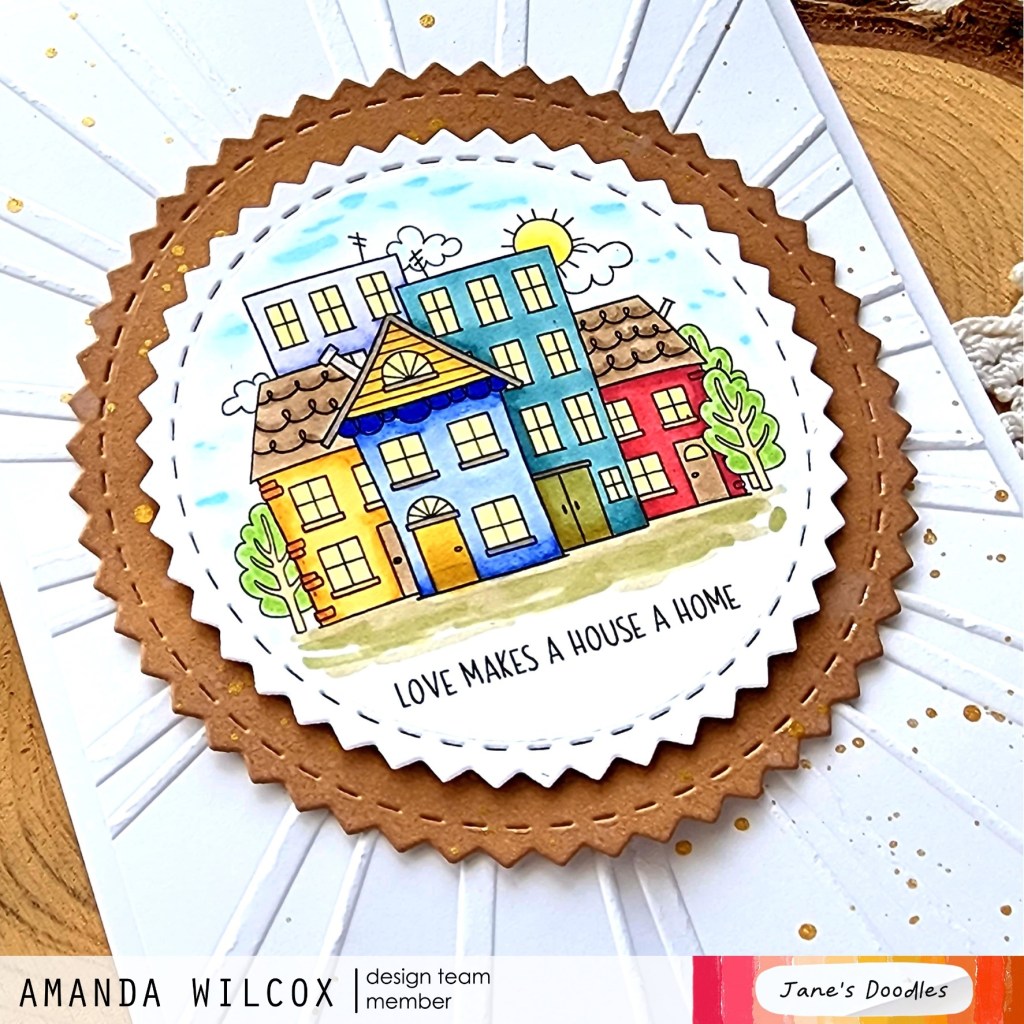
Hello everyone. Today I’m over on the Jane’s Doodles blog with a card featuring a new digital stamp called Home. This stamp is a fundraiser for relief efforts in Ukraine. This is one of two sets you can purchase from Jane’s Doodles to contribute. I purchased both sets and will be coloring images from the other one very soon.
I printed the image on white cardstock and colored it with my copic markers. Then I used a Pink & Main Zig Zag Circle die to cut it out. I used the next size up to cut a karft circle for a border. Next, I cut a white panel and embossed it with the Pink & Main Sunray embossing folder for some texture. I trimmed it down to 4×5.25 inches before splattering it and the kraft circle with gold watercolor.
Once the watercolor was dry, I adhere the white panel to a white card base with foam tape. Then I added the image circle to the kraft circle with foam tape as well. The kraft circle is adhered to the card front with liquid glue and I placed acrylic blocks on top to help it adhere to the texture while it dried.
I just love this image and had fun coloring it up. A fun aspect to digital stamps that I often forget is that you have control over the size of your images. I intentionally printed this one smaller to fit portrait on an A2 size card but I think it would be fun to make it larger to create a landscape scene with it.
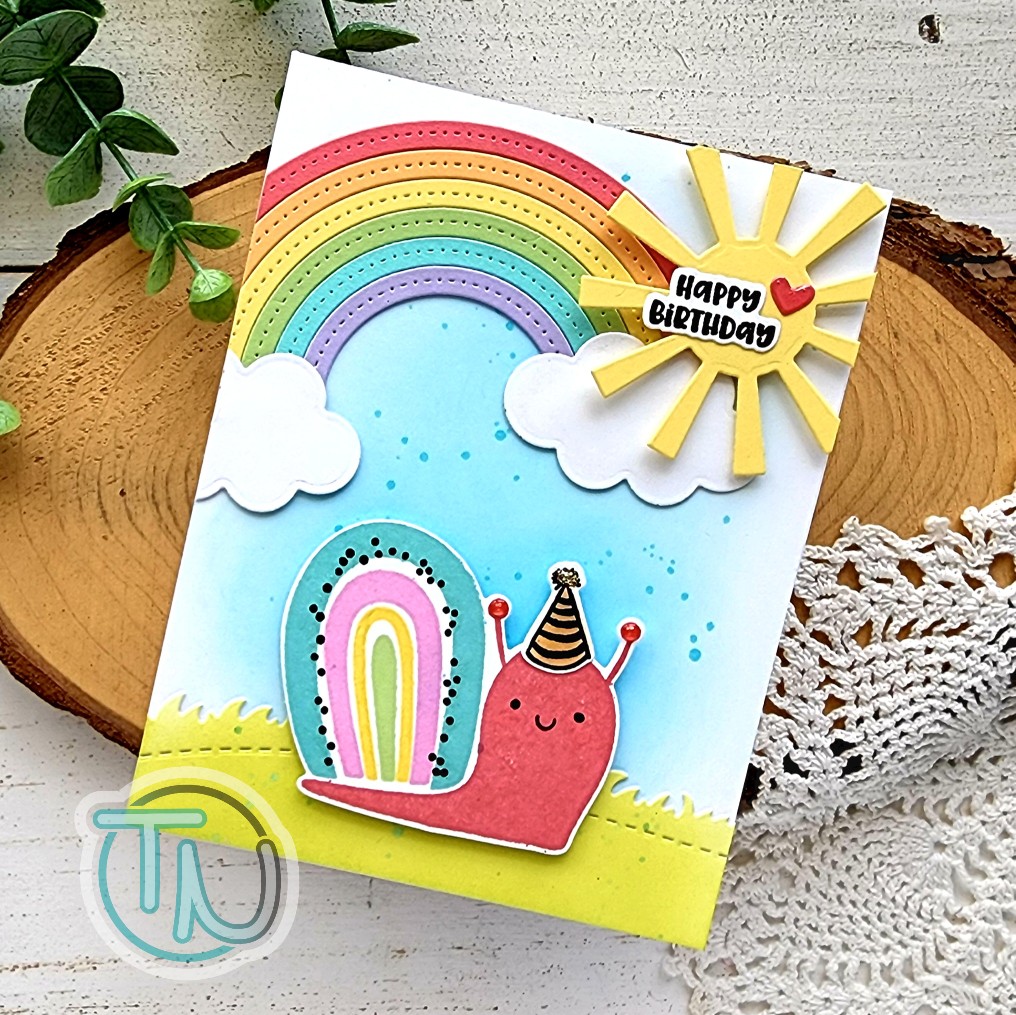
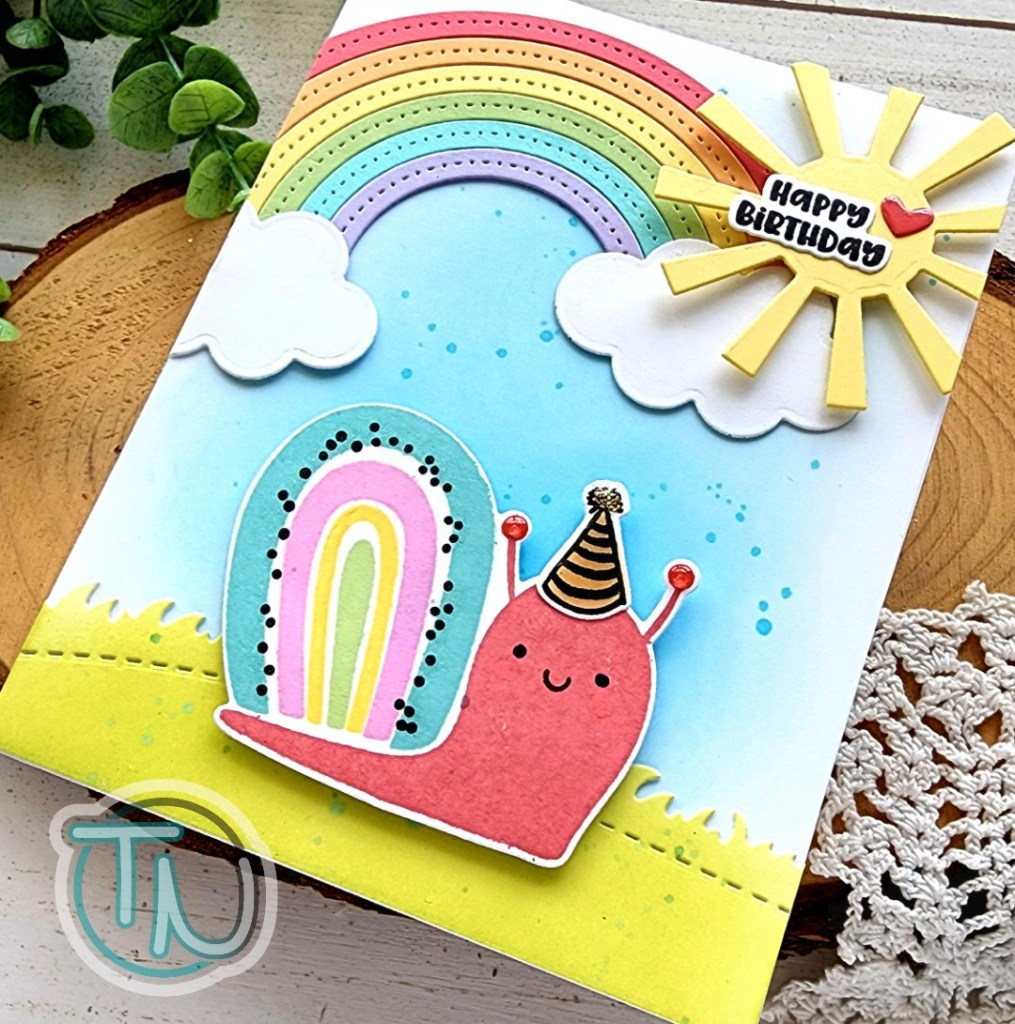
YIPPEE!!! It’s time for another fantastic release from Trinity Stamps! I was fortunate enough to be gifted this sweet rainbow snail stamp and die set early and be able to share some cute projects with you today! I have two cards and a pillow box – all birthday themed – with this adorable rainbow snail.
I had so much fun creating with this stamp set that I made all three of these snails straight away and then decided what to do with them later on! I created a jig to help mass stamping this guy, which is so helpful and really simple too.
I took a scrap of cardstock and die cut the main image from the center of it. I used white so I actually used this cut out but you wouldn’t have to, you mainly want the negative space left over. I placed the negative in my MISTI and held it down with magnets. I started with the body stamp first, lining it up in the space so it was even all around, used the lid of the MISTI to pick it up and placed my die cut in the space. I inked up the stamp and stamped it down. With this jig in place, you can add your same image and double-stamp if you need to and it will be in the same place, or you can place another blank cutout in the opening and keep creating bunches of snails at a time. I just wiped the stamp off between each color and did the same part of the image on all the die cuts before moving on to the next one.
With my snails created, I glued the hats on each one and started playing with designs. Originally I thought I would put all 3 on a slimline card but didn’t love it so I scrapped that idea and went to my stash for inspiration.
For this card, I cut 3 balloons from the Bunch of Balloons die set and tied thread to each one leaving it extra long because I wanted to make sure it was long enough to extend the whole card length. I inked blended blue and teal on a white panel for my background but thought it was a little plain.
To make things more fun, I created a shaker instead of just an ink blended background. For that I die cut a white panel with the largest slimline stitched panel and then cut the middle out with a slimline dainty scallop die to create a wide frame. I lined it with acetate and then foam tape around the edge.
I poured some shaker bits in the center and sealed it up. I added the shake mechanism to a white card base and then added my snail and balloons with foam squares. I hid the end of the thread behind the snail and secured them in place with the foam squares. The sentiment in the set has a coordinating die so I added it to a balloon with foam squares as well.
With my second snail, I really wanted to create a little scene so I pulled out the Rainbow Funshine dies to cut the rainbow, clouds and sun. For the grass I used a slimline great outdoors border die.
I adhered the elements of my rainbow with liquid glue, blended some blue ink for my sky and green ink for my grass panel. I splattered the sky and grass for some fun texture and started adhering everything together.
The rainbow and grass are adhered the the sky panel with liquid glue. Then The snail and sun are popped up with foam squares. I was playing around with placement for the sentiment and absolutely love how it looks on the sun. Then I found the little heart die in the Rainbow Funshine set and cut one from the same cardstock as the rainbow and added it for a sweet touch too!
For finishing touches on this card, I did pull out the glossy accents and unicorn Stickles. I added glossy accents to the tops of the snails little antennae and his party hat, then I went ahead and put some on the heart too. For just a dab of sparkle I added the Stickles to the top of the party hat.
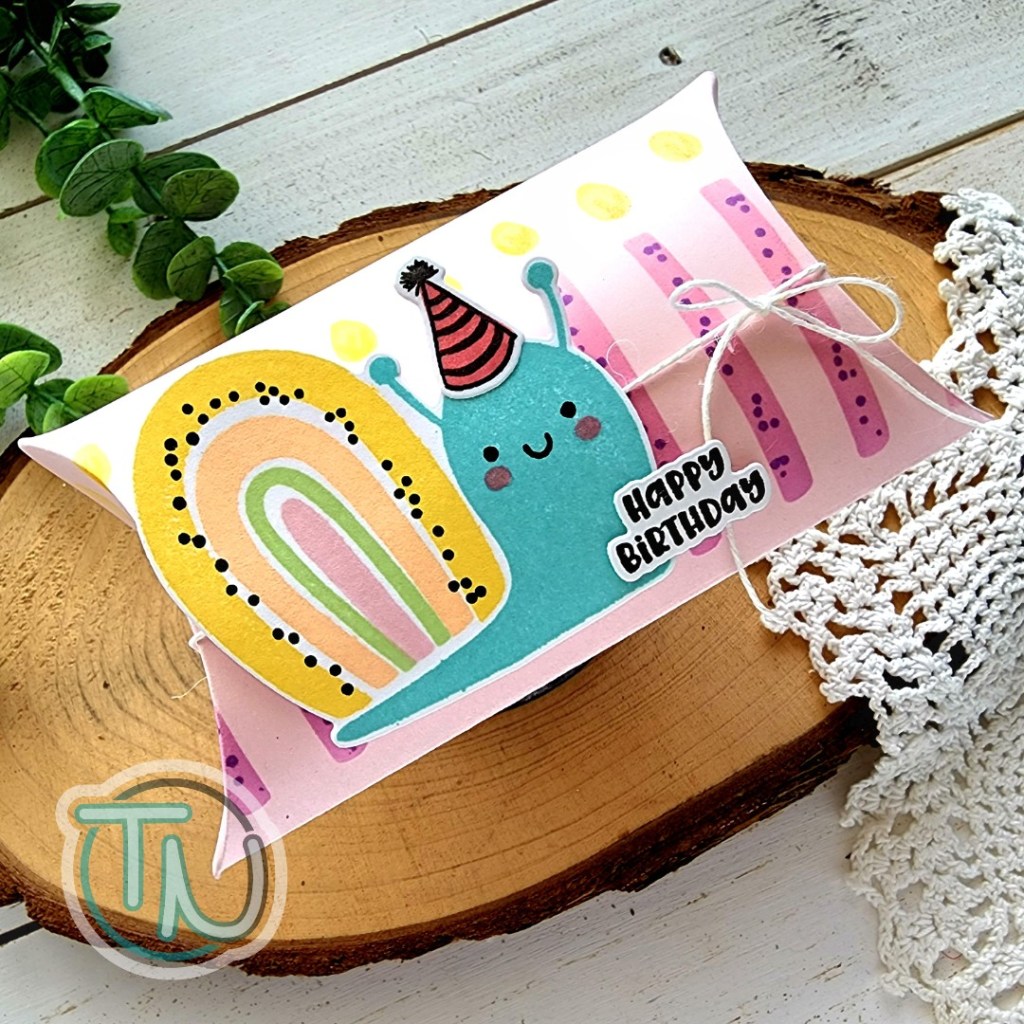
For my final project I pulled out my favorite pillow box dies and created a pink box base. I used the candle half of the cake and candles slimline stencil to decorate it. With the stencil in place, I took the dotted layer from the rainbow snail and stamped some texture in each candle for fun too.
I removed the stencil and adhered my box together. I adhered the sentiment to the edge of my snail with liquid glue and added foam squares to the bottom half of him. I tied some twine around the box and added the snail over the top. The snail keeps the twine in place so the bow can be untied and retied easily.
For finishing touches I added Wink of Stella glitter brush pen to the candle flames, the cheeks on my snail and also his hat.
I know this was a super long post and I truly appreciate you sticking with me to the end. Click HERE to check out the Trinity Stamps new release.
Hello everyone. I hope your week is chugging along nicely. We have had some wild weather the last few days but it’s so sunny and nice today, it’s hard to believe the hail and downpours we had just yesterday.
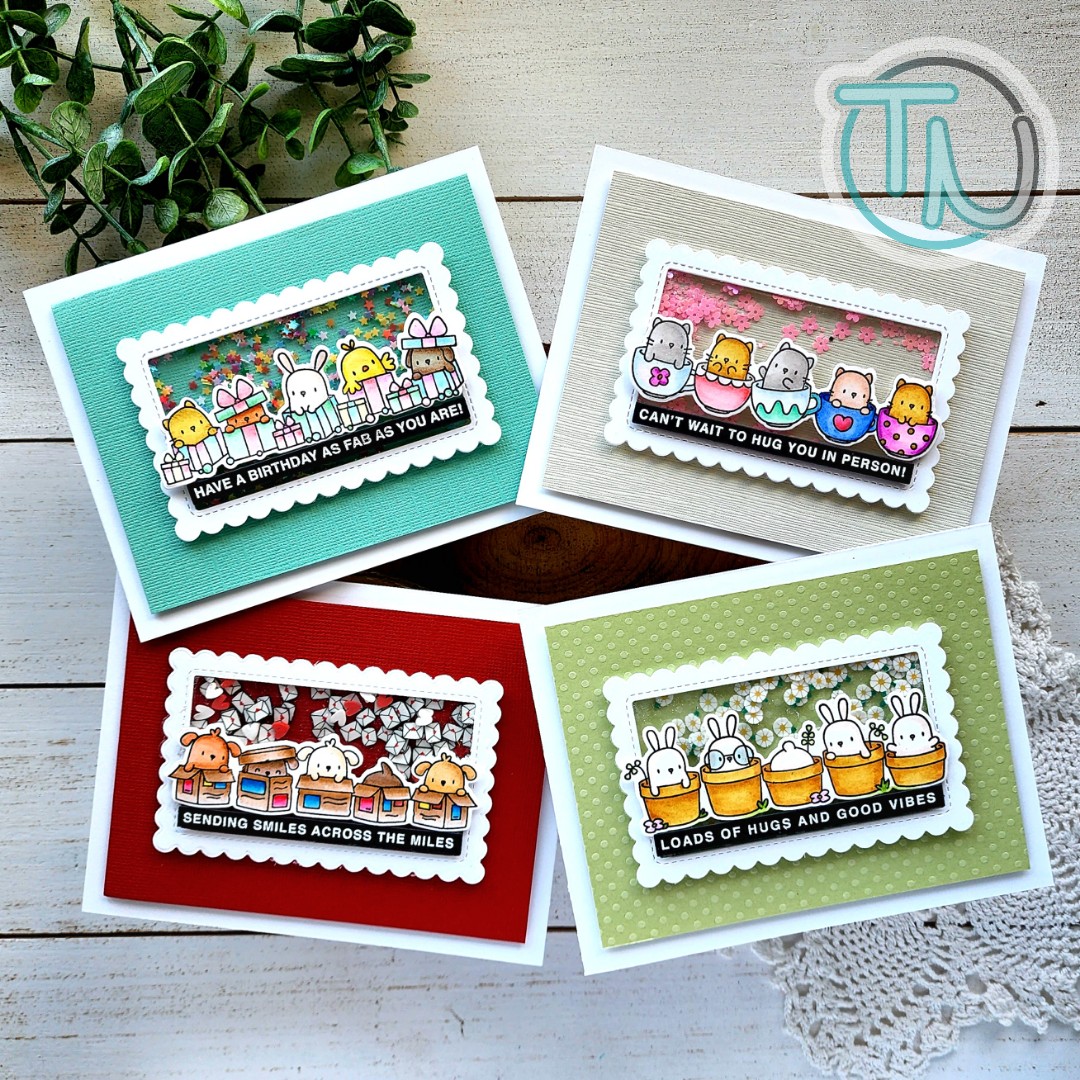
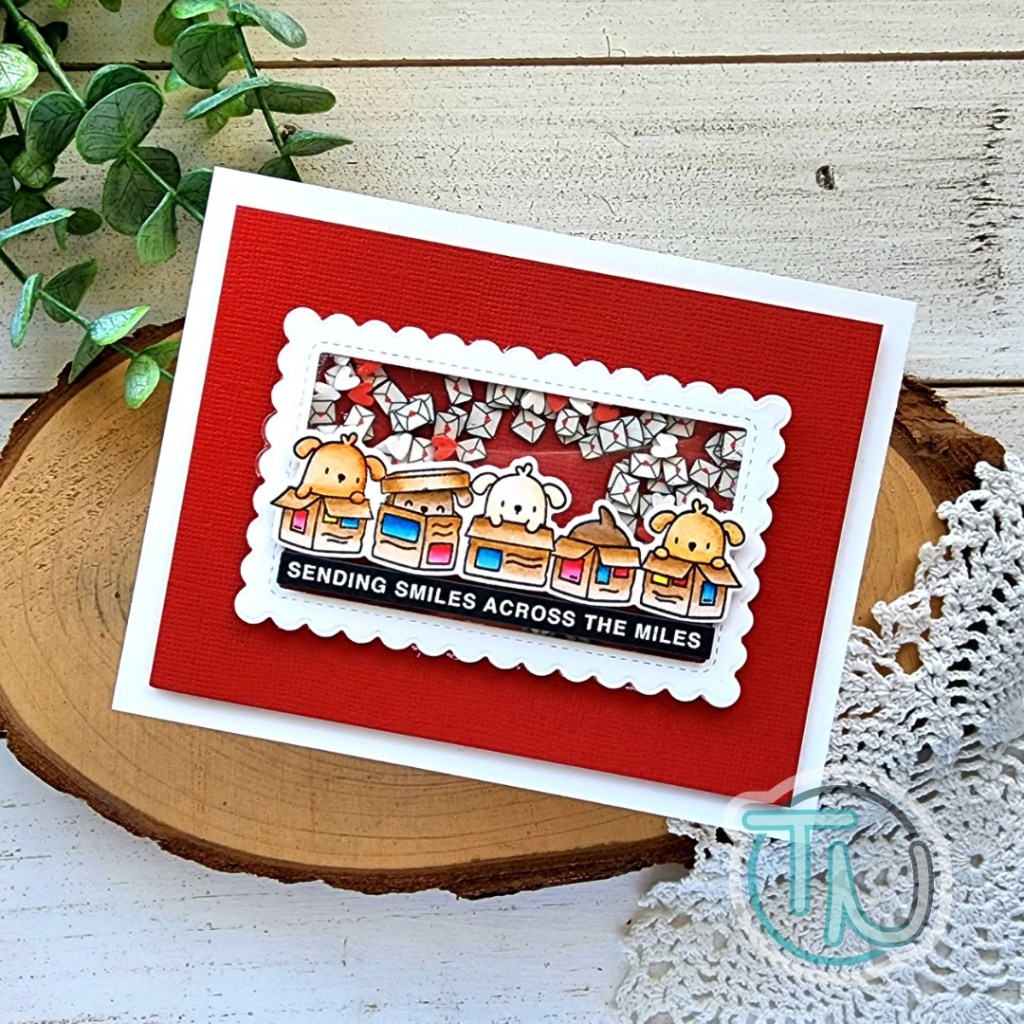
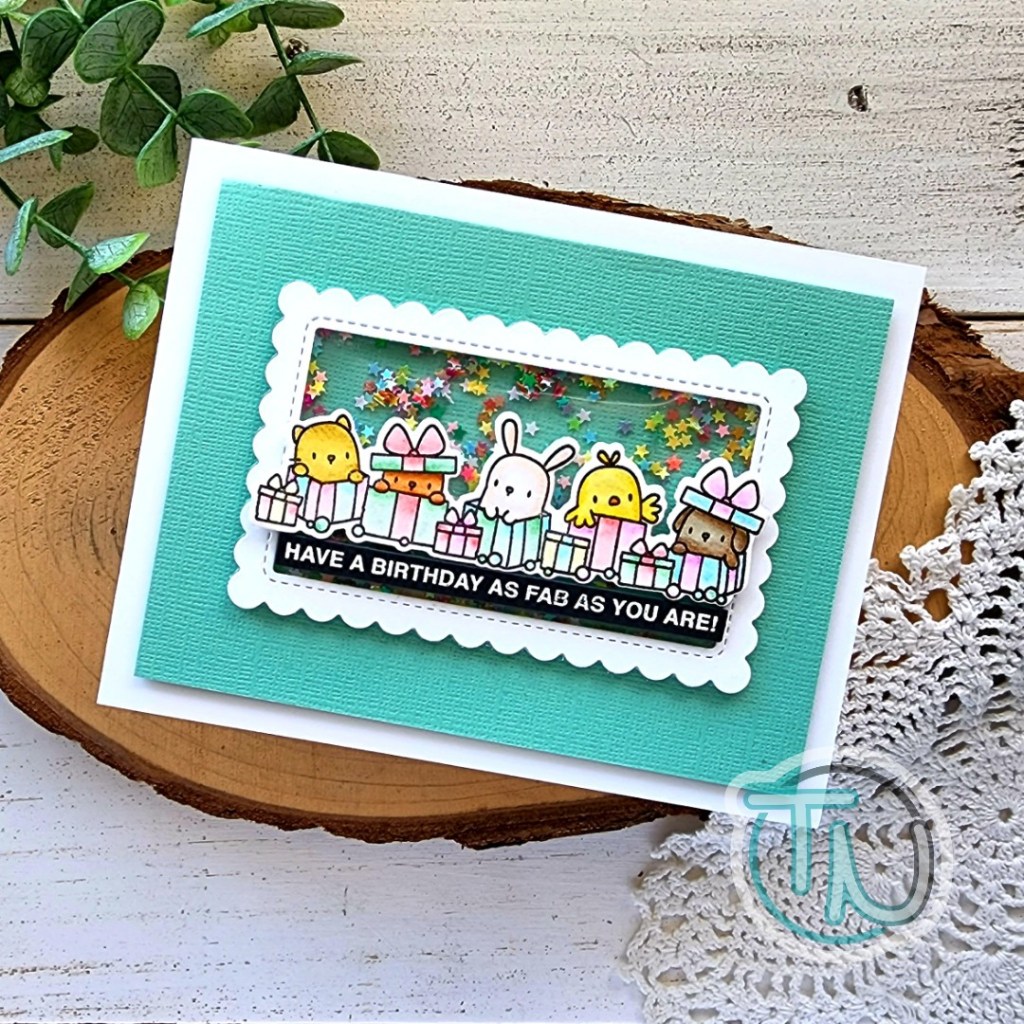
Today I wanted to pop in and share a set of 4 cards I created using the most recent Mama Elephant release paired with shaker bits from the Twiddler’s Nook shop.
I couldn’t resist this adorable Little Line Agenda set. It was a freebie last year that I missed out on and was ecstatic when they brought it out for regular purchase. These cuties are so fun and these arrangements are great for so many occasions!
I stamped each of the images on Bristol Smooth cardstock with VersaFine ink and colored them with my Zig Clean Color Real Brush markers. This is not my go-to coloring medium but sometimes a change is just so refreshing. I saw down and colored them all and then assembled them in the same layout for a great set to use or give as a gift.
I chose a textured cardstock from my stash for the background of each card, cut to 3.75×5 inches for that extra wide white edge. Then I used the new Two Scallop Frames die set to create the shaker mechanisms.
For sentiments on each card, I used the Easy Sentiments stamps and coordinating die. I absolutely love this set and being able to have multiple sentiments at a time is fantastic! I have pre-mades ready to go in white, kraft and black cardstock.
The shaker filler for each of these cards come from the Twiddler’s Nook shop. The kitties at the beginning have pink primrose confetti bits, the bunnies have fresh as a daisy clay bits, the puppies have a combo of love letters and sweethearts clay bits and the last card with the packages has wishing on rainbow stars confetti.
Aren’t these all just the sweetest!?! They have a really clean and simple design but I feel like the shaker adds so much and makes them so fun!
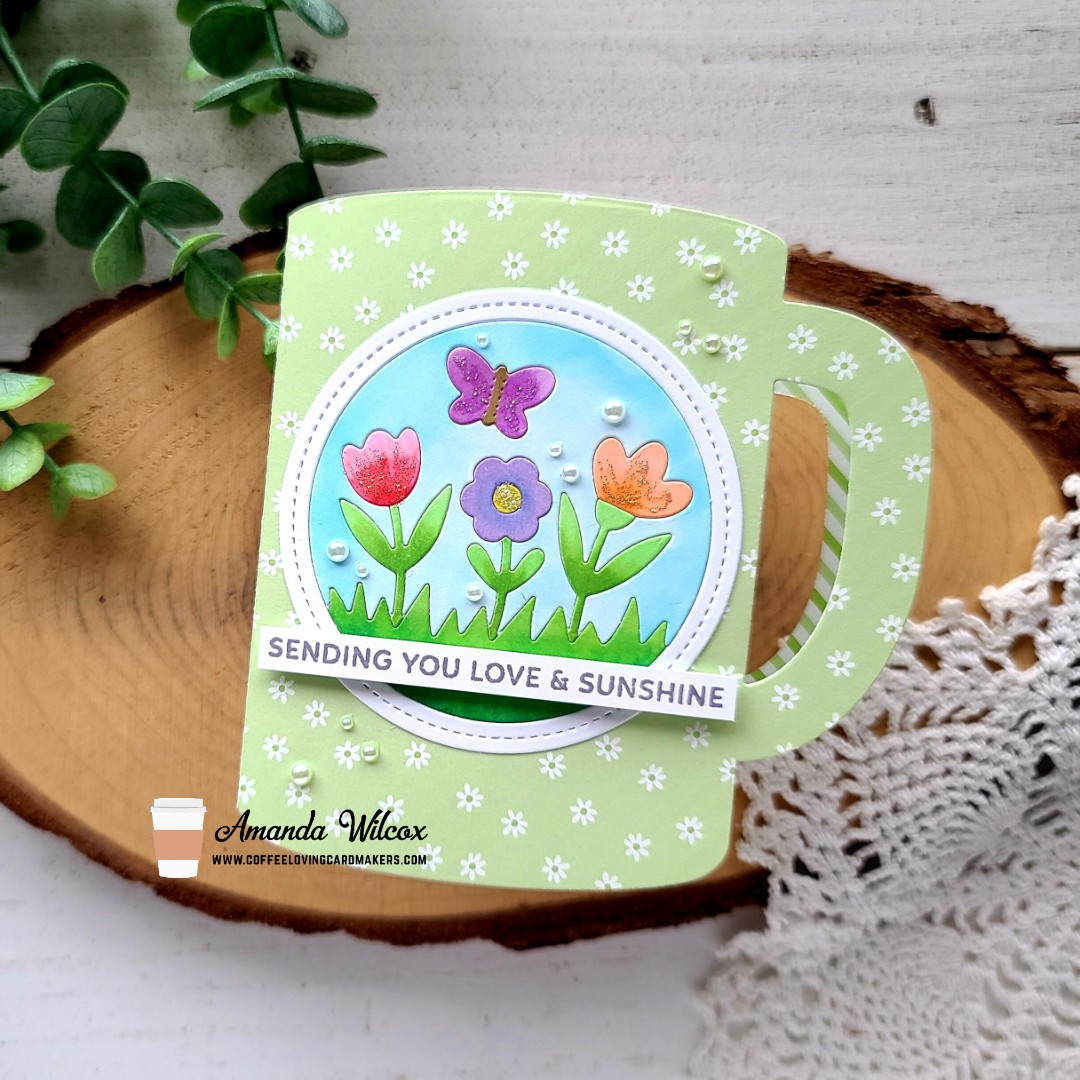
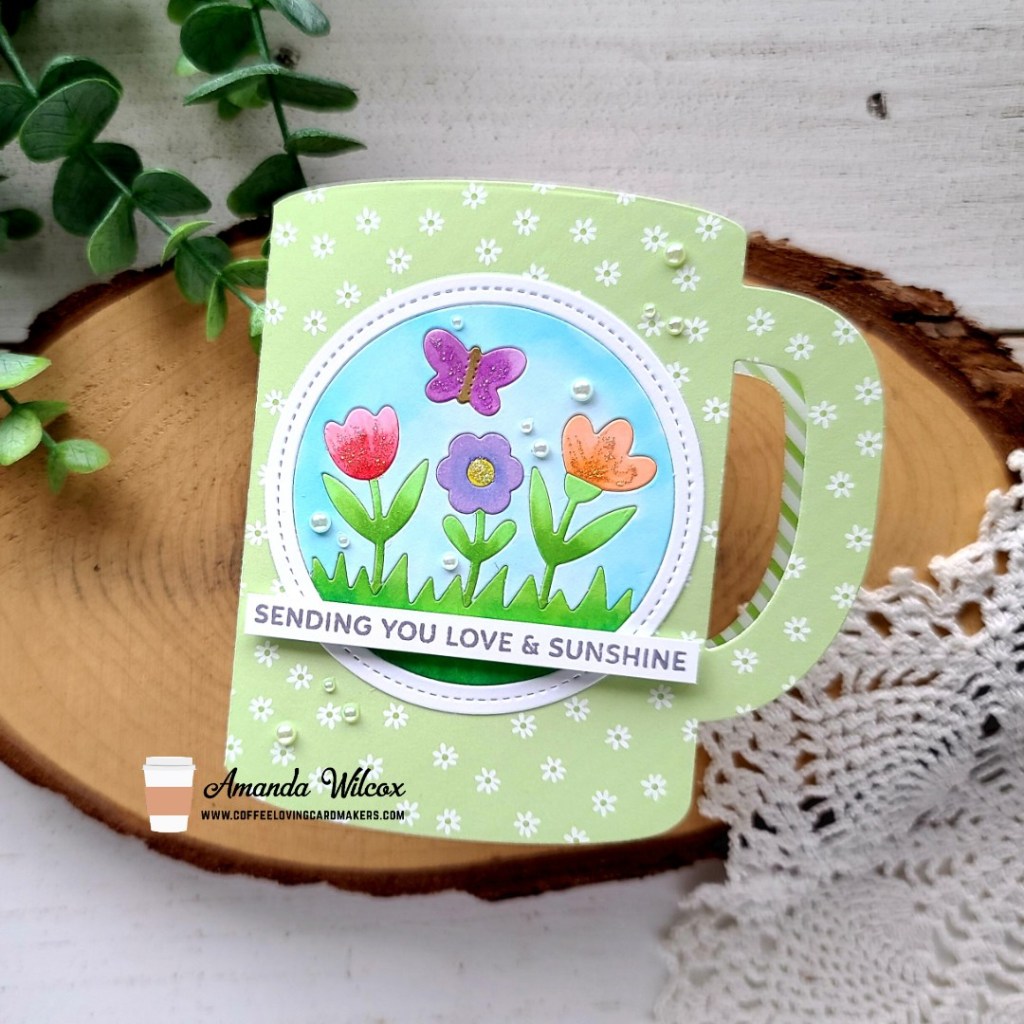
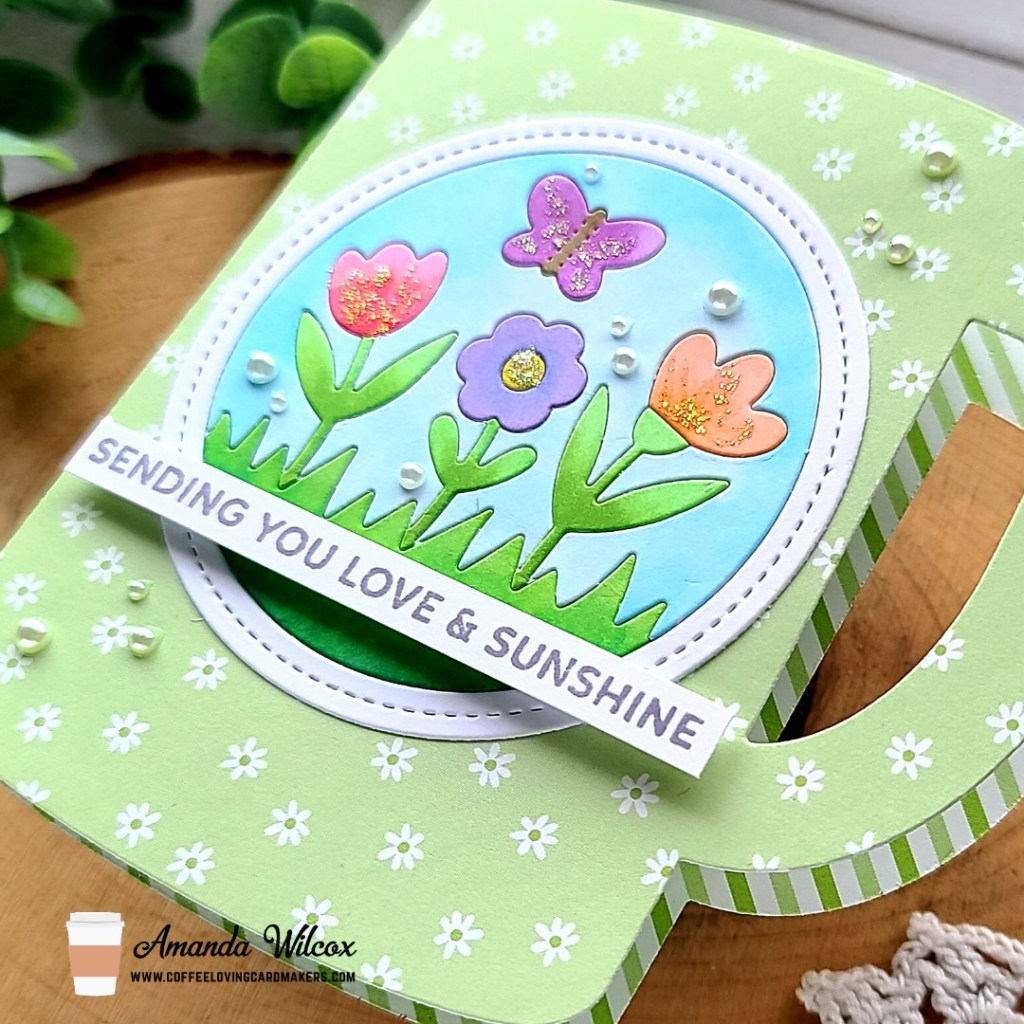
Happy Tuesday everyone! Grab a cuppa and head over to the Coffee Loving Cardmakers for Tuesday Tea with Twiddler’s Nook and a how-to on this adorable spring-themed coffee mug card I created!
The stamps and dies are from Pretty Pink Posh with the coffee mug die being an oldie but goodie from Trinity Stamps!
This spring die is just adorable and I’m so happy it fits so well on this coffee mug because I have a summer and winter version, that you can bet your bottom dollar I’m going to be recreating this card with!
Click HERE to head to the Coffee Lovers blog for all the deets and links to products used.
I appreciate you sharing your time with me. Have a fabulous day!
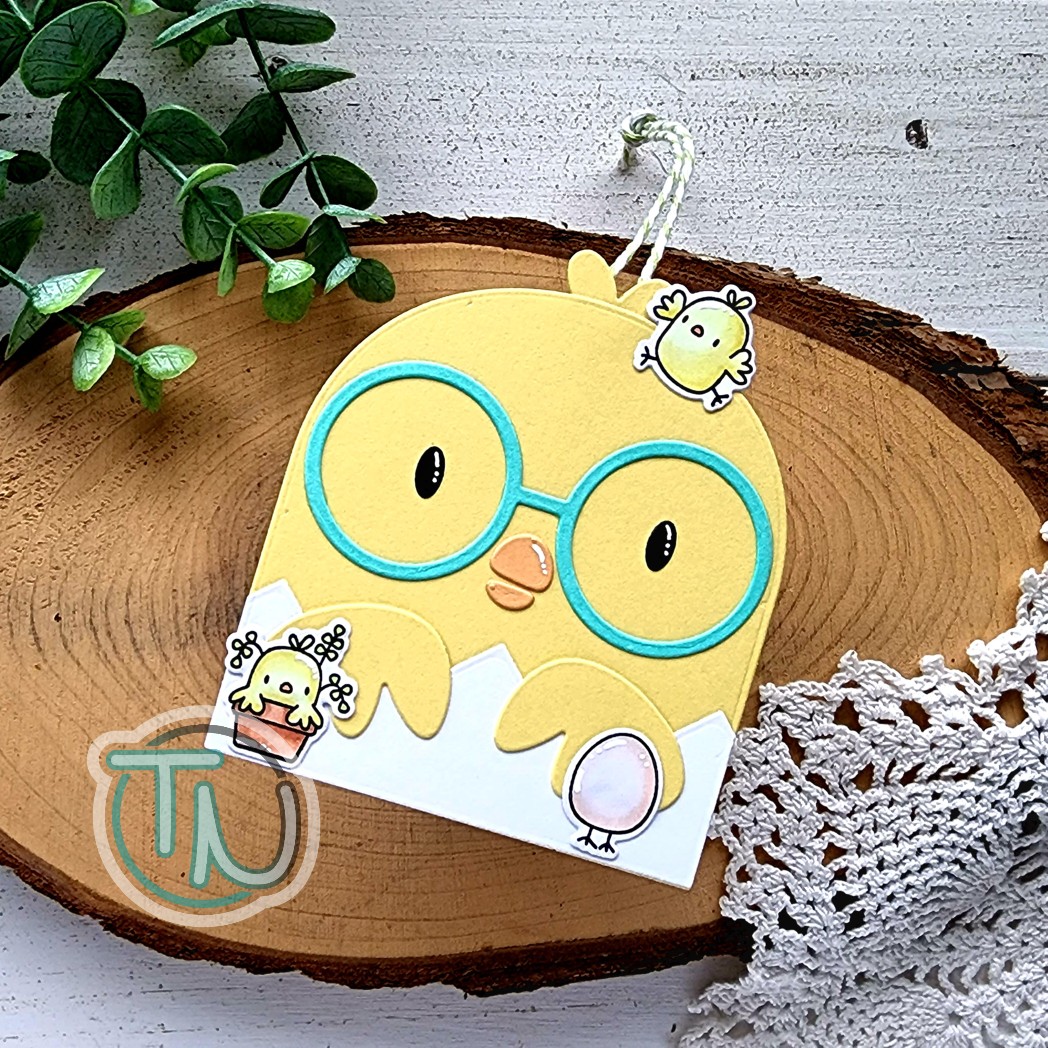
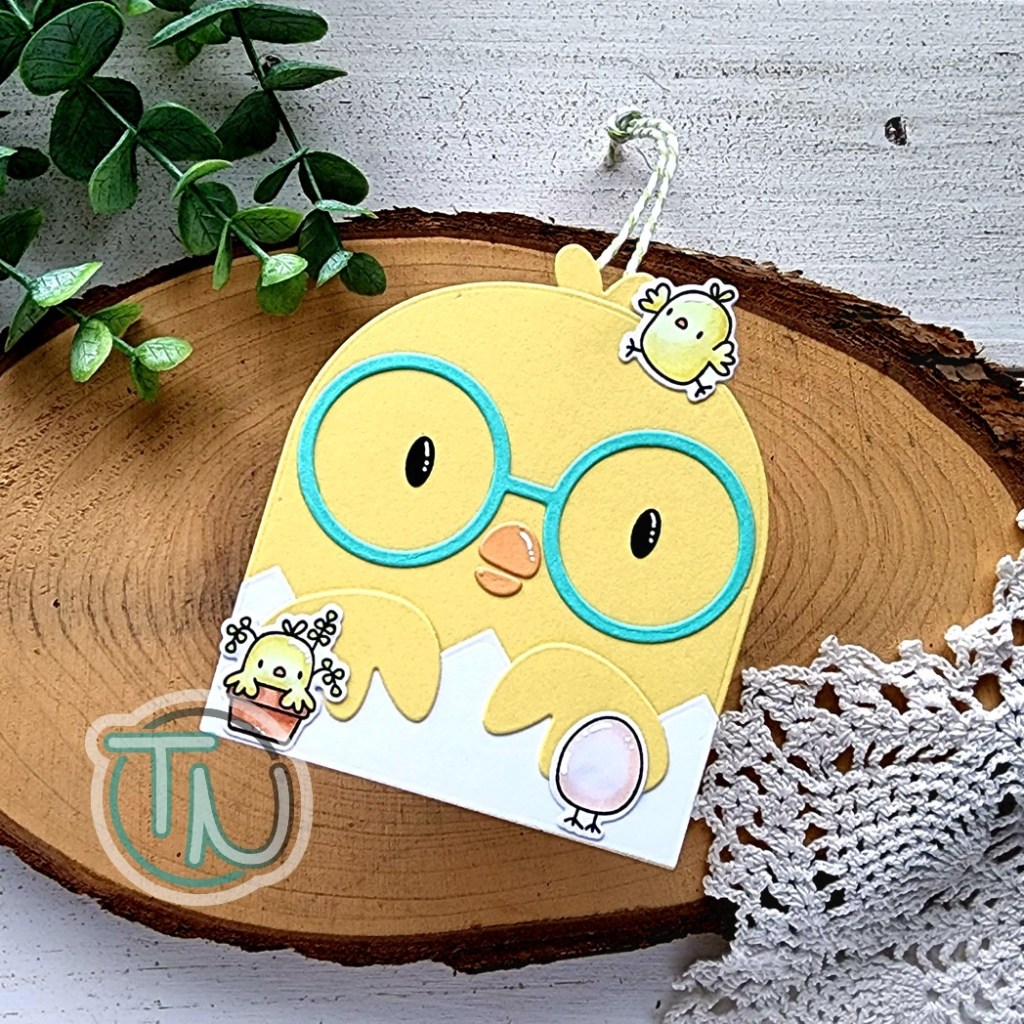
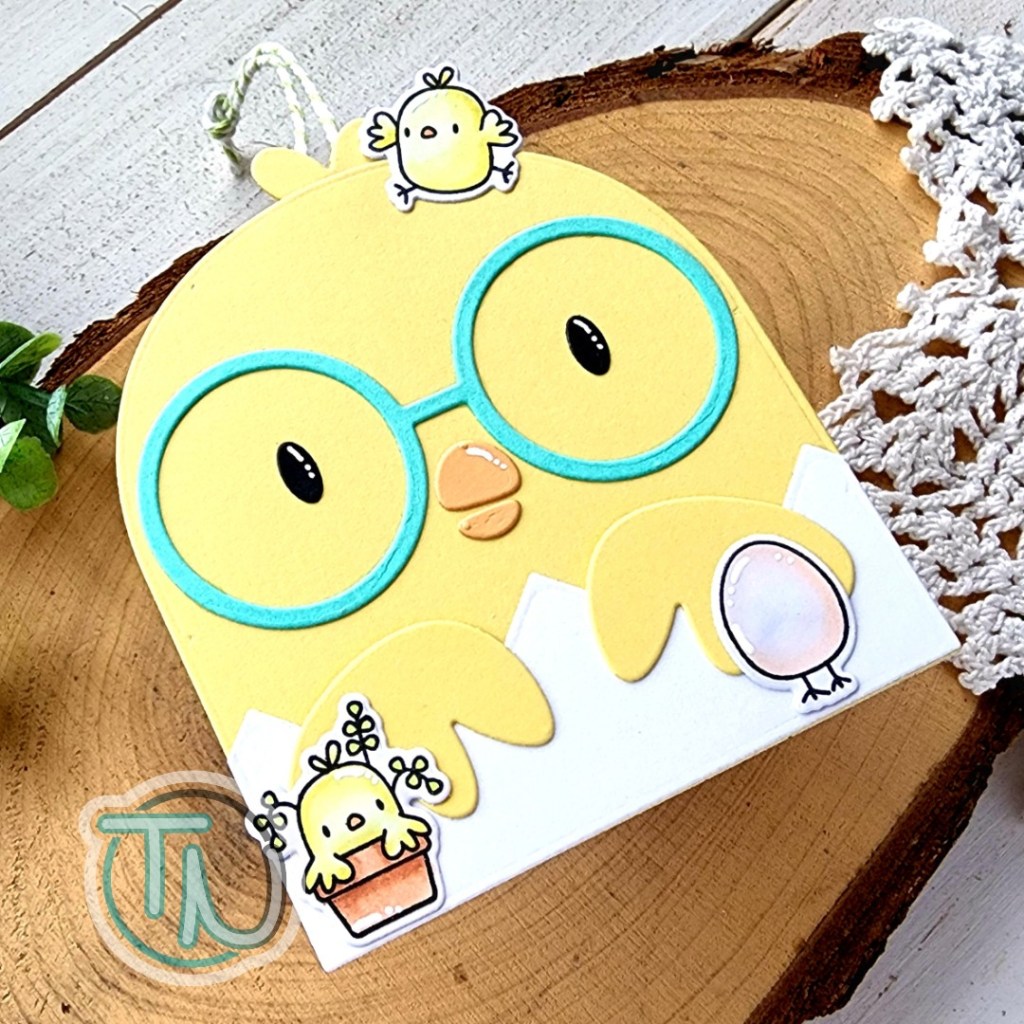
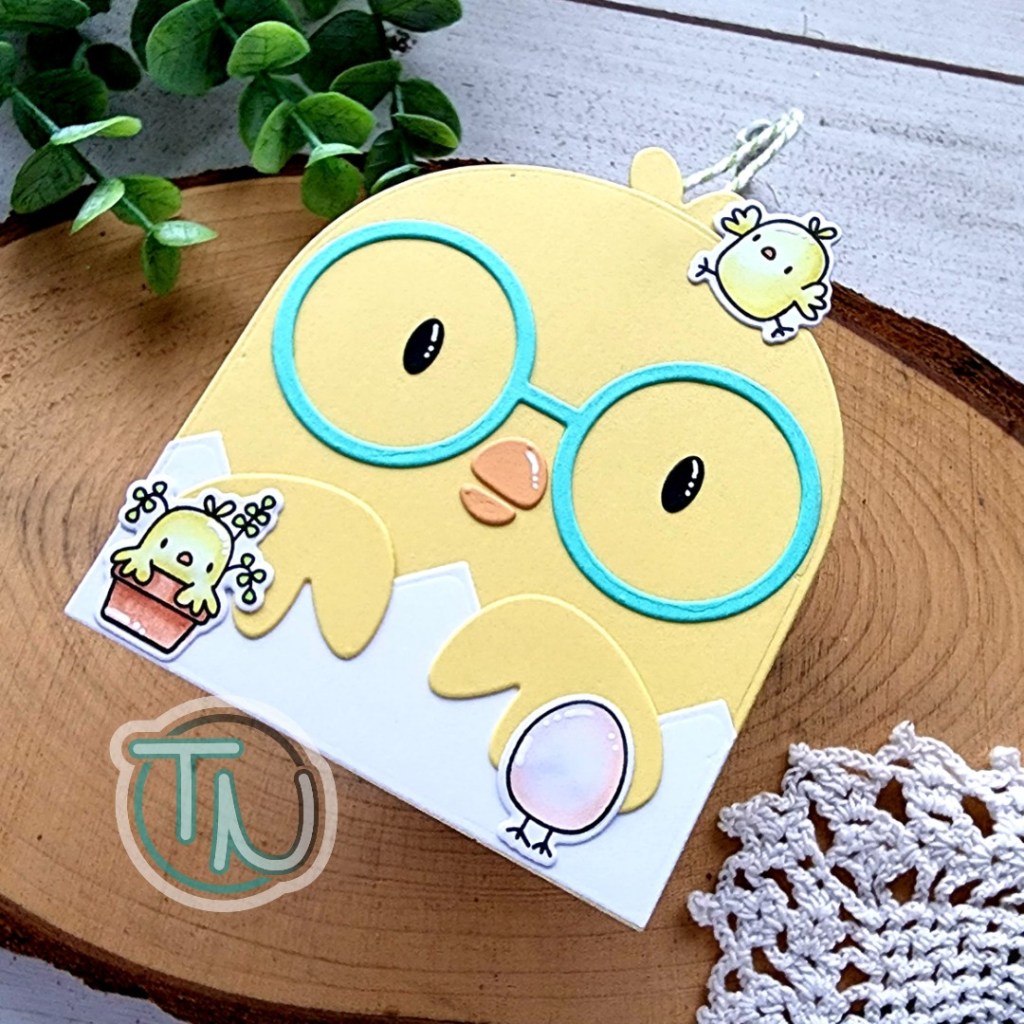
Hey everyone! I’ve started making tags for Easter baskets this weekend and wanted to pop in to share one that I had too much fun creating!
For this tag, I cut all the pieces for the Chickie Favor Bag Accessory from cardstock and adhered the pieces together with liquid glue. Then I cut a second “body” piece from white cardstock and adhered it to the back.
Next, I pulled out the Little Chickie Agenda stamps and chose a few to decorate my big chickie with. I stamped them out and colored them with copic markers before using the coordinating dies to cut them out.
I adhered them with liquid glue and kept finishing touches simple with white gel pen highlights to all of the images.
Last, I added some baker’s twine to the back with washi tape so it could be removed later on. There is lots of space to write the recipient’s name plus a message or maybe stamp a sentiment too.