Blog

Thermoweb – Plaid Flocked Christmas Cards

Hey friends! I hope your holiday weekend was wonderful and you’re off to a great start this week! I’m popping in to share that I’m on the Thermoweb blog today. I have a set of 4 cards featuring deco foil flock and glitz glitter gel.

I have 2 ways to use the flock transfer sheets on the blog post today – transfer gel and a laminator or straight die cutting. It’s one of my favorite things about the flock transfer sheets.

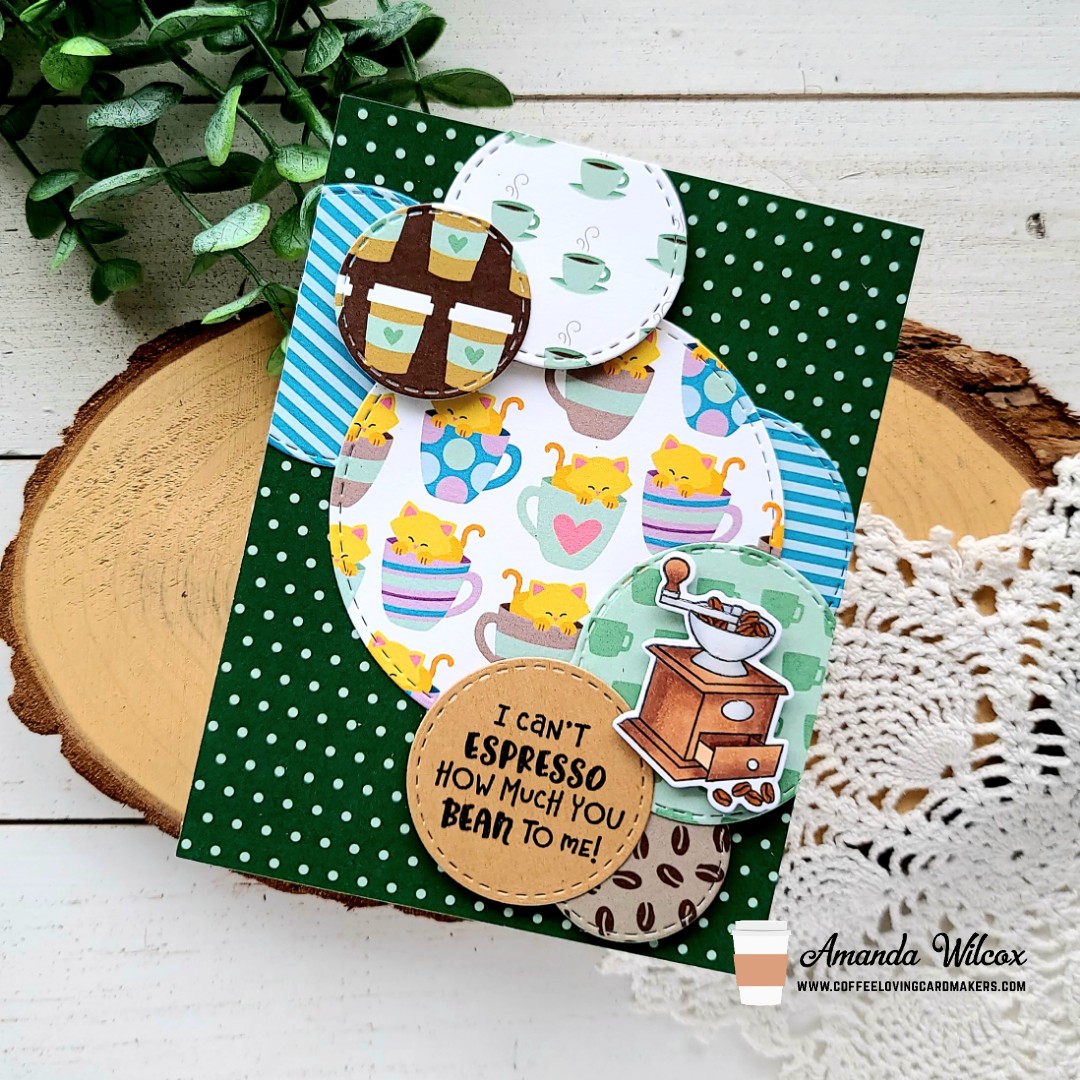
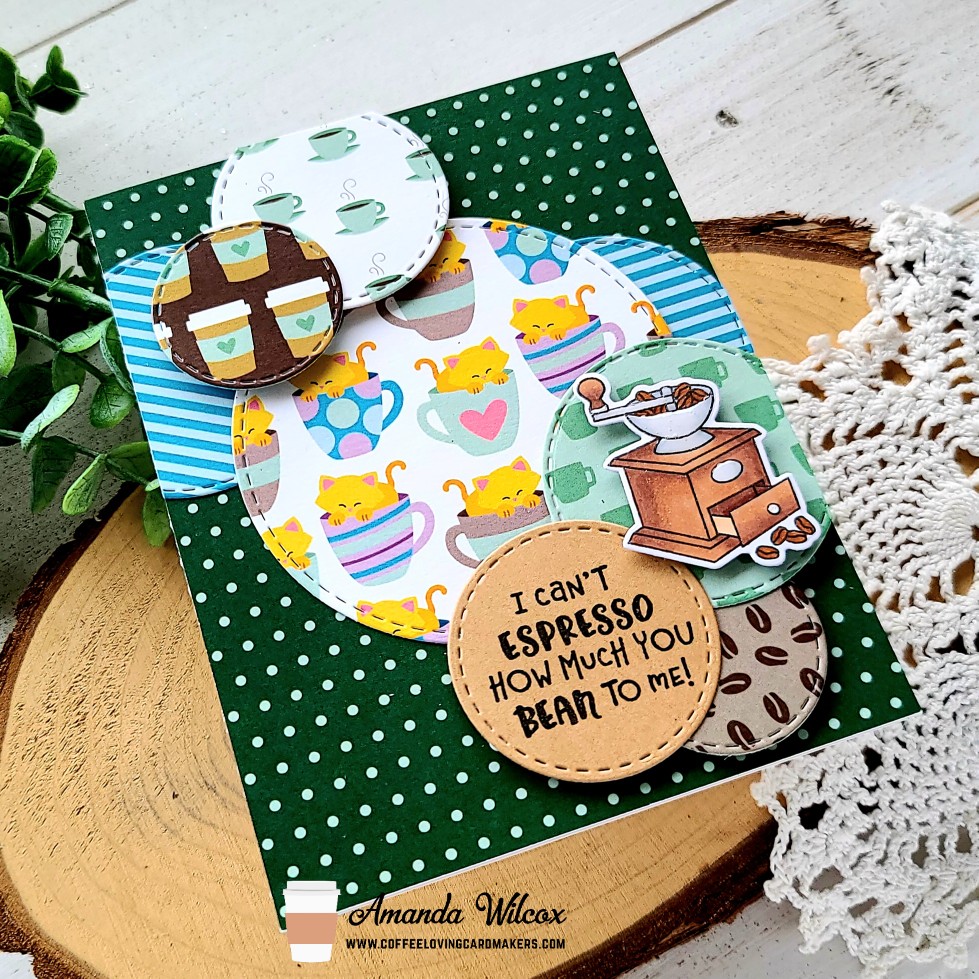
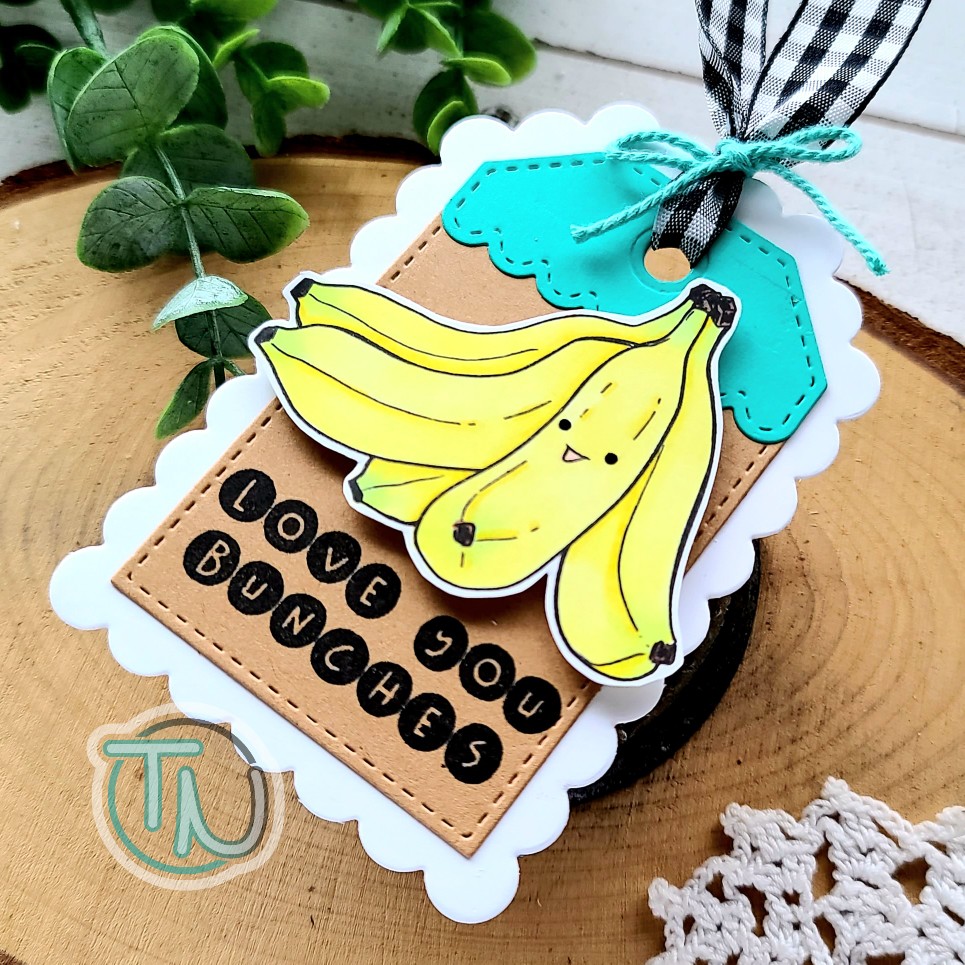
For these fun Newton’s Nook cards, I used transfer gel and my laminator for the first one and used the negative sheet with some glitz gel for the second. No waste and two super fun cards! Stamps dies and stencils from this are all Newton’s Nook.

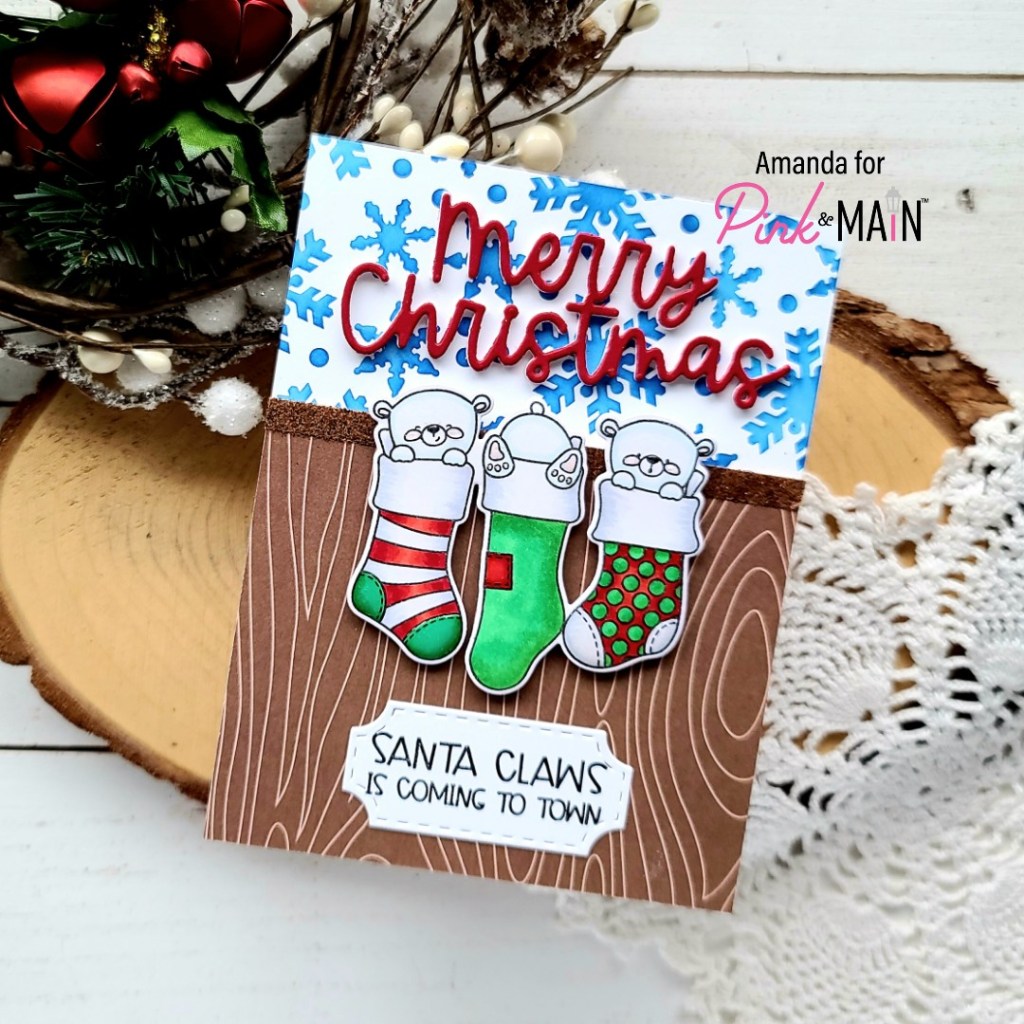
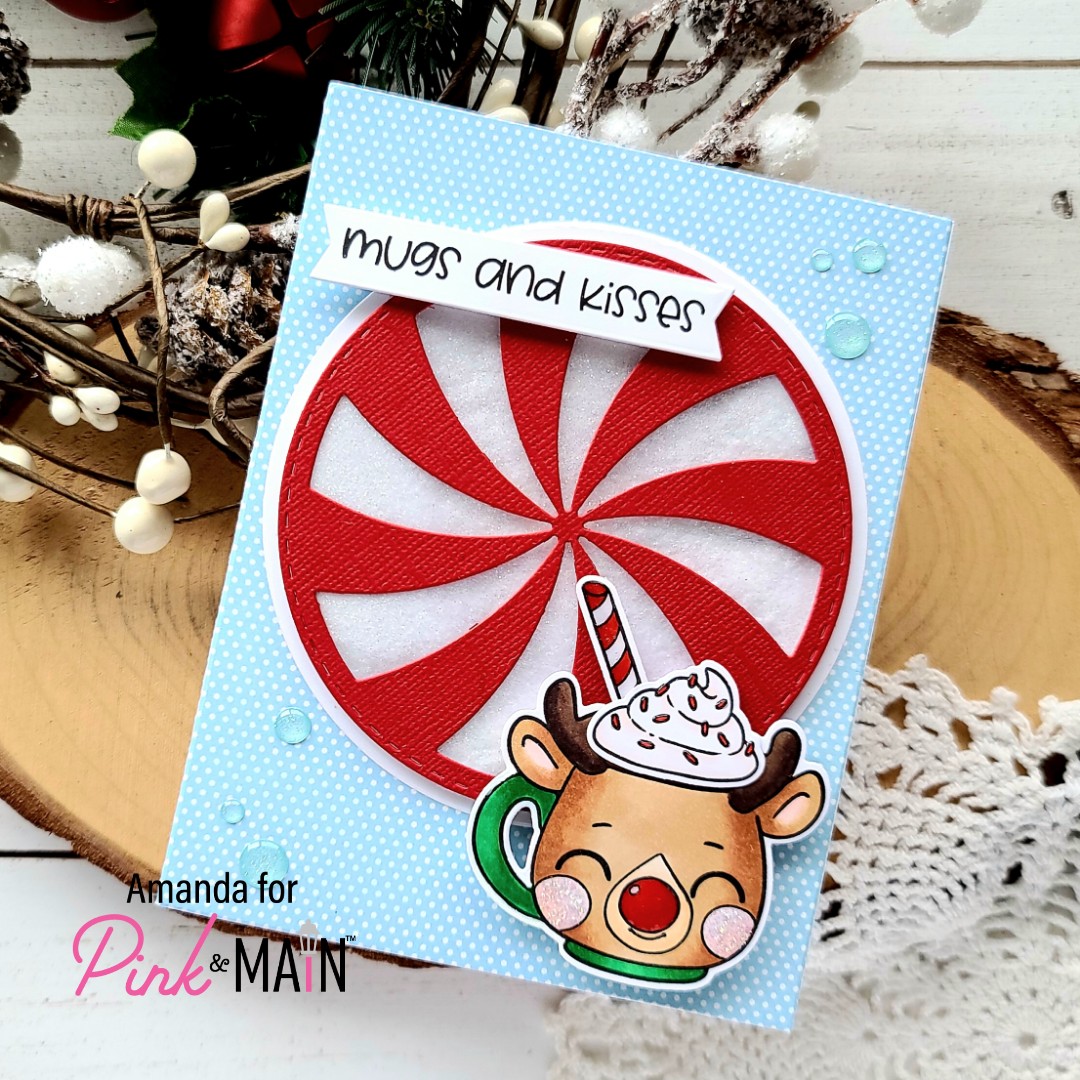
Then for this style, one layer on each card is just die cut flock transfer sheet. Sometimes we don’t have time to be messy and wait for the transfer gel to dry. This is a super fun alternative. The dies for these cards are all Pink & Main.

If you’d like the supply list, full details and photo tutorial please head over to the Thermoweb blog and check it all out.

I appreciate you sharing your time with me. Have a fabulous day!

Pink & Main – Santa Claws is Coming to Town

Happy Sunday friends! Thanks for stopping by today. I’m over on the Pink & Main blog sharing a super sweet Christmas card featuring some adorable polar bears and lots of fun techniques.

To start my card, I stamped the fun stocking image from The Best Gift stamp set and colored it with my copics. I used the coordinating die to cut the image out and set it aside. Next, I took a white A2 size panel and inked up the Blizzard stencil with blue dye ink and my ergonomic blending brush. I used EZ squeeze liquid glue to adhere it to a white card base.

Next, I cut a piece of brown woodgrain paper from the Pumpkin Season paper pad to 4.25×3.5 inches. I adhered a strip of 1/4 inche EZ tear tape to the top edge, removed the release paper and rubbed Sparkling Teddy Bear flock with glitter on it. I added foam tape to the back and adhered it to the bottom of my card front.

Next, I added foam squares to the bears and popped them up in the top center of the woodgrain panel. I knew I wanted to use the “Santa Claws” sentiment in the set so I stamped it and die cut it with the smallest Notched Corner die. I adhered it directly to the woodgrain paper below the bears.

For a little extra something to break up how plain the top of my card felt, I die cut Merry Christmas from the Christmas Greetings die set from white cardstock 4 times and red once. I used EZ squeeze liquid glue to adhere the layers together and to my card front.

Now for finishing touches I pulled out my favorite glossy accents and added it to the bear’s noses, cheeks and toe beans. Then I also added it to the patches on the stockings.

Isn’t this just the cutest!?! I am super happy with how this turned out and can’t wait to play with more images in this adorable stamp set!

Products used today:
The Best Gift stamps and dies
Notched Corners dies
Christmas Greetings dies
Blizzard stencil
1/4 inch EZ Tear Tape
EZ Squeeze liquid adhesive
Sparkling Teddy Bear flock with glitter
Pumpkin Season paper pad
foam tape
glossy accents
copic markers

I appreciate you sharing your time with me. Have a fabulous day!

Miss Ink Stamps – Release Day | Warm Wishes Tag

Welcome everyone!!! Miss Ink Stamps is having an adorable winter release today and I’m sharing a fun tag featuring one of the new stamp sets.

When I saw this image I thought it would fit perfect on a tag so I checked and, sure enough, it’s perfect! I cut the inside panel of the Avery Elle Easy Layer Tag dies and stamped my image and sentiment on it. Then I used copic markers to color the scene.

I inked up the edges of the panel with chipped sapphire distress oxide ink and lined the back with foam tape. I cut the main part of the tag from white cardstock and patterned paper. Then I adhered everything and threaded ribbon through the hole, tying it with some twine.

For finishing touches, I added glossy accents to things like ornaments and snowman eyes. Then I added unicorn Stickles to the mistletoe berries, flower and a little shadow beneath the sentiment.

Such a sweet winter image! This new release is so much fun and not just for Christmas so be sure to check it out HERE.

Products used today:
Miss Ink Stamps Snow Couple stamps
Avery Elle Easy Layers Tag dies
Glossy accents
Stickles – unicorn
3D foam tape

I appreciate you sharing your time with me. Have a fabulous day!

Miss Ink Stamps – Sneak Peek | Sliding By…

Happy Friday friends! I hope your Thanksgiving was wonderful. We had a house full and it was such a great day!

Tomorrow is a new release for Miss Ink Stamps and today I have a sneak of the set – Have an Ice Day. It’s SO CUTE and super versatile for winter, holiday and all occasion cards.

I started my card by stamping and coloring the images from Have an Ice Day with my copic markers. Then I used the scan-n-cut to cut them out. Next, I ink blended an A2 size panel with distress oxide inks in chipped sapphire, blueprint sketch and shaded lilac. I spritzed the panel with water and blotted it dry. Then I put it in my splatter box and flicked pearl watercolor all over it. After it was dry, I cut an inch off the bottom and adhered a strip of white glitter cardstock to it.

I added foam tape to the back of the panel and adhered it to a white card base. Then I used a combination of liquid glue and foam tape to add my snowy hill to the bottom left of my card front. Next, I adhered the penguins with foam squares, decided on a sentiment and popped that strip up with foam strips too.

For finishing touches, I added glossy accents to the penguin’s beaks and feet and a little unicorn Stickles to the hat on the top penguin. Then I glued a scattering of stars from the Champagne Stardust sequin mix.

Be sure to check back tomorrow for another project from the release and then head to the Miss Ink shop to see everything and pick up some winter crafting goodies!

Products used today:
Have an Ice Day stamps
Champagne Stardust sequin mix

I appreciate you sharing your time with me. Have a fabulous day!

Trinity Stamps – Joy Holiday Tags

Hello there! Thanks so much for stopping by today. I am over on the Trinity Stamps blog today sharing this simple set of holiday tags that I created with the new Holiday Tag die set. I just adore the look of this tag and the fact that you can use the holiday accents or not, so it’s great all year long!

To create this set of tags, I inked up a strip of cardstock just wider than the ornament with distress oxide inks in aged mahogany and candied apple. Then I spritzed it with water and blotted it dry. Next, I cut the ball part of the ornament from it three times. I took a small strip of gold foil cardstock and cut the topper portion three times next. While I had the foiled cardstock out I also cut the JOY letters from it. Finally, I cut the whole ornament from white cardstock and just kept the frame.

Next, I cut the main tag shape three times from white cardstock. I used my blending buddy brush to add some light teal dye ink as a shadow behind where the ornaments will be adhered. For some added interest I took a darker shade of teal ink, smooshed it on my glass mat, sprayed it with water and flicked it on the tags with a paintbrush.

Next, I used liquid glue and adhered my ornaments to each tag, then added the foiled JOY letters on top of each one. I finished things off by threading white satin ribbon through the hole and tied it with gold thread from my stash.

Aren’t these tags just beautiful?!? They will be the perfect accent to a Christmas gift bag or treat this season. I’m really excited to start putting things together and giving all of these creations out!

Products used:
Trinity Stamps Holiday Tag dies
Distress Oxide Ink – aged mahogany, candied apple
Liquid glue
Blending Buddy Brushes

I appreciate you sharing your time with me. Have a fabulous day!

Jane’s Doodles – Merry Mice Tags

Hey friends! Jane’s Doodles released a SUPER CUTE digital stamp yesterday – Merry Mice – and I absolutely could not wait to color these sweet images! I seem to be in a kick of making all things Christmas tags so these cuties just flowed together on their own practically.

After printing the stamps, I colored them with my copic markers and used the scan-n-cut to cut them out. Then I used a circle die from Newton’s Nook to cut one sentiment and a Pink & Main large sentiment strip die to cut another. For the third sentiment I actually pulled out Driving Home for Chrimstas, stamped one from it and used a Newton’s Nook banner die to cut it out.

The tags are all cut from the Newton’s Nook Fancy Tag die set. I cut one from kraft and one from white, then I cut toppers for each tag from white cardstock too. I matched some smaller images from other sets to stamp in the background. These snowflakes are also from Driving Home for Christmas.

I popped the images and sentiments up on foam squares. Then I added brown ribbon and red twine to attach the two tags together for each set. I like being able to write on the white one instead of flipping the main tag over. The candy canes for this tag are from Warm and Cozy.

The background images on this tag are from St. Nick. Once everything was adhered, I came back in with glossy accents on all the mouse noses and things like bows, berries and ornaments.

I already have another set of these fabulous images printed and ready for coloring. I’m hoping to get them colored over the holiday weekend.

Products used today:
Jane’s Doodles Merry Mice digital stamp
Jane’s Doodles Driving Home for Christmas stamps
Jane’s Doodles Warm and Cozy stamps
Jane’s Doodles St. Nick stamps
Newton’s Nook Frames & Flags dies
Newton’s Nook Fancy Edges Tag dies
Pink & Main Large Sentiment Strip dies
Glossy accents

I appreciate you sharing your time with me. Have a fabulous day!

*This blog uses affiliate links whenever possible; at no additional cost to you.*

Coffee Loving Cardmakers – National Espresso Day

Hey crafty friends! It’s National Espresso Day and given that it’s my day on the Coffee Loving Cardmakers blog, we couldn’t let it slip passed! So I have a fun themed card for you featuring the new release from Newton’s Nook!

I really wanted to use the new Time for Coffee stamp set and the Coffee House Stories paper pad. They are so much fun and just perfect for today! So I chose an image, stamped and colored it with my copics. Then used the coordinating die to cut it out and started flipping through the fun paper pad!

I chose an array of papers and grabbed the circle frames dies and the frames squared dies (for the circles in it, haha) and started cutting out different size circles. I also cut one from kraft cardstock and stamped a sentiment from Time for Coffee on it.

Moving on to assembly, I adhered the background paper to a white card base with liquid glue. Then I started adding the circles some with liquid glue and some with foam squares. Finally I added my coffee grinder image with foam squares and then went about trimming off anything hanging over the edge.

For finishing touches, I just added some glossy accents to the metal parts of the grinder for a little shine and interest.

I plan on fully celebrating today’s national holiday with a run through the Starbucks line later. How about you?

Products used today:
Newton’s Nook Time for Coffee stamps and dies
Newton’s Nook Coffee House Stories paper pad
Newton’s Nook Circle Frames
Newton’s Nook Frames Squared
Thermoweb foam squares and foam tape
Thermoweb Ultra Bond liquid adhesive
Glossy accents

I appreciate you sharing your time with me. Have a fabulous day!

Thermoweb – Thankful For You

Happy Monday my friends! I’m super excited that it’s Thanksgiving week! We love Thanksgiving at our house. Getting together to hang out, play games, chat and eat good food! Seriously, what gets better…other than crafting? Haha!

Today I’m over on the Thermoweb blog with this set of adorably fun deco foil thankful cards to share!

This ended up being one of those projects where I was having fun and just couldn’t stop so I ended up with 6 fun turkeys and that turned into 6 thankful cards. Not a bad problem to have though. I am excited to write in each one and give them out this week.

For all the details on how I made these, head over to the Thermoweb blog where I share a photo tutorial from start to finish and have links to all the products used too!

I appreciate you sharing your time with me. Have a fabulous day!

Unity Stamp Co – Love You Bunches Tag

I recently received my very first order from Unity Stamp Co and am so excited about all the fun goodies I got! First off, I had to use this super adorable bunch of bananas because my daughter has a thing for food with faces and this is just too perfect! She has her last dance competition of the fall/winter season before championships today so I’m attaching it to some goodies for her.

I mean seriously…how could this not make you smile?!?

To create this tag, I stamped and colored the bananas with copic markers and then fussy cut the image out. I die cut the elements of the Pink & Main fancy tag from kraft, white and teal cardstock. I stamped the sentiment on the kraft layer and adhered everything with tape runner. Then I added the bananas with foam squares.

Next, I threaded some gingham ribbon through the hole and tied it with teal twine matching the cardstock. I finished things off with some simple black glaze pen on the eyes to help them shine.

And the back of the tag is bright white and ready for a special message to encourage her before performing! How fun is that!?! I love it!

Products used:
Unity Stamp Co Bunch of Bananas stamps
Pink & Main Fancy Tag dies
foam squares

I appreciate you sharing your time with me. Have a fabulous day!

Pink & Main – Mugs and Kisses

Happy Friday everyone! Today I’m over on the Pink & Main blog with a super fun Christmas shaker card! It’s adorable and fits in with the final day of the Fall | Winter Coffee Lovers Hop too! Pink & Main is a super sponsor, did I mention that?!? Even better!

I started my card by stamping some images from Mugs and Kisses and colored them with my copic markers. I used the coordinating dies to cut them out and then glued everything together with my EZ Squeeze liquid adhesive. I chose a sentiment from the set, stamped it on white cardstock and cut it out with a large sentiment strip die.

Then I created my shaker mechanism. For that I cut the peppermint swirl die from red cardstock. I found the corresponding size circle in the layered circle dies and cut it from acetate. I used liquid glue to adhere these together and carefully lined the back with thin foam strips. I sprinkled in some sparkling cotton tail flock and ice rink super fine glitter and sealed it up with a white circle. This one was cut from the circle one larger than the acetate.

For my background, I chose a fun light blue patterned paper in the Best Friends paper pad and cut it out with the largest rectangle stack A2 dies and adhered it to a white card base. Next, I added the peppermint shaker and finally added the sentiment strip and reindeer mug with foam squares.

For finishing touches, I added glossy accents to the sprinkles, peppermint stick and rudolph’s nose. Then I came in with unicorn Stickles for his cheeks and finished everything off with a few glitter enamel dots from the Thankful pack.

The mugs in this stamp set are just too cute for words! It was really hard to choose just one so I’m going to have to make more of these just to color the rest of those cuties!

Products used today:
Mugs and Kisses stamps and dies
Peppermint Swirl die
Layered Circles dies
Layered Rectangles A2 dies
Thankful glitter enamel dots
Best Friends paper pad
Ice Rink super fine glitter
Sparkling Cotton Tail flock
EZ Squeeze liquid glue
foam strips and squares
glossy accents
Stickles – unicorn

I appreciate you sharing your time with me. Have a fabulous day!