Happy Thursday everyone! I’m back with a little caffeinated inspiration from Miss Ink Stamps today! I had a little fun with one of my favorite gnome sets – Big Mugs and a new stencil – Lava Lamp. I also wanted to change things up a bit so I decided on a circular card today too!
I stamped my gnome out and colored him with copic markers before cutting him out with my scan-n-cut. Then I inked up a brown panel with the lava lamp stencil and white pigment ink using my blending buddy brush. I die cut the panel with an embossed edge circle from Trinity Stamps. Then I cut the next size up circle from kraft cardstock.
I created a white card base with the same circular die and adhered the kraft circle with liquid glue, then popped the stenciled circle up with foam tape. I felt like the gnome needed something behind him so I cut a smaller circle from vellum.
To hide my adhesive, I attached the gnome to the vellum with foam squares and hid tape runner on the back of the vellum behind the gnome only.
Last, I stamped a sentiment on a banner from Newton’s Nook Banner Trio set and popped it up with foam squares under the gnome’s feet.
For finishing touches I added some brown clay hearts from the Twiddler’s Nook Caffeinated Crafting embellishment mix and gave the image some white gel pen highlights.
Tomorrow is the last day to play along with the Coffee Lovers Fall | Winter Hop. Have you played along yet? I’m entering this cutie for sure!
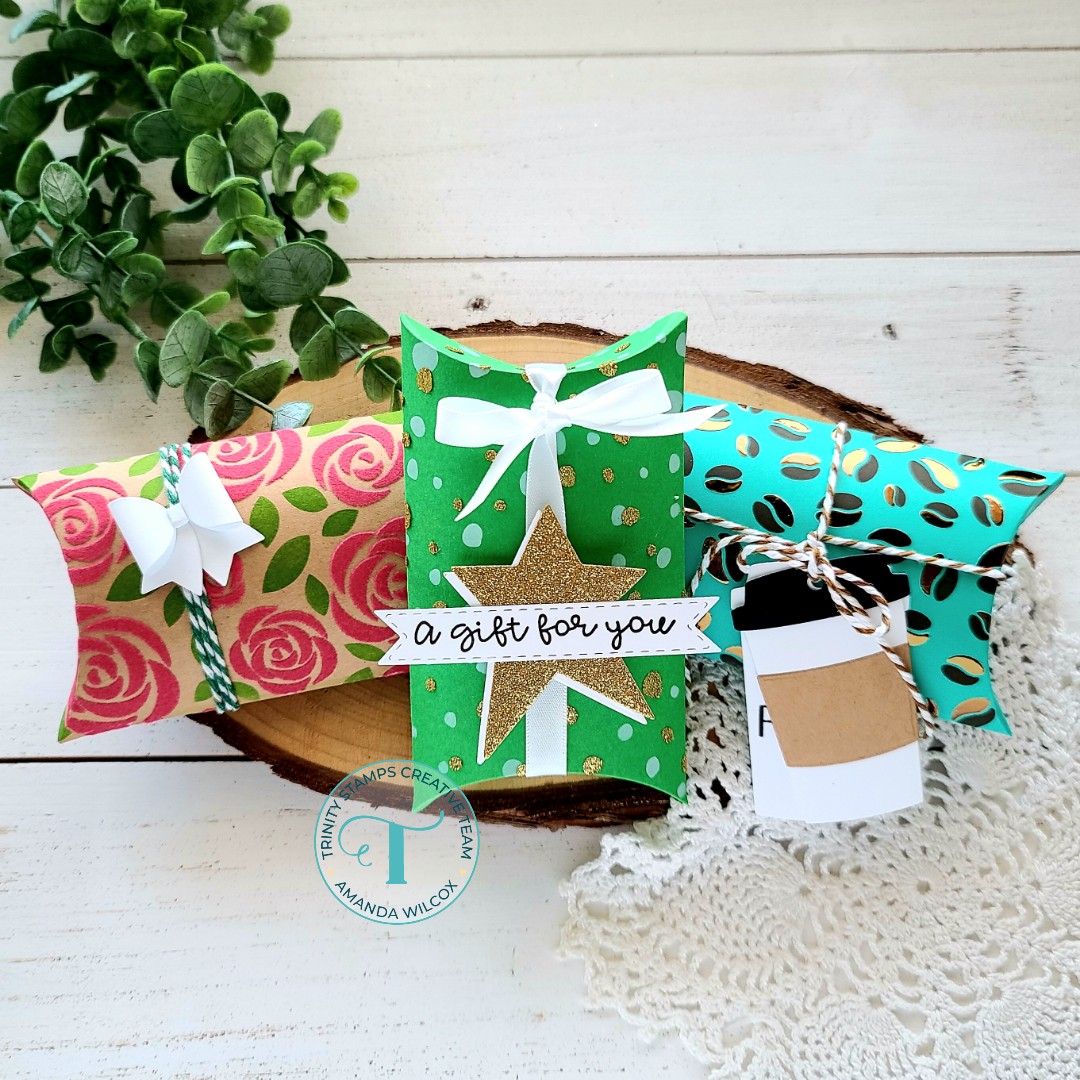
Oh my goodness my friends! I am BEYOND excited to share Trinity Stamps new release with you! Today I have 5 projects featuring the new pillow box die set and other products too! Here’s a peek at a couple of them and then we’ll take a look at each one on its own.
These first 3 that I’m sharing are like the Thermoweb trifecta! We’ve got flocked roses, glitzed snow and foiled coffee beans! How could you go wrong?!? Aren’t they fantastic!?! I love them all! Let’s look at some more, shall we?
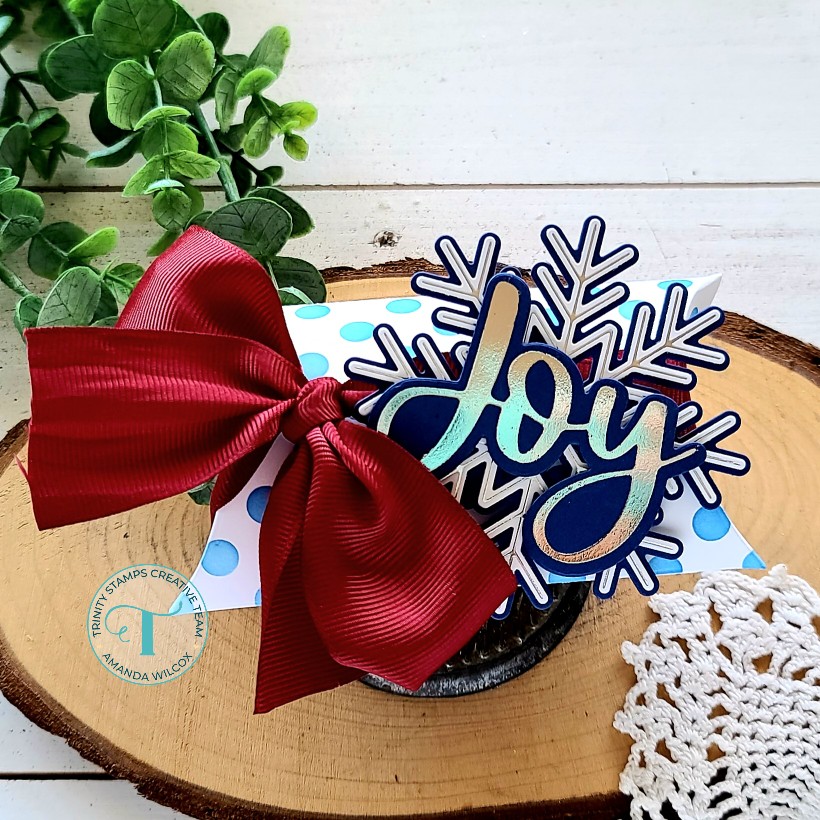
For this beauty, I foiled the big cut and foil snowflake and layered it on dark blue cardstock. Then foiled the cut and foil joy with the same silver foil on the same dark blue cardstock and adhered them with foam squares. I inked up the pillow box with the polka dot stencil and tied it with a fat red ribbon. Isn’t it stunning?!?
For this fun, lovey feeling box, I used the heart in the set to cut out a window and lined the inside with recycled packaging. I cut 2 additional hearts – one from white glitter cardstock and the second from plain white and used the new Holiday Tag Helper stamps to add a to and from.
Heading back to the trifecta at the beginning, I cut the pillow box for this one from green cardstock and inked one layer of the snowfall stencil with white pigment ink. Then I spread gold glitz glitter gel through the second layer and set it aside to dry. While I was waiting I cut 2 stars using the die in the set and adhered them together. Then I stamped another sentiment in the Holiday Tag Helpers stamp set and cut it out with the stitched banner from the Slimline Scalloped Card Panels and Banners die set. After assembling my box, I tied it lengthwise with white ribbon and adhered the star to that with foam squares.
For this sweet box, I inked up the leaf layer of the Bed of Roses stencil with green dye ink and then spread transfer gel blanco through the flower layer. Once it was dry, I ran it though my laminator with ruby red deco foil flock. I assembled the box, wrapped it with green baker’s twine and hid the twine connection with a white bow using the Bunch of Bows die set.
Last, but not least, I cut a teal pillow box and inked up the coffee bean stencil with brown ink for one layer and transfer gel for the second. After that was dry I ran it through my laminator with bronze deco foil for a fantastic shiny caffeinated treat box! Then I cut the coffee cup tag from the pillow box die set twice – one for a decoration with all the details and the second with another to and from included in the Holiday Tag Helper stamps.
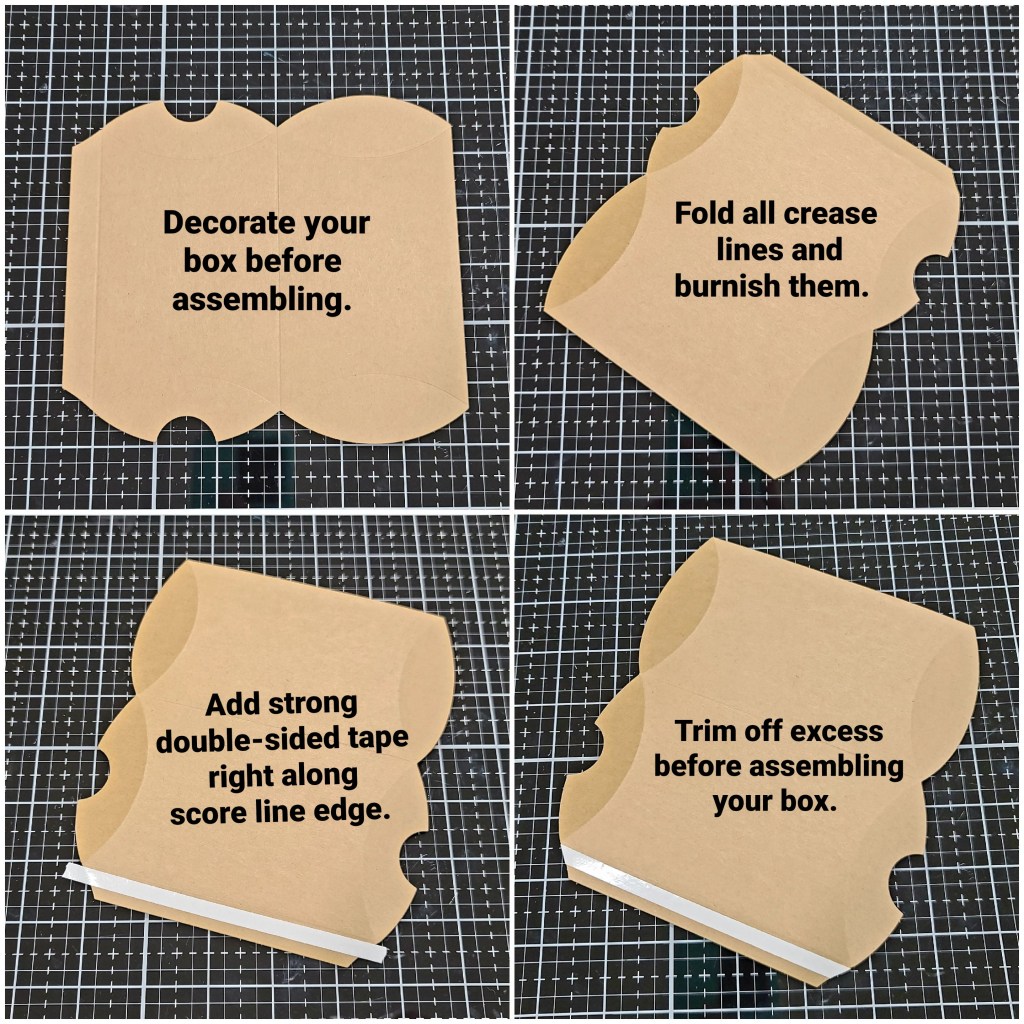
Now, before I go and leave you to your fabulous Thursday. I have a couple of helpful hints if you’re interested in creating wonderful gift boxes this holiday season.
Starting in the top left and going clockwise, this is the process I found most helpful. And, honestly, the biggest part of this simple step-by-step is the way you add your adhesive to the tab that closes your box. Taking completely from one edge to another is very helpful in keeping the box closed when it’s got something inside, possibly pushing at the seam.
Next is simply a preference thing. I made this red box very first cutting the dies apart straight out of my package. When I folded it I though, darn it! So, here I am sharing in case you like to hide the closure of the box too. I make a point now to decorate the side with no finger notches as if it’s going to be the front of my box. The stenciling may go all the way around but my tag and such go on that side.
I hope those help you out a little and you have a total blast creating this fun boxes!
Now, that you’ve stuck with me through this huge post, which I appreciate more than you know! You can head to the Trinity Stamps shop and snag some new goodies HERE or you can head to Instagram and hop along for even more inspiration HERE.
I appreciate you sharing your time with me. Have a fabulous day!
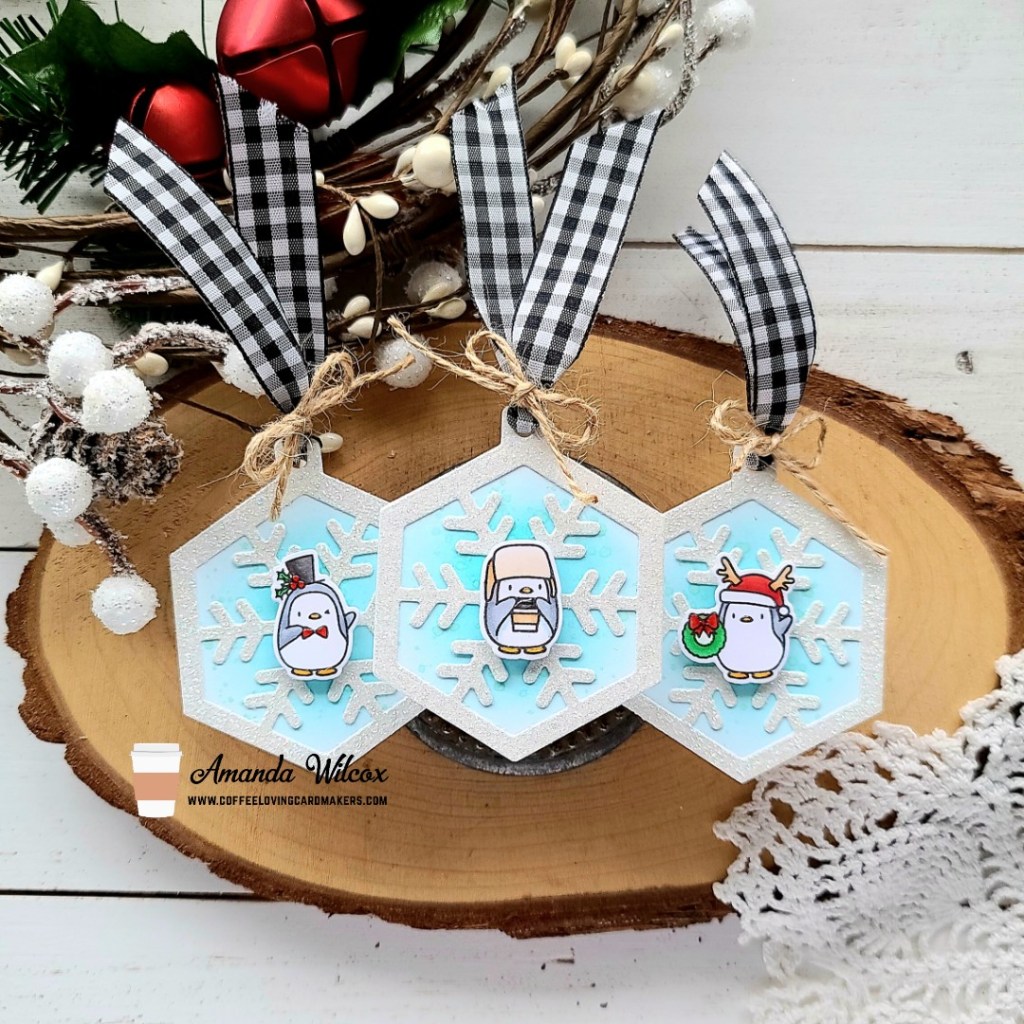
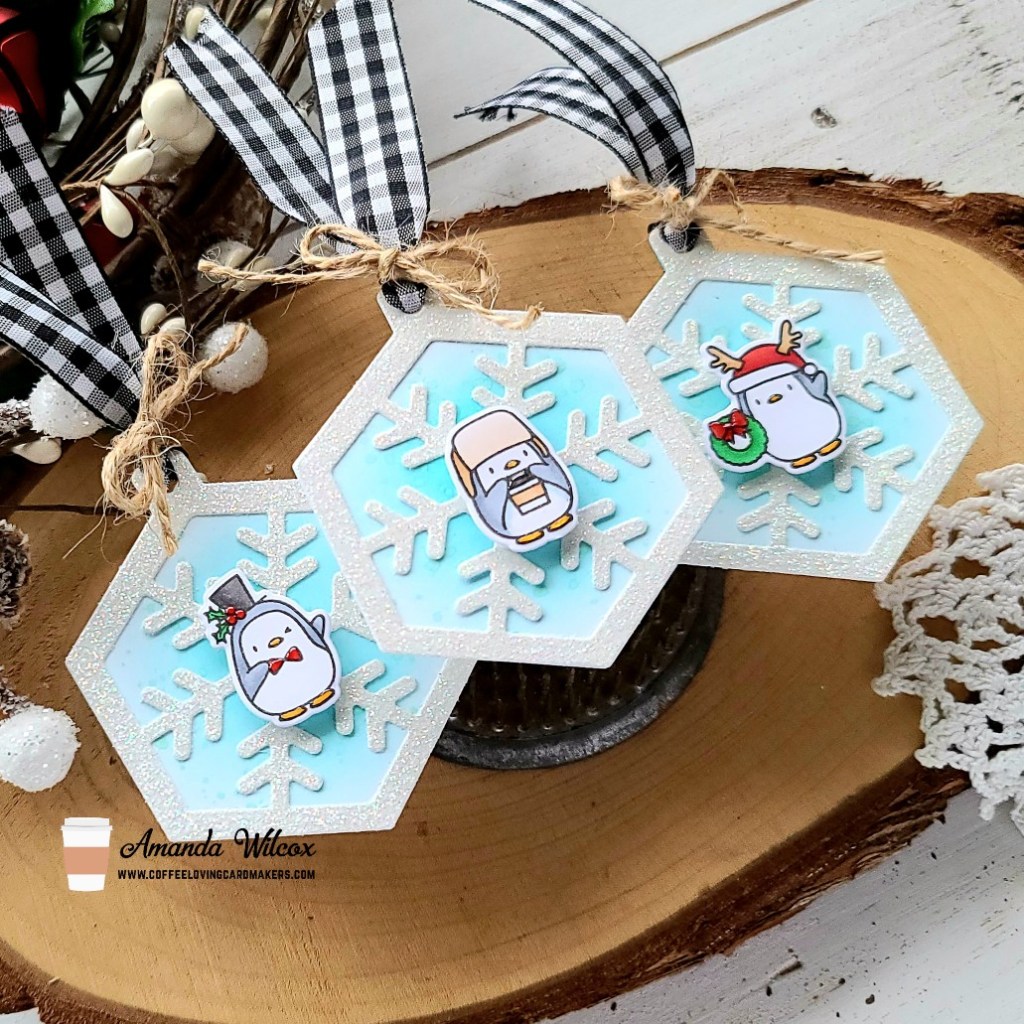
Well, hello again! I’m back today with some mini caffeinated inspiration for the Coffee Lovers hop! This time I’ve made a set of Christmas tags featuring some fun Mama Elephant products. I’m slightly obsessed with how fun they turned out and will probably be making lots more before the holiday season is over!
This is such a simple layout that I knew what I wanted to started with the die cutting first this time. I cut the main tag shape from white cardstock 6 times and white glitter cardstock 3 times. Then I added the snowflake shape to the glitter tags and cut that out of the center.
Next, I took 3 of the white tags and inked them up with Lawn Fawn peacock ink in the center. Then I flicked watered down cracked pistachio distress ink on the tags. Once they were dry, I used liquid glue to adhere the snowflake layer over the tops. Next, I glued the plain white tags to the back so they were sturdy and had a clean side to write on.
Then I chose 3 penguins from the Little Agenda Penguin stamp set and colored them with my copic markers. I used the coordinating dies to cut them out and popped them in the center of each snowflake with foam squares. Next, I threaded black gingham ribbon through the tag hole and tied it with twine.
For finishing touches I added a little glossy accents to each penguin on parts like beaks and feet, berries and bows. These came together so quickly and are seriously adorable!
Are you playing along with the Coffee Loving Cardmakers Fall | Winter hop? There are tons of prizes up for grabs! Just link up a caffeinated project to THIS POST and you’re entered! I hope you will!
I appreciate you sharing your time with me. Have a fabulous day!
Welcome friends! Today I’m popping in with a little sneak peek of some products coming up in the next Trinity Stamps release which goes live TOMORROW!!! It’s got some super fun holiday products that get you well into the New Year and beyond! Can’t wait for you to see it all!
Today I get to sneak the new bottle tag die set with you! I cut the main bottle tag from the new slimline mixed media paper and ink blended it with my blending buddy brushes. Then I took the new Simply Sentimental – Happy stamp set and stamped the happy in all the fonts all over the paper. Next, I wanted some shimmer so I flicked pearl and gold watercolor all over the panel.
Then I used the Simply Sentimental – Happy dies and cut one from black cardstock for the letters and white for the shadow. I used liquid glue to adhere them together and popped them up on the tag with foam squares. I stamped and heat embossed “new year” from the stamps set on black cardstock and trimmed it into a strip, popping it up below the happy.
I really excited for all of the new products that release tomorrow! I’ll be back then with another fun blog post using a whole new set of products available and also remember we’ll have an Instagram hop with tons of inspiration and a chance to win a gift card to the Trinity Stamps shop too!
I appreciate you sharing your time with me. Have a fabulous day!
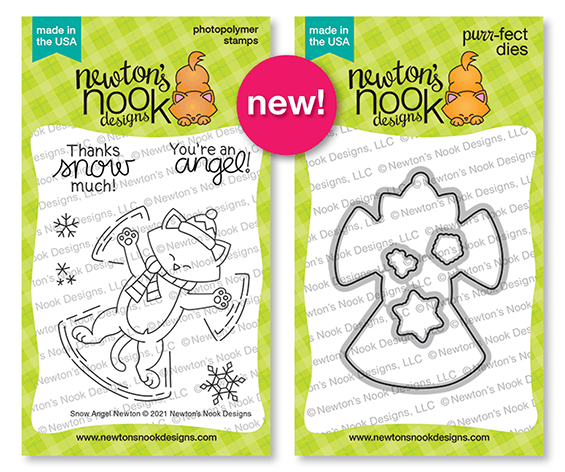
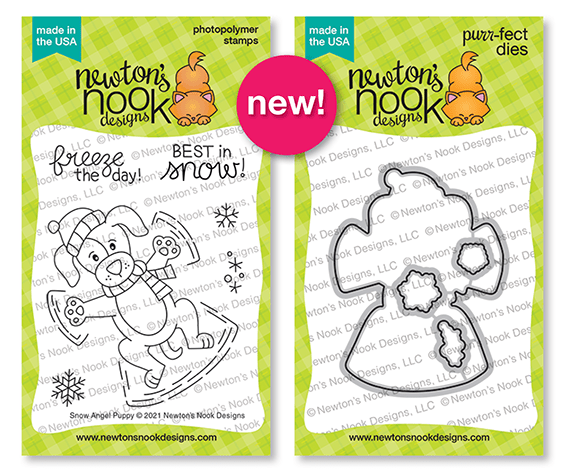
It’s a bit of a smaller release this month so today is the final day of release reveals already! We have 2 more stamp and dies sets, plus a mini stamp to share too!
Snow Angel Newton stamps and dies
Snow Angel Puppy stamps and dies
Roll With It stamps
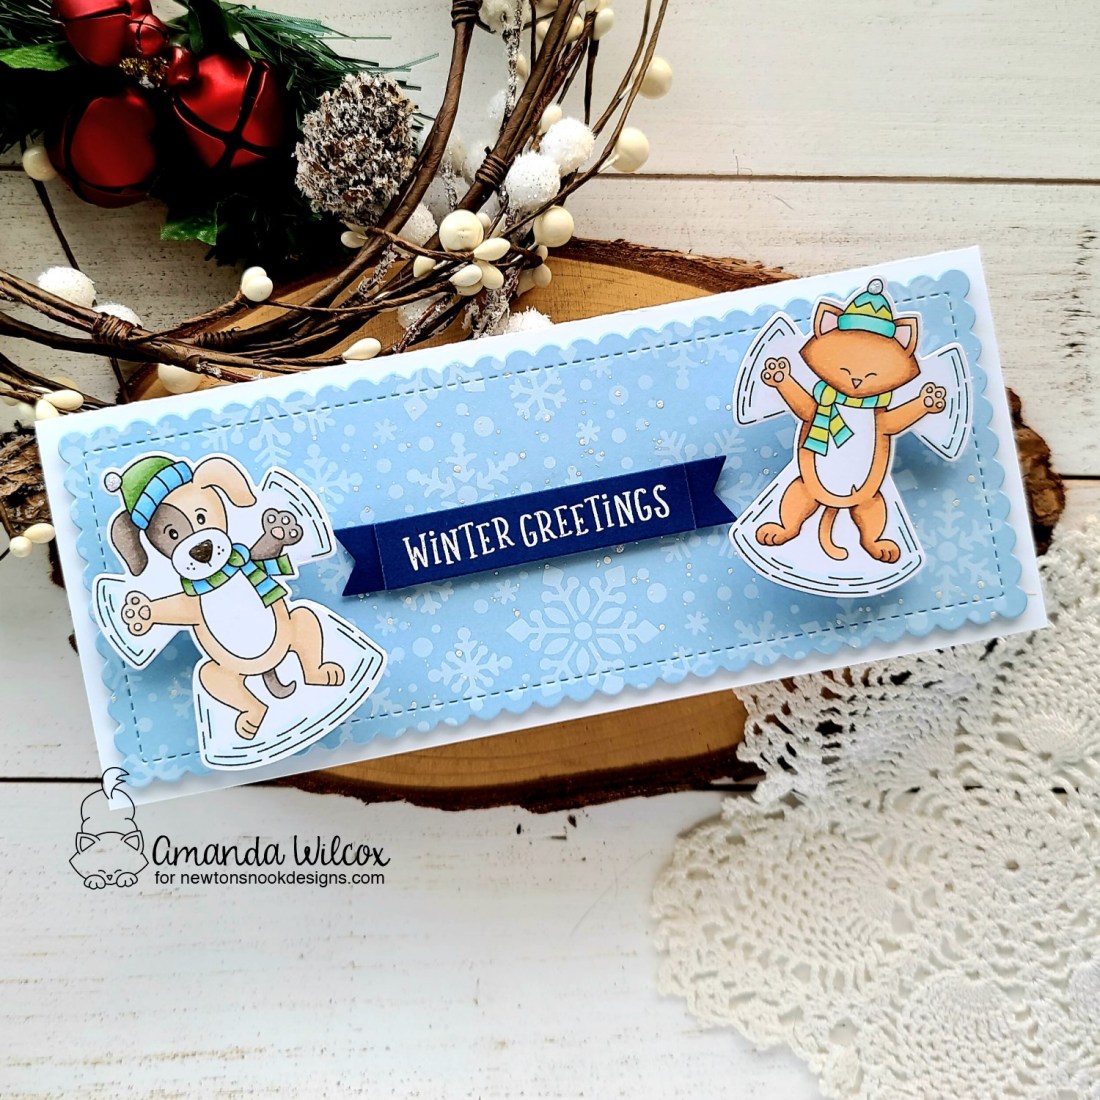
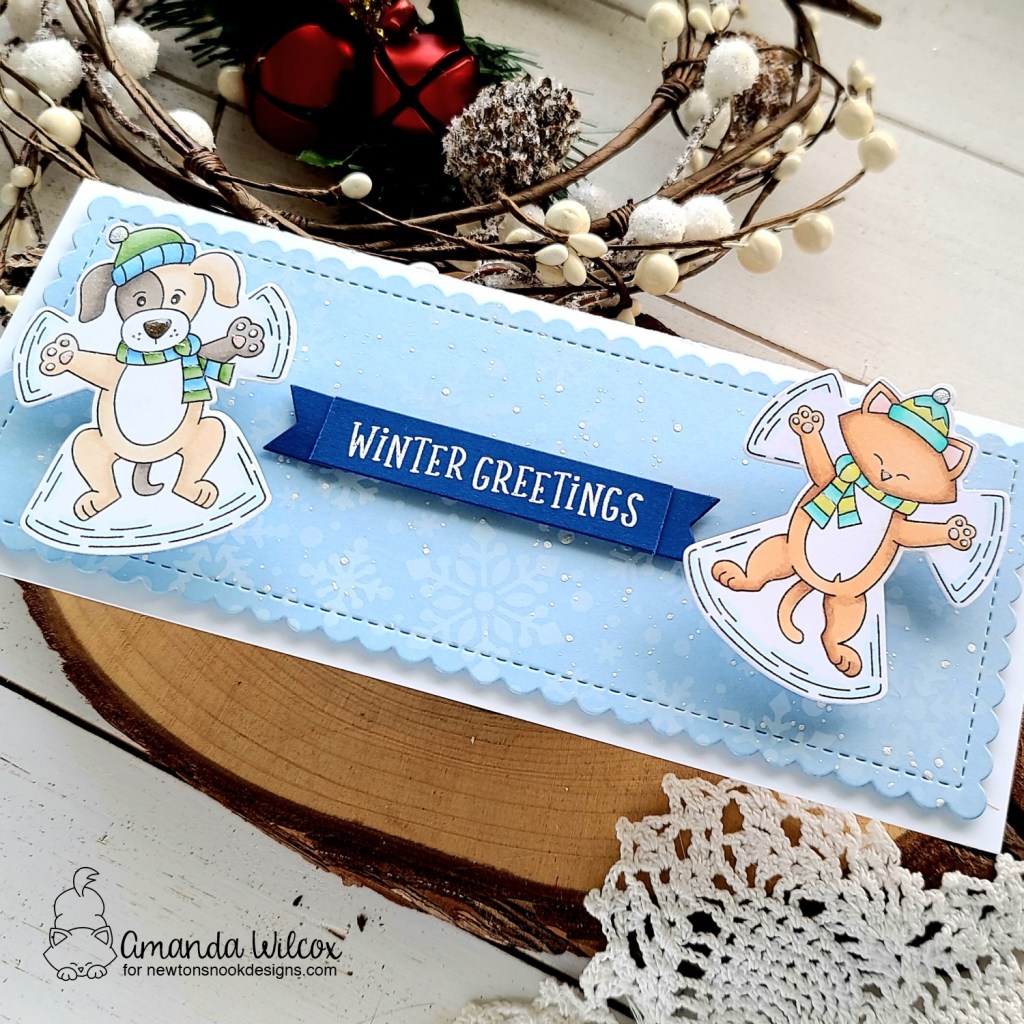
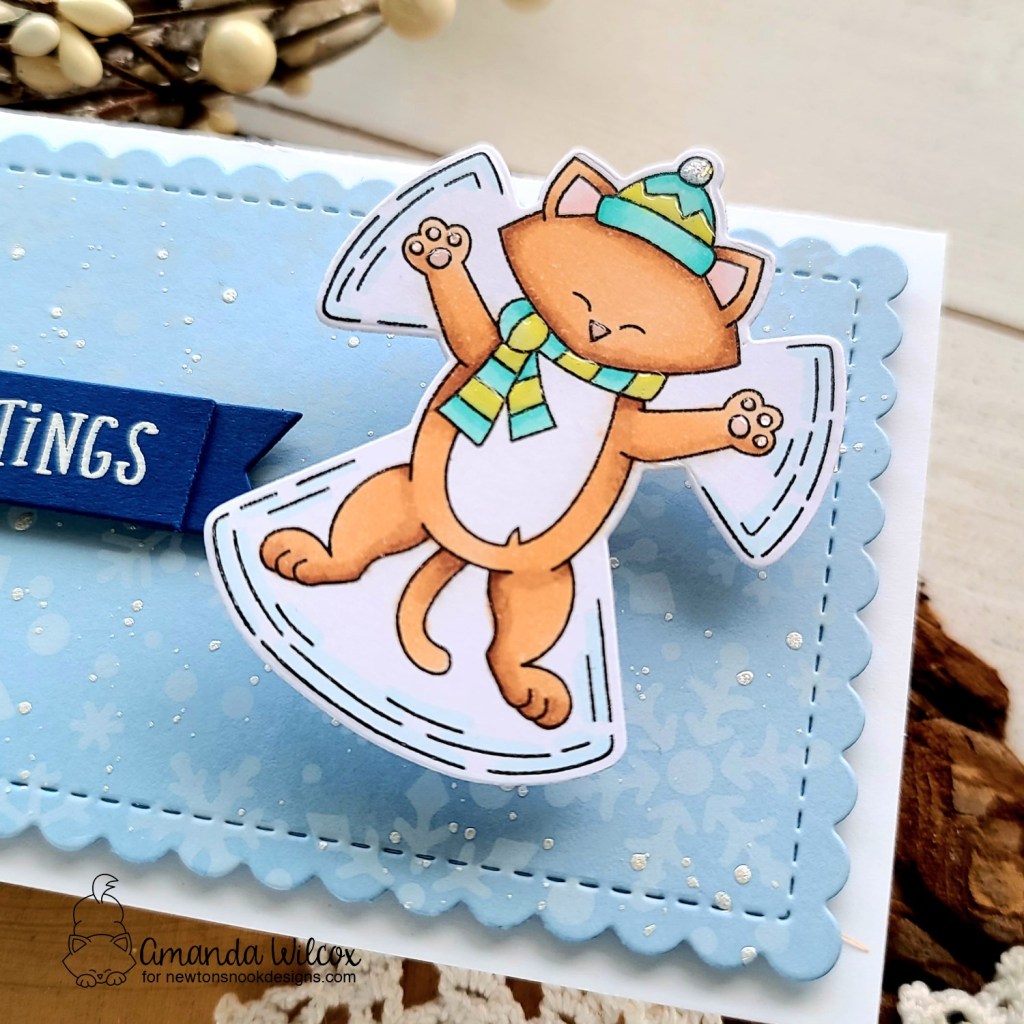
I had so much fun with these sets that I have 2 interactive cards to share with you today. First I have another slimline card featuring both snow angel sets because they are just too perfect together!
To create this card I stamped and colored both images with copic markers. Then I used the coordinating dies to cut them out and adhered action wobblers to the back of them.
I die cut a light blue panel with the scalloped rectangle from Slimline Frames & Portholes and inked it up with white ink and the Snowfall stencil. Then I flicked pearl watercolor all over it for a magical feel. Next, I stamped and heat embossed a sentiment from Snowfall Roundabout on a banner from the Banner Trio dies. I used foam tape to add the background panel to a white card base and foam squares for the banner. Finally, I removed the release paper on the action wobblers and added the sweet Newton and Puppy!
For finishing touches, I added glossy accents to the noses, toe beans and scarves and then unicorn Stickles to the pompoms on their hats.
They are so fun and the wobble totally makes them look like they’re making angels in the snow! It’s absolutely adorable!
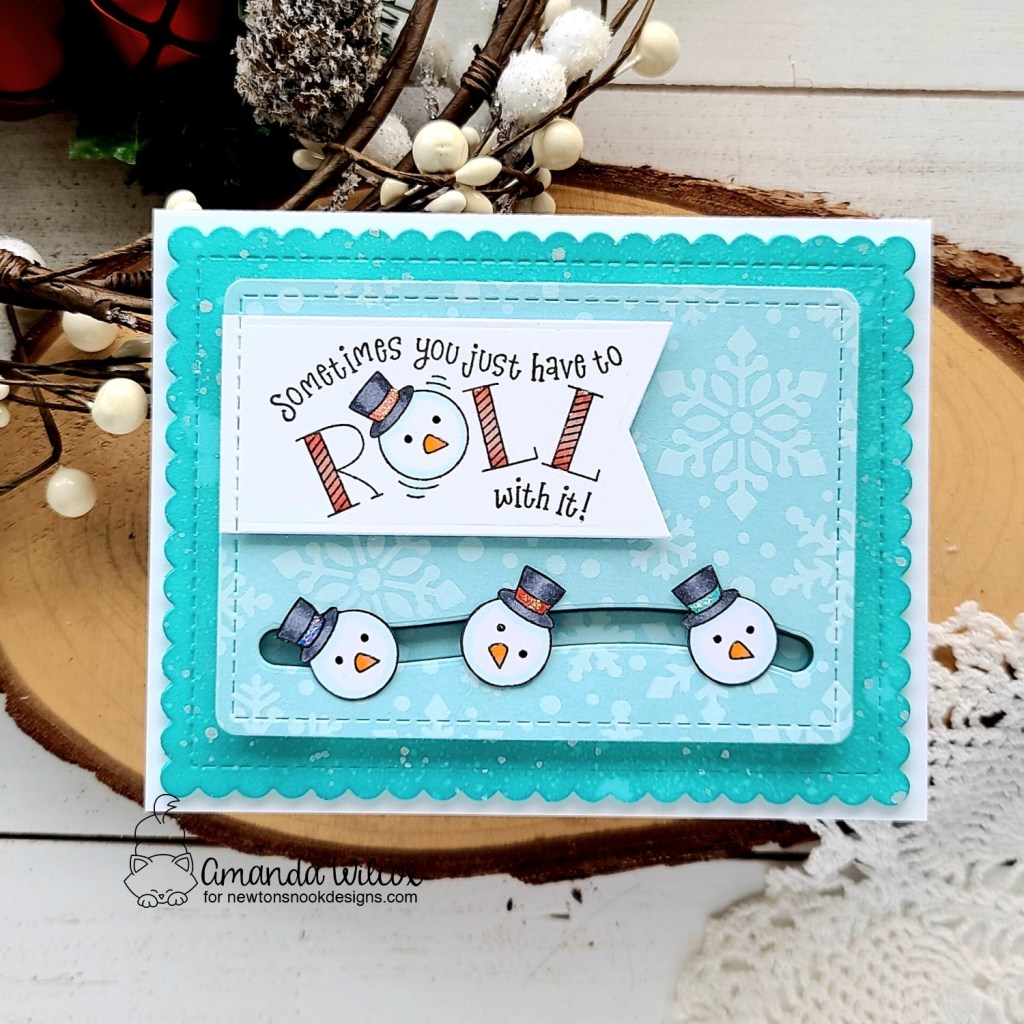
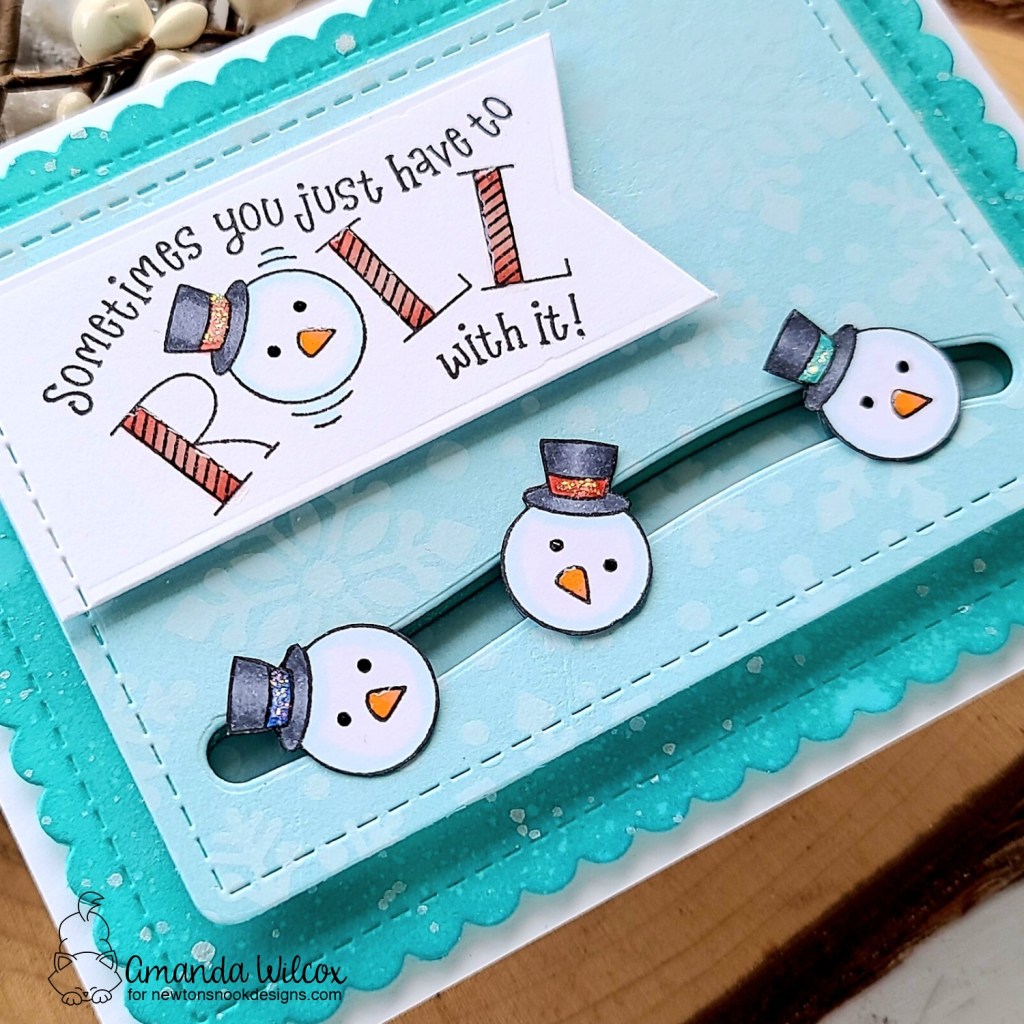
Next, I have a slider card to share because…we’ve got to roll with it. Am I right?!?
For this card, I stamped the full image in the set and colored parts with my copic makers. Then I cut it out with a flag from Frames & Flags. I went ahead and stamped just the snowman head a few more times and colored those as well. Then I fussy cut them out and switched to creating my background and slider mechanism.
The background panel is inked with evergreen bough and mermaid lagoon distress oxide inks and spritzed with water. It’s popped up on a white card base with foam tape. Then I cut a rounded rectangle from the same die set and inked it up with the Snowfall stencil again. I used a slider die to cut a channel and added foam tape to the back, being sure to leave room for the heads to roll from side to side.
I added the snowmen to the slider channel with discs and foam circles so they would roll and not just slide. Then I moved on to finishing touches for this hilarious card!
For that I added unicorn Stickles to the hat bands on all the hats and glossy accents on all the carrot noses. Last, I came in with more glossy accents on the the striped part of the word “roll.”
Would you like to win the “Snow Angel Newton ” or the “Snow Angel Puppy” Stamp Set? We will choose ONE lucky winner for each stamp set!
Here’s how to win: Comment on the NND blog and Design Team blogs (see list below)! The winner will be chosen at random from the collective reveal posts. Make sure to check out each of their blogs and comment for your chance to win. You will not know which blog has been chosen so the more you comment on the better your chances are of winning! You have until Wednesday November 17th at 9pm ET to comment — winners will be announced on the blog post on Thursday, November 18th.
Check out all the awesome Design Team Blogs below to enter:
Hello everyone! I’m back with another entry into the Coffee Loving Cardmakers Fall | Winter Hop! This time I’m playing with super sponsor Reverse Confetti stamps and dies, paired with some fun distress oxide ink blending and that fabulous messy watercolor splatter! You know I love getting inky and making a mess! It’s so fun!
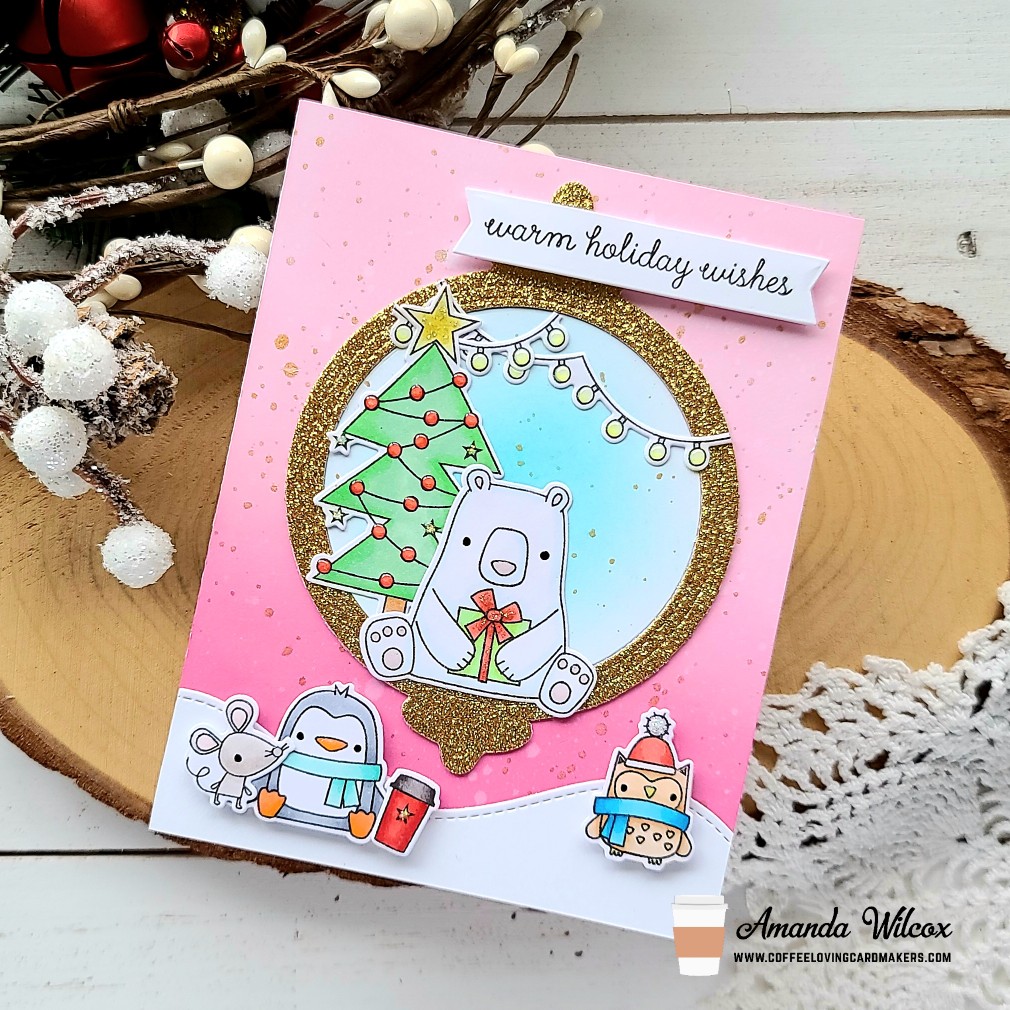
I started my card by stamping out images from Polar Party and Coffee and You from Reverse Confetti and colored them with my copic markers. I used the coordinating dies from each set to cut the images out and played around with different design ideas. Once I decided what I was doing…(In reality this went from a double-sided ornament to a card.) I cut a white panel down to A2 size and inked it up with spun sugar and picked raspberry distress oxide inks. I spritzed the panel with water and flicked gold watercolor on it as well.
Next, I die cut the Ornament Confetti Cut from gold glitter paper and white cardstock. I adhered the frame layers together and put the gold circle cutout away for another day. I took the white circle and inked the center up with Lawn Fawn peacock ink and splattered it with gold watercolor too. I also cut a little white snowy hill for my critters with a Lawn Fawn Stitched Hillside Border.
Moving on to assembly…I adhered the inked panel to a white card base and then added the snowy hill to the bottom of that. I adhered the ornament frame and inset circle above the snowy hill and then started adding my images. The ones in the ornament and adhered directly to the card front with liquid glue and the ones on the hill are popped up with foam squares.
Last, I stamped a sentiment from Polar Party and cut it out with a Pink & Main Large Sentiment Strip die and popped it up with foam squares too.
Moving on to finishing touches, I added glossy accents to all of the lights, beaks, noses and feet. Then I added black glaze pen to the critter’s eyes and some unicorn Stickles to the stars, hat pompom and ribbon on the package.
I’m so happy with how this card turned out! It’s so fun and happy! It will be perfect to share for the Christmas season!
Welcome to day 2 of the Newton’s Nook November release reveals! Today we have a stamp and die set, plus an extra coordinating die set too!
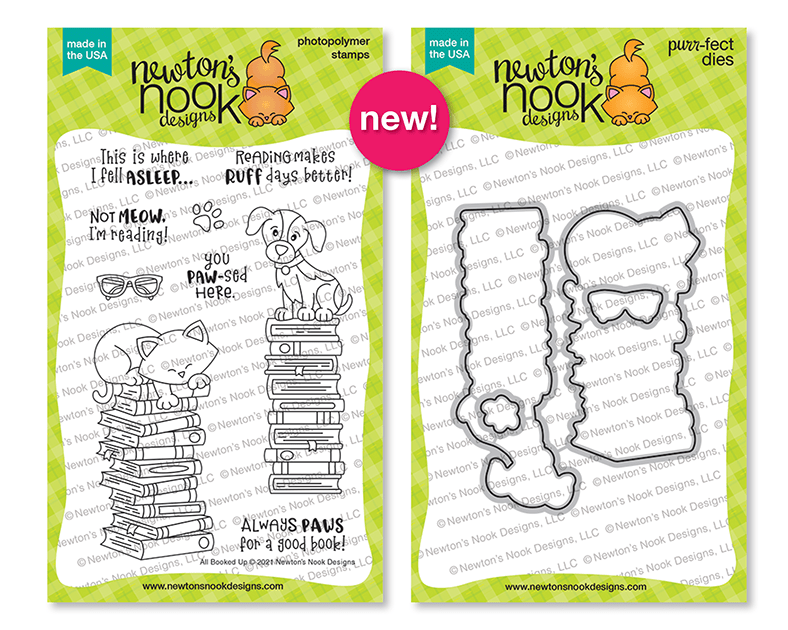
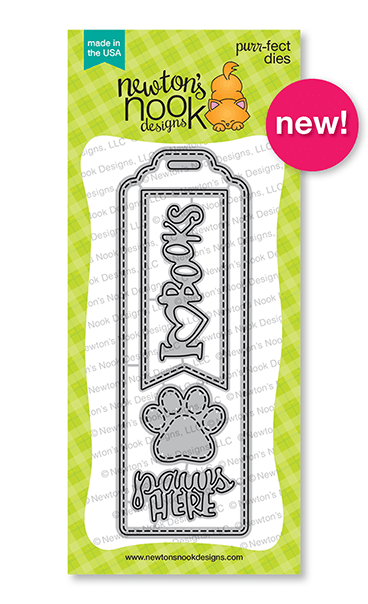
All Booked Up stamps and dies
Bookmark die set
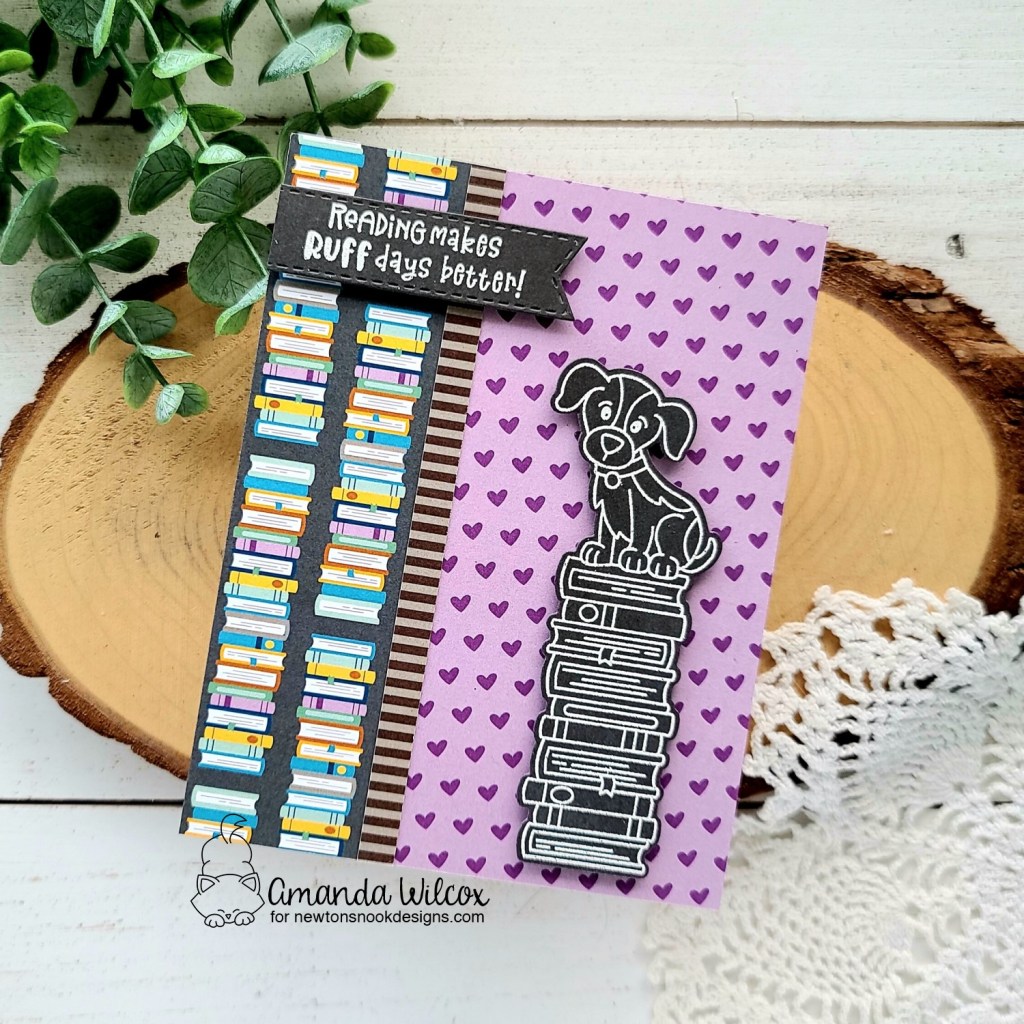
Aren’t these absolutely fantastic!?! The total die hard book lover in me is ridiculously excited for all of the possibilities these sets bring with them! I have a couple of projects to share with you today. Let’s start with this fun card using All Booked Up and the new paper pad from yesterday!
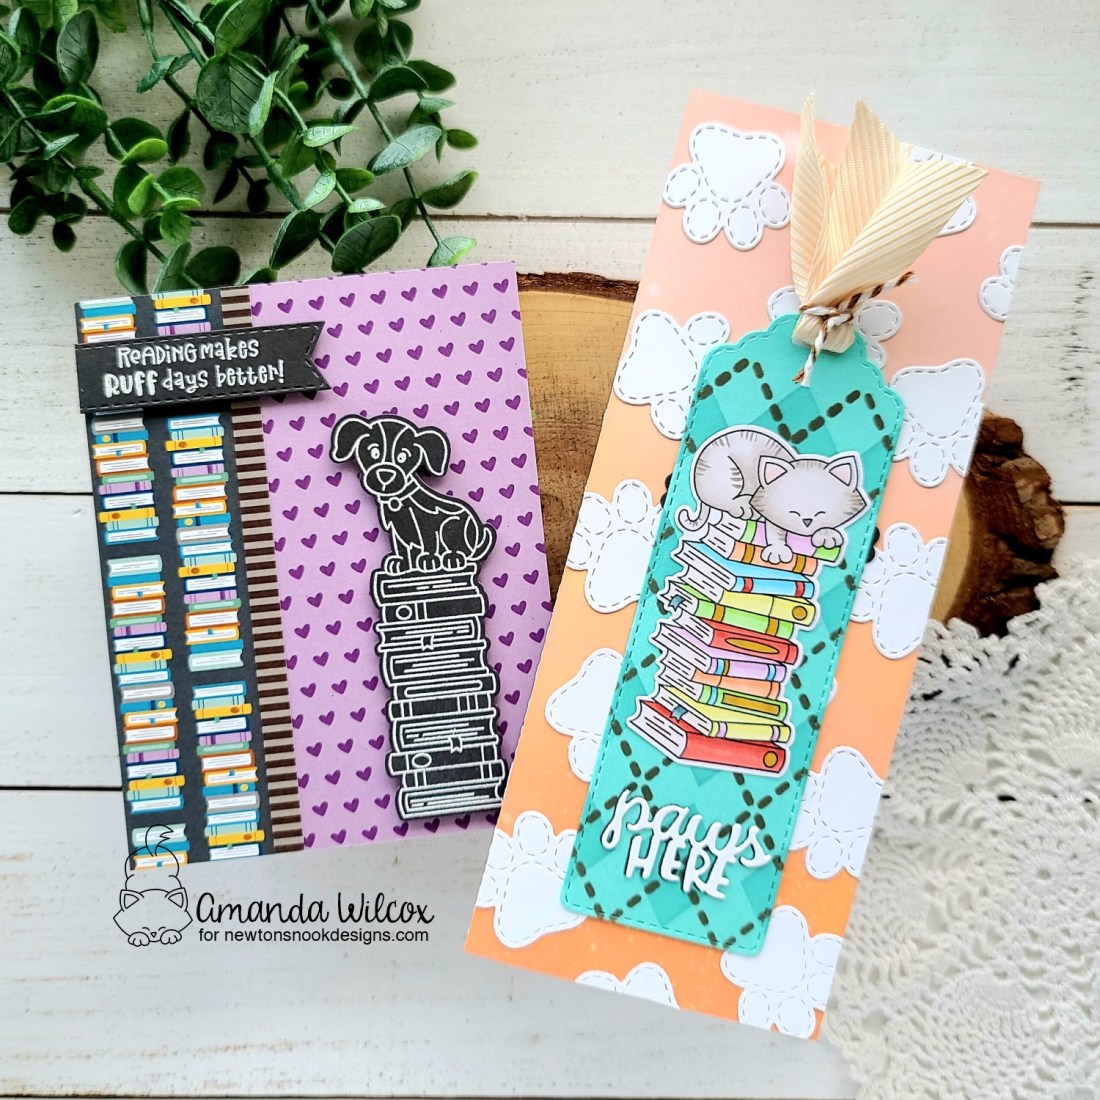
I cut some pieces of the paper pad and adhered them to a white card base. I thought the transition was abrupt so I cut a thin strip of another pattern and adhered it with a foam strip. Then I stamped and heat embossed the puppy image and a sentiment in white on dark gray cardstock. I used the coordinating die for the puppy and a flag from the Frames & Flags die set. I added them with foam squares. I just love the fun chalkboard feel these have!
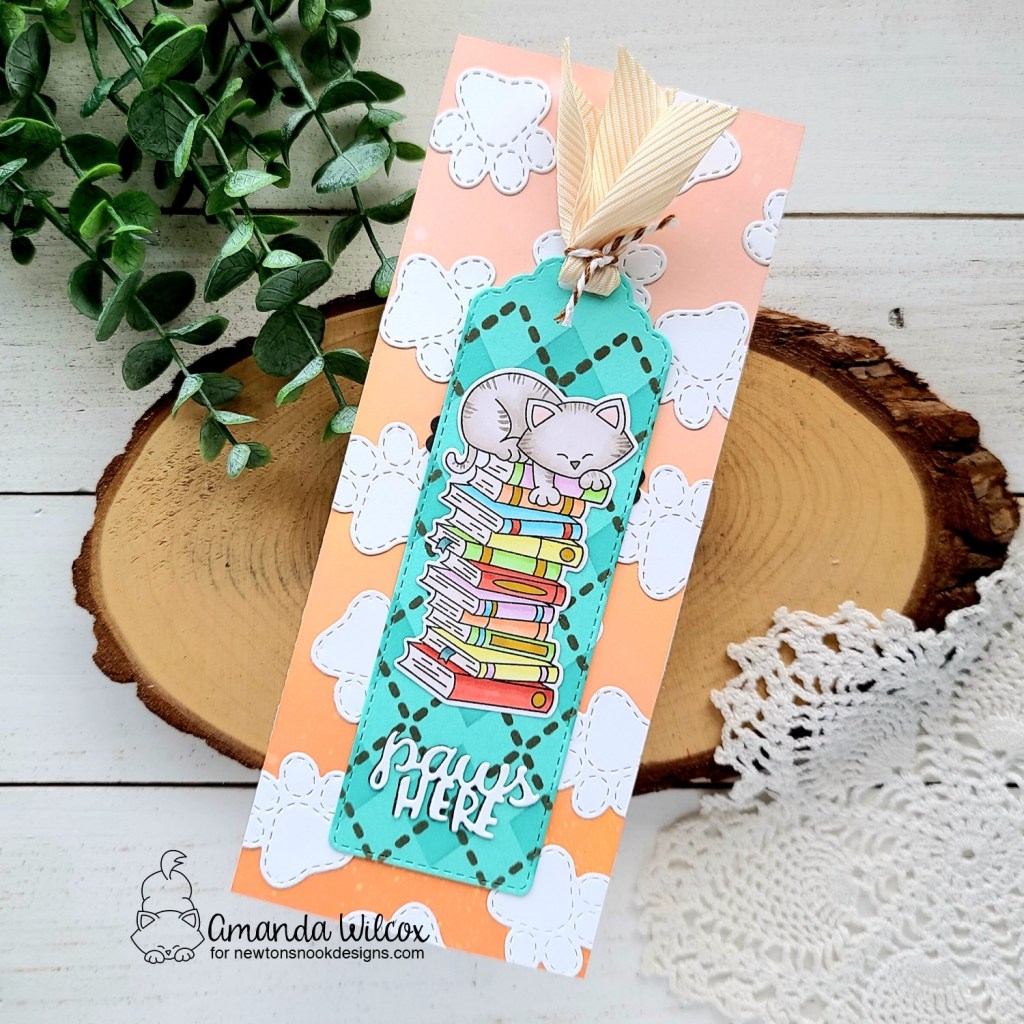
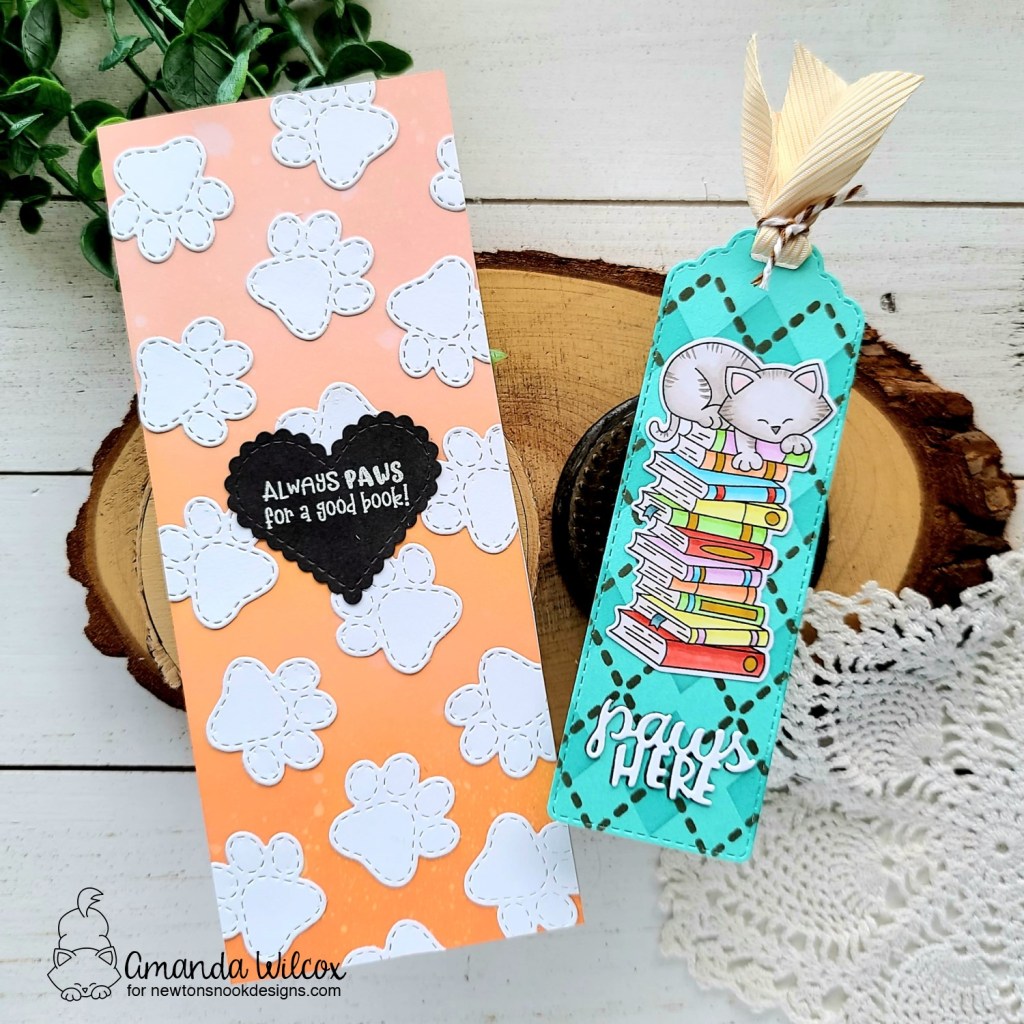
But #1 I couldn’t just use the puppy image, and #2 I couldn’t ignore that fantastic new bookmark die set! So I have another fun card to share with you!
I stamped and coloring the kitty image with my copic markers and used the coordinating dies to cut it out. Then I cut a teal bookmark and inked it up with the Argyle stencil set. I added the kitty image with liquid glue and thought it would be great to add the “paws here” sentiment from the bookmark die set to the bottom. Then I threaded some ribbon through the hole and tied it with baker’s twine.
For my card base, I inked it up with tattered rose, dried marigold and a bit of spiced marmalade distsress oxide ink. I spritzed it with water and adhered it to a slimline card base. Then I cut the paw print from the bookmark die set a bunch of times and adhered them randomly all over the panel. After they were dry, I trimmed the excess off the edge and adhered my bookmark with removable adhesive.
This is really fun but I thought it would be even better if there was another message underneath for the recipient to fun when they remove the bookmark. So I stamped and heat embossed one on a heart from the Heart Frames die set and adhered it in the center of the card.
Would you like to win the “All Booked Up” Stamp Set? This stamp set will be given away to ONE lucky winner!
Here’s how to win: Comment on the NND blog and Design Team blogs (see list below)! The winner will be chosen at random from the collective reveal posts. Make sure to check out each of their blogs and comment for your chance to win. You will not know which blog has been chosen so the more you comment on the better your chances are of winning! You have until Wednesday November 17th at 9pm ET to comment — winners will be announced on the blog post on Thursday, November 18th.
Check out all the awesome Design Team Blogs below to enter:
Hey friends! It’s that time again…reveals for another amazing Newton’s Nook release!!! Today we’re starting with a fantastic stamp and die set along with another paper pad! I’m so excited they are continuing with these amazing paper pads because they are addicting! Let’s take a look!
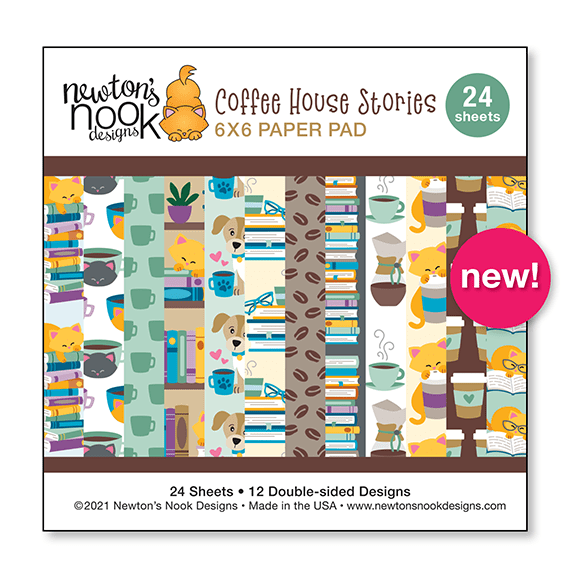
Coffee House Stories Paper Pad
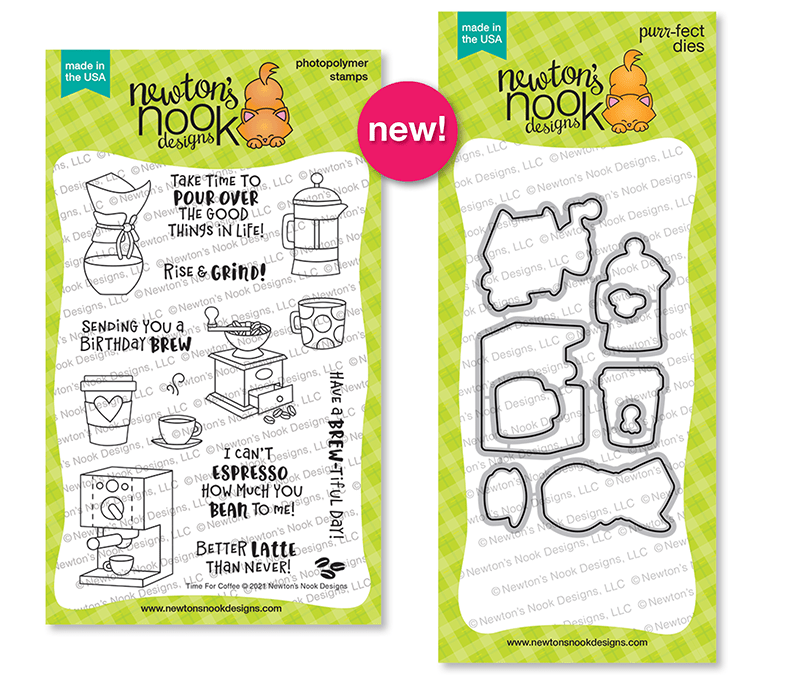
Time for Coffee stamps and dies
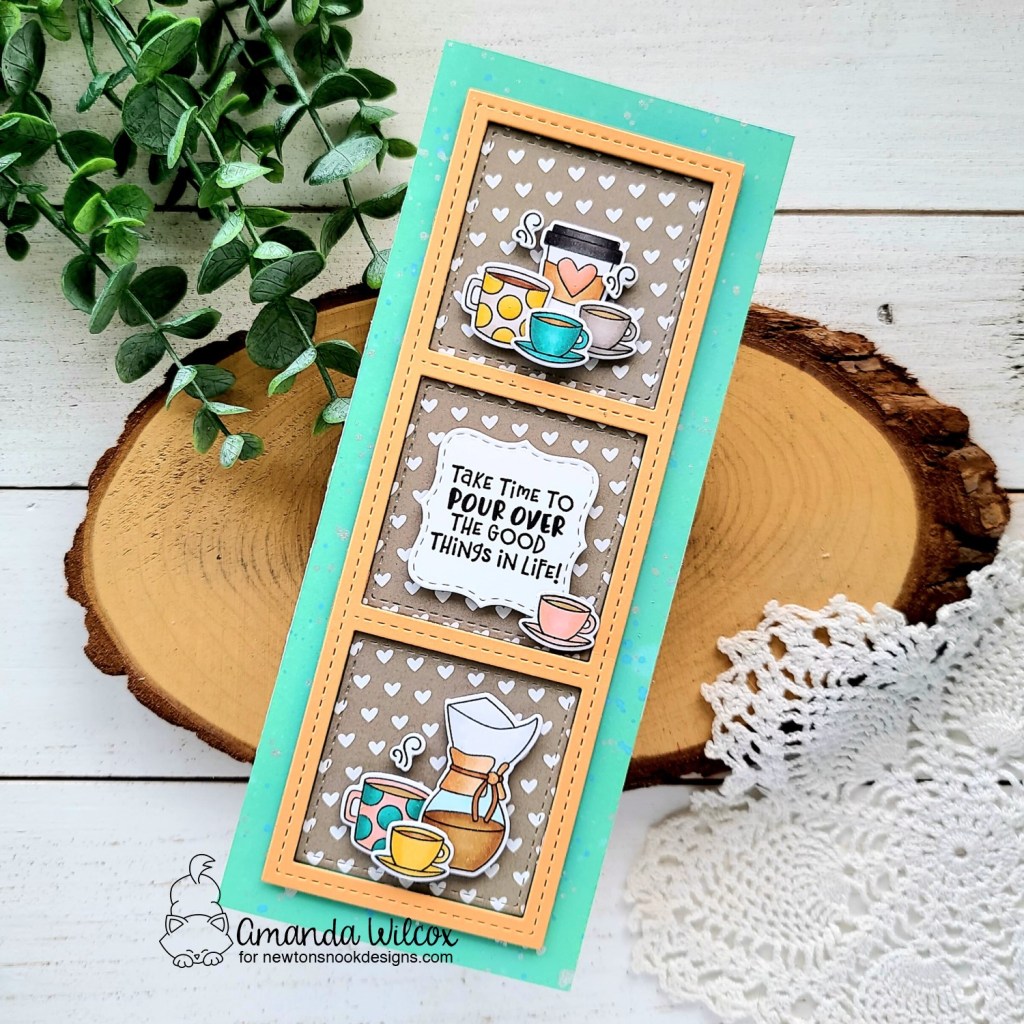
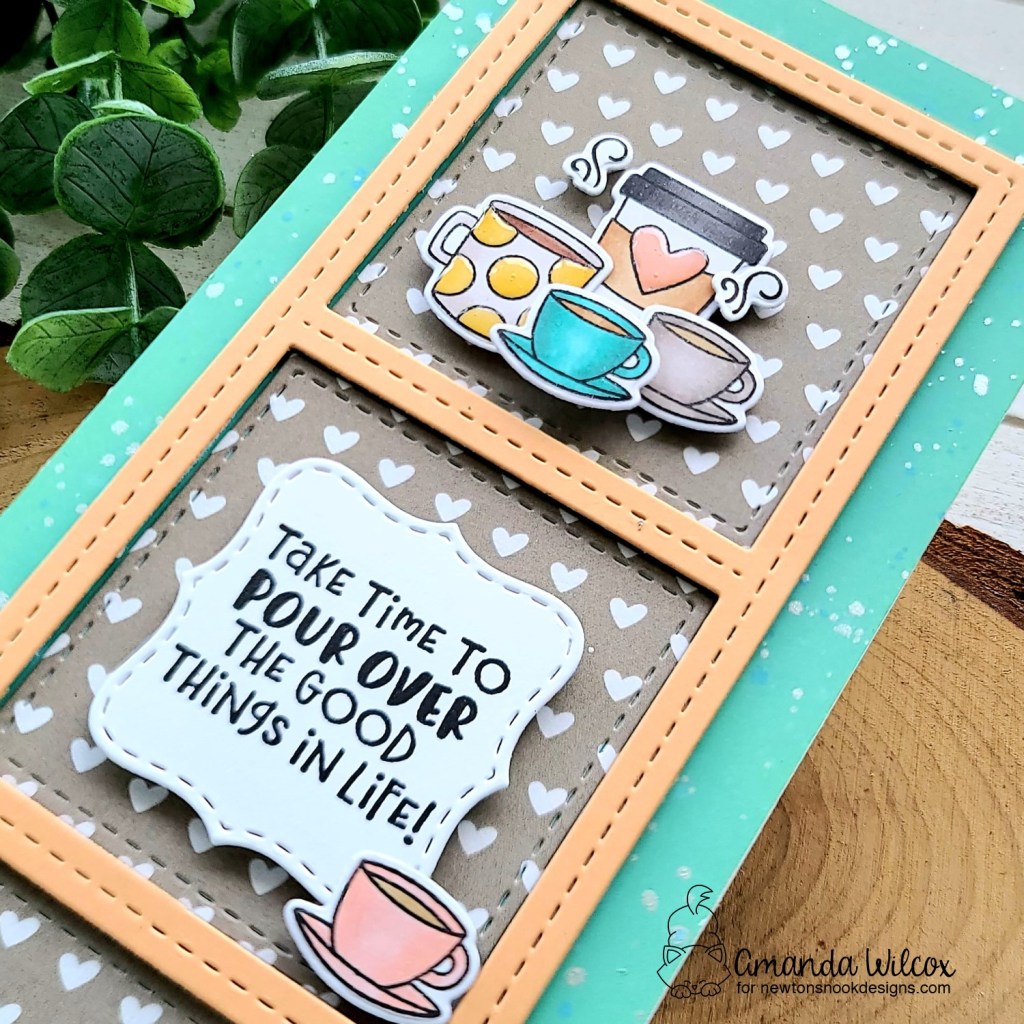
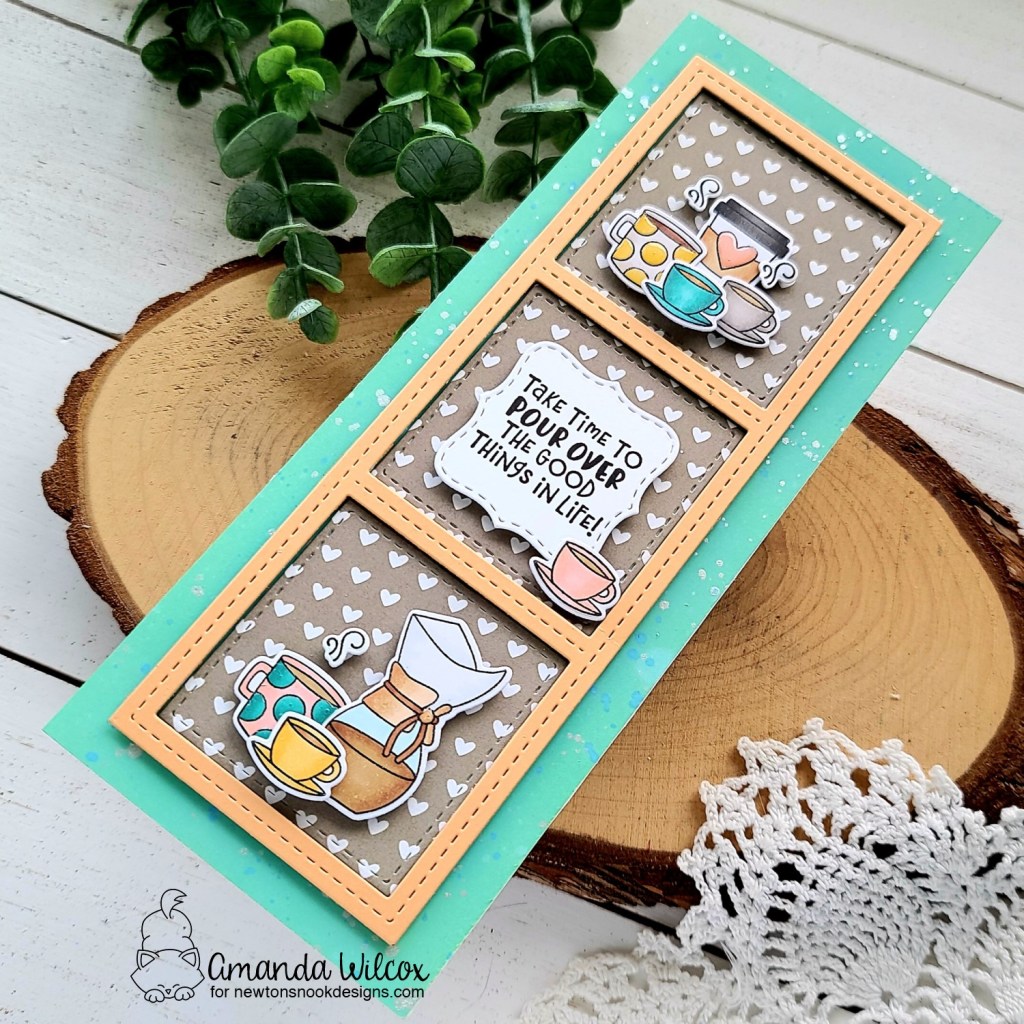
I’m so excited for all of the new caffeinated options these products bring to us! They are fabulous and I had a hard time choosing which ones to use today. So I stamped out a handful and ended up with a fun slimline card to share with you.
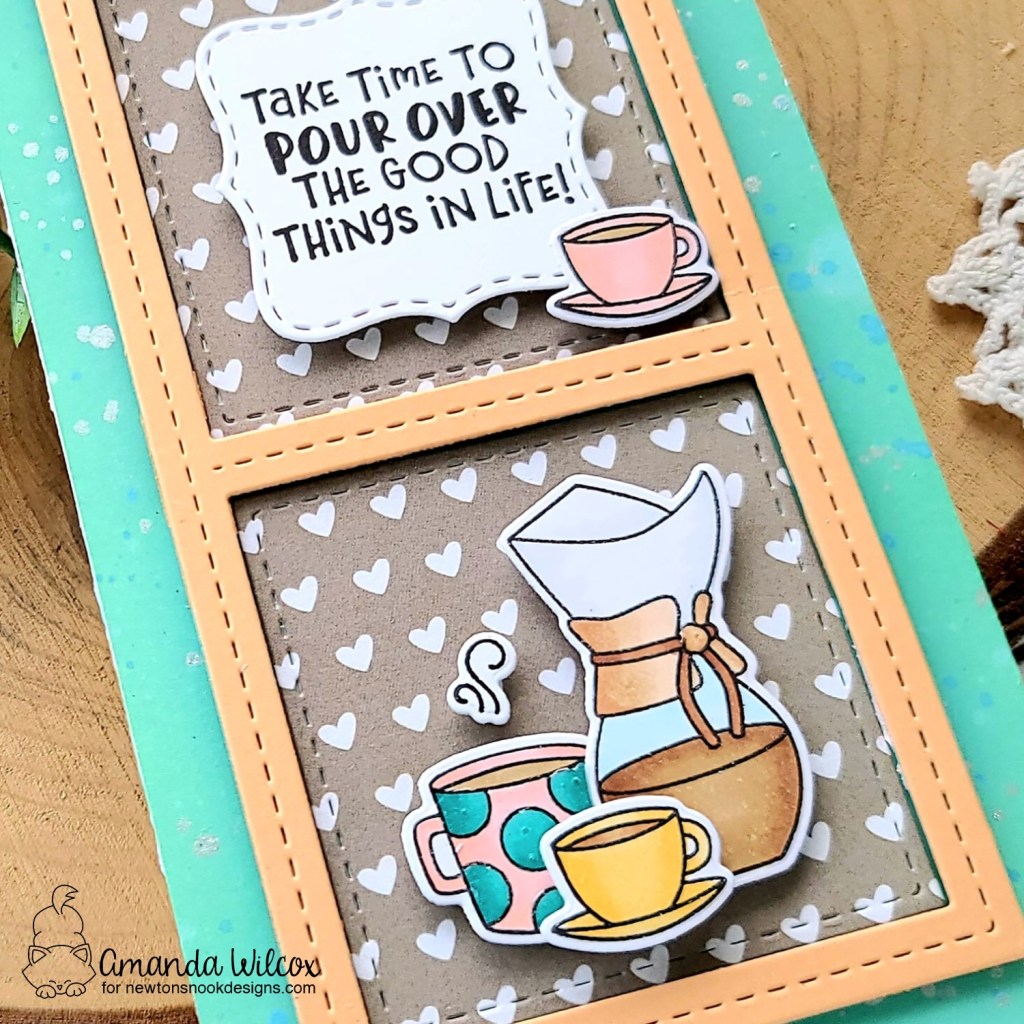
I colored all of the images with copic markers and used the coordinating dies to cut them out. Pulling from the colors I used in the images I die cut the Slimline Frames and Windows frame die from a peach cardstock. Then I inked up a slimline panel with distress oxides in cracked pistachio and mermaid lagoon. Then I spritzed the panel with water and flicked some watered down mermaid lagoon around the edge. For a little shimmer, I also splattered pearl watercolor around it.
I wanted something different for the background of the windows so I immediately went flipping through the new paper pad. Aren’t these neutral hearts just the sweetest?!? I love them! So I cut 3 windows with that paper and started assembling everything.
The inked panel is adhered to a card base with liquid glue and the frame is popped up with foam strips. Then I used the same liquid glue to adhere the heart panels inside the window openings. Next, I used foam squares to adhere all of my images in the top and bottom windows.
I die cut a label from the Slimline Frames & Windows die set and stamped a sentiment on it before popping it up in the center window. Then I added one more small coffee cup to that window as well.
For finishing touches I went back and stamped some steam images and die cut them, popping them up above a few of the different coffee cups in the design. Then I added glossy accents to various parts of the images like polka dots on mugs, the bead on the pour over carafe and the heart on the to-go cup.
Would you like to win the “Time for Coffee” Stamp Set? This stamp set will be given away to ONE lucky winner!
Here’s how to win: Comment on the NND blog and Design Team blogs (see list below)! The winner will be chosen at random from the collective reveal posts. Make sure to check out each of their blogs and comment for your chance to win. You will not know which blog has been chosen so the more you comment on the better your chances are of winning! You have until Wednesday November 17th at 9pm ET to comment — winners will be announced on the blog post on Thursday, November 18th.
Check out all the awesome Design Team Blogs below to enter:
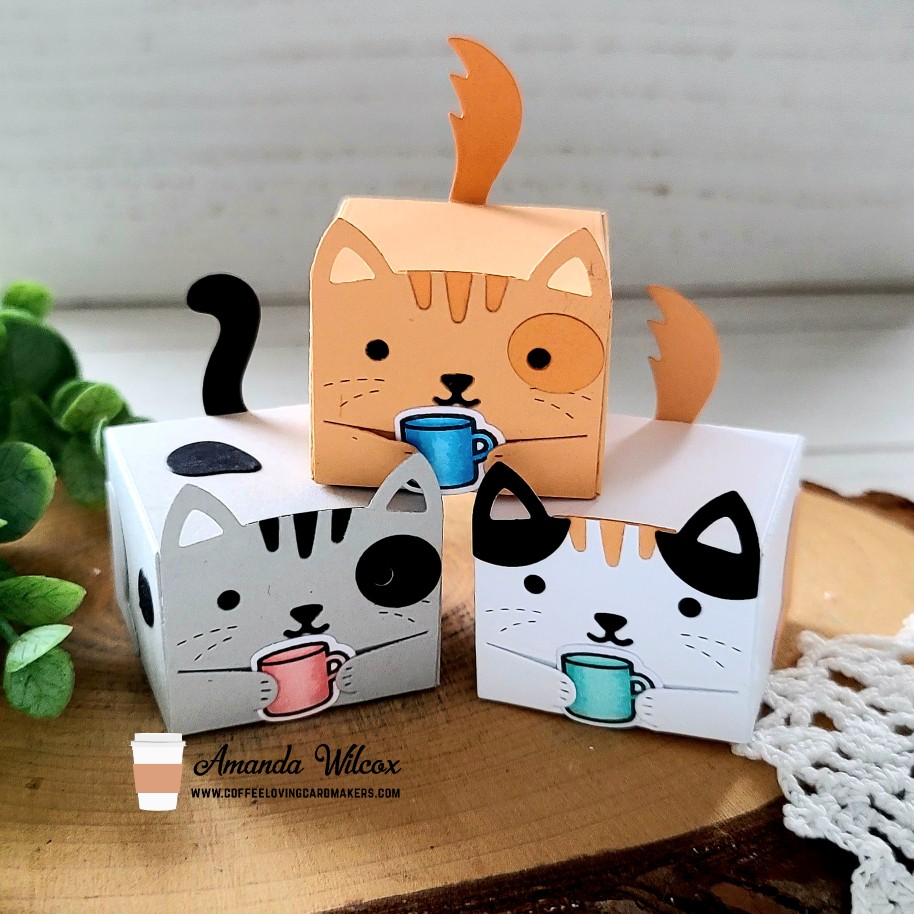
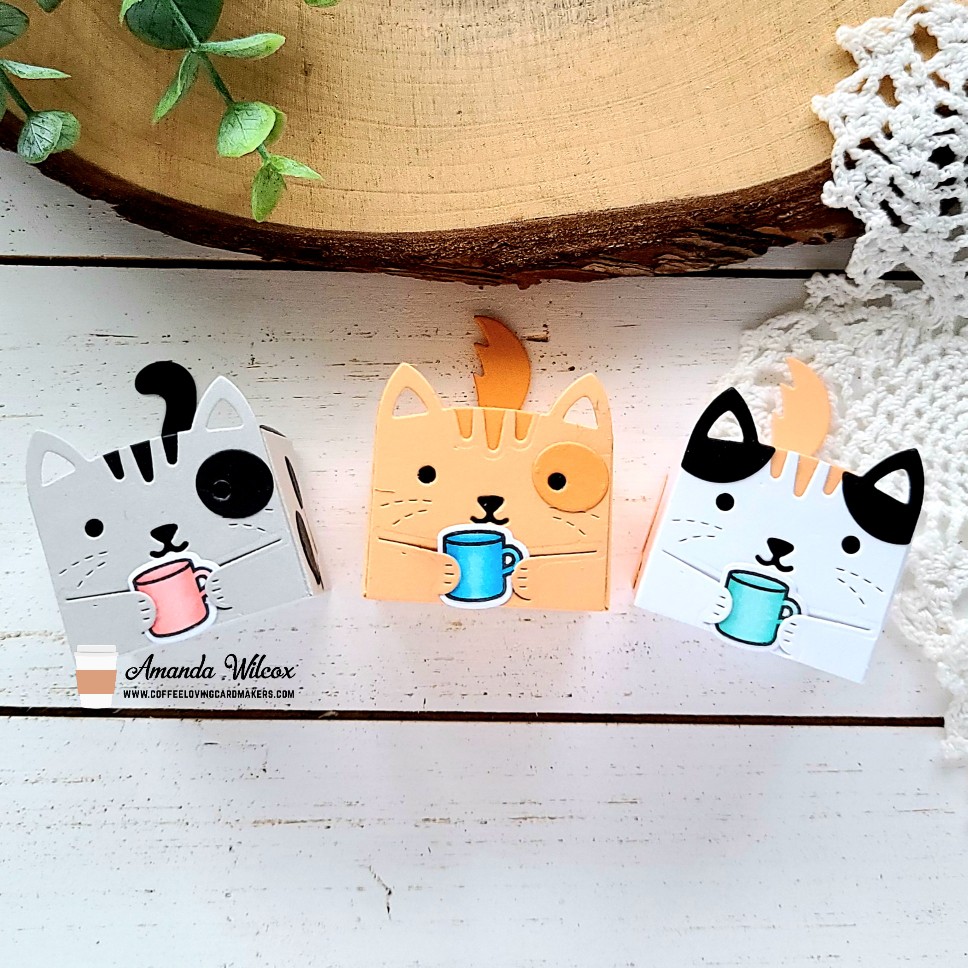
Hi there! I’m back today with a fun project for the Coffee Loving Cardmakers Fall | Winter Hop! Instead of a card today, I have a set of treat boxes that I made with my all-time favorite die set – the Lawn Fawn Tiny Gift Box! This box is fun to decorate on its own but when you add the mountains of add-on die sets Lawn Fawn has created, give me all the things and let me make boxes for decades!!! Seriously, I love it all! So today I have a set of kitties to share with you.
Aren’t these just the most adorable things you’ve ever seen?!? I know you agree! Here’s a link to the Lawn Fawn video on how to create the boxes with the cat add on options. I won’t bore you with those details.
After creating my kitty boxes, I went digging for a coffee mug for them to hold. I found the one in the Den Sweet Den set and it is absolutely PERFECT for this! I stamped and colored 3 of them, used the coordinating dies to cut them out and slid them in the kitty’s paws for each box.
Filling for these boxes today is a folded up Starbucks Via packet and chocolate covered espresso beans! YUM!!! Super excited to share these and also can’t wait to create more with the other critter add ons too!
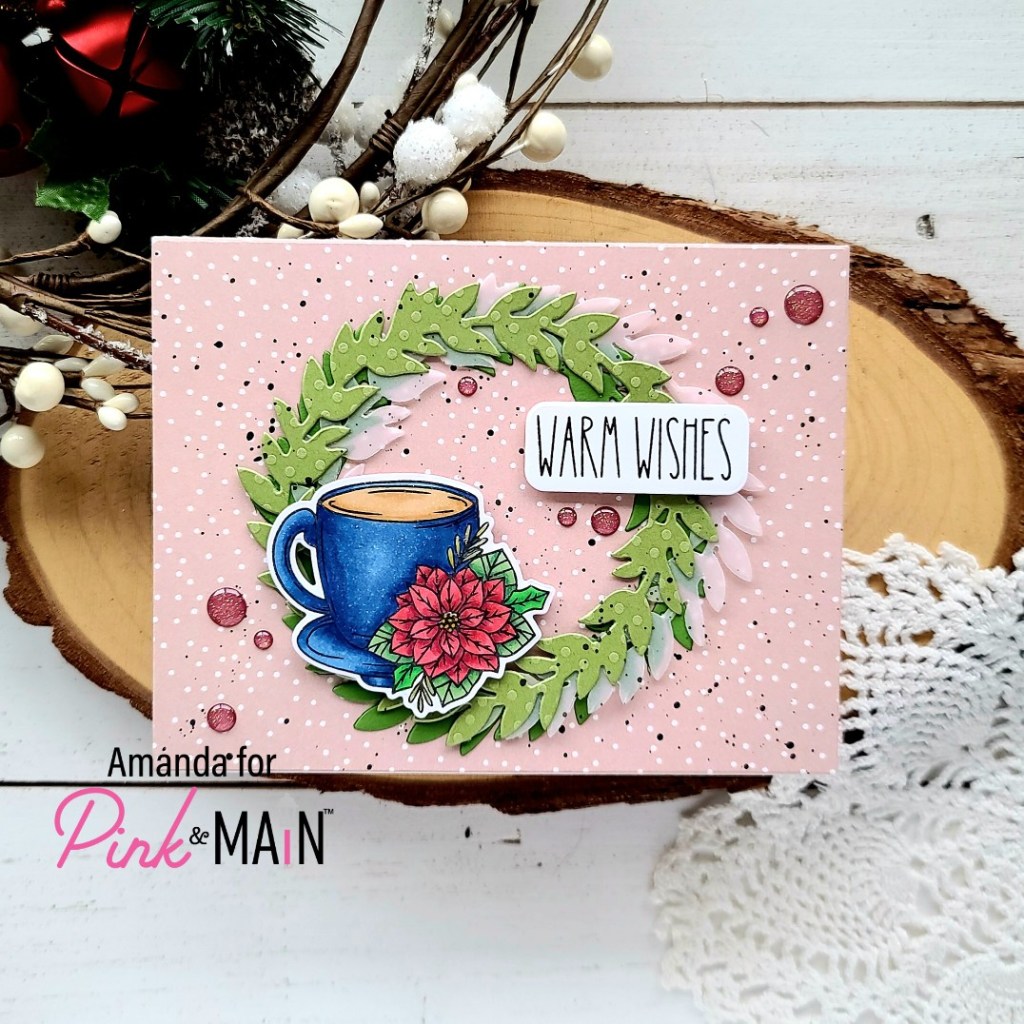
Hi again! I’m over on the Pink & Main blog today, celebrating the start of the Coffee Loving Cardmakers hop, which they are also a sponsor of! I created a fun Christmas card and wanted to share it with you here too!
I started by stamping the image from Holiday Mugs and colored it with my copic markers. Then I used the coordinating die to cut it out. This set also has a die for the sentiment so I stamped and cut it out too. Then I cut 3 wreaths using the Wreath Base die set – 2 from green cardstock and one from vellum.
For my background, I sifted through my amazing stash of Pink & Main patterned paper and landed on this cocoa colored dotted paper from the Pumpkin Season stack. I cut it out with the largest layered rectangle die and adhered it to a white card base with my EZ Squeeze liquid glue. Then I used the same glue to adhere the wreath layers together and down to the card base. For a little extra texture I flicked black acrylic paint across the design before popping the image and sentiment up with foam squares.
For finishing touches, I added glossy accents to the center of the poinsettia and some of the foliage. Then I stuck down a scattering of the red dots from the Rainbow Glitter enamel dots pack.
Are you playing along with the Coffee Loving Cardmakers Fall | Winter Hop? I hope so! It’s so much fun and there are lots of prizes to win!