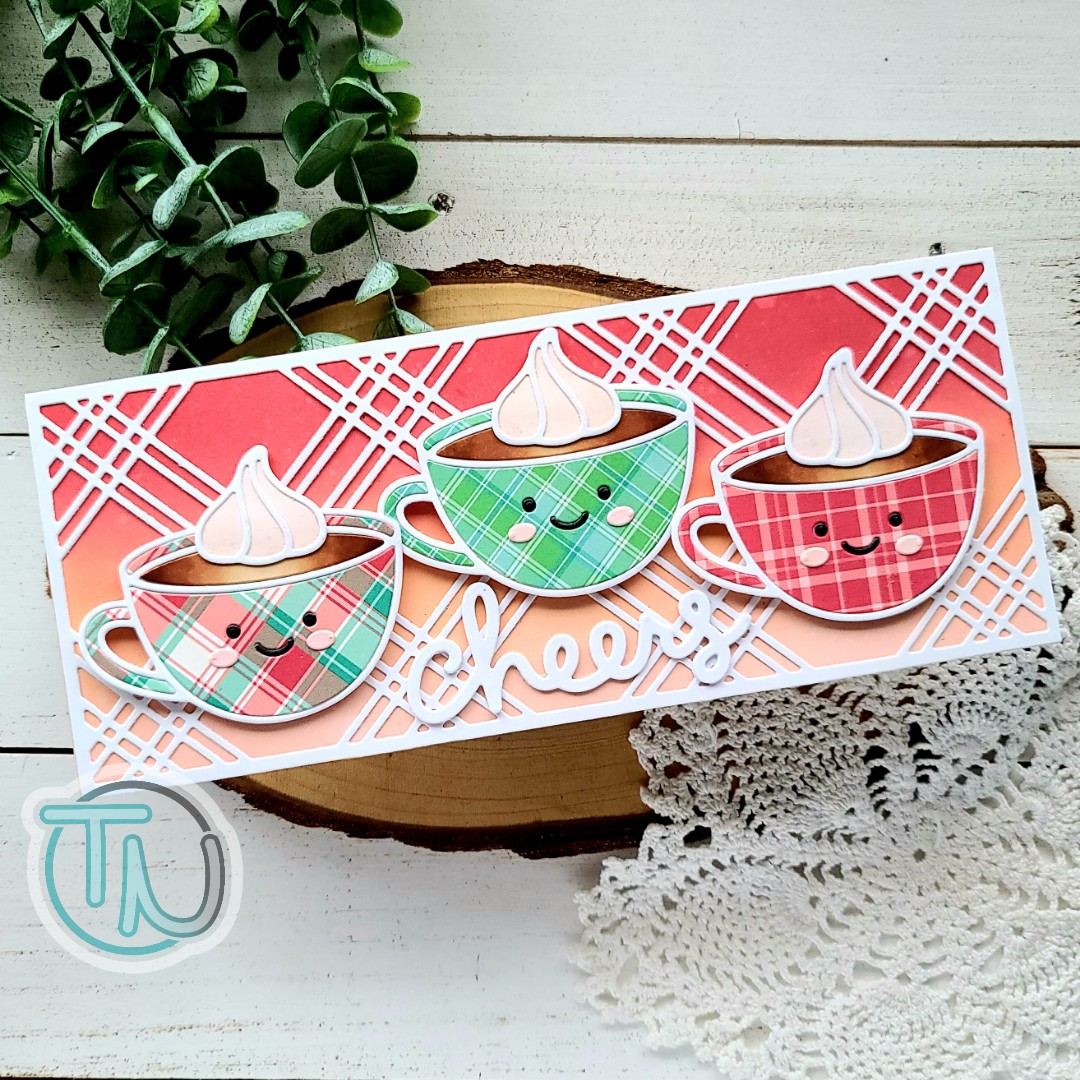
Hey friends! I have an adorable slimline card to share with you today. I snagged the new Lawn Fawn Lovely Latte die set and had some fun creating different cups with my stash of Lawn Fawn papers.
I cut all the pieces from the Lawn Fawn Perfectly Plaid Christmas paper pad and white cardstock. I used copic markers to color the coffee part of my cups – E35, E34 and E31. This seems to be my go-to combo for coffee most of the time. For the whipped cream I used E000 and E0000. I used liquid glue and adhered all the pieces together onto the base layer.
To create the background I inked up distress oxides in candied apple, dried marigold and tattered rose. I spritzed it with water and adhered it to a white card base. Then I cut the awesome Pink & Main Plaid Slimline die from white cardstock and layered it on top. I added foam squares to my mugs and popped them in place.
Next, I die cut the Lawn Fawn Scripty Cheers sentiment from white cardstock 3 times and glued them together. Then I glued the stack to the card front below the cups. For finishing touches I came in with a Wink of Stella glitter brush pen on the sentiment and whipped cream. Such a fun little touch of shimmer.
I am loving this new line of dies Lawn Fawn has come out with. I hope a few of the other iconic characters get added to the mix too!
Hey crafty friends! I am super excited to have one more post as part of my guest designer gig with Mama Elephant! Today I’m featured with some of the other amazing guest designers over on the Mama Elephant blog!
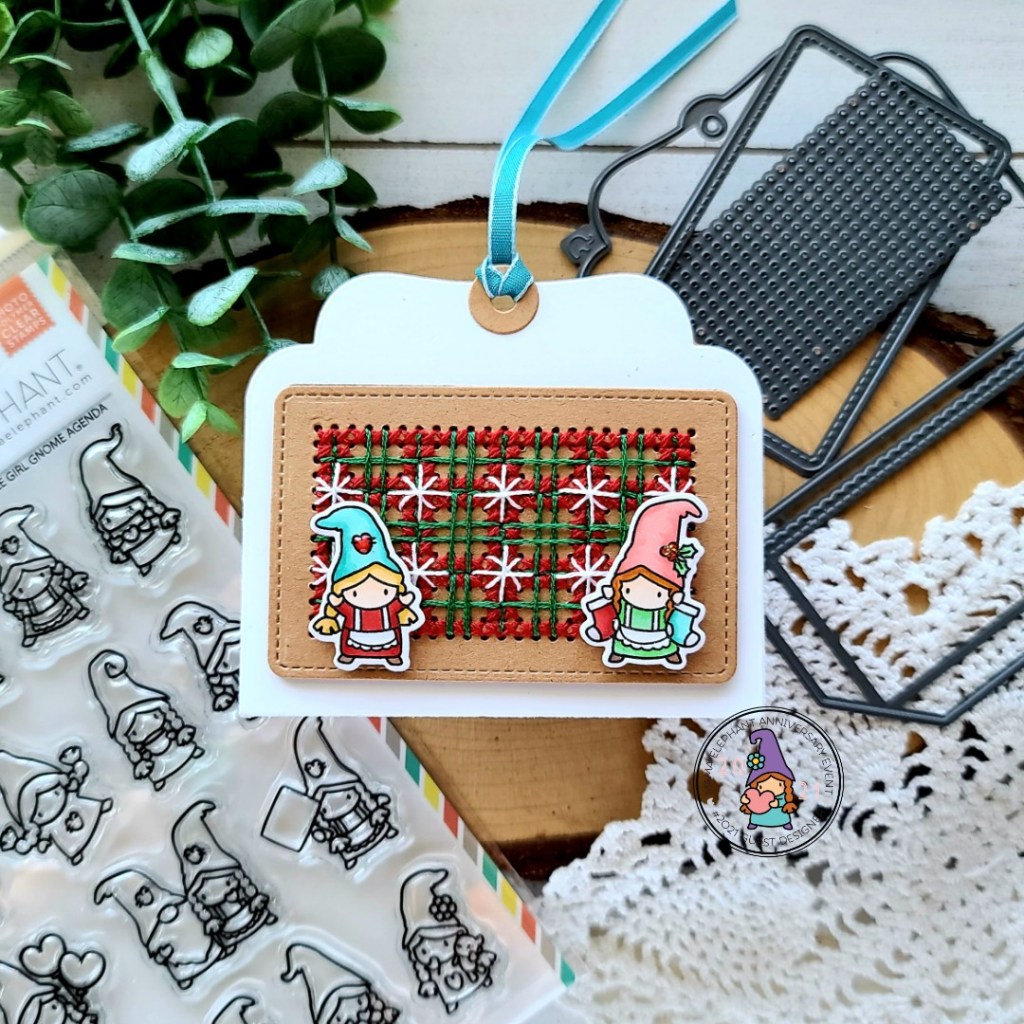
I created a gift card pocket featuring the Little Girl Gnome Agenda cuties, Easy XMas Greetings and Gift Card Pocket dies.
I started by cutting the card shape and the stitching holes. Then I sat for a while an stitched up a fun pattern. Next, I came back and stamped some of the cute gnomes. I colored them with my copic markers and cut them out with the coordinating dies.
Next, I cut the main card holder shape from white cardstock and inked up a red shadow behind the area I wanted to add my gnomes. I assembled the card holder and popped the gnomes up with foam squares.
I cut an extra card shape from kraft cardstock so I could write a message when I was ready to use this project. I stamped and heat embossed Easy XMas Greetings and cut them out. I chose one from the trio and popped it up with a foam strip.
Flipping the card holder back over, I adhered the stitched panel with scrappy tape and popped my additional gnomes up with foam squares. I adhered the hole reinforcer on both sides and threaded some ribbon from my stash through the hole.
For finishing touches I added glossy accents and unicorn stickles to all of the gnomes on both sides. I love the added shine and bling that these give!
I’m so excited about this cute project! I can’t wait to use it at Christmas and hopefully make more before then!
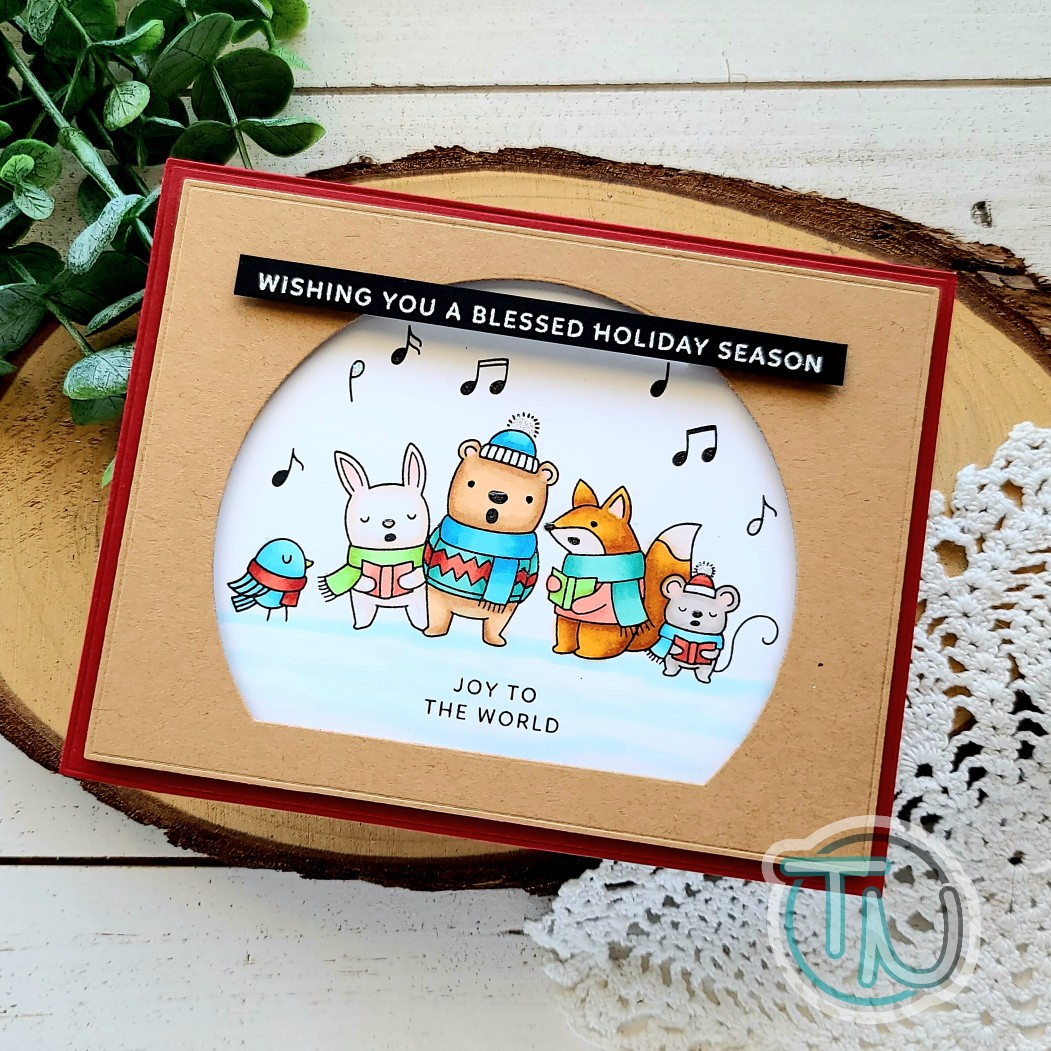
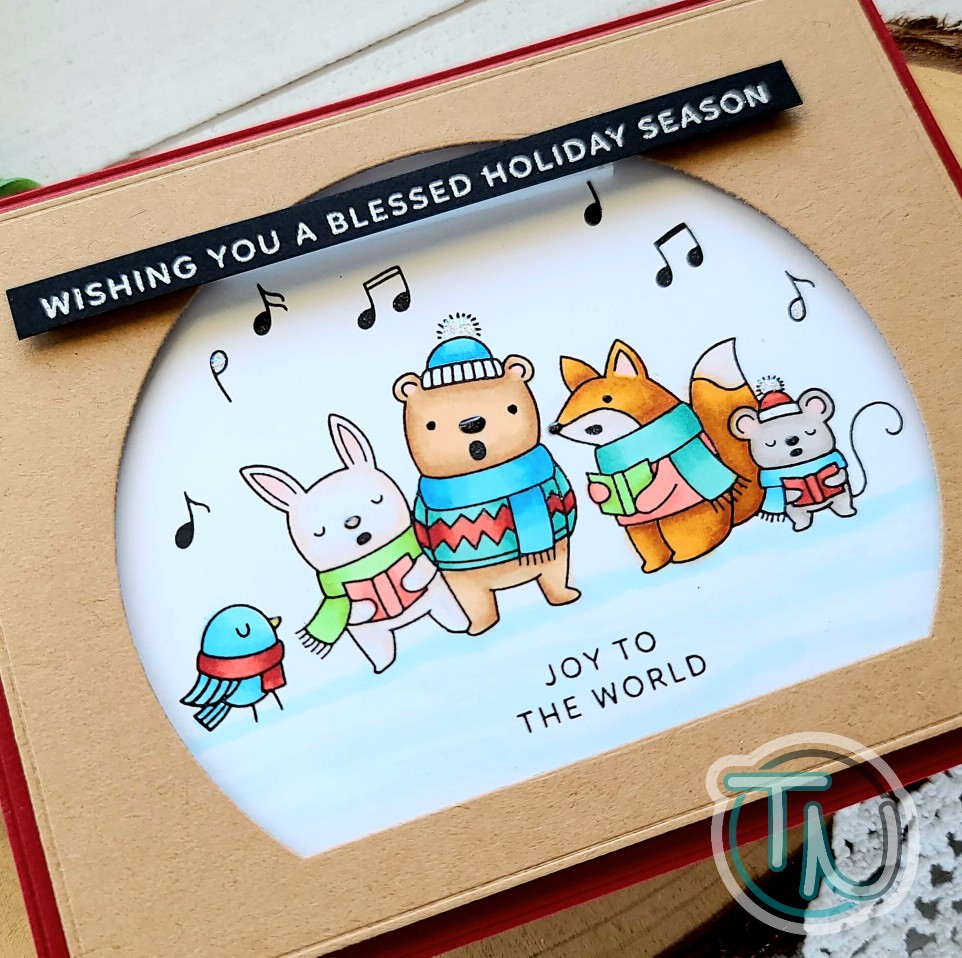
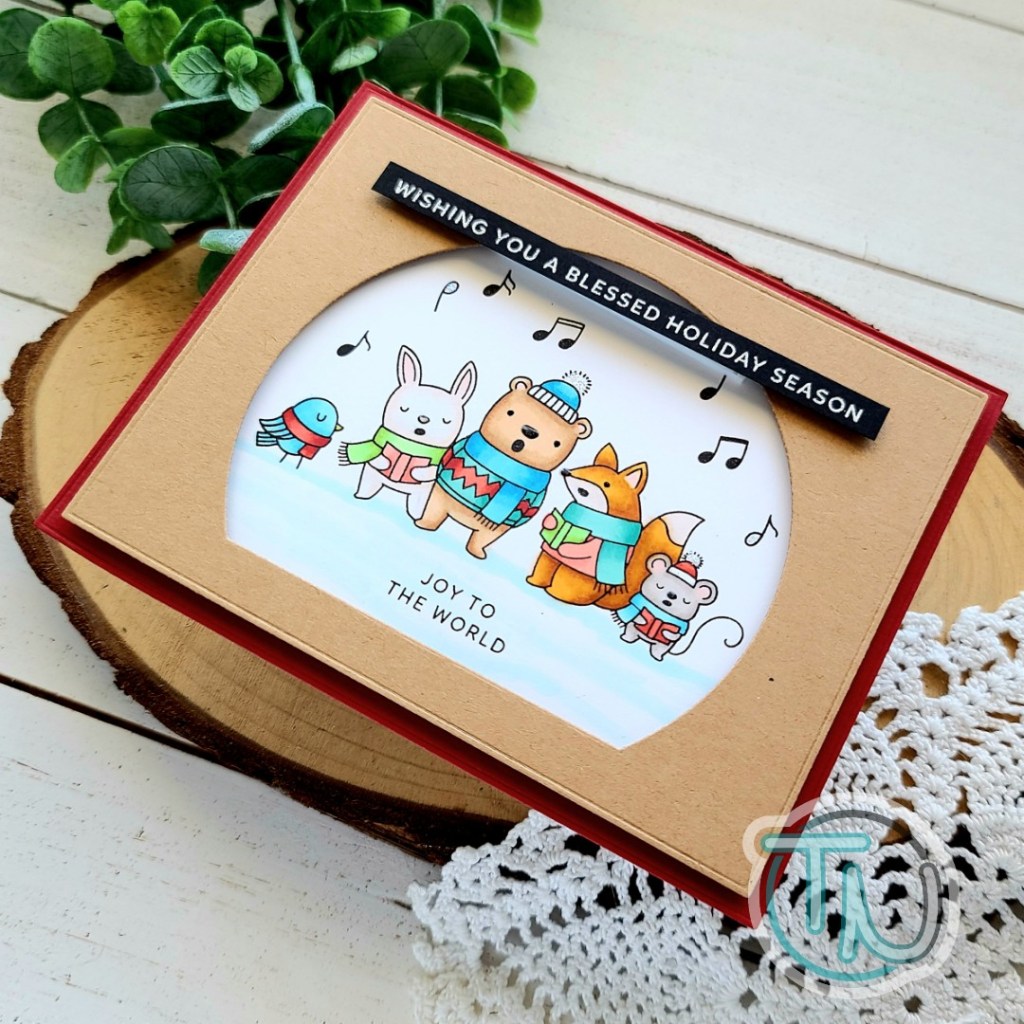
Welcome everyone! Thanks for stopping by today. I’m sharing a clean and simple Christmas card featuring the Caroling Critters from Pretty Pink Posh. I love this set but with no coordinating dies I decided to come up with a window style design for them.
I stamped the image on white cardstock and colored it with my copic markers. Then I used the Trinity Stamps Embossed Edge Rectangle dies to cut a panel from kraft cardstock. For my window opening I used an old MFT arched stax set. I lined the kraft with foam strips and popped it on the scene panel.
I stamped and heat embossed a sentiment from the Joy stamp set and trimmed it into a strip. I added some foam tape to the back of the, doubling the layer in the center so it would lay nicely and placed it over the scene.
I cut another embossed rectangle from red cardstock and adhered it to a white card base and then adhered my scene panel to that.
Moving on to finishing touches, I just added some glossy accents to critter noses and unicorn Stickles to the hat pom poms and open music notes.
I found that this layout idea would work great for me to stamp multiple scenes out and color on the go. Just an idea since it might work for you too.
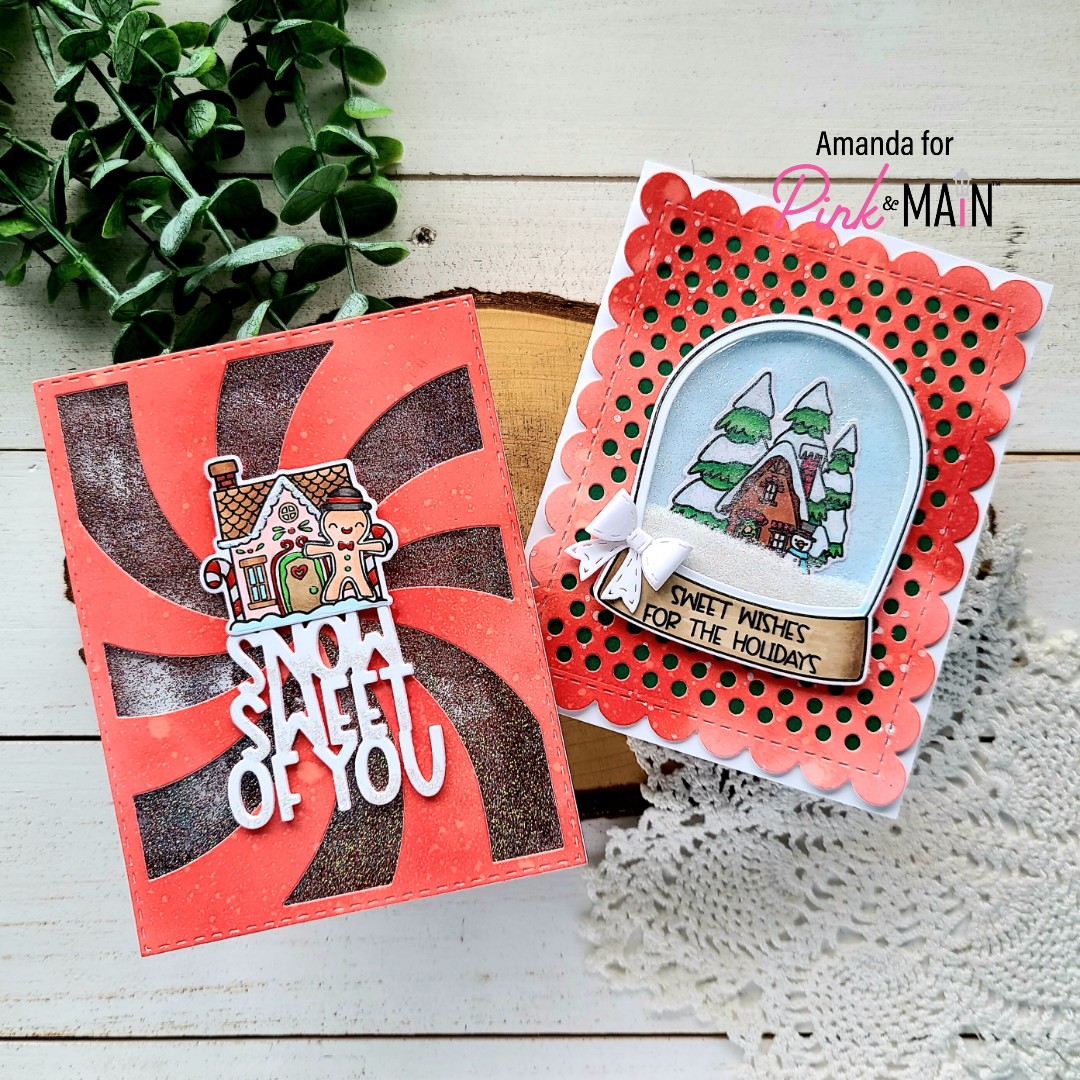
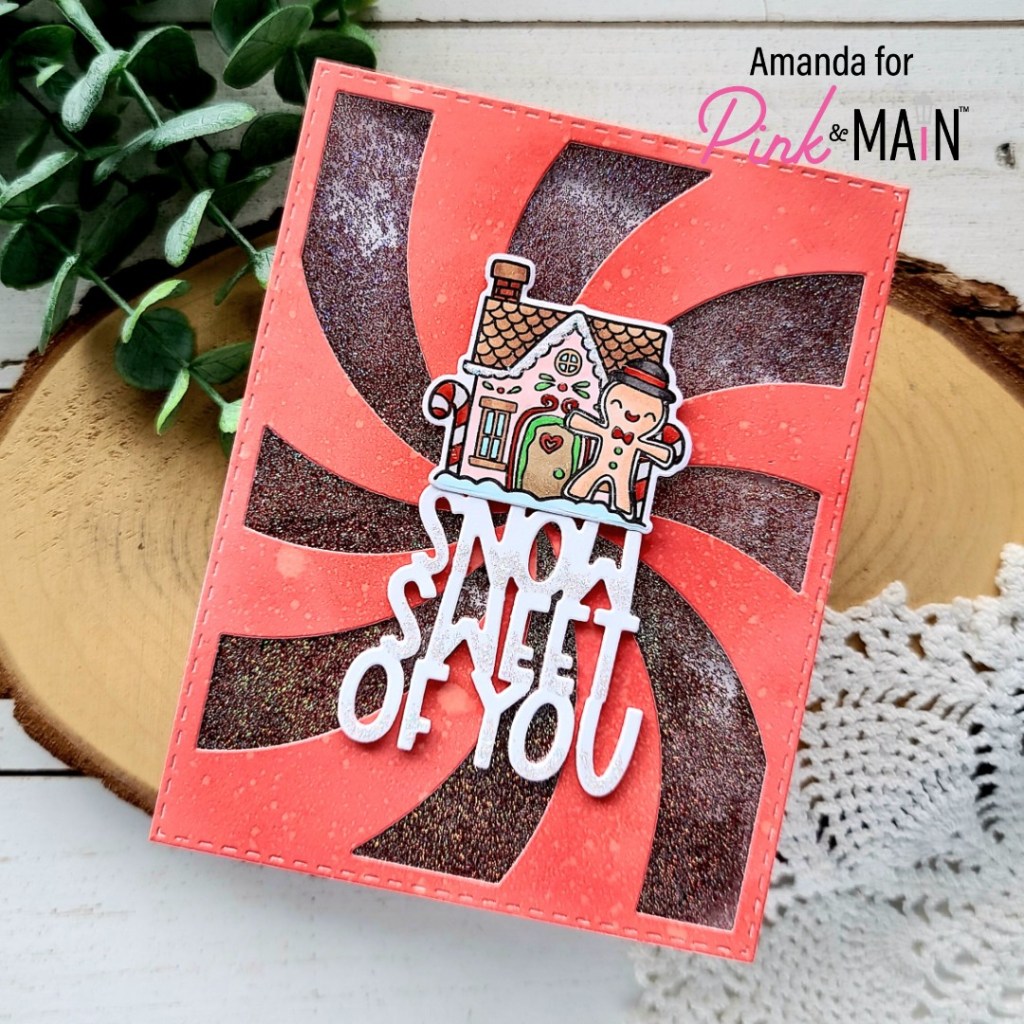
Happy Friday friends!!! Today I’m over on the Pink & Main blog sharing a couple of super fun shaker cards featuring some of the amazing Christmas release. I was creating the first snowglobe card, not planning to make it a shaker and then I couldn’t resist. But while I was creating it I had another idea that I just couldn’t pass up. So today you get double the inspiration! I hope you enjoy them.
This all started because I wanted to make one of those adorable snowglobes. So I stamped images from the Empty Snowglobe set and Winter Snowglobe Scenes and colored them with my copic markers. It became apparent pretty quickly that I did want to make this cute scene into a shaker so I cut the additional elements needed like the acetate panel a new base panel and cut the window out of the stamped snowglobe I already had.
Next, I inked up the base panel with blue and adhered my house scene down to that. Then I adhered the acetate to the frame and lined it with foam strips. I added some ice rink fine glitter to my scene and sealed it all up.
For the background panel of my card, I inked up a white piece of cardstock with candied apple distress oxide as messy as I could. Some heavy spots, some light spots and some streaks. Then I spritzed it with water and flicked pearl watercolor all over it. Once it was dry I die cut it with the Dotted Cover die and just love how it looks! I lined the back with green cardstock and adhered it to a white card base. Next, I adhered the snowglobe down with liquid glue. I thought it was missing something so I pulled out the Stitched Bow dies and cut the smallest one from white cardstock. I used my awesome new reverse tweezers and liquid adhesive to assemble it and glued it to the left of the sentiment.
This was so fun to create and I love how the ultra fine glitter looks like a grand snow bank waiting for kids to run out and play on. Super cute!
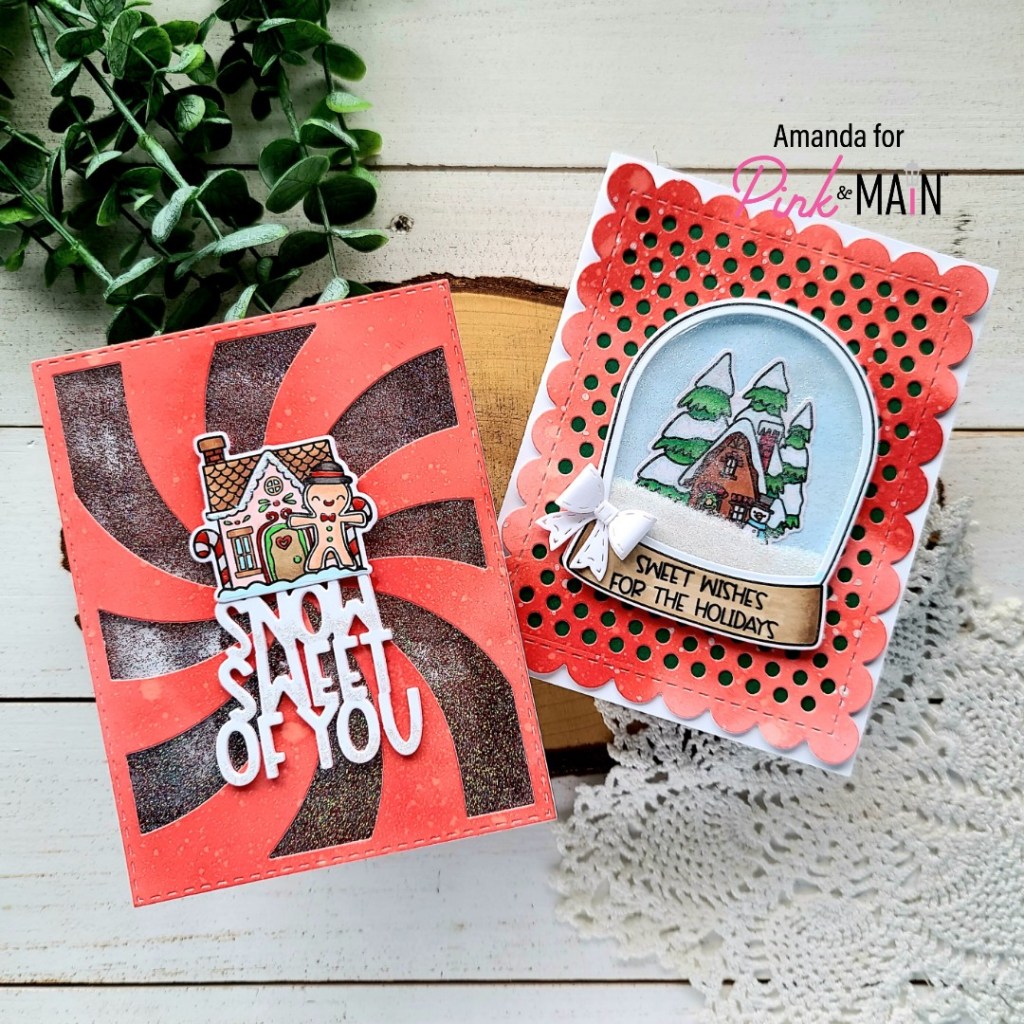
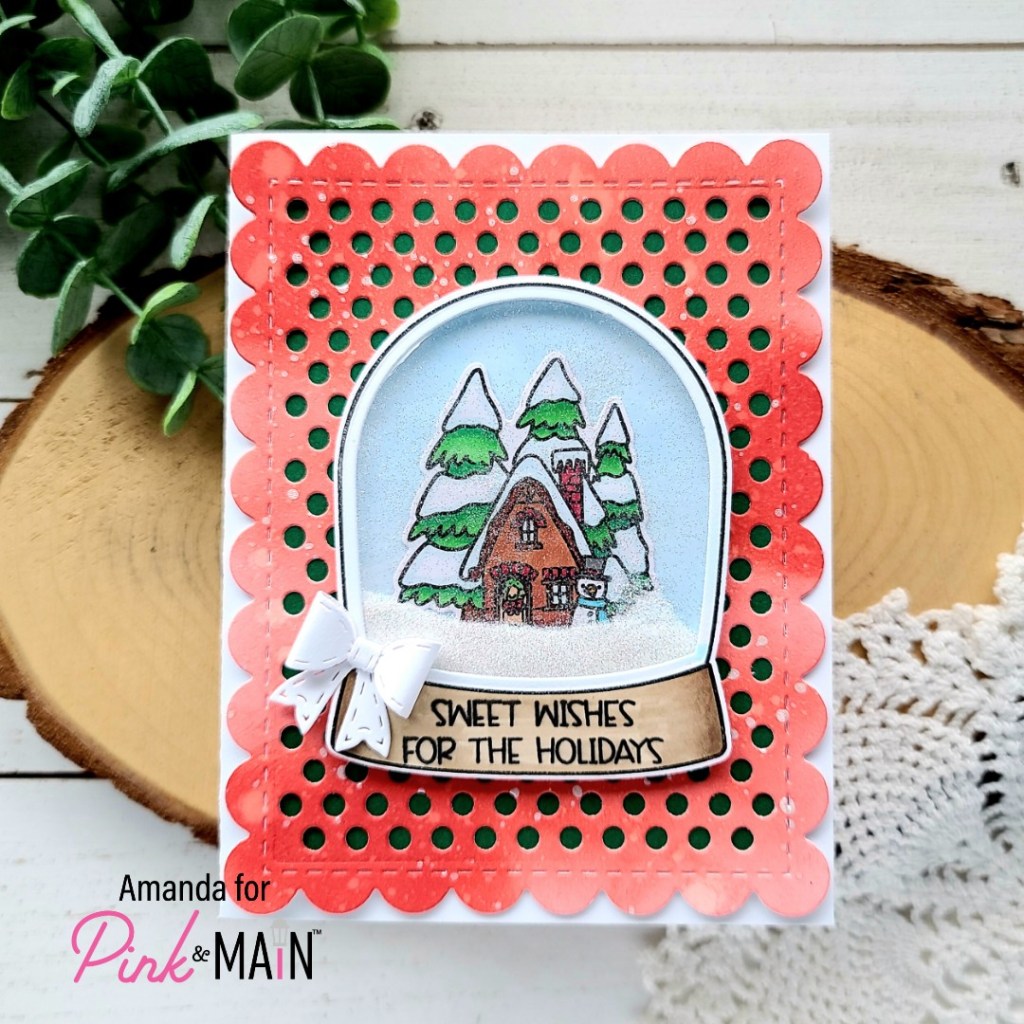
While I was using the Empty Snowglobe dies, I had to move the sentiment die in the set out of the way…which got me thinking that it would go so cute with the gingerbread image from the Winter Snowglobe Scenes. Hence, I have another adorable card to share with you.
For this card, I stamped and colored the Winter Snowglobe Scene with my copics and used the coordinating dies to cut it out. Then I cut the sentiment from white cardstock 5 times and adhered the layers together with liquid glue.
I used the same candied apple distress oxide ink, but this time I started in the center of my panel and inked it up in a circular motion working my way out. I spritzed the panel with water and let it dry. Once it was dry I cut it out with the Peppermint Cover die, trimmed a piece of acetate to fit and adhered them together with liquid glue. I lined it with foam strips and filled it with holly and silver bells fine glitter. Once it was all sealed up I adhered the shaker to a white card base.
Next I used liquid glue to adhere the sentiment on the front and foam squares to pop the image up to same height. For finishing touches, I added unicorn stickles to the bottom of the letters in the sentiment and the roof line of the house. Then I added glossy accents all over the image to anything that looks like frosting. I think these two things really tie them in to the super shimmery glitter shaker.
These are so much fun and such happy cards! They’ll be great to share with someone at Christmas time! I’m also excited to have two more cards for my holiday stash! Have you started yet?
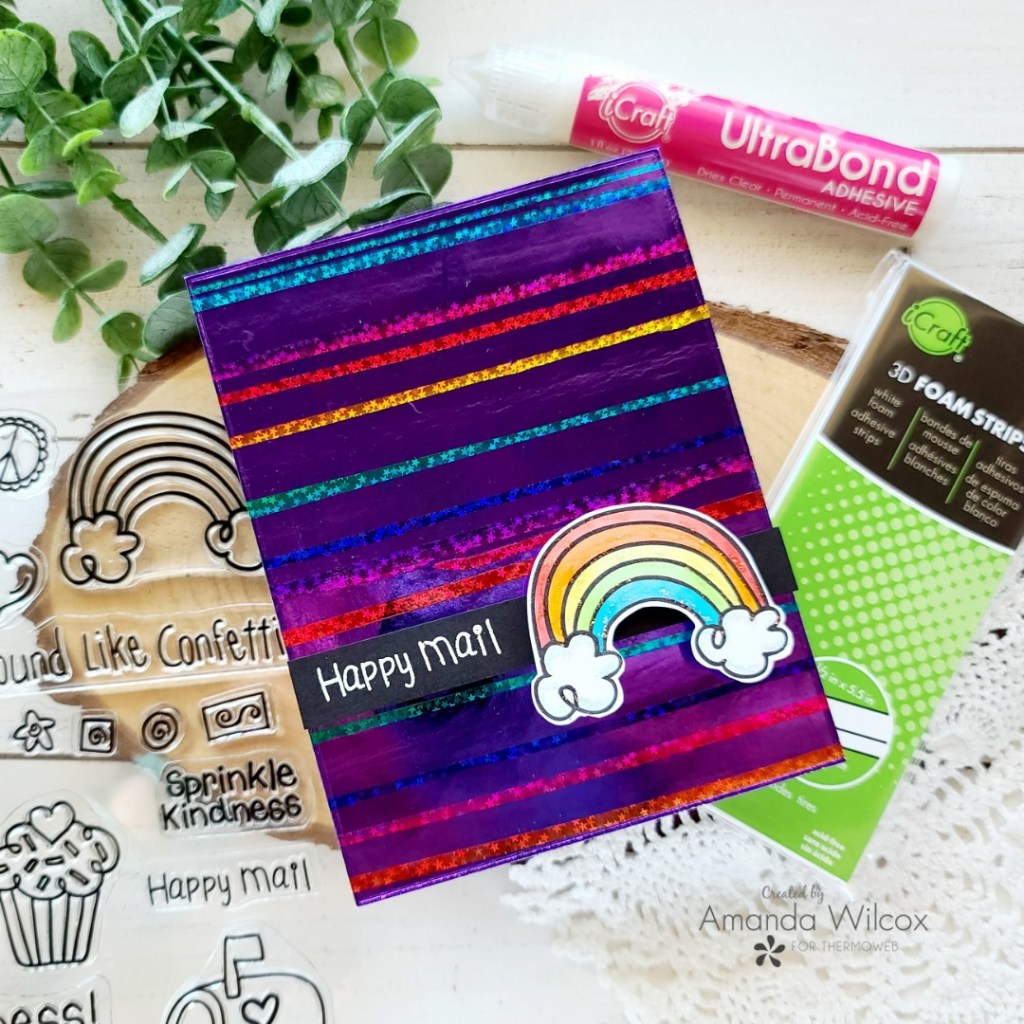
Hello everyone! I’m over on the Thermoweb blog today sharing how I created this pair of cards featuring Laura Kelly Designs products from Thermoweb. Her foil colors and toner card fronts are so fun. Pair those with her whimsical stamps and you’ve got adorable, fun cards!
To create these cards, I started by foiling the toner card front on the right and then adding the negative decofoil sheet to a toner sheet and then foiling the rest with some awesome Rainglow decofoil. It’s kind of a process but it’s fun and magical as you do it!
To add a little something to this first card, I added glitter gltiz gel with a Pink & Main stencil over the foiling. Isn’t it so much fun!?!
And then this amazing double-foiled card needed nothing added because it is so gorgeous!!!
Be sure to head over to the Thermoweb blog for the step-by-step and a list of products used too!
I appreciate you sharing your time with me. Have a fabulous day!
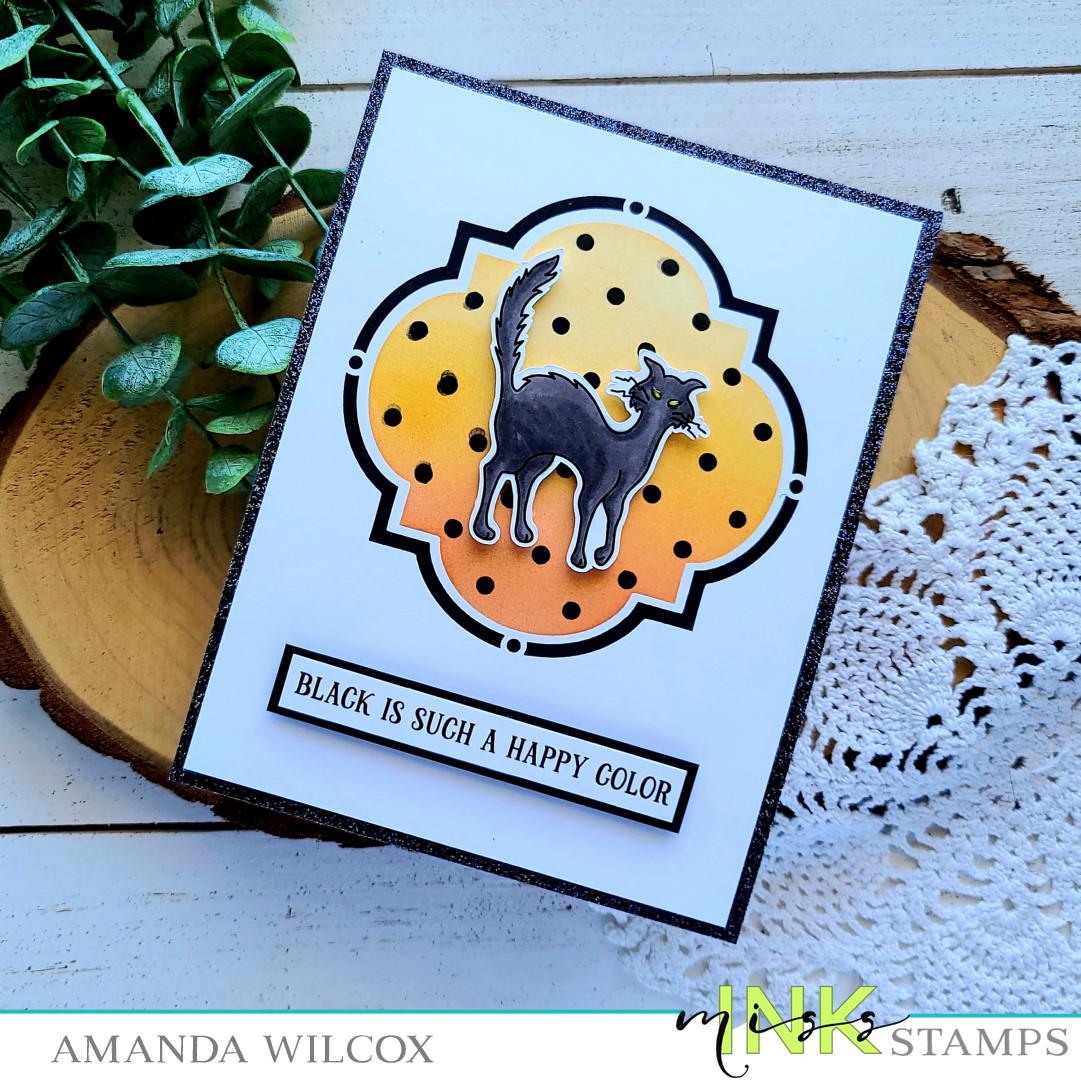
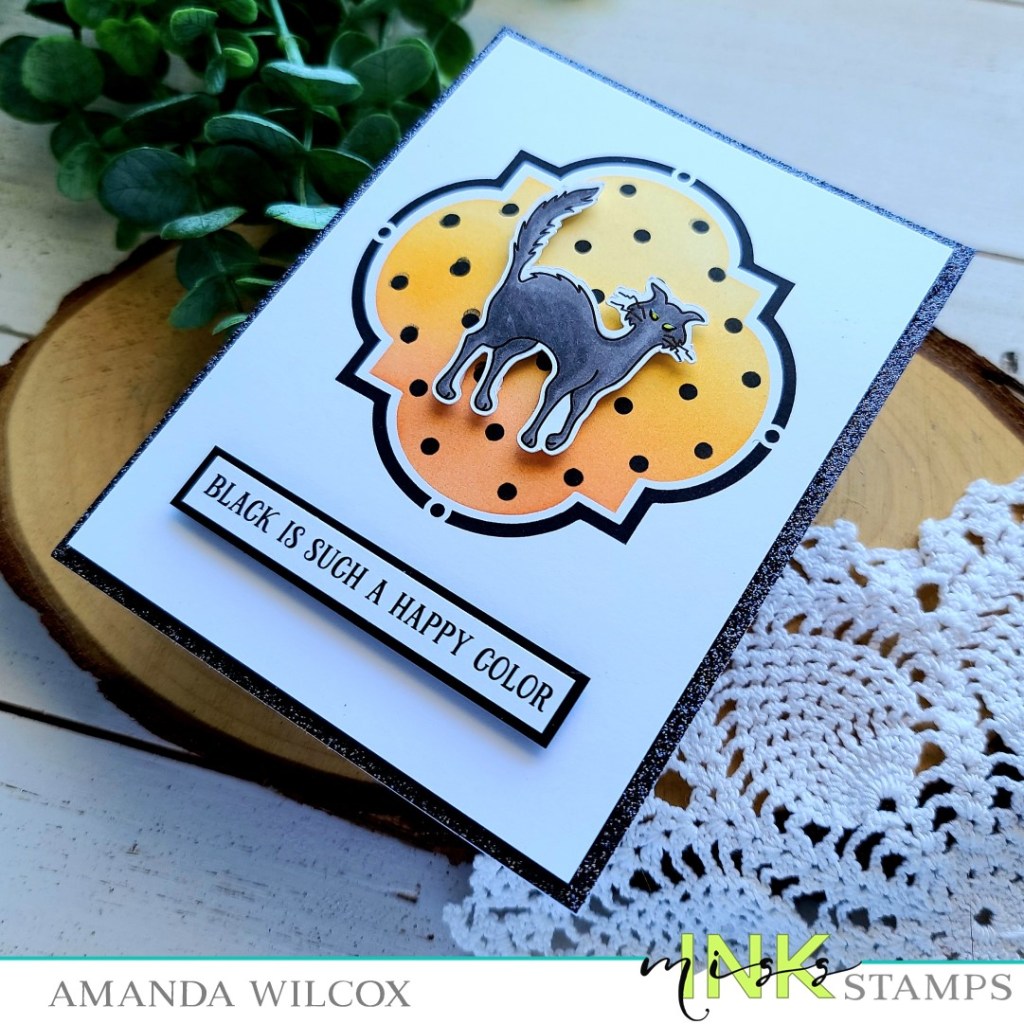
Hahahaha!!! I’m playing with the newest Miss Ink Stamps release again and these sentiments just crack me up! Today I’ve chosen one from Feline Spooky and I can’t even begin to express how much I love it! These cats are fantastic for spooky Halloween settings, I love them!
Given the sarcastic nature of the sentiment I just had to use, I kept the rest of the card light and a little brighter. We wouldn’t want that awesome black cat to get lost!
For the background, I used the quatrefoil ins and outs stencil with a two tone orange background and layered the small alternating dots stencil over the top. Then I used black ink to blend in the quatrefoil border layer.
I popped the black cat from Feline Spooky up with foam squares, stamped and trimmed a sentiment from the same set. Matted it on a black cardstock strip and popped it up too. Then I thought it needed something else. So I trimmed the panel down to 4×5.25 and mounted it on black glitter cardstock from Pink & Main.
I adhered the whole thing to a white card base and finished things off with a little glossy accents on the kitty’s glowing eyes.
Seriously, if you haven’t checked out this whole release…click HERE now and go see. It’s fantastic!
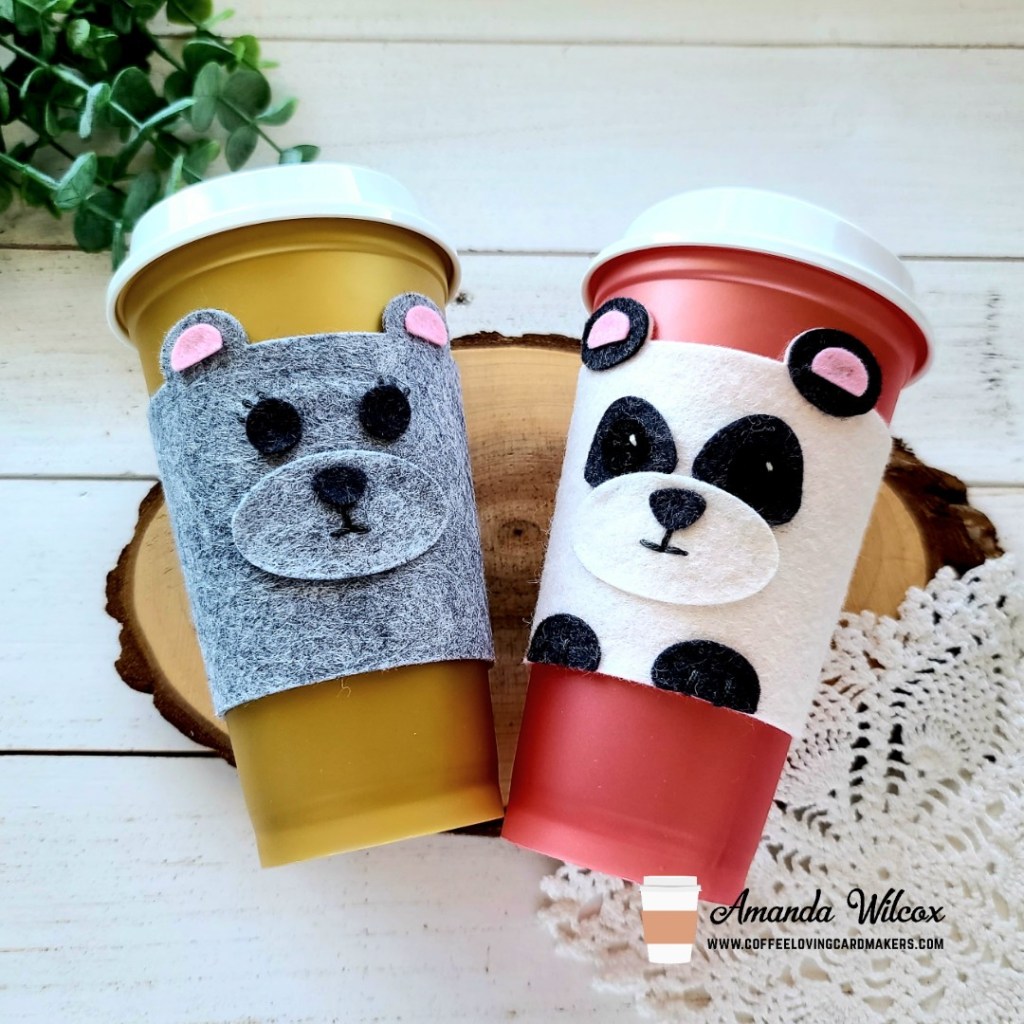
Hey again! As part of the National Coffee Day celebration with the Coffee Loving Cardmakers, we’ve all created super awesome inspiration with the Ellen Hutson Bear Cozy Kit! This kit is SO MUCH FUN! Today I have a couple of simple cozies to share with you featuring items from the kit.
First I created the simple gray bear on the left using only items from the kit. I used Thermoweb FabricFuse liquid adhesive to adhere all of my pieces together and then stitched in a little detail like the mouth and eyelashes.
For the second cozy, I just had to try a panda. They are quite literally my VERY FAVORITE animal and it just had to be done. Lol. I cut the cozy from winter white felt and then the accents from charcoal felt. I cut the eyes from black. In the photos it’s hard to tell the distinction but in person the eyes really do stand out. After gluing these pieces together, I added some fun stitching detail on here too.
There is a die in the set that cuts a row of holes which is perfect for stitching the two sides of your cozy together. You can see here how I stitched the gray one together. Also the little extra detail I gave with that sweet heart and some extra stitches too!
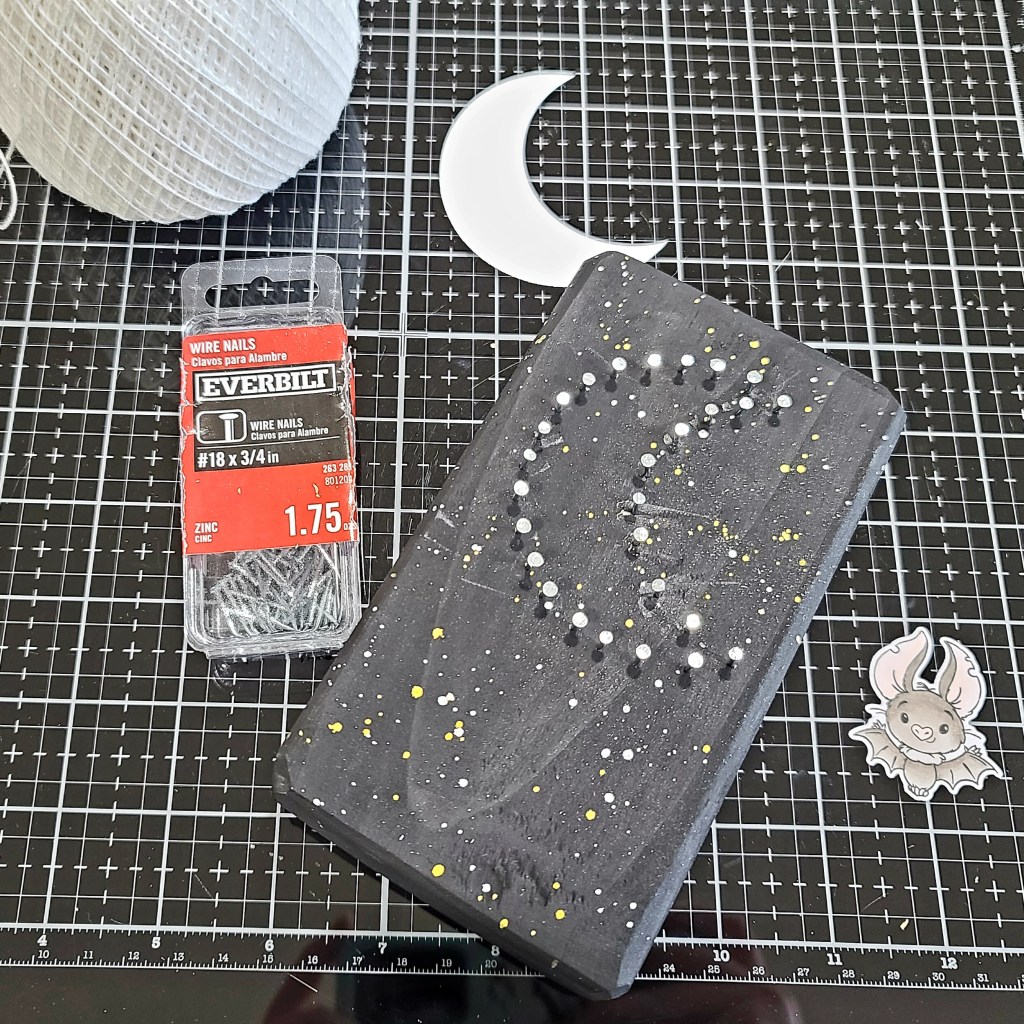
Well, hello friends! Fancy meeting you here. 😉 I’m over on the Trinity Stamps blog today sharing a fun decoration I made for my festively fall decorated mantel! I make a big deal about the mantel because I’ve wanted one since we bought this house and my wonderful husband built a custom one last winter so this is my first fall season being able to decorate it! It’s so fun!
I love swiping the 2×4 scraps from the garage when my husband builds things. This one is about 6 inches tall. Here’s a little photo step-by-step in case you want to try it out!
Sand your piece of wood down to the smoothness/shape you’re looking for. Then paint it with acrylic paint. For this project I put the dry block in my splatter box and added flicks of pearl and gold watercolor all over it and let it dry.
To make a template for my moon, I die cut a circle from white cardstock and then I took the circle one size smaller and cut the side off, creating a crescent shape. I placed it on my block and used a pencil to make dots about 1/2 inch apart, maybe a little more. If you’re more comfortable, you could mark on your cardstock first so that you know if you like the spacing or not. I’ve done enough of these to just wing it now.
After I marked the dots, I hammered in penny nails so they stick up about a 1/2 inch out of the wood. I tied embroidery thread to one nail and started winding and wrapping. It’s not rocket science and the more imperfect, the more fun it looks…to me at least.
I tied off the thread and trimmed the tails. The knots are hidden beneath the wrapped thread naturally so it’s not a worry. Then I stamped my favorite little bat from Fang-tastic Friends, colored him with simple copics and die cut him out. I added black foam squares under him, it took 3 stacked to get him the same height as the nails.
I stamped a sentiment from the same set and heat embossed it on black cardstock. Then I used the banner die from the 4-Bar Card die set to cut it out. I used a foam strip to attach it to the wood block.
For finishing touches, I added some glossy accents to the bat and then glued a scattering of these awesome Glowing Sky clay embellishments all over. They glow in the dark which makes this extra awesome at night!
I am just tickled with how this fun decoration turned out! Have you ever made string art before? I love the way they look but have had even more fun adding stamped images to the designs over the last year. It changes the whole look!
Hey friends! Twiddler’s Nook is a Super Sponsor for the Coffee Loving Cardmakers National Coffee Day celebration! They’re having a HOP full of inspiration and prizes to win!
In the Twiddler’s Nook Shop we offer a big selection of super fun embellishments to adorn your cards and fill your shakers, along with a wide variety of tools that help in the craft room too.
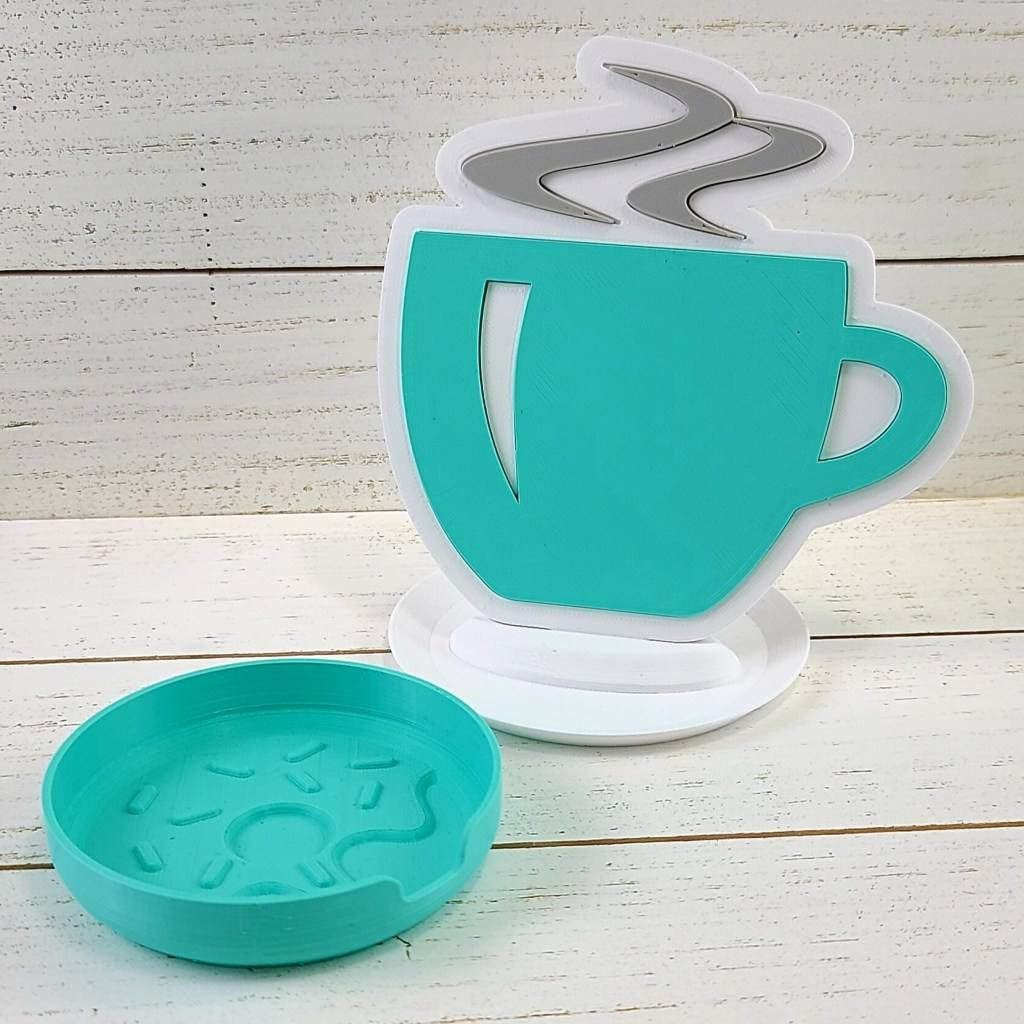
Here’s a look at our coffee mug magnetic die stand and a donut embellishment tray! The perfect set up for any coffee loving papercrafter! The die stands are great for holding your dies in between uses so that you don’t misplace or accidently stick them to something where they are lost forever. The embellishment trays are ideal for sorting through embellishments and pouring the extras back in the package, but these are also amazing for holding your die cut images while building your cards!
Then there’s the ever popular Pressure Pal! This is a very handy tool to help apply even pressure when stamping with a stamp platform like the MISTI. See it in action in this YouTube video a customer did to review it!
SALE
We’re running a sale from today through Sunday for 10% off the shop to celebrate National Coffee Day! We would love it if you headed over and had a look around. Click HERE to get there.
GIVEAWAY
We’re having a fun giveaway to celebrate the hop today. A $20 gift code to the Twiddler’s Nook shop for one random commenter on this post. Commenting closes on October 6 at noon PST.
You should have come to us from the Trinity Stamps blog. We’re last on the hop list but if you didn’t start at the beginning. Click HERE to get to the main post and catch anyone you missed!
Thanks so much for stopping by! I appreciate you sharing your time. Have a fabulous day and good luck!
Welcome! It’s time for another Tuesday Tea with Twiddler’s Nook over on the Coffee Loving Cardmakers and today it’s extra special! We’re celebrating National Coffee Day all week leading up to it and there are giveaways on the blog each day. Click HERE to head over and check out the festivities.
I’m celebrating Thermoweb today with a super fun shaker card featuring stencils and dies from Newton’s Nook, the coffee shaker dies from Lawn Fawn and my shaker bits from the Twiddler’s Nook shop!
Head over and check out the post for all the details on this card plus a chance to win!
Thanks for stopping by. I appreciate you sharing your time with me. Have a fabulous day!