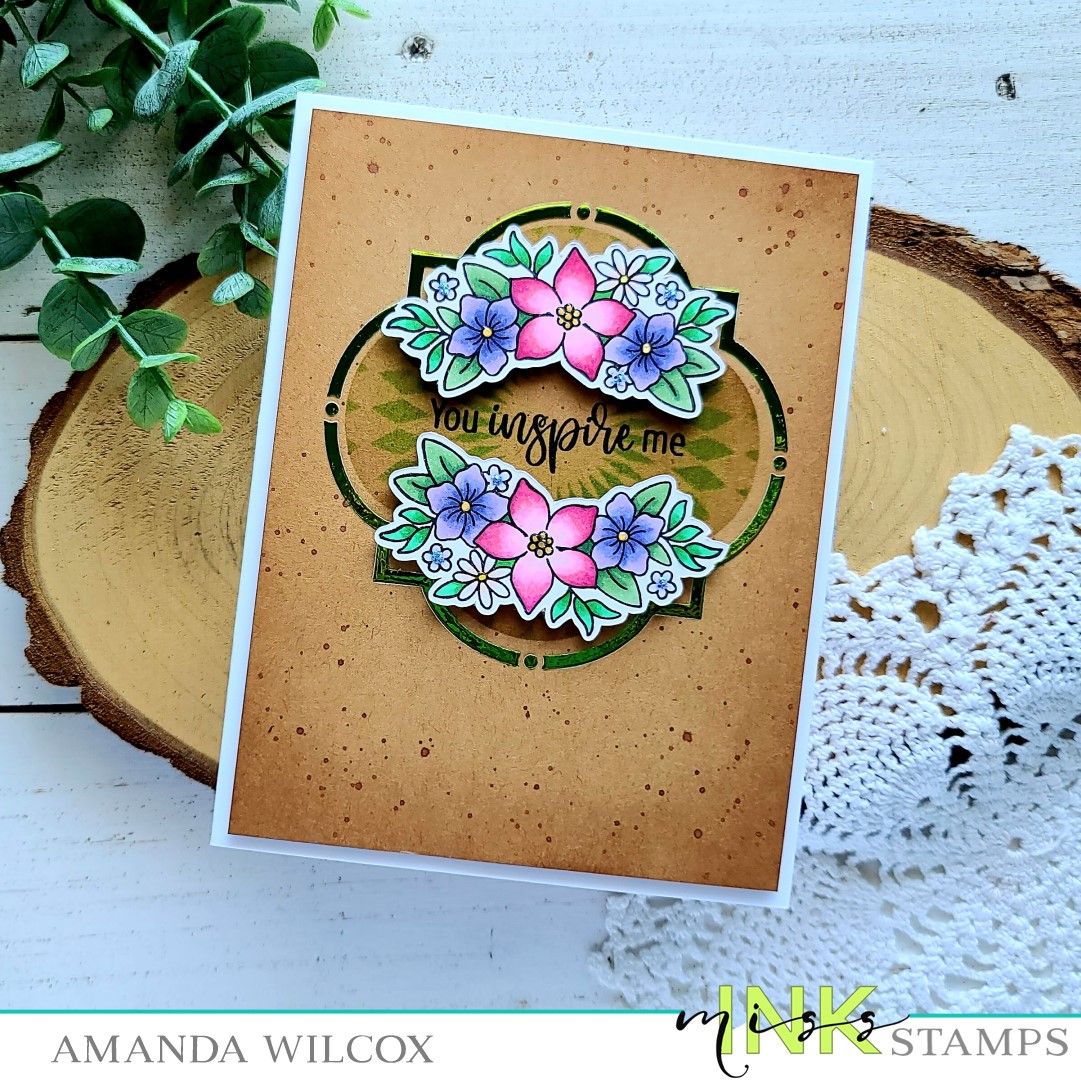
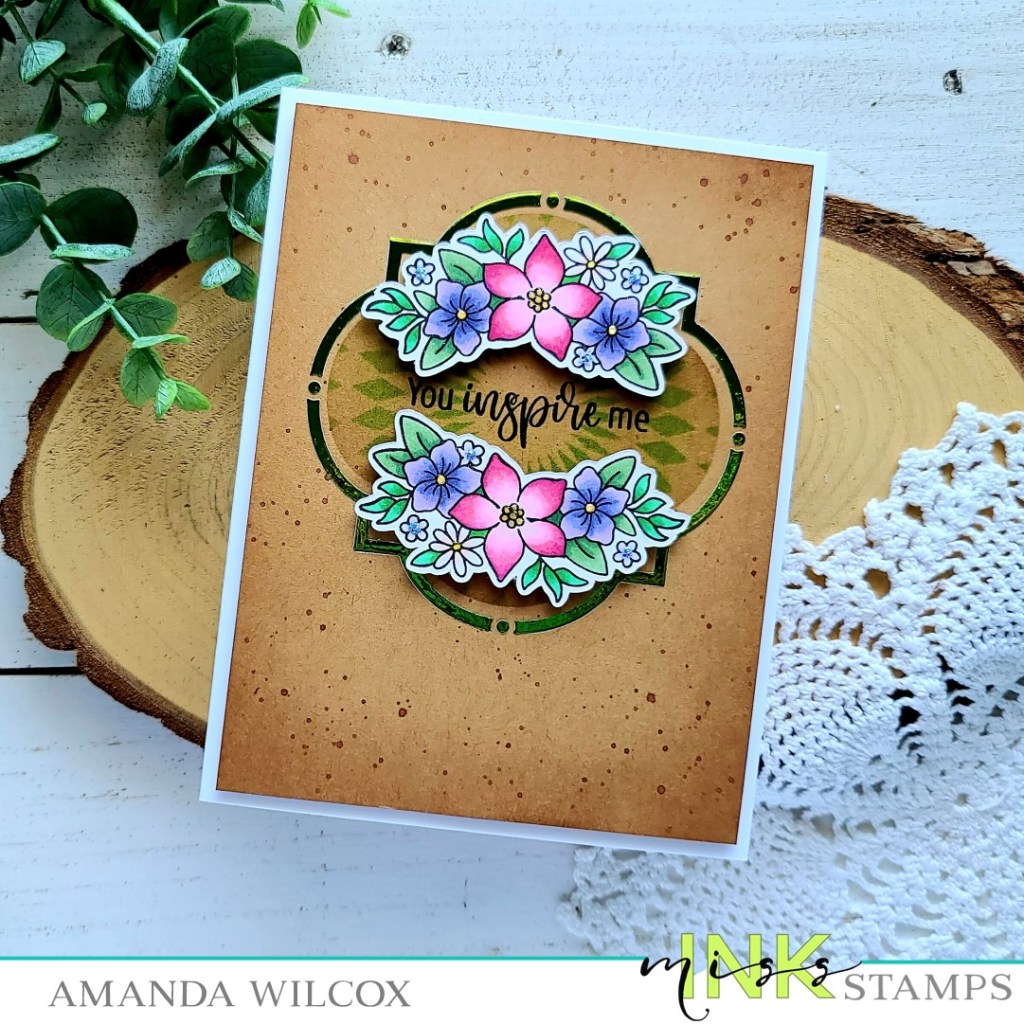
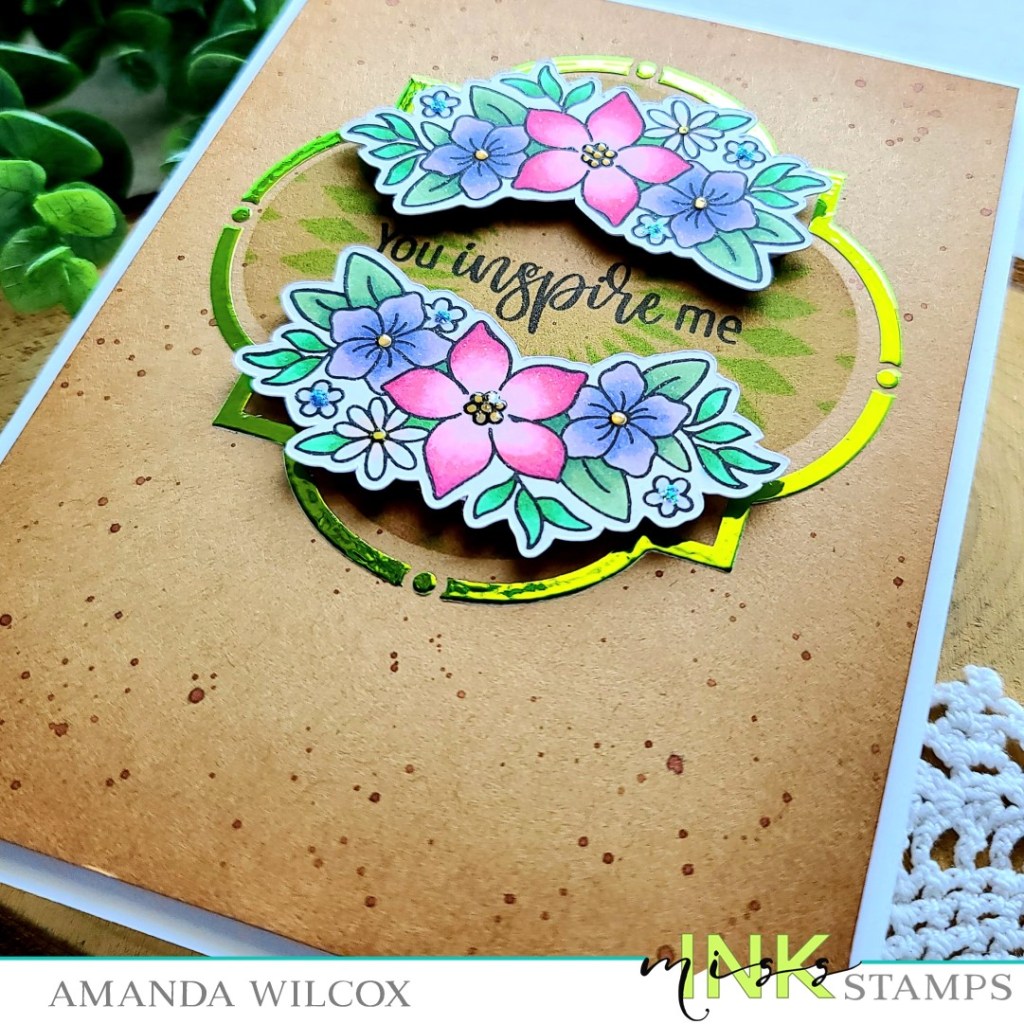
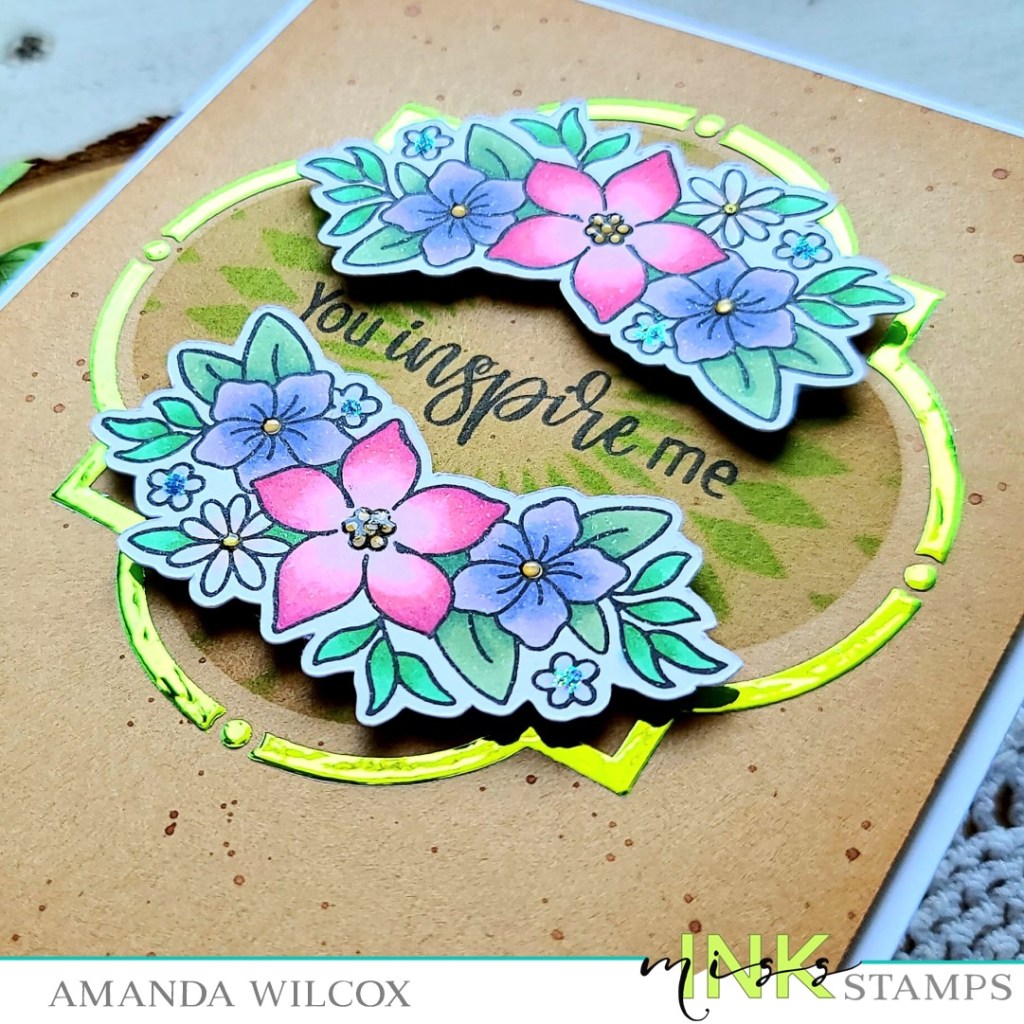
Welcome back friends! I’m here to share a card featuring stamps and stencils from Miss Ink Stamps today. I got a little inky and also did a little foiling for some bling on today’s card. Let’s jump right in.
I started by choosing one of the floral images from the new Blooming Brushes stamp set. I stamped it twice, colored it with my copic markers and used the scan-n-cut to cut them out. Next, I cut a kraft panel to 4×5.25 inches and centered up the smaller Ins & Outs Quatrefoil stencil on it. I inked it up using a blending brush and brown ink. Then I centered the Circular Harlequin stencil and used a green ink on that. I removed both stencils and then taped down the Quatrefoil frame stencil in place. I spread Thermoweb transfer gel blanco on that and set it aside to dry.
Once it was dry, I heated up my laminator and ran it through with grass green decofoil. After removing that I decided to add texture to the panel so I flicked watered down brown ink all over. Once that was dry I used the floral images as a guide and stamped my sentiment in the center. Then I added foam tape to the back and adhered it to a white card base.
Next, I added the floral images with foam squares and moved on to simple finishing touches. For that I just used glossy accents on the flower centers with the exception of the small blue ones. For those I added some waterfall Stickles.
Welcome back everyone! Today we have another pair of gordgeous (pun intended!) stamp sets to share with you! I love the mix of fall and Halloween in this release! It’s so fabulous, I hope you love it too!
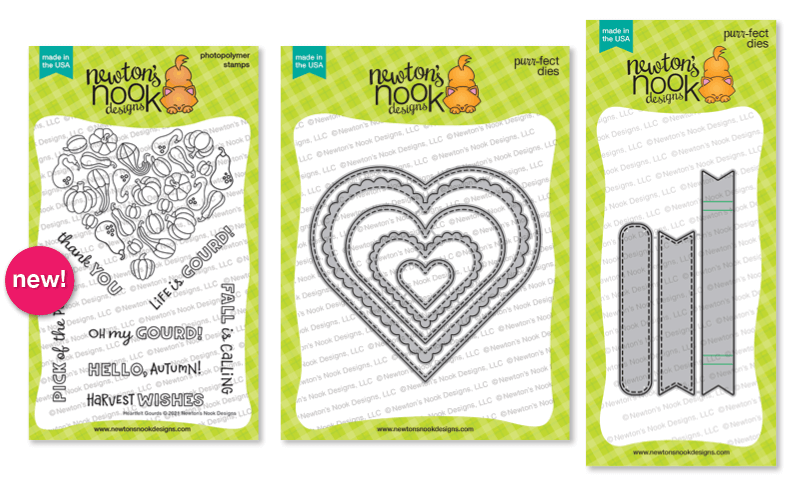
Heartfelt Gourds stamps
Fall Friends stamps and dies
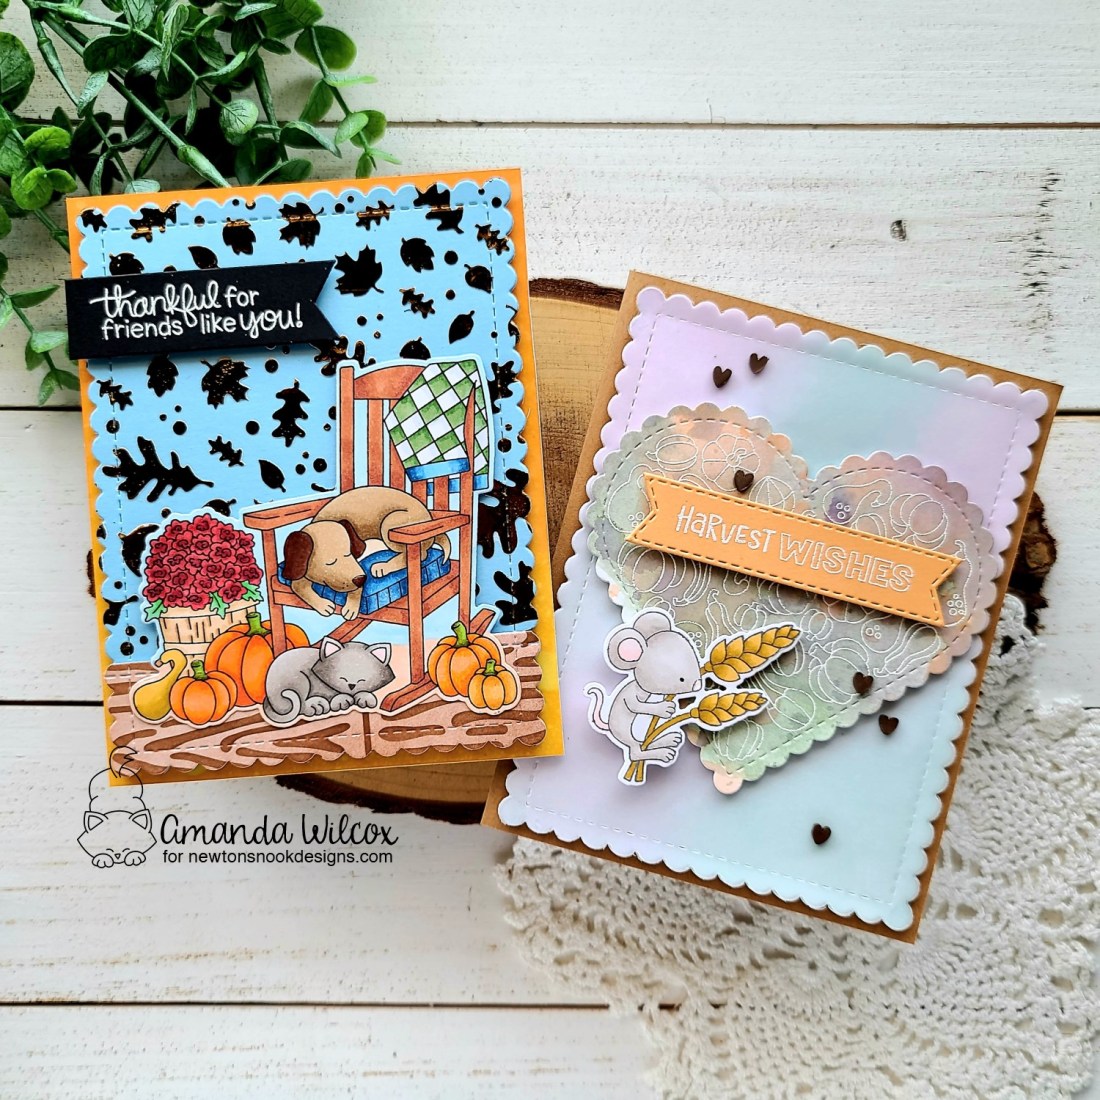
Just like yesterday, I have two cards to share with you featuring both of these amazing sets! I’m so excited to have more to add to the Heartfelt collection. These are fun to color if you need to relax but great as backgrounds, heat embossed or ink blended too!
For this card, I did a little ink smooshing with my Tombow Dual Brush markers and a clear acrylic block. I chose some earthy purples, greens and oranges. Once the panel was dry, I stamped and heat embossed the Heartfelt Gourds in white and cut the panel out with the Heart Frames die. Next, I stamped one of the mice from Autumn Mice in a gray copic friendly ink and color him up. I die cut him and decided on a sentiment. After cutting a banner from the Banner Trio dies, I heat embossed it in white to coordinate with the gourds more. Everything is so soft on this card, I didn’t want any harsh black lines.
Next I created a kraft card base and die cut a whilte scalloped rectangle from the Frames & Flags die set. I cut another from vellum and layered them together. At this point I didn’t like the stark white background so I ink blended blue, purple and brown on the white panel. I love the diffused look the vellum layer adds to this.
I adhered all of my layers together with either tape runner or foam tape and squares. Liquid adhesive can make vellum wrinkle so I tend to use dry adhesives for these always.
For finishing touches, I added a scattering of brown clay heart embellishments, glossy accents on the mouse nose and black glaze pen on his eye. I’m so happy for all things fall and harvest and it was really fun to pull out an older set from my stash to accent this new adorable Heartfelt Gourds set! Don’t forget to do that! Shop your stash and stretch your supplies!
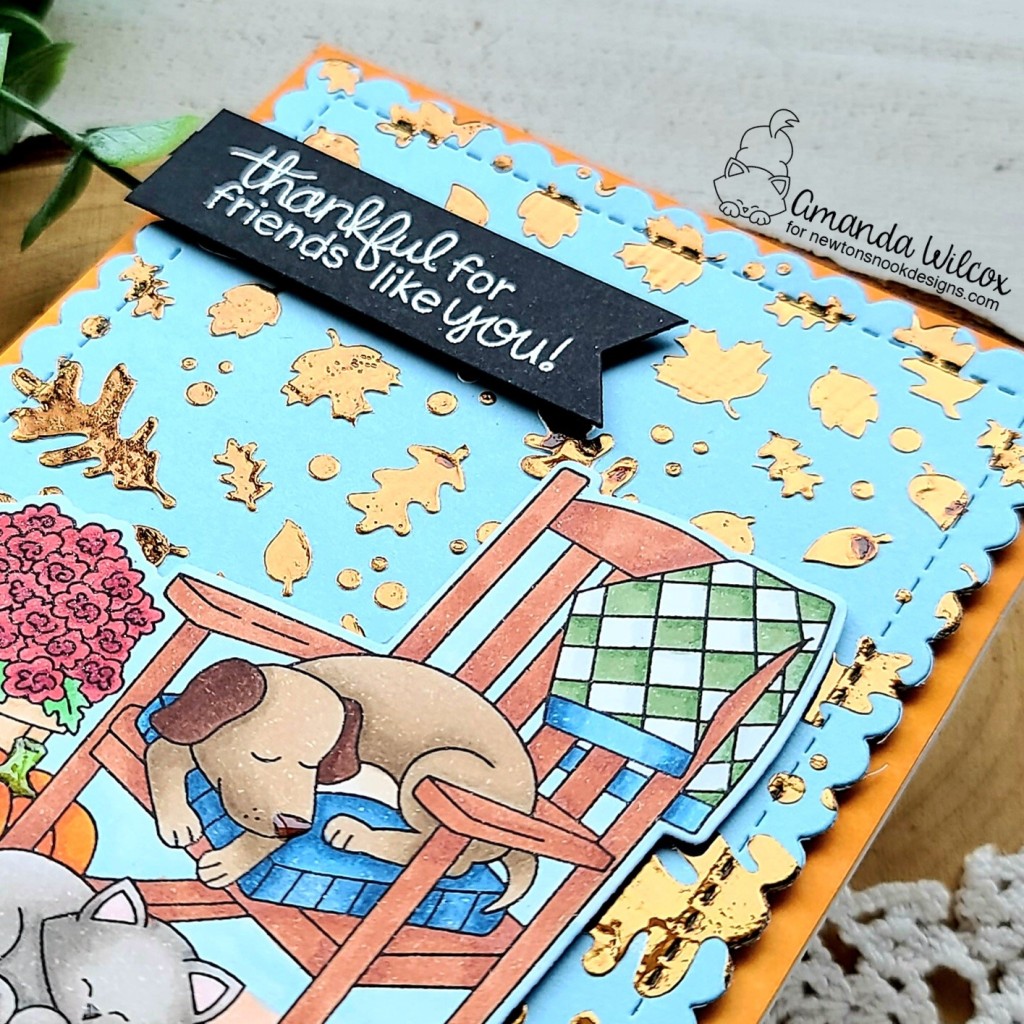
Next, I have a fabulously foiled fall card to share with the new Fall Friends stamp set. This duo is just too cute napping together on the front porch so I had to create a fitting scene for them.
I stamped and colored the image in the set and cut it out with the coordinating dies. Then I taped my Falling Leaves stencil to a piece of blue cardstock and spread Thermoweb transfer gel through it. I set it aside to dry while I worked on the floor of my porch. For that I inked up a scrap of white cardstock with the Hardwood stencil and some brown ink. I removed the stencil and went over the whole panel with the same brown. This darkens the already inked areas so you don’t loose your stenciling at all.
Once the blue panel was dry, I ran it through my heated up laminator with bronze decofoil! This looks so cool when you move it around in the light! Anyway, once it was foiled, I used the scalloped rectangle from Frames & Flags dies to cut it out. I also did the same with the Hardwood stenciled panel so they would fit together for my scene. I used liquid glue to adhere the two together and added foam squares to my image and popped it in place too.
Next, I took a white panel trimmed to A2 size and inked up the edges with wild honey and rusty hinge distress oxide inks. I spritzed them with water and adhered it to a white card base. I added my scene panel with foam tape for dimension.
Finally, I stamped and heat embossed a sentiment from the set on a banner die cut from Frames & Flags as well. I added foam squares to the back, adhered it down and trimmed off the excess.
Moving on to finishing touches, I added glossy accents to the animal noses and stems of the pumpkins. Then I came in with Wink of Stella glitter brush pen on the flowers for some added interest there too.
Would you like to win the “Fall Friends” or the “Heartfelt Gourds” Stamp Set? We will choose ONE lucky winner for each stamp set!
Here’s how to win: Comment on the NND blog and Design Team blogs (see list below)! The winner will be chosen at random from the collective reveal posts. Make sure to check out each of their blogs and comment for your chance to win. You will not know which blog has been chosen so the more you comment on the better your chances are of winning! You have until Thursday August 19th at 9pm ET to comment — winners will be announced on the blog post on Friday, August 20th.
Check out all the awesome Design Team Blogs below to enter:
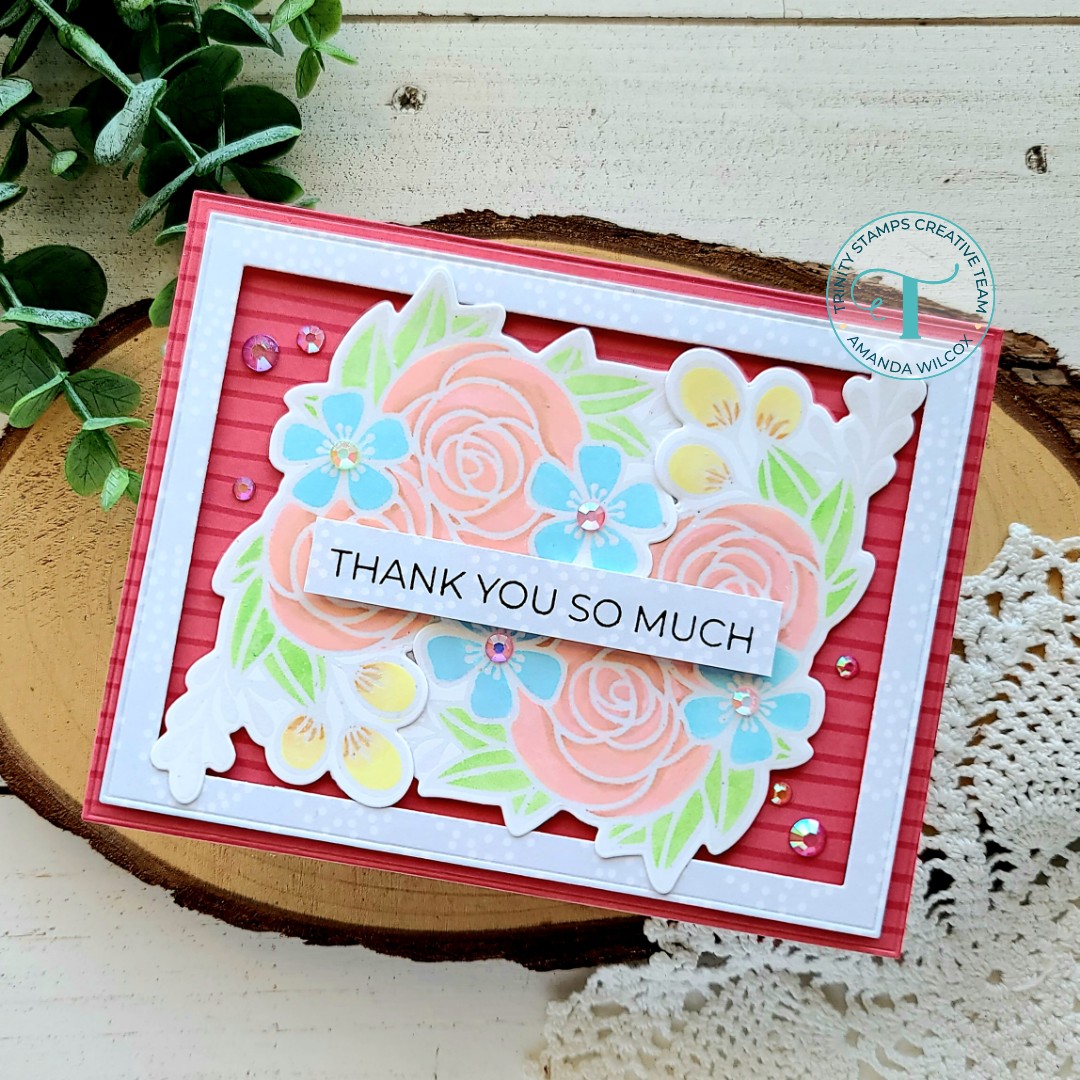
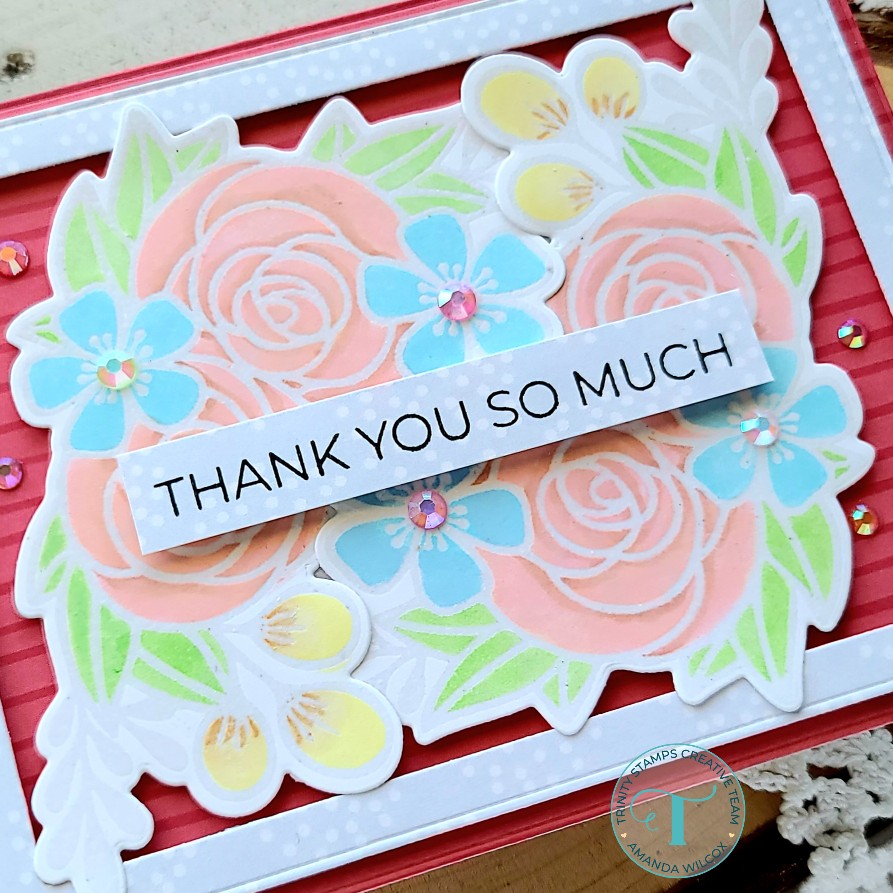
Hi there! I’m over on the Trinity Stamps blog today with another fun card featuring the newly release Summer Blooms Papercrafting Kit. I just love everything included in this kit and have had so much fun creating with it.
For this card, I stamped and heat embossed the largest image in the stamp set with clear embossing powder. Then I came in with my Zig Clean Color Real Brush markers and colored it in. I used the coordinating dies to cut the images out and set them aside. Here’s a look at the colors I used.
Next, I took the Modern Embossed Rectangle dies and cut pieces of the patterned paper in the kit. The red is A2 size and the frame is 2 sizes down from that and then 2 sizes down again for a bit of a thicker frame than normal.
I added foam strips to the back of the frame and adhered it to the background panel. Then I intertwined the floral images and added foam to the back of them and popped them in place.
I went digging in my stash for a sentiment and since I needed a thank you card, this one was perfect in the With Gratitude stamp set. I stamped it on a strip of paper matching the frame and popped it up with foam strips as well.
To finish my card off, I added a scattering of the jewel embellishments from the kit and then also added some to a few flower centers. I really love how this finishes the design off. It’s so pretty and sparkly!
Just a friendly reminder that this kit is limited edition. So, if you’re interested, it’s a fabulous deal and when it’s gone, it’s gone. Click the link in the supply list above to get yours.
I appreciate you sharing your time with me. Have a fabulous day!
(Friendly reminder that this blog does use affiliate links whenever possible, at no additional cost to you.)
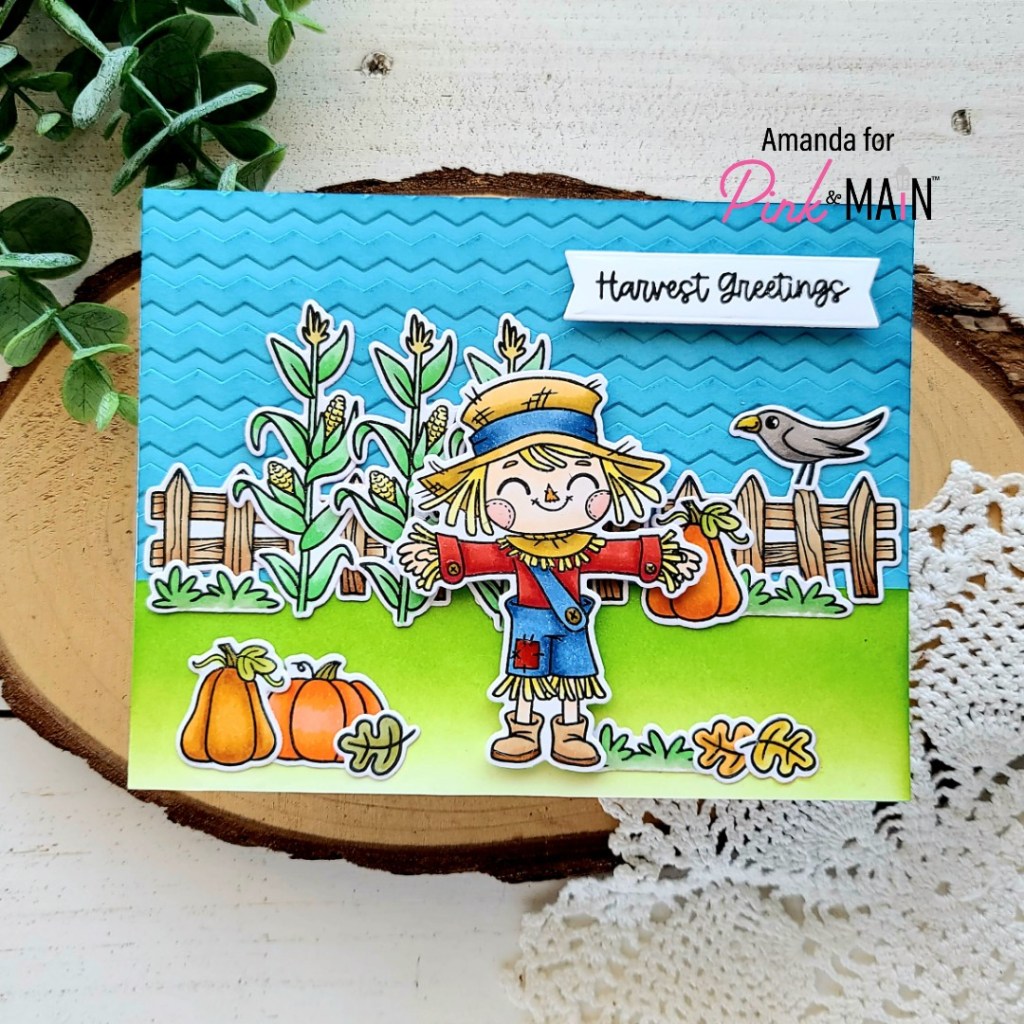
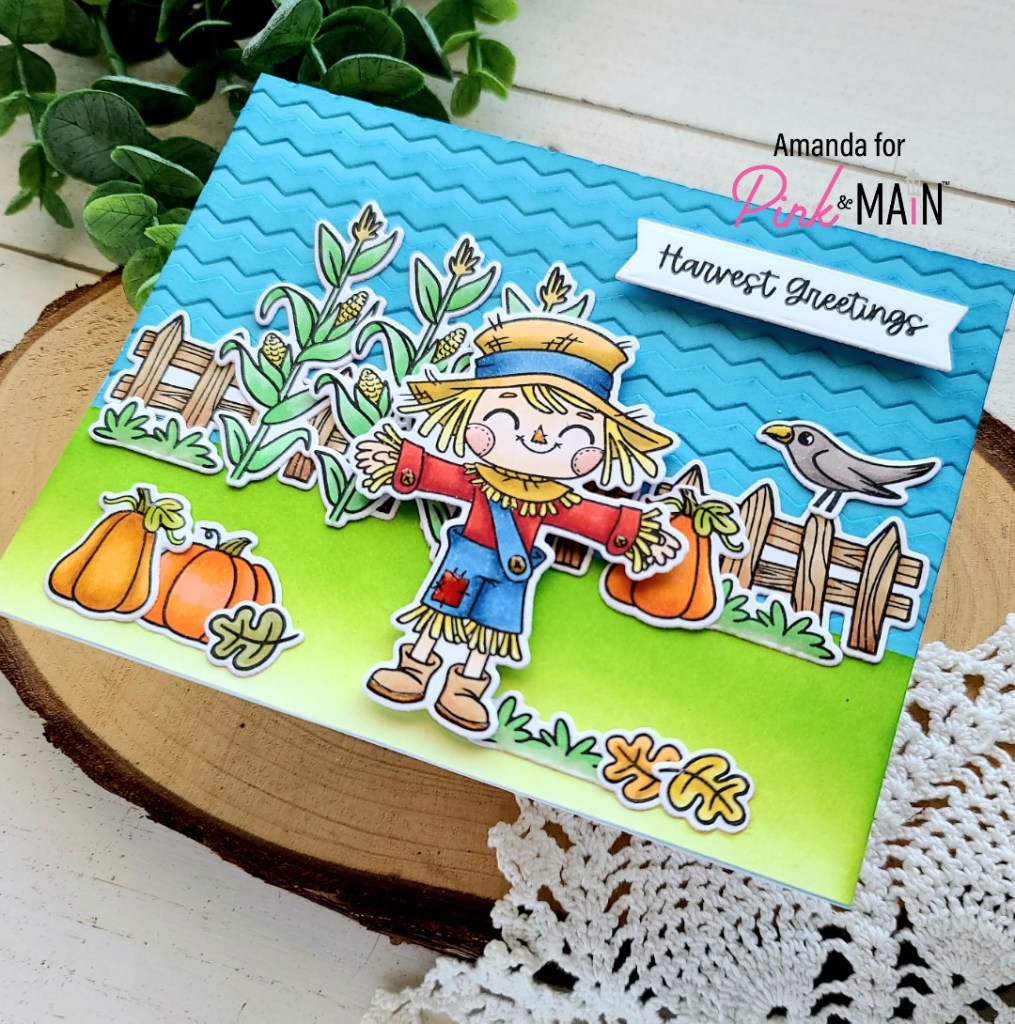
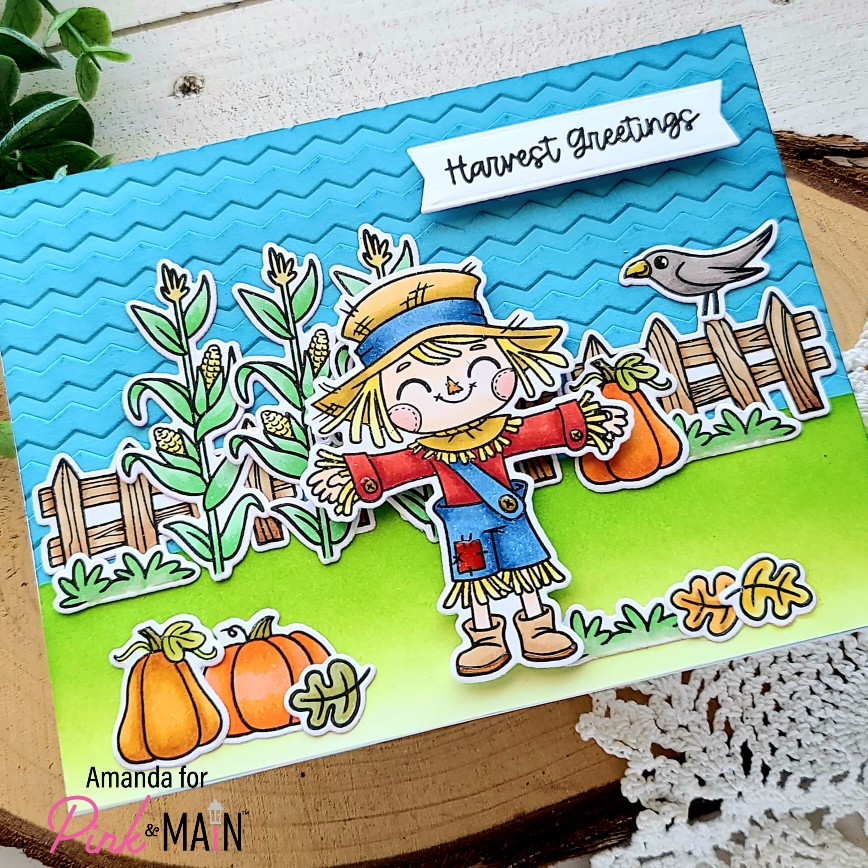
Hello again, I know it’s a busy day but it’s packed full of cuteness so it can’t be all bad, right?!? Thanks for hanging in there with me. I’m also over on the Pink & Main blog today with a few sneak peeks of the upcoming August release. It’s full of fall amazingness and I’m swooning over every bit of it!
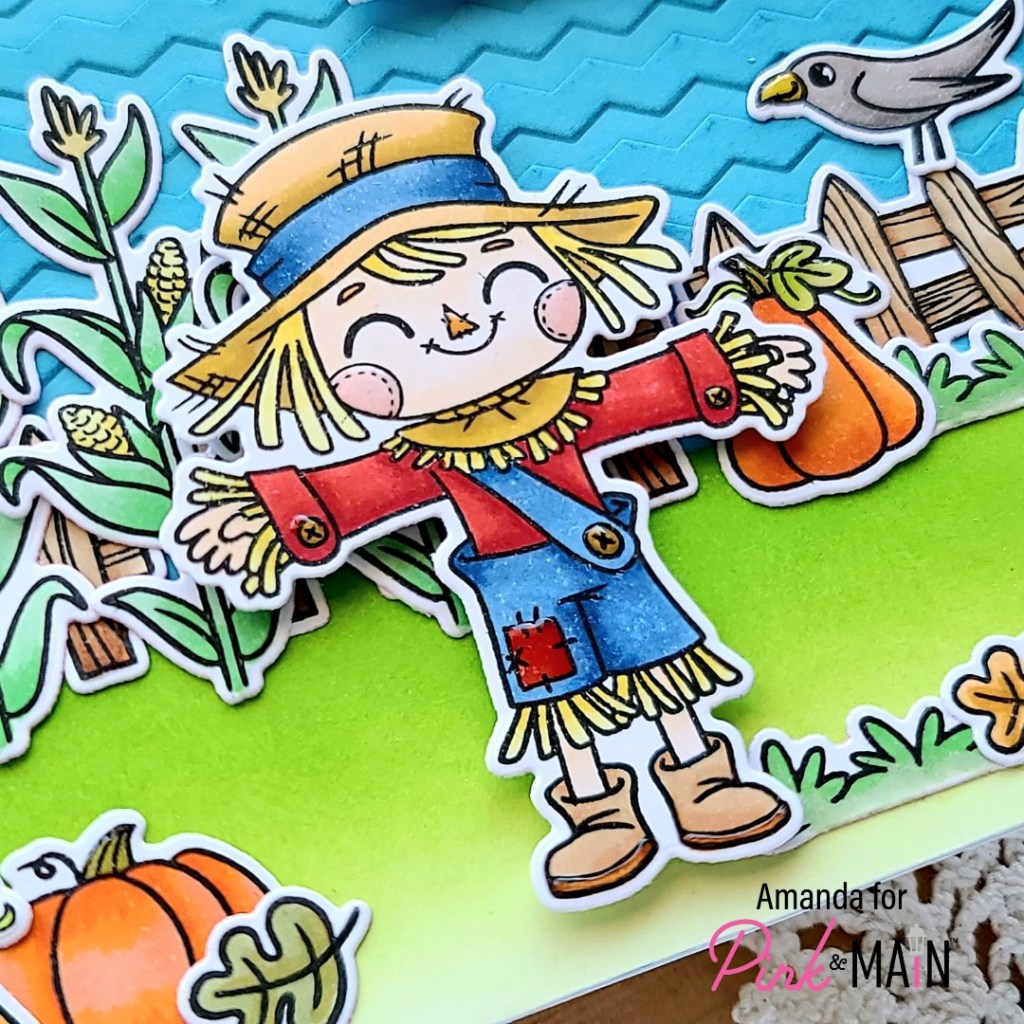
I used the new embossing folder to give my sky a little texture and inked the blue cardstock with a darker blue ink and my blending brush for added definition and texture. I stamped and colored images from the new Harvest Greetings stamp set with my copic markers. Then I used the coordinating dies to cut them out.
I chose a sentiment from the set and cut it out with a large sentiment strip die. To create a little grassy ground, I inked up a white panel with two different green dye inks and my blending brush, then moved on to assembly.
For that I used EZ Squeeze Liquid Adhesive to adhere the grass to the embossed sky panel, then adhered that to a white card base. For the images, I added them all flat to the card with liquid adhesive except the scarecrow and sentiment banner that I popped up with foam squares.
Moving on to finishing touches, I added glossy accents to the scarecrow’s nose, cheeks, patch, shoes and buttons. Then I also added them to the stems and leaves of all the pumpkins and the crow’s beak.
We’re so excited to share this new release with you! You’re going to love it! Stay tuned during the rest of the week for more sneaks and inspiration from the design team. The release will be available on Friday!
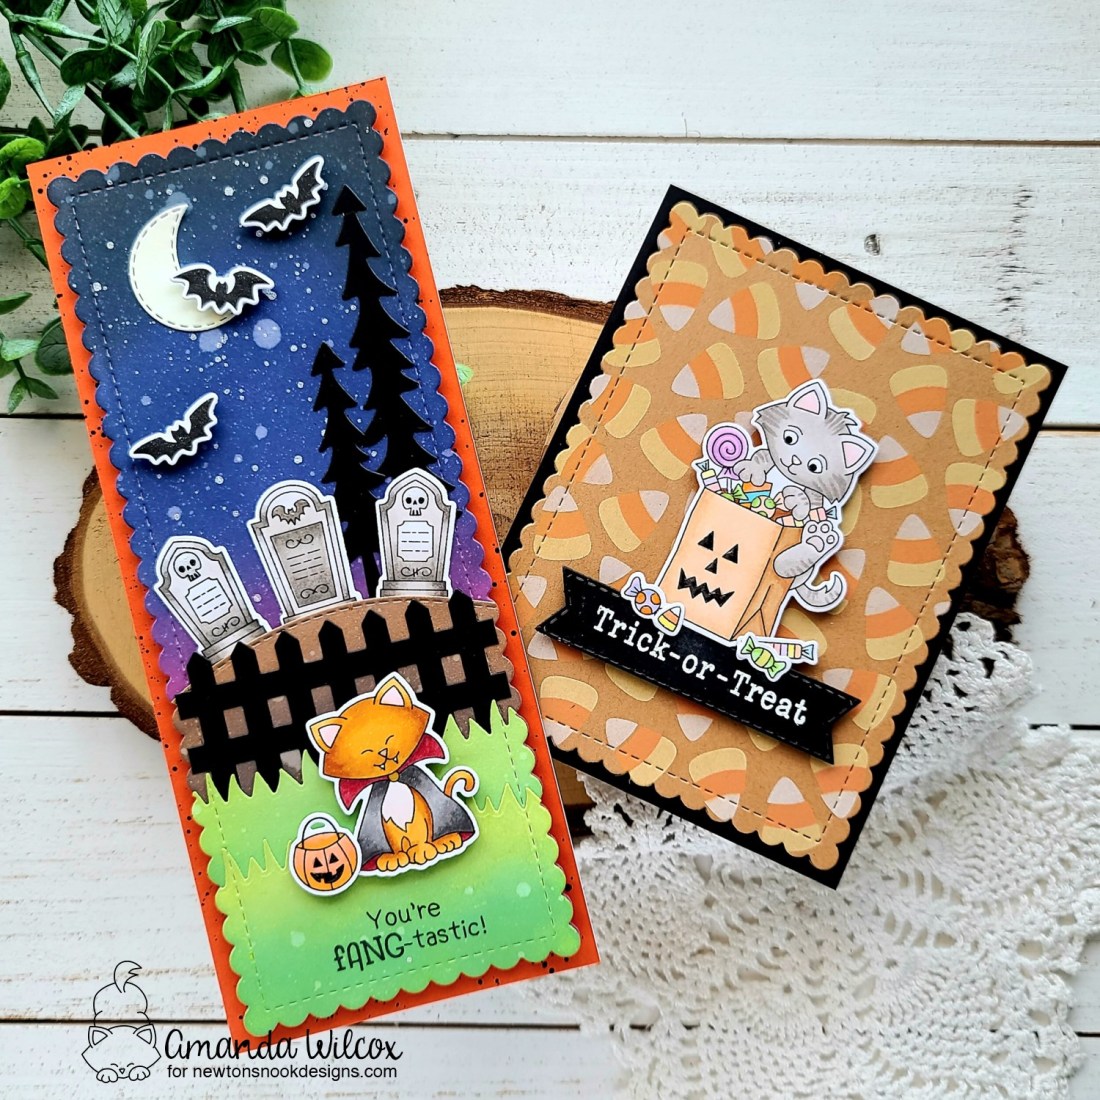
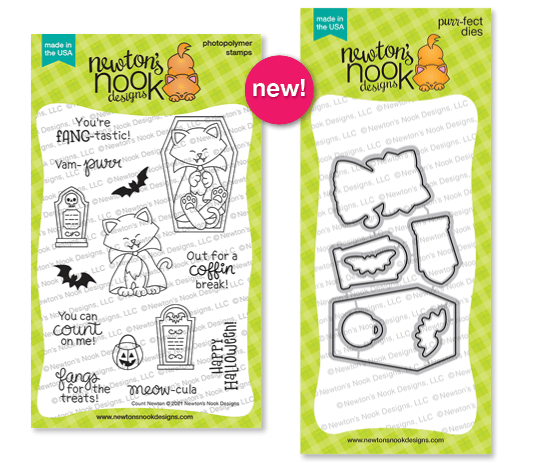
Things are just chugging along and today we get to share 2 really adorable Halloween themed stamp sets and coordinating die sets with you! I can’t even express how much fun I had creating with these cuties! I hope you love them too!
Trick or Treat Kittens stamps and dies
Count Newton stamps and dies
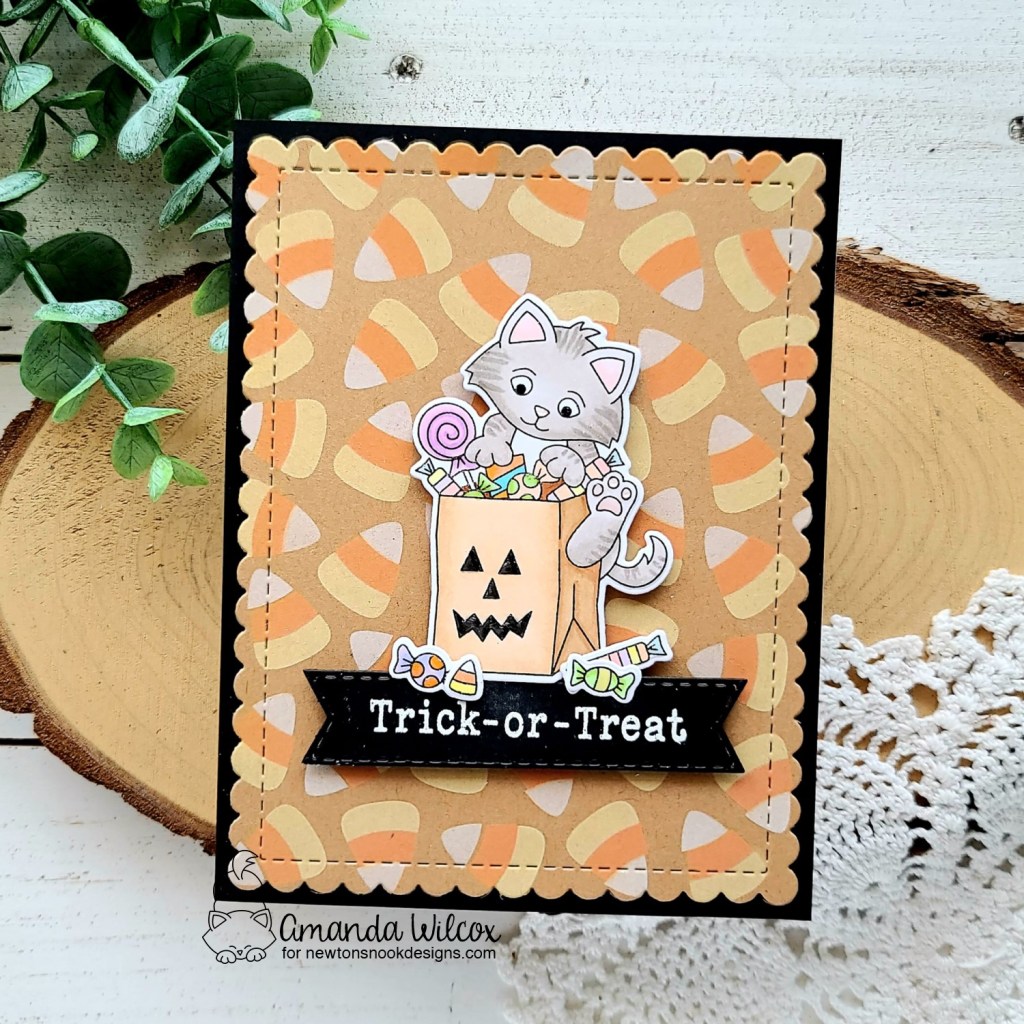
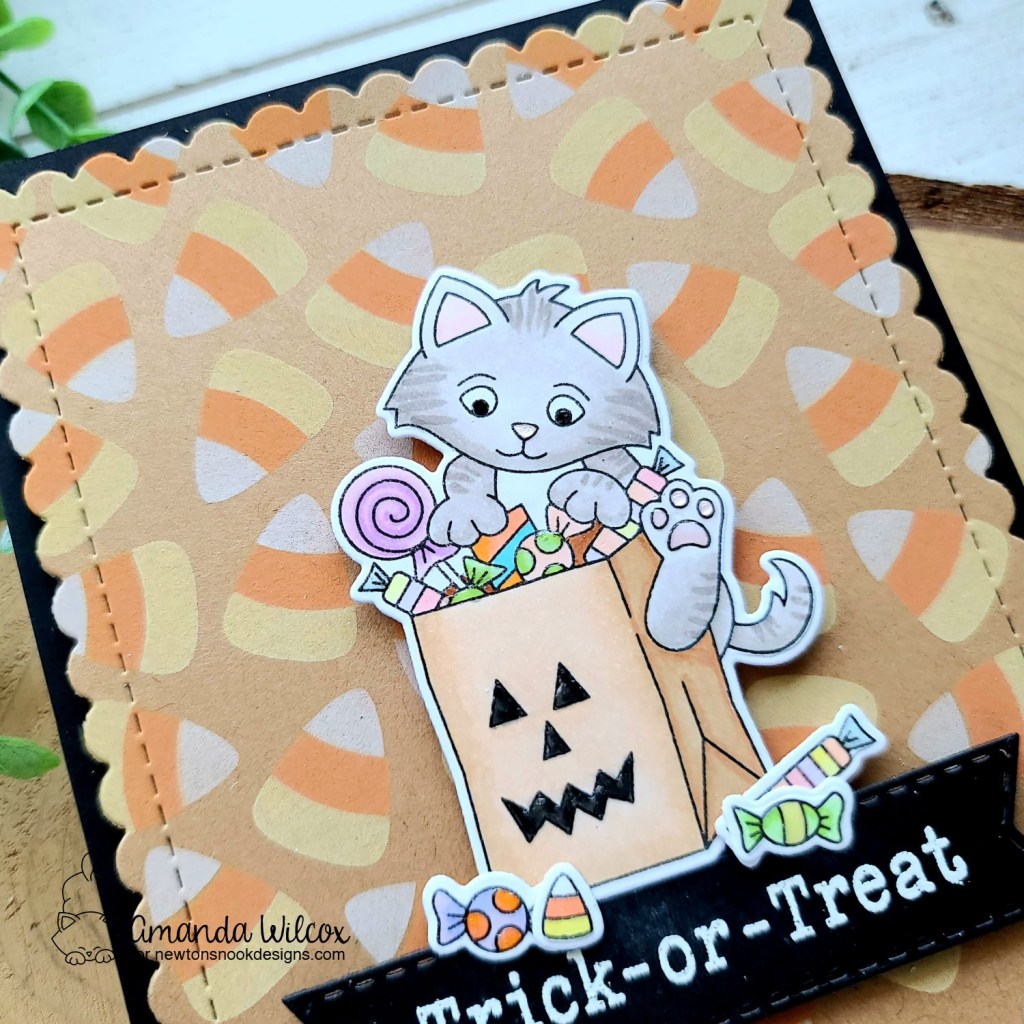
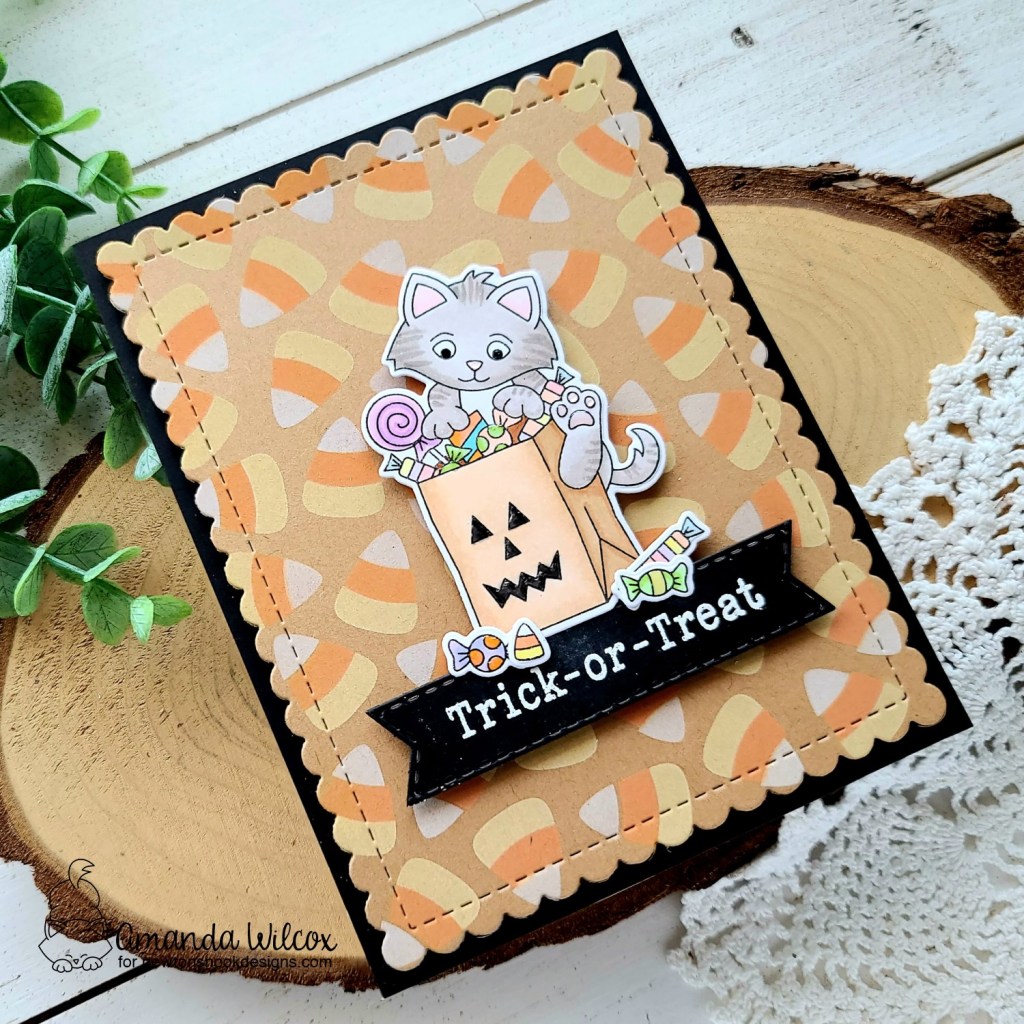
These sets are absolutely adorable and I have two fun cards to share with you today! I’m going to start with the sweet Trick or Treat Kittens where I also used the Candy Corn stencil that was revealed yesterday!
I had a simple design in my head for this card so I started by inking up the Candy Corn stencil layers with distress oxide inks. I just love how these sit on top of the paper so you don’t have to ink them on white! These candy corns on the kraft cardstock just look awesome to me! I let the ink dry for a bit and then I die cut the panel with the scalloped rectangle from the Frames & Flags die set.
Next, I stamped and colored images from the Trick or Treat Kittens set with my copic markers. I used the coordinating dies to cut them out and arranged them together, using liquid glue to adhere them where they overlap.
For the sentiment, I wanted to use one of the Banner Trio dies so I cut it from black cardstock and went digging for a long sentiment to put on it. Last year’s Spooky Roundabout has a fabulous selection so I stamped and heat embossed one from there on the banner.
I added foam tape to the back of the stenciled panel and popped it up on a black card base. Then I added foam squares to the images and sentiment banner and popped them in place next.
For finishing touches, I came in with glossy accents on the kitty’s nose and toe beans, plus the spots and stripes on the candy pieces. Then I thought it would be fun to draw a little interest to the face on the bag so I put them on there too. Last, I added black glace pen to the kitty’s eyes. I really think this makes a difference in the face and darkens those cute eyes just perfectly.
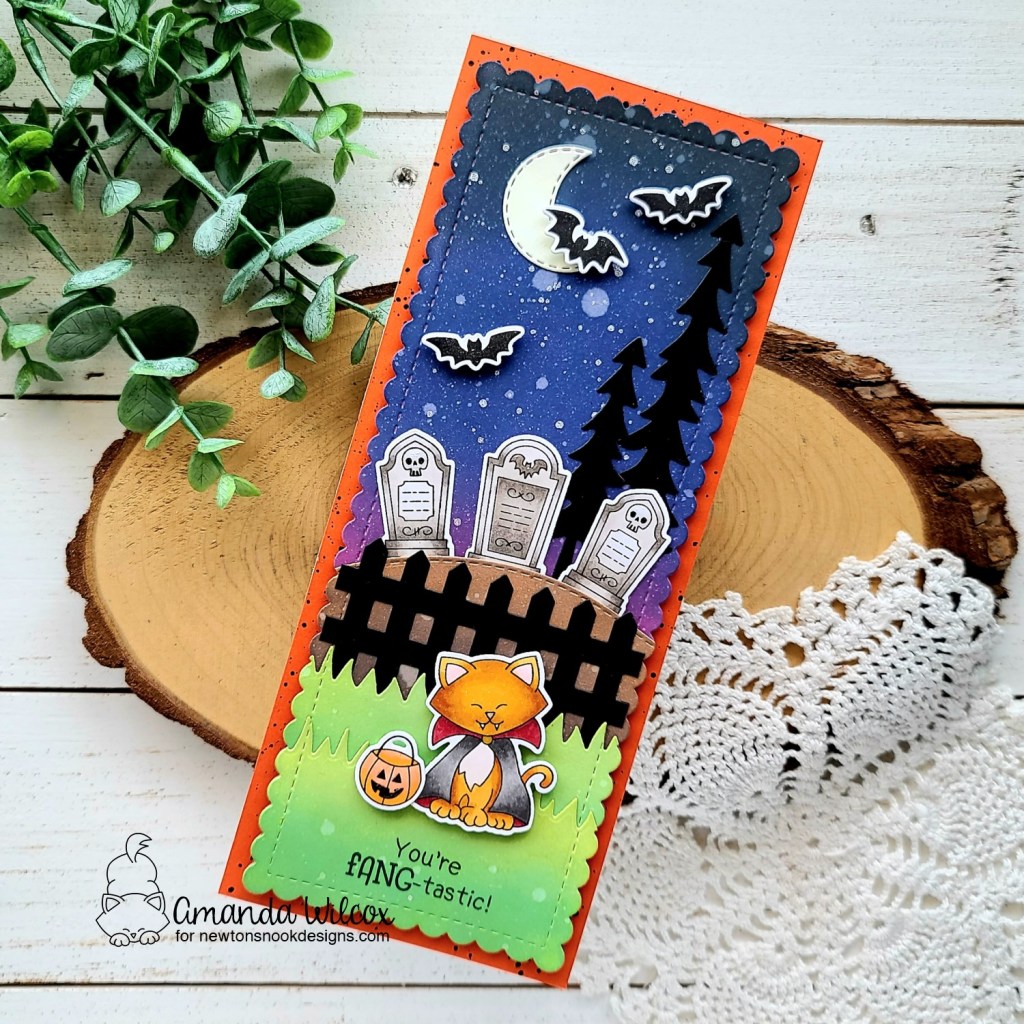
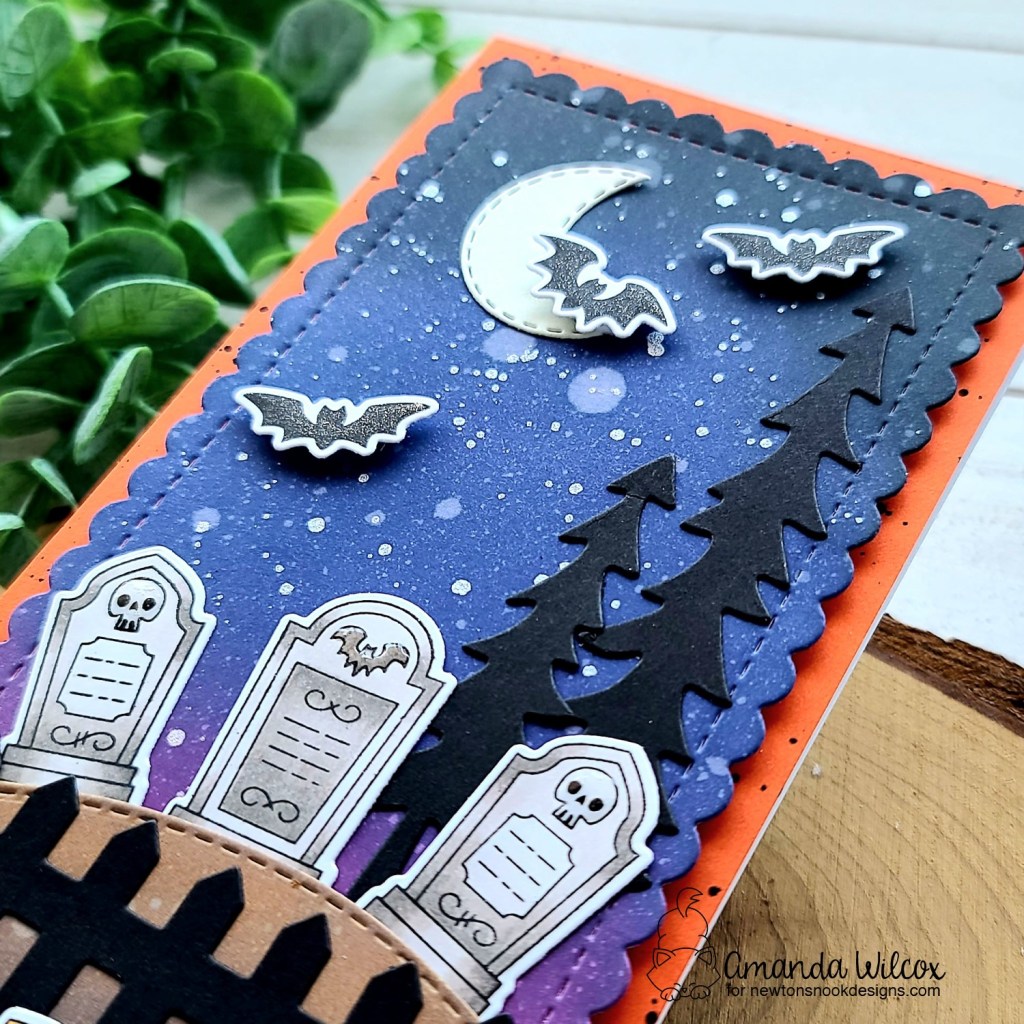
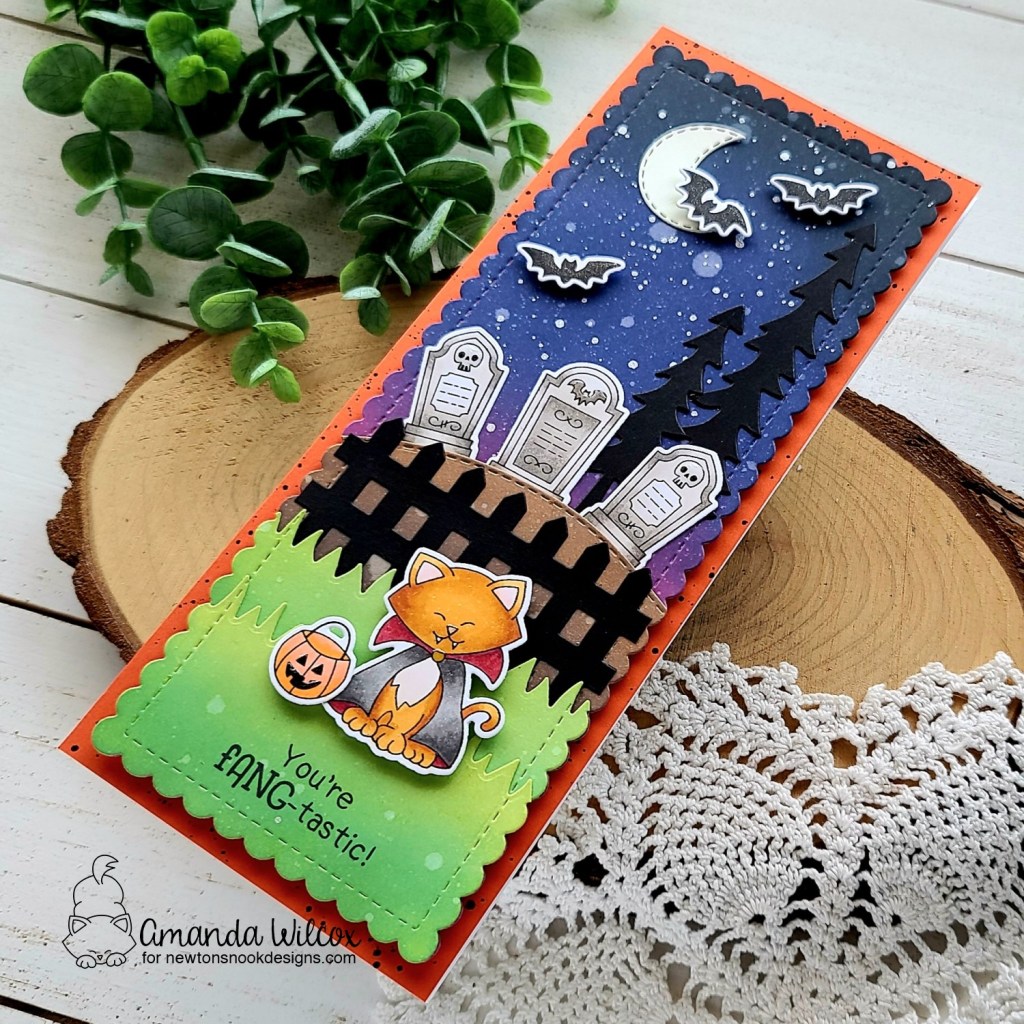
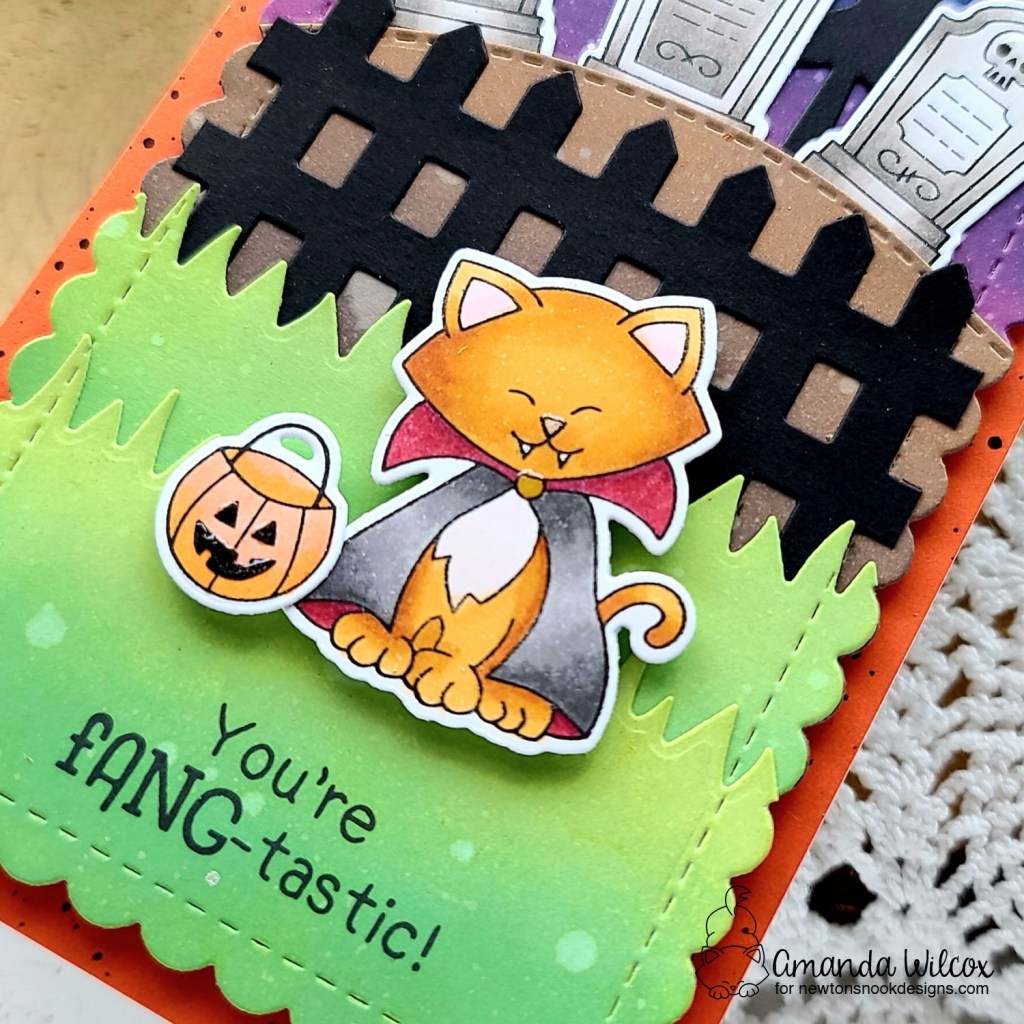
Now, for this fantastic new Count Newton set, I had to make a scene card. There are so many fun supporting images in the set that if you add just a couple supporting dies, it was quick and fun to create a fun, full scene!
For this card, I started by stamping and coloring my images. At the beginning I wasn’t sure if I would make an A2 size card or a slimline. Once the images were die cut and I started playing, it was clear that a slimline would be SO FUN! So that’s what I did. I die cut the Slimline Frames & Portholes scalloped rectangle twice. The background panel I inked up with distress oxides in seedless preserves, blueprint sketch and black soot. Then I took the grass die from the Land Borders set and cut either end off the other scalloped slimline panel. I inked those up with mowed lawn and twisted citron. With the middle portion left of the scalloped panel I used the other land border to cut the top off and create my dirt hill. I inked that up with gathered twigs and ground espresso.
Once all the panels were inked I put them on my glass mat and spritzed them with a distress sprayer all at once. While they were drying, I cut the fence die and some trees from the Forest Scene Builder die set from black cardstock.
Before adhering my layers together I splattered the night sky panel with pearl watercolor. Then I used liquid adhesive to glue all the layers together and let them sit with acrylic blocks on top for a few minutes since there were so many. Next, I came in wtih all of my images, adhering them with a combination of liquid glue and foam squares.
Once I got to filling in the sky, I thought it needed something so I die cut a moon from the Sky Scene Builder die set from white cardstock and colored it with a very pale yellow copic maker. After gluing it down I popped my last bats in place and stamped m sentiment at the bottom of my scene.
I cut a slimline card base but didn’t want a white border so I also cut a 3.5×8.5 inch orange panel and splattered it with black acrylic paint. After that was adhered to the card base I popped my scene panel up with foam tape and moved on to finishing touches.
I added glossy accents to various parts of my images like Newton’s nose, collar medallion, pumpkin face and bits on the headstones too. Then I came in with Wink of Stella glitter brush pen for the bats again because I just love that subtle shimmer.
Would you like to win the “Count Newton” or the “Trick or Treat Kittens” Stamp Set? We will choose ONE lucky winner for each stamp set!
Here’s how to win: Comment on the NND blog and Design Team blogs (see list below)! The winner will be chosen at random from the collective reveal posts. Make sure to check out each of their blogs and comment for your chance to win. You will not know which blog has been chosen so the more you comment on the better your chances are of winning! You have until Thursday August 19th at 9pm ET to comment — winners will be announced on the blog post on Friday, August 20th.
Check out all the awesome Design Team Blogs below to enter:
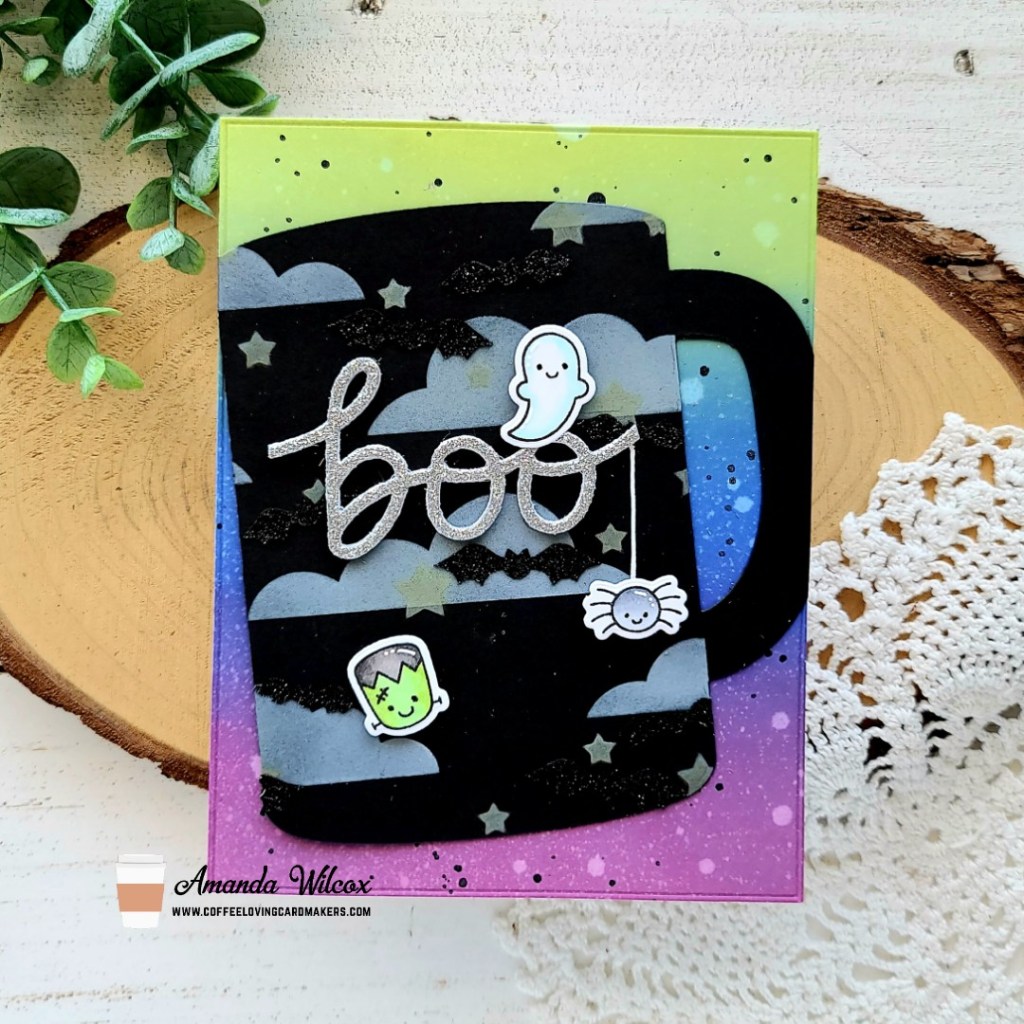
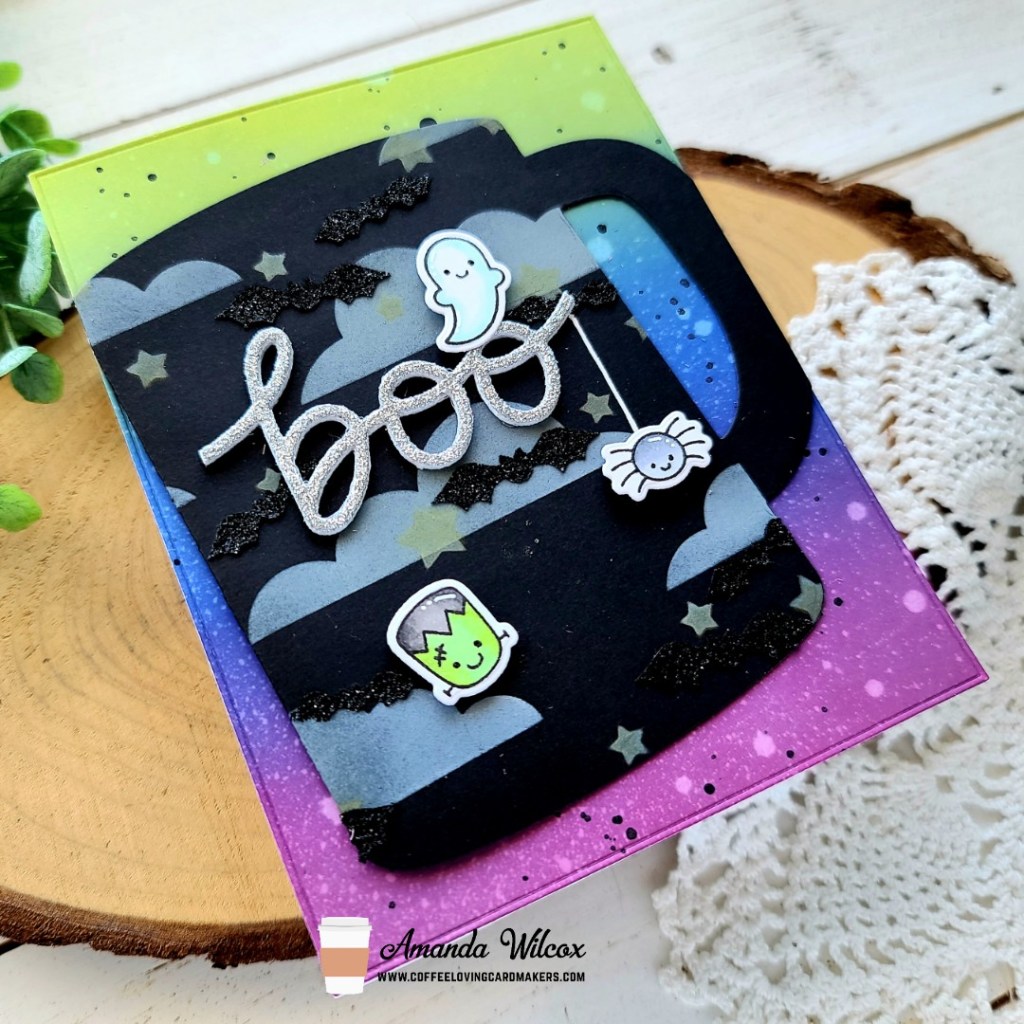
Happy Tuesday friends! It’s Tuesday Tea with Twiddler’s Nook over on the Coffee Loving Cardmakers today and I had some spooky fun creating today’s card! I used some newly released Halloween goodies from Pretty Pink Posh with the never-failing, ever-amazing Trinity Stamps Coffee Mug Card die.
To start, I die cut the coffee mug card from black cardstock. Then I inked it up with the spooky sky layering stencil set and pigment inks. For the last layer I used ThermOWeb glitz glitter gel to have sparkly black bats! To decorate the mug a little more I die cut the boo portion from the center of the boo shaker die from silver cardstock and also 4 times from white cardstock. I trimmed the word out and glued them together for the layered effect. Next, I chose 3 of the supporting images from the Halloween Wreath stamp set and colored them with my copics. I used the coordinating dies to cut them out and popped them up with foam squares on my mug.
At first I was going to make this a shaped card but I switched gears and ink blended a fun Halloween background instead. I used distress oxide inks in twisted citron, blueprint sketch and seedless preserves. I spritzed it with my distress sprayer and also flicked black acrylic paint on it. After the panel was dry I die cut it with the Trinity Stamps Modern Embossed Rectangle die.
I adhered the inked panel to an A2 size card base, glued my mug closed and to my card front and trimmed off anything hanging over the edge. For finishing touches I drew a web string from the end of “boo” to the top of my spider so it looks like it’s hanging down. Then I also added white gel pen accents to the images and black glaze pen to their eyes.
I know there are people clutching on to the last of summer but this girl is BEYOND READY for all thing FALL! These cards are just making my heart so happy to create! Where do you stand? Pumpkin spice or hand me another iced latte?
Woo-hoo!!!! Super excited to start sharing the amazing Newton’s Nook August release with you all this week! Today we’re starting with a REALLY fun stamp set and a new triple-layer stencil that you’re going to die for! Let’s not waste any time!
Brooms & Boos stamps and dies
Candy Corn stencil
Today I have a super fun card to share with the Brooms & Boos stamp set but I’ll be sharing an adorable card with the candy corn stencil later on this week! So, stay tuned!
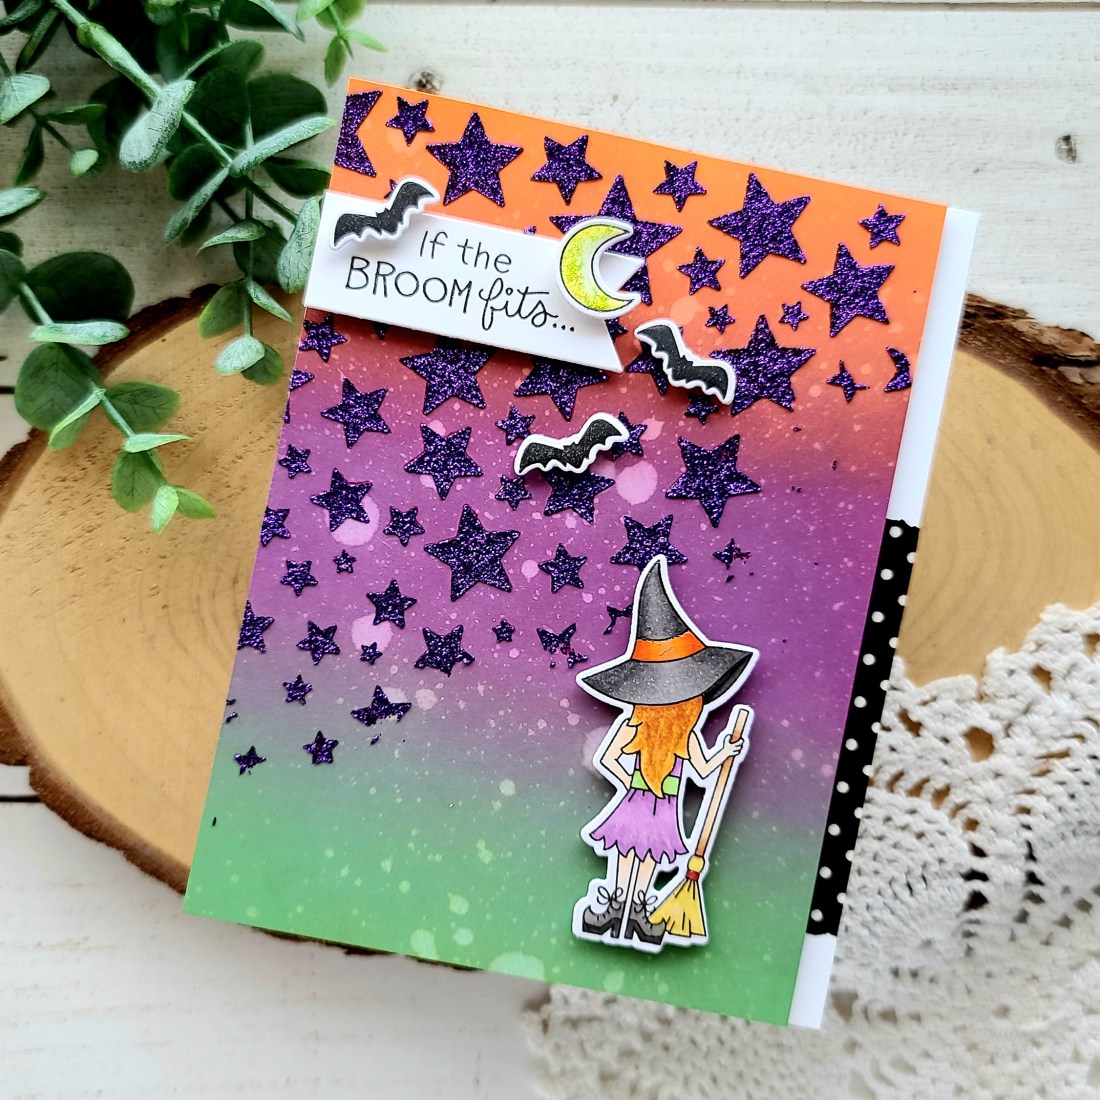
The sentiments in this set go so well with the images and I just love it all! Today I narrowed it down to a silly, moderately snarky sentiment and this cute little witch with her broomstick! I had fun pulling out some traditional Halloween colors to use too!
After stamping my images, I used copic markers to color them and the coordinating dies to cut them all out. For my background panel I blended distress oxide inks in mowed lawn, seedless preserves and carved pumpkin. I sprizted the panel with water and let it dry. Then I adhered the Cascading Stars stencil to it and spread Wild Lilac Glitter Glitz Gel from Thermoweb through that. I started in the top left corner and just spread until it faded out. I didn’t want a full panel of glitter, just some fun accents.
Once that panel was dry, I trimmed it down to 5.5×4 inches and added foam tape to the back. For a little accent I stuck a strip of washi tape on the edge of my card base and then adhered the background panel down.
Arranging my images on the card front, I decided to add my sentiment to a banner from the Frames & Flags die set. This die is solid so I cut it out first and stamped the sentiment second. Then I added foam squares to the back of everything and adhered it all down.
For finishing touches I added some glossy accents to my witch on things like her hat band, boots, broom and belt. Then I added Stickles to the moon for a little glitz up there too. I couldn’t leave the bats alone though so I painted some Wink of Stella clear glitter brush pen on them so they shimmer too!
Would you like to win the “Brooms & Boos” Stamp Set?This stamp set will be given away to ONE lucky winner!
Here’s how to win: Comment on the NND blog and Design Team blogs (see list below)! The winner will be chosen at random from the collective reveal posts. Make sure to check out each of their blogs and comment for your chance to win. You will not know which blog has been chosen so the more you comment on the better your chances are of winning! You have until Thursday August 19th at 9pm ET to comment — winners will be announced on the blog post on Friday, August 20th.
Check out all the awesome Design Team Blogs below to enter:
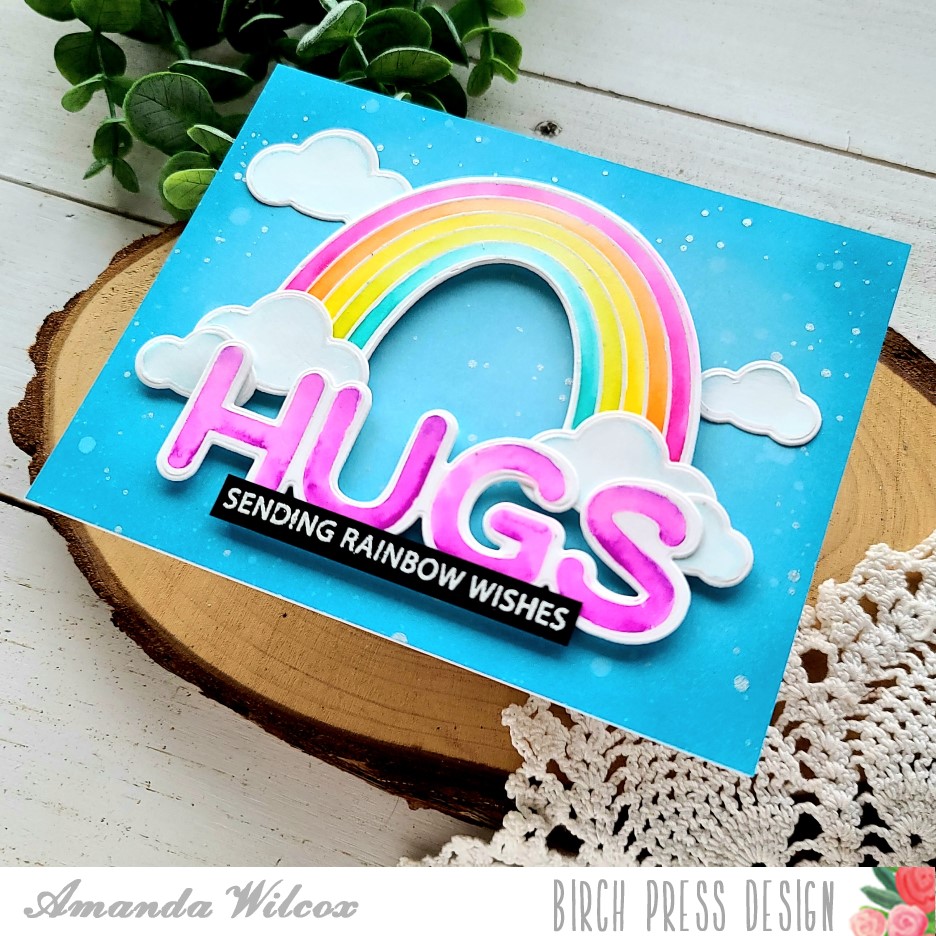
Happy weekend friends!!! I’m up on the Birch Press Design blog today with some bright and happy watercolor fun! Be sure to head there for the step-by-step, but here’s a look at the card and the general gist.
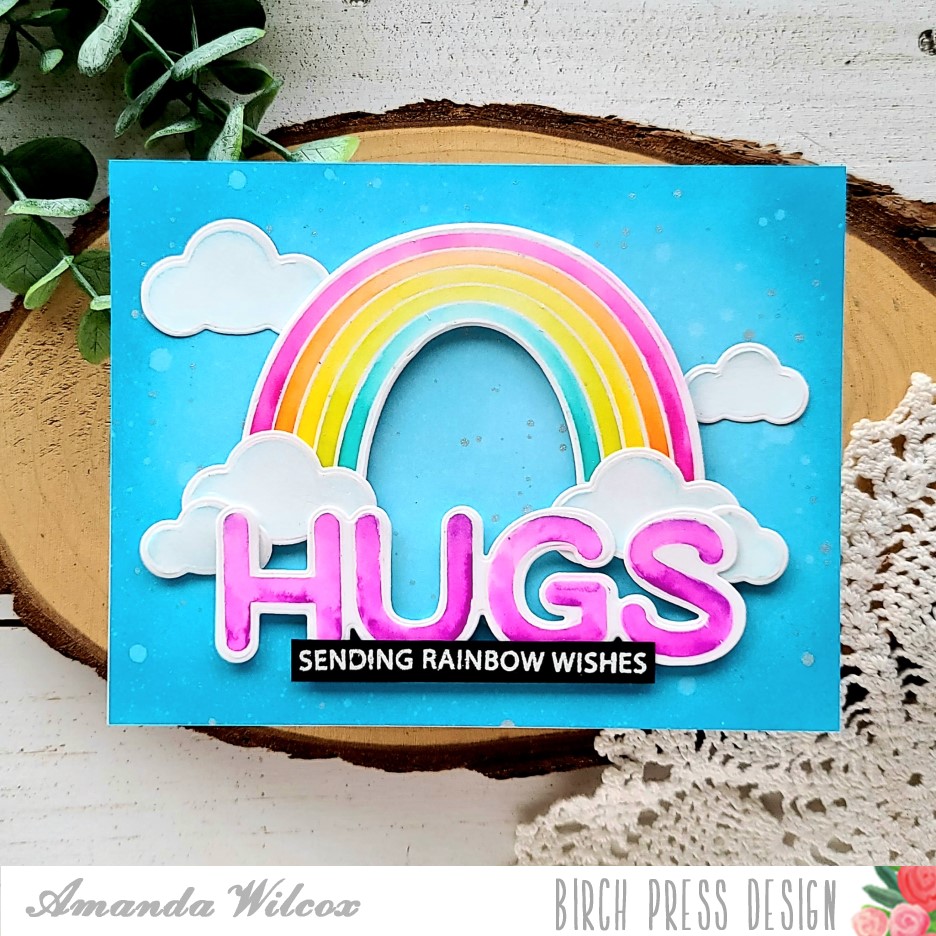
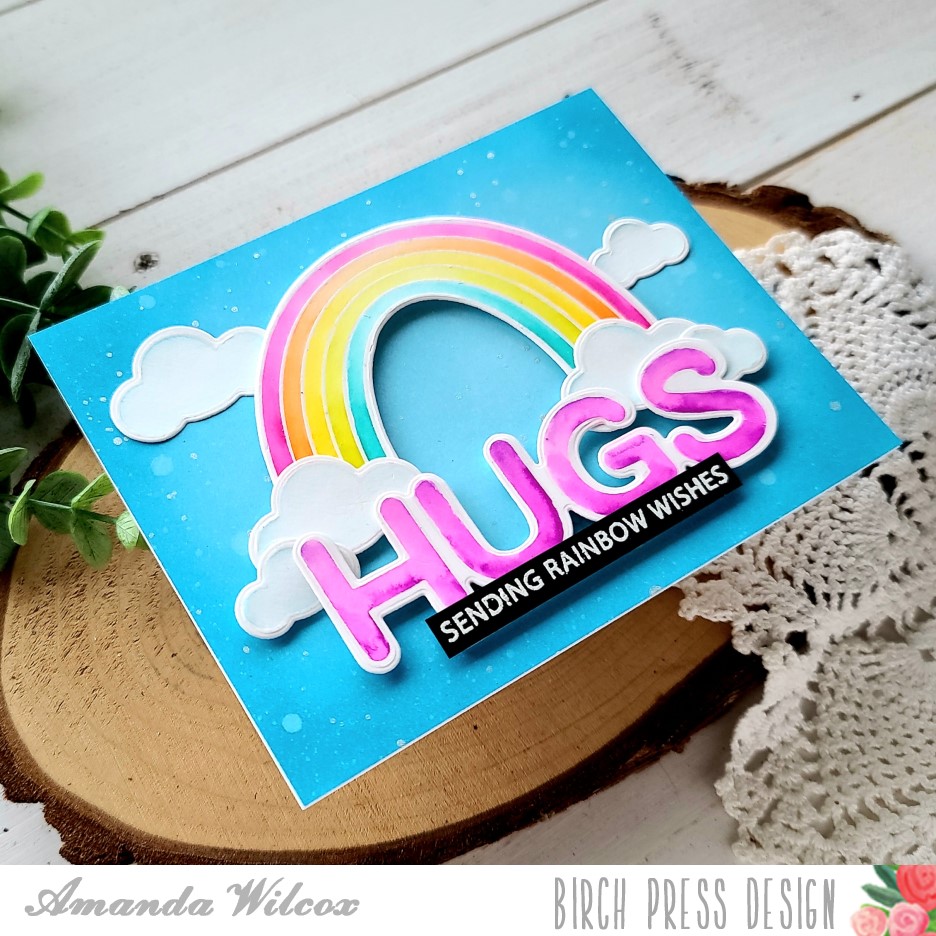
I stamped and heat embossed images from the Rainbow Lingo Notes and Happy Lingo stamp sets with clear embossing powder on Bristol Smooth Cardstock. Then I watercolored them with Zig Clean Color Real Brush markers.
Then I inked blended a background with distress oxide inks in mermaid lagoon and tumbled glass. I spritzed the panel with water and flicked some pearl watercolor on it too.
Next, I adhered the images with a combination of foam squares and liquid glue. After the watercolor portion was adhered I thought it was lacking something. That’s when I discovered the fun “sending rainbow wishes” sentiment in the Rainbow Lingo Notes set and had to use it. I stamped and heat embossed it on black cardstock and popped it in place with a foam strip.
Voila! So bright and happy! I just love how this turned out! I also think it would be fun to color the rainbow in non-traditional, out-of-order colors, maybe with a color theme in mind too! I tend to stick to reality but sometimes it’s just more fun not to! Don’t you think?
I hope you enjoyed today’s card and found some inspiration to create something wonderful.
I appreciate you sharing your time with me. Have a fabulous day!
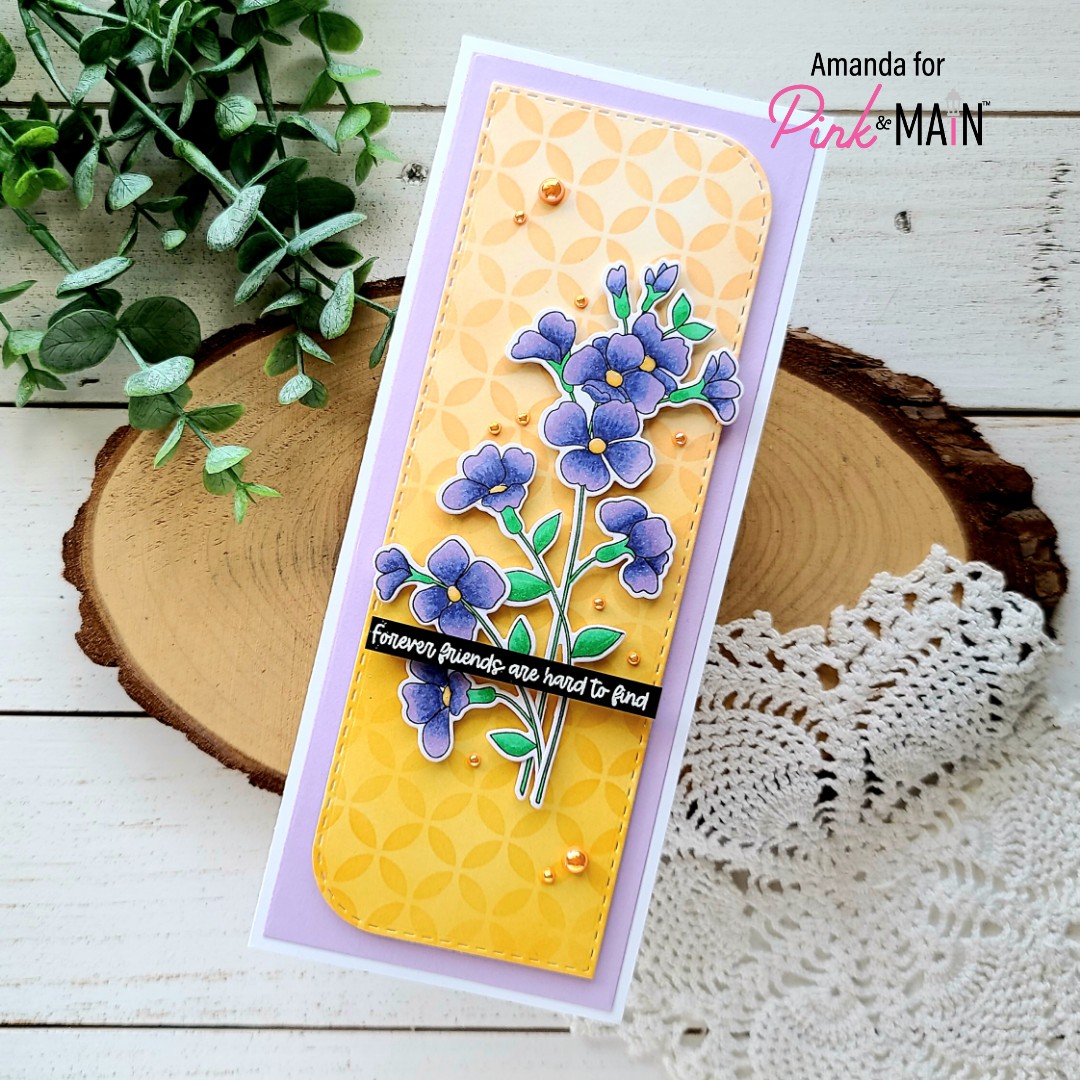
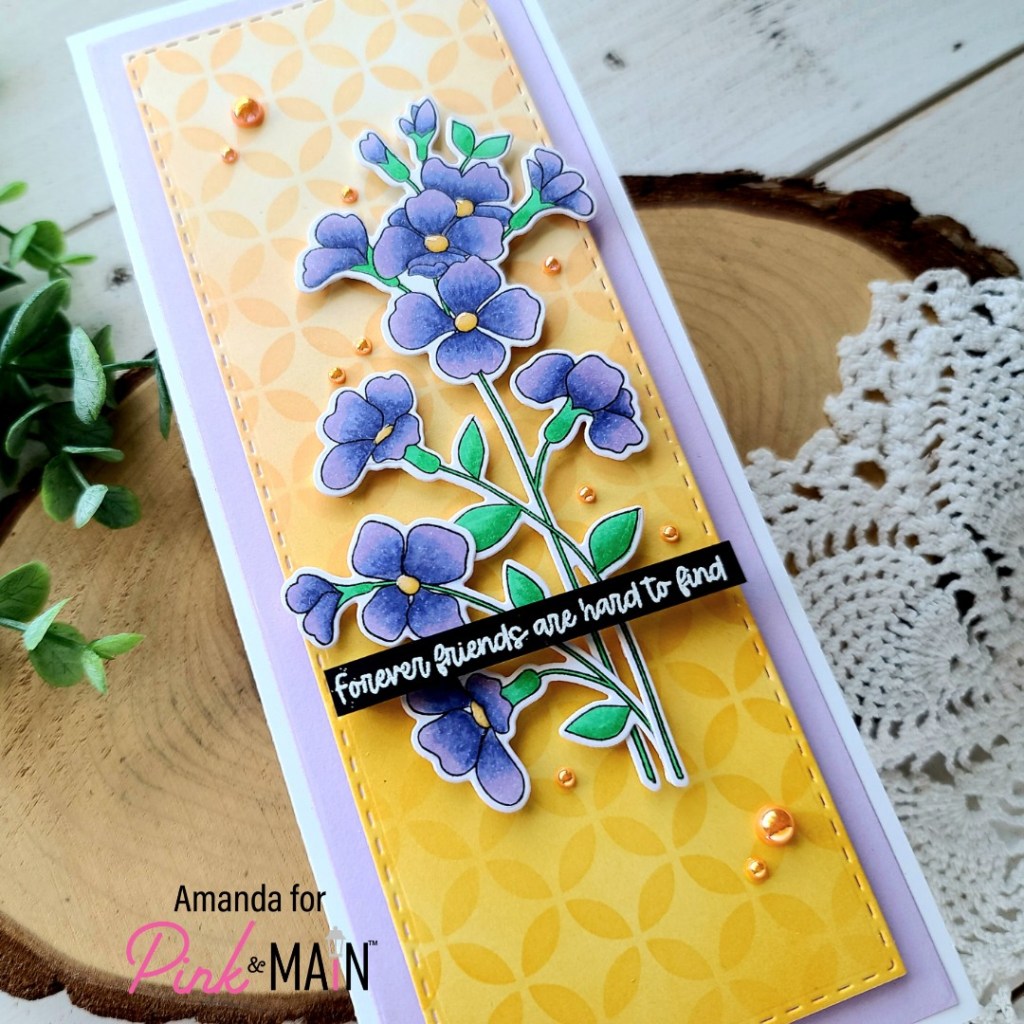
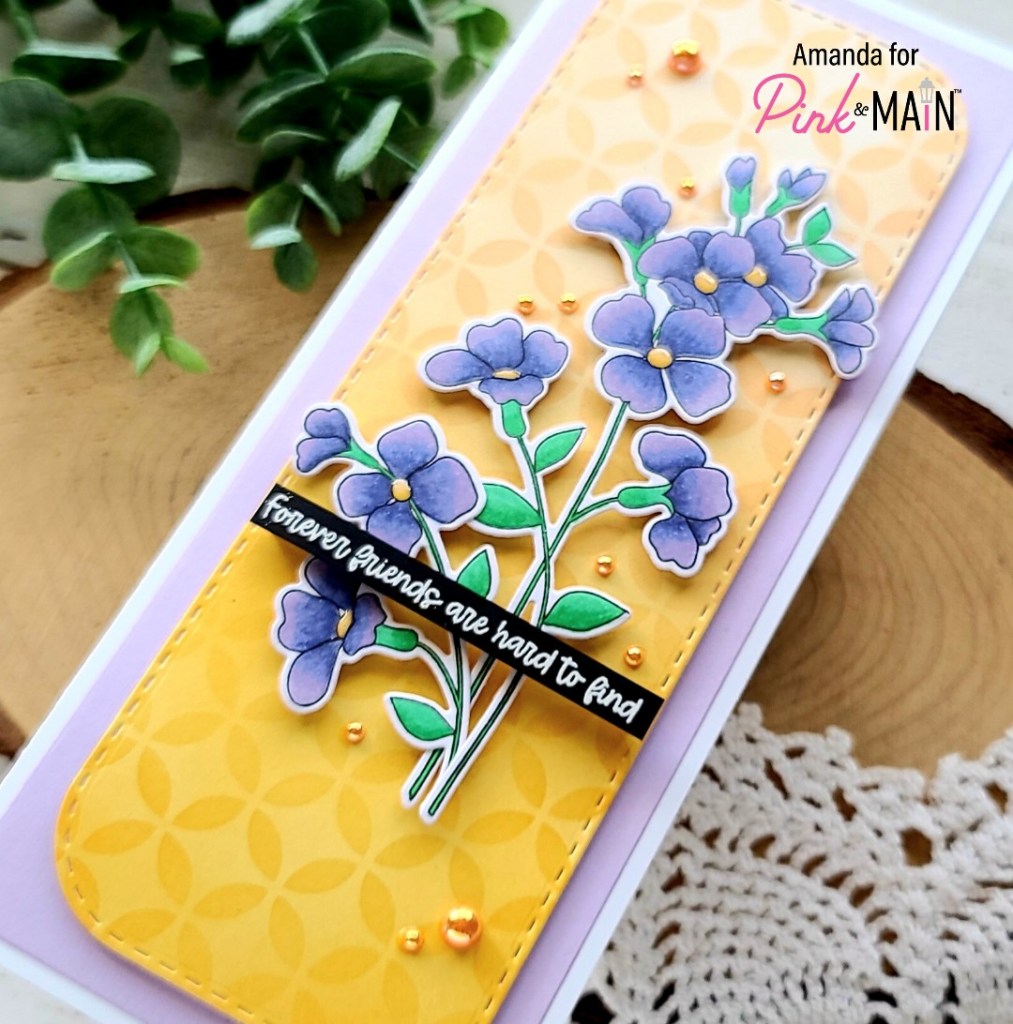
Happy Friday my crafty friends! I hope you had a wonderful week and will be able to do what makes you happy this weekend! Today I’m over on the Pink & Main blog with a floral slimline card.
I thought these florals would be great for a slimline card with their long stems so I started by stamping both images from the You stamp set. I colored them with my copic markers and used the coordinating dies to cut them out. Playing off the colors I used on the flowers, I chose inks close to the flower centers and blended them across a white panel and then again over the deco stencil. Then I used the smaller slimline shape from the Beautiful Slim Line die set to cut the panel out.
Next, I die cut a purple panel with the next-to-largest Layered Slim Line dies and moved on to assembling my card. First I used EZ Squeeze glue to adhere the purple panel to a white slimline card base. Then I popped the stenciled panel up with foam tape. Finally I used foam squares to pop up my flowers.
This latest release was packed full of wonderful sentiment sets so I looked through those and landed on one, which I heat embossed on black cardstock. I trimmed it into a strip and used foam to pop it up as well.
For finishing touches, I added glossy accents to all of the flower centers. Then after much hemming and hawing, I chose beautiful orange pearls to adhere all around my design from the Rainbow Pearls embellishment wheel.
I’m not a floral girl at all but I was quite happy with the way this turned out and had fun coloring these sweet images.
Woo-hoo!!!! Super excited to announce the release of the first ever Trinity Stamps kit! It’s called the Summer Blooms Papercrafting Kit and it includes a stamp and die set, 4 Ink on 3 ink cubes, a special embellishment mix and a coordinating paper pad! We’ve been sharing sneaks all week and today I have another card to share with you plus details on a sale and we’re having a hop over on Instagram too!
So many things going on, we better jump in!
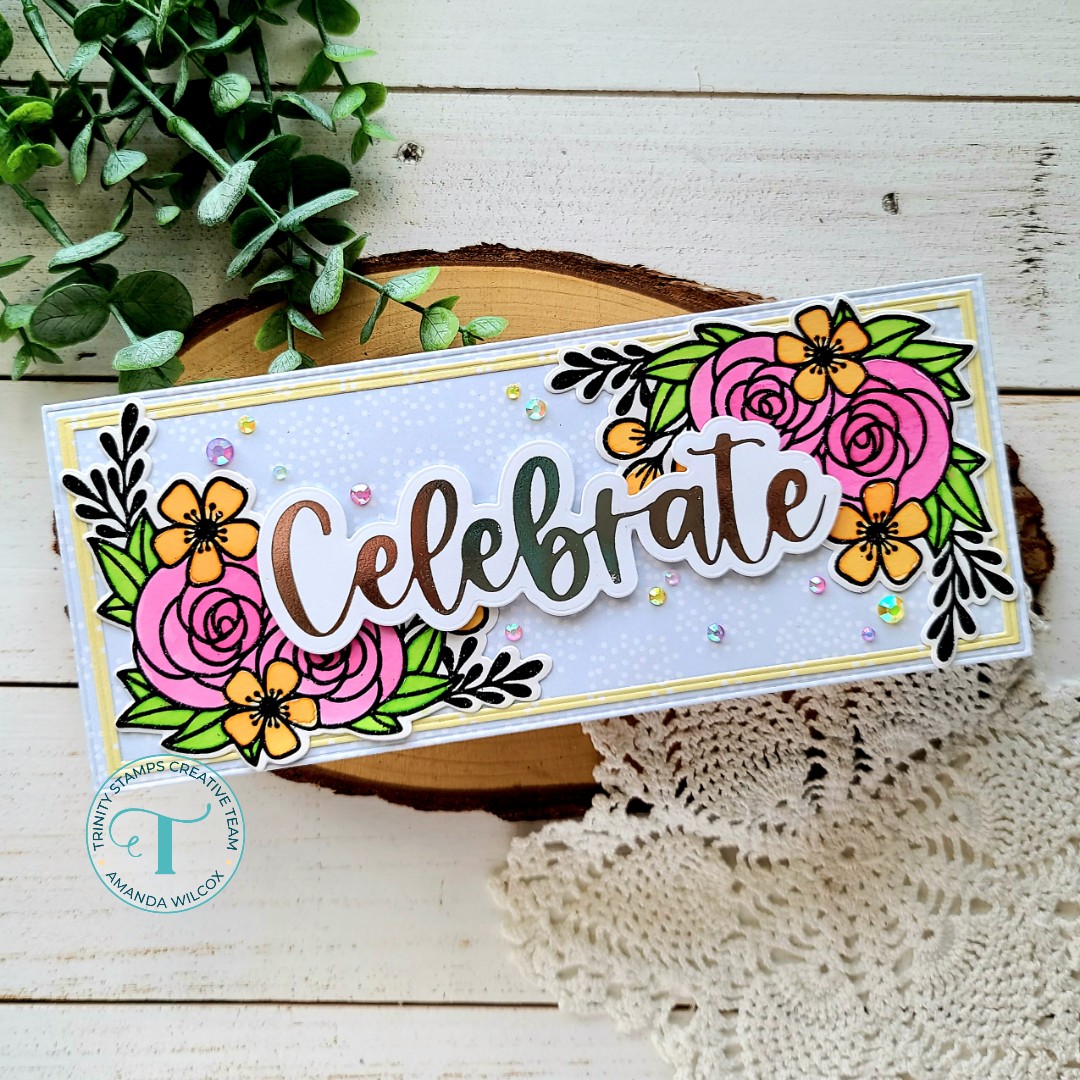
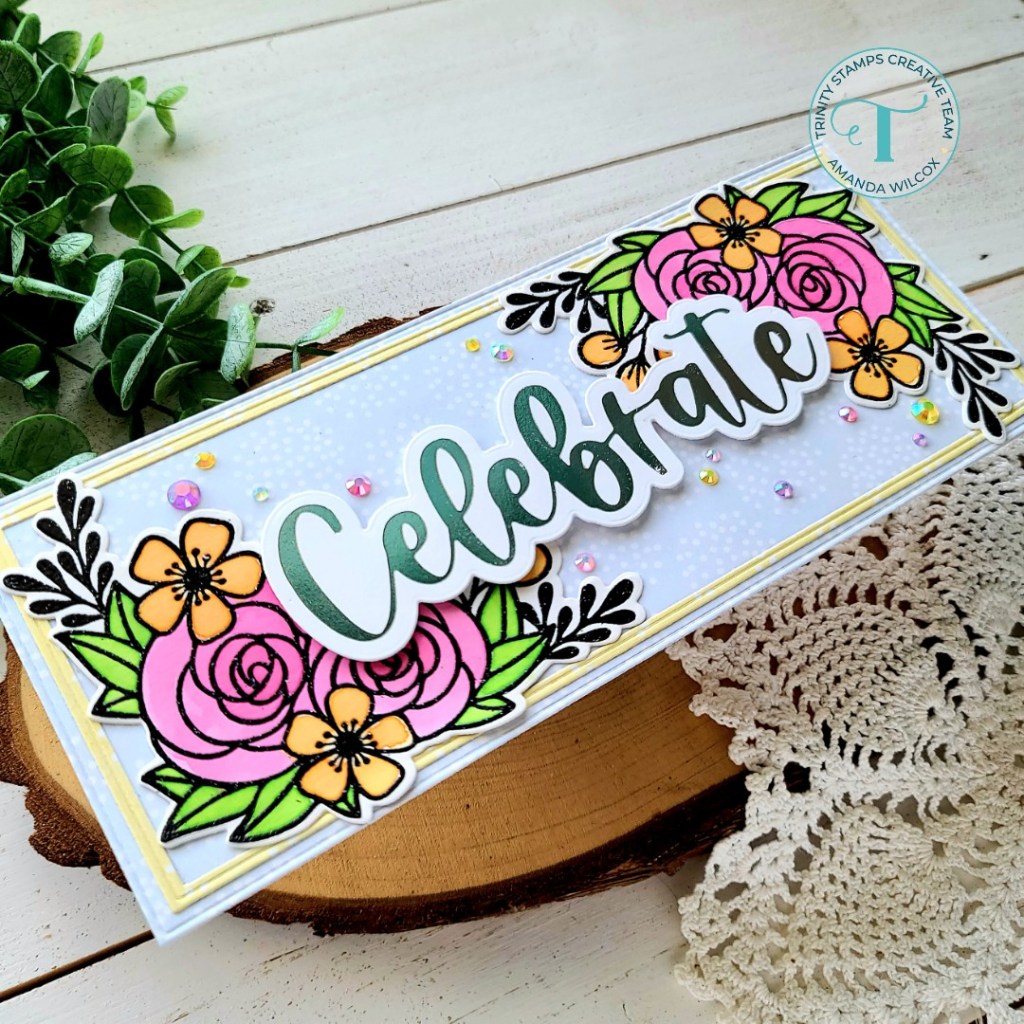
I wanted to showcase as much of the kit as possible so today I stamped and heat embossed the largest image in the stamp set and used the Ink on 3 cubes to watercolor them. Then I used the coordinating dies to cut them out. I used paper from the pad and die cut a Slimline Modern Embossed panel. Then I took the next two sizes down from the same set and cut a thin frame from paper in the set as well. I used liquid glue to adhere these together and to a white slimline card base.
I used liquid glue to adhere the watercolored florals and put clear blocks on top to keep them flat while I switched gears to foiling my sentiment.
For this part, I used the Spellbinders Glimmer System and the new Big Celebrate Cut and Foil die set. I foiled the word Celebrate in silver on a white panel and then used the shadow die to cut it out. I adhered this to my card with foam tape.
For finishing touches I adhered a scattering of jewels from the embellishment mix in the kit all across my design.
I just love the bright and happy feel this kit naturally has and because of that how bright and happy my card is! Okay, now for info on the sale and such…
Summer Blooms Papercrafting Kit was designed by Paper Starr and because of that Trinity has a sale on our First Bloom stamps and coordinating dies which were also designed by her. For a limited time, we are offering a discount on our 4×6 First Bloom Stamp Set and Coordinating Die set when they are purchased with this kit. Just enter code FirstBloom20off at checkout for a 20% discount off of the 4×6 First Bloom Stamp Set and Coordinating Die Set (both items must be added separately and purchased with the kit in order to receive the discount.)
Also, we’re having a hop over on Instagram today so be sure to join us for the celebration and comment there for a chance to win!