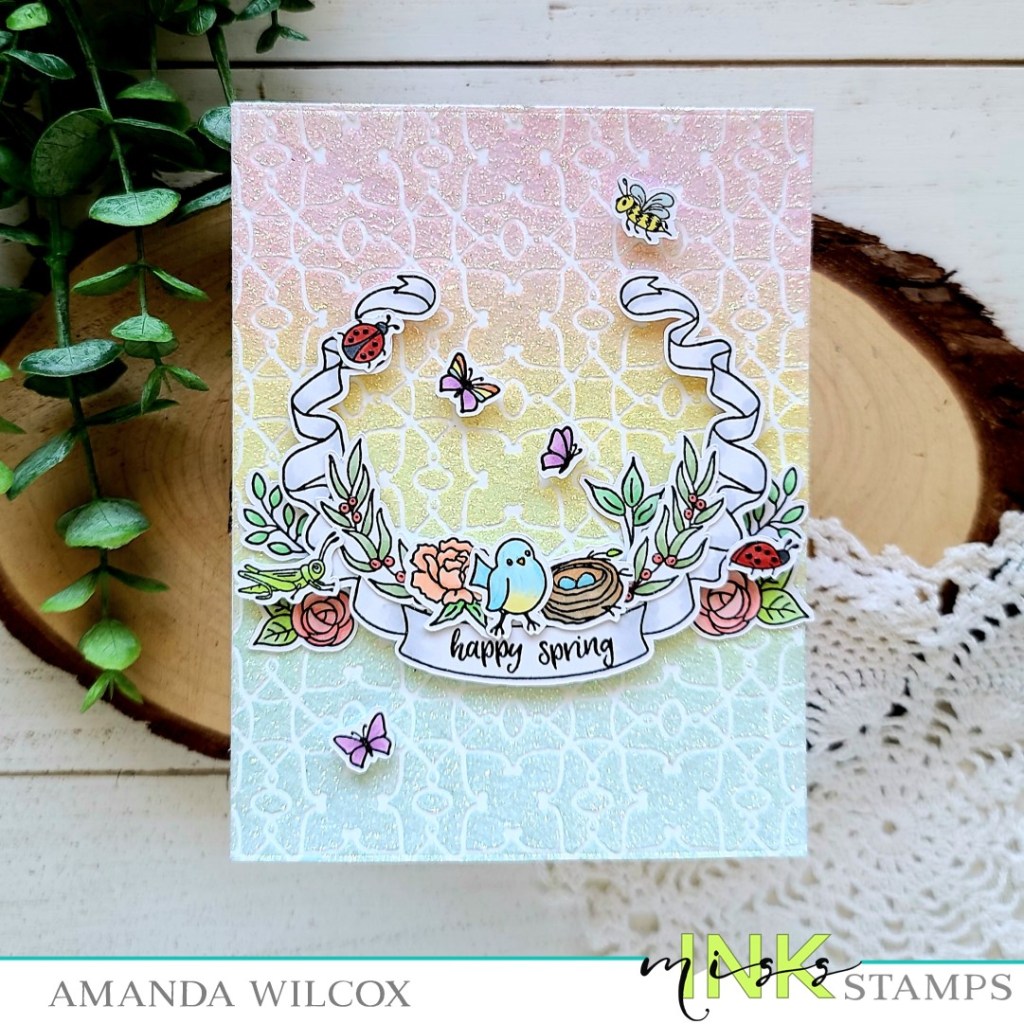
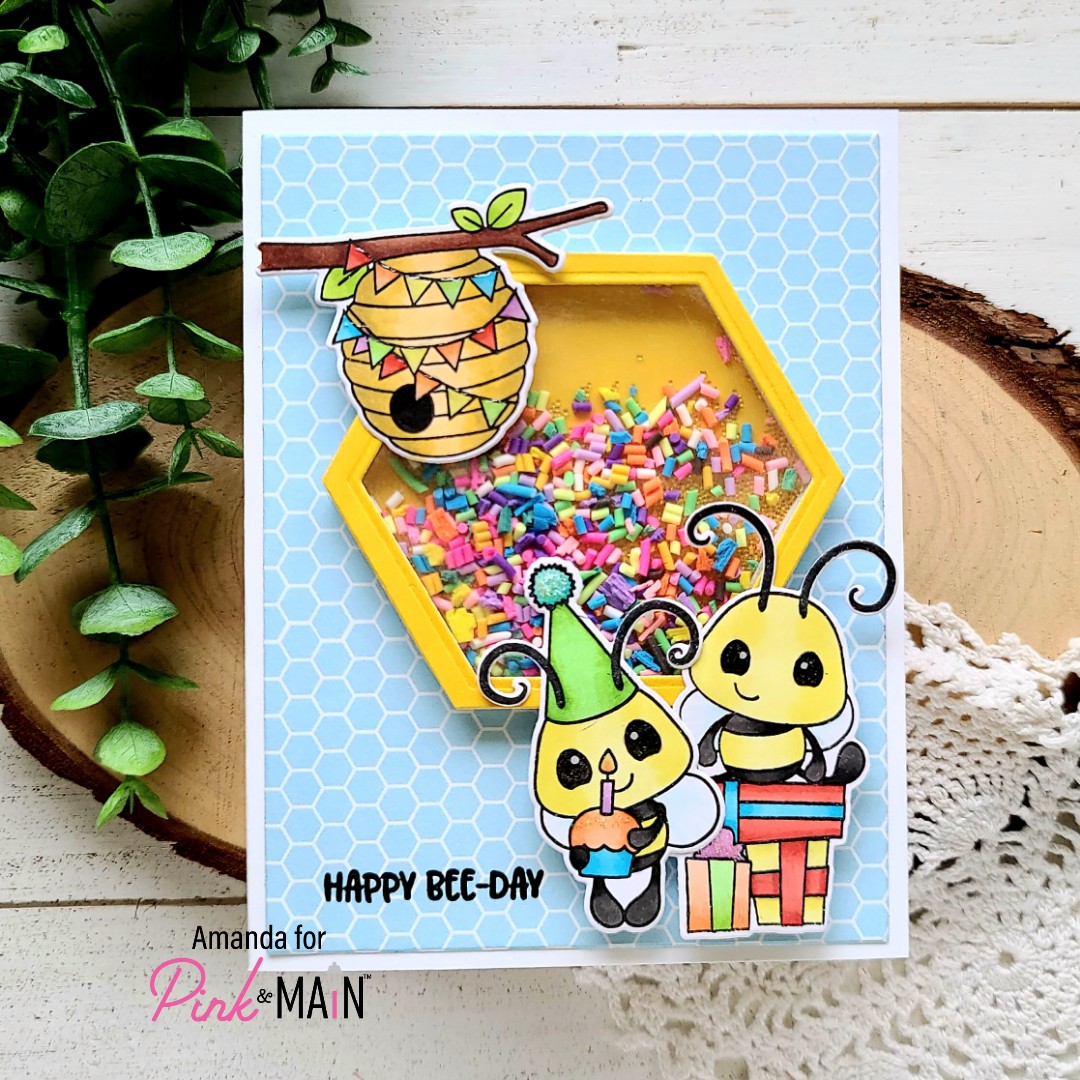
Miss Ink Stamps – Happy Spring + Sneak Peek

Hello everyone! I have a gorgeous Miss Ink Stamps card to share with you today and it has a sneak peek in it too! We’re having a new mini release of stencils tomorrow and I’m using one on my card today called Enchanted. The name is totally what directed the feel of my card and I just love it.

I sprayed my stencil with Pixie Spray and adhered it to a white panel. Then I used my Lawn Fawn dye inks in kiddie pool, butter and ballet slippers and a blending buddy brush to ink up the stencil. I wiped my stencil off and added iridescent Glitter Glitz Gel over the top. I set that aside to dry while I cleaned up and stamped my images from Springtime Banners. I colored those with my copic markers and used the Scan-n-cut to cut them all out. Then, I stamped a sentiment from Springtime Bunnies in the banner.

Once the glitz gel was dry, I ran the panel through my die cutter with the largest Trinity Stamps embossed edge rectangle die. I used liquid glue to adhere the panel to a white card base and started adding images. These were done with a combination of foam squares and liquid glue for some dimension.

I kept finishing touches very light because I wanted to focus to be on that amazing glittery background and cool stencil design – just some simple glossy accents to butterfly bodies, bird eggs and beak, dots on the ladybugs, things like that.

I appreciate you sharing your time with me. Have a fabulous day!

Trinity Stamps – Let’s Hang Out

Hi everyone! Thanks for stopping by! Today I’m over on the Trinity Stamps blog sharing this really super amazing slimline card featuring some of my favorite critters ever!!! I love bats in real life but these cuties just take the cake! Let’s check it out!

I have a little photo grid to walk you through the first steps I did to create my card. I had the design in mind already so after laying the stamps out to make sure things would fit how I wanted, this is what I did.

I stamped and colored the images from Fang-tastic Friends with my copics. Then I cut them out with the coordinating dies. I pulled out the embossed edge circle stack and chose the sizes that fit best together and arranged things. Then I blending distress oxides in twisted citron, pine needles and chipped sapphire on a panel. I spritzed the panel with water and then flicked it with pearl watercolor and black acrylic paint for some fun texture and shimmer. Then I ran the inked panel through my die cutter with the largest slimline series embossed panel die. Next, I taped the embossed edge circles in place and ran those through on a white panel.

To get the line stamped just where it needed to be, I put my inked panel and the white panel in my MISTI and used the images to line everything up. Picked up the stamp with the lid and removed everything by the inked panel so I could stamp the line down. I did this same technique for each opening and it worked like a charm.

I added everything with foam squares and tape, and the moved on to my sentiment. I took one of the sentiments from the Fang-tastic Friends set and stamped it while masking the middle word. I heat embossed them in white on black cardstock and used a banner from the 4-bar card die set to cut them out. Then I used the graham cracker alphabet to cut the word hang from black cardstock 3 times and used a quickie glue pen to glue them all together. This pen works great for teeny tiny pieces. I used foam squares on the back of the banners and popped them in place too.

For the last finishing touches on this sweet card, I added glossy accents to all the bat noses and left it at that. Isn’t this card just adorable?!? And I was able to get extra use out of a Halloween-themed stamp set too! Dig in your stash, maybe you have something fun that you could try too!

I appreciate you sharing your time with me. Have a fabulous day!

Coffee Loving Cardmakers – Boba Tea Birthday Wishes

Hey everyone! Over on the Coffee Loving Cardmakers for another fantastic Tuesday Tea with Twiddler’s Nook! Today I’m playing with some really fun Mama Elephant goodies my family spoiled me with for Christmas.

I simply started by die cutting the penguin favor bag add on from white cardstock and colored it with my copics. Then I had a fun idea to add it to a frame so I pulled out my Avery Elle wonky scalloped frames and cut the largest from teal cardstock. I inked up the center part that the frame cuts out with a couple of purple inks and my blending brushes and decided my penguin needed to hold something. My mind immediately went to the super fun boba tea set so I went to work stamping and coloring one of the cups. I used the coordinating dies to cut it out and started assembling everything.

I found it easiest to adhere my penguin to the inside frame panel and then adhere it to the card base. Then I added the frame around it because it overlaps the side of the penguin just a bit. I carefully tucked the boba cup in the penguins hands and glued it in place. Then I popped the whole thing in my MISTI and stamped my sentiment in the same purple ink that I blended on the panel.

For finishing touches, I added eyelashes to my penguin and glossy accents to the penguin beak, eyes and the bow on her head. Finally, I added some conversation hearts clay bits from the Twiddler’s Nook shop around the sentiment.

Isn’t this just the cutest?!? I seriously have a thing for these big die cut cuties! I love playing around with them!

I appreciate you sharing your time with me. Have a fabulous day!

Birch Press Design – Congrats

Welcome to another wonderful week everyone! Today I’m popping in really quick to share a card that I made for a coworker who recently got married. I used some of the Birch Press Design layering dies, with a Lawn Fawn sentiment and some Trinity Stamps baubles.

I started by die cutting all 3 layers to the Viola Plate layer set from white cardstock. I used liquid glue to adhere them together and then chose a light green card base to glue those to. I pulled out my Lawn Fawn Scripty Thanks die and cut it from silver glitter cardstock, the same green as the card base and white and glued them together with liquid glue as well. I added some foam squares to the back and popped it in place.

I love the look the shifted sentiment gives and how much that teeny bit of glitter cardstock adds to the whole design. It’s so pretty!

Last, I finished the design off by gluing some Trinity Stamps Stunning Silver Baubles to the centers of the “flower” areas on the Viola die cuts.

Isn’t this so pretty? It would be beautiful for so many different occasions as is or swapping out the sentiment takes it to a whole other level of possibilities.

I appreciate you sharing your time with me. Have a fabulous day!

Jane’s Doodles – You’re a Blast!

Hello everyone! I had some fun crafty time Friday night and wanted to share with you what I made. I’ve had this card in my head for a while and was super excited to get it down on paper finally! I just love this To the Moon set from Jane’s Doodles and absolutely had to pair it with the Trinity Stamps Crater Layers stencil.

I started by inking up a panel with Lawn Fawn inks and my Trinity Stamps blending buddy brushes using the crater layers stencil. Once the crater was complete, I used the negative piece included in the set to block the crater and ink up the rest of the panel.

Then I stamped and colored my images from To the Moon with my copic markers. I used my scan-n-cut to cut out the images and started arranging them. I used liquid glue to adhere everything down except the spaceship. I put my card in my MISTI and stamped the sentiment over the crater. Then, I popped the spaceship on my card with an action wobbler to make this card SUPER FUN!

For finishing touches I added unicorn Stickles on the stars, moon rocks and fire, and glossy accents on bits of the spaceship and planet rings.

This card is so awesome and so much fun to play with! In fact, it’s so fun that I made a slo-mo video to share with you too!

Squeeee!!!! Isn’t that just so much fun! And I’m super excited to finally figure out how to edit these fun videos so I can share them with you more often.

I appreciate you sharing your time with me. Have a fabulous day!

Birch Press Design – Enchantment Meets Crystal Lingo

Welcome everyone! Today I’m over on the Birch Press Design blog with this pair of cards featuring the Enchantment layering dies and the Crystal Lingo stamps and coordinating dies. I had a fun idea I wanted to try after being inspired by my friend Ellen earlier this week and instead of having waste, I made 2 cards!

My original idea was to die cut the three layers for the Enchantment layers but omit the middle arch like I did on the card on the left, but I couldn’t just waste those pieces so I went ahead and cut just that middle part a second time and created another card!

My friend Ellen inspired me this week by using Thermoweb Deco Foil Flock for her Birch Press layers and I thought it looked so cool that I wanted to try it out. For today’s card, I used green flock, a pink textured cardstock for the middle layer and a smooth rose colored cardstock for the top layer.

On this first card, I didn’t want the background layer to be stark so I did a little ink smooshing on a panel and adhered it to a white card base. Then I adhered the Enchantment layers together and on to the card. I stamped, heat embossed and cut out the sentiment from the Crystal Lingo set and used a combination of foam squares and liquid glue to adhered them down. For finishing touches I used pearl baubles from Twiddler’s Nook to give some shiny accents around the design.

For the second card, I blended tattered rose and dried marigold distress oxide inks on a panel, spritzed it with water and flicked some pearl watercolor on it. Once it was dry, I trimmed it down to 4×5.25 inches and popped it up with foam strips on a white card base. I adhered my Enchantment ring and then the sentiment just like the first card. I used the pearl baubles from Twiddler’s Nook on this card as well, just in a different way scattering them across the design randomly.

These colors are so pretty and have me wishing for sunshiny warm days and being outside!

I appreciate you sharing your time with me. Have a fabulous day!

Pink & Main – Easter Peeps

Happy Friday everyone!!! I hope you all had a wonderful week and are ready for a great weekend ahead! Today I’m over on the Pink & Main blog sharing this set of 4 Easter cards featuring the Easter Peeps stamp set, coordinating dies and some other goodies too! Let’s dive in and I’ll give a little explanation of each one.

Actually, first…I had no direction when I started these cards, just an itch to watercolor these cute chicks so I stamped and heat embossed a bunch of them on a piece of Bristol Smooth cardstock and colored them with my Zig markers and a waterbrush pen. Then…

For this first card, I pulled out the new Happy paper pad and the largest Stackable A2 rectangle dies to create my background. I cut a white circle and, using the green watercolor paper from the same pad, a reverse scalloped circle. I created a shaker mechanism adding some great primrose confetti bits from the Twiddler’s Nook shop. I adhered the background to a card base with liquid glue and the shaker mechanism on that the same way. Then I added foam tape to the back of my images and popped them in place. I stamped a sentiment from the stamp set and die cut it with a large sentiment strip and popped it up as well.

I knew that I wanted to make a card with the basket cover die as my background so I pulled that out next and cut it from white. I used liquid glue to adhere it down and added foam squares to the back of my images. For the sentiment, I stamped and heat embossed it black so it matches the images and did partial die cutting with one of the mod stitched rectangles to create a custom size. Then, to finish this card off I made the smallest stitched bow and added it below the sentiment.

I only had 2 images left at this point so I made a couple of fun clean and simple cards with them. This one, I did some ink smooshing with cracked pistachio distress oxide ink on a white panel, popped my image up with foam squares and stamped the sentiment below it. I trimmed 1/2 inch off the bottom of the panel and added foam tape to the back. Then I stamped a striped background with black ink on a card base and added my panel. This card might be my favorite of all…

For this final card, I trimmed another piece of paper from the Happy paper pad and adhered it to a card base. Then I trimmed a piece of white cardstock to 2 strips and popped them up with foam tape. Using my MISTI, I stamped my sentiment and then using a combo of foam tape and liquid glue to adhere my little chickie. I decided to finish this card off with some super cute Happy Mail glitter enamel dots scattered across the card.

I know this was a long post and I’m glad you stuck with me to the end. Did you have a favorite card from the bunch?

I appreciate you sharing your time with me. Have a fabulous day!

Miss Ink Stamps – We’re All Mad Here

Hi again! I’ve fallen down the rabbit hole again…those wonderful Miss Ink Stamps Alice in Wonderland products are ahhhhh-mazing! This time for some reason, when I looked at the rabbit hole stencil looked a bit like the Cheshire Cat’s stripes so I decided to play a little bit.

I took some Glitz Glitter Gel in bubblegum and the rabbit hole stencil from Miss Ink Stamps on purple cardstock! It’s totally brilliant and I love it! I left it overnight to dry and when I came back the next day I did think the purple cardstock was a little flat so I inked up the edges with distress oxide ink in wilted violet and spritzed it with my distress sprayer.

I arranged my stamps how I wanted them and found a Trinity Stamps modern embossed rectangle the correct size and die cut a piece of vellum. Then I stamped and heat embossed my sentiments from Miss Ink Stamps Madness and that awesome image of Chesh’s face from Wonderland Wisdom. I hid some liquid glue behind the embossing and placed it on the stenciled panel, topping it with some acrylic blocks to help it dry flat.

I left it be for a while and came back to finish things up. I trimmed 1/8 inch off each side of the stenciled panel and added foam tape to the back. Then I adhered it to a white card base and my card is finished.

Isn’t it splendid?!? I just love how the bright, vibrant colors turned out! It’s so fun and the Alice sentiments just make me happy.

I appreciate you sharing your time with me. Have a fabulous day!

Trinity Stamps – Hello There

Hi again! Popping in with a super bright and happy slimline card featuring Trinity Stamps goodies today too. Hoping these sunshiny vibes will go out into the universe and come back to me in the form of a weather change around here. Haha!

I started by stamping and coloring images from Hello There with my copic markers. Then I used the coordinating dies to cut them all out. I stenciled a white panel with the Waving Hello layering stencil in 2 different yellow inks. I die cut a scalloped frame from Slimline Series: Envelope Builder die set.

Moving on to assembly, I used liquid glue to adhere the stenciled panel to a slimline card base measuring 3.5×8.5 inches. I added foam strips to the back of the frame and put that down next. Then I added foam squares to the back of all my images and sentiment and put them in place.

For finishing touches, I added some glossy accents here and there on places like the gnome shirt sleeve and parts of random butterflies. Then I went back and added a little sparkle with unicorn Stickles to other parts of butterflies.

Cheers to better weather soon…I hope. I could really use some sunshine and walks outside soon.

I appreciate you sharing your time with me today. Have a fabulous day!

Newton’s Nook – Barnyard Party

Welcome! Welcome! The party is just getting started! So glad you could join us…

Haha! I couldn’t resist. I’m over on the Newton’s Nook blog today sharing a really fun barnyard party slimline card. Now that we’ve got sheep to add to the farming mix I couldn’t resist getting everyone together for a birthday celebration.

I started this card by die cutting a panel with the Slimline Frames & Portholes scalloped die and laid out my stamps across it to make sure everyone would fit. Then I stamped images from Bleat, Moo, Baa, Neigh, Oink and Cluck. I used my copic markers to color everything in and then the coordinating dies for each set to cut them all out.

For the background, I inked the top of the white scalloped panel I started with in a light blue. Then I cut a second scalloped panel and then used the Land Borders die to cut a hill. I inked the top brown and then used the Hills & Grass Stencil to add some grass to the bottom. This gives the look of another layer without an actual extra layer.

I added foam tape to my hill and attached it to the sky panel. Then using a combination of foam squares and liquid glue I adhered all of my animals and the barn. Some are popped up for extra dimension and some are glued straight down. Once that was finished, I popped the panel in my MISTI and stamped the sentiment in some of the open sky.

Next, I cut a yellow panel 3.5×8.5 inches and used liquid glue to adhere it to a white card base. Then with foam tape I popped the panel on that and moved on to finishing touches.

For those, I started with black glaze pen on all of the critter eyes so it had time to dry. Then I moved on to glossy accents on things like hooves, beaks and noses. Then I added some glossy accents to the white parts of the barn as well. Once the critter eyes were dry, I went back in and added white gel pen highlight to the ones that typically have one in the stamped image.

I can’t get over all these different critters and how well they work together. This is such a fun and happy card! I hope you enjoyed it too!

I appreciate you sharing your time with me. Have a fabulous day!