Happy Friday everyone!!! The Newton’s Nook January Release is officially available for purchase! I hope you love it and would be super excited to hear what you choose to snag from it.
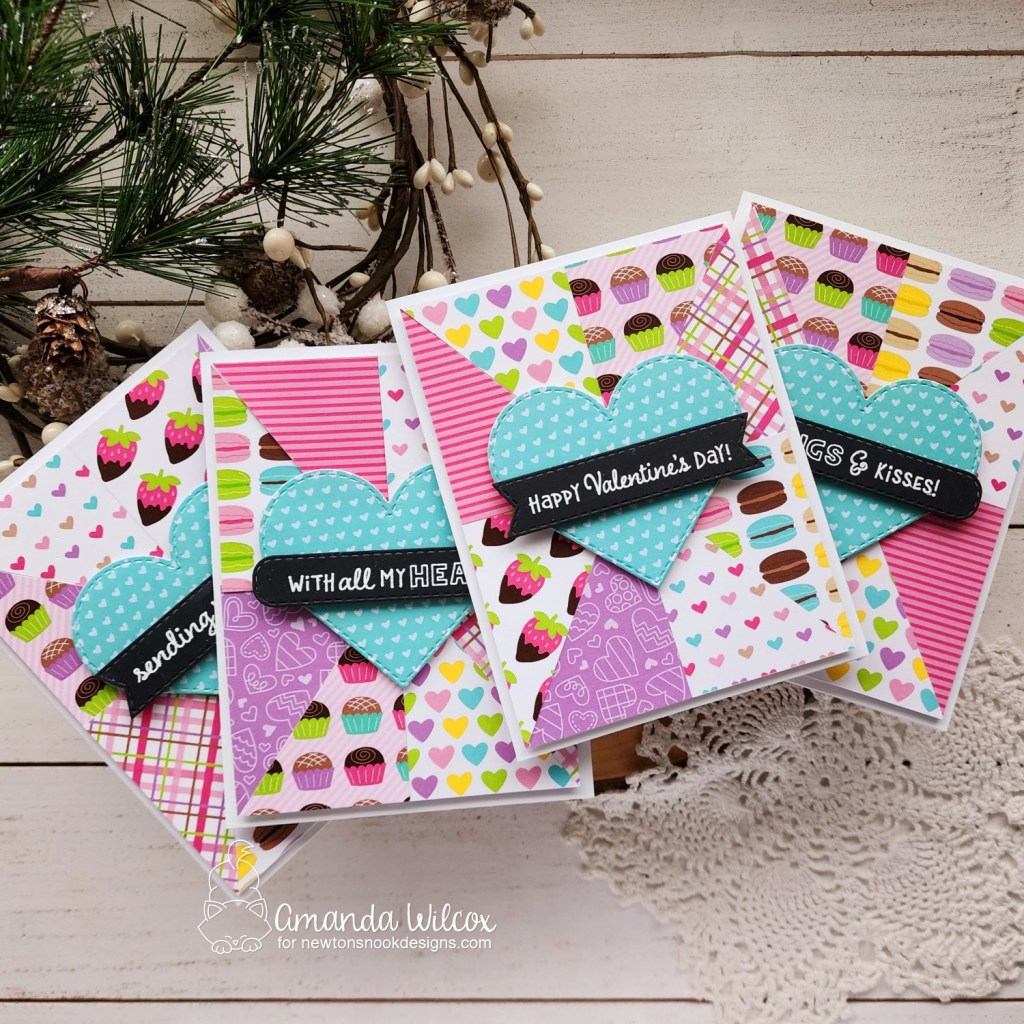
Today I have a set of cards to share using the Love & Chocolate paper pad. This design goes well with virtually any paper pad but I thought it was extra fun for Valentine’s Day coming quick and wanted to share some inspiration.
Since the paper pads are double sided, I chose four designs and cut them into4 – 2×2 3/8 rectangles. Then I cut those rectangles in half diagonally – two going one way and two going the other so the designs that had a direction had options of where to be placed.
I arranged the pieces so each background has one of each design, then glued them to copy paper and added foam tape to the back of that. Next, I cut 4 of the same heart using the Heart Frames dies to pop up in the center of each background. I die cut a few banners using the Banner Trio dies and heat embossed sentiments from the Heartfelt Love stamps on each one.
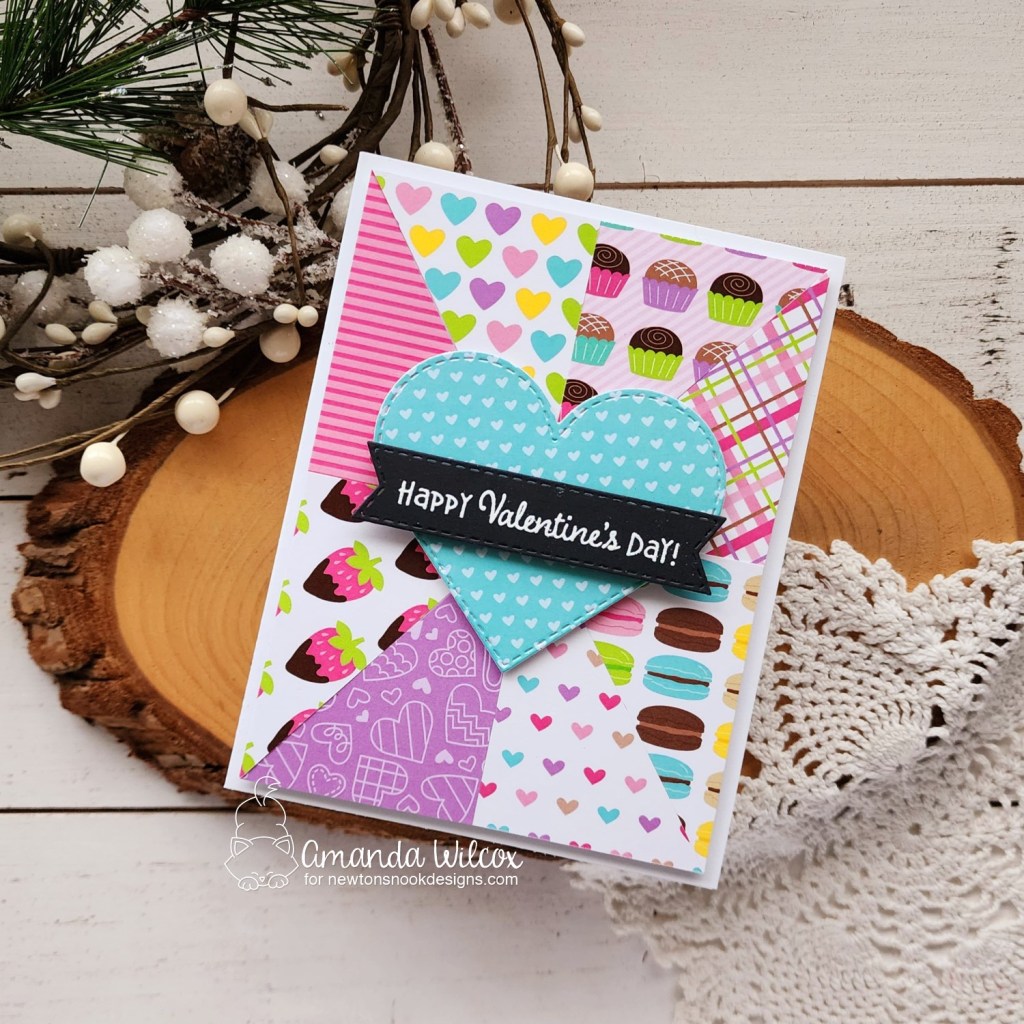
Here’s a less busy photo of just one card so you get the idea. These are easy to create in mass and fun with all of those awesome designs to choose from in the different paper pads.
Remember if you change the center shape to a circle or star, you could create birthday, get well, thinking of you, the sky is the limit! Also, the Roundabout and Heartfelt stamp lines from Newton’s Nook are absolutely PERFECT for sentiments in the Banner Trio dies. This expands your sentiment choices ten-fold!
I can’t believe it’s already the final day of release reveals for the Newton’ Nook January Release! I hope you have loved everything as much as we do and are excited for today’s inspiration and tomorrow’s fantastic shopping day!
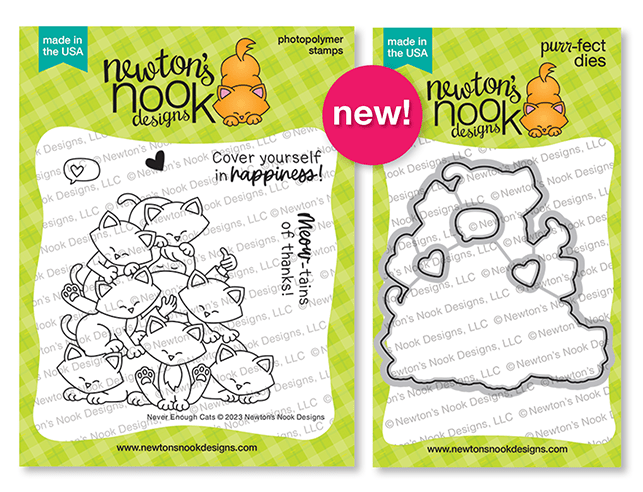
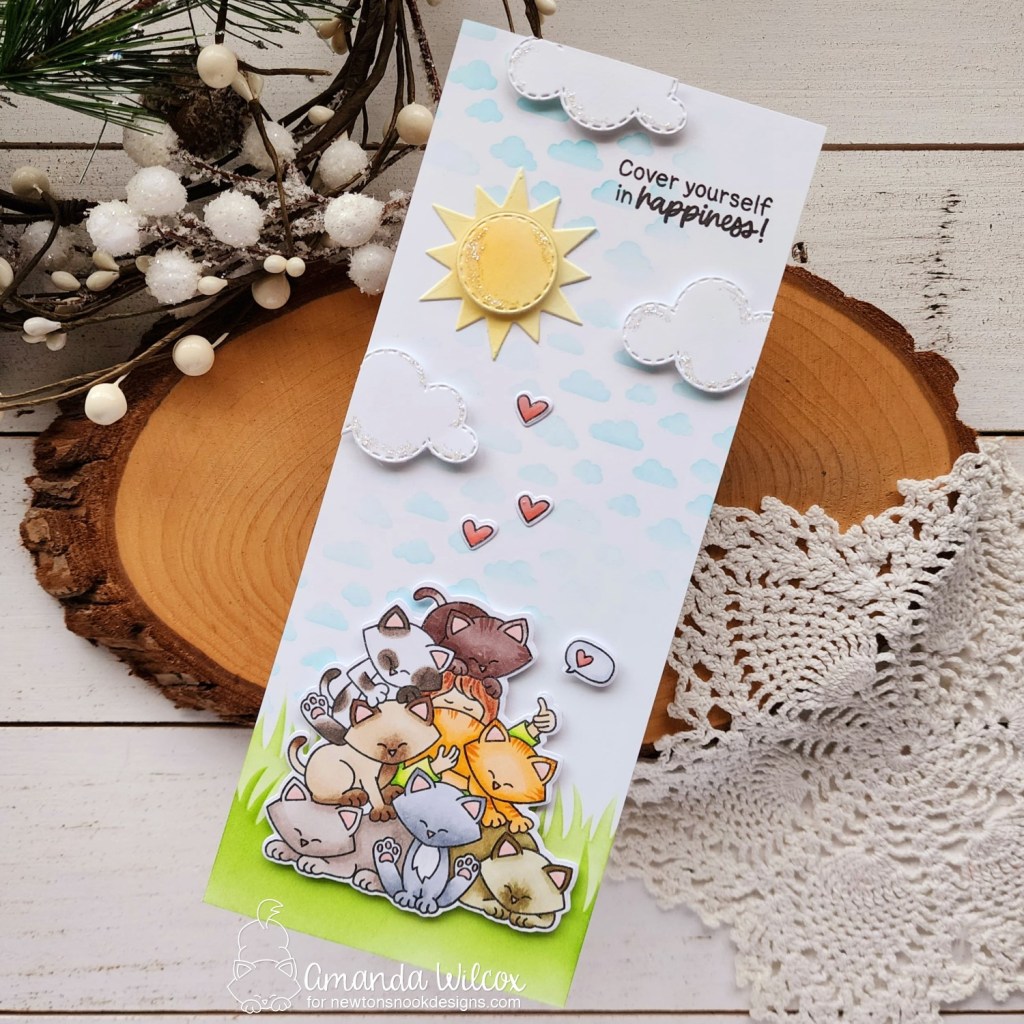
Never Enough Cats stamps and dies
Just like Monday and Tuesday, yesterday and today have a little theme. Catering to the dog and cat lovers alike.
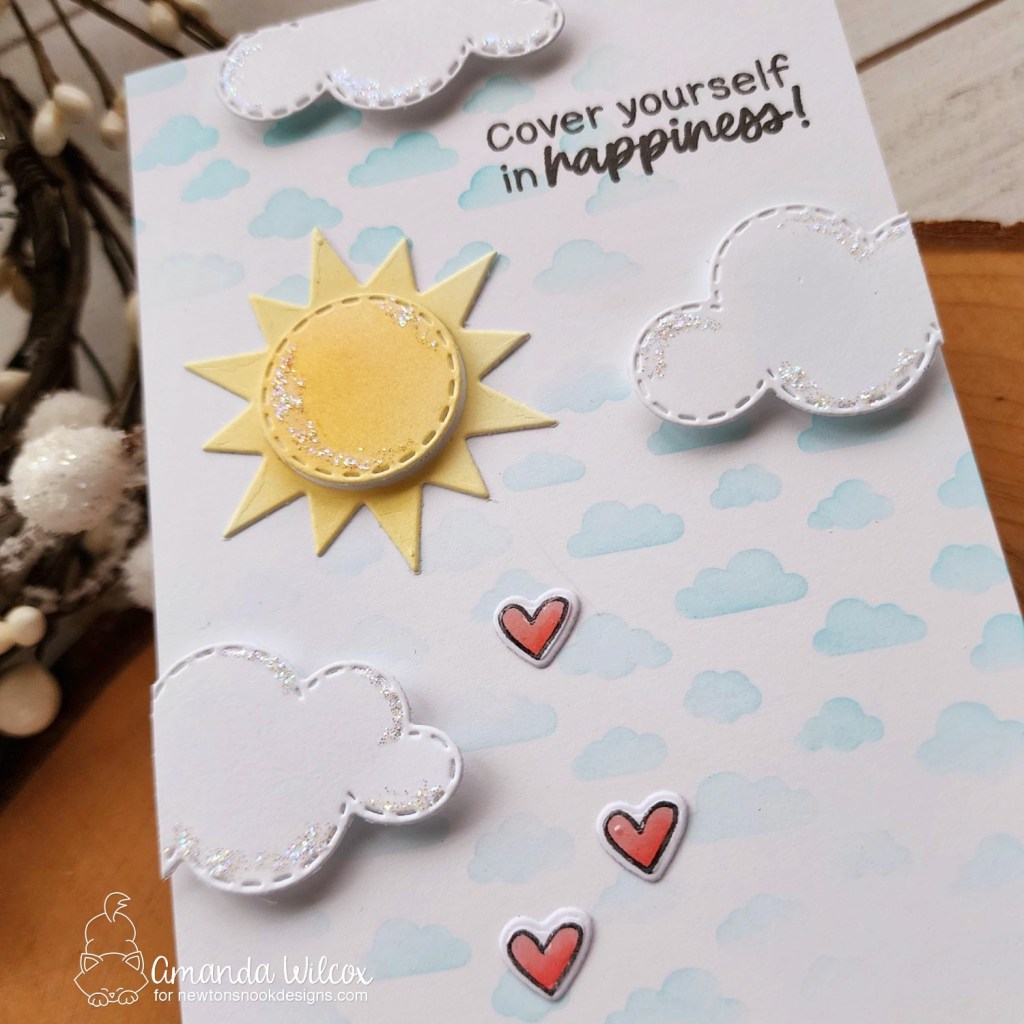
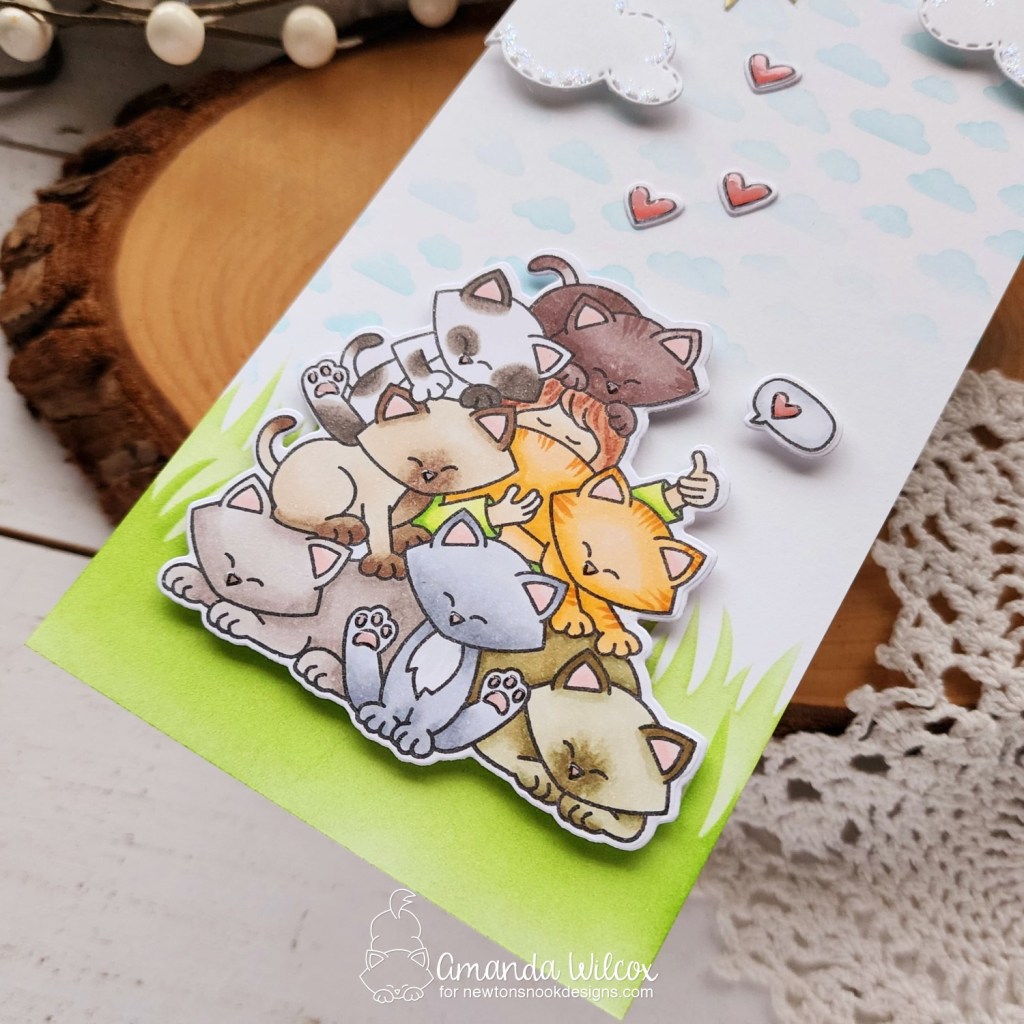
I softened things up today and created a slimline scene with this pile of adorable kitties! Also, before I started coloring this image, I went back and forth deciding to color all the same kind of kitty or different ones. Ultimately, I went with different because in all my years we have never had two cats that looked the same. So why start now?!?
I inked the sky with the Petite Clouds stencil and added die cuts from the Sky Scene Builder die set, along with my stamped sentiment. The hearts from the set are glued directly to the card front while the others are popped up.
Then I used the grass stencil to add my ground in a couple of layers before popping the image and that cute speech bubble up with foam tape. This just makes me smile!
Moving on to finishing touches today, I added stardust Stickles to the sun and clouds in the sky and glossy accents to all the hearts, kitty noses and toe beans.
Would you like to win the “Never Enough Cats” Stamp Set? This stamp set will be given away to ONE lucky winner!
Here’s how to win: Comment on the NND blog and Design Team blogs (see list below)! The winner will be chosen at random from the collective reveal posts. Make sure to check out each of their blogs and comment for your chance to win. You will not know which blog has been chosen so the more you comment on the better your chances are of winning! You have until Thursday January 19th at 9pm ET to comment — winners will be announced on the blog post on Friday, January 20th.
Check out all the awesome Design Team Blogs below to enter:
Okay, it’s day 3 of the Newton’s Nook January Release reveals and we’re switching gears. It’s SOOOOOOOOO FUN!!!!
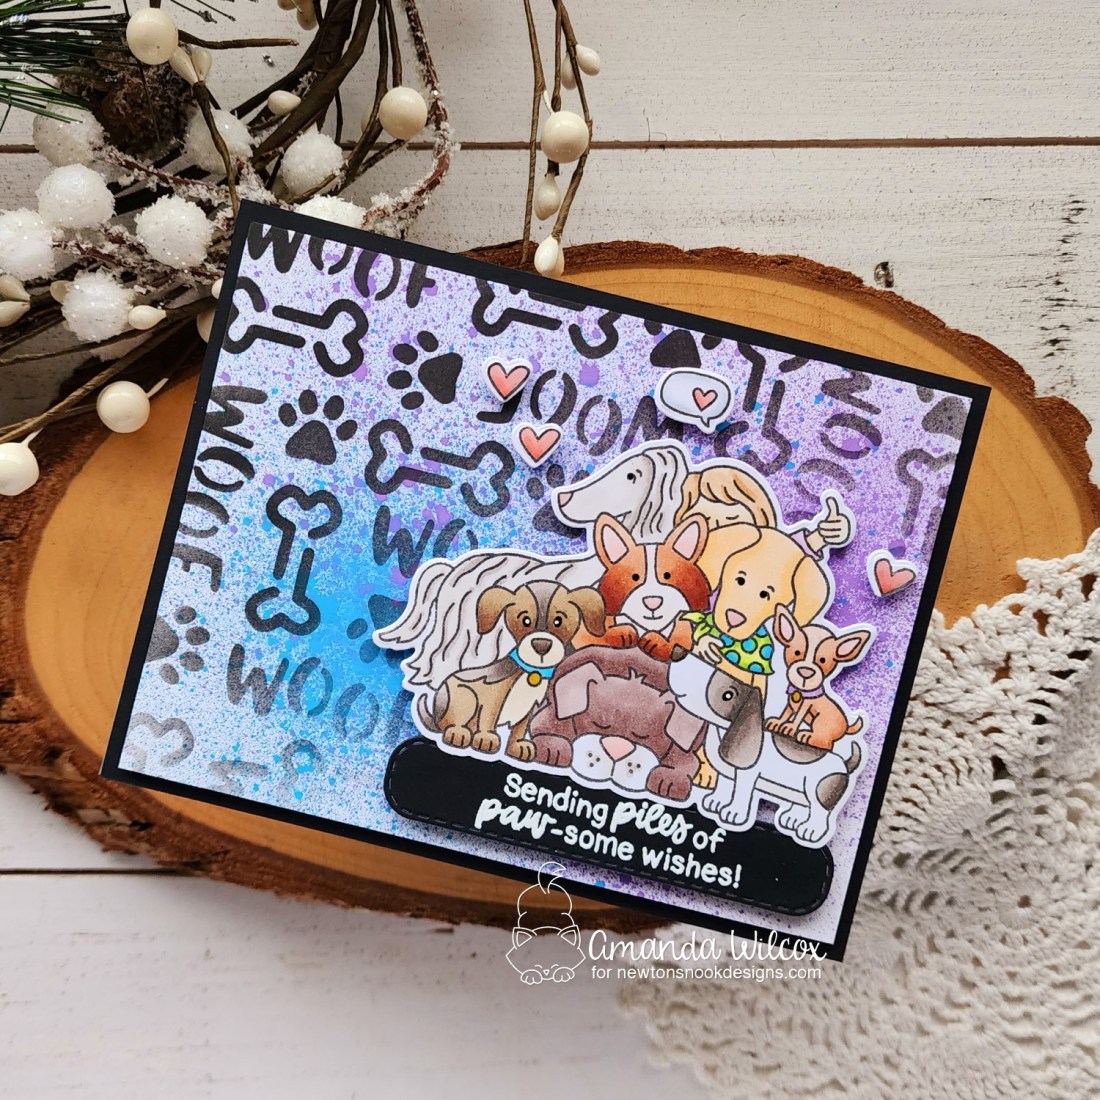
Never Enough Dogs stamps and dies
Is this not the sweetest image ever!?! I just adore it and completely relate on a ridiculous level! Trust me, if there are animals at a place, that’s where I’ll be. You all can have the people. I love critters!
I went a little bold and dark for today’s card but it would be so easy to lighten things up changing the color palette. I also let myself have fun and creative license when coloring all these cute pups! I used the coordinating dies to cut them out and then went back to add a couple extra hearts to go with the fun little speech bubble too.
My background is started with distress oxide sprays in wilted violet and mermaid lagoon. I got these for Christmas and have been enjoying playing around with them. Once the panel was dry, I layered the Woofs stencil over top and blended a little black ink fading from the top left to lower right.
I trimmed the panel down to 4×5.25 inches and popped it up on a black panel before adhering them to a card base. I die cut a rounded banner from the Banner Trio set and heat embossed a sentiment on it. Then I added everything with foam squares.
For finishing touches today, I started with black glaze pen on all puppy eyes. Then glossy accents on all puppy noses and hearts. I also added that to the dots on the scarf and both medallions on the collars. Once the glaze pen was dry, I added the white highlight back to the two dogs that have them in the original stamped image.
Would you like to win the “Never Enough Dogs” Stamp Set? This stamp set will be given away to ONE lucky winner!
Here’s how to win: Comment on the NND blog and Design Team blogs (see list below)! The winner will be chosen at random from the collective reveal posts. Make sure to check out each of their blogs and comment for your chance to win. You will not know which blog has been chosen so the more you comment on the better your chances are of winning! You have until Thursday January 19th at 9pm ET to comment — winners will be announced on the blog post on Friday, January 20th.
Check out all the awesome Design Team Blogs below to enter:
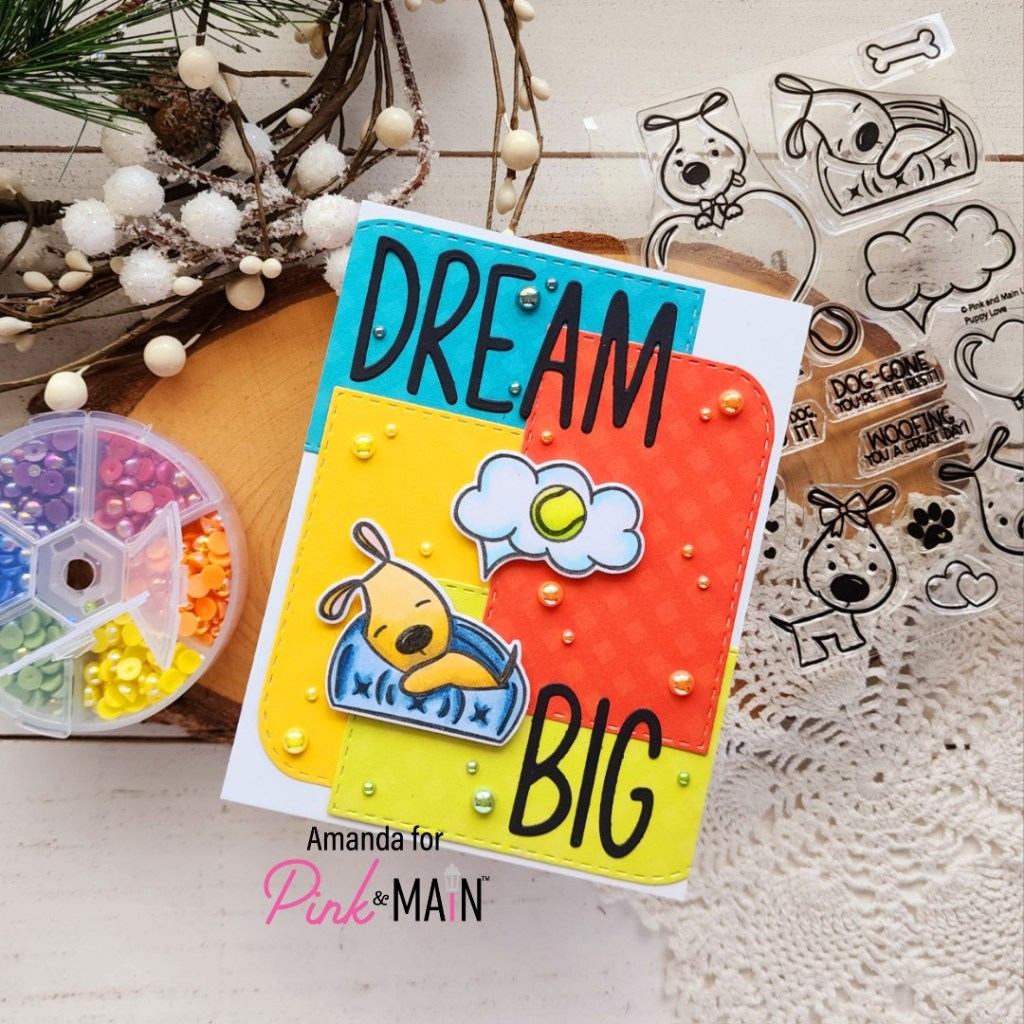
Hey friends! It’s time for sneak peaks with Pink & Main for the new release on Friday but my package didn’t arrive so I’m here with a little inspiration using lots of great previously release products. I hope you like it!
I pulled out these sweet pups from Puppy Love that released in time for Valentine’s Day last year and decided to put a different spin on them. This dreaming pup just called out to me and my daughter insisted that I add the tennis ball to his dream bubble in spirit of our pup who is recently obsessed with “the ball!” Lol. It’s so fun! I stamped and colored everything with copic markers before using the coordinating dies to cut them out.
I chose 4 colors from the Sweater Weather paper pad and cut them with a Mod Stitched Rectangle die. I layered them together and adhered them with EZ Squeeze liquid glue. Once the placement was how I liked it, I added that to a white card base and trimmed off the excess. This is when it hit me to use the Thin Alpha dies to create my own sentiment.
I cut the letters out and arranged everything before gluing them down. I used foam squares to add my sentiments and switched to finishing touches next.
For that I started with Touch of Gloss on the puppy’s nose and tennis ball. Then I pulled out my pearls and added a scattering matching each color of paper on the card front. I found coordinating colors in Rainbow Pearls and the teal was in Rainbow Pearls II.
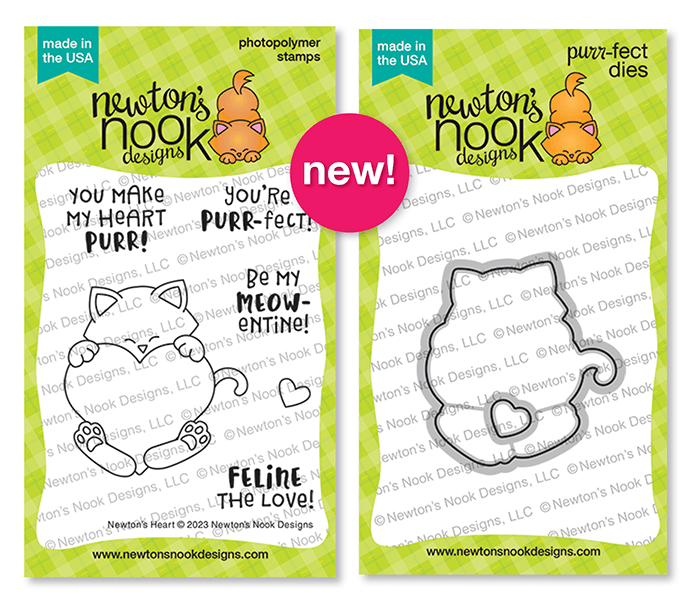
Welcome back everyone! We’re moving along today to another sweet heart stamp set with coordinating dies.
Newton’s Heart stamps and dies
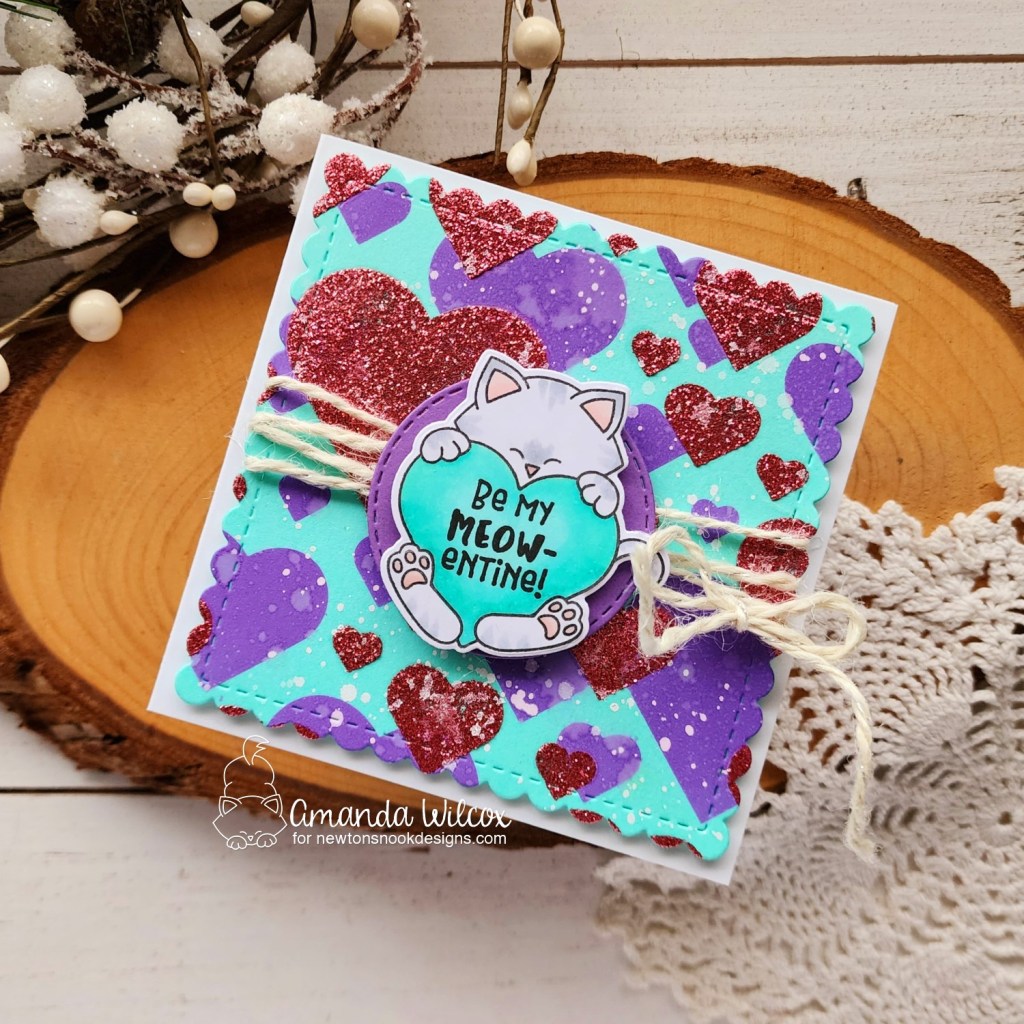
I had fun using patterned paper for by background yesterday so for today’s card I made a huge, wonderful crafty mess! It was glorious and made my heart happy. I hope you enjoy it too!
I started with teal cardstock and inked it up using the Bokeh Hearts stencil – first with wilted violet distress oxide ink. I made sure I had a good layer so these hearts really popped. Then for the second layer I added bubblegum glitz glitter gel from Thermoweb. After the panel was completely dry I spritzed and flicked water everywhere and let that dry. I was too clean still so then I came back with white paint and now I’m in love!
I stamped and colored Newton with copic markers, keeping him light and simple to pop against all the color in the background. I tried my best to match markers with the teal cardstock for my heart – BG13, BG32 and BG11 did the job pretty well.
I used the coordinating die to cut Newton out. Then I die cut my background panel with the second largest Frames Squared die and also cut a purple circle from the same set to go behind Newton.
To assemble my card, I wrapped twine around the square and tied it in a bow on the right side. Then I carefully added foam tape to the back, avoiding the twine and popped the panel up on a white card base. Then I did the same think with the purple circle and finally added Newton on top!
For finishing touches I simply added glossy accents to Newton’s nose and toe beans. I love all that texture and sparkle! It’s so fun!
Would you like to win the “Newton’s Heart” Stamp Set? This stamp set will be given away to ONE lucky winner!
Here’s how to win: Comment on the NND blog and Design Team blogs (see list below)! The winner will be chosen at random from the collective reveal posts. Make sure to check out each of their blogs and comment for your chance to win. You will not know which blog has been chosen so the more you comment on the better your chances are of winning! You have until Thursday January 19th at 9pm ET to comment — winners will be announced on the blog post on Friday, January 20th.
Check out all the awesome Design Team Blogs below to enter:
Hello everyone! I’m very excited to be here to share the first Newton’s Nook Release of 2023! It’s adorable and packed full of fun! Let’s see what we get to reveal today!
Love & Chocolate and Love & Woofs paper pads
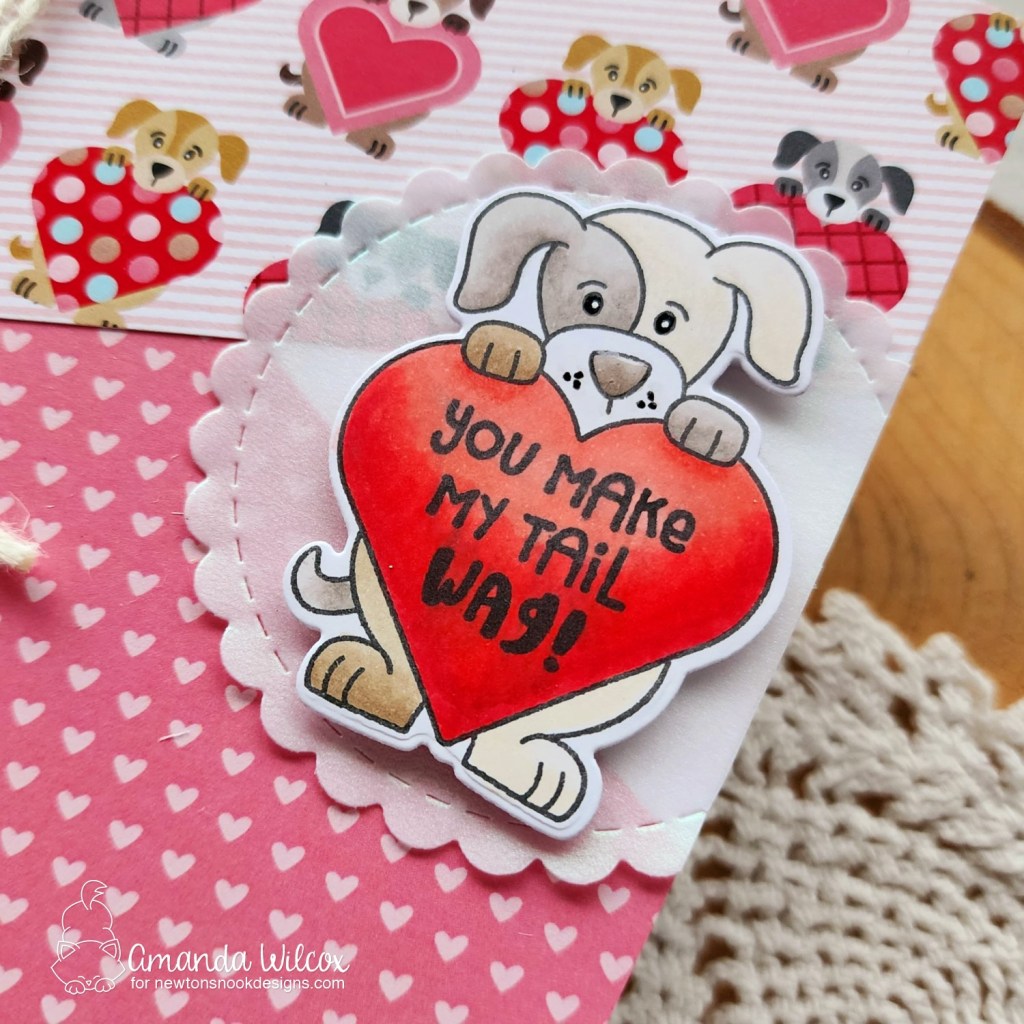
Puppy Heart stamps and dies
I had a blast with the paper pads along with today’s stamp and die reveal! To start let’s look at the card I created using Puppy Heart and the Love & Woofs paper pad together! It’s so fun!
To start my card today, I stamped and colored the sweet image from Puppy Heart with my copic markers. Then I went back and stamped the sentiment inside the heart and used the coordinating die to cut him out.
To create the background, I chose a piece of paper from the Love & Woofs paper pad and cut it in half at a diagonal. I flipped one over and adhered the two pieces to a white card base.
I die cut a scalloped circle from the Circle Frames dies out of iridescent vellum. I adhered the puppy with foam squares to the circle and hid tape runner behind him to attach the circle to the card front. Then I trimmed off the extra.
For finishing touches I just added sparkly twine to the left side of my card, tying it in a bow. Then I added black glaze pen to the puppy’s eyes and whisker dots and glossy accents to his nose. When the glaze pen was dry I added a white gel pen highlight back in.
Keeping with the puppy theme, here are a couple of bonus cards I created using just the Love & Woofs paper pad, along with the Paw Print shaker dies and Puppy Heart stamps for sentiments.
Again, I just cut the paper at an angle – two sheets this time so the angles were the same. I covered the seam with some silver glitter cardstock and popped the pawprints up with foam tape.
Would you like to win the “Puppy Heart” Stamp Set? This stamp set will be given away to ONE lucky winner!
Here’s how to win: Comment on the NND blog and Design Team blogs (see list below)! Thewinner will be chosen at random from the collective reveal posts. Make sure to check out each of their blogs and comment for your chance to win. You will not know which blog has been chosen so the more you comment on the better your chances are of winning! You have until Thursday January 19th at 9pm ET to comment — winners will be announced on the blog post on Friday, January 20th.
Check out all the awesome Design Team Blogs below to enter:
Welcome friends! I’m here today with a card featuring one of the new releases from Spellbinders in The Painter’s Garden release. These dies are stunning and create life-like florals so simply. The design of the dies makes it seamless and simple for you.
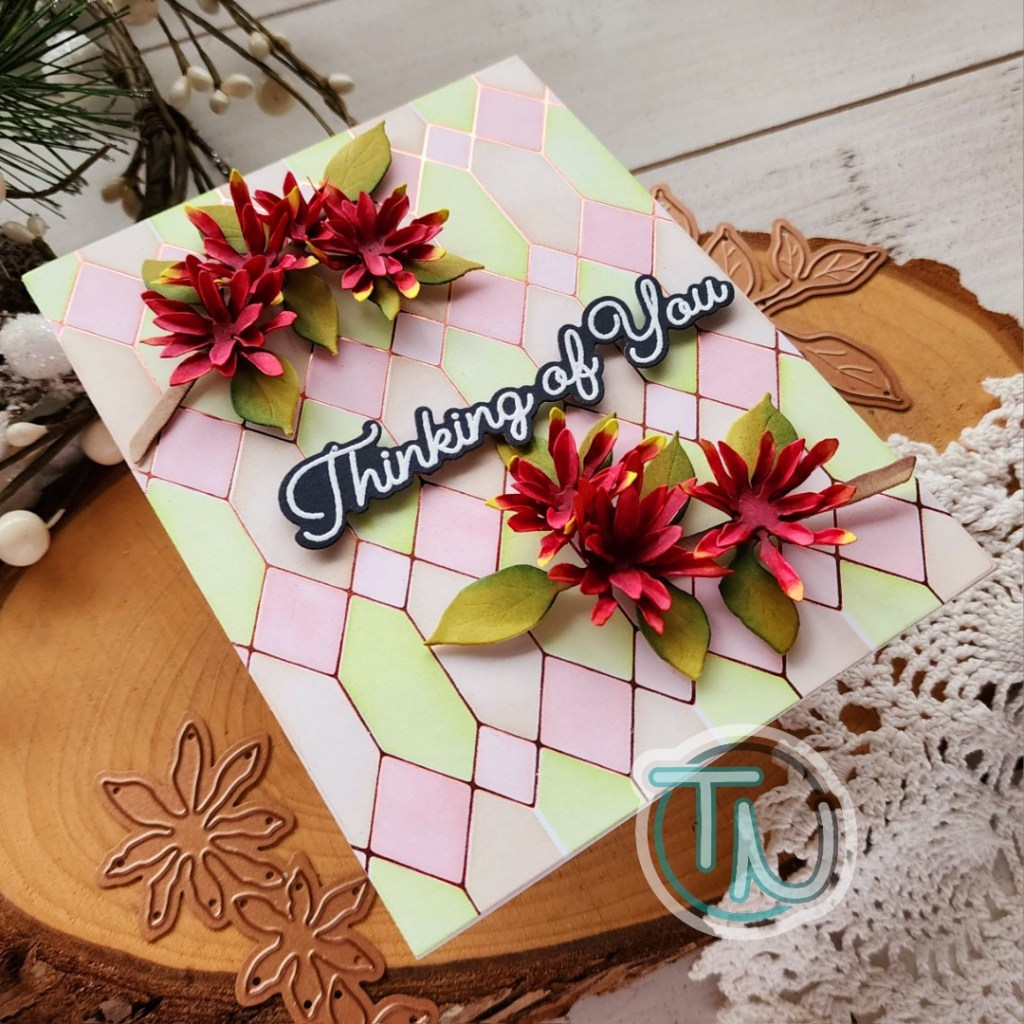
Today I am using the Carolina Allspice dies and can’t believe how these flowers just came to life as I colored and worked with each layer.
There is slight embossing on each die that should be cut more than once with a “x2” or “x3” depending how many you’ll need to accomplish the intended look. For this die set, for each stem it suggests you die cut x2 sets of flowers. So I did that from white cardstock to create two stems and coordinating florals.
I did a simple Google search to find out the general color of these flowers and started playing around with copic colors. For the blooms I landed on R59, R37 and R35 with YG03 for the tips of some. I did color both sides of the cardstock because these are 3D and you do see both sides.
For the foliage I used E77 and E74 for the branch and a very odd combo of YG95 and YG03 for a base with G28 for shadows and blended back out with YG95. After it worked for the first leaf I just kept repeating it for both sets. There could very well be an easier combo to accomplish something similar. However, I do find it therapeutic to color die cuts like these where you have no lines to worry about.
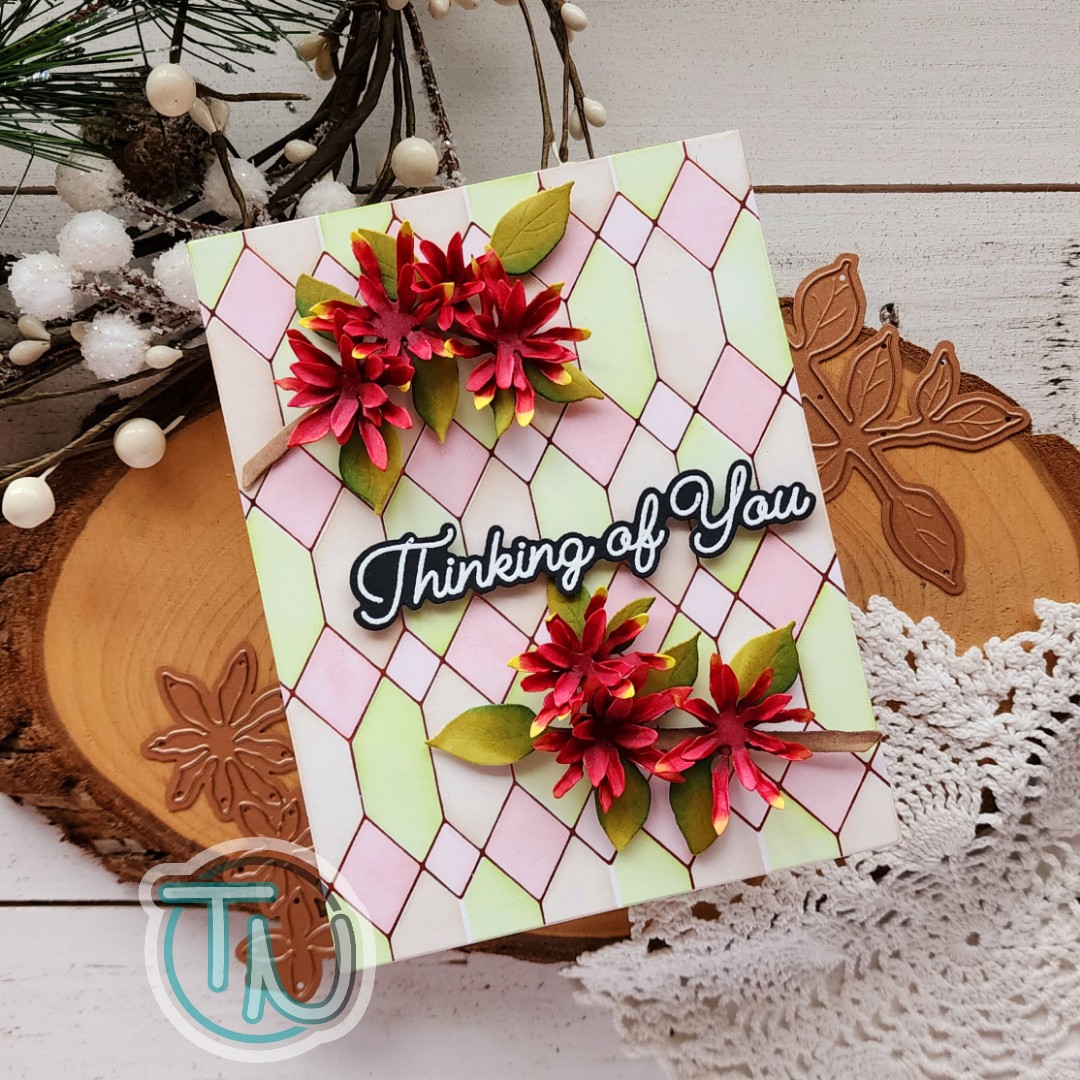
The background panel is hot foiled with rose gold foil and the Geometric Diamond plate, then blended color in using the coordinating stencil set and Lawn Fawn dye inks.
I stamped and heat embossed my sentiment from the I’ve Got You Covered stamp set. Then I used the coordinating die to cut it out.
I adhered the foiled background to a card base and added the Carolina Allspice branches with foam squares. I popped the sentiment up the same way and my card is all finished. Isn’t it just beautiful!?! I love the shiny foiling with the 3D florals together. So much visual texture and interest.
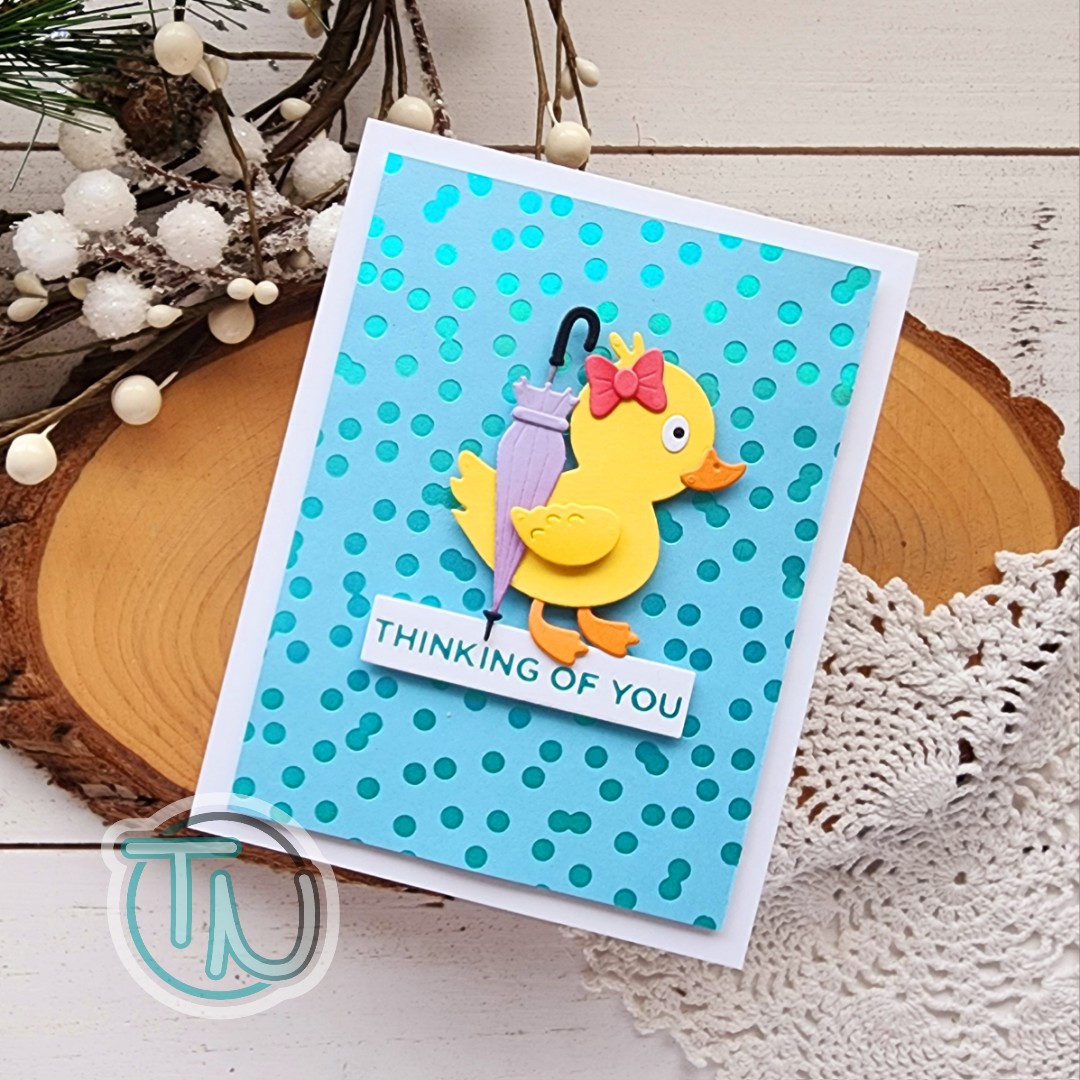
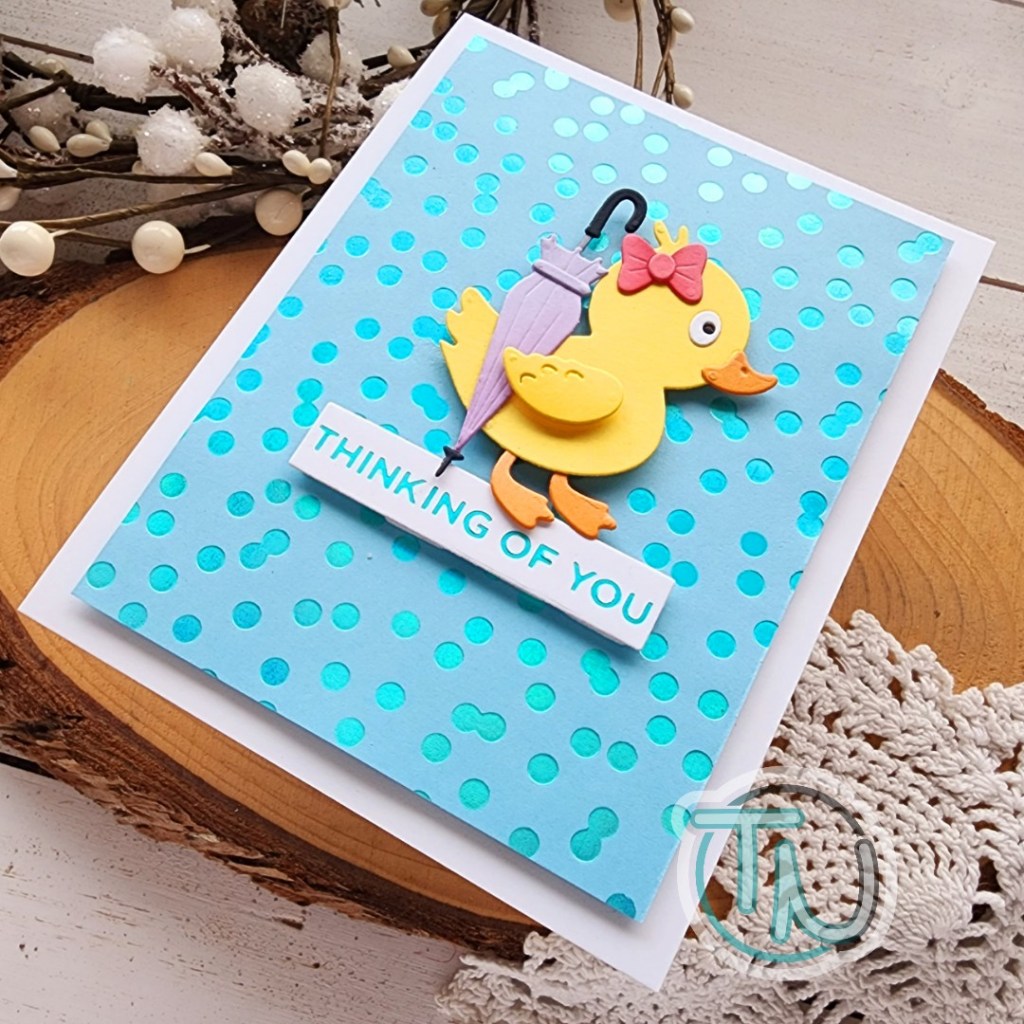
Hello again! I’m back with another card featuring the newly release Sprinkled With Love Collection from Spellbinders. Today I have a card using the adorable ducky from Duck With Umbrella. Not only is there a super cute duck but so many fun accessories to use with it!
To start, I took a moment to die cut a bunch of elements from Duck With Umbrella and used my liquid glue to assemble them all. I decided to pop the wing up with a foam square so it gave a little dimension and made it easier to place the umbrella too.
For the background, I foiled the Scattered Dot Pattern hot foil plate with the teal foil in the Spellbound variety pack. Then I took a scrap from the same color and foiled “thinking of you” from Everyday Sentiments II on white cardstock. To assemble my card, I trimmed the background to 4×5.25 inches and popped it up on a white card base. Then I popped the duck and sentiment up with foam squares too.
Isn’t she just the cutest thing!?! I had so much fun cutting and assembling her and can’t wait to create a bunch more duckies with different accessories! It’s going to be so fun!
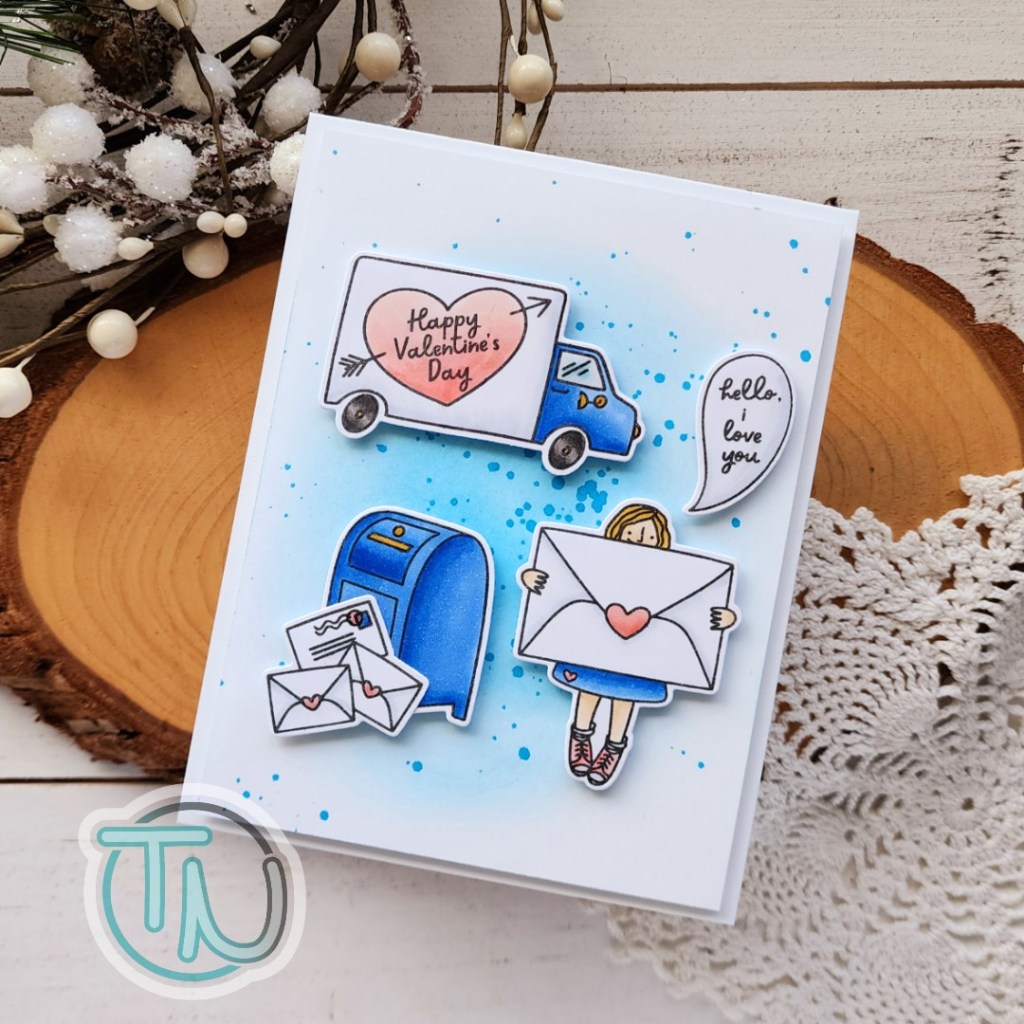
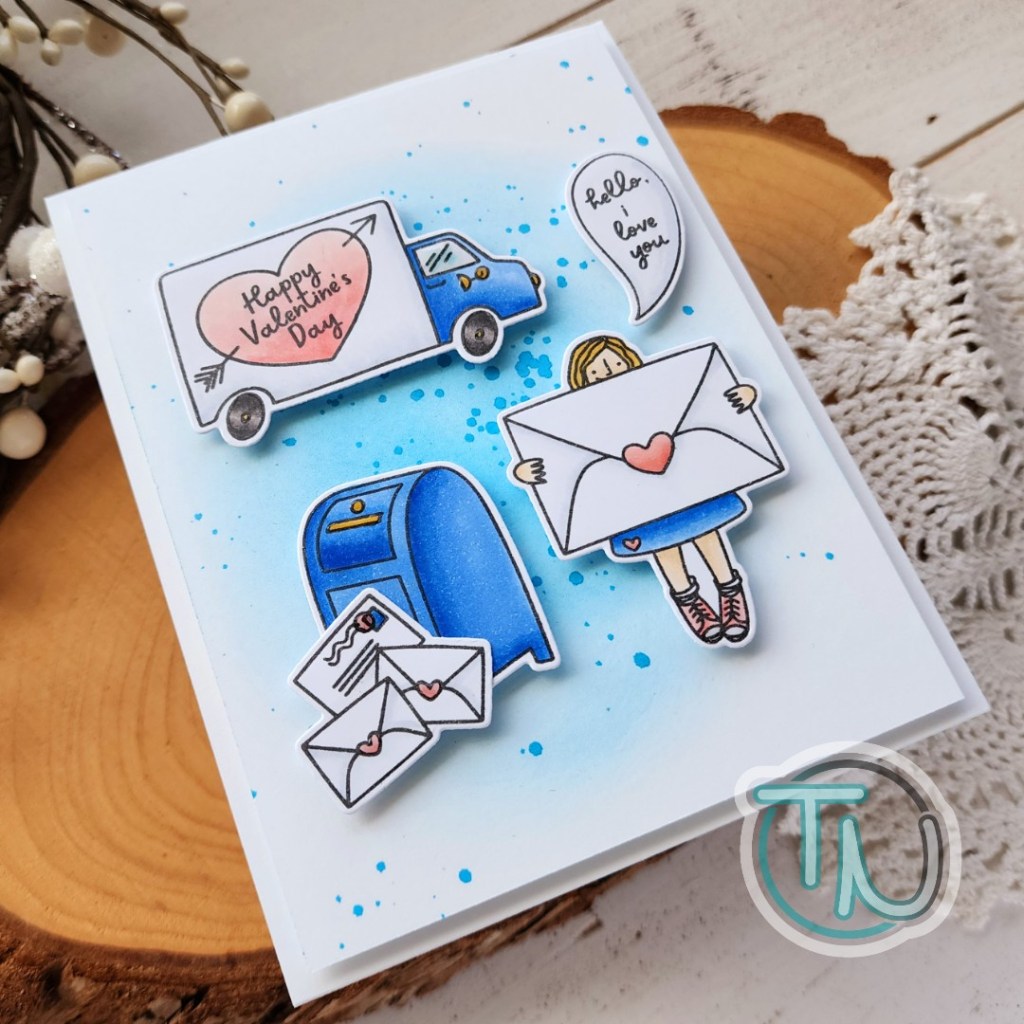
Welcome everyone! This is Amanda from Twiddler’s Nook and I’m very honored and excited to be guest designing for Ellen Hutson’s January Valentine Release! It is packed full of so many amazing products and I have had so much fun creating with them. For the Instagram Release Hop I shared some projects with So Chewsy and Essential Hearts, so today I wanted to share inspiration with another set – Hello, I Love You. This one has super fun images to mix and match that give you an easy way to incorporate your sentiment with the images.
Sometimes I plan a card and get excited about the fun images, forgetting to make a place or even leave room after the fact for a sentiment. While this isn’t a horrible problem to have, it’s also fun and convenient when the sentiments are contained in your images.
To create my card today, I had a layout in mind but wasn’t sure if everything would fit how I wanted. When these occasions arise, I pull out a card base or piece of cardstock the size I’m looking to create on and play with my stamps. This helps decide how many images to stamp, and avoids doing all the work but not being able to accomplish the intended outcome too.
Here, I was hoping the speech bubble would fill the space in front of the mail truck and still keep the general square shape I was hoping to arrange my images in. Also, starting this I thought the mailbox would be enough on its own but it looked really empty until I added the envelopes to go with it. Now it looks like things are going to work great!
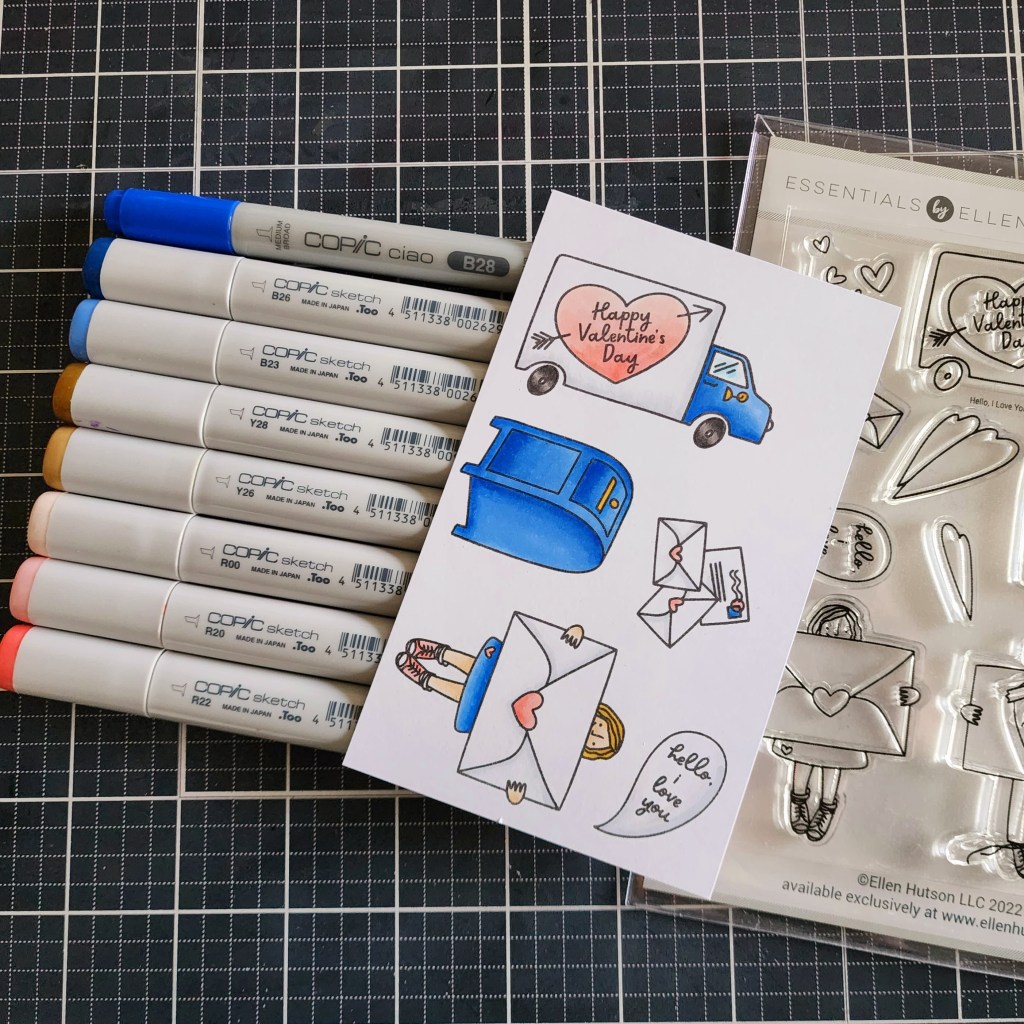
When I have limited time, too many options or lots of images I tend to plan out a color palette ahead of time and I make sure to keep it simple. Here I’ve kept to the basic red/yellow/blue primary color trio. To keep from things looking like a kindergarten drawing though, I chose a darker, gold/yellow, lighter pink/red and a bright blue for pop and interest. Then I threw in a light gray for shading and a couple simple colors for things like the tired and truck window. Otherwise, everything is using the same markers shown.
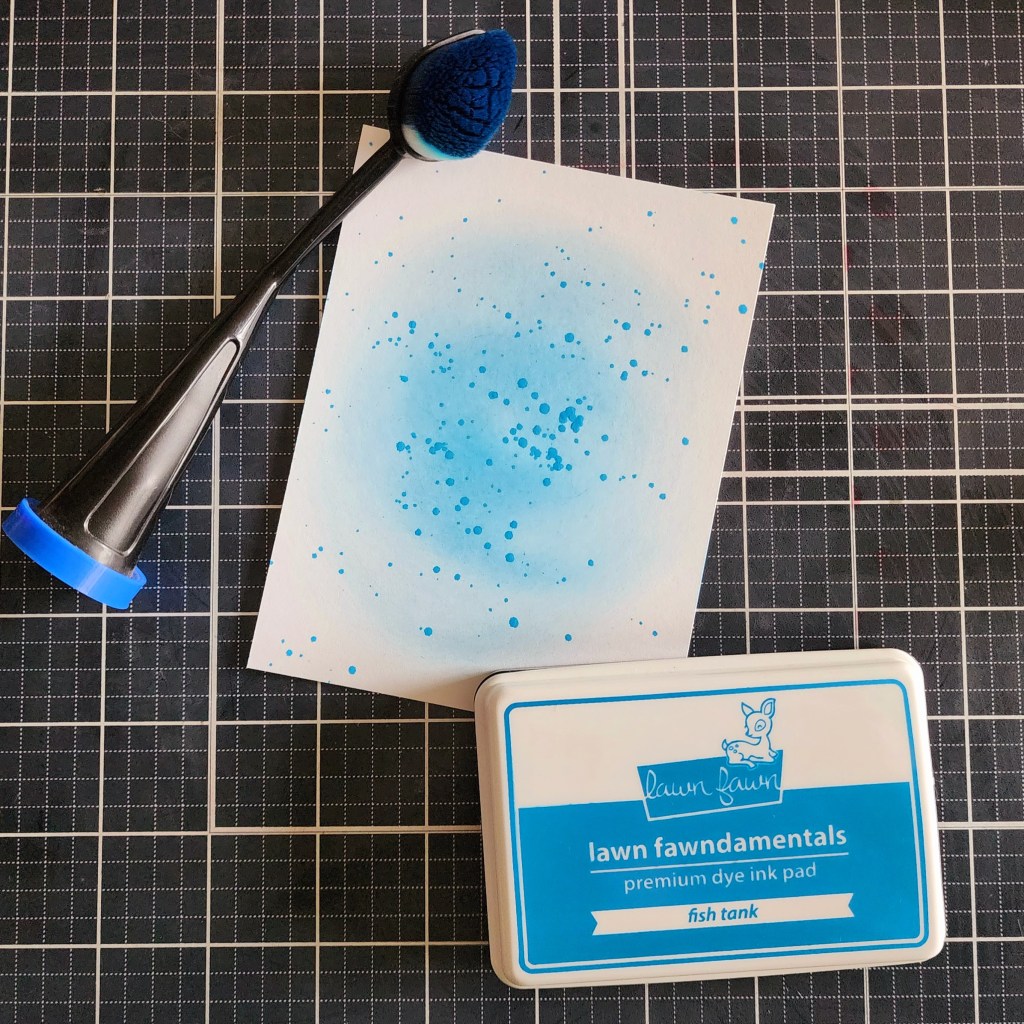
After coloring everything, I used the coordinating dies to cut them all out and arranged them on my white panel. Doing this, I made two decisions. First, I wanted to pop it up on the card base because I really love dimension on my card. So I trimmed it down to 4×5.25 inches to create a little frame when it’s popped up. Then, second, I didn’t like all of the white space. I also really love texture. So I chose a blue ink close to my copic color choice and blended a little blob in the middle. Be forgiving when you do this. Most of it will be covered up. Also, when dye inks dry they even out and look nicer than you think they will.
For extra texture I smooshed the ink pad on an acrylic block, spritzed it with water and used a paintbrush to flick some splatters on the panel too. You could add watercolor or metallic paint at this point for extra shimmer too!
Once the panel was dry, I added it to a white card base with foam tape and then added my images with foam squares too. Another level of dimension. It keeps them from blending in to the background, along with the inking. Then all we have to do is decide on finishing touches.
This might seem like a really small thing but it can absolutely make your card stand out among the rest. This is when I add extra shine and shimmer. Usually Stickles or Glossy Accents, sometimes both depending on the feel of the card. Today I stuck to glossy accents on parts of all of the images. The girl’s shoes and hearts, then the postage stamp and gold details for the mailbox, finally on the truck the window, light, mirror and hubcaps.
I hope you enjoyed today’s project and found something new to try in your cardmaking.
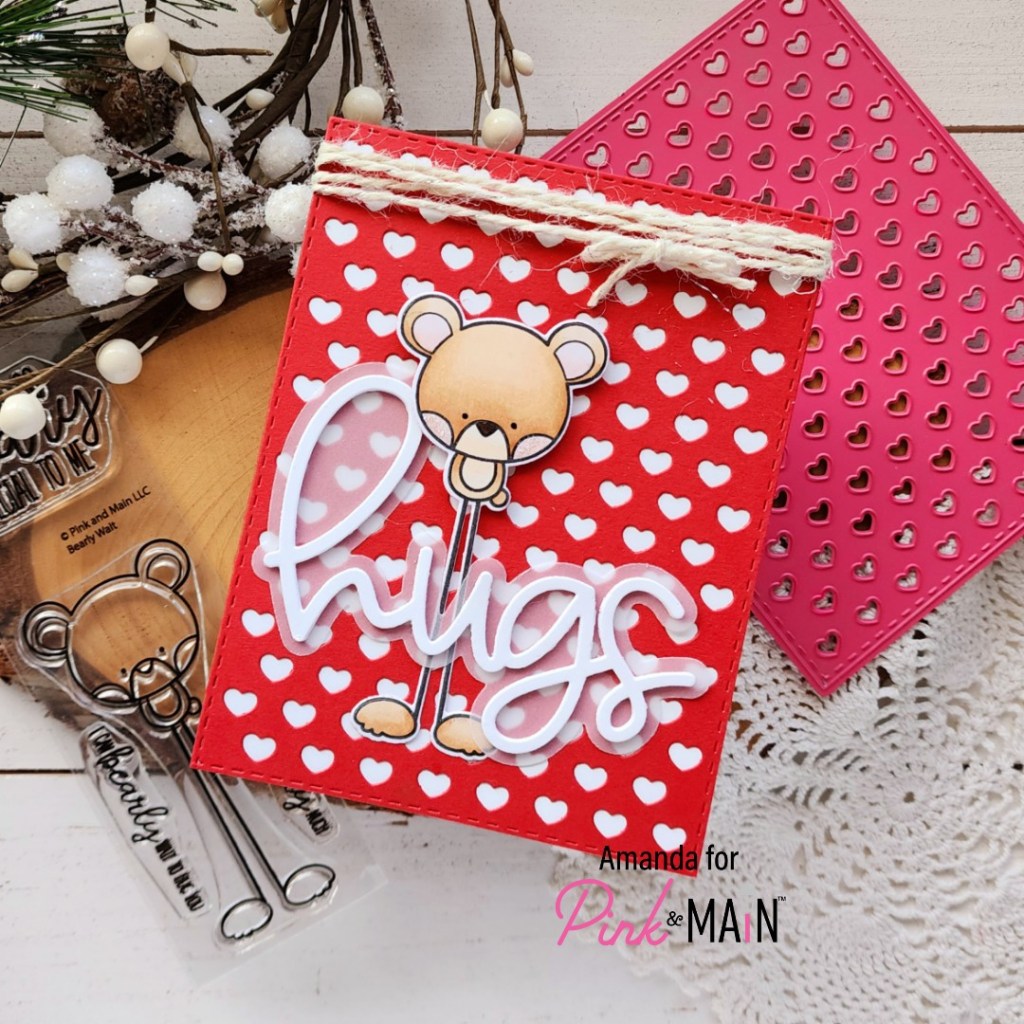
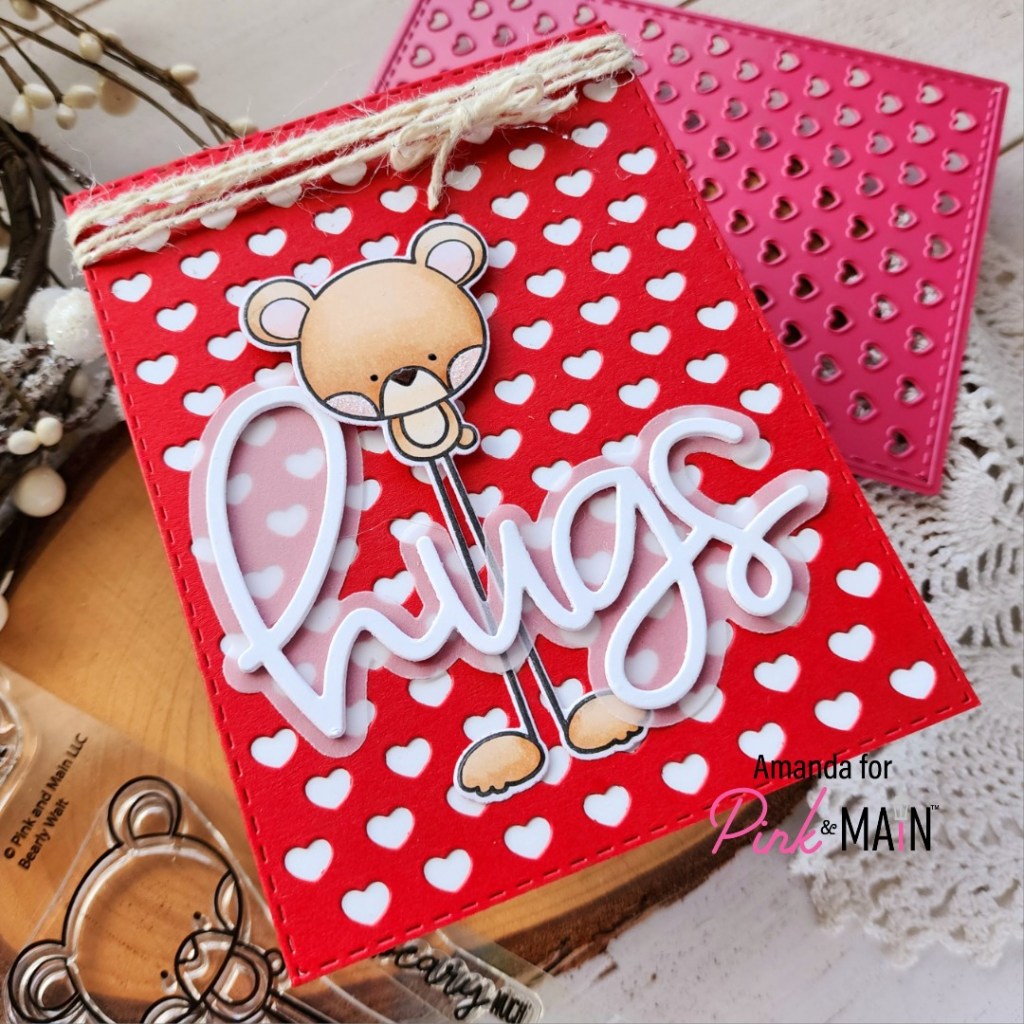
Hello friends! It’s time for your weekly Pink & Main inspiration post! Today I went back and pulled out some super fun favorites to create with! I absolutely LOVE all of the long legged critters and squealed when I came across them as an idea for my card today.
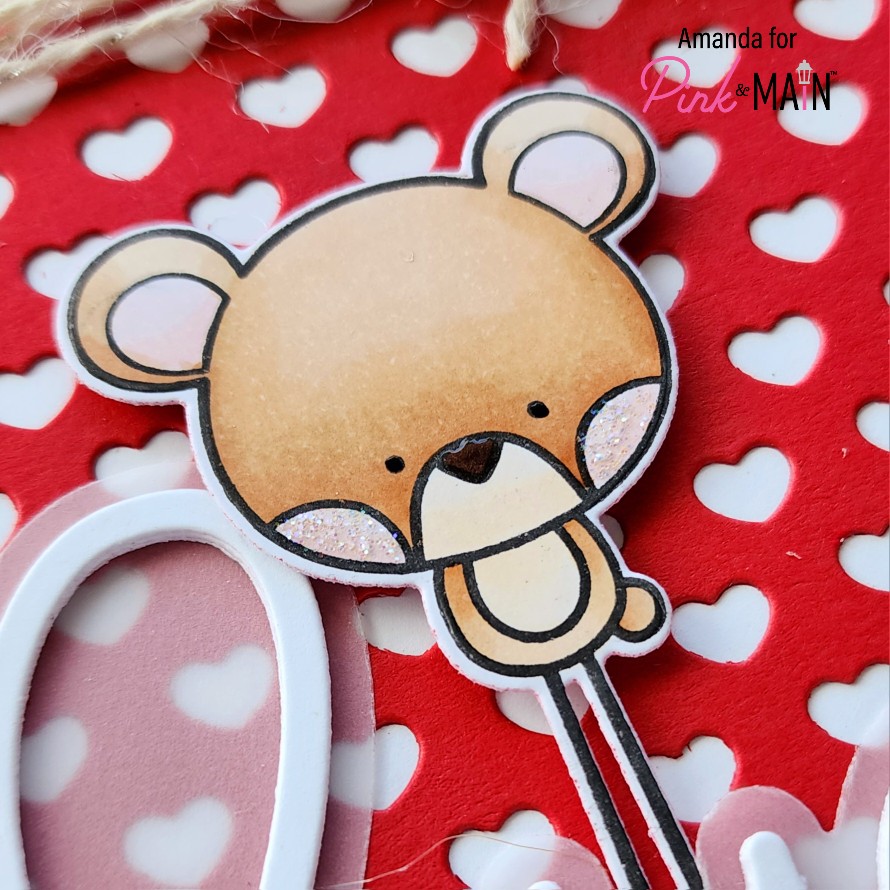
This card came together really quickly and would be so fun to make a stack of to share with lots of friends! Quick tip: When I’m creating with these long legged cuties, I die cut my paper first and then arrange the stamp on that because those legs like to move and not line up correctly. Then I colored it with my copic markers and set it side to do a little die cutting.
I cut the background using stop sign cardstock and the polka hearts cover die. Then I glued it to a white card base with EZ Squeeze liquid glue. Next, I die cut the big hugs set from white cardstock and vellum. After adhering them together I decided for dimension, because I love dimension. So I cut the word from white cardstock 3 more times and adhered them to the original.
When playing around with placement I thought it would be fun to have the legs behind the word but his head poking around the side. So I added liquid glue to everything except his head where I added foam squares. Then I carefully layered everything together and to the card front.
I wrapped some glittery twine from my stash to the top and tied it in a bow before moving on to finishing touches.
For those I just added black glaze pen to his eyes, touch of gloss to his nose and stardust stickles to his cheeks. I think the stickles is one of my favorite parts to playing with these fun critters! I love their cheeks!