Pink & Main – Warm Wishes

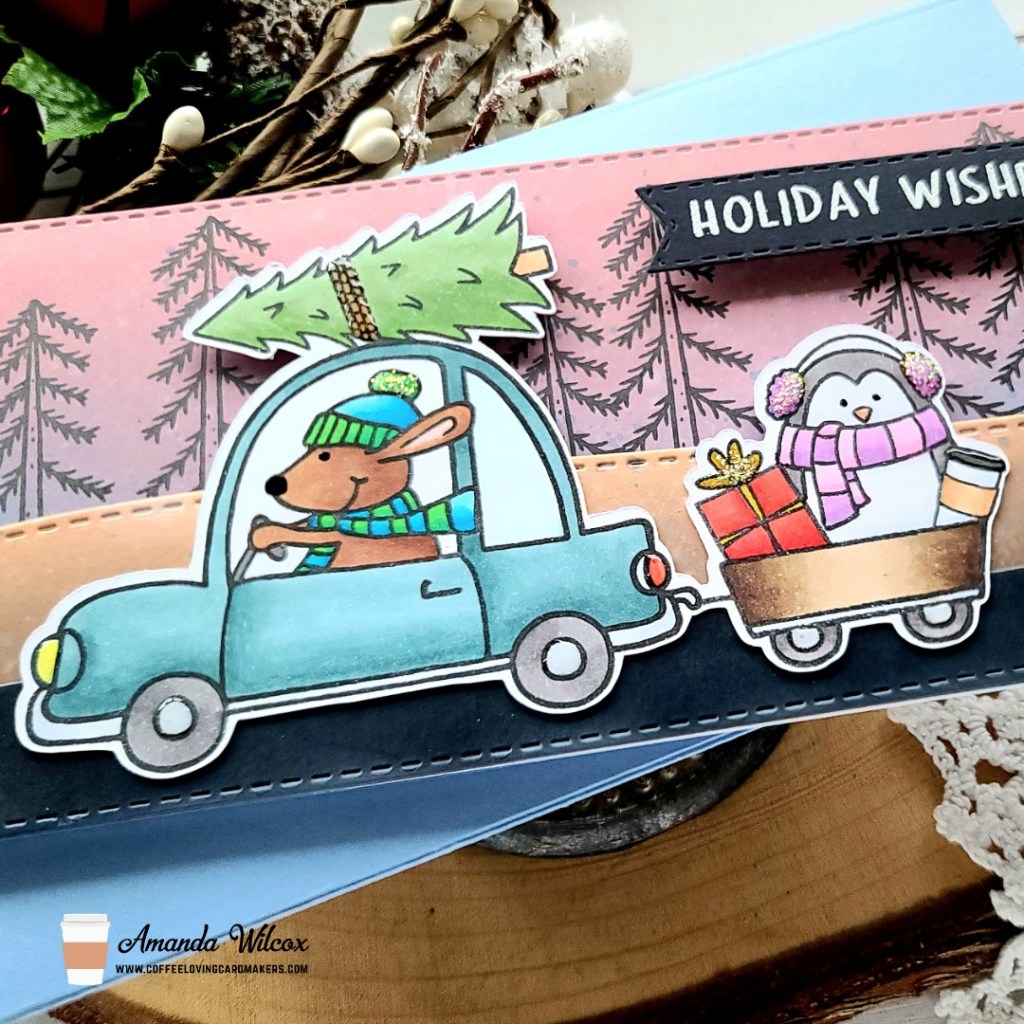
Hi again! I’m over on the Pink & Main blog today, celebrating the start of the Coffee Loving Cardmakers hop, which they are also a sponsor of! I created a fun Christmas card and wanted to share it with you here too!

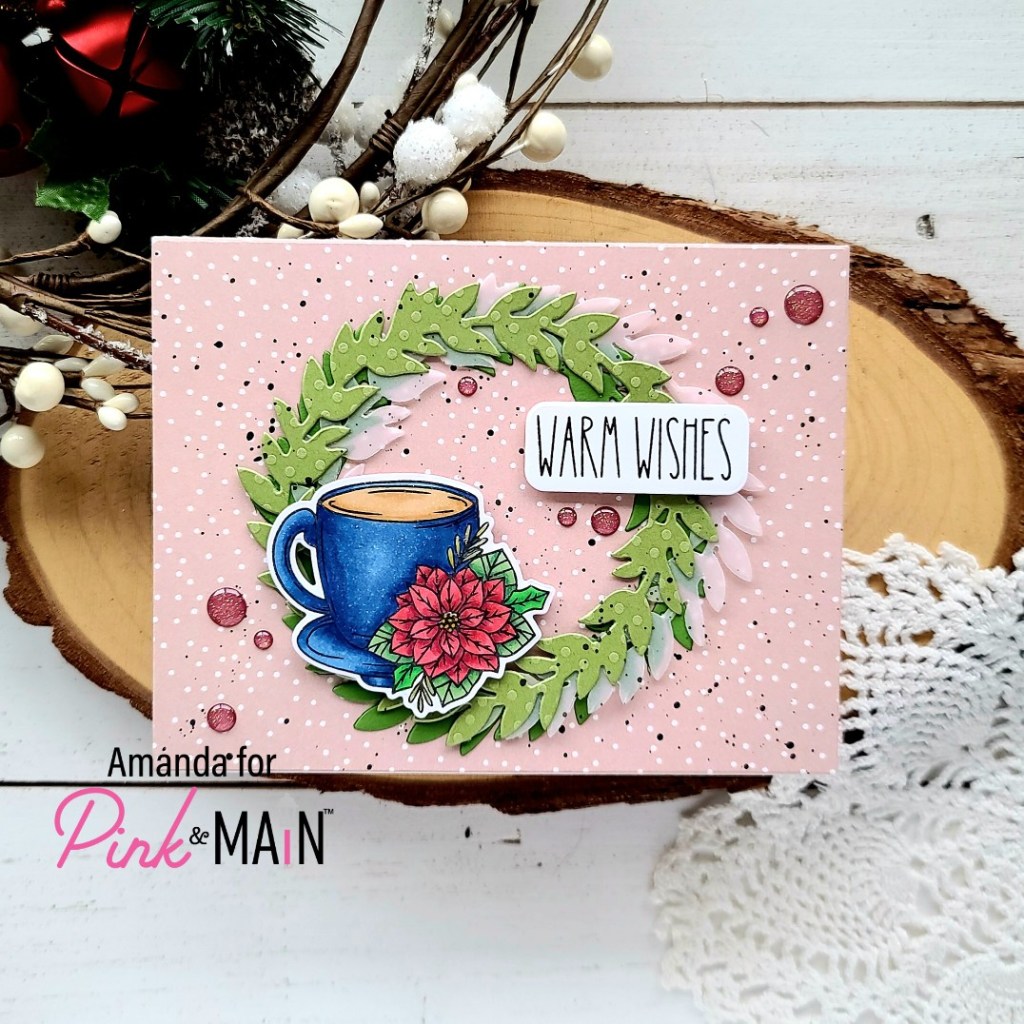
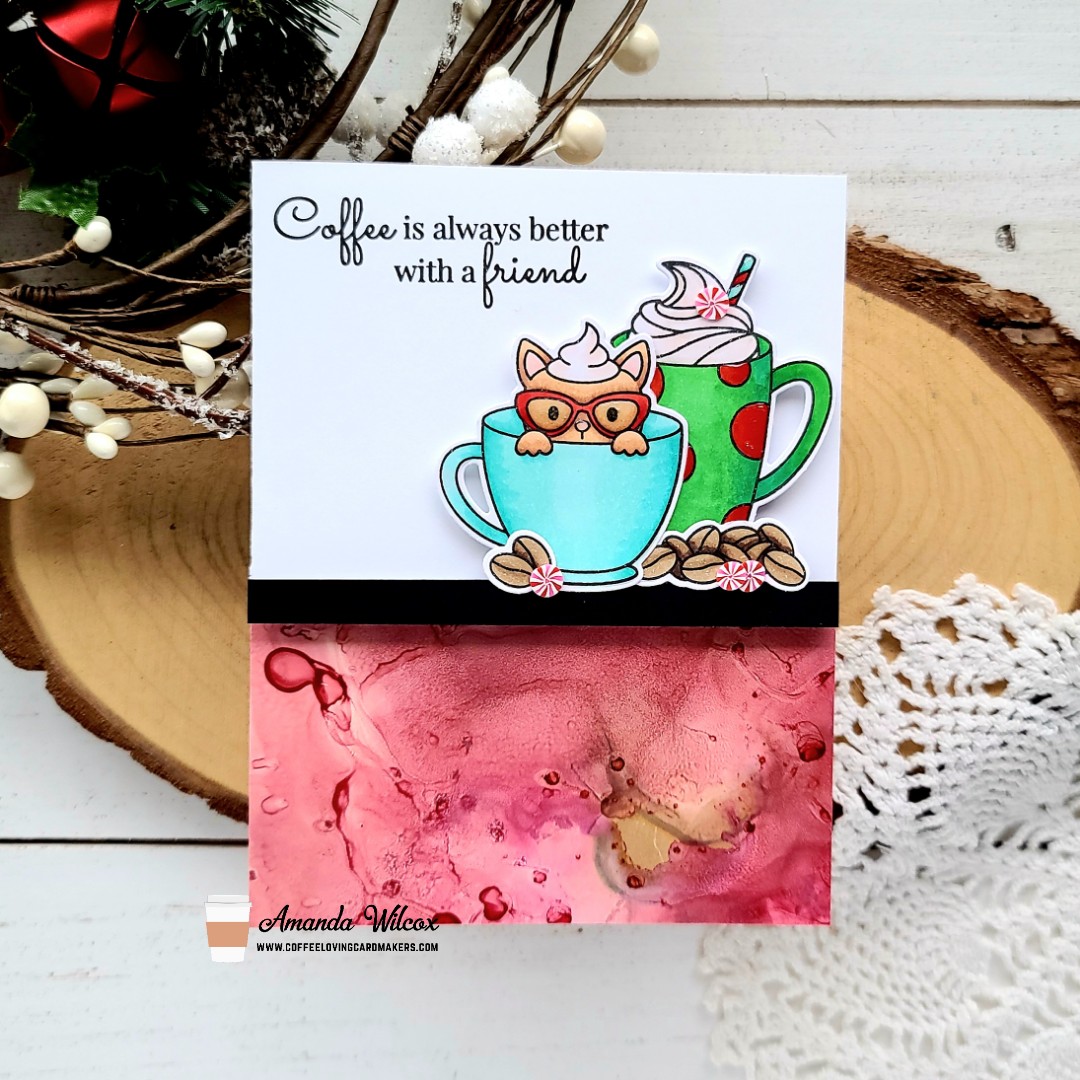
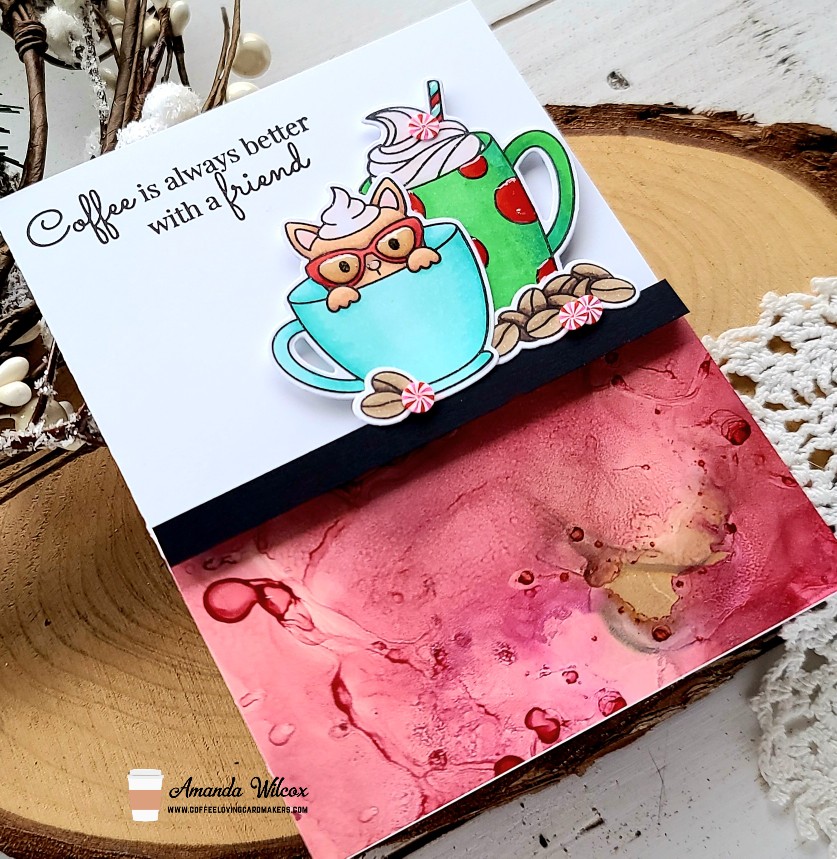
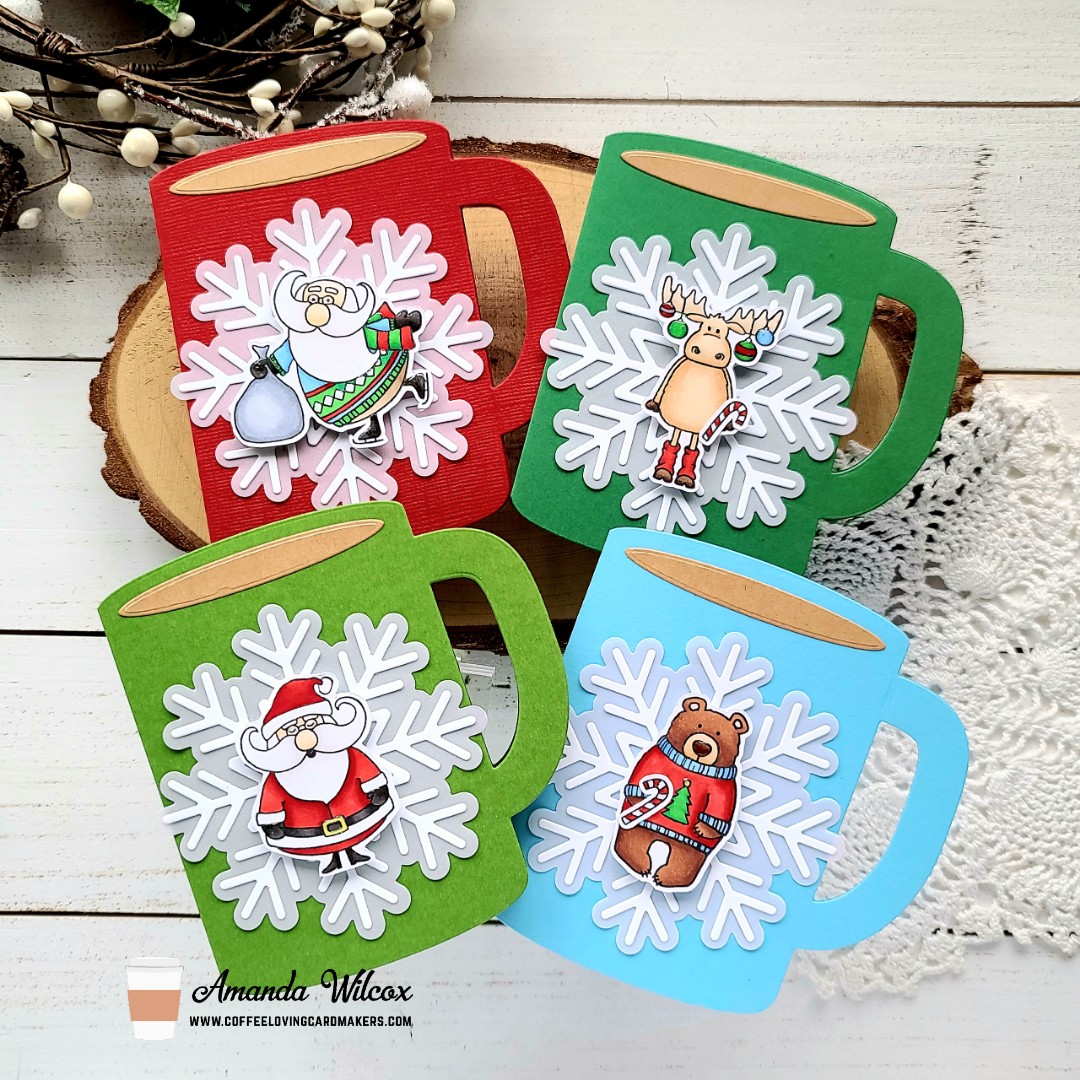
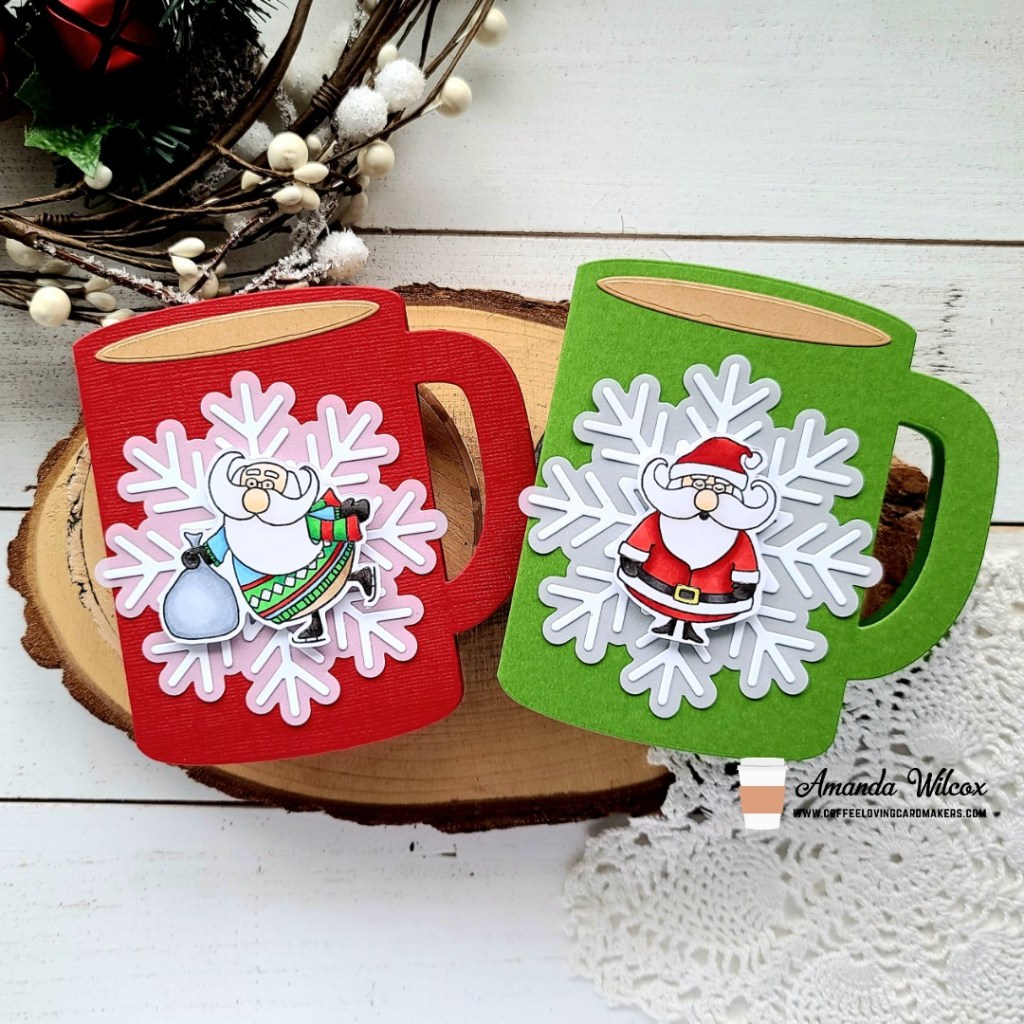
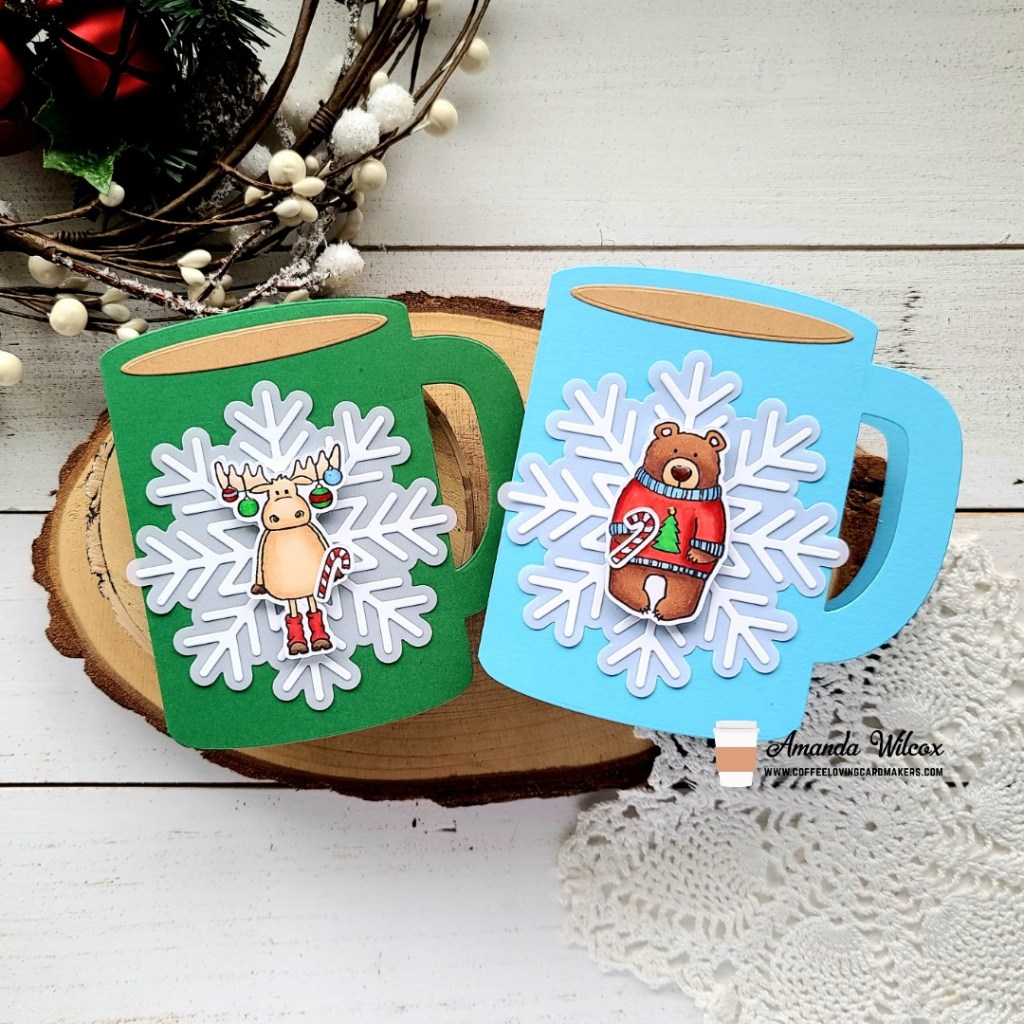
I started by stamping the image from Holiday Mugs and colored it with my copic markers. Then I used the coordinating die to cut it out. This set also has a die for the sentiment so I stamped and cut it out too. Then I cut 3 wreaths using the Wreath Base die set – 2 from green cardstock and one from vellum.

For my background, I sifted through my amazing stash of Pink & Main patterned paper and landed on this cocoa colored dotted paper from the Pumpkin Season stack. I cut it out with the largest layered rectangle die and adhered it to a white card base with my EZ Squeeze liquid glue. Then I used the same glue to adhere the wreath layers together and down to the card base. For a little extra texture I flicked black acrylic paint across the design before popping the image and sentiment up with foam squares.

For finishing touches, I added glossy accents to the center of the poinsettia and some of the foliage. Then I stuck down a scattering of the red dots from the Rainbow Glitter enamel dots pack.

Are you playing along with the Coffee Loving Cardmakers Fall | Winter Hop? I hope so! It’s so much fun and there are lots of prizes to win!

Products used today:
Holiday Mugs stamps and dies
Wreath Base dies
Layered Rectangle dies
Pumpkin Season paper pad
Rainbow Glitter enamel dots
EZ Squeeze liquid glue
Foam squares

I appreciate you sharing your time with me. Have a fabulous day!

Coffee Loving Cardmakers – Fall | Winter Hop Inspiration

Hey friends! I’m back again kicking off some great card inspiration for you as part of the Coffee Loving Cardmakers Design Team. I’m starting the hop off with Super Sponsor Pawesome Stamps! Their artwork is beyond words adorable and so fun to create with!

Today I chose some images from Coffee Besties, inked them up and colored them with my copic markers. I used the coordinating dies to cut them out and switched gears to my background.

It’s been a minute since I played with alcohol inks so I did a little panel with deception and mineral alcohol pearl inks on yupo paper. After it was dry, I trimmed my panel down and adhered it to a white card base. I popped up a black strip of cardstock with a foam strip and then added my images with foam squares too.

Finally, I put the whole thing in my MISTI and stamped a sentiment in the top left white space. For finishing touches I added peppermint clay embellishments around the coffee beans and in the whipped cream. Then I added glossy accents to the kitty’s glasses, nose, dots on the cup and stripes on the straw.

I love how versatile stamps can be when you think outside the box. Nothing about this card says Christmas except the colors I chose for the mugs and the peppermint candies. I’m hoping to add a little coffee gift card to the inside of this and mail it to a friend for Christmas.

Products used today:
Pawesome Stamps Coffee Besties stamps and dies
Twiddler’s Nook Peppermint Candy clay embellishments
Alcohol Pearl Ink – deception and mineral
Foam strips and squares
Glossy accents

I appreciate you sharing your time with me. Have a fabulous day!

Coffee Loving Cardmakers – Fall | Winter Hop Sponsor

Hey friends! Twiddler’s Nook is super excited to be a sponsor of the Coffee Loving Cardmakers Fall | Winter Hop! We just love these hops and seeing everyone’s creations!

In case you’re new to us, let me show you just a few products that we offer and you can move along to hopping the rest of the fabulous sponsors! But I warn you…be sure to make it to the end of this post for the most fun part!

Our biggest seller is the wonderful Pressure Pal. It helps get even pressure when stamping with a stamp platform. Pictured here with the mini MISTI, but it works with all stamp platforms the same. It can give relief to your hands and wrists and keeps from getting smooshy spots in your impressions from pressing with fingertips.

Some other favorites are our magnetic products. Show here is the Paw Print Magnetic Die Stand and Magnetic Tray. These are both fabulous for holding your die cuts in between uses so that you don’t lose them. I’ve also been told that they work great for needlework accessories too! The die stands come in a variety of shapes such as a coffee mug, flower and skull. All of the colored parts of our products are customizable too. We offer a variety of colors!

Another fun product we offer are our Embellishment Trays. They are super fun to create so we just keep coming out with designs and it seems that I love the next one more and more each time. Here you see our cute cloud, original circle with the heart and the fabulous donut tray! We also offer honeycomb, skulls, stars and paws! Once again…so many color options too!

Now for my most favorite part of today’s post!!! We have a brand new embellishment release today!!!!!!!!! Twelve new embellishments have been added to the shop AND…WE’RE HAVING A SALE!!! Starting today through next Friday, Nov. 19 the entire shop is 15% off!

Happy shopping and happy crafting my friends!!! Click HERE if you’d like to take a look at what’s available.

Coffee Loving Cardmakers – Christmas Coffee Mug Cards

Hey there! It’s Tuesday Tea over on the Coffee Loving Cardmakers blog today and I’ve got a whole set of absolutely adorable cards to share with you!

I was really itching to color these cuties from Jane’s Doodles so I pulled them out and did just that. They are from Warm and Cozy and St. Nick. I colored the images with my copic markers and use the scan-n-cut to cut them out. Then I pulled out the every amazing Trinity Stamps Coffee Mug Card die and cut some mugs and the little oval that looks like coffee in the cup.

For a little something I decided to add the Trinity Stamps Cut and Foil Snowflake behind each image. I cut the shadow from iridescent vellum and the snowflake from white cardstock. I adhered them with liquid glue and then adhered them to the mug. I popped eahc image up on their mug and moved on to finishing touches.

For those I just added bits of glossy accents to each image somewhere. Things like critter noses, St. Nick’s glasses, candy cane strips and ornaments.

I actually plan to stick hot cocoa packets in each of these and tie the handles with ribbon but they would be adorable cards or gift card holders for the holidays too!

Products used today:
Jane’s Doodles St. Nick stamps
Jane’s Doodles Warm and Cozy stamps
Trinity Stamps Coffee Mug Card dies
Trinity Stamps Big Snowflake Cut and Foil dies
UltraBond liquid adhesive
Foam squares

I appreciate you sharing your time with me. Have a fabulous day!

Coffee Loving Cardmakers – Jane’s Doodles | Holiday Wishes Mini Slimline

Hello everyone! It’s that time again, Tuesday Tea with Twiddler’s Nook over on the Coffee Loving Cardmakers blog today. I’m sharing a super fun and silly mini slimline card featuring a mash-up of Jane’s Doodles sets and Trinity Stamps slimline dies.

To start my card, I pulled out a few Jane’s Doodles sets and played around with different images. Once I figured out how I wanted to layer everything I started stamping and cutting masks and then stamping the layers. The car, tree, trailer and gift are all from Driving Home. The penguin and trees in the scene are from Hot Cocoa while the coffee cup came from Warm Hugs and the sentiment from Warm and Cozy. I wasn’t kidding when I said this was a mash-up. Lol! It’s so fun to get use from so many sets on one card though!

Anyway, once everything was stamped out I colored everything with copic markers and used the scan-n-cut to cut it out. Next, I switched gears to ink blending my background scene layers with distress oxide inks. The sky is stormy sky and victorian velvet with a little chipped sapphire on the edge and splattered on the panel. The dirt is gathered twigs and tea dye with some ground espresso splatters. Then I cut a black layer for the road and inked it up with the leftovers of white pigment ink on my blending brush just so it wasn’t flat in comparison to the rest of the card.

I cut the layers with the largest Trinity Stamps Stitched Mini Slimline die and then cut the ground layers with Slimline Scenic Borders die. I stamped the trees in the background with VersaFine ink and started assembling my layers. The background is mounted on a white card base measuring 3×6 inches and then the dirt layer is popped up with foam tape. The road is adhered with liquid adhesive and the image is mounted with a combination of liquid adhesive and foam squares. For my sentiment, I stamped and heat embossed it on black cardstock and used the banner die from the Trinity Stamps Mini Slimline Card and Envelope die set. Then I popped it up with foam strips.

I finished things off with black glaze pen on the critter eyes and the dog’s nose. Then glossy accents on the penguin beak, coffee cup lid, lights and wheel hubs on the card and trailer and also the rope around the tree. For a little shimmer fun I added unicorn Stickles to the penguin’s earmuffs, the bow on the gift and the dog’s pompom.

I created an envelope to coordinate using the Trinity Stamps die set. I love doing this from time-to-time. It gives the card a little extra something. Sometimes I even stamp an image from the card on the front to give a hint what’s inside.

Products used on today’s card:
Jane’s Doodles Driving Home
Jane’s Doodles Hot Cocoa
Jane’s Doodles Warm Hugs
Jane’s Doodles Warm and Cozy
Trinity Stamps Mini Slimline Card and Envelope dies
Trinity Stamps Mini Slimline Stitched Layers dies
Trinity Stamps Slimline Scenic Border dies
Thermoweb 3D Foam Tape
Thermoweb Ultra Bond Liquid Adhesive
Glossy accents
Copic markers
Distress Oxide ink – victorian velvet, stormy sky, tea dye, gathered twigs, chipped sapphire, ground espresso
Stickles – unicorn

I appreciate you sharing your time with me. Have a fabulous day!

Coffee Loving Cardmakers – National Coffee Day | Ellen Hutson Cup Cozies

Hey again! As part of the National Coffee Day celebration with the Coffee Loving Cardmakers, we’ve all created super awesome inspiration with the Ellen Hutson Bear Cozy Kit! This kit is SO MUCH FUN! Today I have a couple of simple cozies to share with you featuring items from the kit.

First I created the simple gray bear on the left using only items from the kit. I used Thermoweb FabricFuse liquid adhesive to adhere all of my pieces together and then stitched in a little detail like the mouth and eyelashes.

For the second cozy, I just had to try a panda. They are quite literally my VERY FAVORITE animal and it just had to be done. Lol. I cut the cozy from winter white felt and then the accents from charcoal felt. I cut the eyes from black. In the photos it’s hard to tell the distinction but in person the eyes really do stand out. After gluing these pieces together, I added some fun stitching detail on here too.

There is a die in the set that cuts a row of holes which is perfect for stitching the two sides of your cozy together. You can see here how I stitched the gray one together. Also the little extra detail I gave with that sweet heart and some extra stitches too!

Products used on today’s projects:
Ellen Hutson Bear Cozy Kit
Ellen Hutson felt – charcoal, black, winter white, linen, carnation

Head over to the Coffee Loving Cardmakers blog for a chance to win your own kit!

I appreciate you sharing your time with me. Have a fabulous day!

Coffee Loving Cardmakers – National Coffee Day plus a GIVEAWAY

Hey friends! Twiddler’s Nook is a Super Sponsor for the Coffee Loving Cardmakers National Coffee Day celebration! They’re having a HOP full of inspiration and prizes to win!

In the Twiddler’s Nook Shop we offer a big selection of super fun embellishments to adorn your cards and fill your shakers, along with a wide variety of tools that help in the craft room too.

Here’s a look at our coffee mug magnetic die stand and a donut embellishment tray! The perfect set up for any coffee loving papercrafter! The die stands are great for holding your dies in between uses so that you don’t misplace or accidently stick them to something where they are lost forever. The embellishment trays are ideal for sorting through embellishments and pouring the extras back in the package, but these are also amazing for holding your die cut images while building your cards!

Then there’s the ever popular Pressure Pal! This is a very handy tool to help apply even pressure when stamping with a stamp platform like the MISTI. See it in action in this YouTube video a customer did to review it!

SALE

We’re running a sale from today through Sunday for 10% off the shop to celebrate National Coffee Day! We would love it if you headed over and had a look around. Click HERE to get there.

GIVEAWAY

We’re having a fun giveaway to celebrate the hop today. A $20 gift code to the Twiddler’s Nook shop for one random commenter on this post. Commenting closes on October 6 at noon PST.

You should have come to us from the Trinity Stamps blog. We’re last on the hop list but if you didn’t start at the beginning. Click HERE to get to the main post and catch anyone you missed!

Thanks so much for stopping by! I appreciate you sharing your time. Have a fabulous day and good luck!

Coffee Loving Cardmakers – Thanks a Latte Shaker

Welcome! It’s time for another Tuesday Tea with Twiddler’s Nook over on the Coffee Loving Cardmakers and today it’s extra special! We’re celebrating National Coffee Day all week leading up to it and there are giveaways on the blog each day. Click HERE to head over and check out the festivities.

I’m celebrating Thermoweb today with a super fun shaker card featuring stencils and dies from Newton’s Nook, the coffee shaker dies from Lawn Fawn and my shaker bits from the Twiddler’s Nook shop!

Head over and check out the post for all the details on this card plus a chance to win!

Thanks for stopping by. I appreciate you sharing your time with me. Have a fabulous day!

Coffee Loving Cardmakers – Thanks a Latte

Happy Tuesday everyone! Grab a cuppa because it’s Tuesday Tea over on the Coffee Loving Cardmakers blog today. I’m still having a blast with the latest Trinity Stamps release. Today I took a stab at creating a shadow sentiment in my slimline image. It was really fun to create and the end result is pretty cool too.

To create this card, I stamped the Fa-BREW-lous image in black on white cardstock. I die cut the panel with a Slimline Modern Embossed Panel die so it would fit inside the dainty scallop panel. Then I took the Marshmallow alphabet die set and cut “thanks” from the center of it. To do this I lined the letters up on my craft mat and picked them up with post-it tape, then positioned them where I wanted them a cut. It helped that the letters in thanks are all different. Next, I cut the same letters from white cardstock 3 more times and adhered all the layers together with liquid adhesive.

I used my copic markers to color the images on the letters only. Next, I stamped a sentiment on white cardstock, cut it into a strip and colored it to match some of the cups in the letters.

I die cut a peachy-orange dainty scallop panel and adhered my stamped panel to that. Then I inlaid my letters and used foam strips to pop up my sentiment. Next, I added foam tape to the back of the scalloped panel and adhered it to a slimline card base.

I had a lot of fun taking this card from an idea to reality and think it turned out pretty cool. I hope you enjoyed it too.

Products used on today’s card:
Trinity Stamps Fa-BREW-lous stamps
Trinity Stamps Marshmallow alphabet dies
Trinity Stamps Slimline Modern Embossed Panel dies
Trinity Stamps Slimline Dainty Scallop Edge dies

I appreciate you sharing your time with me. Have a fa-BREW-lous day!