Coffee Loving Cardmakers – Java Junkie Shaker

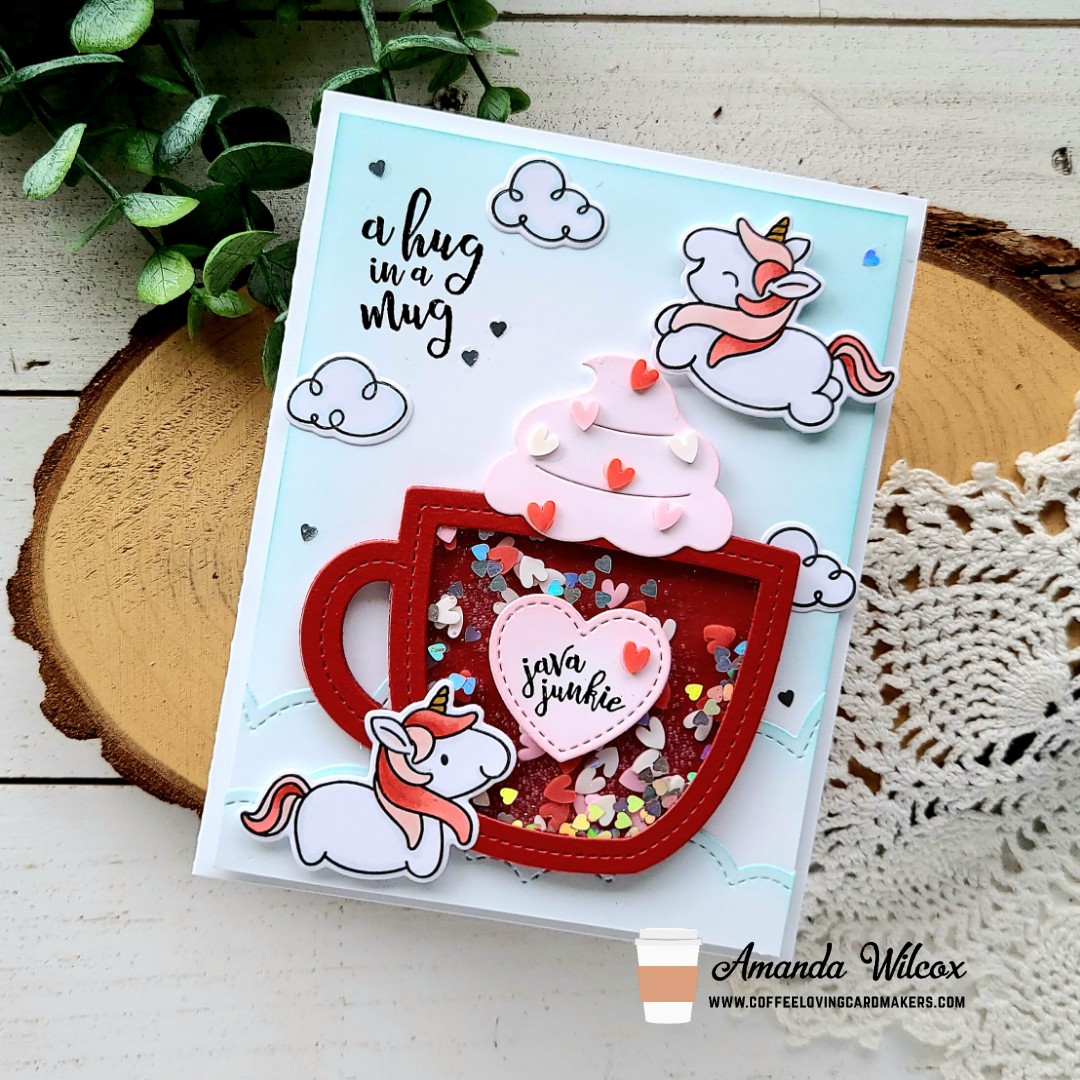
Hello there! Today I’m over on the Coffee Loving Cardmakers for the first Tuesday Tea of 2022!!! Can you even believe it?!? Time just flies by too fast. I hope you all had a wonderful New Year holiday and are ready to jump into fun crafting! I’ve got a shaker card today featuring so many companies and highlighting embellishments from the Twiddler’s Nook shop. We just had our mini Valentine release yesterday and I couldn’t wait to start creating with it!

I recently picked up these adorable unicorns from Heffy Doodle that I’ve been eyeing for an eternity and I’m so happy to color them up in Valentine colors! Aren’t they adorable!?! Then I used the Lawn Fawn stitched mug die sets to create a shaker and filled it with three embellishments from Twiddler’s Nook – sweethearts clay hearts, holographic hearts confetti and rosetta pixie dust micro beads. The whipped cream on my mug is from the Lawn Fawn cupcake die set.

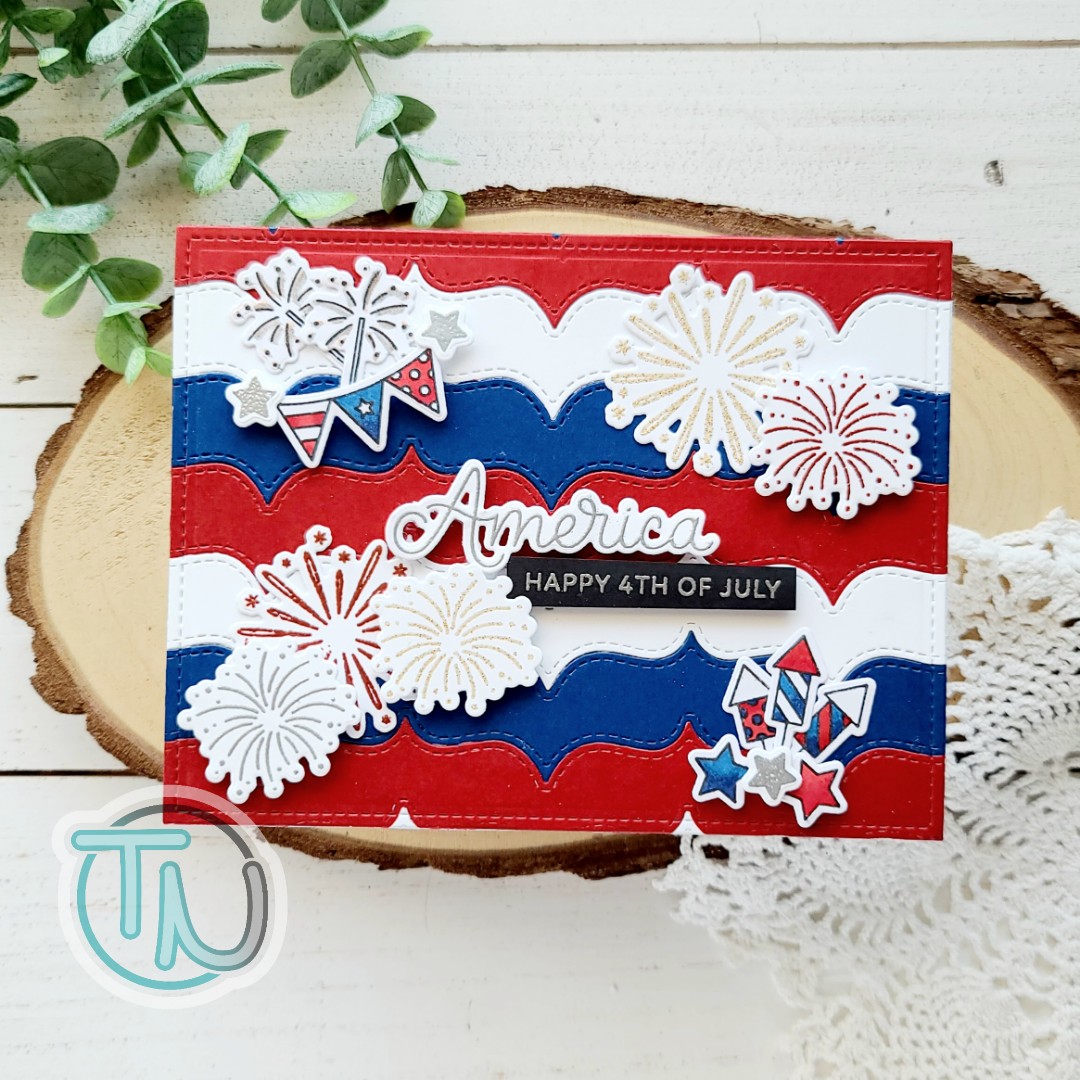
To create the background for my card, I cut a white panel to 4×5.25 inches and inked the top and side edges with Lawn Fawn mermaid ink and a blending brush. Then I cut two layers of clouds used the Lawn Fawn cloudy border dies and inked the tops of those with the same color before adhering all the layers with liquid glue.

Next, I used my images as guides before stamping my sentiment in the top left sky area. Then I started adding everything with either foam squares or liquid glue, or a combo.

For finishing touches today, I added Wink of Stella glitter brush pen to the unicorn horns, sweetheart clay embellishments to the whipped cream and heart on the mug and a scattering of holographic hearts around the sky.

I probably had way too much fun creating this card but I’m just so happy with how it turned out and think it would make anyone smile when they opened it! Don’t you?!?

Products used today:
Heffy Doodle Fluffy Puffy Unicorn stamps and dies
Lawn Fawn Outside In Stitched Mug dies
Lawn Fawn Stitched Mug Frame dies
Lawn Fawn Puffy Cloud Border dies
Lawn Fawn mermaid ink
Trinity Stamps blending buddy brushes
Hero Arts 2018 My Monthly Hero Kit stamp set
Twiddler’s Nook Pixie Dust Micro Beads – rosetta
Twiddler’s Nook Sweethearts Clay Heart embellishments
Twiddler’s Nook Holographic Hearts embellishments
Wink of Stella glitter brush pen
Foam squares
Liquid glue

I appreciate you sharing your time with me. Have a fabulous day!

Coffee Loving Cardmakers – Let It Snow Thank You Card

Hello everyone! It’s hard to believe but today is the last Tuesday Tea with Twiddler’s Nook on the Coffee Loving Cardmakers blog for 2021! Another year has completely flown by! Today I’m sharing a fun mash up card with Newton’s Nook images and some Lawn Fawn dies.

I started my card by stamping images from Newton’s Nook Sending Hugs and Snowman Greetings stamp sets. I colored them with my copic markers and cut them out with the coordinating dies. Then I die cut my background panel from white cardstock using the Lawn Fawn Stitched Snowflake Backdrop die and inked it up with some Lawn Fawn dye ink and a blending brush. I smooshed some of the ink on my glass mat, sprayed it with water and used a paintbrush to flick it on the background for added texture.

With my background finished, I used it along with my images as guides to die cut a white snowy hill to ground my scene. Then I combined a few Lawn Fawn sets to create a custom sentiment to make this a fun winter thank you card to use after the holidays. The top and bottom sentiments came from Thanks a Latte and the middle word came from Big Thanks. After that was stamped I flicked some paint on the hill as well to tie in the speckles a little. Then I popped it up with foam tape on the bottom of my card front.

Last, I added my images with foam squares and liquid glue and switched over to finishing touches. For that I added glossy accents to the snowman nose, buttons and heart, and the other critter noses and beaks too. Then I added black glaze pen to the eyes with a little white gel pen highlight on Winston. So that everyone had a little shiny interest I also added glossy accents to the coffee cup lid and ribbon on the gift. Then to complete my scene I adhered a scattering of snowflakes from Twiddler’s Nook’s Snowy Day embellishments.

Have you switched gears yet or are you still holiday crafting? I am doing a mix of thank you cards and still making holiday things as I’m inspired. I’ve even thrown in a couple Valentine’s Day cards already too. So fun!

Products used today:
Newton’s Nook Snowman Greetings stamps and dies
Newton’s Nook Sending Hugs stamps and dies
Lawn Fawn Simple Stitched Hillside Border dies
Lawn Fawn Stitched Snowflake Backdrop die
Lawn Fawn Thanks a Latte stamps
Lawn Fawn Big Thanks stamps
Foam tape and squares
Ultrabond liquid glue
Glossy accents

Twiddler’s Nook Snowy Day embellishments

I appreciate you sharing your time with me. Have a fabulous day!

Coffee Loving Cardmakers – Lawn Fawn Kitty Boxes

Hi there! I’m back today with a fun project for the Coffee Loving Cardmakers Fall | Winter Hop! Instead of a card today, I have a set of treat boxes that I made with my all-time favorite die set – the Lawn Fawn Tiny Gift Box! This box is fun to decorate on its own but when you add the mountains of add-on die sets Lawn Fawn has created, give me all the things and let me make boxes for decades!!! Seriously, I love it all! So today I have a set of kitties to share with you.

Aren’t these just the most adorable things you’ve ever seen?!? I know you agree! Here’s a link to the Lawn Fawn video on how to create the boxes with the cat add on options. I won’t bore you with those details.

After creating my kitty boxes, I went digging for a coffee mug for them to hold. I found the one in the Den Sweet Den set and it is absolutely PERFECT for this! I stamped and colored 3 of them, used the coordinating dies to cut them out and slid them in the kitty’s paws for each box.

Filling for these boxes today is a folded up Starbucks Via packet and chocolate covered espresso beans! YUM!!! Super excited to share these and also can’t wait to create more with the other critter add ons too!

Products used today:
Lawn Fawn Tiny Gift Box dies
Lawn Fawn Tiny Gift Box Cat Add On dies
Lawn Fawn Den Sweet Den stamps and dies
Copic markers
Tombow Mono Multi liquid adhesive
Scrappy tape – 1/4 inch

I appreciate you sharing your time with me. Have a fabulous day!

Coffee Loving Cardmakers – Ellen Hutson Coffee Sleeve and Matching Card

Happy Tuesday friends! It’s time for Tuesday Tea with Twiddler’s Nook on the Coffee Loving Cardmakers. So be sure to grab a cuppa and settle in because I’ve got a really fun project to share with you today!

I couldn’t resist this super fun Halloween set from Ellen Hutson called Halloween Treat Tags. The ghost and bat in this set are beyond adorable! Today I’m just using the ghost for a super fun coffee sleeve with the Bear Cozy Kit and then switching gears to a card that coordinates!

For the cozy, I die cut the bear cozy main die from black felt and trimmed off the ears with scissors. Then I cut the ghost from sprout, lilac and sunset felt. I placed the negative from one of the ghosts in my MISTI and used it to align the stamp. Then I simply placed each ghost in the negative and stamped the image right on it. I happen to have a craft ink pad for fabric but I did a little research and you can you Ranger Archival ink on fabric too! I used Thermoweb Fabric Fuse liquid adhesive to adhere my ghosts in place and set it aside to dry.

While it was drying, I die cut a piece of black cardstock with a Lawn Fawn stitched rectangle. Then I took the die from the Bear Cozy kit that gives you stitching holes to sew your cozy together and cut two strips on my black cardstock. I dug through my embroidery floss and stitched a fun, random mess back and forth across the cardstock. I adhered the ends on the back with some washi tape. Then I cut the Lawn Fawn diagonal striped cover plate from coordinating cardstock and adhered it to a card base. Once that was done I used scrappy tape to adhere the stitched panel in place.

I chose sentiments from Tag It Halloween and stamped them in coordinating colors. Then I used a Pink & Main sentiment strip die to cut them all out. I stamped another ghost and used the coordinating die to cut him out and popped everything up with foam strips and squares.

With my card all finished and the ghosts on my cozy dry, I used the stitching die to cut holes on both ends, sewed a fun blanket stitch on the edges and then sewed the ends together, completely my little gift set!

This is going to be such a fun set to give away! I’m super excited!

Products used today:
Ellen Hutson Bear Cozy Kit
Ellen Hutson Tag It stamps
Ellen Hutson Halloween Treat Tags stamps and dies
Ellen Hutson felt – black, sunset, sprout, lilac

Thermoweb Fabric Fuse adhesive
Lawn Fawn Simple Stripes – diagonal die
Lawn Fawn Large Stitched Rectangle dies
Scrapbook Adhesives foam squares and strips
Scrappy tape – 1/4 inch

I appreciate you sharing your time with me. Have a fabulous day!

Lawn Fawn – Cheers!

Hey friends! I have an adorable slimline card to share with you today. I snagged the new Lawn Fawn Lovely Latte die set and had some fun creating different cups with my stash of Lawn Fawn papers.

I cut all the pieces from the Lawn Fawn Perfectly Plaid Christmas paper pad and white cardstock. I used copic markers to color the coffee part of my cups – E35, E34 and E31. This seems to be my go-to combo for coffee most of the time. For the whipped cream I used E000 and E0000. I used liquid glue and adhered all the pieces together onto the base layer.

To create the background I inked up distress oxides in candied apple, dried marigold and tattered rose. I spritzed it with water and adhered it to a white card base. Then I cut the awesome Pink & Main Plaid Slimline die from white cardstock and layered it on top. I added foam squares to my mugs and popped them in place.

Next, I die cut the Lawn Fawn Scripty Cheers sentiment from white cardstock 3 times and glued them together. Then I glued the stack to the card front below the cups. For finishing touches I came in with a Wink of Stella glitter brush pen on the sentiment and whipped cream. Such a fun little touch of shimmer.

I am loving this new line of dies Lawn Fawn has come out with. I hope a few of the other iconic characters get added to the mix too!

Products used on today’s card:
Lawn Fawn Lovely Latte dies
Lawn Fawn Scripty Cheers die
Pink & Main Plaid Slimline die
Distress oxides – candied apple, dried marigold, tattered rose
Copic markers
Foam squares
Wink of Stella

I appreciate you sharing your time with me. Have a fabulous day!

Coffee Loving Cardmakers – Thanks a Latte Shaker

Welcome! It’s time for another Tuesday Tea with Twiddler’s Nook over on the Coffee Loving Cardmakers and today it’s extra special! We’re celebrating National Coffee Day all week leading up to it and there are giveaways on the blog each day. Click HERE to head over and check out the festivities.

I’m celebrating Thermoweb today with a super fun shaker card featuring stencils and dies from Newton’s Nook, the coffee shaker dies from Lawn Fawn and my shaker bits from the Twiddler’s Nook shop!

Head over and check out the post for all the details on this card plus a chance to win!

Thanks for stopping by. I appreciate you sharing your time with me. Have a fabulous day!

MFT Stamps – Sending You HUGS

Hi friends! I hope you’re having a fabulous day so far! I’m popping in with a simple and sweet thinking of you card featuring some goodies from MFT Stamps. I recently picked up these adorable Mini Meows kitties and couldn’t wait to play with them!

This whole card started with the need to stamp and color these cute kitties! So I chose 3 and colored them with my copics. Then I used the coordinating dies to cut them out. Seeing how perfectly they fit in the photo booth strip die I just had to use it. So I took a piece of white cardstock slightly smaller and ink blended peacock feathers and tumbled glass distress oxide inks. I spritzed it with water and glued it to the back of the photo booth strip frame. I added the kitties next.

For the background panel, I blended tattered rose, worn lipstick and candied apple distress oxide inks and spritzed it with water. Once it was dry I die cut the panel with the largest Stitched Rectangle die from Lawn Fawn. It took me a minute but I die cut the Sending You Hugs sentiment and tried different arrangements. Once I decided how I liked it, I adhered the first layer down. Then I die cut the letters 3 more times and glued them on top for some dimension. I added foam tape to the back of the photo strip and popped it on the panel next.

I used liquid glue to adhere the panel to a white card base and moved on to finishing touches. Those are pretty small here but I still like the effect they make. I used black glaze pen on the kitties’ eyes and a little dab of glossy accents to their noses.

At the last minute I thought it would be adorable to take one of the heart speech bubbles and add it to that middle kitty. So I cut it from white, colored the heart with copics and glued it in place. I couldn’t leave it alone though so I added glossy accents to the heart too! So cute!!!

Products used on today’s card:
MFT Stamps Mini Meows stamps and dies
MFT Stamps Sending You Hugs die
MFT Stamps Photo Booth Strip die
MFT Stamps Love Speech Bubbles
Lawn Fawn Large Stitched Rectangle Stackable dies
Distress Oxide Ink – candied apple, worn lipstick, tattered rose, peacock feathers, tumbled glass
Glossy accents
Foam tape

I appreciate you sharing your time with me. Have a fabulous day!

MFT Stamps – No One Stacks Up

Hey crafty friends! I have a super adorable and fun card to share with you today featuring some MFT Stamps goodies paired with beautiful ink blending and a Lawn Fawn backdrop die. Let’s get started!

I started this card with an idea in mind so I grabbed my inks and set to work blending the background panel first. These are distress oxide inks in tattered rose, dried marigold and abandoned coral. One of my very favorite combos ever! I spritzed it with water and blotted it dry. Then I flicked watered down black acrylic paint on the panel and set it aside to dry.

While I was waiting I die cut 3 of the MFT Stamps Out of the Box dies from kraft cardstock. I used a blending brush and Lawn Fawn walnut ink to darken some of the edges to give it depth. I used liquid glue to adhere the layers together and then stack my boxes too.

Next, I stamped the panda and a flag from MFT Stamps Weather With You stamp set and colored it with my copic markers. I used the coordinating dies to cut them all out and used liquid glue to adhere them inside the stacked boxes.

Next, I stamped the sentiment and used a banner die from the Lawn Fawn Flippin’ Awesome set to cut it out. Now that the inked panel was dry, I ran it through my die cutter with the Lawn Fawn Polka Heart backdrop die. Next, we assemble everything!

I used liquid adhesive to adhere the background panel to a white card base. Then added foam squares to the back of the sentiment banner and stack of boxes and popped them in place.

For finishing touches, I added black glaze pen to the panda’s eyes and glossy accents to the flagpole and panda’s nose.

Isn’t this just a sweet little card to share with a friend!?! I love the critters in this set and all of the different sentiments too! So many options to mix and match!

Products used on today’s card:
MFT Stamps Weather With You stamps and dies
MFT Stamps Out of the Box dies
Lawn Fawn Polka Hearts backdrop die
Lawn Fawn Flippin’ Awesome dies
Scrapbook Adhesives foam squares
Tombow Multi Mono liquid adhesive
Glossy accents
Distress Oxide Inks – tattered rose, dried marigold, abandoned coral
Lawn Fawn walnut ink
Blending Buddy brush
Copic markers

I appreciate you sharing your time with me. Have a fabulous day!

Lawn Fawn – Wild Ride

Hello everyone! I’m back again today to share a really special card that I made because today is my anniversary. My husband and I have been married for 14 years today and I couldn’t resist making this card because the sentiment was just too perfect!

To create my card, I started with a piece of kraft cardstock. I smooshed some green ink on my glass mat and spritzed it with water. Then I smooshed my paper in the ink repeatedly, drying in between layers. Once that panel was dry, I ran it through the die cutter with the Hero Arts vines and leaves cover die. I placed it over a light teal panel and thought it was too plain. So I used a blending brush and green ink on the edges of the teal panel and really liked the difference it made. So, I used liquid glue and adhered them together.

Next, I stamped and colored images from the new Lawn Fawn Toucan Do it set and then cut them out with the coordinating dies. I stamped and heat embossed a sentiment from the set on black cardstock and trimmed it into two strips.

With a combination of liquid adhesive and foam squares I adhered all of my images and the sentiment strips. Then I went in for finishing touches like glossy accents to the bird beaks and unicorn Stickles to the butterflies and flower centers. I also added black glaze pen to the eyes and glossy accents to the jaguar noses too.

I’m just so happy with how this card turned out and am really excited to give it to my husband today too!

Products used on today’s card:
Lawn Fawn Toucan Do It stamps and dies
Hero Arts Leaves and Vines cover die
Lawn Fawn inks
Glossy accents
Stickles – unicorn
Foam squares
Tombow Multi Mono liquid adhesive
Blending Buddy brush

I appreciate you sharing your time with me. Have a fabulous day!

(This blog uses affiliate links whenever possible, at no additional cost to you.)

Pretty Pink Posh – Happy 4th of July!

Happy 4th of July to all of my American friends! I have a really fun themed card to share with you featuring stamps and dies from Pretty Pink Posh. I baked some blueberry muffins and delivered them to my parents with this card just for fun.

To create the card, I die cut one of the Stacked Edges 3 dies from red, white and blue cardstock and handful of times. Then I used liquid glue to adhere them to a white scrap of cardstock. Then I die cut the panel with the a Large Stitched Rectangle from Lawn Fawn. I adhered it to a card base and moved on to stamping and heat embossing.

The images for this card are all from the Pretty Pink Posh 4th of July set. I stamped and colored some with my copic markers and heat embossed others. Once I was finished, I used the coordinating dies to cut everything out.

Copic Color Map for this card:

Reds – R27, R29 (stars, banner and fireworks)

Blues – B37, B39 (stars, banner and fireworks)

Grays – C00, C3 (sparkler stick and slight shading on white areas

Once everything was cut out, I used a combination of foam squares and liquid adhesive to adhere all of my images in place. For finishing touches I just added a little silver Wink of Stella glitter brush pen to the sparklers.

Isn’t this a totally fun and festive card?!? I just love it!

Products used on today’s card:
Pretty Pink Posh 4th of July stamps and dies
Pretty Pink Posh Stacked Edges 3 dies
Lawn Fawn Large Stitched Rectangles
Wink of Stella – silver
Tombow Multi Mono liquid adhesive
Scrapbook Adhesives foam squares and strips
Copic markers

I appreciate you sharing your time with me! Have a fabulous and safe holiday!