Birch Press Design – Winter Thanks

Hello again! I’m over on the Birch Press Design blog today with a pair of thank you cards fit for winter thank yous that we’ll all be sending out soon.

I couldn’t totally decide on a color scheme so I decided to try both ideas and see if I liked them.

I used the Birch Press radial pinpoint plate, floral star and big sugar script sending paired with Trinity Stamps embellishments and the thanks from Lawn Fawn’s Big Thanks set.

The first card has a white bottom layer and gray background for an understated, simpler card but I think it’s beautiful.

Then the other idea I always have with Birch Press layering dies is to add a little bling to one of the layers. It just looks so cool every time! So I added a silver glitter layer to the star, white background and used vellum on the sentiment. Again, beautiful and I love it.

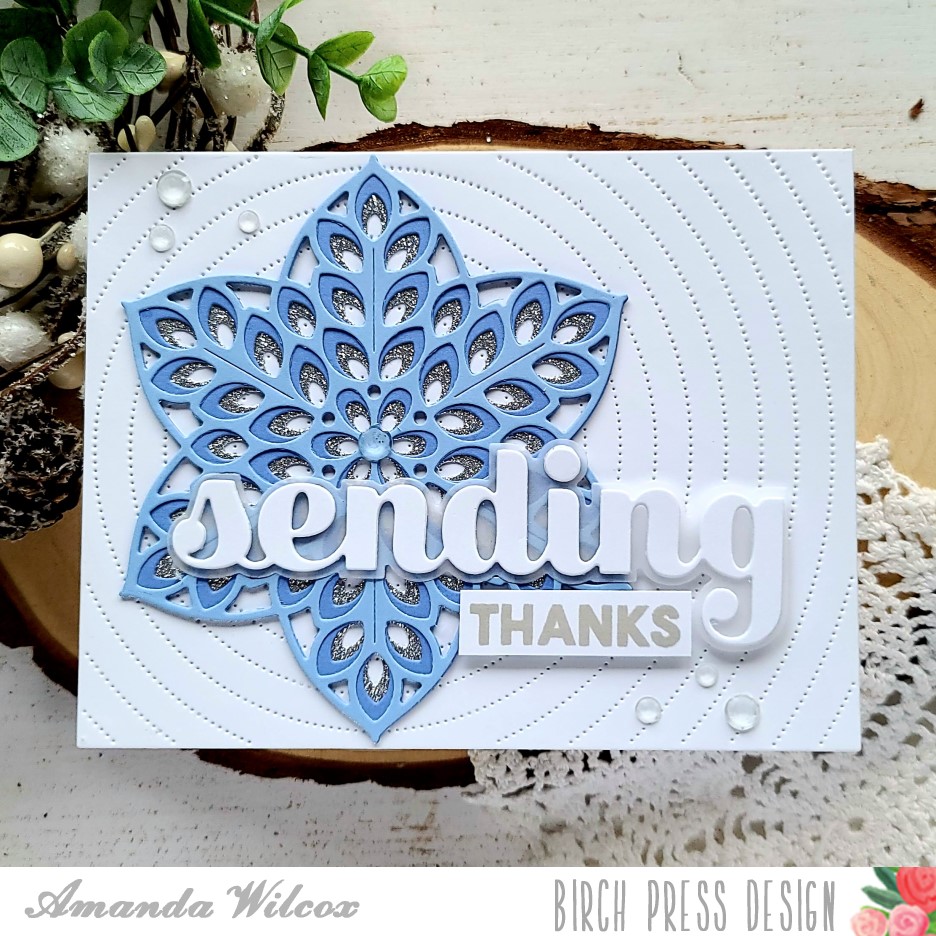
Do you like one more than the other? I think the first one would be better for mass producing as the glitter cardstock can get spendy but I think I like the bling more to be honest.

I appreciate you sharing your time with me. Have a fabulous day!

Lawn Fawn – Hap-pea Holidays!

Hey friends! It’s been a minute since I checked in. The holidays have me super busy and I took advantage of the lull in design team requirements to clean my craft room and wrap our gifts over the last week. Yesterday I had some time to play in the craft room and finally pulled out the adorable Lawn Fawn pea sets – Be Hap-pea and Peas on Earth.

I paired those two sweet sets with the MFT Stamps shutter card dies to create a fun, interactive card. Here’s the front with those sweet peas hanging out in their pod and that great Lawn Fawn Snow Day Remix paper.

Ta-da!!! Here’s the inside. Super simple but adorable and sure to make someone smile. Aren’t these peas just the cutest? And I’m totally a fan of those great puns that come in both stamp sets.

Here’s a look at the inside and the band together. I’m still getting the hang of these shutter cards but they are so much fun to create!

We have a few birthdays coming up so I think I’ll try another for one of those.

I appreciate you sharing your time with me. Have a fabulous day!

Coffee Loving Cardmakers – National Tea Day

Hey everyone! It’s a super special day because, not only is it Tuesday Tea with Twiddler’s Nook, but it’s actually National Tea day and we’re going to celebrate with a whole lot of fun! I’ve got a card share for you and then Amy will pop in with some information about a guest designer opportunity and link up at the bottom. Let’s get started with today’s card share!

Today I decided to pull out a fantastic set by The Cat’s Pajamas called Make Tea. I absolutely LOVE the critters in this set and had so much fun coloring them up. For this card, I stamped and colored them with my copics, then used my scan-n-cut to cut them all out. Next, I pulled out some Lawn Fawn snow day remix paper and the reverse stitched scalloped circle window dies to set my mini scene. 

After die cutting and assembling my papers, I used my MISTI to stamp a sentiment over this very chill tea party that’s going on. Since I chose to make this a last minute Christmas card with the patterned paper used, I pulled out the Trinity Stamps Merry Christmas Senti-mini set and stamped a quick Merry Christmas banner which is popped up with foam squares.

For finishing touches on my card, I added some glossy accents to the critter eyes and noses and their mugs. Then I used Wink of Stella glitter brush pen on the steam coming from the cups. Last, I glued a scattering of Trinity Stamps Cinnamon Red Hots Jelly Drop Hearts across the design.

AND THEN, on a whim, I decided to stamp on the inside of my card today too. I never do this but I have a couple of crafty friends who do and I always think it’s super cute. So I grabbed a bunny that I didn’t use on the front and another sentiment from Make Tea and stamped it in red ink to coordinate with the colors on the front. 

Now, it’s your turn to play! Head over to the Coffee Loving Cardmakers Blog for information on a chance to become a guest designer with us!

I appreciate you sharing your time with me. Have a fabulous day!

Coffee Loving Cardmakers – Shaker Ornament and Card Combo

Hi friends! It’s time for Tuesday Tea and I’m really excited to share with you today so grab your cuppa and settle in. Today’s project is a card with a removable shaker ornament on it! I just love how it turned out!

I started my card thinking it would be a shaker snow globe with the cute bear and her coffee inside it. Once everything was colored and die cut I realized that she’s just a bit too big for my liking so I switched gears.

I used the Ready, Set, Snow set by Lawn Fawn to create the snow globe shaker and decided it would be fun to have the bears on either side. Even better, if I use foam tape behind the bears, they hold the ornament in place for a cute card front and removable ornament! I’m quite please with myself in this moment, you have no idea.

Here’s a little peeky peeky at the card and ornament separate too. I wanted to hide something behind but nothing I tried worked for me so I let go and left it how it is. I did, however, decorate the back of the shaker so it doesn’t matter how it hangs on the tree.

Simple but super cute and the glitter paper I used for the snowflake will catch the lights on the tree nicely I think.

How are your Christmas cards coming along? I still need to come up with one of those simple, mass produce-able designs but things like today’s card keep popping in my head and I can’t resist!

I appreciate you sharing your time with me. Have a fabulous day!

Lawn Fawn – Critter Christmas

Hey there! I’m back with my daily entry and inspiration for the 2020 Fall | Winter Coffee Lovers Hop! I had some fun die cutting last night and playing with my Lawn Fawn goodies, which I don’t do as often anymore.

This card is pretty straight forward, die cutting my critter hugger elements and the holiday add on elements too and then I glued it all together. I used the scalloped stitched frames in green woodgrain over the plaid stitched rectangle. Then I pulled out the stitched snowflakes in white glitter paper for a little extra interest. I finishing things off with scripty merry and stamped Christmas from Cheery Christmas and cut it into a strip.

For finishing touches I added Unicorn Stickles to the mittens, whipped cream, holly berries and owl’s cheeks. Then I added glossy accents to the owl’s eyes and beak.

You can guarantee I’ll be playing with these cuties again very soon! I think maybe some shaped cards for Thanksgiving place markers would be a blast! Writing a thankful message inside each one! Wouldn’t that be great?

I appreciate you sharing your time with me. Have a fabulous day!

Lawn Fawn – Spooky Cocoa

Hey friends! I’m over on the Scrapbook Pal blog today and we’re having some spooky cocoa. The weather is changing and things are getting ooky spooky around here! It’s great since this is my favorite time of year!

I had 2 new goodies from Lawn Fawn that I have been dying to use and thought it would be so much fun to combine them! So today we’re having Halloween themed cocoa with some ghostly steam rising from our cup!

I created my Lawn Fawn Stitched Mug shaker mechanism, filled it with fun embellishments from Trinity Stamps and sealed it up. Then I stamped and colored my Lawn Fawn Booyah ghosts with copics, using the coordinating dies to cut them out. Then I used liquid glue to adhere the accessories to each ghost.

To create my background, I used some Tombow brush pens on watercolor paper and did some messy ink smooshing. I always have so much fun with this technique! Once it was dry, I trimmed it to 4×5.25 and popped it up on a black card base with foam tape. I adhered my whipped cream and spoon to the back of my mug and glued it directly to the card front, while the ghosts were popped up with foam squares. (The whipped cream came from the frosting of the stitched cupcake dies from Lawn Fawn.)

Then I stamped and heat embossed a banner from Bannertastic and a sentiment from Booyah and die cut it. I used a quickie glue pen to adhere my banner, trying to hide the glue behind the embossing lines.

For finishing touches, I added black glaze pen to the Frankenghost’s eyes, glossy accent’s to the witch’s hat buckle and spider and white gel pen accents throughout the images.

I had so much fun mixing and matching and making things a little spooky for Halloween!

I appreciate you sharing your time with me. Have a fabulous day!

Lawn Fawn – Let’s Go Nuts

I’ve been having so much fun with the little bit I ordered from the Lawn Fawn fall/winter release and today I’m excited to share a card with you featuring some of those goodies! It’s a little more involved in cutting and measuring so I’ve got a step-by-step for you with measurements in case you want to follow the design completely.

1. Cut card base from kraft cardstock and score at 2 1/8 from each side and crease. Cut 2 plaid panels measuring 1 7/8 x 5 1/4 and adhere them to either side.
2. Die cut shutter pieces from kraft cardstock and crease the score lines. Cut a woodgrain panel 2 3/4 x 6 and score 1/4 inch from the top and bottom. Cut a white piece of cardstock measuring 3 x 5 7/8 and adhere it behind the woodgrain panel. Then use the circle die from the shutter card components set and run them through your die cutter.
3. Die cut another circle from yellow plaid and using your shutter components adhere it to the inside of your card base.
4. Stamp, color and die cut your images from Let’s Go Nuts and Big Acorn however you like.
5. Using scrappy tape, adhere your kraft shutter pieces to the inside of your card and then adhere the woodgrain panel over the top of them. 
6. Using liquid glue or tape runner adhere your images inside the shutter and on the woodgrain panel however you choose. Don’t forget to stamp and heat emboss your sentiments and cut them into strips too. Then close your card up to create the belly band that keeps it closed. 
7. Cut a white strip that measures 2 x 8 1/2. Instead of scoring at a specific spot, I just wrap the strip around my card and crease it where it folds. This still gives you over a 1/4 inch overlap to adhere the band together. 
8. Die cut a plaid circle with the stitched circle stackables and adhere the woodgrain circle you cut from the inside of your card to it. Cut another woodgrain circle for a ground and use the simple stitched hills to cut the top. Adhere it along with your images and sentiments. Then add the whole circle to your belly band. I glued it over the seam so the band looks seamless but you could put the seam in the back too.
9. Slide your belly band over the top and VOILA your card is all finished and ready to wow the recipient!
I hope you enjoyed today’s card. I appreciate you sharing your time with me. Have a fabulous day!

A few notes about today’s card…where I love all things Lawn Fawn, I decided to go with the My Favorite Things shutter card components dies because they give you more control and flexibility where your opening will be and the opening is larger too. Keep this in mind if you want to use any of the add-ons for the Lawn Fawn version though, they won’t work with this one. But today’s card could easily be modified for that shutter die set too.

If you have questions or need clarification on anything, just comment below, email me from the contact form or message me on IG or Facebook. I’m super happy to help in any way I can!

I appreciate you sharing your time with me. Have a fabulous day!

Miss Ink Stamps – Pumpkin Spice & Everything Nice

Hi there! It’s that fabulous time of year again…pumpkin spice everything! Which happens to be exactly what my shirt says today. I love pumpkin everything and this time of year is my absolute favorite! But I digress…

It’s release week for Miss Ink Stamps and we have some super fun sneak peeks for you! Today I’m sharing Pumpkin Spice Latte. This set is so much fun! I had a blast coloring it, especially with these bold, fall-type tones.

I paired the image with the stripes stencil from the basics stencil bundle and a vellum die cut Lawn Fawn stitched circle. I also heat embossed my sentiment on a strip and cut banner ends with my scissors.

I finished things off with some white gel pen accents to the images and glossy accents on some key areas like the coffee beans, decoration on the mug and the gnome’s hat. Then I glued down some Trinity Stamps boiled sugar jelly drop heart embellishments too.

Today is your last chance to comment over on Instagram for a chance to win before the release goes live for purchase tomorrow!

I appreciate you sharing your time with me. Have a fabulous day!

Lawn Fawn – Birthday Gnomes – AND A SALE

Happy Friday everyone!!! I want to hijack the beginning of my own blog post to let you know that we’re running a SALE through the Labor Day weekend over at the Twiddler’s Nook shop! So be sure to head there and treat yourself!

Now, let’s get on with today’s super special card share! Yesterday was my mom’s birthday and since I gave her her card already, I get to share it with all of you today!

To create my card I pulled out a couple of great sets from Lawn Fawn – Oh, Gnome and Gleeful Gardens, stamped some images and colored them with my copics. Then I used the coordinating dies and cut them all out. Next, I took an A2 panel and inked it up with mowed lawn and twisted citron distress oxide inks. I spritzed it with water and used the stitched hillside borders to cut some ground.

Next, I took my card base and lightly inked the edges with broken china distress oxide and the center with squeezed lemonade to look like the sun peeking over the horizon. Then I began to place my images and adhere them down with liquid glue. The gnomes and their accessories are popped up with foam squares for a little dimension.

My sentiment is from wavy sayings and it’s stamped on a wavy banner with a yellow border layered over the top of the stitched banner. This is adhered with liquid glue as well since it falls a little behind the standing gnome. The second part of my sentiment is stamped directly on the grass with Versafine onyx black ink.

Finally, I moved on to finishing touches. For those I added some white gel pen accents to the images and then glossy accents to the mushroom dots, gnome buckles, flower centers and the ribbon on the gift.

My mom really likes garden gnomes and has plenty around the yard so I thought this card was just perfect for her. I think she really liked it which, of course, made me happy.

Don’t forget to stop by the SHOP and pick up some goodies over the weekend. The sale runs today through Monday.

I appreciate you sharing your time with me. Have a fabulous day!

Lawn Fawn – Magical Happy Birthday

Welcome to a new week. I hope you all had a wonderful weekend. I recently had a moment to play with some new goodies I ordered from Scrapbookpal.com. It was mostly supplies but I had to throw in a few fun things too and one of them was the new Little Dragon mini set.

To create my card, I started by stamping and coloring my images with my copics. I used the Little Dragon and Critters Ever After stamp sets to create this scene. Then I inked up a panel with distress inks for a darker sky and spritzed it with water. Next, I inked up 2 other panels – for grass and a hill – and die cut them with my grassy border die and one of the stitched hillside borders.

I die cut a stitched rectangle from an old Beachside paper pad I’ve been hoarding. Then I cut the largest outside-in stitched scalloped circle from the center. Using my images as a guide I stamped some stars in the sky with VersaMark ink and heat embossed them in white. Now, it’s time for assembly.

I adhered the hill and grass together and then to the back of the panel with the circle hole. I line the back of that with foam tape and adhered it to my inked panel. This whole panel was then glued to a card base and I started on my images. Those are adhered with a combination of foam squares and liquid glue.

For my sentiment, I die cut one of the wavy banners and stamped “Happy Birthday” from the wavy sayings stamp set. After folding on the crease lines I added a little glue to the folds and popped the banner up with foam squares.

To finish this card off, I added unicorn Stickles to the stars in the sky, glossy accents to the dragon horns, flames and flags on the castle and a black glaze pen on the dragon’s eye. Last, I glued down a scattering of Fortune Teller flat back beads from Trinity Stamps.

I had so much fun creating this card! I hope you enjoyed it and find a little inspiration to make something wonderful.

I appreciate you sharing your time with me. Have a fabulous day!