Hello again! I’m over on the Newton’s Nook blog today with a super fun caffeinated creation to get your juices flowing today! I’ll be entering it into the Coffee Loving Cardmakers Spring|Summer Hop. I really hope you’re playing along with us. It’s so fun and there is so much inspiration to be had and prizes to be won!
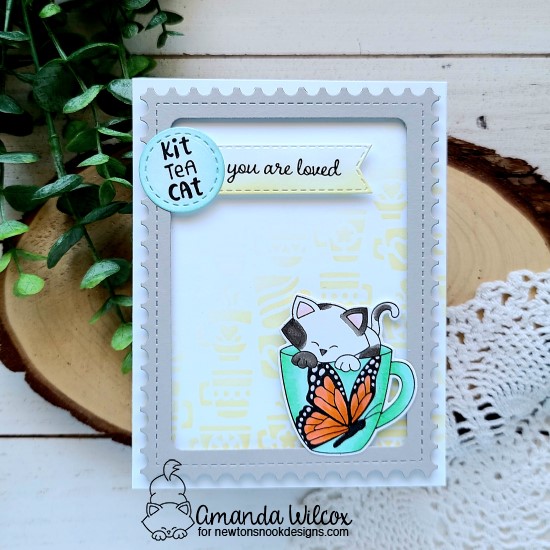
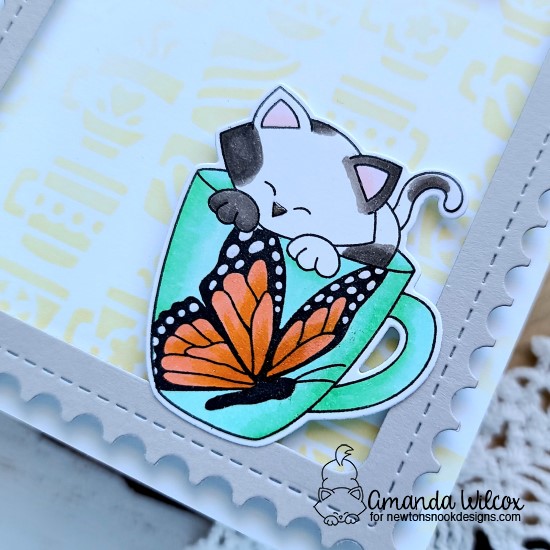
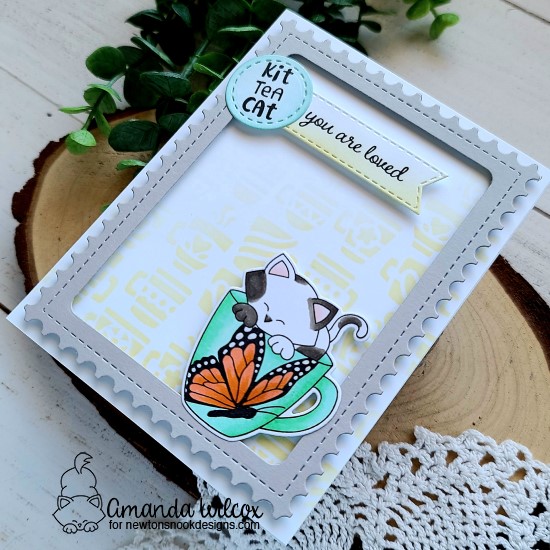
I am honestly, SUPER EXCITED to share this card with you today! I had the fun idea to mask off the mug from Newton’s Mug and stamp one of the Monarchs images inside it for a decorated coffee cup! I love it! I colored the image with my copics and used the coordinating dies to cut it out.
Then for my background I cut a white panel to A2 size and inked up the Mugs stencil with light yellow ink. I took the Framework dies and cut the largest rectangle, then cut the rounded rectangle from the Frames & Flags set out of the center to create a frame.
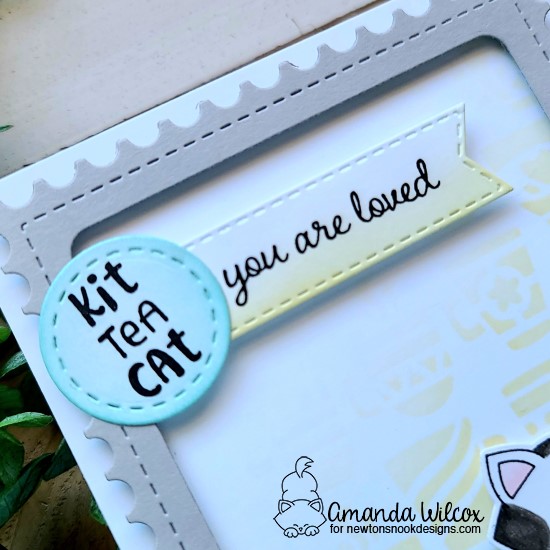
For my sentiment, I chose the first one from Newton’s Mug and stamped it on a stitched circle from the Frames Squared set. Then I added a sentiment from Heartfelt Essentials to a banner from the Banner Trio set. I inked up the edges of the circle with a light green ink as close to the mug color as I could get, then I inked up the bottom of the banner with the same yellow as the mugs stenciling.
Moving on to assembling my card, I added the stenciled panel to a white card base, then popped the frame up with foam strips. I added foam squares to Newton’s Mug and popped it in place. I used liquid glue to adhere the circle to the banner and added foam squares to the back of that before placing it at the top of the design.
For finishing touches, I added a little glossy accents to Newton’s nose and Wink of Stella glitter brush pen to the butterfly on the mug and the circle sentiment.
I appreciate you sharing your time with me. Have a fabulous day!
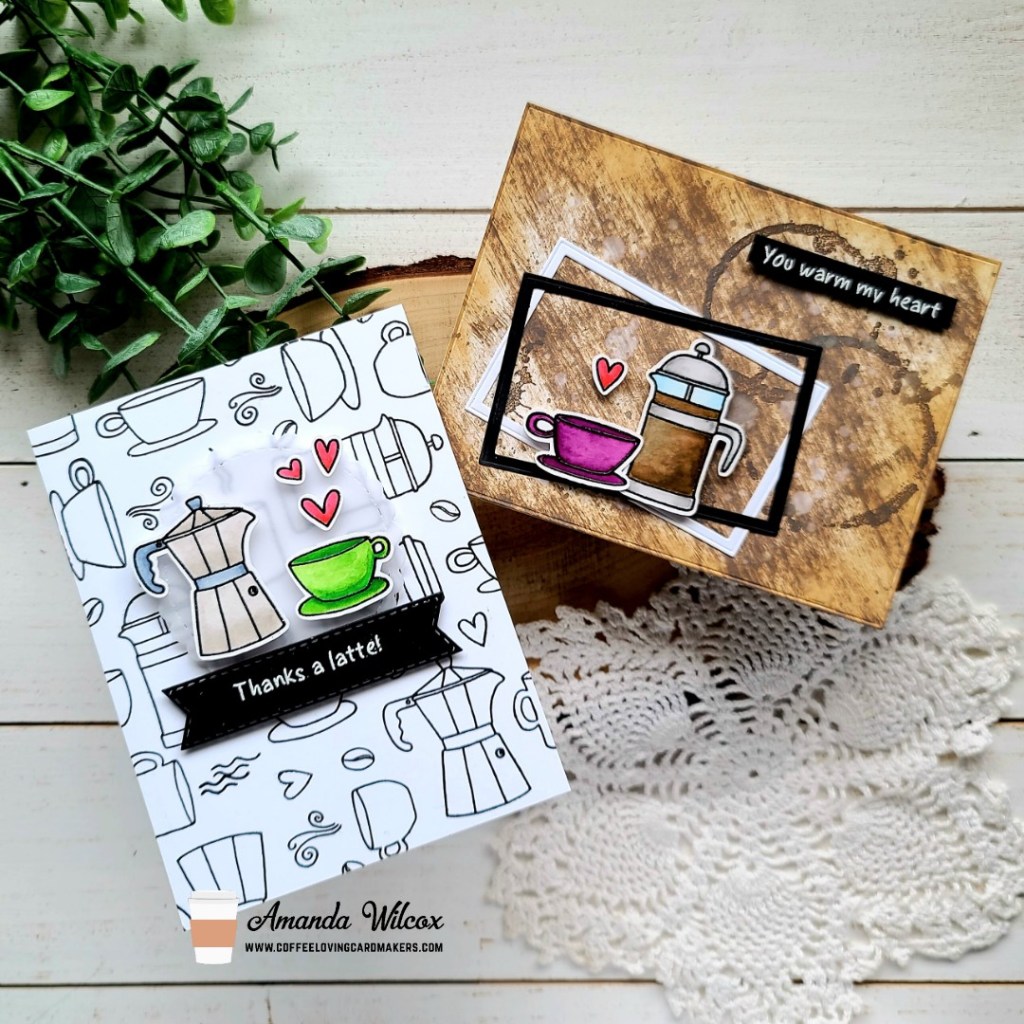
Hi again! Today is Tuesday Tea over on the Coffee Loving Cardmakers blog, in the middle of the Spring|Summer Coffee Lovers Hop! Today I have a pair of cards featuring Super Sponsor Jane’s Doodles to share with you.
I started these cards by stamping the images from Coffee Time on Bristol Smooth cardstock and heat embossing them in black. Then I used my Zig Clean Color Real Brush markers to watercolor them in. Then I ran them through the scan-n-cut and started playing with them to decide on final designs.
For this first one, I inked up a white panel with ground espresso distress oxide by dragging the pad across the paper. Then I used gathered twigs distress oxide around the edges. I spritzed it with water and die cut it with Super Sponsor Trinity Stamps’ embossed edge rectangle die. Next, I dug out a very old Bo Bunny stamp set and stamped the coffee stain rings on the panel with ground espresso distress oxide ink. Then I chose 2 smaller embossed edge rectangle dies and cut out frames in white and black and glued them down with liquid glue. I popped up my images with foam squares. Last, I stamped and heat embossed a sentiment from Coffee Time, cut it into a strip and popped it up as well.
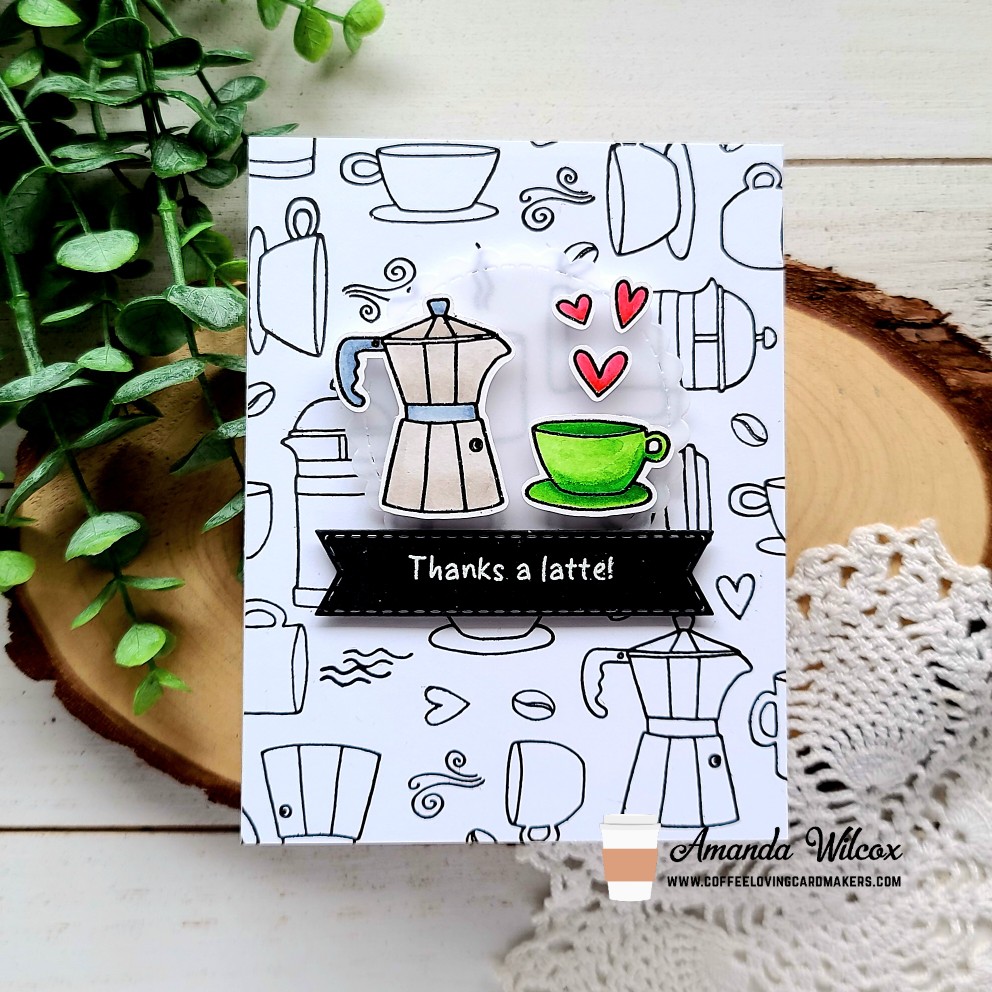
For the second card, I took a white panel and arranged all the images from Coffee Time on them and stamped them repeatedly creating my own patterned paper. I had so much fun placing each image and seeing how I could make them fit together like a puzzle. Then I pulled out two die sets from Super Sponsor Newton’s Nook – circle frames and banner trio. I cut a circle from vellum and a banner from black. I heat embossed a different sentiment on the banner and adhered it to the bottom of the circle. Then I popped my images up with foam squares and hid more foam squares behind those on the vellum circle so both layers have dimension.
I hope you’re having a fun week with all of the caffeinated inspiration and that you’re playing along with us too! Remember to head HERE to link up your coffee creations before Friday.
I appreciate you sharing your time with me. Have a fabulous day!
Hello again! I’m over on the Newton’s Nook blog today sharing a fun set of cards I made using the fun bunny tails stencil. Isn’t it just the cutest with those fluffy tails sticking out everywhere!?! I love them! For release week I made rainbow tails so today I’m sharing fuzzy ones and foiled, shiny ones too!
I originally wanted to see what the bunnies looked like inked up with white pigment ink on kraft cardstock and had planned to give them fuzzy white tails but changed my mind after I inked up the second panel with those cute light brown bunnies. These cards were super fun and really quick to come together.
For both cards I started by inking the stencils up and then used Thermoweb transfer gel on the tail portion and set them aside to dry before running the panels through my laminator with pink melon deco foil and white latte deco foil flock. Let’s take a closer look at the foiled one first.
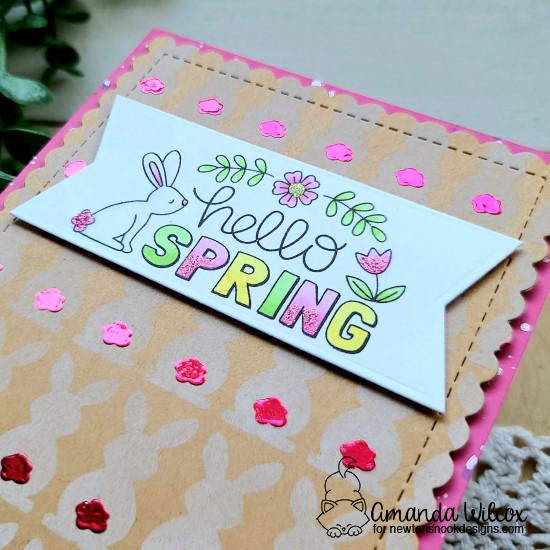
After foiling those cute bunny tails, I die cut the panel with a scalloped rectangle from frames & flags. Then I die cut a banner from the same set, flipped the die and cut it again to create a double-ended banner. I stamped the Hello Spring stamp and colored it with my copics.
I cut a piece of pink cardstock to match the pinks in the foil and markers I chose to color my image. Then I inked the edge with picked raspberry distress oxide, flicked it with water, pearl watercolor and black soot distress ink so it’s got some texture and interest. I adhered this panel to a card base then popped up the stenciled panel and banner with foam tape.
For finishing touches on this card, I added some pink glitter glue from my stash to the bunny’s tail, pink letters and tulip. Then I added unicorn Stickles to the flower center and glossy accents to the bunny’s nose. It’s such a bright, happy card! I’m really wishing for lots of sunshine after making it.
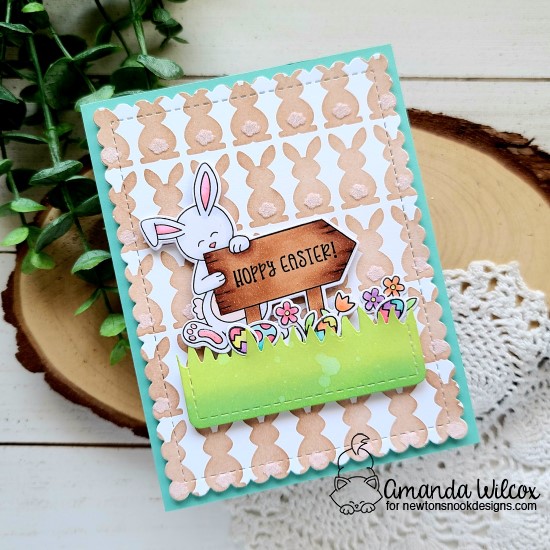
I added foam tape to my images and grass and added them to the stenciled panel. Then I added foam tape to that and popped it onto a teal card base I had created. Next, I moved on to some simple finishing touches. On this card I just added glossy accents to the flower centers, bunny’s nose and toe beans and called it finished.
These cards are so fun and perfect for spring! My daughter always gets really excited for Easter so I think I create more decorations, cards and things for it because we’re just in the mood and it all makes us happy. I’ve also always had a thing for bunnies. They are too cute and these bunnies are no exception!
Did you have a favorite between today’s cards?
I appreciate you sharing your time with me. Have a fabulous day!
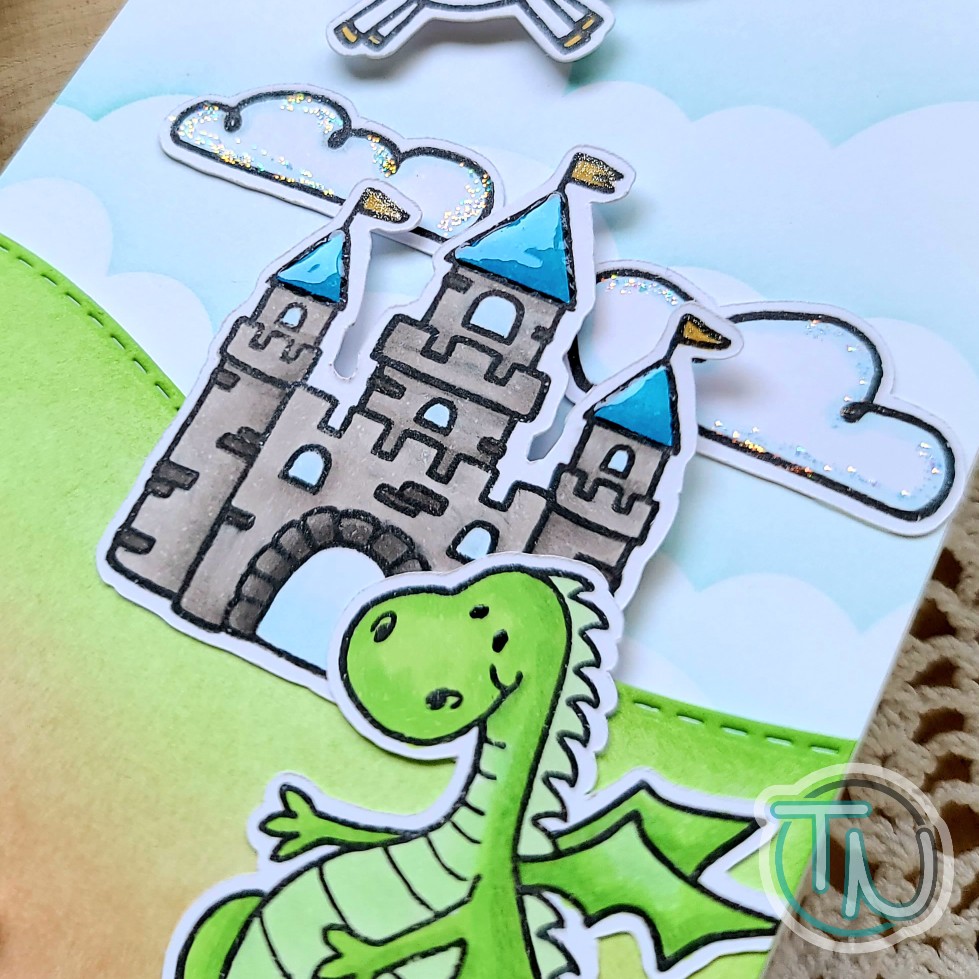
Hey friends!!! I have a wonderfully happy and magical card to share with you today featuring some Jane’s Doodles stamps and Newton’s Nook stencil and dies to help set the scene. I hope you love it because I REALLY DO!!!
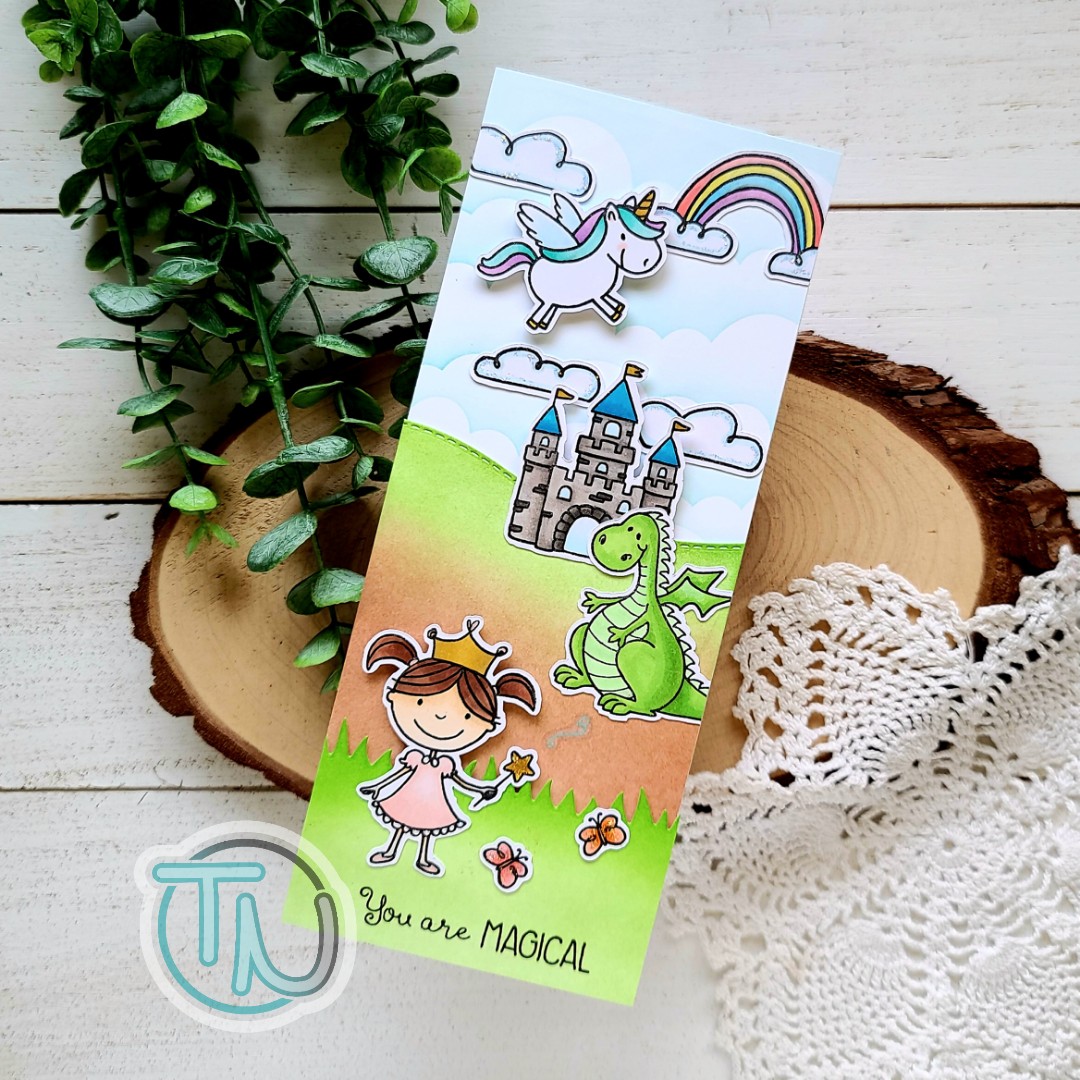
I mean, seriously, it’s just too cute!!! I started by stamping images from Unicorn and Magical and colored them all with my copic markers. I used the scan-n-cut to cut them all out and started playing around with final arrangement before I inked up my scene.
I used the Newton’s Nook clouds stencil on a full slimline panel with a blending brush and some Lawn Fawn kiddie pool ink. Then I inked up a shorter panel with Lawn Fawn jalapeno and die cut it with the Newton’s Nook land borders die for some grass. Last I inked up a slightly longer panel with Lawn Fawn walnut and doe inks and cut it with the other Newton’s Nook land borders die to create a hill for my castle to sit on.
I used liquid glue to adhere the clouds to a card base, then foam tape to adhere the hill and grass panels. Finally with a combination of liquid glue and foam squares I added all of my super cute images! Once those were added, I stamped a little magic whoosh coming out of the little girl’s wand and my sentiment at the bottom, then I moved on to finishing touches.
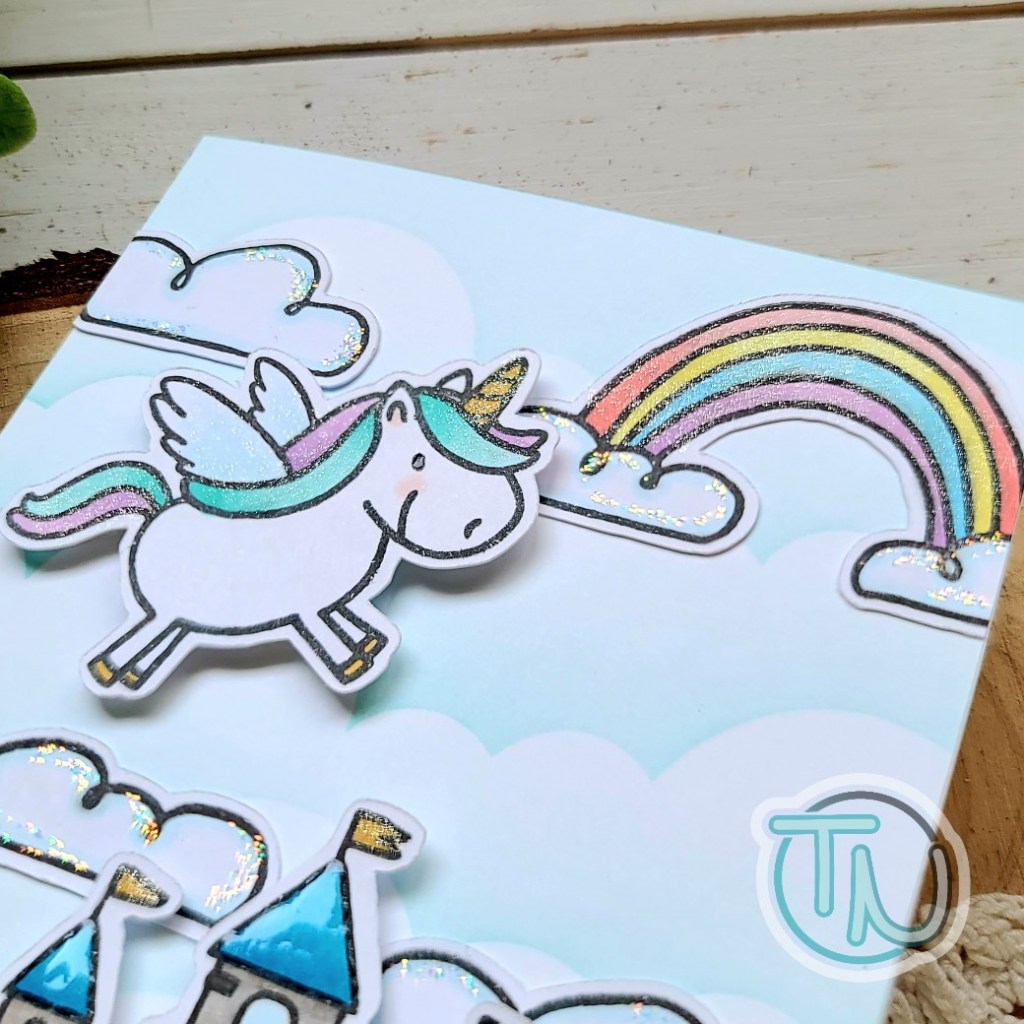
As you can see in the close-up photos I didn’t hold back on shine and sparkle. I added unicorn Stickles to the wand, butterflies and clouds. Then Wink of Stella glitter brush pen to crowns, wings, flags and the rainbow. Then I added black glaze pen to the eyes and glossy accents to things like the girl’s dress, crown and hair ties and the castle peaks.
Ooooh, I just love this sweet scene and how much extra I was able to pack in it on a slimline size!
I appreciate you sharing your time with me. Have a fabulous day!
Welcome! Welcome! The party is just getting started! So glad you could join us…
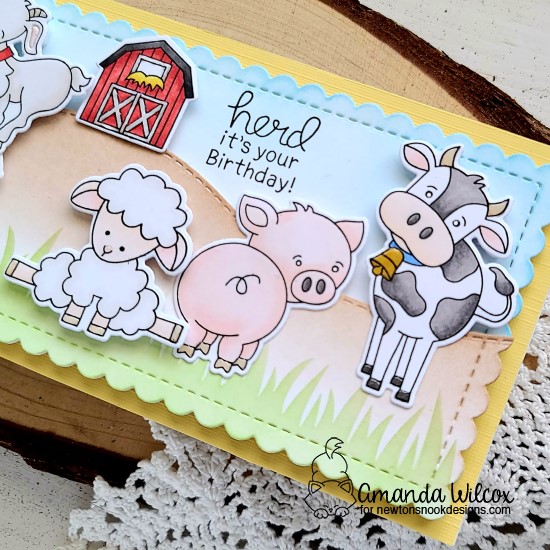
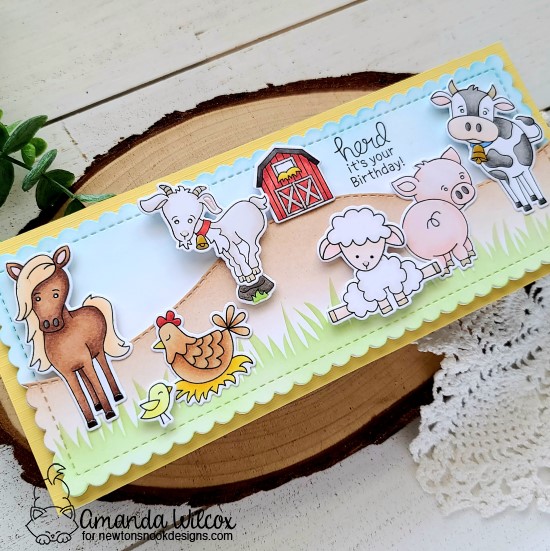
Haha! I couldn’t resist. I’m over on the Newton’s Nook blog today sharing a really fun barnyard party slimline card. Now that we’ve got sheep to add to the farming mix I couldn’t resist getting everyone together for a birthday celebration.
I started this card by die cutting a panel with the Slimline Frames & Portholes scalloped die and laid out my stamps across it to make sure everyone would fit. Then I stamped images from Bleat, Moo, Baa, Neigh, Oink and Cluck. I used my copic markers to color everything in and then the coordinating dies for each set to cut them all out.
For the background, I inked the top of the white scalloped panel I started with in a light blue. Then I cut a second scalloped panel and then used the Land Borders die to cut a hill. I inked the top brown and then used the Hills & Grass Stencil to add some grass to the bottom. This gives the look of another layer without an actual extra layer.
I added foam tape to my hill and attached it to the sky panel. Then using a combination of foam squares and liquid glue I adhered all of my animals and the barn. Some are popped up for extra dimension and some are glued straight down. Once that was finished, I popped the panel in my MISTI and stamped the sentiment in some of the open sky.
Next, I cut a yellow panel 3.5×8.5 inches and used liquid glue to adhere it to a white card base. Then with foam tape I popped the panel on that and moved on to finishing touches.
For those, I started with black glaze pen on all of the critter eyes so it had time to dry. Then I moved on to glossy accents on things like hooves, beaks and noses. Then I added some glossy accents to the white parts of the barn as well. Once the critter eyes were dry, I went back in and added white gel pen highlight to the ones that typically have one in the stamped image.
I can’t get over all these different critters and how well they work together. This is such a fun and happy card! I hope you enjoyed it too!
I appreciate you sharing your time with me. Have a fabulous day!
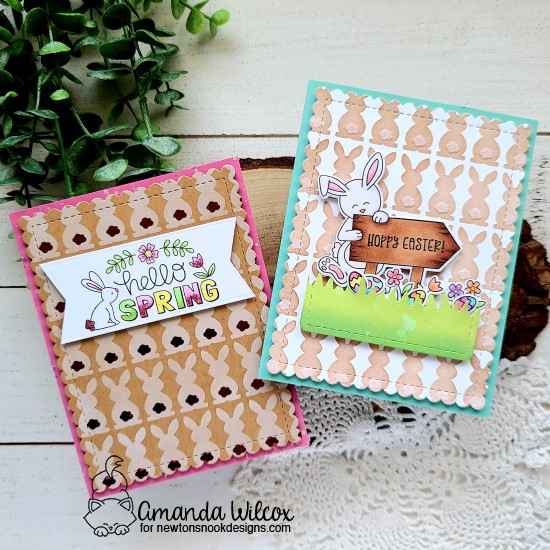
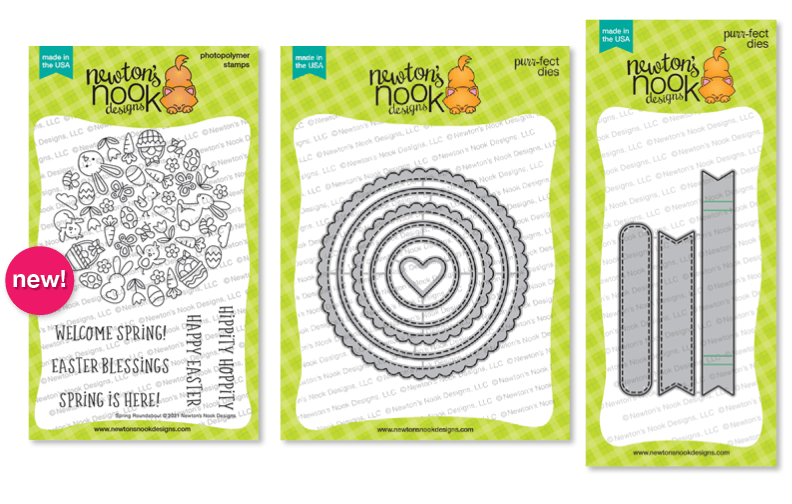
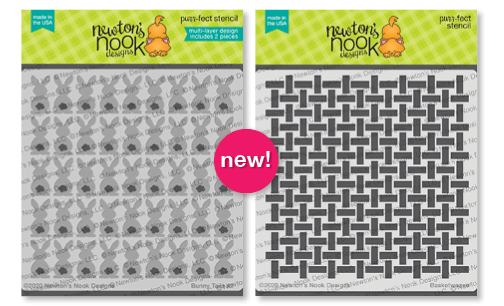
Hello everyone! We’re diving head first into another amazing Newton’s Nook release today! It’s day one and we’ve got another adorable roundabout to add to your collection, along with some fabulous stencils! Let’s have a look!
Spring Roundabout
Basketweave and Bunny Tails Stencils
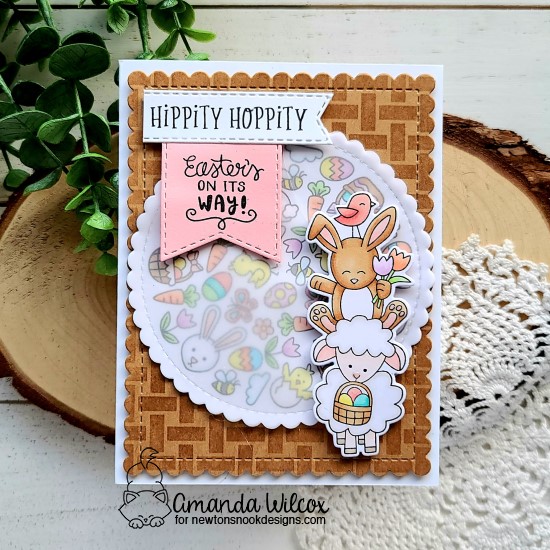
I absolutely fell in love with everything, as usual so I’ve got 2 fun cards to share with you today. Let’s look at the awesome Spring Roundabout first. Remember these pair perfectly with the Banner Trio dies and Circle Frames dies.
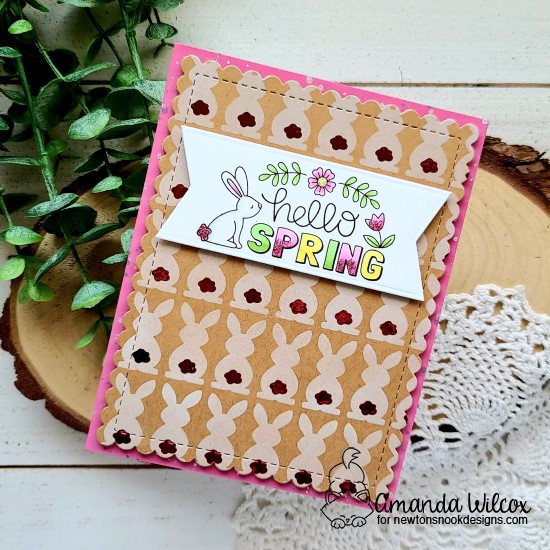
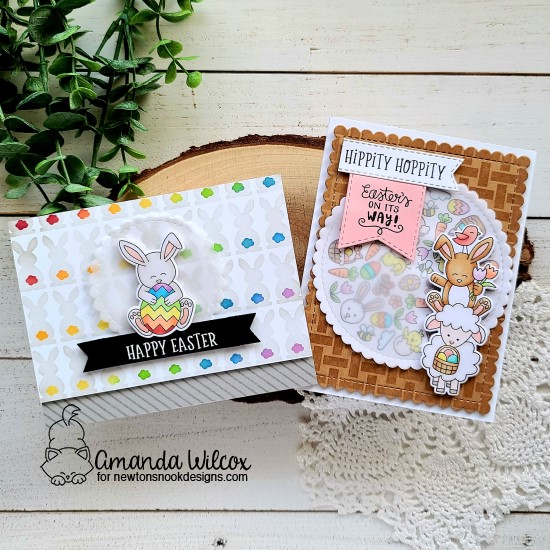
For this fun card, I started by stamping and coloring the spring roundabout with my copic markers. Then I stamped and colored the Spring Pile Up characters with the same colors. I used the circle frames dies and spring pile up dies to cut everything out.
I loved one of the sentiments in the spring pile up set and saw that part of it was in the spring roundabout set so I did some partial stamping and created it in a new way. I die cut one of the banner trio dies and stamped the first part, then die cut a pink banner from the slimline frames & windows set and stamped the rest of it. I glued them together so it was easy for placement later. I die cut the scalloped rectangle from frames & flags and used the basketweave stencil on the background.
Moving on to assembly, I added foam tape to the stenciled panel and added it to a white card base. The spring roundabout circle was too much with the critters so I added another circle frame from vellum over the top, hiding the glue behind the spring pile up characters when I added them with foam squares. I also added foam to the back of the sentiment banners and popped them in place.
For finishing touches, I added glossy accents to noses, beaks, toe beans and hooves! It’s barely past Valentine’s Day and I’m so excited for Easter with all of this cuteness to play with! Now, on to that cute bunny tails stencil!
For this card, I took a white panel and stenciled a light gray over the bunnies. Then I placed the tail part of the stencil and did a rainbow effect diagonally across the whole thing. This panel measures 3.75×5.5 inches. I chose a cute bunny from Hop Into Spring and colored it with my copics in the same fun rainbow colors. I cut it out with the coordinating dies and set it aside. Next, I die cut a vellum scalloped circle from circle frames to create a focal point. For the sentiment I die cut a banner from Banner Trio, stamped and heat embossed a sentiment from Spring Roundabout and glued my bunny to the top of it. Adding foam squares to the bunny and banner, I adhered it to the vellum circle and hid liquid glue behind the image attaching the whole thing to the stenciled panel.
I stamped a diagonal strip on a gray panel and adhered it to a white card base. Then, with foam tape I added the stenciled panel on top. Finally I added the vellum circle, bunny and banner to that. For finishing touches, I added glossy accents to the bunny’s nose and toe beans.
Would you like to win the “Spring Roundabout” Stamp Set? This stamp set will be given away to ONE lucky winner!
Here’s how to win: Comment on the NND blog and Design Team blogs (see list below)! The winner will be chosen at random from the collective reveal posts. Make sure to check out each of their blogs and comment for your chance to win. You will not know which blog has been chosen so the more you comment on the better your chances are of winning! You have until Thursday February 18th at 9pm EST to comment — winners will be announced on the blog post on Friday, February 19th.
Check out all the awesome Design Team Blogs below to enter:
Newton’s Nook Designs 7th Annual Sweet Treats Blog Hop!
The Newton’s Nook Design Team is hopping along today to share some great Sweet Treats – just in time for Valentine’s Day! Make sure you scroll down to the bottom of this post to see the whole list and hop along and comment for a chance to win!
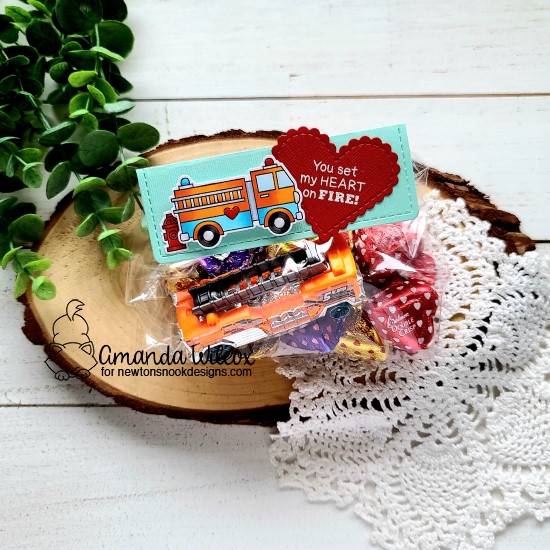
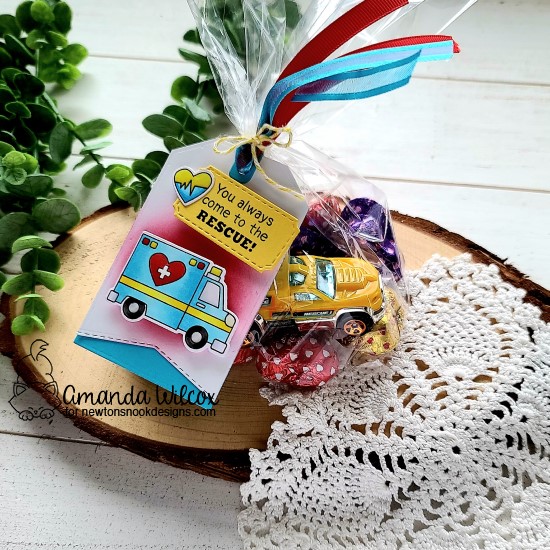
I couldn’t resist heading to the store and finding Hot Wheels to match the new Love Emergency stamps for my projects today. Then I thought it would be fun to find different ways to package them. Let’s start with that awesome police car!
I started these by stamping all of the images from Love Emergency and colored them to go with the cars that I had bought. It was a fun way to decide my color palette and not necessarily color everything realistic like I tend to lean toward.
For the police card, I die cut a red rectangle from Framework and folded it in half. I masked off one half and inked up the other half with the gingham stencil and white ink. Then I cut another rectangle from black and used the land borders die to create a ground. I glued them together and then added my police car with foam squares. I stamped and heat embossed a sentiment on a flag from Frames & Flags and trimmed off the top. I adhered that and attached my topper to a cellophane bag filled with some chocolates and that awesome Hot Wheels police car!
The super cool fire truck topper has the same idea but uses dies from Frames & Flags for the topper and a heat embossed sentiment on one of the hearts from the new Heart Frames set. The fire truck is popped up with foam squares for a little dimension.
Last, but not least, I moved on to the ambulance and decided to create a tag for this treat bag. I used the Fancy Edge Tag and cut 2 – one from white and one from blue. Then I inked the middle of the white one with red and popped me ambulance on it with foam squares. I stamped my sentiment on the smallest ticket shape in the Framework set and added the heart image to the side of it. I attached it with foam tape and threaded some ribbon through the holes of both tag pieces. I tied it to my back with some yellow baker’s twine and this bag is done too!
Sweet Treats Blog Hop Giveaway!
Would you like to win a $25 store credit to Newton’s Nook Designs online shop?
We are giving them out to TWO lucky winners!
Here’s how to win:
Comment on the NND blog and Design Team blogs (see list below)! The winner will be chosen at random from the collective reveal posts. Make sure to check out each of their blogs and comment for your chance to win. You will not know which blog has been chosen so the more you comment on the better your chances are of winning! You have until Monday, February 8th at 9pm EST to comment — winners will be announced on the NND blog on Tuesday, February 9th.
Check out all the awesome Design Team Blogs below to enter:
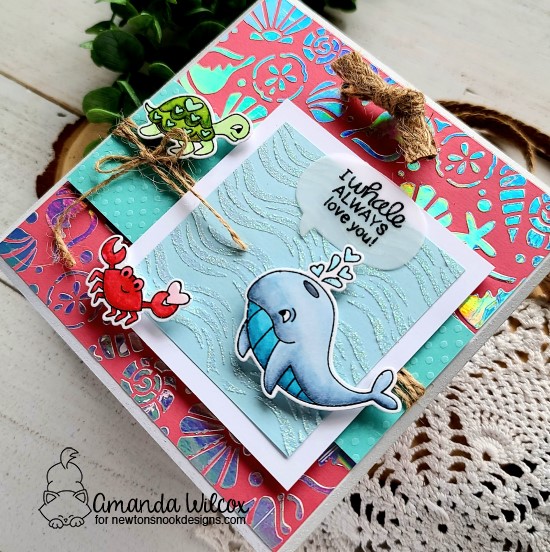
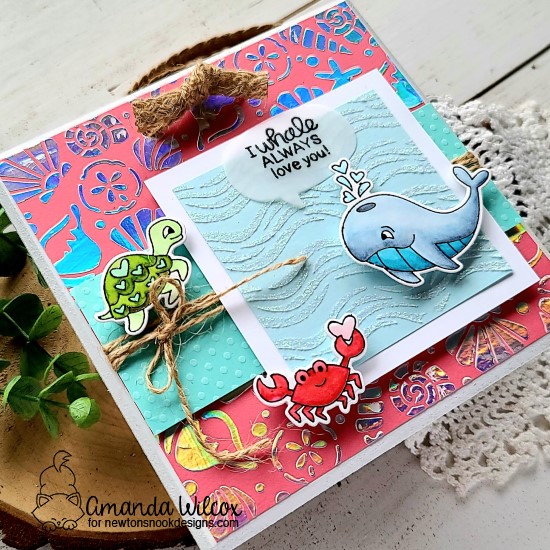
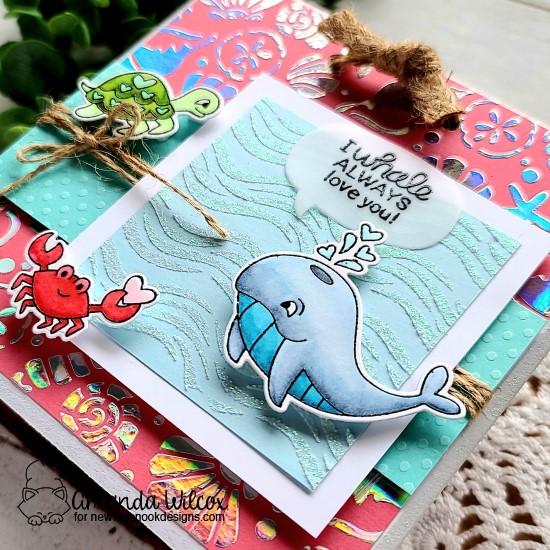
Hello everyone! I’ve been on a major Valentine decor creating kick lately to go with my cards. Today I’m sharing a fun wood plaque I created featuring a few Newton’s Nook goodies that I absolutely adore!
I started by painting my plaque white. These have been available at my local craft store for years and they are only $1. So, needless to say, I have a stash and we’ve done a bunch of different projects with them. Then I set to deciding on a theme and some general pieces I wanted to go together. I stamped and heat embossed critters from Tides of Love and watercolored them with my Zig markers. Then I used the coordinating dies and cut them out.
Next, I made a mess which is always so fun to me. I used the seashell stencil with Thermoweb transfer gel blanco on some coral colored cardstock and white glitter glitz gel on light blue cardstock with the waves stencil. I cleaned up after myself and left them over night to dry. In the morning I ran the seashells through my laminator with iridescent decofoil and totally swooned! These are gorgeous in the light!
Time for trimming and assembly. I trimmed everything down and decided on final layout before adhering anything down.
Here are the specs: seashells – 5 1/4 x 5 1/4 inches glitter waves – 3×3 inches white frame – 3 1/2 x 3 1/2 inches polka dot teal stripe – 2 x 5 1/4 inches
I hope that helps if you want to recreate the same layout.
Now for assembly. I used liquid glue to attach the seashells to the plaque. Then I wrapped twine around the polka dot teal stripe and tied it in a bow. Then I added foam tape to the back so it would lay flat. I adhered the waves to the white frame and added foam tape to the back of that to help it lie flat around the twine too. Last, I added foam squares to the back of my images and put them in place. I learned a trick with vellum a while ago and have never gone back…if you have an even layer of glue behind the whole image you don’t see any glue spots showing through. Using the Xyron sticker maker is the easiest for this but mine is empty right now so I used liquid glue and my trusty finger. 😉
I seriously wish you all could see this in person. The shimmer and shiny of all the pieces is so pretty!!! I just adore this sign and am excited to make more for other occasions.
I appreciate you sharing your time with me. Have a fabulous day!
Welcome everyone! I’m over on the Newton’s Nook blog today sharing this pretty floral slimline shaker card.
I had a completely different idea in my head when I started this card but I think it turned out very elegant and pretty in the end. I’ll give my other idea another try in the future. 😉
I started this card by stamping and coloring the Roses image with my copic markers. Then I used the coordinating dies to cut it out. Next, I cut a panel and inked it up using the new square masking stencil. Then I die cut the Slimline Frames & Windows frame from white cardstock and layered it on top. At this point I thought things were too plain so I die cut my stenciled panel with the Slimline Frames & Portholes scalloped panel die and turned my card into a shaker.
I added acetate to the back of the window panel and lined it with foam strips. Then I sprinkled some Princess Rings embellishments from the Twiddler’s Nook shop on each stenciled square and popped the frame in place. I added foam squares to the back of my rose image and popped it in place. Then I die cut one of the Banner Trio banners and stamped a sentiment from the new Heartfelt Roses set and adhered it with liquid glue.
I added foam tape to the back of my shaker and popped it on a yellow panel measuring 3.5×8.5 inches. Then I used liquid glue to attach it to a white slimline card base.
For finishing touches I just added some Wink of Stella glitter brush pen to the flower petals and leaves.
I appreciate you sharing your time with me. Have a fabulous day!
Hey friends!!! I’m super excited to share all the things with you today! I had a massive crafting session this weekend and created a ton of projects! It was so much fun and felt so good to be so productive! A handful of them all revolve around Jane’s Doodles’ set – Stinks! – so I thought I would group them all into one blog post to share with you.
It’s going to be long but I hope you’ll bear with me because there is so much cuteness to share. I hope you’ll find some fun inspiration along the way. Let’s get started with a peek at everything and then I’ll break it all down in case you’re curious.
This whole thing came about because I needed to create some gift tags for my daughter’s Valentine gifts she is delivering to friends in a few weeks. We both decided that the sentiments in this set plus the ADORABLE skunks were just too perfect to pass up. But I couldn’t stop at tags, I just wanted to color a million of these cuties so we’ve ended up with some string art, a dozen tags and two cards…and I love it all!
Let’s start with the tags. I’ve been fairly obsessed with Trinity Stamps nested hearts dies lately, so I cut 12 white ones in the middle size. Then used Newton’s Nook grass & hills and clouds stencils on it. I adhered the skunks with tape runner and stamped the sentiments, some hearts and a flower on them assembly line style. I die cut another heart the same size in pink and adhered them together for stability. Then I punched holes, added twine and glued some red bows on. My daughter loves taking her time with handwriting so she’ll add to and from herself to the back of each one. I just love them!
Next, I made some cards with extra images I had colored. Aside from the Jane’s Doodles Stinks! skunks, the goodies on these cards are all Newton’s Nook. They’re pretty self explanatory but I used stencils for the backgrounds – hills & grass, cloudy sky, argyle, and bokeh hearts. Then I used dies like frames & flags, framework and fancy edge tags for the components. Then everything is pretty much attached with foam tape or foam squares because I love dimension on my cards.
My final project today is another string art creation that popped in my head and I just had to create! I added water to my acrylic paint to create more of a white wash look, rather than the coated paint. I love this and will be making more with this idea. I used another one of the Trinity Stamps nested hearts to outline my nails for the string art. Then I die cut additional Stinks! images so each one is layered 4 times for stability and added with foam squares. I die cut LOVE from the Trinity Stamps marshmallow alphabet and adhered that directly to the wood with liquid glue. I finished things off with some red hearts from the Twiddler’s Nook conversation hearts clay embellishments.
Phew, that was a lot. Thank you so much for making it this far. I appreciate you sharing your time with me. I hope you found some inspiration to create something wonderful! Have a fabulous day!