Coffee Loving Cardmakers | Newton’s Nook – Cup of Cheer

Hello everyone!!! Today is a very special day in our house…our daughter’s 14th birthday. Seriously, where the heck has the time gone??? I have no idea but we’re loving every minute of it. She’s amazing and we’re having a blast celebrating this weekend.

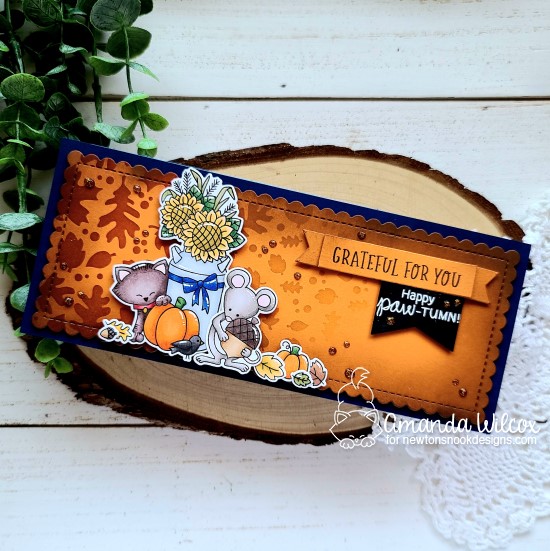
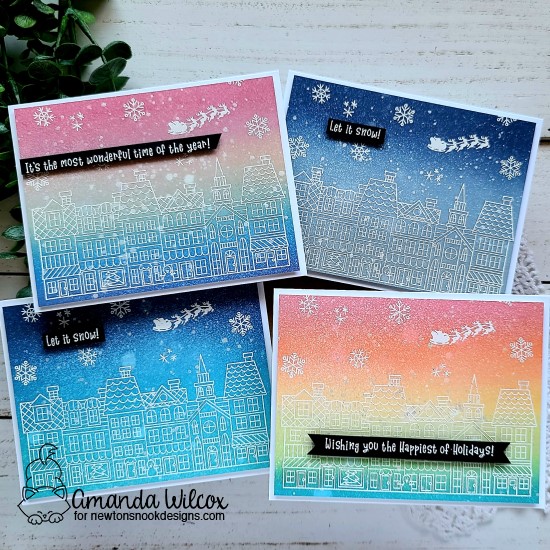
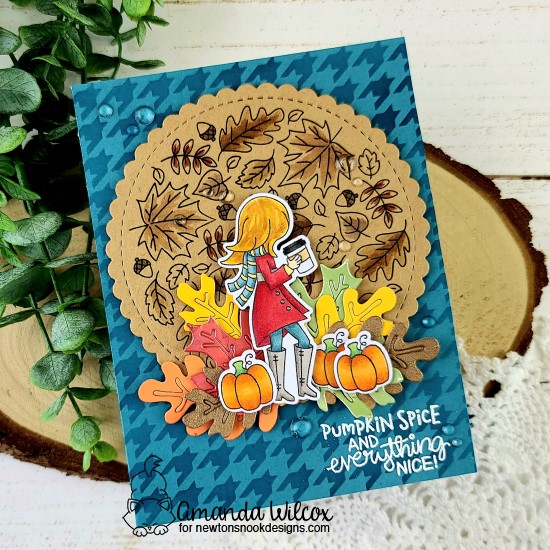
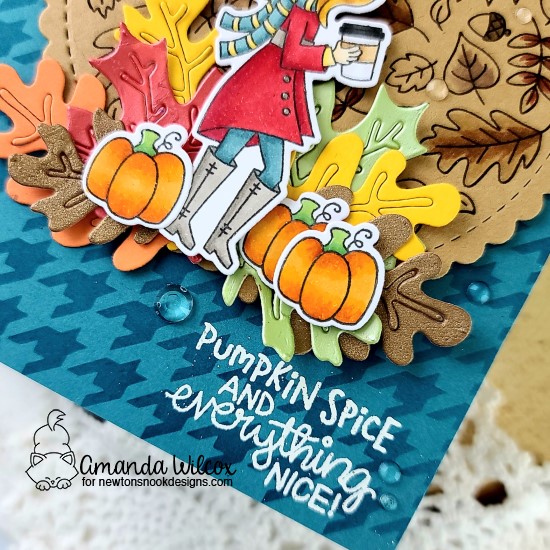
And on here I’m also still celebrating the Fall | Winter Coffee Lovers Hop! I have a fun Newton’s Nook shaker card to share with you featuring shaker bits from my shop too!

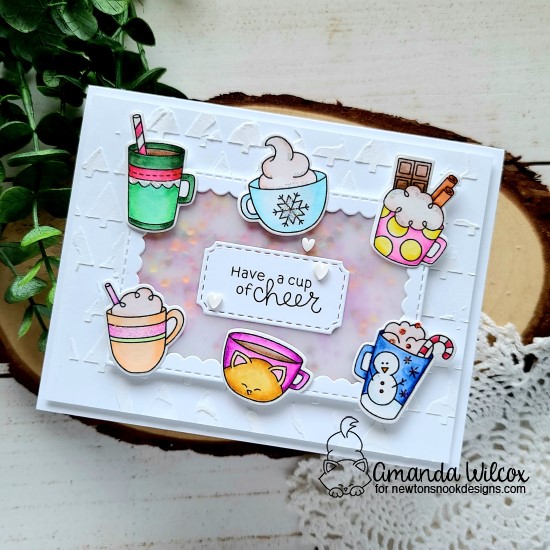
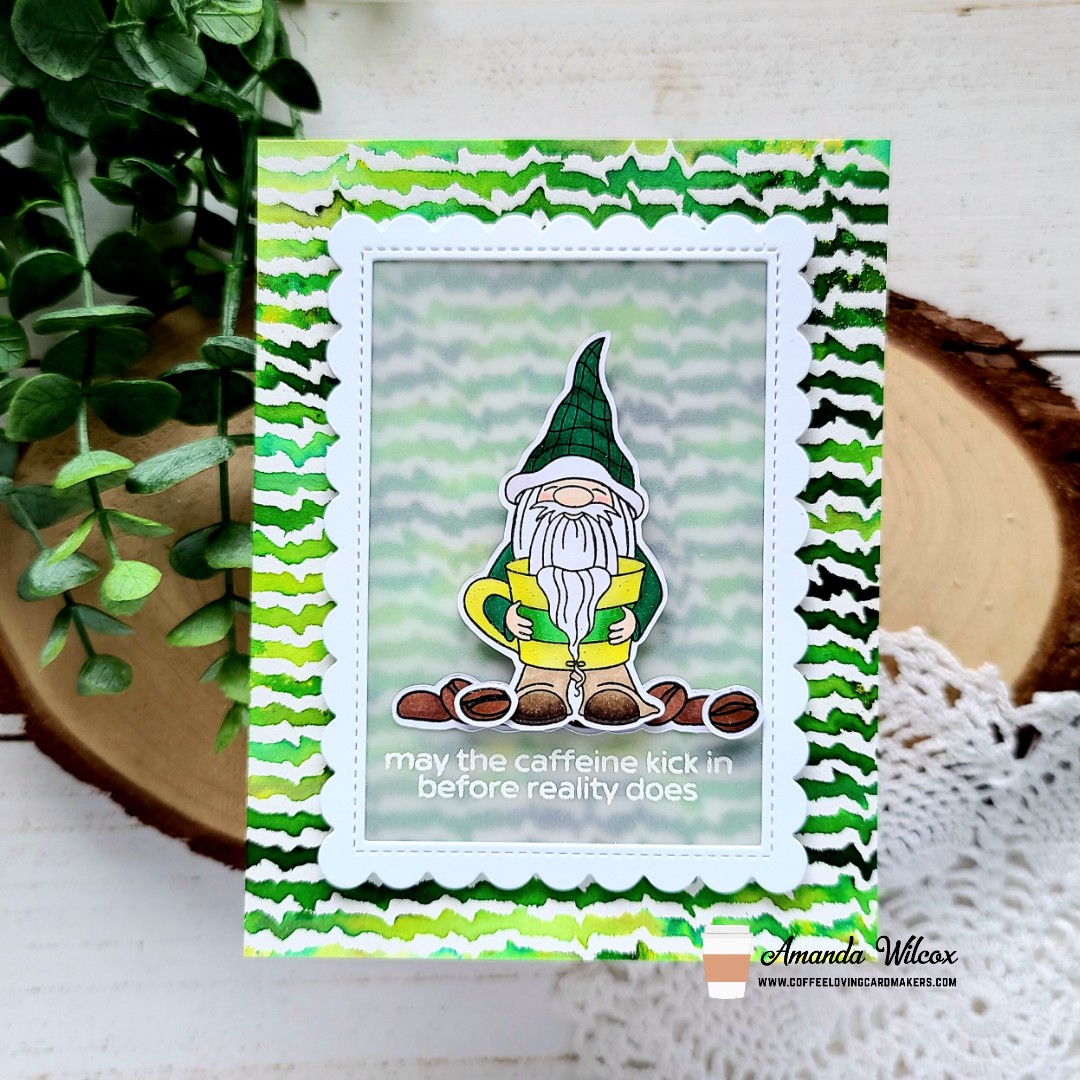
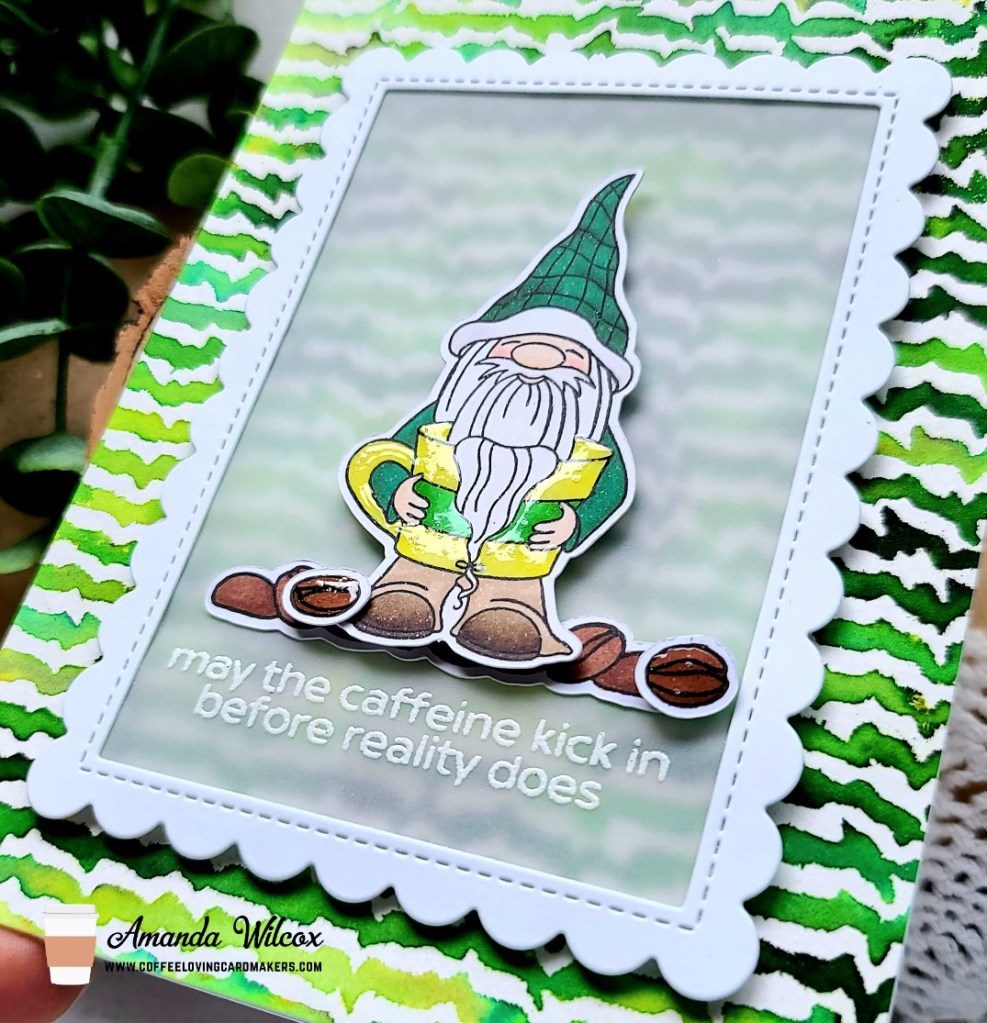
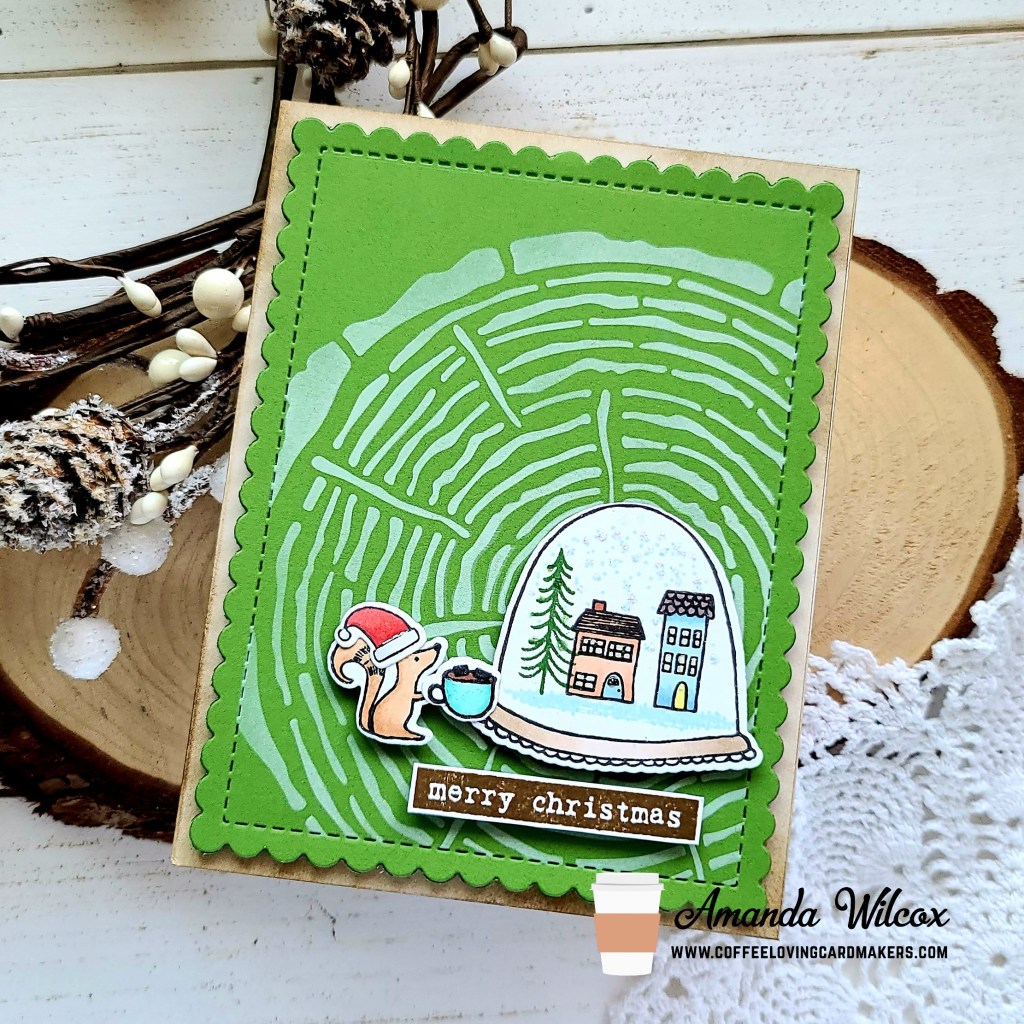
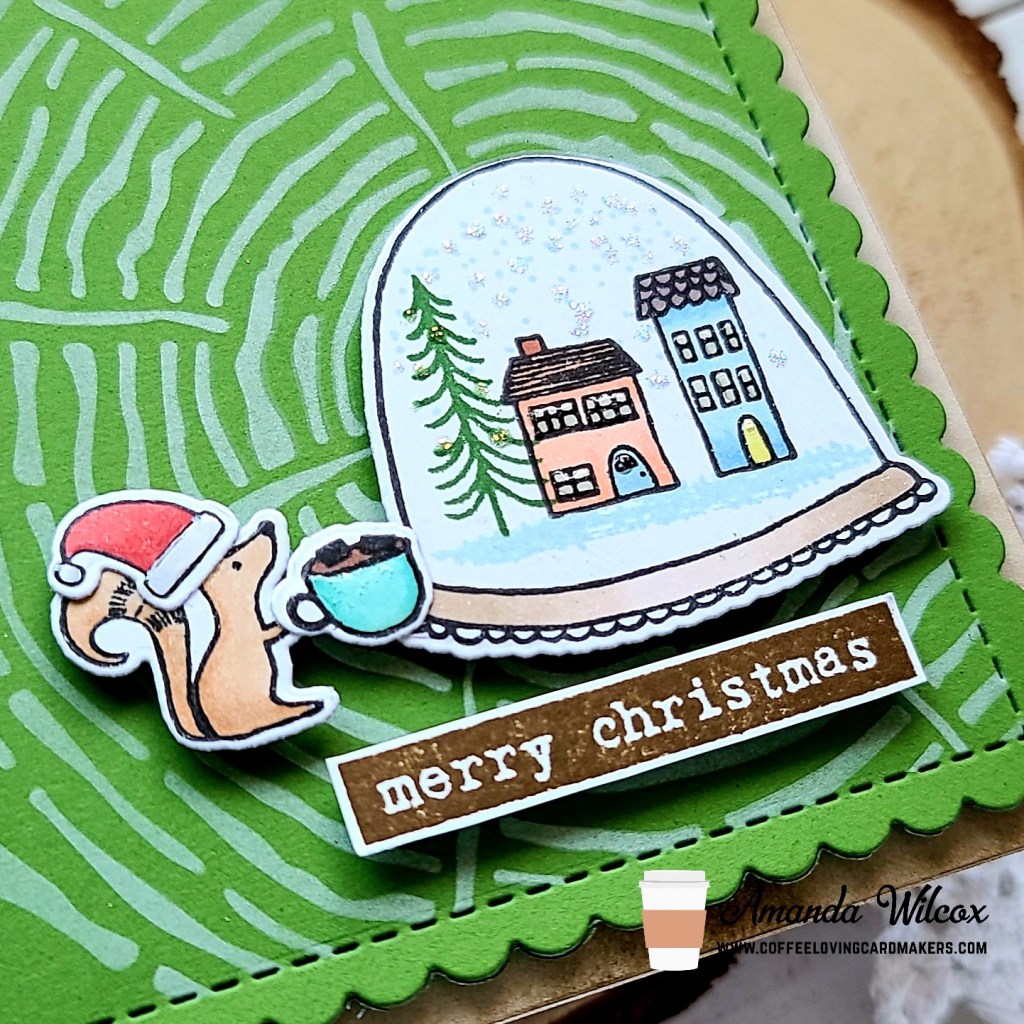
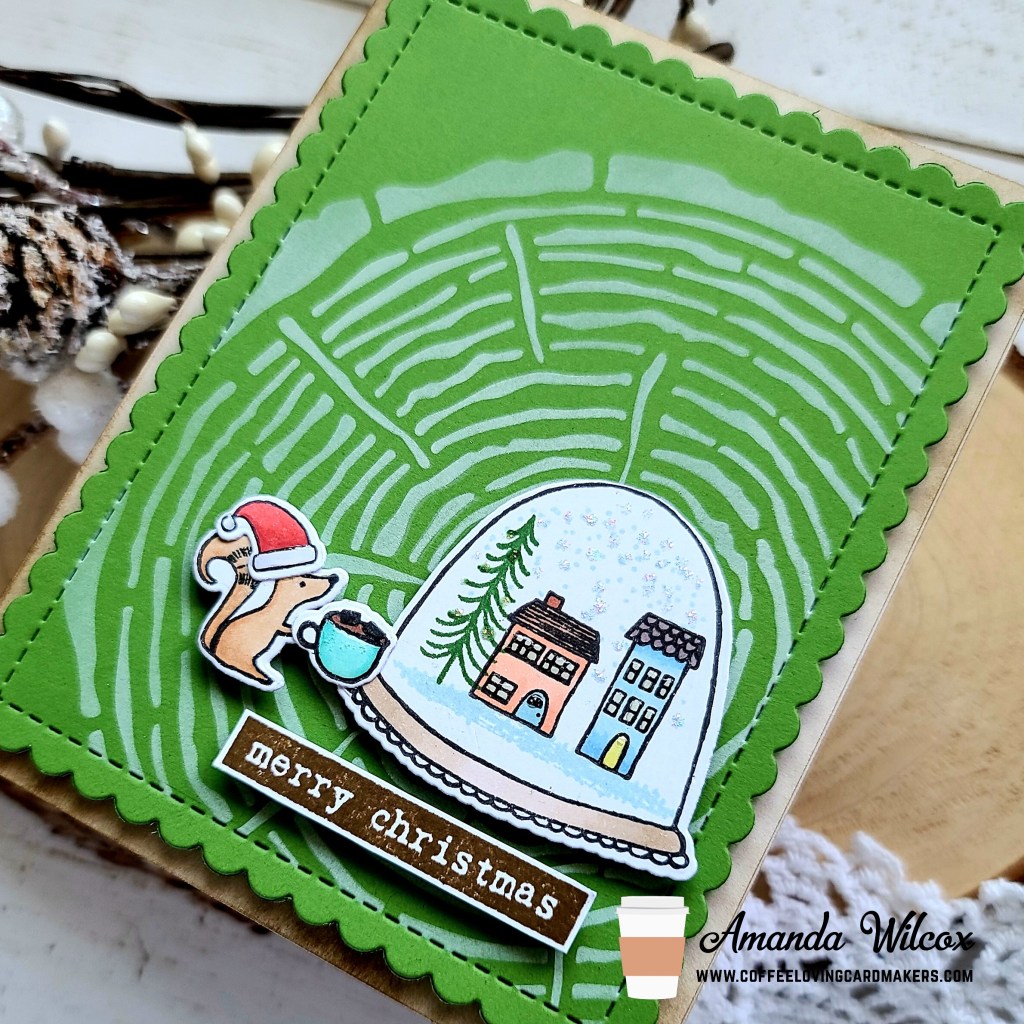
A few weeks ago we went away for the weekend so I stamped some images and packed my Zig markers to watercolor while we were gone. This fun batch of mugs were part of that. The images are from Cup of Cocoa and I used the coordinating dies to cut them out. Then I pulled out my tiny trees stencil and used texture paste for an intentionally imperfect background.

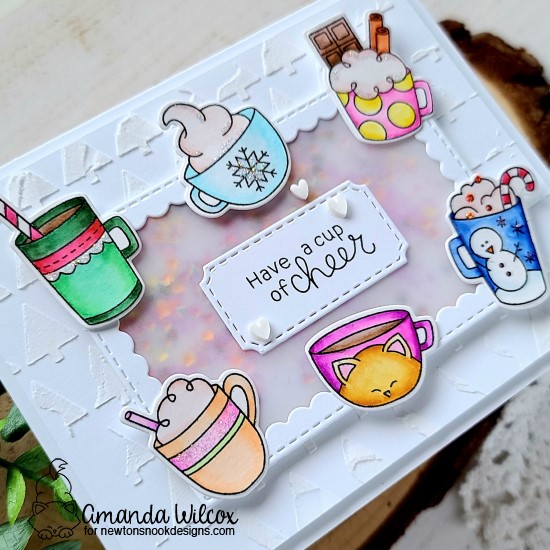
Moving on to my shaker mechanism, I die cut a frame from Framework dies and the ticket looking shape too. I backed the frame with vellum and foam tape. I poured some Burning Embers and Pixie Dust Micro Beads in the Vidia color to the center of my stenciled panel and adhered the shaker frame on top. I stamped my sentiment on the ticket shape and attached it to the vellum.

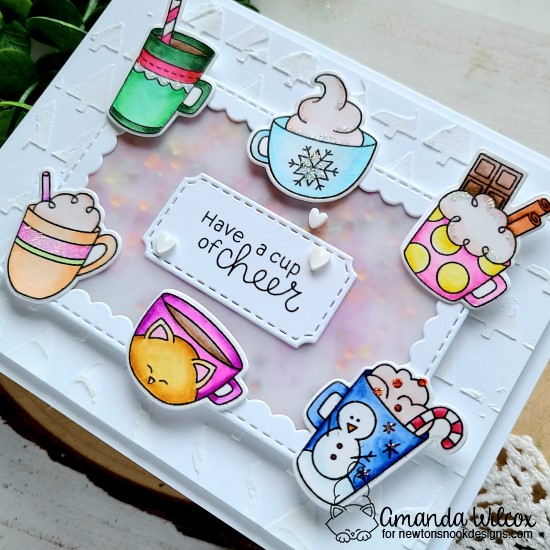
I attached my mugs around the frame and moved on to finishing touches. For those I added Stickles in unicorn to each of the mugs somewhere and a few white clay hearts to by the sentiment.

Such a fun and sweet card! Are you linking up fun projects to the Coffee Lovers Hop? I hope so! I can’t wait to see them all!

I appreciate you sharing your time with me. Have a fabulous day!

Newton’s Nook – 25 Days of Christmas Tags

Hello everyone! I’m fortunate enough to take part in the 25 Days of Christmas Tags celebration with 3 companies this year! Head to Tracey’s post HERE to see the details of the celebration and how you can enter to win incredible prizes!

First off we’re staring with Newton’s Nook! I had so much fun creating this sweet little tag with one of my very favorite Newton’s Nook images – Penguin Pile.

To create my tag, I started by stamping and coloring the Penguin Pile image with my copics. Then I used the coordinating dies to cut them out. Next, I wanted a different shape for my tag so I pulled out the Circle Frames and cut the middle size out from green cardstock twice. I used the Snowfall stencil with some white glitter glitz gel on one green circle and let it dry. Once it was dry I glued the 2 green circles together. I pulled out one of the hole reinforcer dies from the Fancy Edges Tag set and cut it from white. I used it to punch a hole in the green circles and adhered the reinforcer with liquid glue.

I pulled out the Banner Trio dies and cut the rounded banner from white and stamped a sentiment from the Christmas Roundabout on it. Then I colored the open letters with the same colors as my penguins. The banner is adhered with liquid glue and the penguins were popped up with foam squares.

I threaded some red jute twine through the hole, glued a smaller white circle to the back so I had a place to write to and from and moved on to finishing touches.

With the background being wonderfully glittery, I just added glossy accents to the penguins and JOY on the sentiment banner.

I am having a blast making little tags again this year. Smaller area to work with and different shapes too! A change of pace is good for creative thinking.

I appreciate you sharing your time with me. Have a fabulous day!

Coffee Loving Cardmakers – Miss Ink Stamps | Caffeine First

Happy Tuesday everyone! It’s time for tea with Twiddler’s Nook over on the Coffee Loving Cardmakers today. I had some fun with powdered watercolor and stencils over the weekend. It’s quite addicting. I could easily sit and make bunches of backgrounds at once with this technique.

Obviously, I started today’s card with the background. I took watercolor paper and laid my Miss Ink Stamps Jitters stencil over the top. Then I sprinkled powdered watercolor over the stop and spritzed it with water. I carefully removed the stencil and smooshed another piece of watercolor paper on it for the negative so I have another background the play with later on. I set those aside to dry and stamped out my images which are also from Miss Ink Stamps. They are from Big Mugs and Brewtiful. I colored them with my copics and used the scan-n-cut to cut them out.

Using the Newton’s Nook Framework dies I cut a frame and adhered vellum to the back. I heat embossed my sentiment from Big Mugs on it and lined the back of the frame with foam strips. I popped it up on the watercolor background and moved on to my images. The strip of coffee beans are adhered with liquid glue and the other images are popped up with foam squares.

For finishing touches I added glossy accents to the coffee beans that are popped up and to the gnome’s mug.

I think this is such a fun card and the colors I used represent the college team we root for at home so I know exactly who this card will be going to.

I appreciate you sharing your time with me. Have a fabulous day!

Newton’s Nook – Spook-tacular

Happy Halloween everyone!!!!! I just love this holiday! I look all the spooky and fall and kiddos running around dressed up. It just makes me happy! So I wanted to share a special card with you today to celebrate.

To create this awesome card, I started with the background. I used the ghosts stencil with deco foil transfer gel blanco on black cardstock. When it was dry, I sent it through my laminator with iridescent deco foil. Then I sat and played with it for a while because those ghosts are SO COOL!!!

I stamped and colored Witchy Newton with my copic markers and also made sure to stamp a couple of bats too. I cut it all out with the coordinating dies and decided on my final layout. Using the Framework dies, I cut the scalloped rectangle from the middle of my stenciled panel. I lined the outside frame with foam tape and adhered it to a white card base. Then I inserted the rectangle in the opening and glued it directly down. I cut a second rectangle from vellum and heat embossed my sentiment from the Spooky Roundabout on it. Then I used foam squares and popped Witchy Newton and the bats up. I hid some glue behind those areas and placed the vellum rectangle in its place.

The coolest thing happened when I added the vellum to the center…it mutes the light refraction from the deco foil and makes those ghosts look stark white. I had no idea this would happen but got really excited and thought it looked soooo extra cool! What do you think?

For finishing touches I added glossy accents to Newton’s nose and hat, and dots on the boot. I didn’t want to distract from the cool background but I just love adding those little touches.

I’m linking this up to the Cat Lover’s Hop. Today is the final day, so get your projects linked up if you haven’t already.

I appreciate you sharing your time with me. Have a fabulous day!

Newton’s Nook – Reach for the Stars

Hello friends! Welcome to a new week! Today marks the start of the Cat Lover’s Hop which Newton’s Nook is a sponsor of. They’ll be showcasing some fun inspiration on Friday but I wanted to jump in early with an extra card share for you.

I started my card by inking up a panel with fossilized amber, spiced marmalade, blueprint sketch, faded jeans and black soot distress inks. I spritzed it with water and blotted it dry. Then I flicked some gold watercolor on it. Next, I used the cascading stars stencil with some champagne metallix gel for my sky.

I pulled out Cosmic Newton, stamped a couple of images and colored them with my copics. I used the coordinating dies to cut them all out next. I needed to create a ground for my images so I inked up a small panel with evergreen bough and twisted citron distress ink and spritzed it with water. When it was dry, I used the land borders dies to cut a grassy top and adhered it to my stenciled panel. Using the images as a guide I stamped my sentiment on the bottom right.

With my background complete, I adhered it to a white card base and then popped my images up with foam squares. For finishing touches I added some glossy accents to the planet, shooting star and glass on the telescope and of course Newton’s nose.

This is not my typical sky color combo but it was so fun to play around and I love how it turned out. What are your favorite combos for sky colors? I’d love to hear in the comments.

I appreciate you sharing your time with me. Have a fabulous day!

Coffee Loving Cardmakers – Merry Christmas Snowglobe

It’s time for tea everyone! Grab a cuppa of your drink of choice because it’s Tuesday Tea with Twiddler’s Nook over on the Coffee Loving Cardmakers blog today.

I had so much fun putting this silly, adorable card together with some products from Flora and Fauna, along with Newton’s Nook stencil and dies. I stamped my images from Woodland Snowglobe and colored them with copics. Then I used the coordinating dies to cut them all out and set them aside.

I die cut a green panel with my Newton’s Nook Frames & Flags dies and inked it up with white pigment ink and their Tree Rings stencil. I took a white card base and inked up the edges with a blending brush and brown die ink and then popped the green panel up with foam tape.

Then I added my images with foam squares, stamped a sentiment from the same Woodland Snowglobe set, cut it out with my scissors and popped it up too. For finishing touches I added some glossy accents to the house windows, squirrel’s hot cocoa mug and hat and Stickles to the snow for a little shimmer in the light.

I just picture this cute squirrel enjoying his hot cocoa while watching the snow fall in his fun snowglobe. haha. Silly critters…

I appreciate you sharing your time with me. Have a fabulous day!

Newton’s Nook – Grateful For You

Hello everyone! I’m over on the Newton’s Nook blog today featuring a sweet fall themed slimline card. I had extra fun mixing and matching different products to create a mini scene and got inky with some stenciling too!

I started my design by laying out the images to see how many of each thing I might need to stamp out. Then I stamped and colored the images from Paw-tumn Newton and Autumn Mice and colored them with my copics. I used the coordinating dies to cut them all out and switched gears to my background.

Pulling from the colors I chose to used on the images, I cut an orange panel with the Slimline Frames & Portholes scalloped die and inked it up with the Falling Leaves stencil. I used a dark orange and faded it to a dark yellow on the stencil. Then I took a medium brown and inked the edges of the whole panel. I like the blue in the bow on my milk jug so I cut a blue panel to 3.5×8.5 inches and inked it up with a darker blue ink to deepen the color a bit. I adhered this to a card base and popped the scalloped panel up with foam tape. Then I added my images with foam squares and liquid glue.

I die cut a banner from the Banner Trio set and stamped a sentiment from the Fall Roundabout set on it. Then I die cut a flag from Flags & Frames and heat embossed another sentiment on that. I attached the 2 and adhered them to the card front with foam squares.

For finishing touches, I went with white gel pen accents on the images and a little bit of glossy accents on the acorn hats, pumpkin stems and Newton’s Nose. Then I scattered some Nuvo Glitter Drops in golden sunset across the design.

I just really love the deep, bold colors that come with fall! They are so pretty and I love falling leaves and pumpkins…pretty much everything I included on this card. ❤

I appreciate you sharing your time with me. Have a fabulous day!

Newton’s Nook | Designer’s Nook Preview

Hey friends! Tomorrow is another Designer’s Nook newsletter from Newton’s Nook! Remember there’s a weekly inspiration newsletter that’s for subscribers only. You get special project inspiration directly from the design team!

Here’s a teeny sneak peek for you but you’re going to want to head over and subscribe if you haven’t already so you don’t miss it!

I appreciate you stopping by today! Have a fabulous day!

Coffee Loving Cardmakers – Hug in a Mug

It’s Tuesday Tea with Twiddler’s Nook over on the Coffee Loving Cardmakers blog today and we’re wrapping up a fabulous celebration where we turned National Coffee Day into National Coffee Week on the blog! Be sure you commented on all the hop posts for chances to win 32 different prizes! Click HERE to go to that post.

But for now, I’ve got a super awesome card share for you featuring bundles of products from Super Sponsor Newton’s Nook!

I had an idea in my head so I got my stamps out and piled them together to see if it might turn out how it was looking in my head. Things were looking promising so I stamped out a bundle of images from My Type, Cup of Cocoa and Lovely Blooms. I colored everything with my copics and used the coordinating dies to cut it all out. Then I stamped and heat embossed the jar from Lovely Blooms on vellum and cut it out as well. For the sentiment, I carefully masked off part of a sentiment from Cup of Cocoa and stamped it on the typewriter from My Type.

Next, I moved on to my background so it would have time to dry. I used Nuvo Embellishment Mousse in forest green over the Mugs stencil on a white panel. I let it dry and trimmed it down to 4×5.25. However, while it was drying I pulled out the Essential Alphabet dies and cut the word “hug” from gray cardstock 4 times and glued them together. I die cut a flag from the Frames & Flags dies from white and dark red and adhered them together with a little overlap showing at the bottom. I adhered the letters to that with liquid glue.

At this point, I used liquid glue to adhere all the flower layers together and the cup to the side of the typewriter as well. The flower jar was adhered to the stenciled panel with liquid glue white the mug and typewriter were popped up with foam squares. Then I popped up the flag with foam squares too.

I popped the whole decorated panel up with foam tape on a white card base and moved on to finishing touches. There’s a lot going on so I just added some glossy accents to the mug, typewriter, flower centers and the die cut letters. A little extra shine but it doesn’t distract from the whole picture.

I had so much fun creating this card and I can’t wait to share it with someone. I hope you enjoyed it and also enjoyed our week of celebration for National Coffee Day!

I appreciate you sharing your time with me. Have a fabulous day!

Newton’s Nook – Nat’l Coffee Day Hop

Happy National Coffee Day! Today the Newton’s Nook Design Team is hosting a blog hop to celebrate! You can visit all the Design Team Member’s blogs and leave comments for a chance to win! You can also visit the Coffee Loving Cardmakers blog today for another big blog hop and a chance to win more prizes! They will also be posting inspiration over there all week long! 

Here is what I created:

There were so many fun sets to choose from when looking for caffeinated inspiration but this Pumpkin Latte set from last year is really one of my favorites so it was a no-brainer to use it today. I stamped and colored my images and then used the coordinating dies to cut them all out. Then I stamped the Fall Roundabout on kraft cardstock and gave it some brown shading with copics before using the largest Circle Frames die to cut it out. I had some leftover textured leaves from another card so I die cut some red and golden yellow ones to add to the mix and created a “ground” for my girl to stand on.

I adhered the leaves together and used a combination of liquid glue and foam squares to attach those and my images to the Fall Roundabout circle. Then I cut a teal A2-sized panel and used the Houndstooth stencil with some teal ink. I added foam tape to the circle and popped it on the panel.

Then I used my MISTI to stamp and heat emboss my sentiment on the bottom right corner. For finishing touches, I added some glossy accents to the girl’s coat buttons and the pumpkin stems. Last of all I added a scattering of clear gems throughout the card design.

Would you like to win a $25 store credit to Newton’s Nook Designs online shop?
We will choose one lucky winner from our Hop!

Here’s how to win: Comment on the NND blog and Design Team blogs (see list below)! The winner will be chosen at random from the collective reveal posts. Make sure to check out each of their blogs and comment for your chance to win. You will not know which blog has been chosen so the more you comment on the better your chances are of winning! You have until Tuesday, October 6th at 9 p.m. EST to comment. Winners will be announced on an NND blog post on Friday, October 8th, so please check back to see if you’ve won!

Check out all the awesome Design Team Blogs below to enter:

Newton’s Nook Designs
Ellen Haxelmans
Larissa Heskett
Samantha Mann
Zsofia Molnar
Andrea Shell
Tina Smith
Tatiana Trafimovich
Amy Tsuruta
Amanda Wilcox