Pink & Main – Welcome Spring Wreath

Happy Wednesday everyone! I’m over on the Pink & Main blog welcoming spring with some sweet little bunnies!

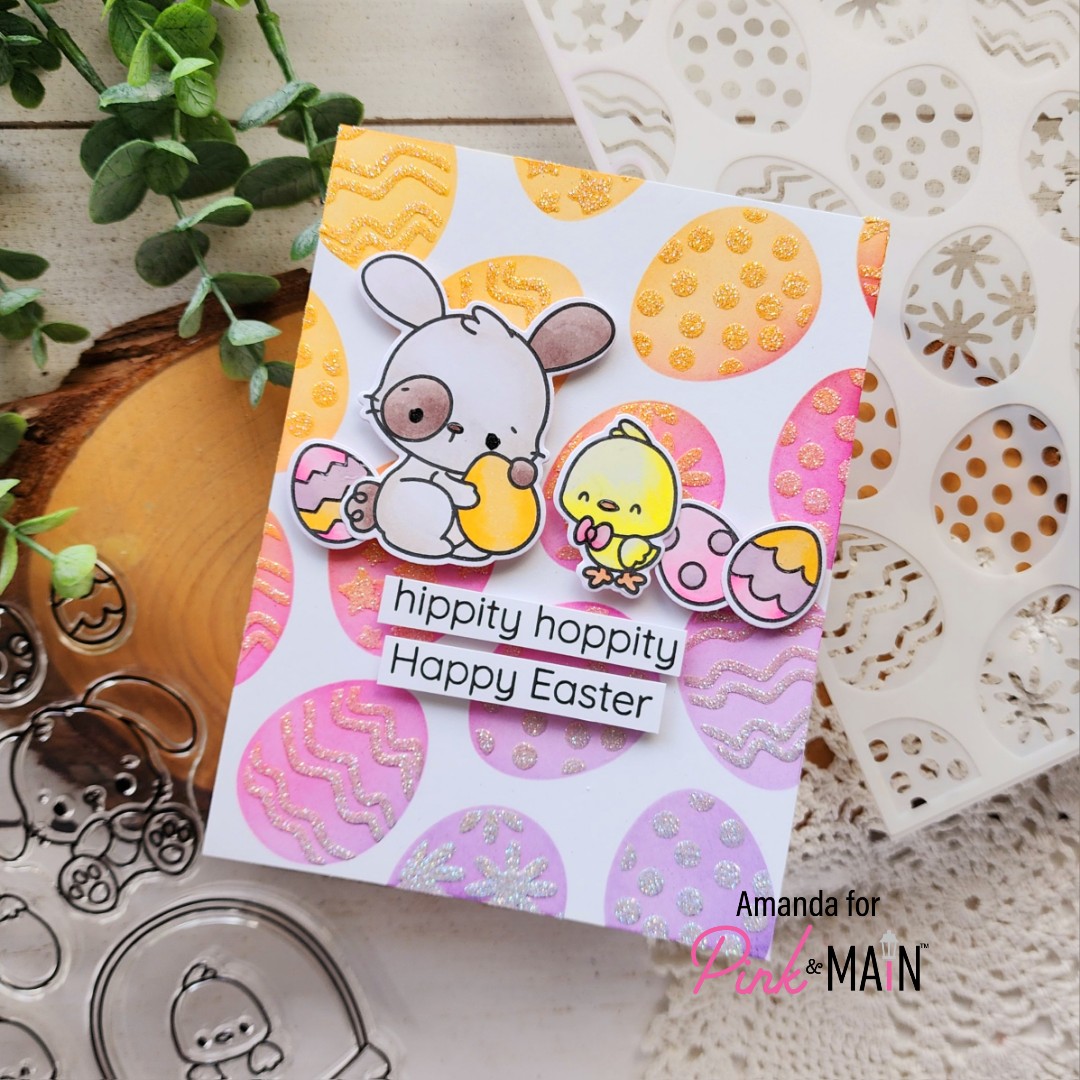
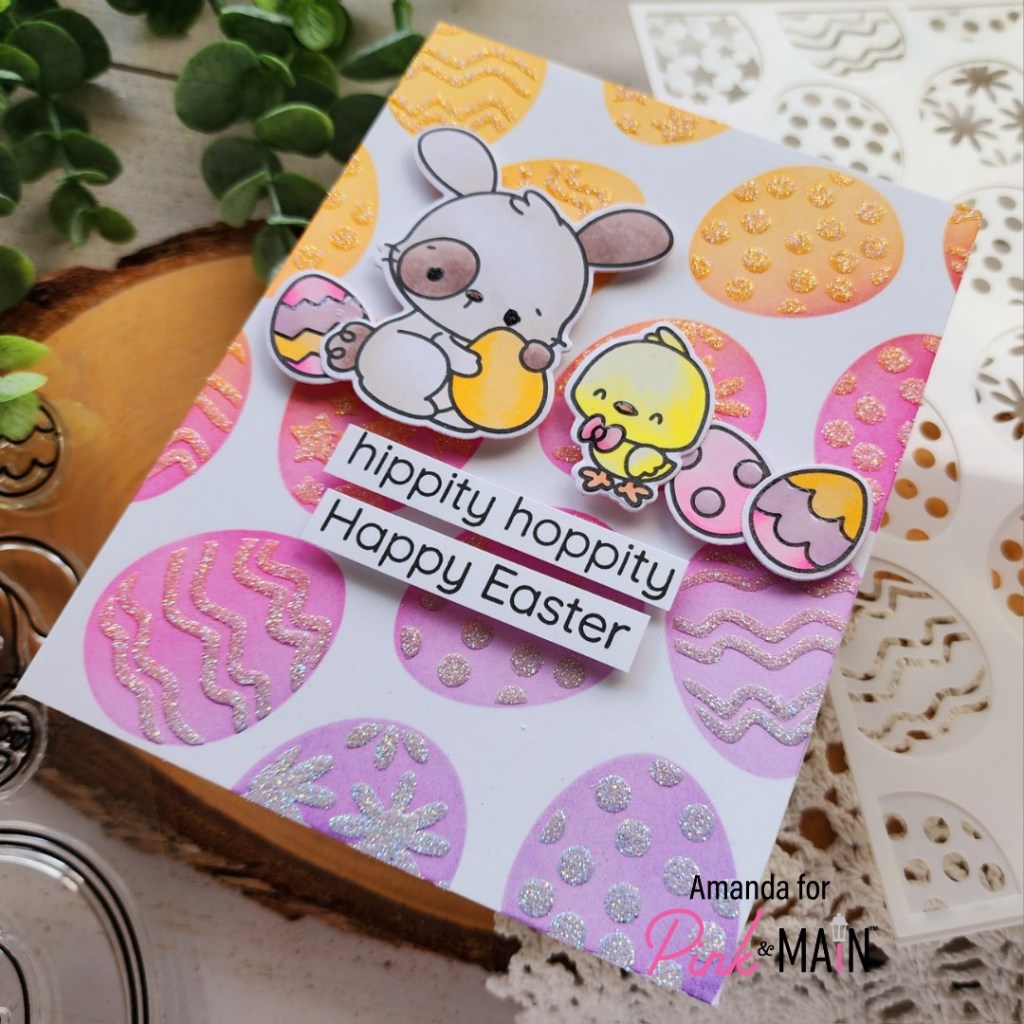
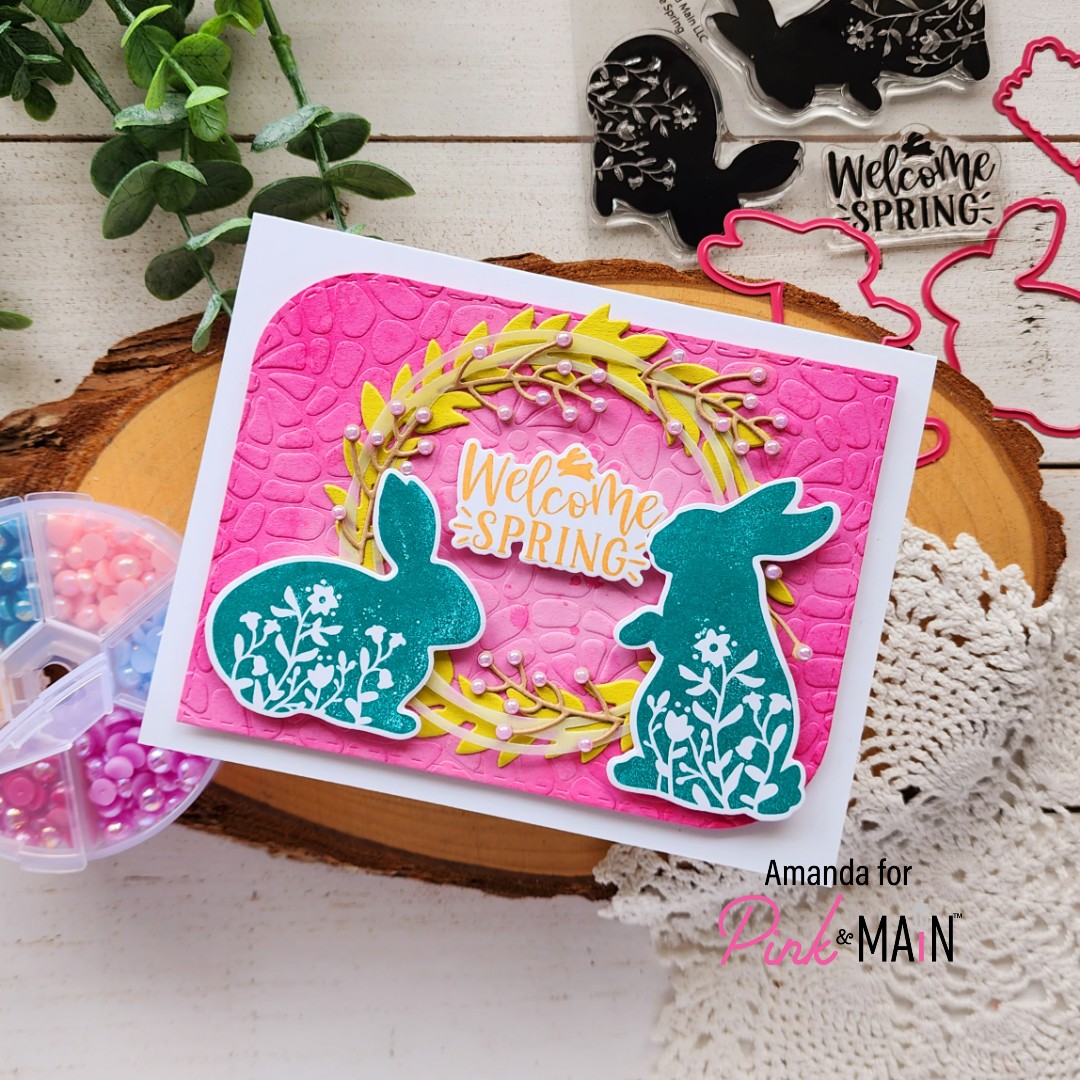
To create my card, I cut a mod stitched rectangle from dress shop cardstock and ran it through my die cutter with the new Cobblestone embossing folder. Then I used a blending brush and the coordinating ink to add depth to the edges and also splattered some watered down ink on the panel for extra texture.

I stamped and die cut the bunnies and sentiment from Welcome Spring using construction and lakeside inks. Then I cut both Wreath Base die sets – one from the park cardstock and the other from vellum. The the Wreath Base 2 die set I used the spring die to cut 5 sprigs using pebble cardstock. The sprigs are strategically adhering themselves and the vellum wreath to the leafy wreath and then that is glued to the embossed panel using EZ Squeeze glue.

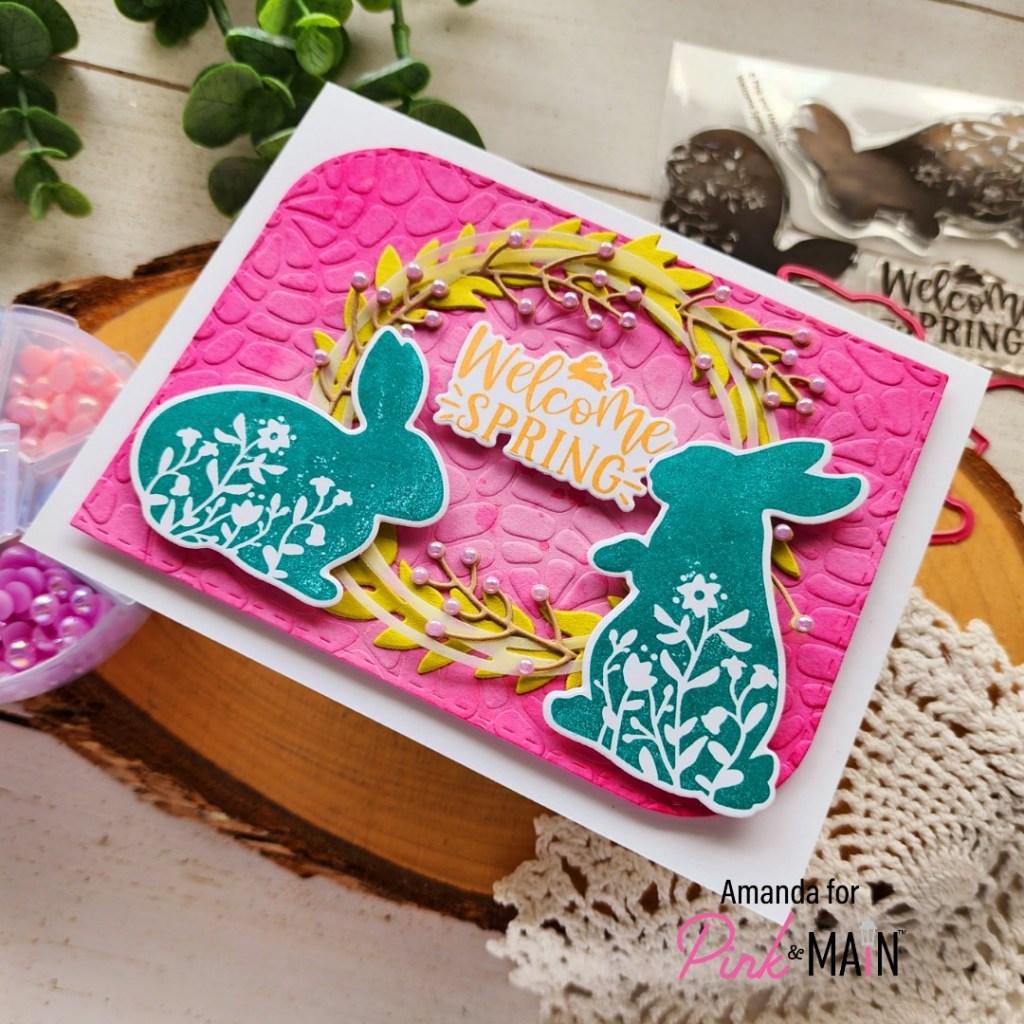
The bunnies and sentiment are attached with foam squares. Then, for finishing touches I pulled out the Rainbow Pearls 2 collection and glued the purple color pearls to the ends of the sprig pieces. I feel like these add so much to the ending look and feel of the card.

Is anyone else done with winter and ready for sunshine and rainbows? I sure am!

Products used today:
Welcome Spring stamps and dies
Wreath Base dies
Wreath Base 2 dies
Cobblestone embossing folder
Mod Stitched Rectangles dies
Foam tape and squares
EZ Squeeze liquid glue
Ink – dress shop, lakeside and construction
Cardstock – dress shop, the park and pebble
Rainbow Pearls 2 embellishments
Ergonomic blending brush

I appreciate you sharing your time with me. Have a fabulous day!

Pink & Main – Hippity Hoppity Happy Easter

Happy Friday friends! Today I’m hippity hopping over on the Pink & Main blog with some sweet Easter inspiration to share. I got inky and messy and had so much fun doing it!

I started this card by creating my background with the Layered Eggs stencils and Pink & Main dye inks. Today I blended Night Sky, Dress Shop and Construction for a springy happy color palette. Starting lighter with the first layer, then adding the detail stencil over the top and using the same colors again. Then I spread Glossy Gel through the detail stencil and sprinkled the panel with Ice Ring super fine glitter.

I set that panel aside to dry while I stamped and color adorable critters from Hippity Hoppity. I used the ink blending as my color palette for the eggs and accessories. Then I stamped sentiments from the set and trimmed them into strips.

Once the panel was dry, I added it to a card base. Then I popped the images and sentiment strips up with foam squares. For finishing touches I added black glaze pen to the bunny’s eyes and Touch of Gloss to the eggs, chick’s beak and bowtie and bunny’s nose too.

Aren’t they just the sweetest ever?!? I love the art in this whole set!

Products used:
Hippity Hoppity stamps and dies
Layered Eggs stencils
Ink Pads – night sky, dress shop, construction
Touch of Gloss
Glossy gel
Super fine glitter – ice rink
Blending brushes
Foam squares

I appreciate you sharing your time with me. Have a fabulous day!

Pink & Main – Layered Scallops Mini Slimline Cards

Hello again! Today I’m over on the Pink & Main blog sharing two versions of the mini slimline layered scallops die set. I’m totally loving these dies and how adorable the borders they create are! I paired them with the freebie of the month and the stamp and die of the month subscription.

I had so much fun creating both of these cards! I started with the St. Patrick’s Day cuteness because I really wanted to see the scallops in gold glitter and green. Aren’t they so fun!?!

After cutting the scallop layers and gluing them together I pulled out the new stitched mini slim rectangles set 2 and found the one that fit just inside the scallops. I cut that from white and stamped the shamrock in the February Pup stamp set with The Park ink – first and second generation for different darknesses. Then I used a blending brush and inked a little shadow with the same ink. I stamped the sentiment on the bottom and popped the panel up with foam tape.

I stamped and colored the pup with my copic markers and used the coordinating die to cut him out before popping him up with foam squares.

Then, for finishing touches I added Touch of Gloss to the puppy’s eyes and tongue, shine spots on the pot and buckle on the hat. Then I used Wink of Stella glitter brush pen on the shamrock in his hat and the coins in the pot.

For my second card, I created the scallops using striped paper from the Year Round Dots & Stripes paper pad. I cut another stitched mini slim rectangle and inked it with a blending brush using The Park and Barbershop ink pads. I stamped images from Easter Train and colored them with my copic markers.

I used the coordinating dies to cut them out and assembled everything with EZ Squeeze liquid glue and foam tape or squares. Honest to goodness, I forgot about my sentiment until the end so I placed my card in my MISTI and held my breath. It stamped beautifully but I highly recommend doing that before adding it to your scallop layers.

For finishing touches on this card I used Touch of Gloss on things like flower centers, dots and stripes. Then I added stardust Stickles to all cheeks and steam clouds. Isn’t this Easter train just the cutest ever!

What would you create with these sweet mini slim scallop dies???

Products used today:
Layered Scallops Mini Slim dies
Stitched Mini Slim Rectangles Set 2 dies
Easter Train stamps and dies Stamp of the Month
February Pup stamps and dies – freebie for February with qualifying purchase
Ink pads – The Park and Barbershop
Cardstock – On the Green
Year Round Stripes and Dots paper pad
Touch of Gloss
Ergonomic Blending Brush
EZ Squeeze liquid glue
Foam tape and squares
Stickles – stardust

I appreciate you sharing your time with me. Have a fabulous day!

Pink & Main – Happy Easter Sneak Peek

Hi there! Thanks for stopping by today. It’s almost time for another Pink & Main release which means I get to share a sneak peek of some of the goodies coming on Friday! I hope you are ready for sweet bunnies and so many things Easter because that’s what we’ve got and it’s adorable!!!

Today I have a card using the new Easter Basket cut & emboss folder. These are such a cool and innovative idea. You get that fantastic embossing and it die cuts the images for you at the same time! I cut these from white cardstock and then used all my Pink & Main dye inks to give them color with a blending brush.

Another thing coming on Friday is a bundle of new embossing powder colors and they are FABULOUS!!! I used grass green today for my sentiment and look at that color pop! I can’t wait to hear what your favorite one will be.

To assemble my card, I adhered the eggs inside the basket with EZ Tear Tape and then added foam tape to the back of that to pop it up on the card base. I added the extra egg with foam squares and carefully hid adhesive behind the embossing on my sentiment to keep it in place.

To finish things off I pulled out the Stitched Bows dies and made the middle size from white cardstock to adorn the top of my basket handle. Isn’t that the sweetest!?! I love it.

Products used today:
Easter Bakset Emboss and Cut Folder
Easter Joy stamps and dies
Stitched Bows dies
Embossing Powder – grass green
Premium Dye Inks – dress shop, night sky, barbershop, lakeside and construction
Embossing & Watermark ink

Ergonomic Blending Brushes
Magic anti-static brush
EZ Tear tape 1/4″
EZ Squeeze liquid glue

Foam squares and tape

I appreciate you sharing your time with me. Have a fabulous day!

Pink & Main – Floating By Slimline Scratch Off Card

Hello everyone! I’m on the Pink & Main blog today sharing another fun interactive scratch off card! The new release has a few different additions that work great with the scratch off sticker sheets. Floating By is definitely my favorite!

You have all the fun stamps to choose from with adorable critters and different balloon configurations and shapes. Then you have separate dies that cut just the balloon part for the scratch off sticker. It makes creating these cards a snap! I chose a few of the critters and different balloons to stamp out. Then I colored everything with my copic markers and used the coordinating dies to cut them out. I chose a balloon to stamp a secret sentiment on and also cut and stamped on a scratch off balloon shape. Then I removed the backing paper and stuck it on the surprise balloon.

To create my background, I cut 3 1/2 x 8 1/2 inch strip of Middle School cardstock and stenciled glossy gel through the Rainbow Fun stencil all over it. I removed the stencil and sprinkled Sparkle Cottontail Flock on the whole panel. Once it was dry I knocked off the excess and was left with a gorgeous fluffy sparkly rainbow background! I die cut it with a Layered Slim Line die the same side as the scalloped frame in Blessings Slim Line die set. I adhered those together with EZ Squeeze liquid glue.

I adhered all the critters and balloons with liquid glue and trimmed off what was hanging over the edge. Then I added the panel to a slimline card base. Here’s a look at that fun mystery message the balloon has been hiding all this time. Isn’t it so cute!?!

Whenever I create these cards, I use washi tape to stick a scratcher on the inside so the recipient can scratch it off right away to see what’s underneath.

Products used:
Floating By stamps and dies
Blessings Slim Line dies
Layered Slim Line dies
Rainbow Fun stencil
Glossy Gel
Middle School cardstock
Sparkle Cottontail Flock
EZ Squeeze liquid glue
Scratch Off sticker sheets
Scratchers

I appreciate you sharing your time with me. Have a fabulous day!

Pink & Main – I Woof You Tags

Hello everyone! Today I’m over on the Pink & Main blog sharing a pair of really adorable gift tags for Valentine’s Day. This is one of my favorite crafting holidays for tags and treat holders of any kind. I pretty much find any reason to gift something to everyone around me. My family, friends, coworkers, their kids and grandkids. I’m actually not kidding. I love creating little love gifts for everyone!

These super cute tags are being tied so some little bags of chocolates and given to very special people for Valentine’s Day. Kind of a his and hers which is where I pulled in the pink and teal background papers.

I stamped and colored the adorable January Pup image with my copic markers. Then I used the coordinating die to cut him out. Next, I prepped some black cardstock with the magic anti-static brush, stamped and heat embossed the sentiment in the new Peppermint Swirl embossing powder. The flecks in the embossing powder are so much fun! Once they were cooled off, I used the coordinating die to cut that out too.

Next, I pulled out my very favorite Fancy Tag die set and cut the elements from white cardstock and then striped from the Year Round Stripes & Dots paper pad. I used EZ Squeeze liquid glue to adhere the tag layers together as well as the puppy on each tag. Then I used foam strips to add the sentiments to each tag.

Finally, I came in with Touch of Gloss on the puppy’s eye and nose, plus the heart inside his curlicue tummy. Once that was dry, I cut and threaded ribbon through the tag hole so they’re all ready to go.

Can’t get enough of these sweeties! Are you making gifts for Valentine’s Day? I would really love to know! I can’t be the only one who goes all out for this holiday.

Products used:
January Pup stamps and dies
Fancy Tag dies
Year Round Dots & Stripes paper pad
Magic Anti-static Brush
Embossing & Watermark ink
Peppermint Swirl embossing powder
Touch of Gloss
EZ Squeeze liquid glue
Foam strips

I appreciate you sharing your time with me. Have a fabulous day!

Pink & Main – Love Language

Hello again everyone! Thanks for stopping by for your weekly dose of super cute Pink & Main inspiration. Today I’m finally able to feature a card using the new release! My package was very delayed so I was extra excited when it finally showed up. This release is incredible and it was really difficult to choose what to color first! This Love Language stamp and die set is fantastic for Valentine’s Day along with other occasions like anniversaries and just because cards too!

I started by arranging my stamps on a blank panel to see if a design came to me. I started with that beautiful floral heart but it was plain so I thought about the bouquet and then the sentiment fit so perfectly to balance the design that I couldn’t stamp things quick enough! I also stamped some extra flowers and leaves for that “extra” I love to do! I colored everything with my copic markers and used the coordinating dies to cut it all out.

I took the white panel I was arranging my stamps on at the beginning and trimmed it to 4×5.25 inches before inking it up with the new Woven stencil and Pink & Main night sky ink. Then I smooshed the pad on my acrylic block, spritzed it with water and flicked that on my paper for extra texture. Have you tried this on your cards? It’s one of my favorite things ever!

Next, I glued the heart directly to the inked panel and popped the bouquet, sentiment and extra flowers up with foam squares. Then I added the panel to a white card base with foam tape.

Moving on to finishing touches, I started with my usual black glaze pen on the eyes of that sweet bouquet and Touch of Gloss on the flower centers and bow. Then I pulled out the Rainbow Pearls Set 2 because those colors matched the tones I used so well and landed on the peach colored ones to scatter on the design. I love pearls so much! They’re so soft and pretty. Don’t you think?

I think this will make a sweet Valentine but would also be amazing for an anniversary too!

Products used today:
Love Language stamps and dies
Woven stencil
Night Sky ink
Ergonomic Blending Brush
Rainbow Pearls 2 embellishments
EZ Squeeze liquid glue
Touch of Gloss
Foam squares and tape

I appreciate you sharing your time with me. Have a fabulous day!

Pink & Main – Dream Big

Hey friends! It’s time for sneak peaks with Pink & Main for the new release on Friday but my package didn’t arrive so I’m here with a little inspiration using lots of great previously release products. I hope you like it!

I pulled out these sweet pups from Puppy Love that released in time for Valentine’s Day last year and decided to put a different spin on them. This dreaming pup just called out to me and my daughter insisted that I add the tennis ball to his dream bubble in spirit of our pup who is recently obsessed with “the ball!” Lol. It’s so fun! I stamped and colored everything with copic markers before using the coordinating dies to cut them out.

I chose 4 colors from the Sweater Weather paper pad and cut them with a Mod Stitched Rectangle die. I layered them together and adhered them with EZ Squeeze liquid glue. Once the placement was how I liked it, I added that to a white card base and trimmed off the excess. This is when it hit me to use the Thin Alpha dies to create my own sentiment.

I cut the letters out and arranged everything before gluing them down. I used foam squares to add my sentiments and switched to finishing touches next.

For that I started with Touch of Gloss on the puppy’s nose and tennis ball. Then I pulled out my pearls and added a scattering matching each color of paper on the card front. I found coordinating colors in Rainbow Pearls and the teal was in Rainbow Pearls II.

Products used:
Puppy Love stamps and dies
Mod Stitched Rectangles dies
Thin Alpha dies
EZ Squeeze liquid glue
Touch of Gloss
Rainbow Pearls
Rainbow Pearls II
Sweater Weather paper pad

I appreciate you sharing your time with me. Have a fabulous day!

Pink & Main – Bear Hugs

Hello friends! It’s time for your weekly Pink & Main inspiration post! Today I went back and pulled out some super fun favorites to create with! I absolutely LOVE all of the long legged critters and squealed when I came across them as an idea for my card today.

This card came together really quickly and would be so fun to make a stack of to share with lots of friends! Quick tip: When I’m creating with these long legged cuties, I die cut my paper first and then arrange the stamp on that because those legs like to move and not line up correctly. Then I colored it with my copic markers and set it side to do a little die cutting.

I cut the background using stop sign cardstock and the polka hearts cover die. Then I glued it to a white card base with EZ Squeeze liquid glue. Next, I die cut the big hugs set from white cardstock and vellum. After adhering them together I decided for dimension, because I love dimension. So I cut the word from white cardstock 3 more times and adhered them to the original.

When playing around with placement I thought it would be fun to have the legs behind the word but his head poking around the side. So I added liquid glue to everything except his head where I added foam squares. Then I carefully layered everything together and to the card front.

I wrapped some glittery twine from my stash to the top and tied it in a bow before moving on to finishing touches.

For those I just added black glaze pen to his eyes, touch of gloss to his nose and stardust stickles to his cheeks. I think the stickles is one of my favorite parts to playing with these fun critters! I love their cheeks!

Products used today:
Bearly Wait stamps and dies
Big Hugs dies
Polka Hearts cover die
Stop Sign cardstock
EZ Squeeze liquid glue
Foam squares
Touch of Gloss
Stickles – stardust

I appreciate you sharing your time with me. Have a fabulous day!

Pink & Main – You Party Animal

Hello everyone! It’s time for more Pink & Main inspiration. With the new year comes a need to restock my birthday card stash so you’ll be seeing more of that for a while. I hope you enjoy it! Today I’m pulling out one of my very favorite birthday sets of all time – Party Animal. These critters are the cutest and are so fun to color! I couldn’t believe that I actually hadn’t used the giraffe yet so I had to change that immediately!

I stamped and colored him with my copic markers straight away, then die cut him with the coordinating die. I also stamped and cut out a sentiment with a large sentiment banner. Next, I cut the Dotted Cover pieces from white and blue cardstock. After laying my image and sentiment banner out for placement, I thought the design needed something. So I pulled out my adhesive sheets and cut three strips – 1/2 inch, 1/4 inch and 1/8 inch.

I stuck them to the blue panel and pulled the release paper off the top one strip at a time so I could add three different colors of super fine glitter – foliage, lemonade and ice rink were the colors I chose. I love this!!! Then I glued the dotted layer to the white scallop and popped the giraffe and sentiment banner up with foam squares.

I popped the scallop layer up with foam tape on a white card base before moving on to finishing touches. So I didn’t detract from the fun texture going on too much I just added a touch of gloss to parts of the giraffe, his hat and cake. Then I added a scattering of glitter enamel dots from the Butterfly Kisses pack.

I had so much fun switching gears out of holiday crafting to a fun and bright color palette with tons of texture! I’m always excited for holiday crafting but that transition after so many months is fun and refreshing.

Products used today:
Party Animal stamps and dies
Dotted Cover dies
Large Sentiment Strip dies
Adhesive sheets
Super Fine Glitter – foliage, lemonade, ice rink
EZ Squeeze liquid glue
Glitter Enamel Dots – butterfly kisses
A Touch of Gloss
Foam squares and tape

I appreciate you sharing your time with me. Have a fabulous day!