Miss Ink Stamps – Good Day to be Happy

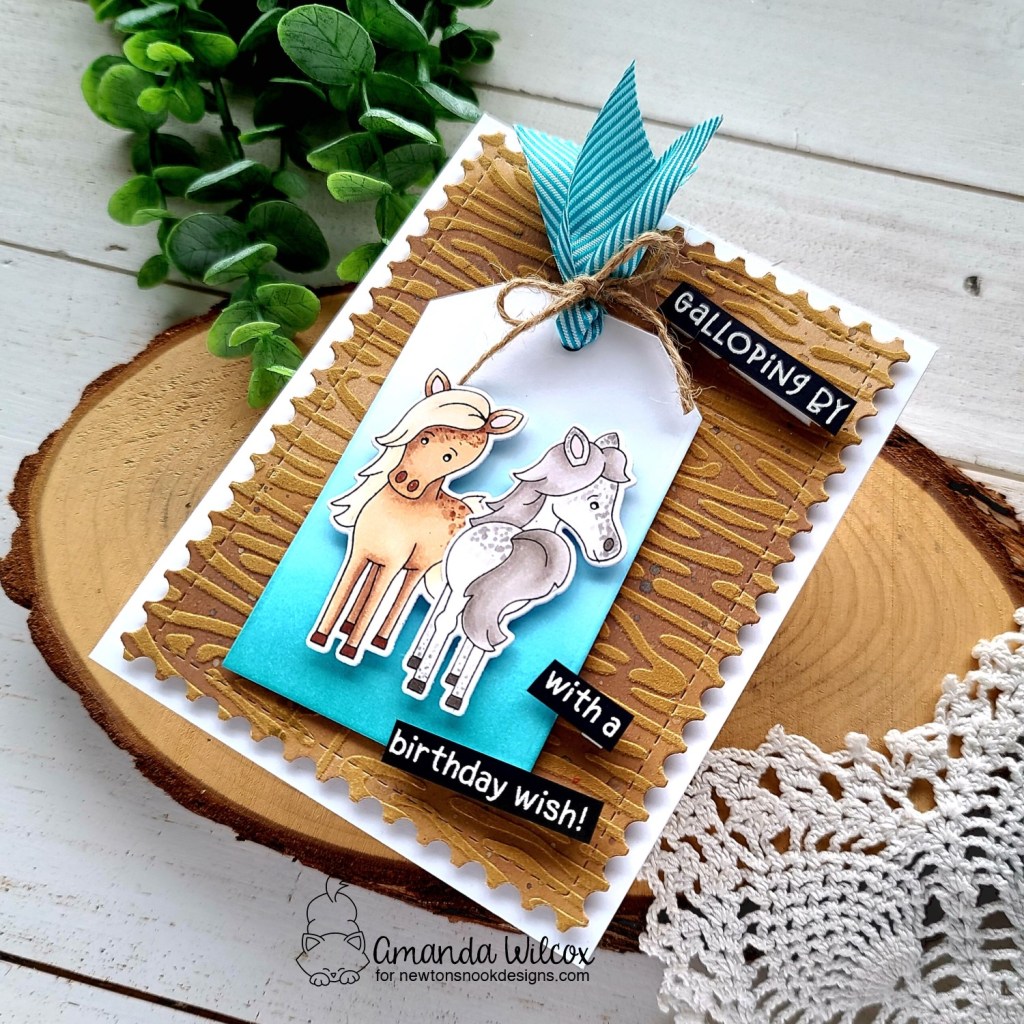
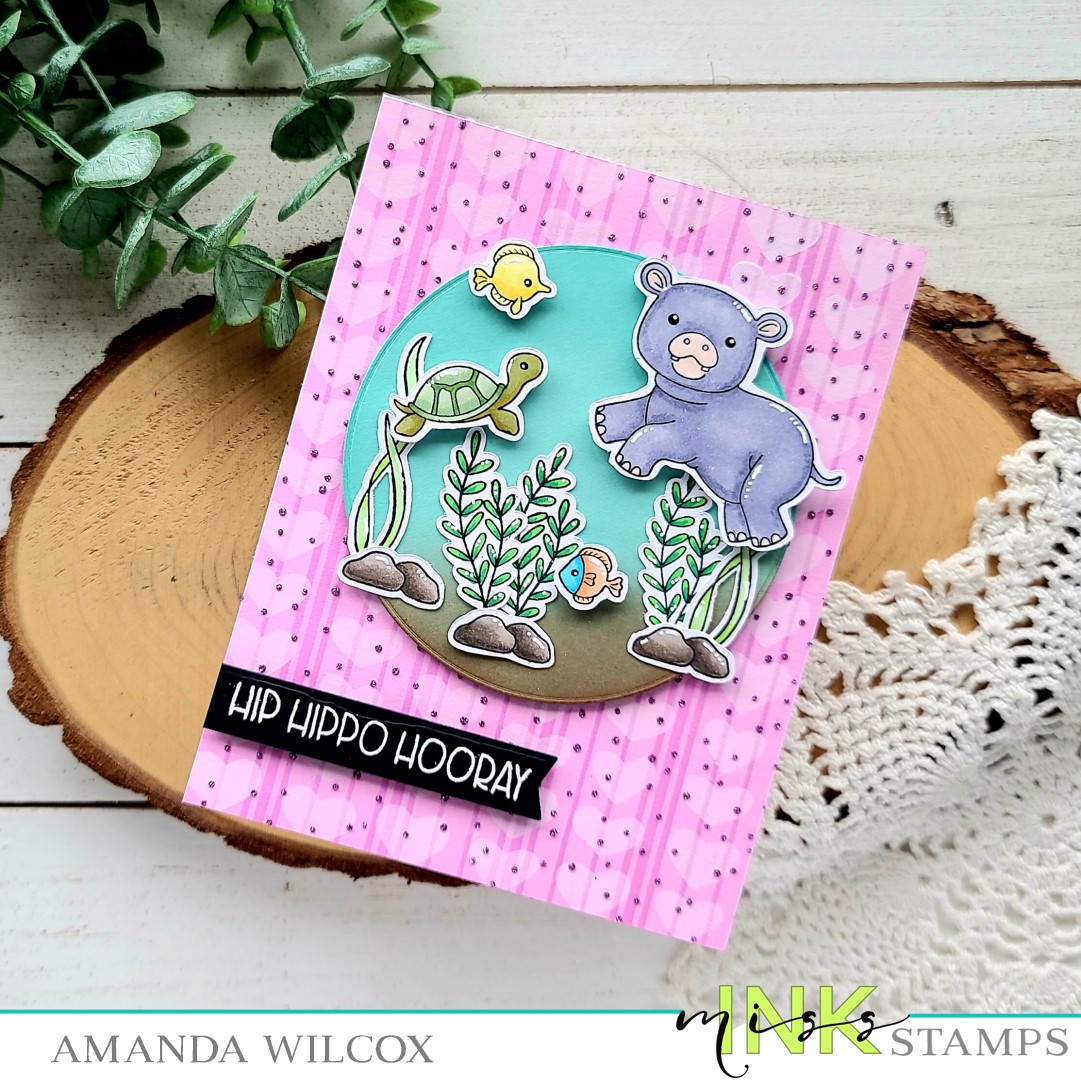
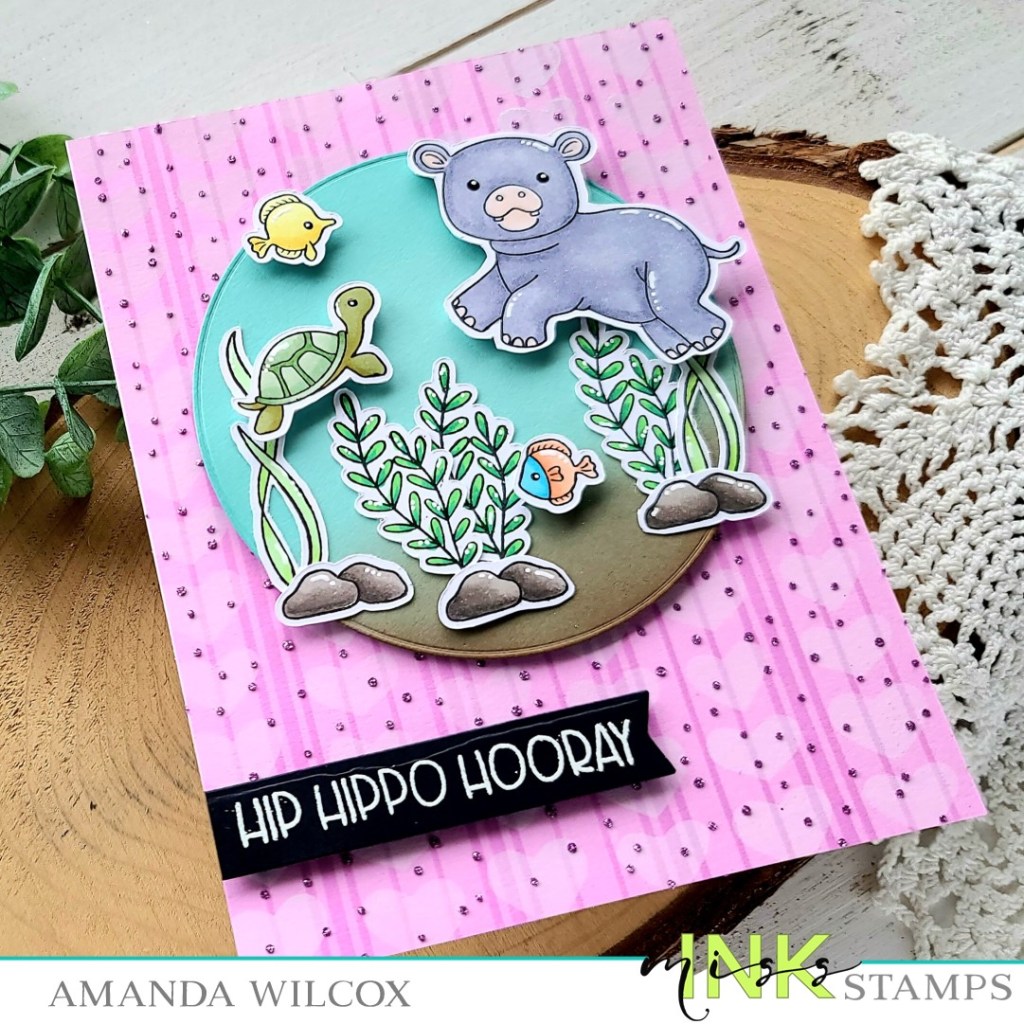
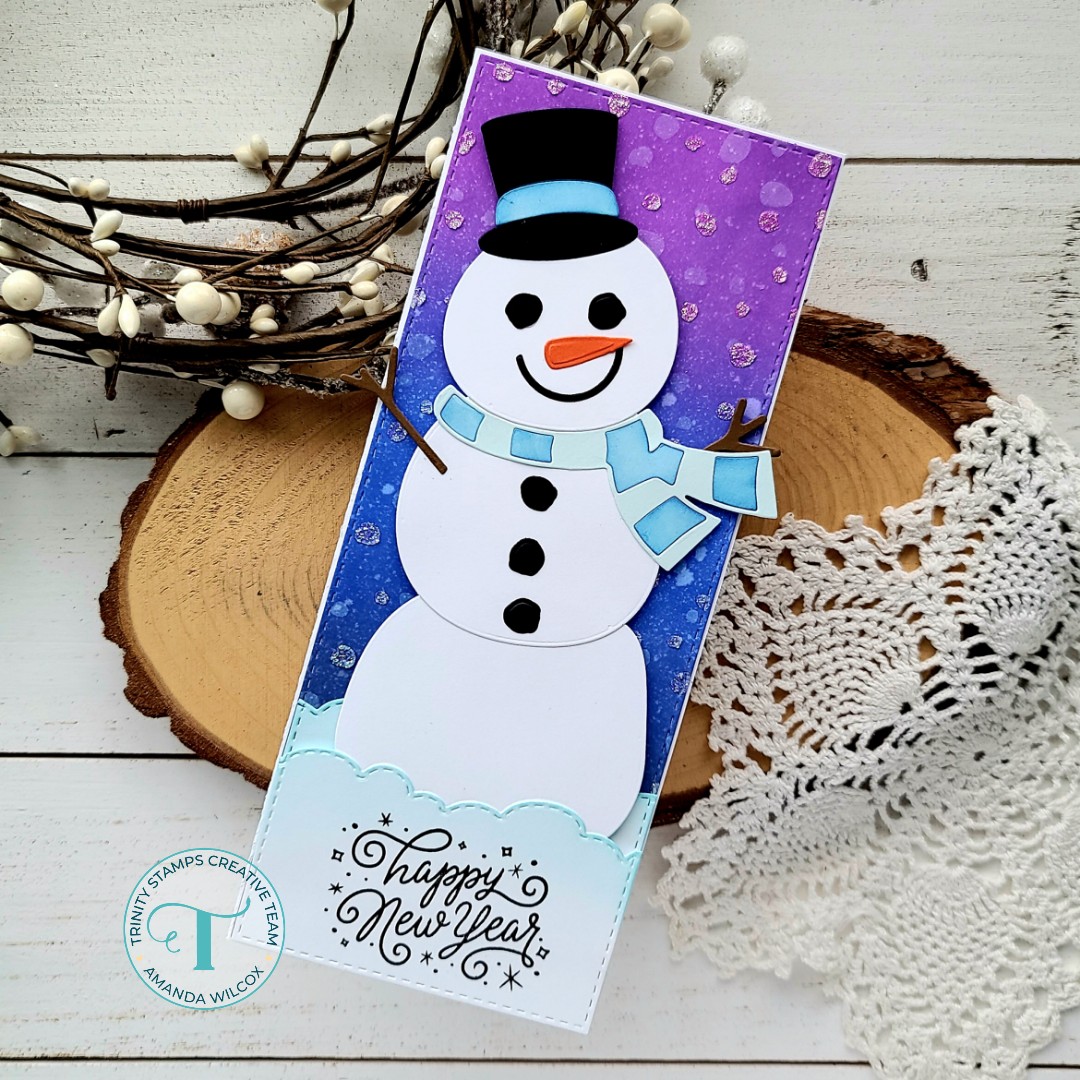
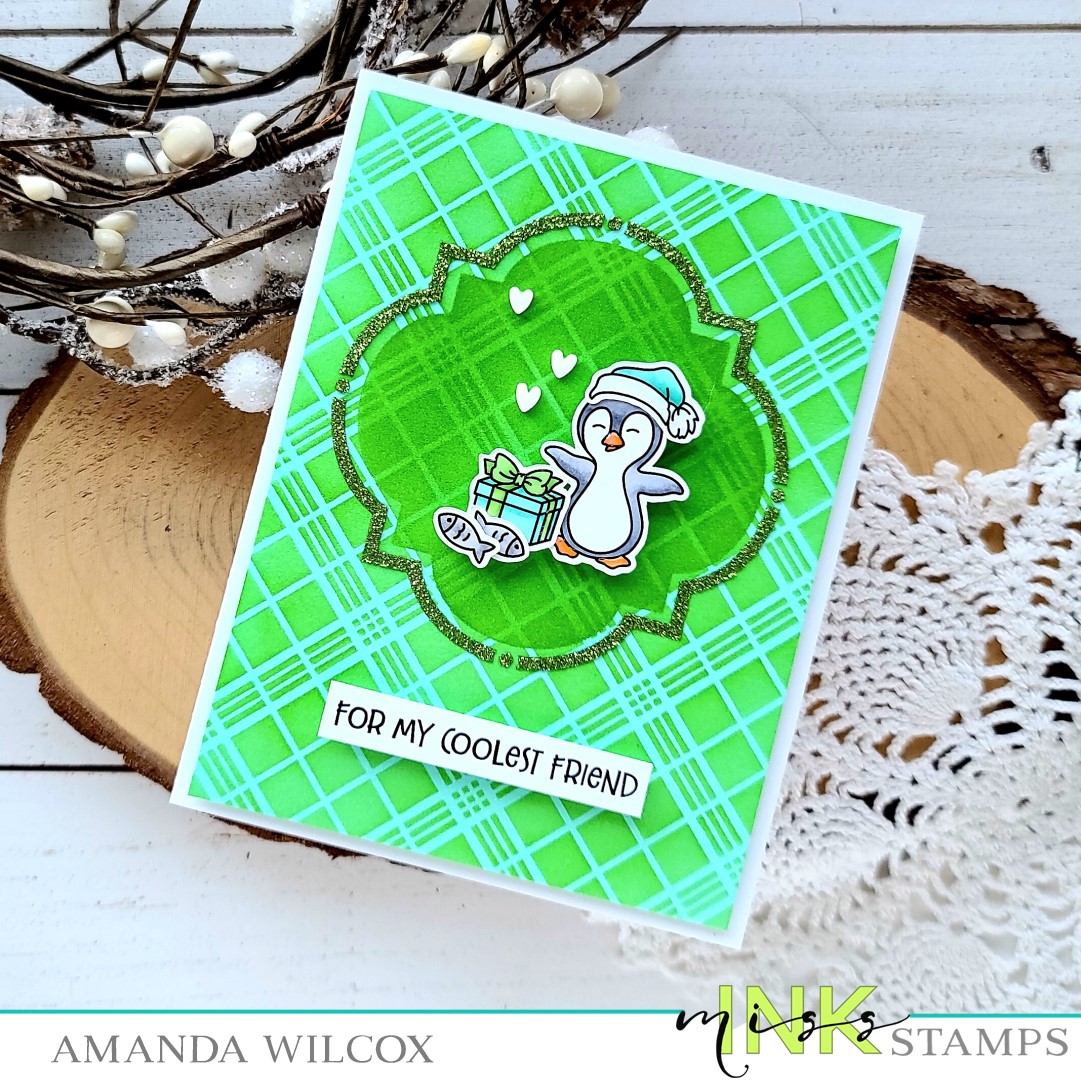
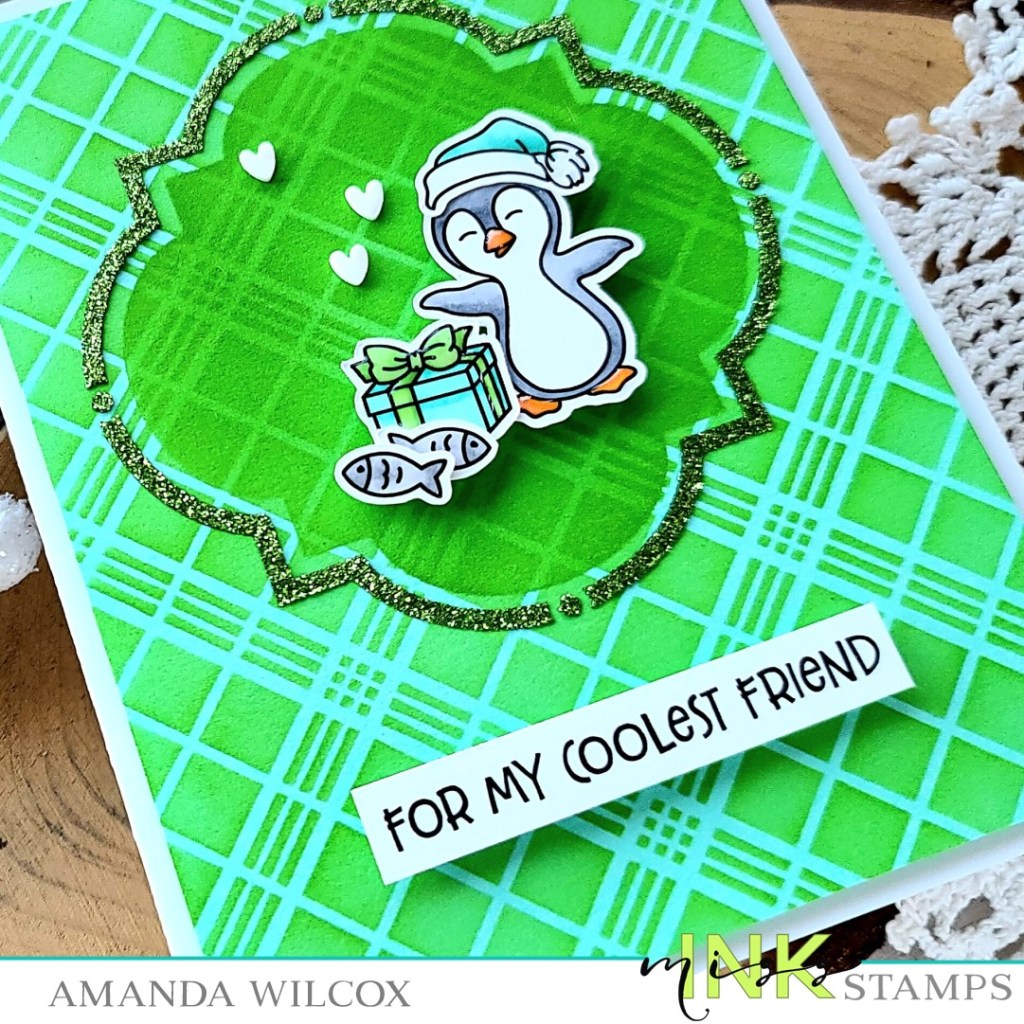
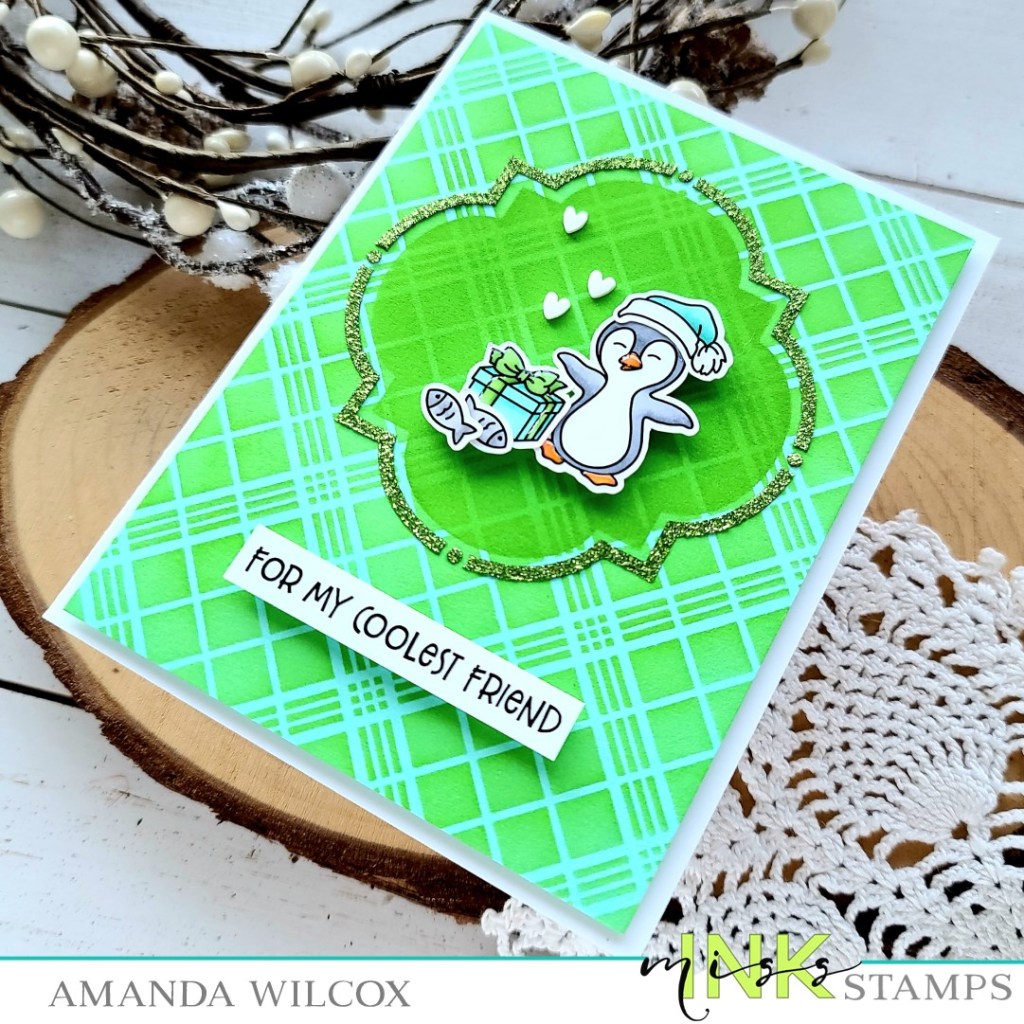
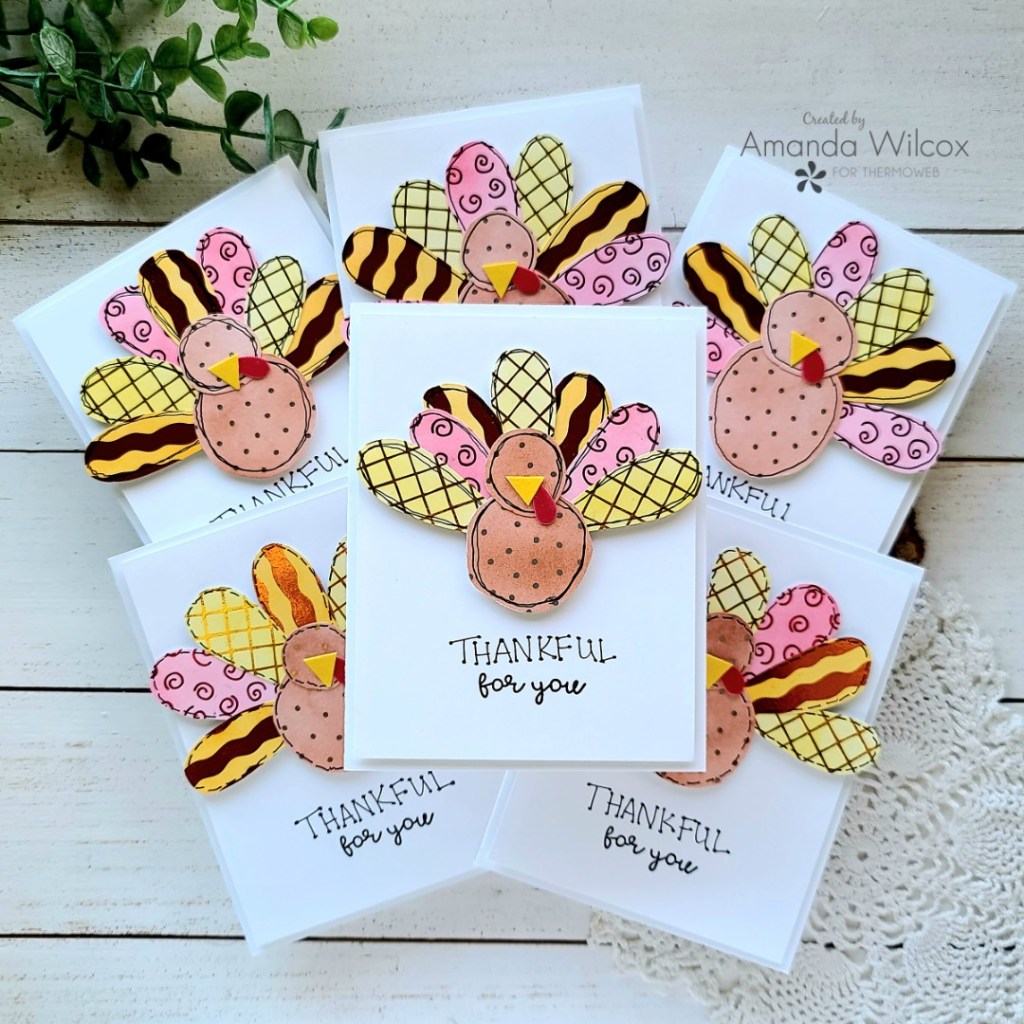
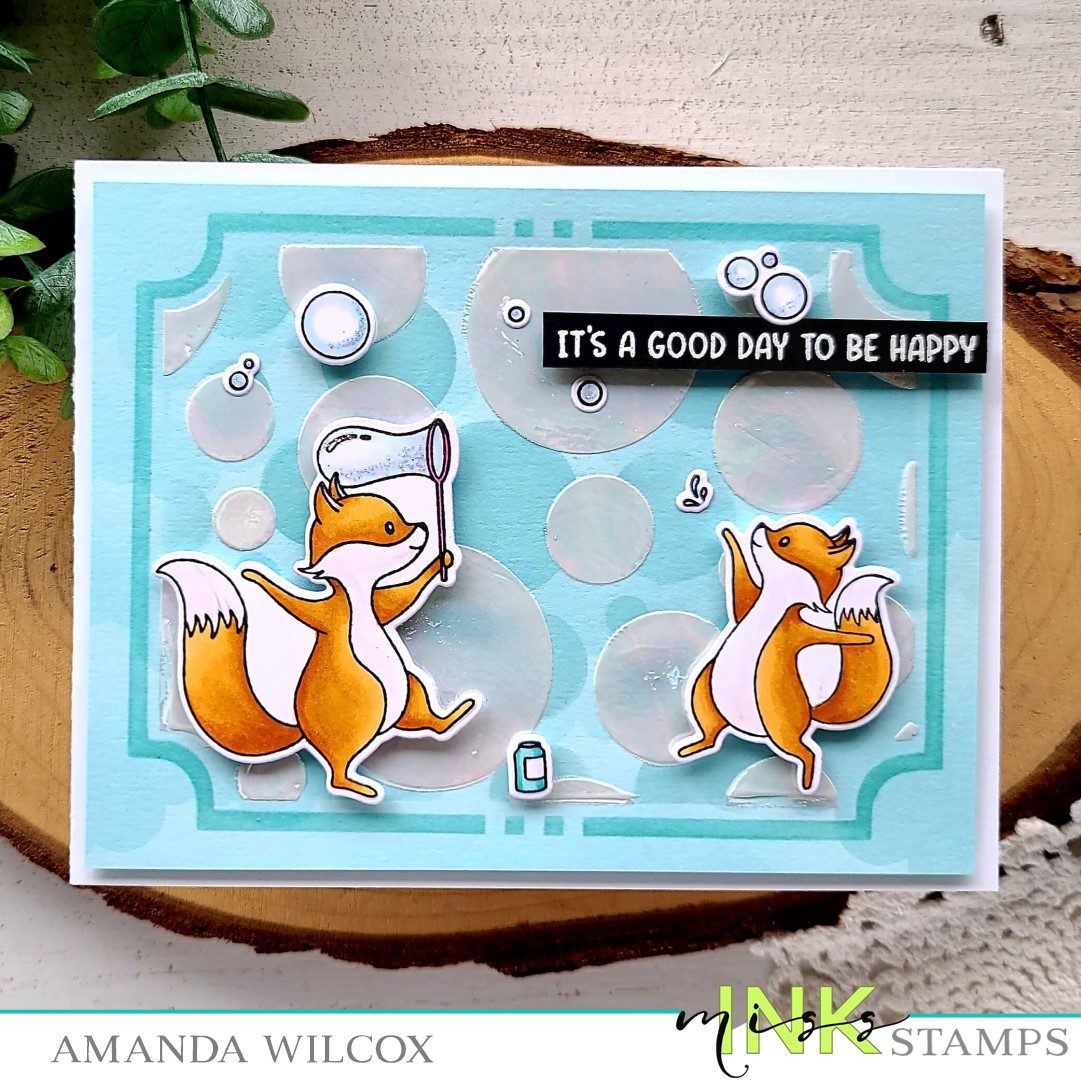
Welcome everyone! It’s been a very busy week and I’m super excited to share all the things I’ve been creating. For today I have a brilliant card using Miss Ink Stamps Bubbles stamps and dies and a few stencils layered together to create an awesome background!

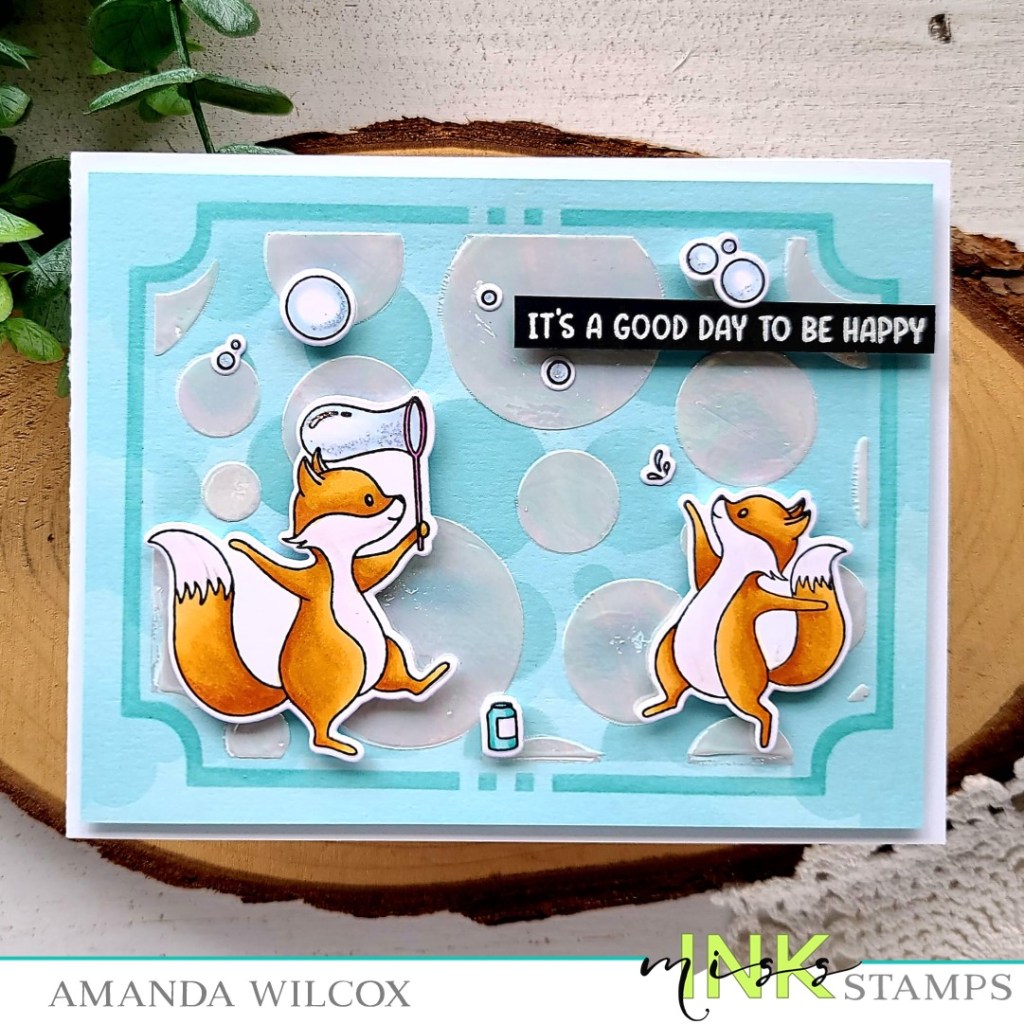
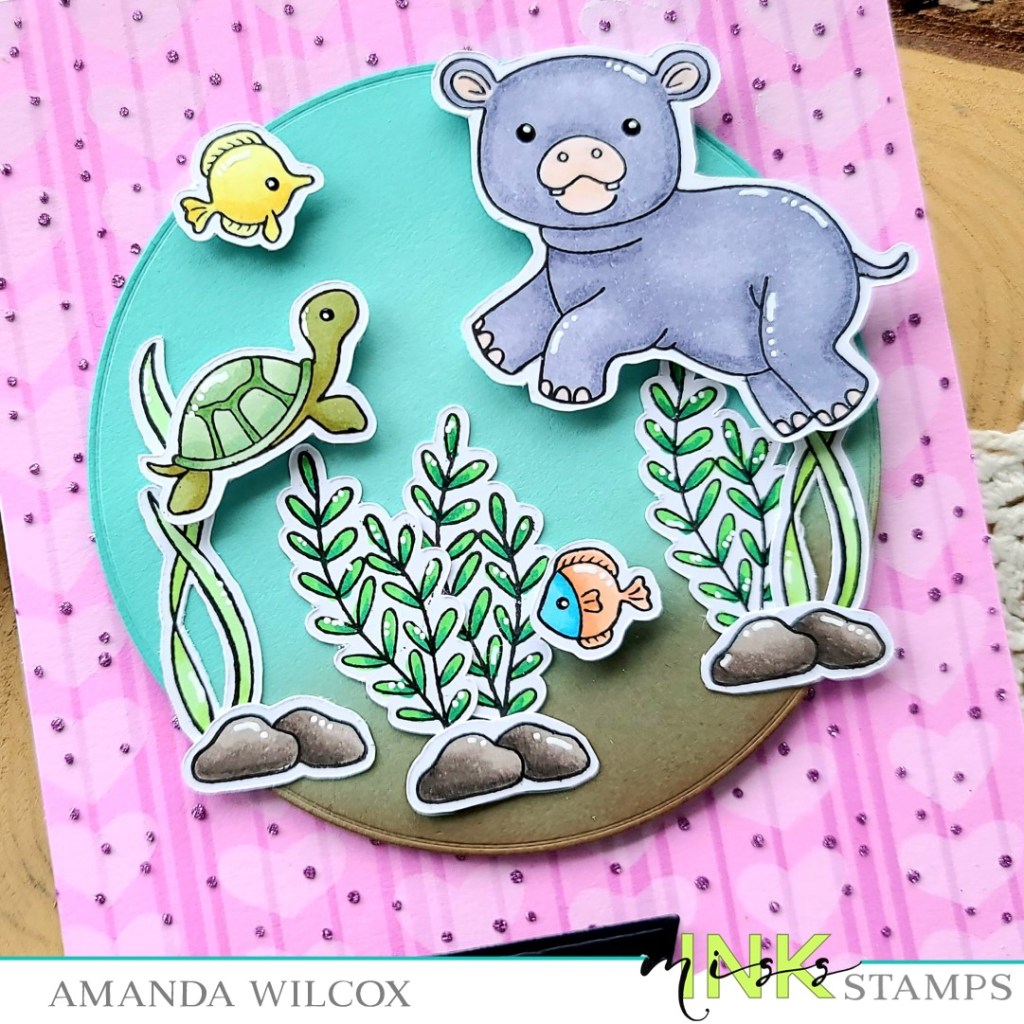
I started by stamping and coloring some images from Bubbles with my copic markers. I used the coordinating dies to cut them out and then set them all aside while I got inky. I started by taping my cardstock to the masking layer of the Ins and Outs Marquis stencil. Then I added the Random Dots stencil over the top and inked it with a light teal ink. I removed that and switched it for the Large Random Dots stencil and spread Thermoweb transfer gel blanco through that one. I set the panel aside to dry and cleaned up my mess.

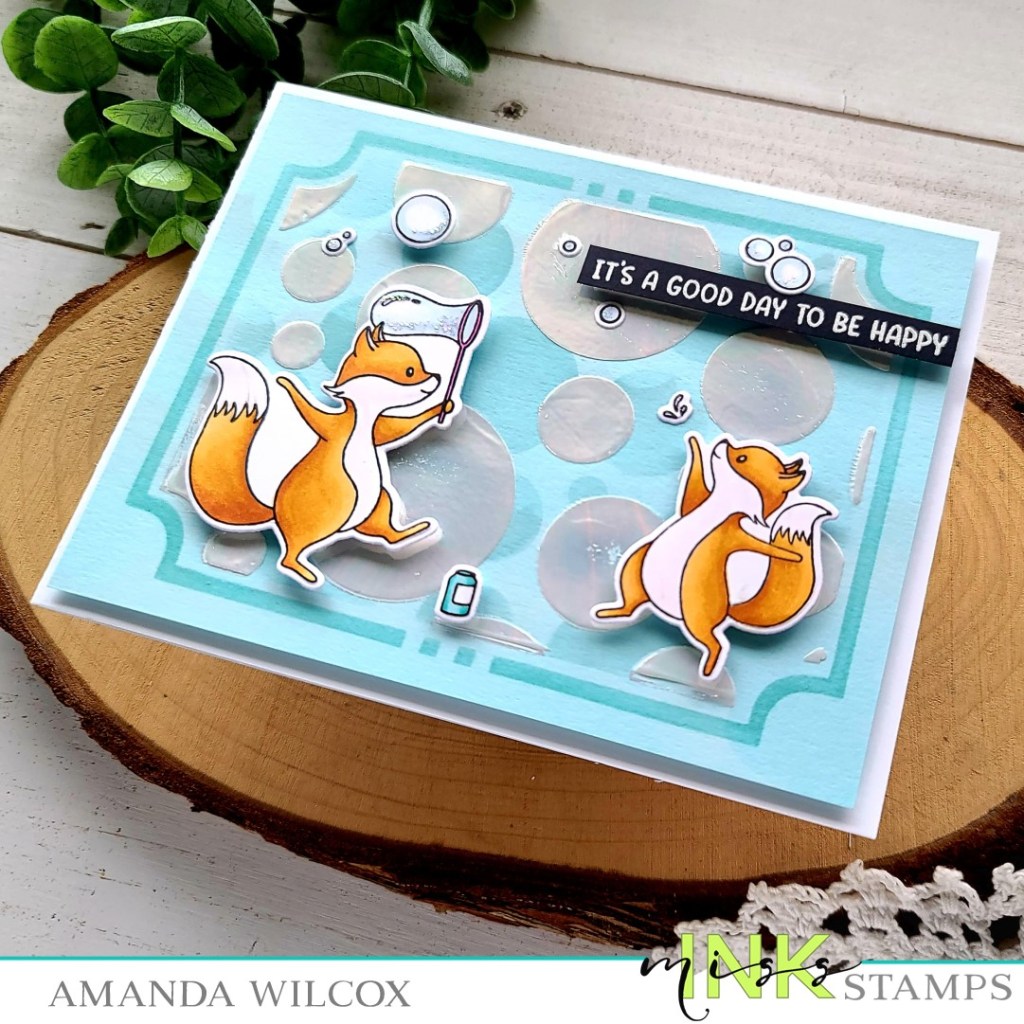
Coming back later on, I heated up my laminator and ran the panel through with pearlescent deco foil transfer sheet and it turned out amazing! After that, I layered the border for the Ins and Outs Marquis over the top and blended a darker teal ink for that. Then I started playing with placement for my images and digging for a sentiment.

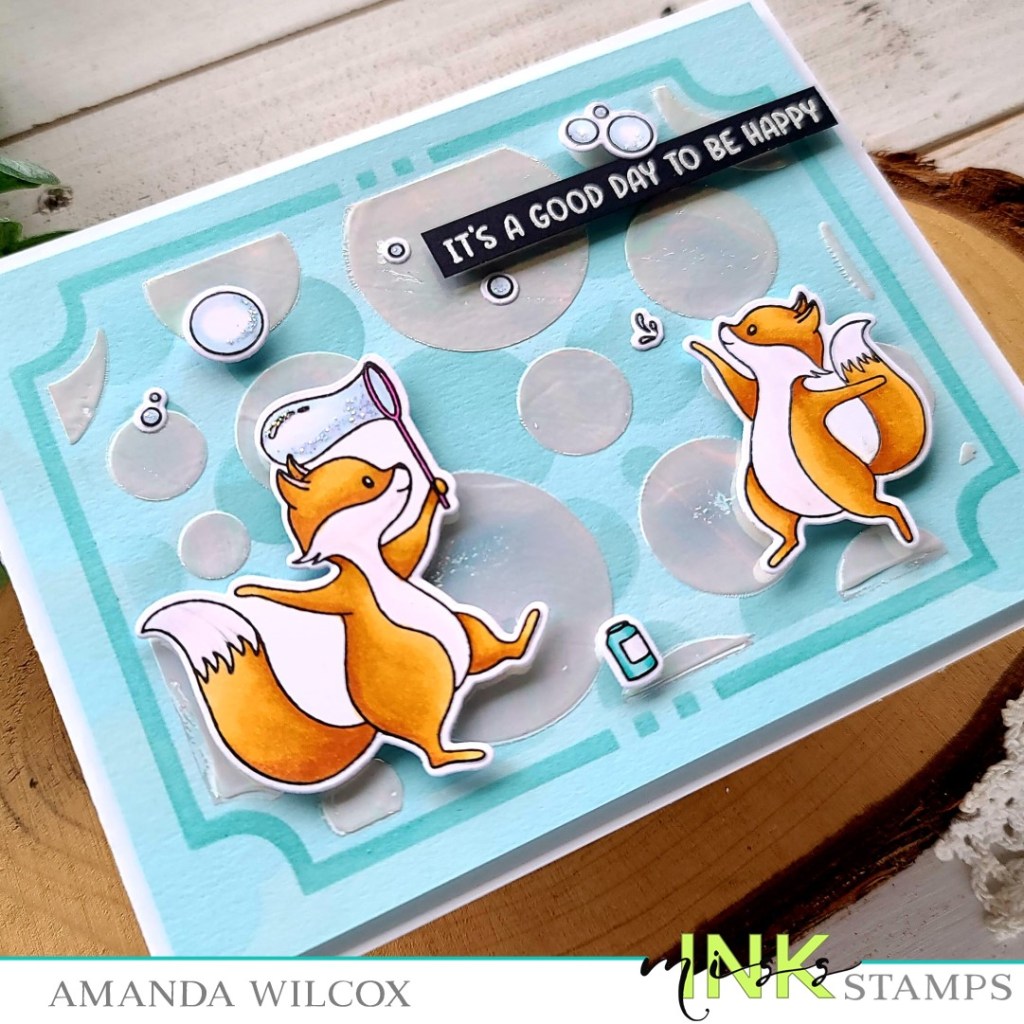
I added my images with a combination of liquid glue and foam squares. Then I stamped and heat embossed a sentiment from Sunshine and Rainbows, trimmed it into a strip and popped it up with foam squares too.

For finishing touches, I added unicorn Stickles to the bubbles and called it good. There is so much interest in the background that makes those sweet foxes pop, I didn’t think it needed much else.

Products used today:
Bubbles stamps and dies
Ins and Outs Marquis stencils
Large Random Dots stencil
Random Dots stencil
Sunshine and Rainbows stamps
Thermoweb transfer gel blanco
Stencil Pal
Deco Foil – pearlescent
Foam squares
Stickles – unicorn

I appreciate you sharing your time with me. Have a fabulous day!

Newton’s Nook – Just Because Knight Owl

Hey friends! I’m back today with version 2 of my simple sketch design featuring another mini stamp set from Newton’s Nook. This Knight Owl stamp set it adorable but I had a hard time finding ways to use it. Then I reminded myself, that you don’t have to use the sentiments included with the image, duh! So I went digging and found this fun “just because” sentiment in the Heartfelt Blooms stamp set. How fun is that!?!

For today’s card, I stamped and colored the knight owl image with copic markers and used the coordinating die to cut him out. Then I moved on to inking up my background panels. and die cutting the other elements.

Starting with the background, I inked the edges of a dark blue cardstock panel with chipped sapphire distress oxide ink for a little depth before taping down the cascading stars stencil over the top and spreading transfer gel blanco through it. I cleaned up my mess and set the panel aside to dry. Then I too a scrap strip of white cardstock and inked it up with mowed lawn and forest moss distress oxide ink. I spritzed the panel with water and blotted it dry before cutting it with the largest Frames & Flags die and then again with the grass die in the Land Borders set.

Once the star panel was dry, I heated up my laminator and ran it through with Thermoweb gold glitter deco foil by Unity. I absolutely love the tiny shimmer this foil gives off. It’s gorgeous! Then I cut that panel out with the same die from the Frames & Flags set.

Next, I cut a stitched banner and fence from white cardstock. I stamped my sentiment on the banner and started assembling my card. First, I adhered the fence to the grass with liquid glue. Then I added the banner behind the owl using the grass panel as a guide for width. I added foam tape to the star panel, grass/fence panel and owl/banner. I removed the release paper and adhered them together one layer at a time.

For finishing touches, I added white gel pen accents to my image, black glaze pen to his eyes and glossy accents to his beak.

Isn’t this such a fun card and ready to go for any reason you can come up with to send it! I’m so excited to have another happy mail card in my stash to share.

Products used today:
Knight Owl stamps and dies (retiring and on sale)
Heartfelt Blooms stamps
Frames & Flags dies
Banner Trio dies
Fence die
Land Borders dies
Cascading Stars stencil
Thermoweb Transfer Gel Blanco
Thermoweb Deco Foil gold glitter by Unity
Thermoweb stencil pal
Thermoweb foam tape and squares
Glossy accents

I appreciate you sharing your time with me. Have a fabulous day!

Newton’s Nook – Galloping By…

Happy Wednesday friends! Today I’m over on the Newton’s Nook blog sharing a birthday card featuring a couple of the retiring products that are on sale and only available while supplies last! If you have any of the farm collection but don’t have Neigh yet, I highly recommend you snag it. What’s a farm without horses?!?

To create today’s card, I stamped 2 of the horses from Neigh and colored them with my copic markers. I cut them out with the coordinating dies and also stamped and heat embossed my sentiment straight away too. I trimmed the sentiment into strips with my scissors for an imperfect look. Sometimes I just prefer this to banner dies.

Next, I took a piece of kraft cardstock and very messily added gathered twigs distress oxide ink in random places. I spritzed it with water and flicked some watered down ink all over the panel for texture. Then I spread Thermoweb transfer gel blanco through the Hardwood stencil onto the panel and set it aside to dry while I cleaned up and made my tag.

I die cut a white tag with the Fancy Edges Tag dies and inked the bottom with peacock feathers and tumbled glass distress oxide inks. I threaded ribbon through the hole and tied it with twine. Then I added foam squares to my horses and adhered them to that.

With the stenciled panel dry, I heated up my laminator and ran the panel though with a tuscan gold deco foil flock transfer sheet. I peeled the transfer sheet off and ran the panel through my die cutter with the largest Framework die. I added foam tape to the back and popped it on a white card base.

I added foam tape to the tag and adhered it next, then I trimmed the sentiment apart and added foam strips to attach it to the card front.

For finishing touches I just added black glaze pen the the horse’s eyes and then came back with a white gel pen highlight when that was dry. I like the rustic texture of this card so I didn’t add glossy or shimmery anything. I think it’s pretty cool as is!

Products used today:
Neigh stamps and dies
Hardwood stencil
Fancy Edges Tag dies
Framework dies
Thermoweb transfer gel blanco
Thermoweb stencil pal
Thermoweb Deco Foil Flock – tuscan gold
Thermoweb 3D foam tape
Distress Oxide Ink – peacock feathers, tumbled glass, gathered twigs

I appreciate you sharing your time with me. Have a fabulous day!

Miss Ink Stamps – Hip Hippo Hooray

Happy Thursday everyone! Thank you for stopping by. Today I have an adorable hippo card using stamps and a bunch of stencils layered for a cool background from Miss Ink Stamps.

I knew the general design I wanted to create so today I jumped straight in with my background panel. I chose a fun purple cardstock from my stash and sprayed the Fine Lines stencil with pixie spray. With delicate stencils like this pixie spray is your best friend, I promise! After letting it sit for a few minutes I pressed the stencil to my panel and inked up with a purple ink for that great tone-on-tone stripe! I love it! Next I used the Hand Drawn Hearts stencil with white pigment ink over the stripes. Then, last but not least, I used the Tiny Snowfall stencil and spread lovely lavender glitz glitter gel from Thermoweb through it.

I set that panel aside to dry and cleaned up my mess. Then I chose images from Hippo Hooray, stamped and colored them with my copics. I used the scan-n-cut to cut them out. For my scene, I die cut a circle with the Trinity Stamps embossed edge circle stack from teal cardstock. I inked up the bottom portion with a blending brush and brown dye ink, then I went around the rest of the edge with teal ink for a little depth.

I adhered the seaweed and rocks with liquid glue and popped all the critters up with foam squares. Then I popped the circle up on the stenciled panel with foam tape and adhered the whole thing to a white card base. Last, I stamped and heat embossed a sentiment on black cardstock and die cut it with a Pink & Main large sentiment strip die. I popped the sentiment up with foam squares and trimmed off the edge.

For finishing touches today I just added loads of fun white gel pen highlights to all the images. Then I added black glaze pen to the critter eyes and after it dried put a tiny white highlight back in. This really makes the eyes come to life. I love it!

Do you layer your stencils over top of each other? It’s a newer technique for me but I just love it every time I play with a new combo!

Products used today:
Miss Ink Stamps Hippo Hooray stamps
Miss Ink Stamps Fine Lines stencil
Miss Ink Stamps Tiny Snowfall stencil
Miss Ink Stamps Hand Drawn Hearts stencil
Trinity Stamps Blending brushes
Trinity Stamps Embossed Edge Circle dies
Pink & Main Large Sentiment Strips dies
Thermoweb Pixie Spray
Thermoweb Glitz Glitter Gel – fresh lavender
Thermoweb Stencil Pal
Thermoweb foam tape and squares

I appreciate you sharing your time with me. Have a fabulous day!

Thermoweb – Gift Tags with Flocking

Hey crafty friends! I’m over on the Thermoweb blog today sharing a couple of fun gift tags featuring Deco Foil Flock transfer sheets and a new way to use your slimline toner sheets!

The panel I used for my flocking was perfect to die cut 2 of these Reverse Confetti tags out of so I just ran with it and made a set of fun tags for the next time I have gifts to give.

I absolutely LOVE that I was able to create these fun rosettes with the slimline toner card fronts too! Each card front will give you 4 rosettes!!! Such a fun addition to the design.

Be sure to head over to the Thermoweb blog for all the details and a list of products I used to create these awesome tags!

I appreciate you sharing your time with me. Have a fabulous day!

Trinity Stamps – Happy New Year Snowman

Hello everyone! The year is coming to a close and I can’t even believe it! It flew by but oddly drug on at the same time. This year was much harder for me than 2020 so I’m happy to see it go and ready to move forward with happy positive vibes!

Today I’m popping in with a super fun slimline card featuring all Trinity Stamps dies, stencils and stamps! So much cuteness!

I started by cutting all the elements for the Slimline Happy Snowman die and assembled them with liquid glue. I cut the scarf and hat band from light blue cardstock and inked them up with blue dye ink and my blending brush before adhering them in place.

Next, I inked up a white panel with distress oxide inks in chipped sapphire, blueprint sketch and wilted violet. I spritzed the panel with water and blotted it dry. Then I used the Slimline Snowfall stencil – layer 1 is white pigment ink with my blending brush and layer 2 is iridescent glitz glitter gel and a stencil pal.

Once the panel was dry I die cut it with the largest Slimline Stitched Panel die. Then I cut 2 more scraps of white with the same stitched panel to create snow hills. I trimmed the top of each white scrap with the cloud border from the Slimline Scenic Borders die set. I like the bumpy look of snow drifts.

I inked the edges of the snow drifts with my blending brush and light teal ink. Then I stamped Happy New Year from the Holiday Tag Helper stamp set on the front one. Now it’s time to assemble everything!

I adhered the inked panel to a white slimline card base with liquid glue. Then I added the back snow drift the same way. I added foam tape to the snowman and used the front snow drift as a guide where to pop him in place. Then I carefully added foam tape to the front snow drift so that it didn’t interfere with the snowman and added it last.

Isn’t this just the cutest scene!?! I love it! I don’t normally send new year cards out but I ran out of Christmas cards and time to send them so I’m going to send a few out and have had fun creating them!

Products used today:
Slimline Happy Snowman dies
Slimline Stitched Card Panel dies
Slimline Snowfall stencils
Slimline Scenic Border dies
Holiday Tag Helper stamps
Blending Buddy Brushes
Distress Oxide Ink – chipped sapphire, blueprint sketch, wilted violet
Thermoweb Glitz Glitter Gel – iridescent
Thermoweb Stencil Pal
Thermoweb 3D foam tape
Thermoweb liquid glue

I appreciate you sharing your time with me. Have a fabulous day!

Miss Ink Stamps – Coolest Friend

Happy Tuesday friends! I’m over on the Miss Ink Stamps blog today with a fun stencil layered card featuring those new adorable penguins in the Ice Day stamp set.

To create my card, I started with the images. I chose a penguin and some accessories from Ice Day, stamped them and colored them all with copic markers. I used my scan-n-cut to cut them out and set them aside.

Moving on to the background, I chose a light blue piece of cardstock and prepared my Perfectly Plaid stencil with pixie spray. I inked it up with a blending brush and green dye ink. I removed the plaid stencil and centered the Ins & Outs Quatrefoil stencil over the top. I inked up another layer of the same green ink creating a focal point for my images. I switched from the window to the frame layer of the stencil and spread grass green glitz glitter gel through that.

Once the panel was dry, I trimmed it down to 4×5.25 inches and popped it up on a white card base with foam tape. Then I added foam squares to my images and arranged them in the window area. I chose a sentiment from the Ice Day set, stamped it and trimmed it into a strip before popping it up with a foam strip too.

For finishing touches I added some white clay hearts with liquid glue and glossy accents to parts of the images like the penguin beak and feet and the bow on the present.

Wouldn’t this card make the cutest birthday card for a winter baby?!? I think so! It’s so fun and also great for guys or girls!

Products used today:
Ice Day stamps
Perfectly Plaid stencil
Ins & Outs Stencil – Quatrefoil
Pixie spray
Glitz glitter gel – grass green
Blending Brush
Lawn Fawn ink – jalapeno
Foam tape
Foam squares
Glossy accents
Twiddler’s Nook Sweethearts embellishment mix

I appreciate you sharing your time with me. Have a fabulous day!

Miss Ink Stamps – One-Layer Slimline Christmas Forest

Hey friends! Today I have a really fun Miss Ink Stamps card to share with you that is literally one layer! I actually don’t think I’ve ever successfully accomplished this before and I couldn’t be more happy with the result!

To create my card, I took a white panel and secured it to my glass mat. Then I taped down the new Treeline stencil toward the bottom. I used Lawn Fawn dye inks and just inked the edge around the trees one layer at a time, shifting the stencil up 1/4 inch each color.

The rainbow I chose for today was, from top to bottom, fresh lavender, mermaid, celery stick, sunflower, peachy keen and guava.

Once I got to the top, I shifted the stencil to use the negative on the bottom half to protect my inking and smeared Thermoweb iridescent glitz glitter gel on the white space. I left it to dry and then trimmed my panel down to 8.5×3.5 inches and adhered it to a slimline card base.

Last, but not least, I popped the whole thing in my MISTI and stamped a sentiment from Deck the Halls in the upper right and this card is finished!

I have been very into rainbow Christmas cards this year for some reason. They are just happy and make me smile! I hope you are enjoying them too!

Products used today:
Miss Ink Stamps Treeline stencil
Miss Ink Stamps Deck the Halls stamps
Thermoweb glitz glitter gel – iridescent
Thermoweb stencil pal
Thermoweb Ultra Bond liquid glue pen
Blending brushes
Lawn Fawn dye inks

I appreciate you sharing your time with me. Have a fabulous day!

*This blog uses affiliate links, at no additional cost to you, whenever possible.*

Thermoweb – Plaid Flocked Christmas Cards

Hey friends! I hope your holiday weekend was wonderful and you’re off to a great start this week! I’m popping in to share that I’m on the Thermoweb blog today. I have a set of 4 cards featuring deco foil flock and glitz glitter gel.

I have 2 ways to use the flock transfer sheets on the blog post today – transfer gel and a laminator or straight die cutting. It’s one of my favorite things about the flock transfer sheets.

For these fun Newton’s Nook cards, I used transfer gel and my laminator for the first one and used the negative sheet with some glitz gel for the second. No waste and two super fun cards! Stamps dies and stencils from this are all Newton’s Nook.

Then for this style, one layer on each card is just die cut flock transfer sheet. Sometimes we don’t have time to be messy and wait for the transfer gel to dry. This is a super fun alternative. The dies for these cards are all Pink & Main.

If you’d like the supply list, full details and photo tutorial please head over to the Thermoweb blog and check it all out.

I appreciate you sharing your time with me. Have a fabulous day!

Thermoweb – Thankful For You

Happy Monday my friends! I’m super excited that it’s Thanksgiving week! We love Thanksgiving at our house. Getting together to hang out, play games, chat and eat good food! Seriously, what gets better…other than crafting? Haha!

Today I’m over on the Thermoweb blog with this set of adorably fun deco foil thankful cards to share!

This ended up being one of those projects where I was having fun and just couldn’t stop so I ended up with 6 fun turkeys and that turned into 6 thankful cards. Not a bad problem to have though. I am excited to write in each one and give them out this week.

For all the details on how I made these, head over to the Thermoweb blog where I share a photo tutorial from start to finish and have links to all the products used too!

I appreciate you sharing your time with me. Have a fabulous day!