Trinity Stamps – Hopping By…

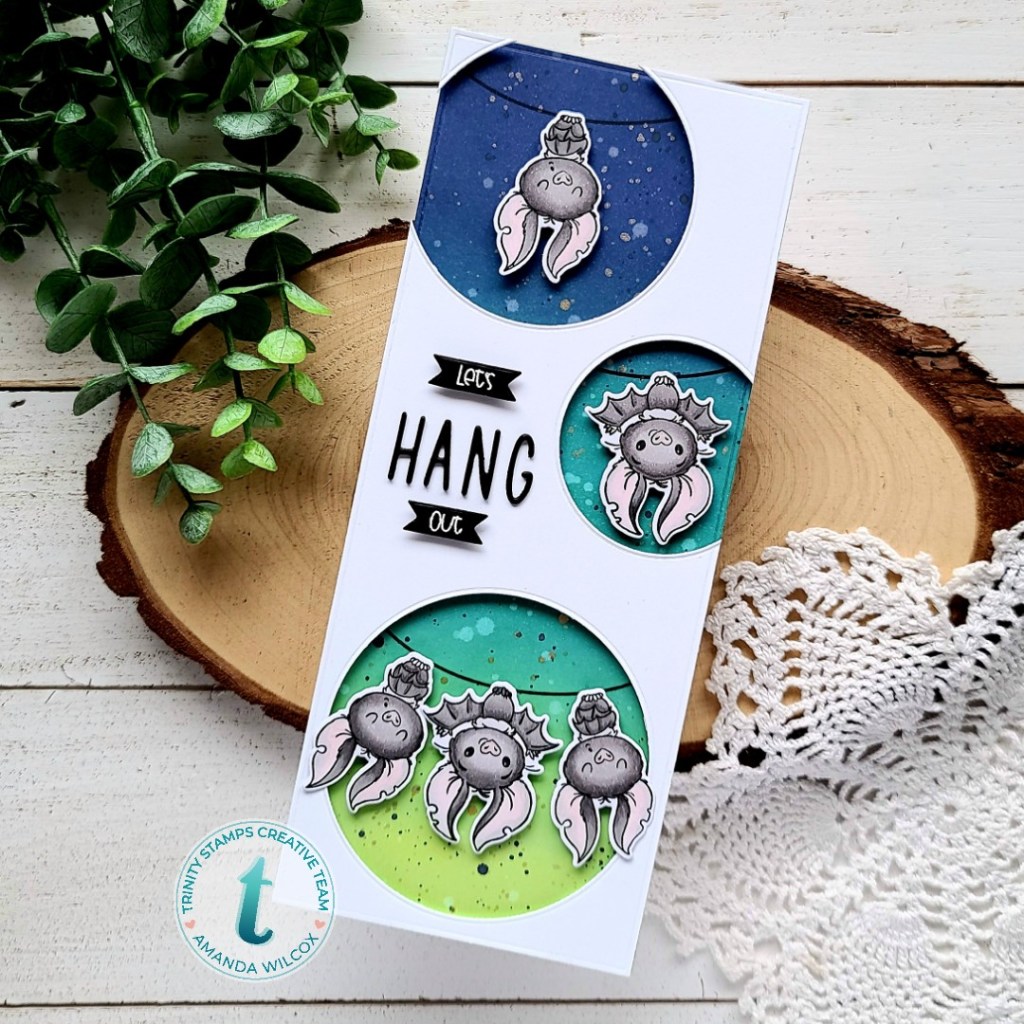
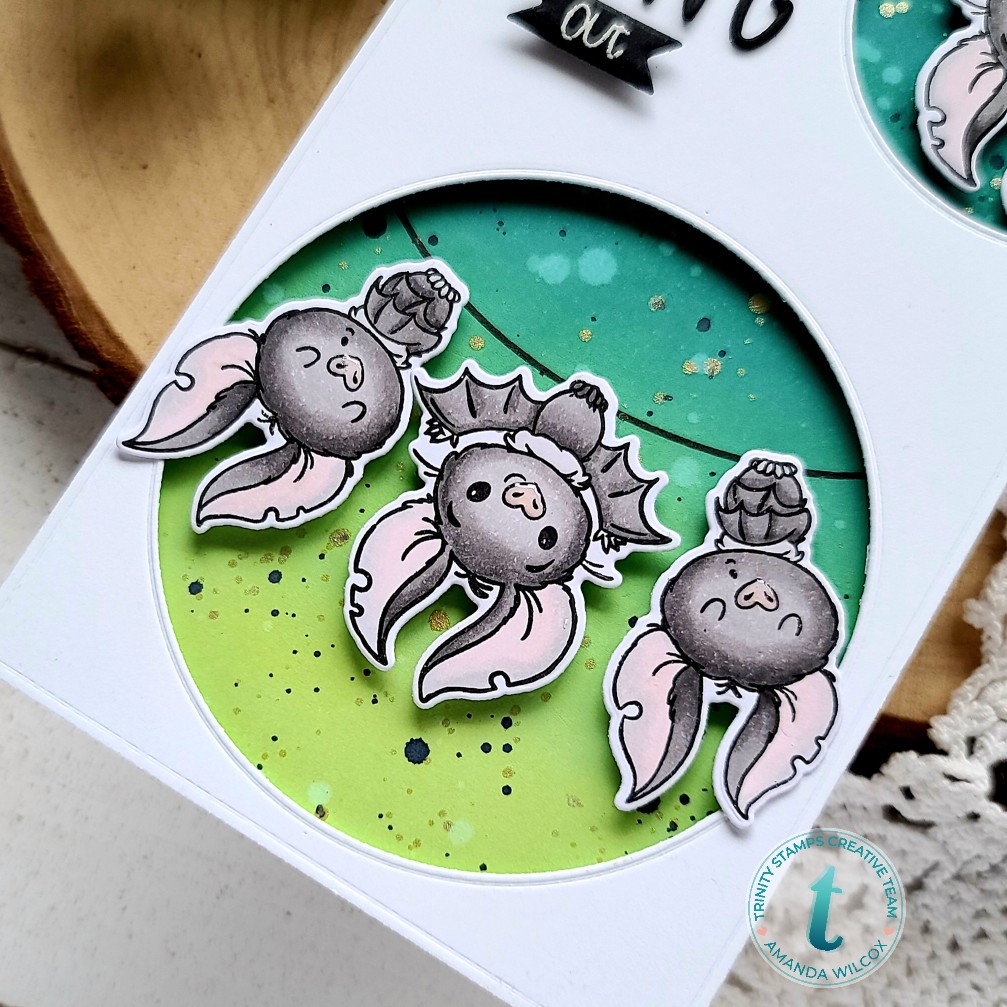
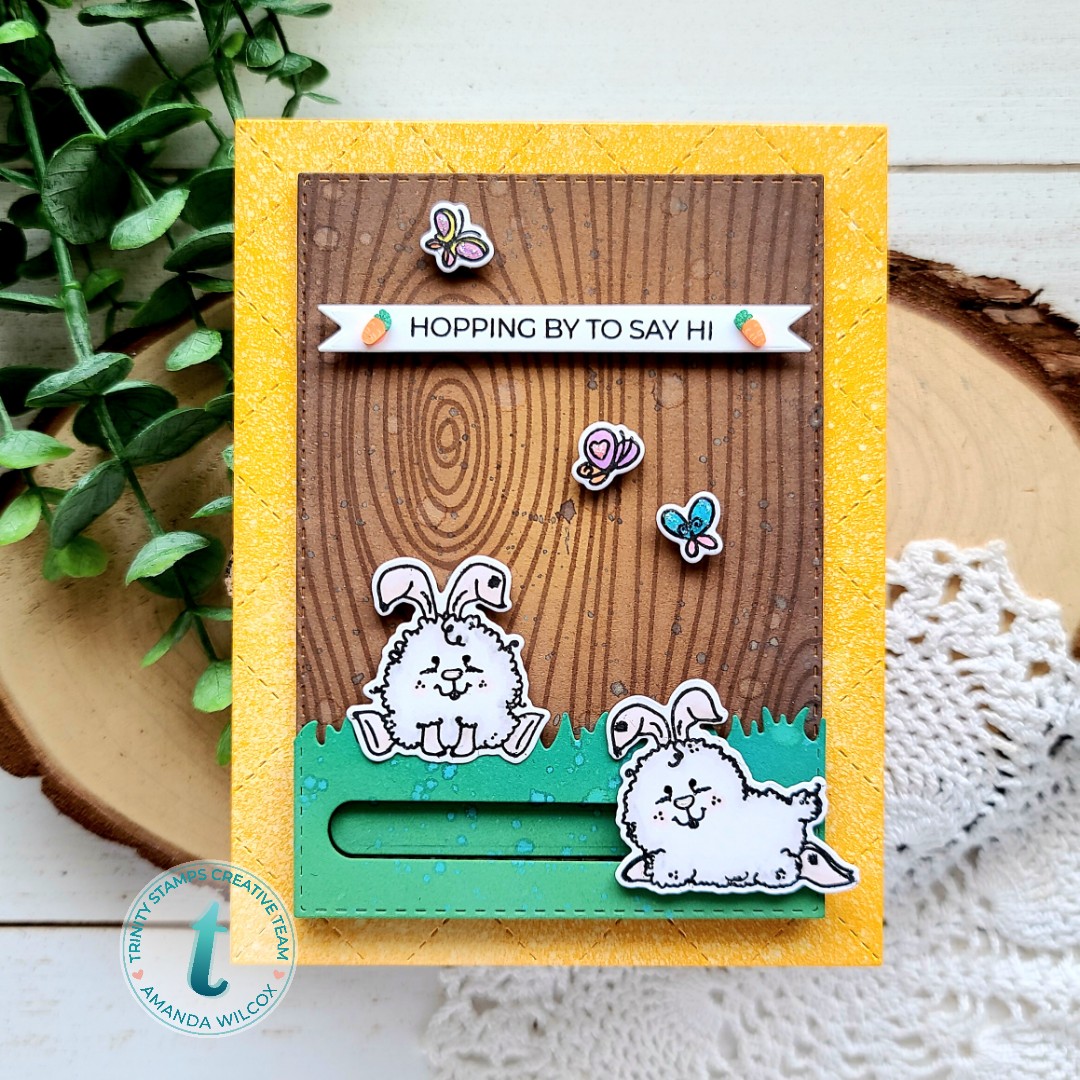
Happy Wednesday everyone! Thanks for joining me. Today I’m sharing a really fun interactive card featuring some goodies from Trinity Stamps. First off, these bunnies from the Dust Bunnies set last year are so cute and I was so excited to pull them back out to play! Second, it was so much fun to make them into an interactive card! I keep playing with it while it’s sitting on my desk.

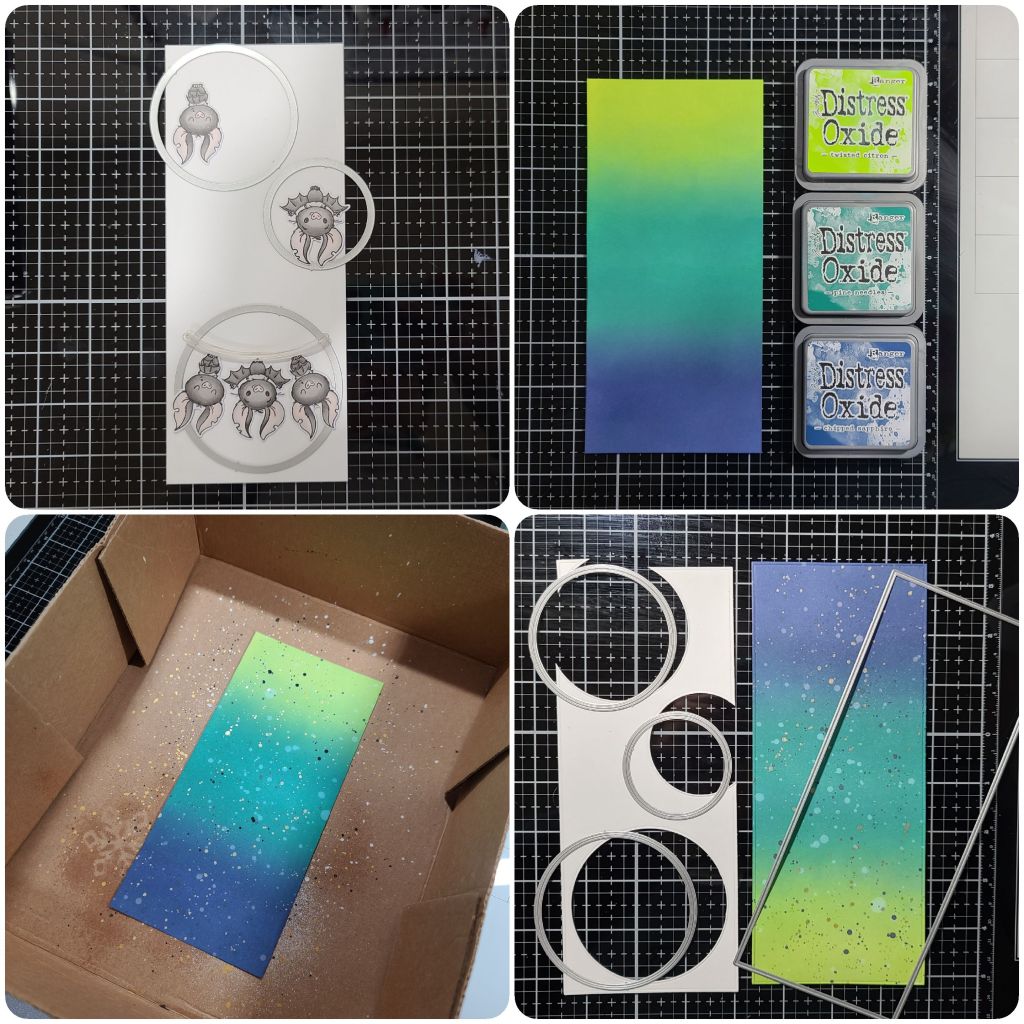
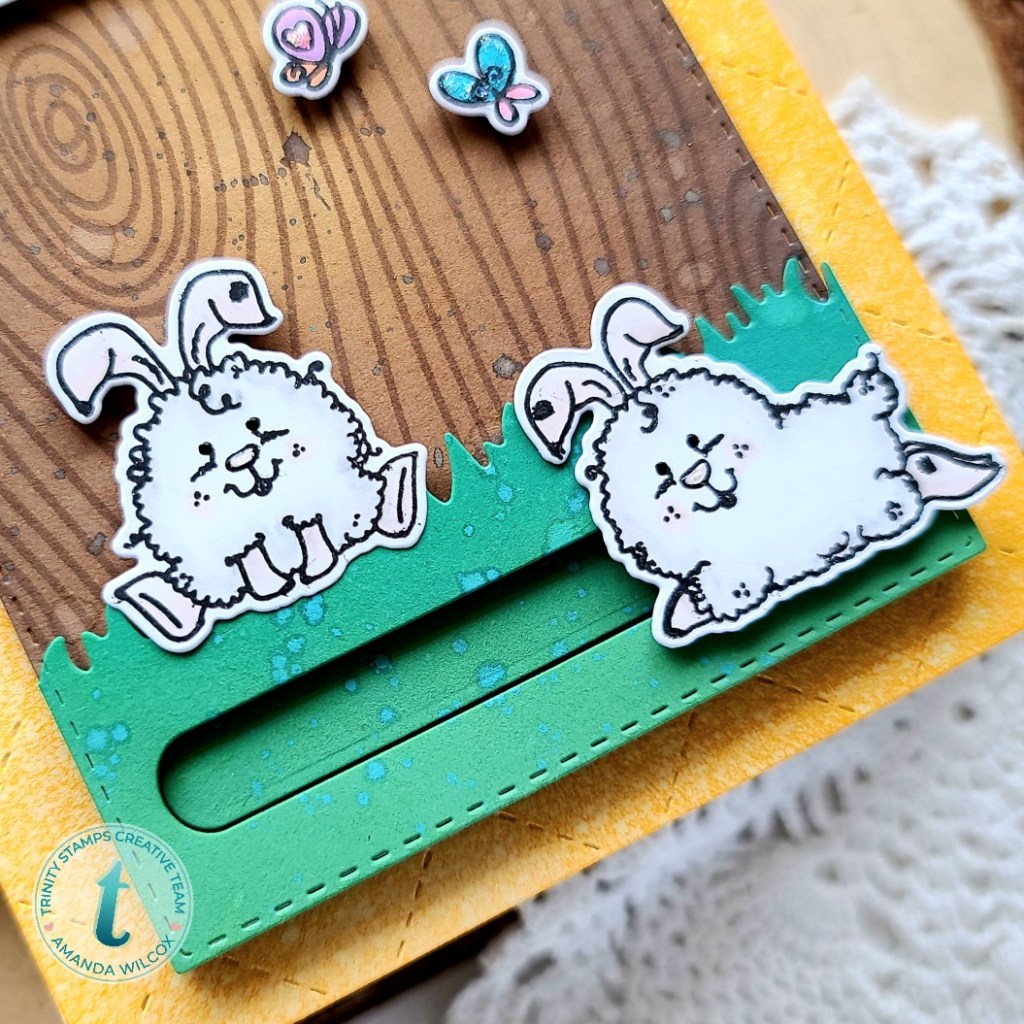
To create my card, I started with the Dust Bunnies stamps, Slimline Woodsy background stamp and 4-bar card dies and played around with size and placement. Once I had an idea, I stamped the bunnies, colored them with some copics and cut them out with the coordinating dies. Then I inked up a kraft panel with ground espresso and gathered twigs distress oxide inks. I spritzed it with water and after it was dry, stamped it with the Woodsy background stamp. Then I die cut that panel with the largest 4-bar card die. Next, I cut a piece of green cardstock with the same rectangle, inked it up with mowed lawn distress oxide and spritzed it too. I cut the top off with the grass die in the slimline great outdoors borders set and then cut the slider mechanism with the smallest track in the slimline twist and slide dies.

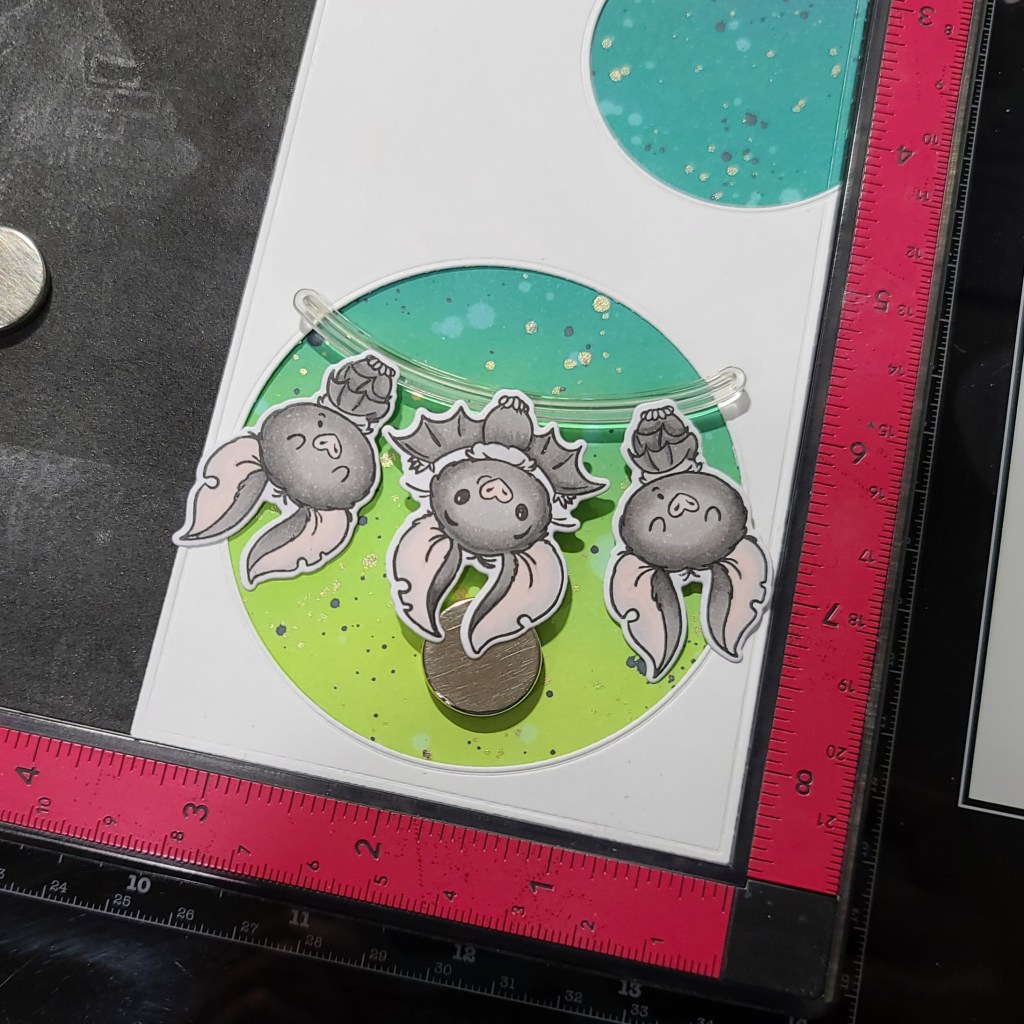
Moving along to assembly. I laid the grass panel on the woodgrain panel to use as a guide and adhered the piece that cut out the track. This was it’s green like the ground behind my bunny too. I added double-height foam squares to the back of the green panel and single layer foam to a piece of white cardstock smaller than my bunny. Pushing the foam squares on the white cardstock square through the slider track, I peeled off the liner paper and adhered my bunny to it. Then I removed the liner paper from the green panel and adhered it to the woodgrain background. I popped my other bunny in place and moved on to my sentiment.

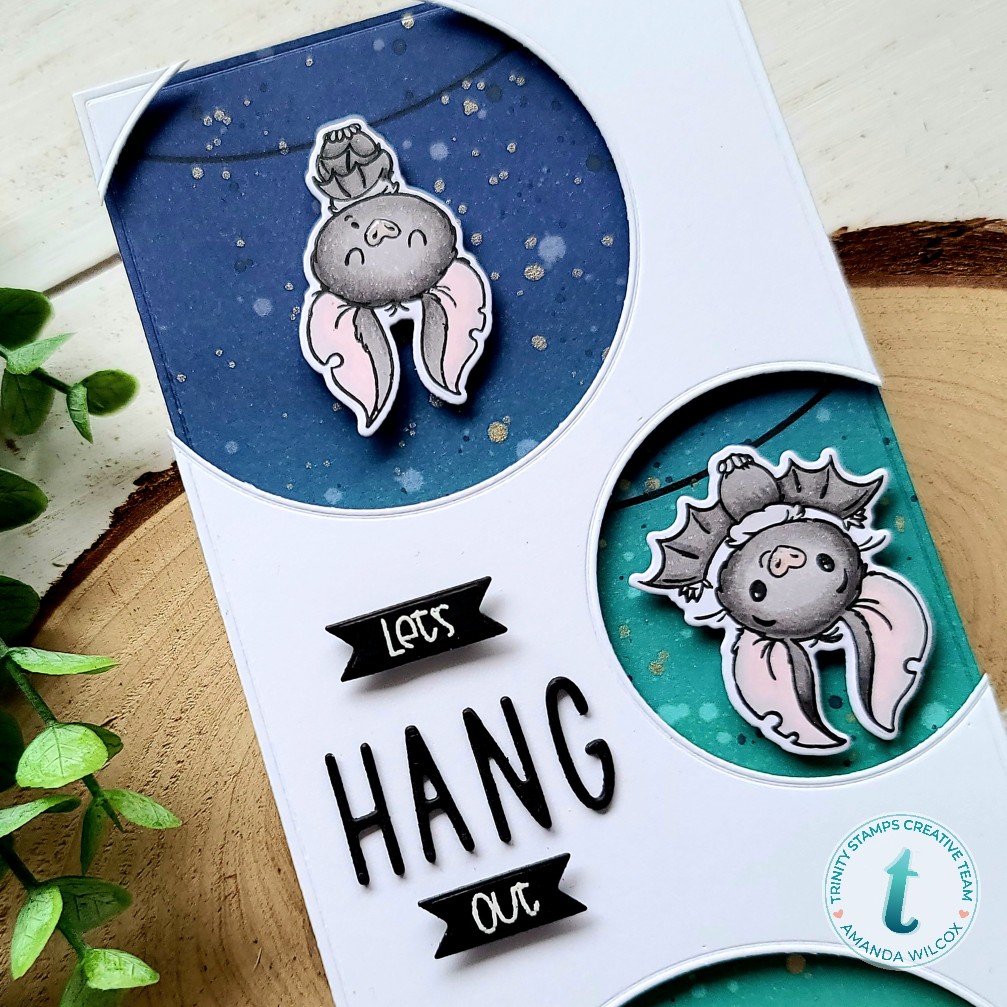
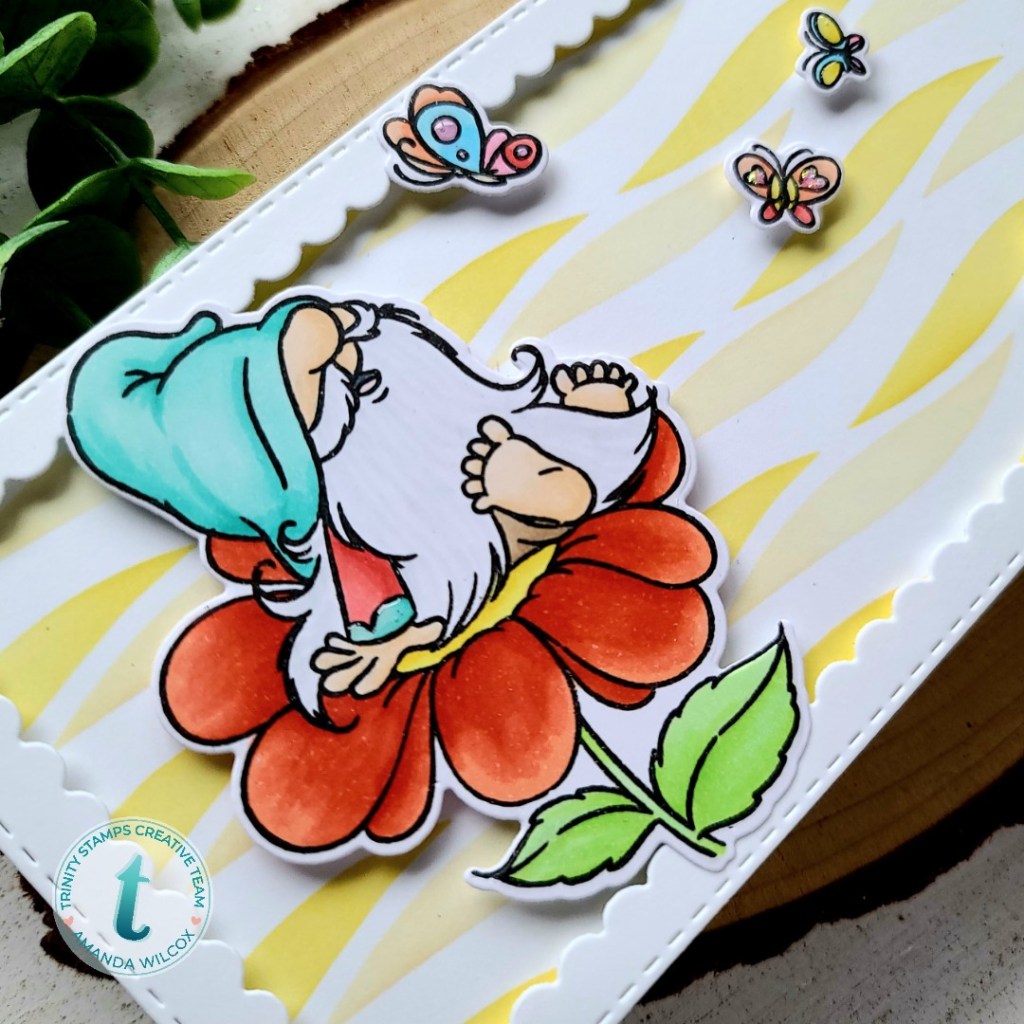
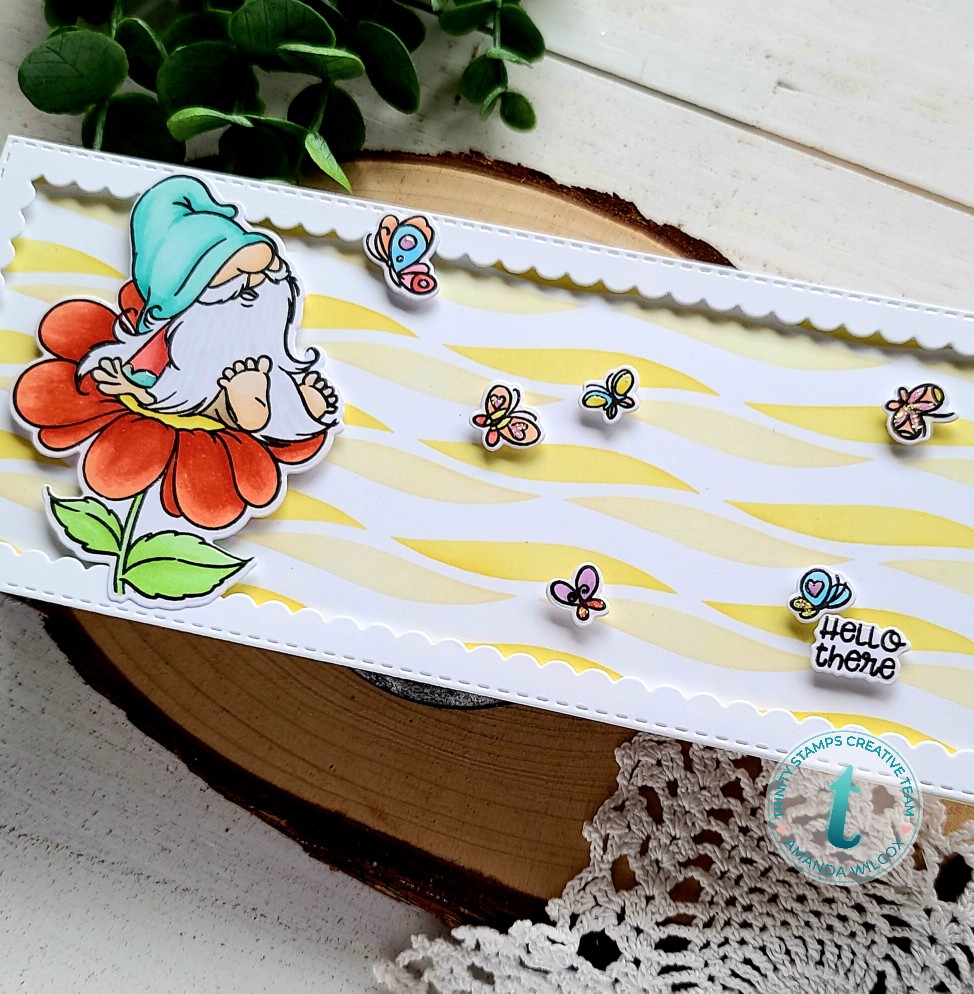
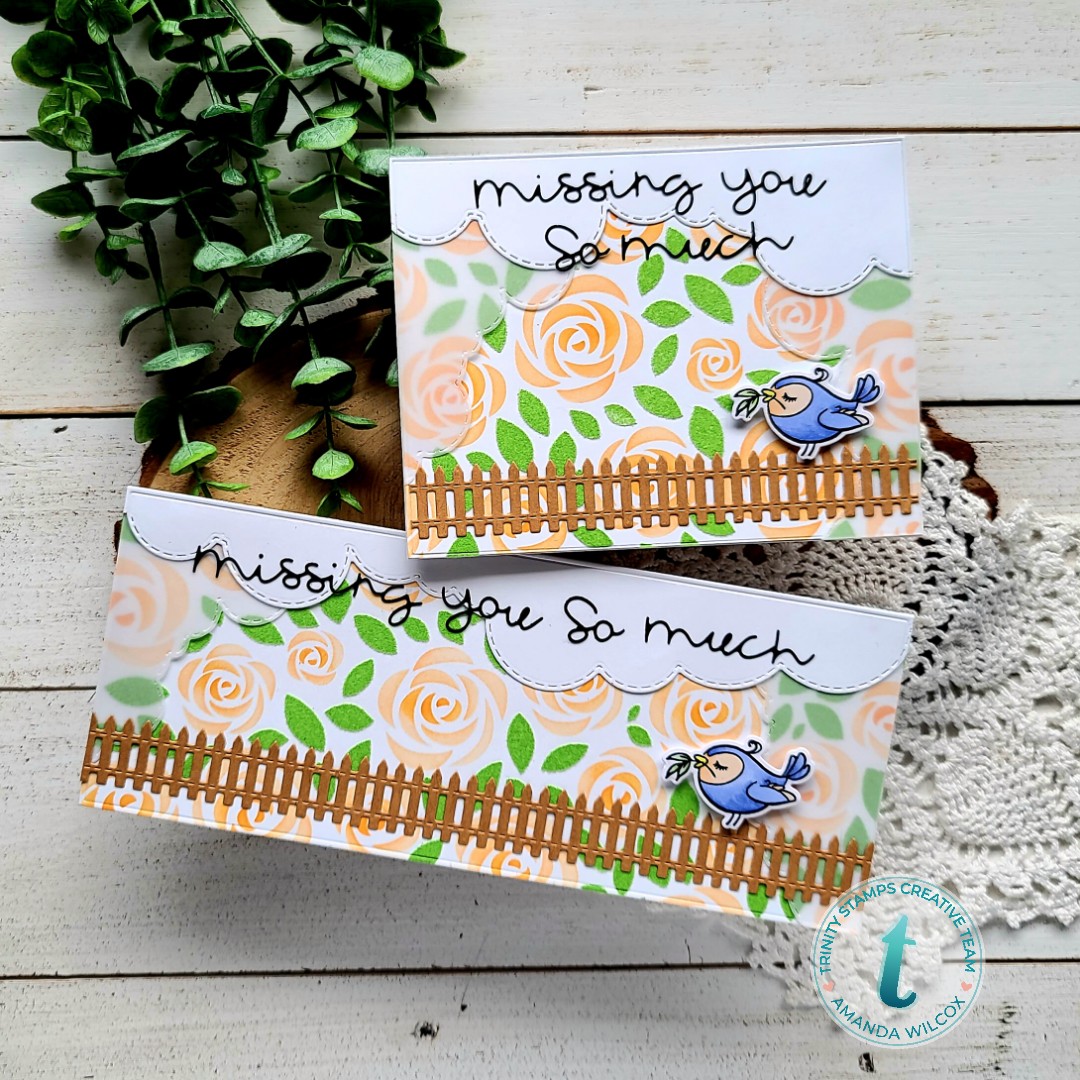
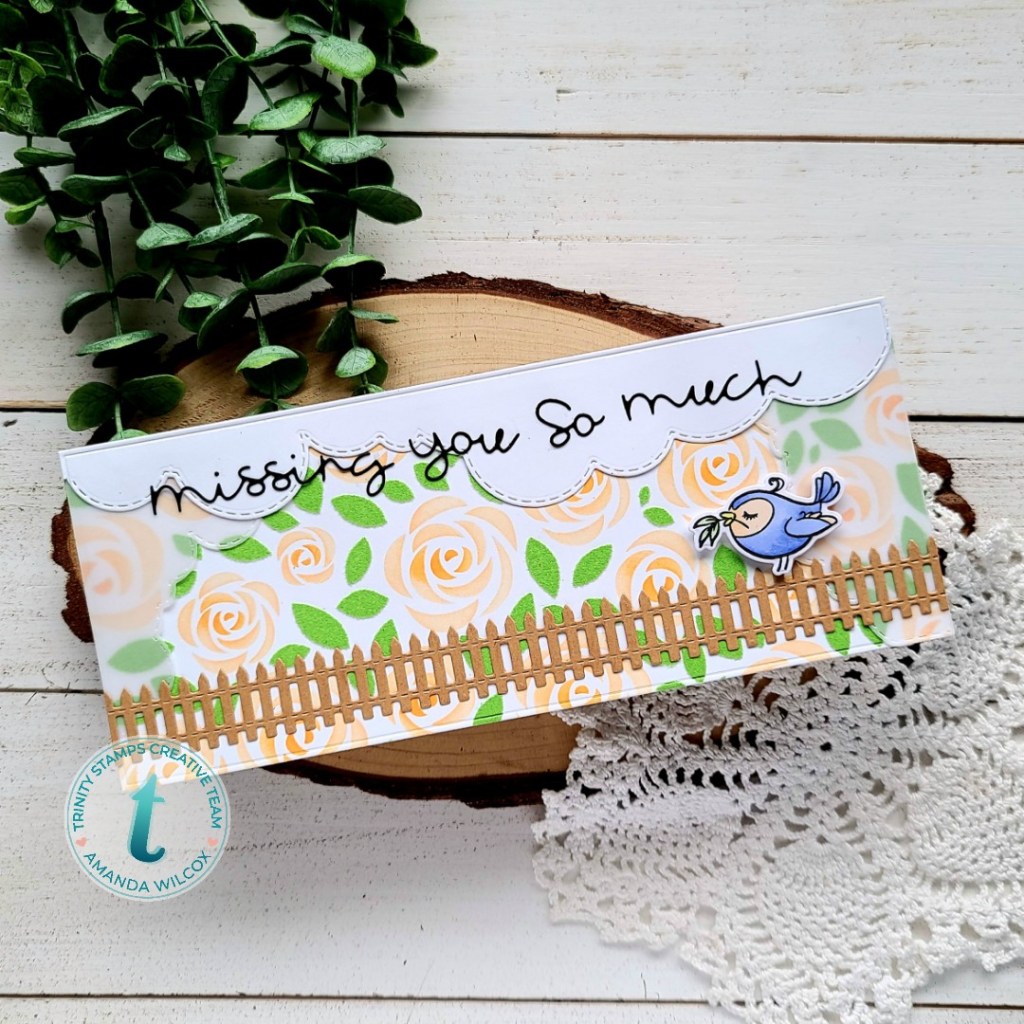
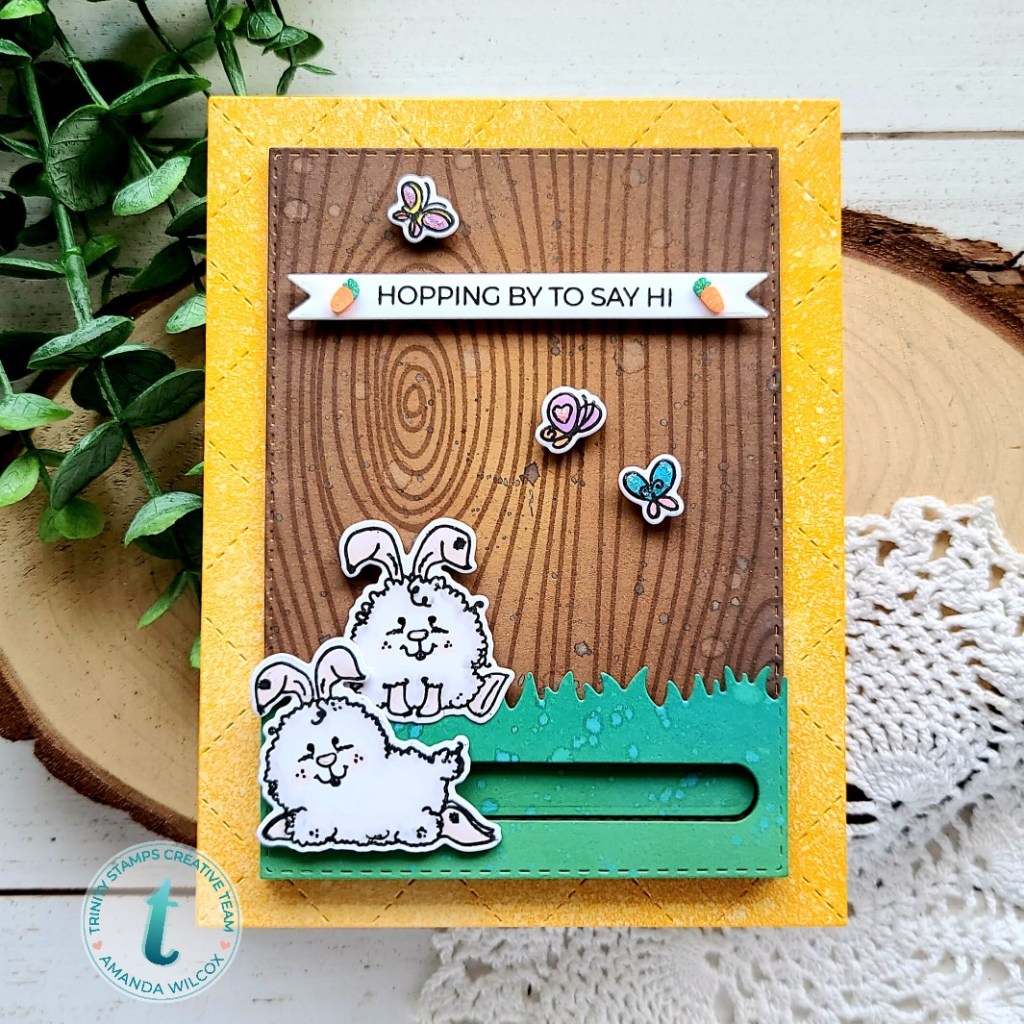
I chose a sentiment from Springtime Sentiments, stamped it and die cut it with a banner from the 4-bar card die set. I added foam strips to the back and popped it in place, along with my second bunny. I thought the panel was lacking so I went digging and found butterflies in the Hello There set that I thought would go great. I stamped, colored and die cut those and popped them up with foam squares too.

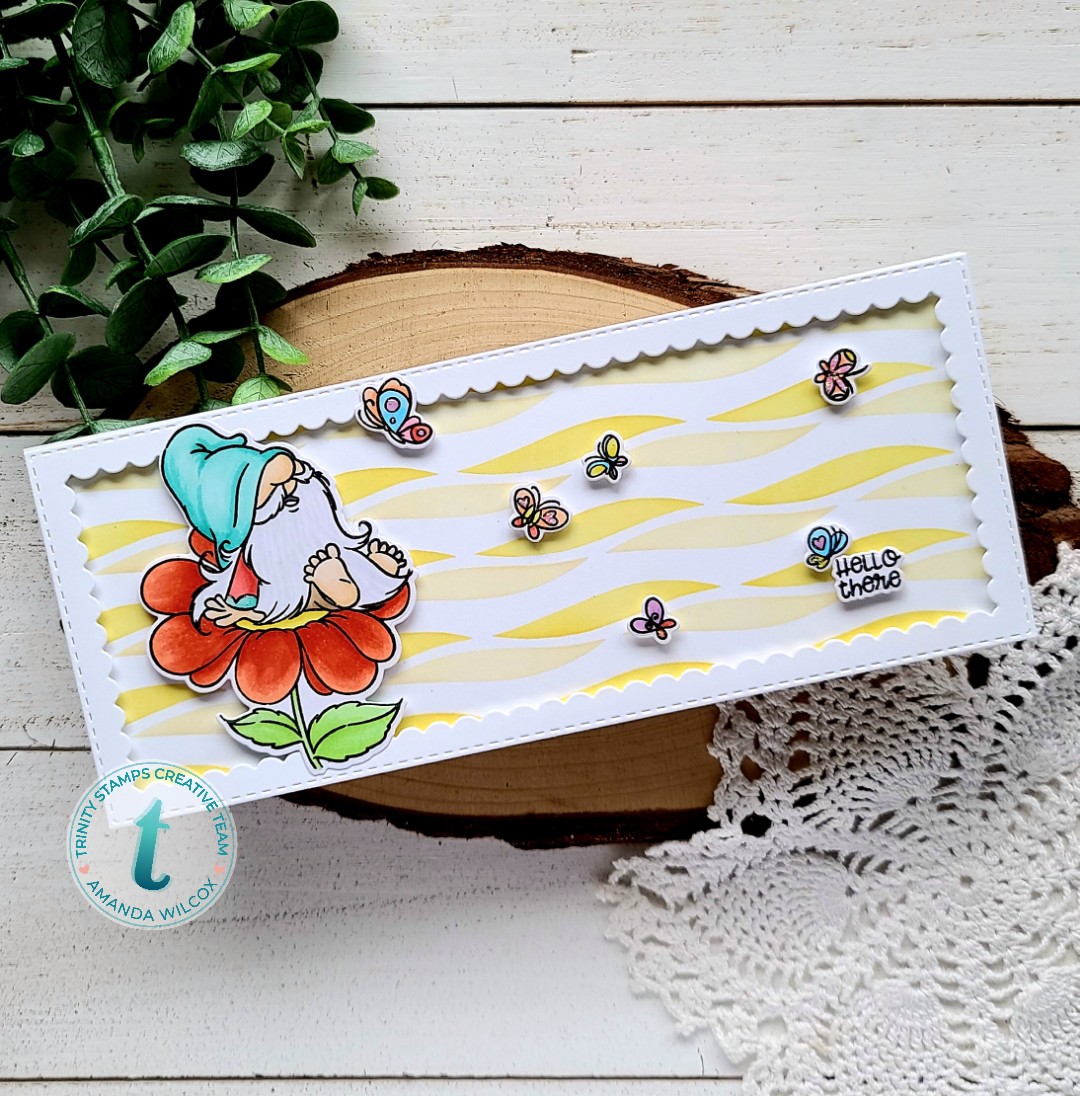
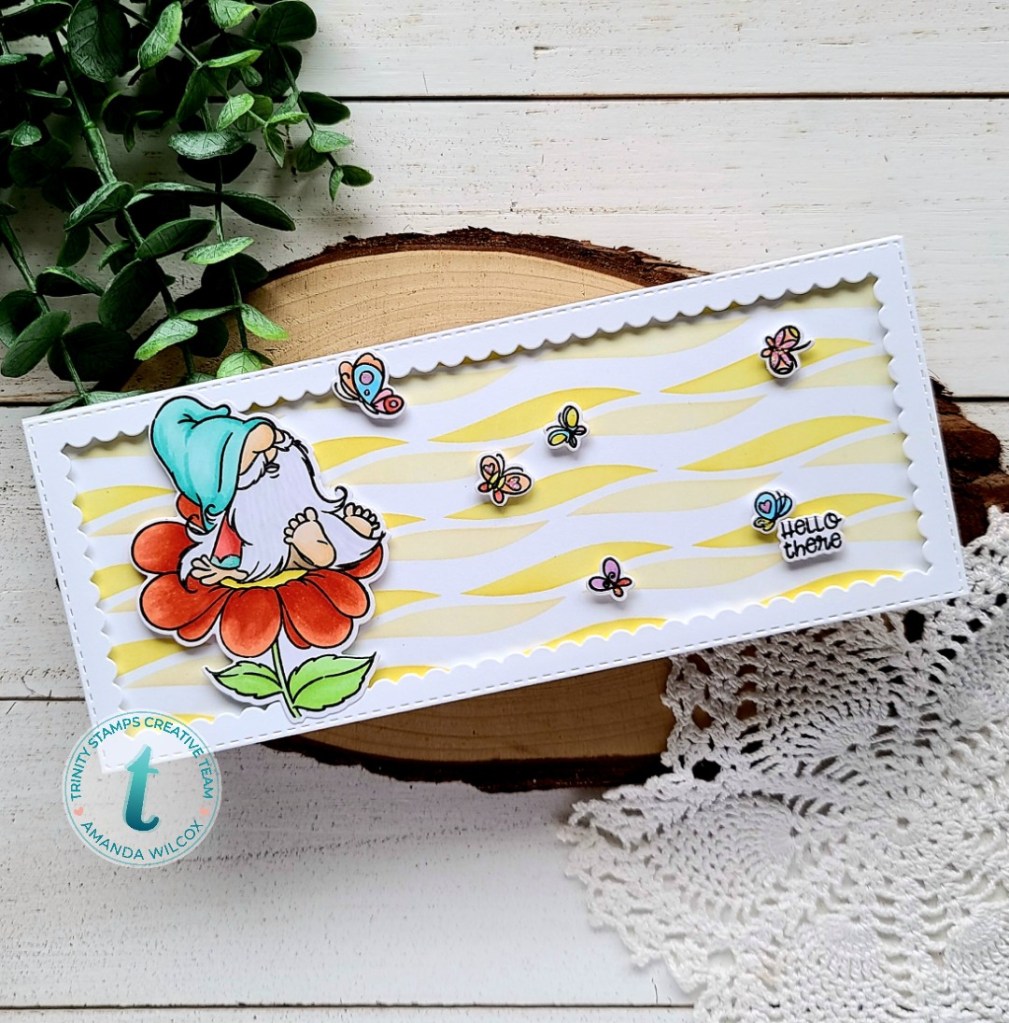
For the background on my card base, I went with yellow so make it bright and cheerful. I inked up the edges with mustard seed distress oxide and spritzed it with water. Then I went back with Avery Elle white ink spray and once that was all dry, I die cut the panel with the A2 quilted cover die. I added this it a white card base with liquid glue and popped my scene up with foam strips.

For finishing touches I added black glaze pen to the bunny’s eyes, glossy accents to their noses and unicorn Stickles to the butterflies. Then I found some clay carrots in my stash and added those on either side of the sentiment banner for an extra cute touch.

I know that was a lot of steps today but I promise it’s so worth it when your card is finished! It’s adorable and so fun to play with. And I can’t wait to share it with someone when it gets closer to Easter too!

I appreciate you sharing your time with me. Have a fabulous day!

Miss Ink Stamps – Red Roses

Hi everyone! I’m over on the Miss Ink Stamps blog today with a card featuring the gift with purchase stencil – Pocket Full of Posies – that Miss Ink is offering right now to celebrate their new stencil release. Isn’t it fabulous?!? I just had to pair it with the amazing Red Queen!

I started by spraying ThermoWeb Pixie Spray on my stencil and laying it on a piece of black cardstock. Then I used my stencil pal to add some red glitter glitz gel over top. I removed the stencil, cleaned up and set it aside to dry while I worked on my other pieces. I stamped one of the queen images from Queen of Hearts and colored it with my copics. Then I fussy cut her out and ran a black pen around the edge of the image to clean it up. This makes a huge difference when you cut things out on the stamped line. I promise it’s worth the extra bit of time.

For the mini scene in the opening, I trimmed a piece of white cardstock to 3×3 inches and stamped the bush image from Painting the Roses on it. I used a blender brush to ink the top blue and bottom green for just a hint of color. Having this small piece made it easy for me to line it up with my window once I cut it from the stenciled panel.

At this point the stenciled panel was dry so I cut it with an embossed edge rectangle from Trinity Stamps and then die cut the window with an embossed edge circle which is also from Trinity. Using the window as my guide I used liquid glue to adhere the bushes to my card front and then popped the stenciled panel up with foam tape. I added the queen to the window with foam tape so she lays flat.

For this card, I chose a sentiment from Wonderland Wisdom and heat embossed it in white on black cardstock. Then I used a banner from Trinity Stamps 4-bar card die set and popped it up with foam strips. For finishing touches, I added glossy accents to the queen – areas like her crown, the gold edges of her dress, the hearts and her shoes. It doesn’t rival the awesome glitz gel but gives her a little extra interest and shine. She is the Queen after all.

I appreciate you sharing your time with me. Have a fabulous day!

Miss Ink Stamps – Happy Spring + Sneak Peek

Hello everyone! I have a gorgeous Miss Ink Stamps card to share with you today and it has a sneak peek in it too! We’re having a new mini release of stencils tomorrow and I’m using one on my card today called Enchanted. The name is totally what directed the feel of my card and I just love it.

I sprayed my stencil with Pixie Spray and adhered it to a white panel. Then I used my Lawn Fawn dye inks in kiddie pool, butter and ballet slippers and a blending buddy brush to ink up the stencil. I wiped my stencil off and added iridescent Glitter Glitz Gel over the top. I set that aside to dry while I cleaned up and stamped my images from Springtime Banners. I colored those with my copic markers and used the Scan-n-cut to cut them all out. Then, I stamped a sentiment from Springtime Bunnies in the banner.

Once the glitz gel was dry, I ran the panel through my die cutter with the largest Trinity Stamps embossed edge rectangle die. I used liquid glue to adhere the panel to a white card base and started adding images. These were done with a combination of foam squares and liquid glue for some dimension.

I kept finishing touches very light because I wanted to focus to be on that amazing glittery background and cool stencil design – just some simple glossy accents to butterfly bodies, bird eggs and beak, dots on the ladybugs, things like that.

I appreciate you sharing your time with me. Have a fabulous day!

Trinity Stamps – Let’s Hang Out

Hi everyone! Thanks for stopping by! Today I’m over on the Trinity Stamps blog sharing this really super amazing slimline card featuring some of my favorite critters ever!!! I love bats in real life but these cuties just take the cake! Let’s check it out!

I have a little photo grid to walk you through the first steps I did to create my card. I had the design in mind already so after laying the stamps out to make sure things would fit how I wanted, this is what I did.

I stamped and colored the images from Fang-tastic Friends with my copics. Then I cut them out with the coordinating dies. I pulled out the embossed edge circle stack and chose the sizes that fit best together and arranged things. Then I blending distress oxides in twisted citron, pine needles and chipped sapphire on a panel. I spritzed the panel with water and then flicked it with pearl watercolor and black acrylic paint for some fun texture and shimmer. Then I ran the inked panel through my die cutter with the largest slimline series embossed panel die. Next, I taped the embossed edge circles in place and ran those through on a white panel.

To get the line stamped just where it needed to be, I put my inked panel and the white panel in my MISTI and used the images to line everything up. Picked up the stamp with the lid and removed everything by the inked panel so I could stamp the line down. I did this same technique for each opening and it worked like a charm.

I added everything with foam squares and tape, and the moved on to my sentiment. I took one of the sentiments from the Fang-tastic Friends set and stamped it while masking the middle word. I heat embossed them in white on black cardstock and used a banner from the 4-bar card die set to cut them out. Then I used the graham cracker alphabet to cut the word hang from black cardstock 3 times and used a quickie glue pen to glue them all together. This pen works great for teeny tiny pieces. I used foam squares on the back of the banners and popped them in place too.

For the last finishing touches on this sweet card, I added glossy accents to all the bat noses and left it at that. Isn’t this card just adorable?!? And I was able to get extra use out of a Halloween-themed stamp set too! Dig in your stash, maybe you have something fun that you could try too!

I appreciate you sharing your time with me. Have a fabulous day!

Birch Press Design – Congrats

Welcome to another wonderful week everyone! Today I’m popping in really quick to share a card that I made for a coworker who recently got married. I used some of the Birch Press Design layering dies, with a Lawn Fawn sentiment and some Trinity Stamps baubles.

I started by die cutting all 3 layers to the Viola Plate layer set from white cardstock. I used liquid glue to adhere them together and then chose a light green card base to glue those to. I pulled out my Lawn Fawn Scripty Thanks die and cut it from silver glitter cardstock, the same green as the card base and white and glued them together with liquid glue as well. I added some foam squares to the back and popped it in place.

I love the look the shifted sentiment gives and how much that teeny bit of glitter cardstock adds to the whole design. It’s so pretty!

Last, I finished the design off by gluing some Trinity Stamps Stunning Silver Baubles to the centers of the “flower” areas on the Viola die cuts.

Isn’t this so pretty? It would be beautiful for so many different occasions as is or swapping out the sentiment takes it to a whole other level of possibilities.

I appreciate you sharing your time with me. Have a fabulous day!

Jane’s Doodles – You’re a Blast!

Hello everyone! I had some fun crafty time Friday night and wanted to share with you what I made. I’ve had this card in my head for a while and was super excited to get it down on paper finally! I just love this To the Moon set from Jane’s Doodles and absolutely had to pair it with the Trinity Stamps Crater Layers stencil.

I started by inking up a panel with Lawn Fawn inks and my Trinity Stamps blending buddy brushes using the crater layers stencil. Once the crater was complete, I used the negative piece included in the set to block the crater and ink up the rest of the panel.

Then I stamped and colored my images from To the Moon with my copic markers. I used my scan-n-cut to cut out the images and started arranging them. I used liquid glue to adhere everything down except the spaceship. I put my card in my MISTI and stamped the sentiment over the crater. Then, I popped the spaceship on my card with an action wobbler to make this card SUPER FUN!

For finishing touches I added unicorn Stickles on the stars, moon rocks and fire, and glossy accents on bits of the spaceship and planet rings.

This card is so awesome and so much fun to play with! In fact, it’s so fun that I made a slo-mo video to share with you too!

Squeeee!!!! Isn’t that just so much fun! And I’m super excited to finally figure out how to edit these fun videos so I can share them with you more often.

I appreciate you sharing your time with me. Have a fabulous day!

Miss Ink Stamps – We’re All Mad Here

Hi again! I’ve fallen down the rabbit hole again…those wonderful Miss Ink Stamps Alice in Wonderland products are ahhhhh-mazing! This time for some reason, when I looked at the rabbit hole stencil looked a bit like the Cheshire Cat’s stripes so I decided to play a little bit.

I took some Glitz Glitter Gel in bubblegum and the rabbit hole stencil from Miss Ink Stamps on purple cardstock! It’s totally brilliant and I love it! I left it overnight to dry and when I came back the next day I did think the purple cardstock was a little flat so I inked up the edges with distress oxide ink in wilted violet and spritzed it with my distress sprayer.

I arranged my stamps how I wanted them and found a Trinity Stamps modern embossed rectangle the correct size and die cut a piece of vellum. Then I stamped and heat embossed my sentiments from Miss Ink Stamps Madness and that awesome image of Chesh’s face from Wonderland Wisdom. I hid some liquid glue behind the embossing and placed it on the stenciled panel, topping it with some acrylic blocks to help it dry flat.

I left it be for a while and came back to finish things up. I trimmed 1/8 inch off each side of the stenciled panel and added foam tape to the back. Then I adhered it to a white card base and my card is finished.

Isn’t it splendid?!? I just love how the bright, vibrant colors turned out! It’s so fun and the Alice sentiments just make me happy.

I appreciate you sharing your time with me. Have a fabulous day!

Trinity Stamps – Hello There

Hi again! Popping in with a super bright and happy slimline card featuring Trinity Stamps goodies today too. Hoping these sunshiny vibes will go out into the universe and come back to me in the form of a weather change around here. Haha!

I started by stamping and coloring images from Hello There with my copic markers. Then I used the coordinating dies to cut them all out. I stenciled a white panel with the Waving Hello layering stencil in 2 different yellow inks. I die cut a scalloped frame from Slimline Series: Envelope Builder die set.

Moving on to assembly, I used liquid glue to adhere the stenciled panel to a slimline card base measuring 3.5×8.5 inches. I added foam strips to the back of the frame and put that down next. Then I added foam squares to the back of all my images and sentiment and put them in place.

For finishing touches, I added some glossy accents here and there on places like the gnome shirt sleeve and parts of random butterflies. Then I went back and added a little sparkle with unicorn Stickles to other parts of butterflies.

Cheers to better weather soon…I hope. I could really use some sunshine and walks outside soon.

I appreciate you sharing your time with me today. Have a fabulous day!

Miss Ink Stamps – How You Bean?

Hi everyone! I shared this card on social media earlier in the week but hadn’t had a chance to write up a post about it. Someone had asked so I wanted to pop in with a quick explanation how I created this fun mini slimline card. It features stamps and stencils from Miss Ink Stamps and dies from Trinity Stamps.

I started by die cutting the largest panel from Trinity Stamps Clean and Simple Mini Slimline Panels die set from a melon cardstock and a second from kraft. Then I used champagne metallix gel from Thermoweb over the Circular Harlequin stencil from Miss Ink Stamps and set it aside to dry. I stamped and colored images from Miss Ink Stamps Brewtiful and colored them with my copic markers. Then I fussy cut them all out.

Once the metallix gel was dry I used one of the Trinity Stamps Lift the Flap dies to create a flip up window. Using that panel as a guide, I stamped sentiments on the kraft panel that would show when the flap was opened and moved on to assembly.

I adhered the melon panel to the kraft one with tear tape and then used liquid glue to attach all of my images. The trick here is to not attach something to the flap and the card front. You have to choose one. Haha. I stamped one more sentiment and trimmed it into a small strip and attached it as well. Last, I used liquid glue to adhere the panels to a white card base that measures 3×6 inches and trimmed off images that hung over the edge.

I hope this helps and inspires you to create something wonderful.

I appreciate you sharing your time with me. Have a fabulous day!

Trinity Stamps – Missing You So Much

Hey there! I’m over on the Trinity Stamps blog today with a fun idea. I’ve made the same card two different ways…same products and design, same colors and everything but one is slimline and the other is traditional A2 size.

I started these cards with the backgrounds. I really wanted to play with the new Bed of Roses stencil from Trinity Stamps. They make stencils specifically sized to fit slimline and A2 size panels, which extends the life of your product x100 in my book!

I inked up my panels with two different yellow/peach colors of ink so there was a little dimension in the flowers. The darker color is focused toward the center but isn’t perfect.

For the second layer which are the leaves, I used Thermoweb Transfer Gel Blanco and set it aside to dry all the way. Once it was dry, I ran it through my laminator with the awesome green flocking transfer sheets so I have fuzzy leaves! Seriously people, I could play with these all day long. I love this flocking!

To build my cards, I die cut the backgrounds from the modern embossed slimline panels and rectangles so they have a finished look. Then I die cut 2 fences from the Slimline Great Outdoors Borders. I took the clouds from the Slimline Rainbow Builder and cut them from white and vellum. I stamped the bird from Best Place to Be twice and colored it the same, using the coordinating dies to cut them out. Finally, I die cut my sentiment from the Beary Special Sentiments set.

For assembly, I simply used liquid glue to adhered the background panels to card bases and then carefully used liquid glue to adhere the clouds, hiding glue on the vellum pieces behind other pieces. The birds are popped up with foam squares for a little added interest. And last, I added the sentiments with a Quickie Glue Pen because the lines are so fine.

I love how versatile all of these awesome products are and how you can stretch them in different ways.

I appreciate you sharing your time with me. Have a fabulous day!