Trinity Stamps – Holiday Cheer

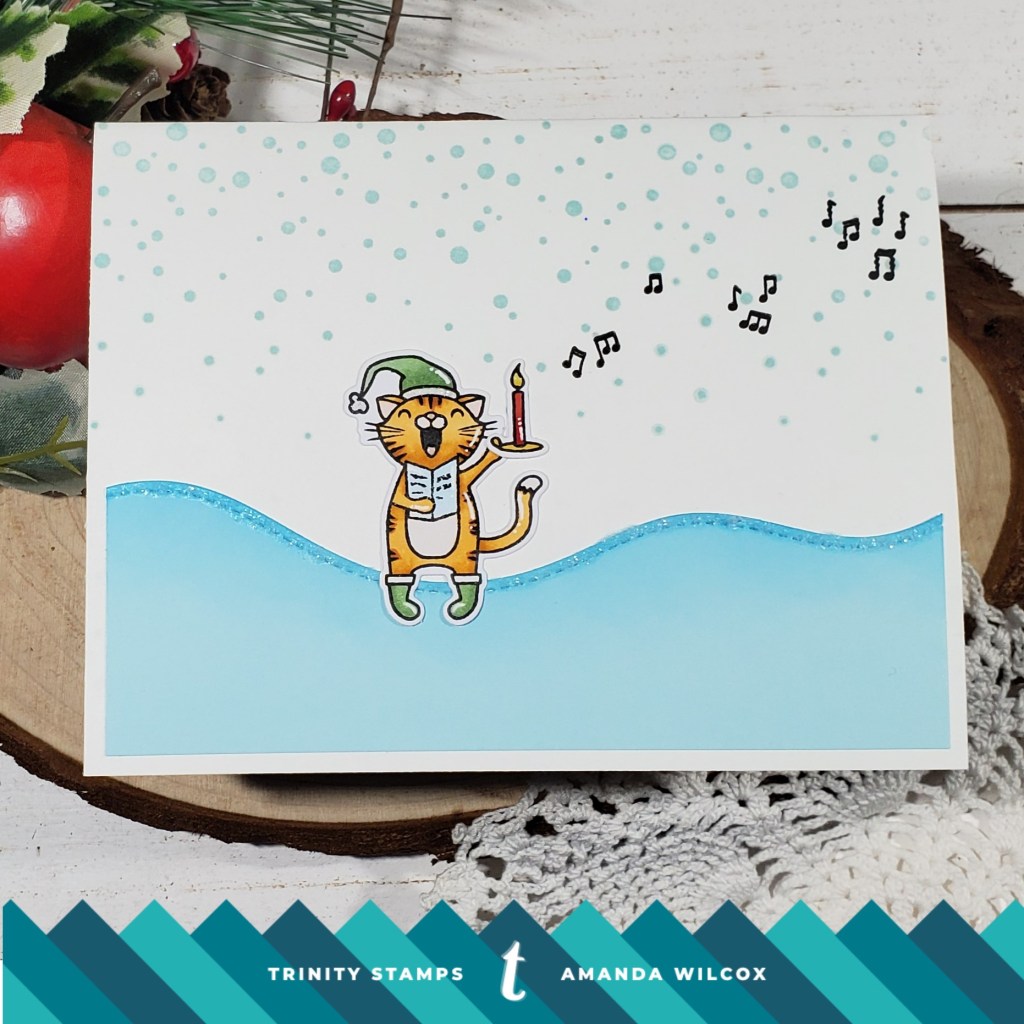
Welcome back to the start of another week! Thanks for stopping by. My daughter and I have been so sick for the last week but I managed a little crafting in between naps and doctor appointments.

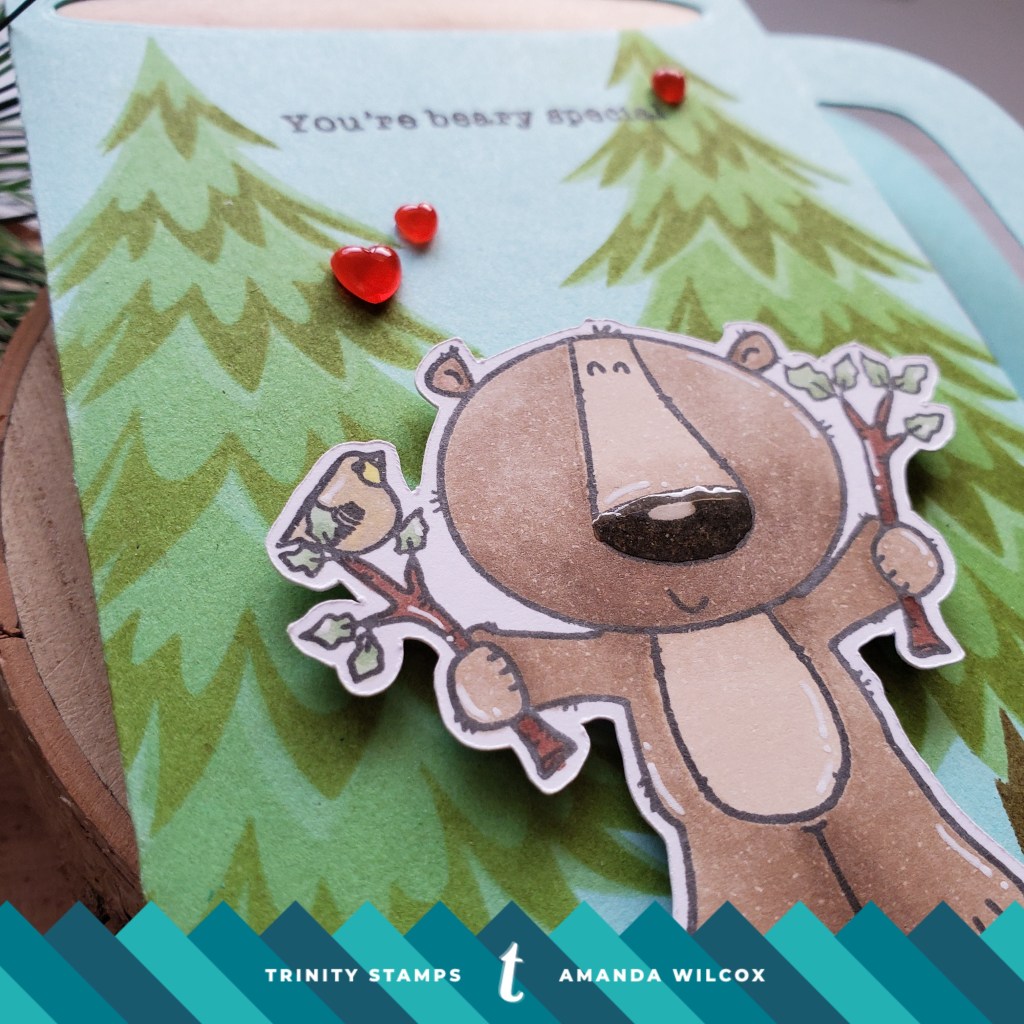
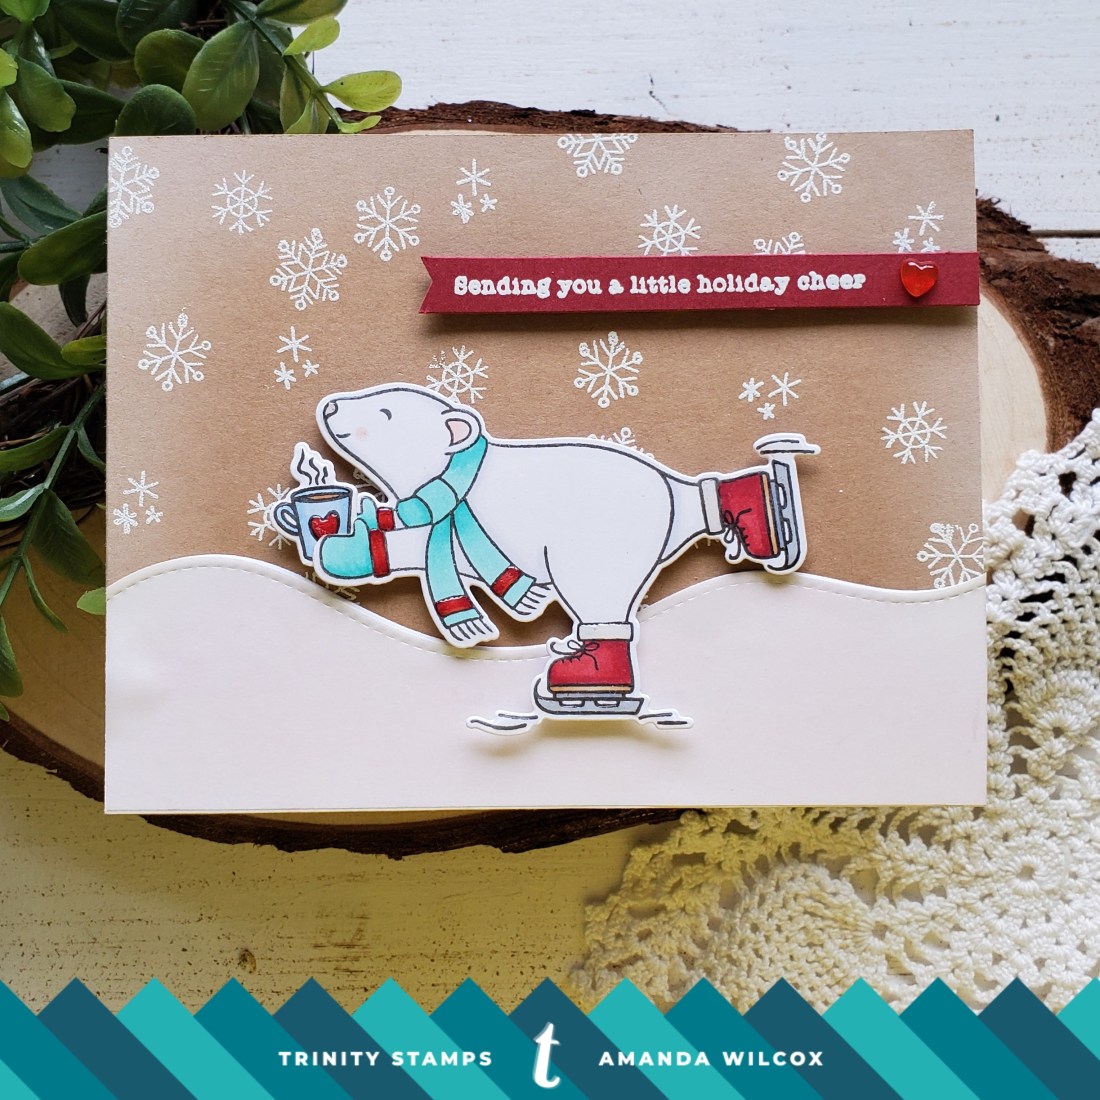
I have been dying to ink this super cute polar bear up from Trinity Stamps Have an Ice Day since it released. I love how you can make him hold multiple different things and the sentiments in the set are fabulous too!

For this card, I stamped my polar bear and hot cocoa, colored them with copics and die cut them. Then I cut a little slit in between the bear’s paws so he could hold the cocoa. Adorable!

Then I took my kraft card base, stamped and heat embossed snowflakes in white across the background. I used my blending buddy brush and inked a light white edge around the card to take off the harshness of the kraft. I die cut a border from some iridescent vellum, backed it with white cardstock so it stood out more and glued that to the card base.

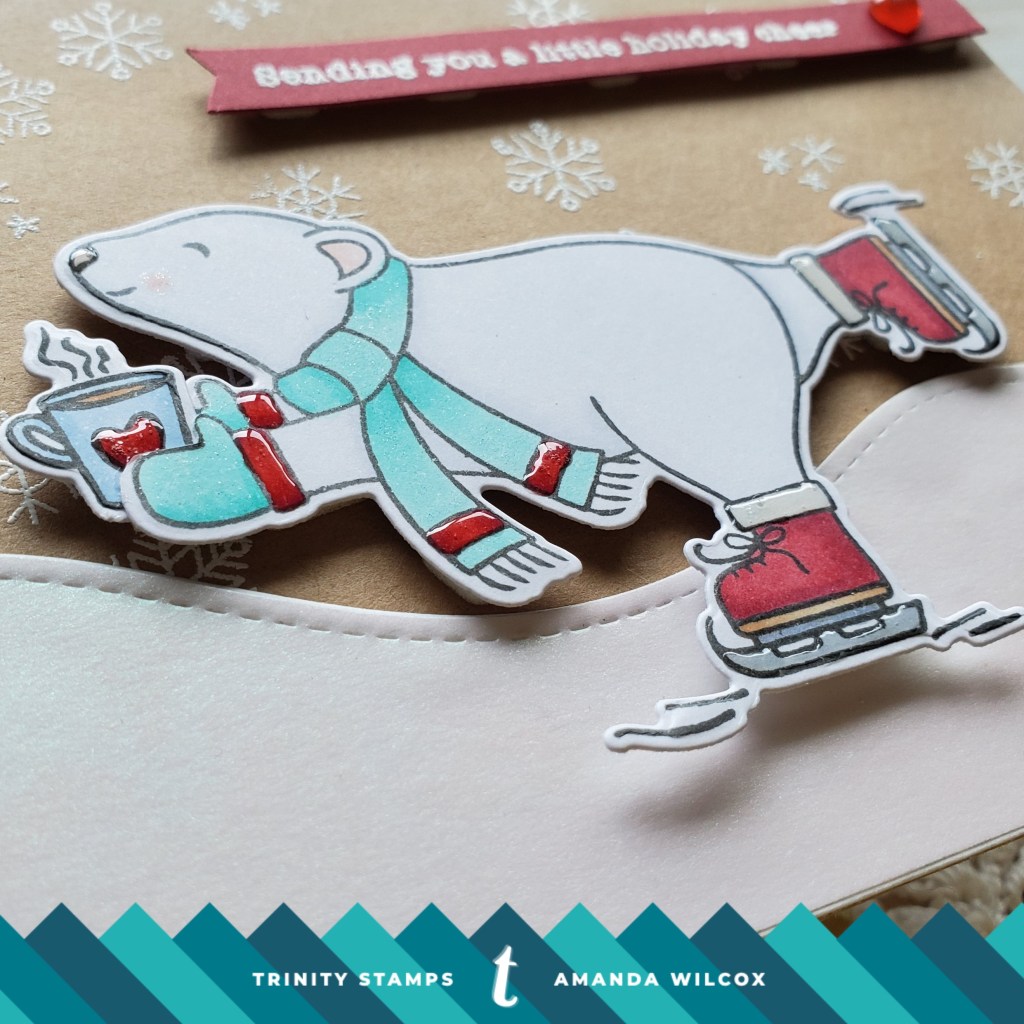
Next I popped my polar bear up with foam squares, heat embossed my sentiment, cut it into a thin strip and popped it up as well. For finishing touches on this cute card I added Wink of Stella glitter brush to the mittens and scarf, and glossy accents to the skates, boot cuffs, mitten cuffs, scarf stripes, bear’s nose and the heart on the mug. Finally, I added a cinnamon red hots jelly drop heart to the end of the sentiment strip.

I am in love with this polar bear! He is the absolute cutest and I can’t wait to make more cards with him! Be on the look out for those.

I appreciate you sharing your time with me. Have a fabulous day!

Trinity Stamps – Guest Designer

Welcome back everyone! I’m so excited to be featured on the Trinity Stamps blog today guest designing this fun rainbow Do Re ME OW card! I’ve learned a secret from many crafters: When you don’t know what color to choose, rainbow is the best option! This theory has never failed me and is what inspired today’s card.

I started by stamping each kitty from the Do Re ME OW set twice, coloring them in and die cutting them so I could figure out my arrangement.

I seriously went through about 4 different layouts before deciding on this one and then everything clicked! I took out my new shine brighter stencil and started inking my background with distress inks and the blending buddy brushes. Then I took the same distress inks and splattered them on the background as well. Next, I took pearl watercolor and splattered it all over for some added interest.

Then I popped my kitties up with foam squares, stamped my sentiment underneath and then decided to add rainbow music notes above them coordinating with their clothing colors. So much fun!

For finishing touches I added white gel pen accents and then glossy accents to their noses, tongues and stars.

Eeek! I love how this card turned out, don’t you?!? It’s super fun and sure to make the recipient smile.

Thank you so much for stopping by today! I appreciate your time.

Trinity Stamps – Do Re Me Ow Snowglobe

Thanks for stopping by today! It’s been one crazy week in our house and I haven’t got much crafting done but things should settle down now for a short bit, until the holiday rush that is. 😉

Today I’m sharing this fun snow globe shaker card featuring Trinity Stamps products. I can’t get enough of these kitties and the snow globe dies were just asking to be made into a shaker card.

To create the shaker piece, I die cut the main elements of the tall shaker dome set from white cardstock 6 times and once from acetate. I colored the top and bottom pieces with copics for some added dimension. Then I stamped, colored and die cut my Do Re Me Ow kitty, fence and lamp. The accents were cut from silver cardstock.

I cut down a piece of patterned paper and adhered it to a card front. Next, I adhered my completed shaker window with the images and some fun snowflake soup glitter confetti inside.

I stamped a sentiment from the Do Re Me Ow set on the label that fits the snow globe and adhered it. I also stamped the “We Wish You a Meowy Christmas” on the inside. To finish this fun card off, I added boiled sugar jelly drop hearts in various sizes across the background.

Shaker cards are so fun to make and to give! This kitty belting out his Christmas carols in the snow just makes me smile!

I appreciate you sharing your time with me. Have a fabulous day!

Trinity Stamps – Beary Special Coffee Mug

Thanks for joining me again today! I’m excited to share a fun shaped card featuring Trinity Stamps stencils, stamps and dies. The coffee mug card die is from the previous release but the layered pine tree stencil, bear tree and have an ice day stamps are from the most recent release that went live last Friday. It’s chock full of amazing product that is so fun to create with!

To make this cute card, I started by die cutting my mug and then used the layered pine tree stencil on the background. Then I stamped, colored and popped up my bear with foam squares. For the coffee part of the mug I took vellum and colored it with brown copics, then adhered it to the inside. To cover that up I took the gift card holder from the mug die set and adhered it over the vellum hiding it and making this card dual purpose.

To finish this cute card off I stamped my sentiment from the have an ice day set, then added jelly drop hearts to the background, white gel pen detail and glossy accents to the bear’s nose.

I’m new to using layered stencils and this was so fun! I can’t wait to try it with other ideas like glittery snow on the trees and playing with the other new shine brighter stencil that was released too!

I appreciate you sharing your time with me. Have a fabulous day!

Trinity Stamps – Unforgettable Gift

Happy Saturday everyone! Thanks for stopping by to check out this super cute card featuring the newly released Unforgettable Gift stamp set from Trinity Stamps.

Mini back-story – My mom’s favorite animal is the elephant but more specifically she collects pink elephants. As soon as I saw this set I knew how I was going to color it. She hasn’t seen this yet and she’s gonna flip when she does. ❤

To make this card I stamped, colored and cut out my image. Then set to work on the background. Using my awesome new blending buddy brushes from Trinity I masked off areas and blended pink and red inks on the background, alternating. I splattered pearl watercolor on the panel and added a black strip to ground it. Next, I stamped my sentiment underneath and popped my elephant up with foam squares.

For finishing touches I added cinnamon red hots jelly hearts to the background, Wink of Stella glitter brush pen to the hat and white gel pen detail to the image.

This was a pretty quick card to put together and such a fun way to say thank you for that special gift you receive at Christmas. I can’t wait to color this guy in non-Christmas colors for an everyday thank you card too.

You can pick up the new Trinity Stamps release HERE and check out the BLOG for tons of amazing inspiration too!

I appreciate you sharing your time with me. Have a fabulous day!

Trinity Stamps Release Day Blog Hop

I’m thrilled to be guest designing with Trinity Stamps for their brand new Christmas release. There’s an amazing blog hop going on today with tons of inspiration and prizes to be won.

I have 3 amazing projects to share with you and the hop info will be at the bottom. Be sure to read all the way down so you don’t miss out!

This first card features the new bear tree stamp and shine brighter layered stencils. I simply ink blended my background, inked the stencil over it, then distress sprayed it. I popped my sparkly snow on the ground and my bear with foam squares. Then I finished it off by stamping my sentiment at the top, with glossy accents on the bear’s nose and fun embellishments from Trinity too!

This next card is completely die cut except the sentiment. I used the tall shaker dome dies and frosty snowflakes sprinkle embellishments. I cut all of my dome pieces with white cardstock and used copic markers to color them in. To make the dome shorter and fit my card better, I die cut it, then realigned the dome and partial cut the top again shrinking it down. This is a great way to get more life out of your dies.

I purposely made the front of this final card a little sparse because the inside is where all the fun is! This Do Re Me Ow set is to die for! These kitties are the absolute cutest and I feel like I could make 100 cards with them! Okay, ready for it???

Look at those cute kitty carolers! They are so fun! For this card I ink blended blue on a blue panel for dimension, die cut a hill from the top and then used pop up dies for the kitties to be attached to. (You could totally do this part with a craft knife though.) I stamped the snow from the front on the inside and adhered my pieces together. Then popped the kitties on their spots and stamped my sentiments. For finishing touches I added Stickles to the snow edge on the front and inside and glossy accents to kitty noses and tongues and little things like the candle flames, holly berries, lights and hat star.

Here’s a side view so you can see the dimension when the card is opened up flat. This is my first time trying this technique and I can totally see myself doing it more. It was so much fun to put together! And there is plenty of room for a handwritten message at the bottom.

Be sure to leave comments on all the hop spots for a chance to win a $25 gift card to the Trinity Stamps store. The winner will be selected from participating blogs.  Must comment by 11/7 at 11:59 PM PT. Winner will be announced on the Trinity Blog the following Friday on Nov. 8.

Blog Hop List
Trinity Stamps
Brenda Noelke
Christine Burillo-Kirch
Davina Cantrell
Courtney Kreeber
Lisa Bzibziak
Emelie Hessler
Shanna Slater
Andrea Shell
Jeannie Lieu
Jenn Bena
Katie Brooks
Amanda Wilcox
Mary Polanco
Emily Mydlowski


Trinity Stamps – Mini Squirrel Card

Hello again! Today I’m excited to share this super cute mini card using the Trinity Stamps nutty squirrel set. I’ve been having so much fun with this set since I got it. The squirrel is such a great focal image and all the foliage images that also come in the set immediately had my wheels turning for a wreath builder card. So, that’s what I’m sharing with you today.

This is a mini card with the white panel being 3.5×3.5 and the card base is 3.75×3.75. I started by stamping my wreath images and then added my squirrel after. I colored everything with copic markers and added glossy accents to the acorns and squirrel’s nose. I added Nuvo Crystal Drops to the berries and Wink of Stella to the squirrel’s scarf. I stamped my sentiment, cut it into a strip and glued it down. Last I adhered Lawn Fawn knit picky paper to a card base and added my stamped panel to that.

I kept the card fairly flat because I plan to pop it in my daughter’s lunchbox today for a fun pick-me-up at lunch time. I love doing this randomly and she gets excited too.

I appreciate you sharing your time with me. Have a fabulous day!

Trinity Stamps – You’re my favorite nut!

Hello again! I’m so happy you stopped by today. I just received my latest order from Trinity Stamps and I couldn’t contain myself; I had to make this card immediately! I’ve had it sketched out since I ordered this cute squirrel!

Using my new narrow card dies and nutty squirrel stamps and dies, I made this awesome slim, long card.

It’s pretty simple really. I die cut the scalloped card front and masked off the stitched edge. Then I used a cloud stencil and distress inks to give the panel a sky and ground. I stamped, colored and die cut my images and then laid them all out to start gluing. I find that liquid glue sticks better to distress ink so that’s what I used here. Then I took the panel and popped it up on an olive green card base.

For finishing touches on this card I used black glaze pen to the squirrel’s eyes and nose and white gel pen throughout the images.

If you’ve read my posts or seen my cards lately, you know this is my newest obsession for rounding out a card. Look at what those fun little details do for it. I just love it!

The sentiment on this card cracks me up. It’s my favorite from the whole set. I’m seeing a mini note in my daughter’s lunch with this on it in the near future!

I appreciate you sharing your time with me. Have a fabulous day!

Trinity Stamps Mr. Snailman

I’ve found a new-to-me company and I’m instantly obsessed!!! Trinity Stamps – I love all of their stuff and can’t wait to grow my collection. My first order arrived Saturday and I started playing right away. Today I’m sharing one from the Mr. Snailman set I ordered.

This was a fairly simple, one-layer card and it even required ZERO masking! Hooray for that one!

I stamped my snail and mailbox and colored them with copics. Then I stared at my panel for a very long time. It didn’t help. So, I slept on it and when I woke up in the morning, it hit me…stencils! So I got up and stenciled some cute clouds and gave it a ground and voila! I love it! For finishing touches I added glossy accents to all of the hearts and white gel pen accents throughout the images. After all that I popped the panel on a piece of craft foam for dimension and then to a blue card base and it’s ready to go.

Here’s a closer look at the glossy shine. I love what that adds to an otherwise simple card.

Once this one was finished I had an idea for a Christmas version of this same card. Be on the look out for that one soon!

Thanks for stopping by and, as always, I appreciate you sharing your time with me. Have a fabulous day!