Trinity Stamps – Glory in the Highest Slimlines

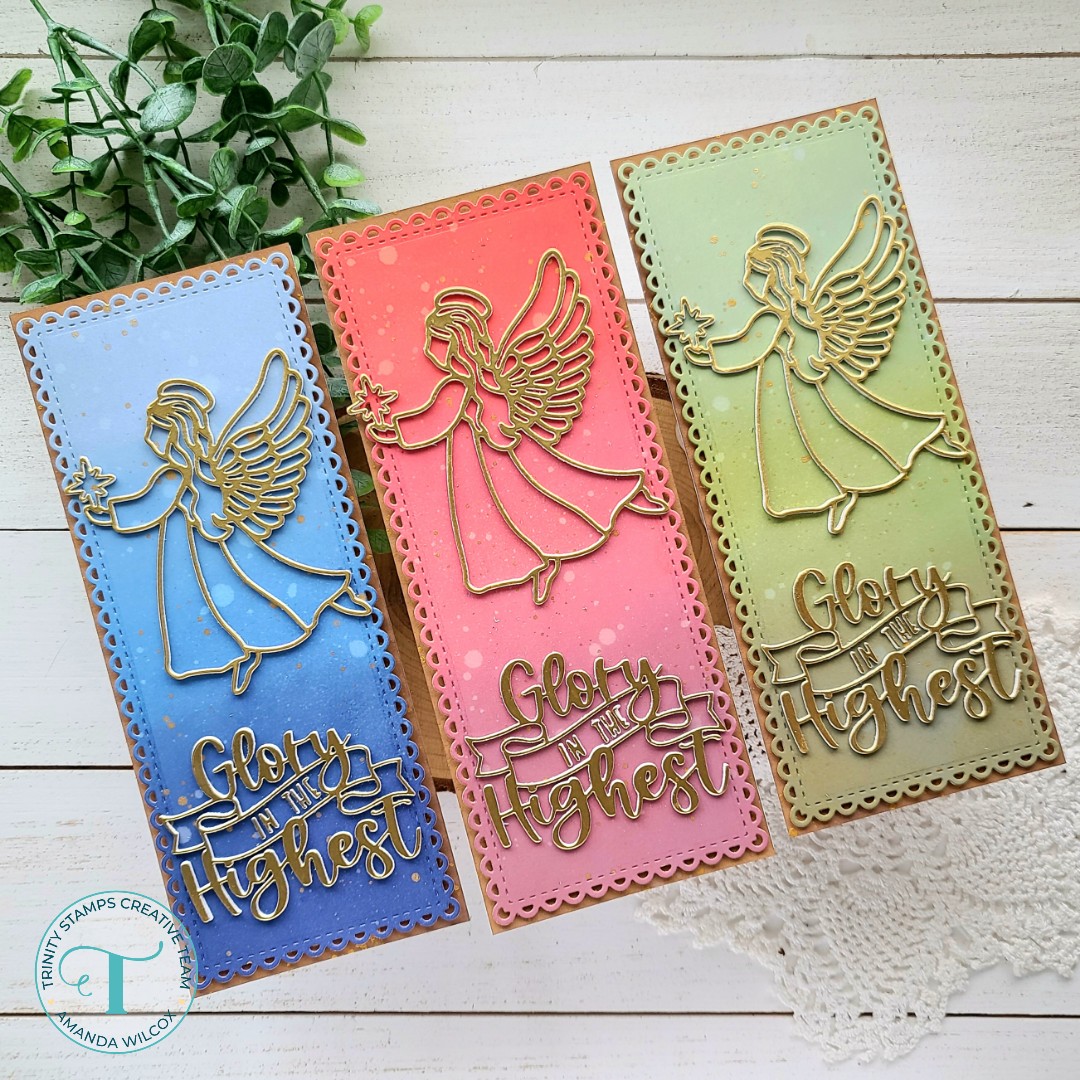
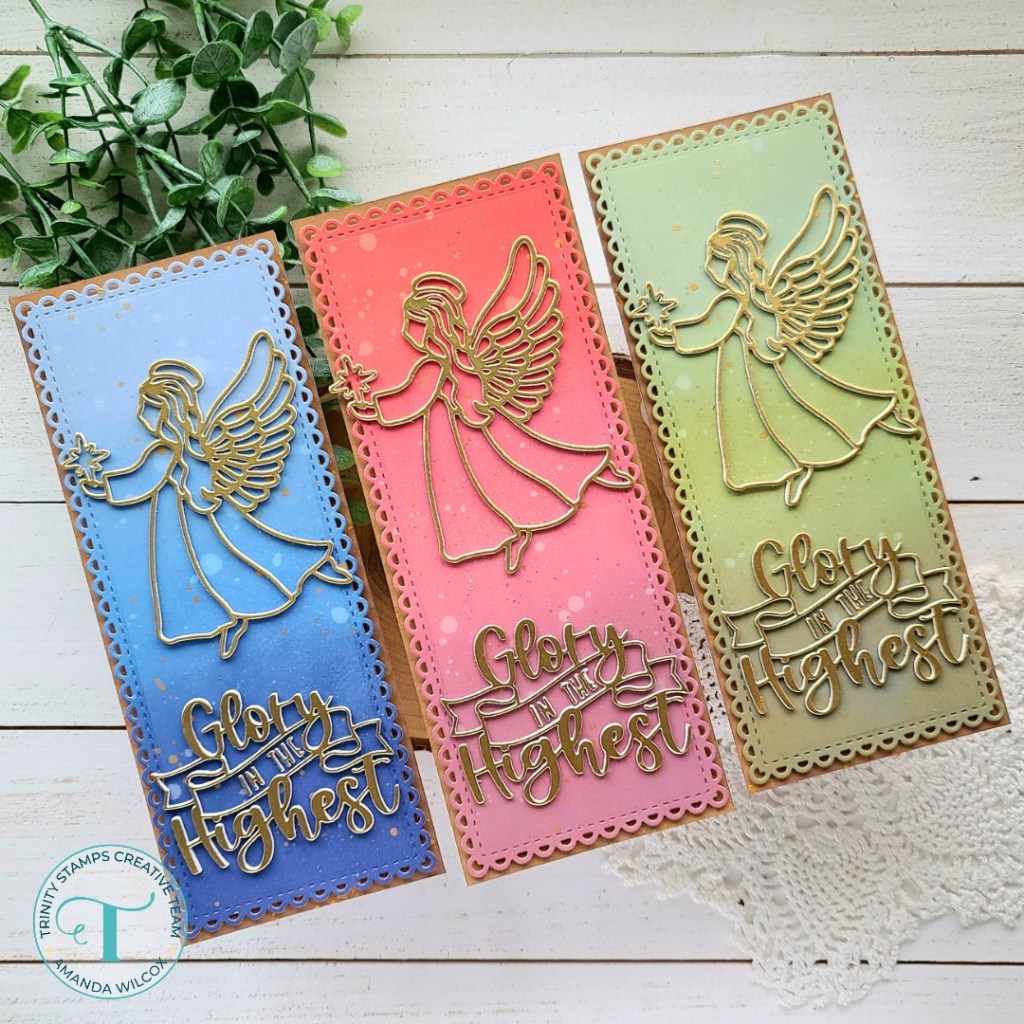
Hello everyone! Today I’m over on the Trinity Stamps blog sharing this trio of slimline cards I created using the new Glory in the Highest dies. As soon as I saw this set I knew that I wanted to try this design in multiple colors. I love how they all turned out.

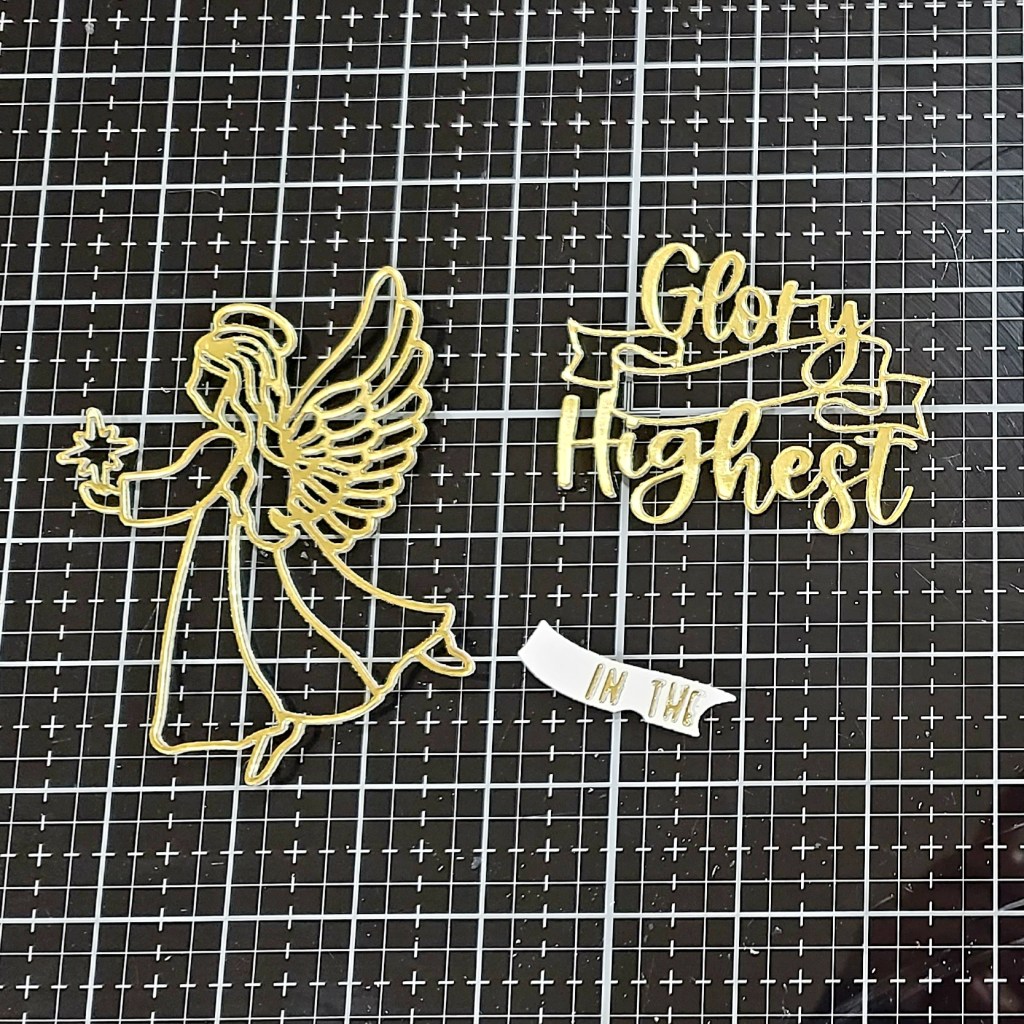
I started this process by die cutting the angels and sentiments from white cardstock 3 times for each card and once from gold, then I glued the layers all together. I tried to keep the small letters inset for one layer so they were easier to manipulate, like you see in the picture below.

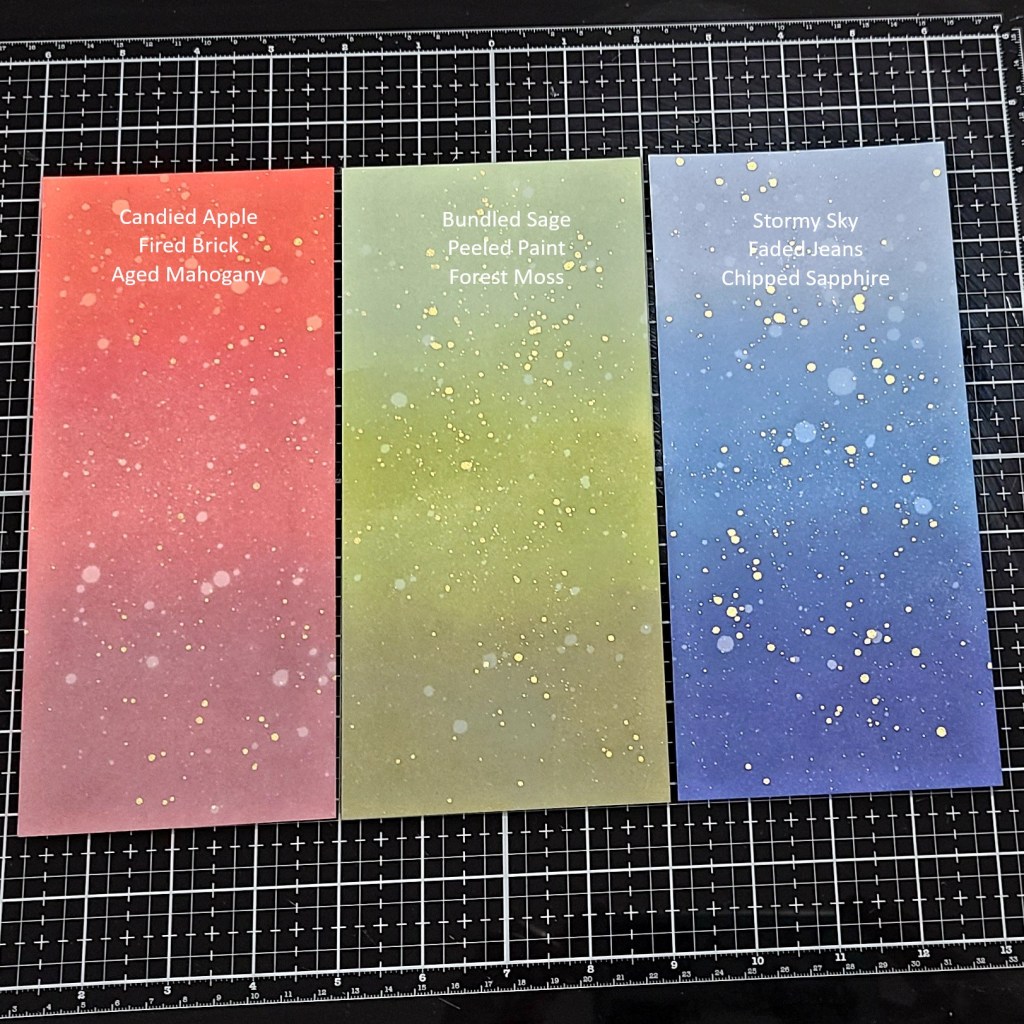
Next, I cut 3 panels and chose my colors of distress oxide inks for blending. I blended a trio of colors for each card, spritzed the panels with water and flicked gold watercolor on them as well. Here’s a color map in case you’d like to replicate any of the blends.

Once the panels were dry, I die cut them with the dainty scallop edge panel die and adhered the angel and sentiments with liquid glue. I lined the back with foam tape and was getting ready to mount them on white card bases but I didn’t like how stark it looked.

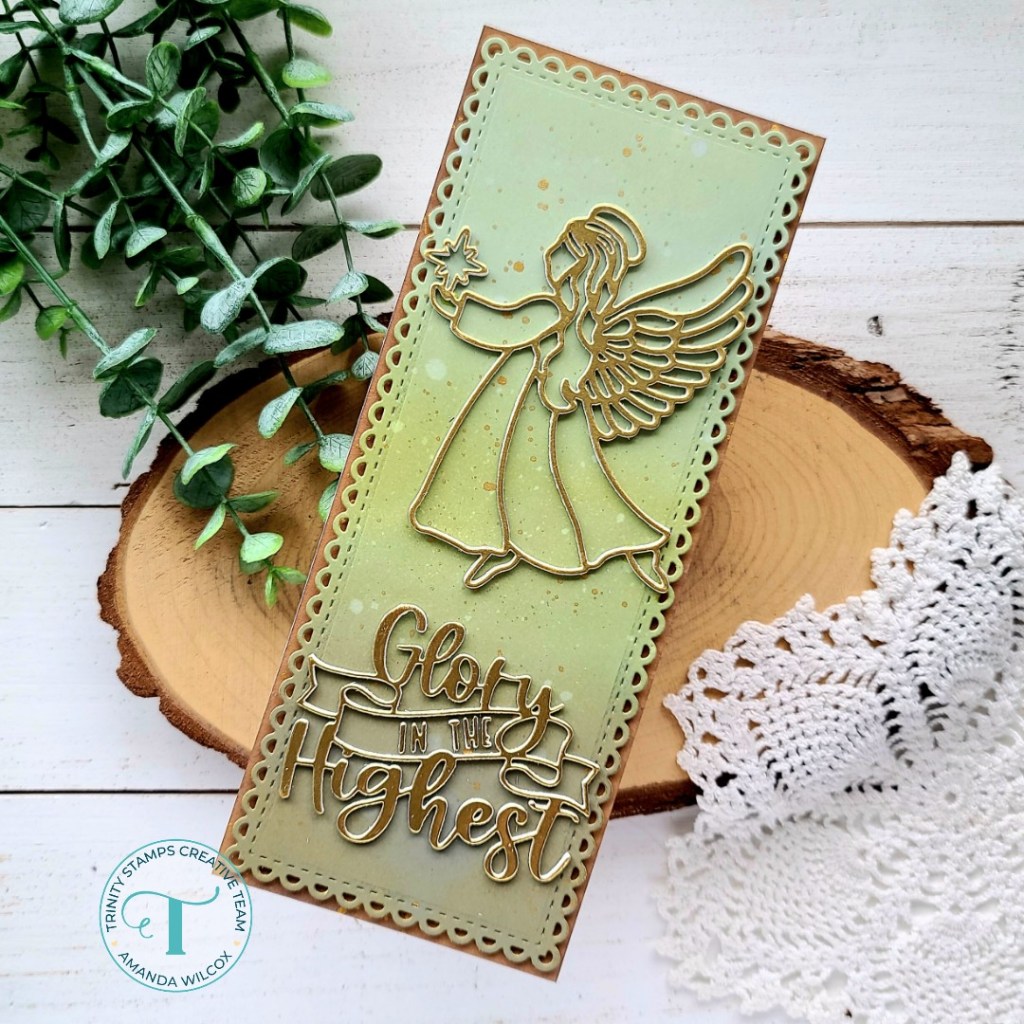
So instead I cut 3 pieces of kraft cardstock, adhered those to the white card bases and inked up the edges with gathered twigs distress oxide ink. I spritzed them with water and flicked gold watercolor on there as well so everything ties together.

Then I removed the release paper and adhered each panel to a card base. Voila, 3 gorgeous Christmas cards to add to my stash.

I hope you found some inspiration from today’s project to create something wonderful and share it with someone!

Products used today:
Glory in the Highest dies
Dainty Scallop Edge dies
Distress Oxide inks
Liquid glue
Foam tape

I appreciate you sharing your time with me. Have a fabulous day!

Coffee Loving Cardmakers – Jane’s Doodles | Holiday Wishes Mini Slimline

Hello everyone! It’s that time again, Tuesday Tea with Twiddler’s Nook over on the Coffee Loving Cardmakers blog today. I’m sharing a super fun and silly mini slimline card featuring a mash-up of Jane’s Doodles sets and Trinity Stamps slimline dies.

To start my card, I pulled out a few Jane’s Doodles sets and played around with different images. Once I figured out how I wanted to layer everything I started stamping and cutting masks and then stamping the layers. The car, tree, trailer and gift are all from Driving Home. The penguin and trees in the scene are from Hot Cocoa while the coffee cup came from Warm Hugs and the sentiment from Warm and Cozy. I wasn’t kidding when I said this was a mash-up. Lol! It’s so fun to get use from so many sets on one card though!

Anyway, once everything was stamped out I colored everything with copic markers and used the scan-n-cut to cut it out. Next, I switched gears to ink blending my background scene layers with distress oxide inks. The sky is stormy sky and victorian velvet with a little chipped sapphire on the edge and splattered on the panel. The dirt is gathered twigs and tea dye with some ground espresso splatters. Then I cut a black layer for the road and inked it up with the leftovers of white pigment ink on my blending brush just so it wasn’t flat in comparison to the rest of the card.

I cut the layers with the largest Trinity Stamps Stitched Mini Slimline die and then cut the ground layers with Slimline Scenic Borders die. I stamped the trees in the background with VersaFine ink and started assembling my layers. The background is mounted on a white card base measuring 3×6 inches and then the dirt layer is popped up with foam tape. The road is adhered with liquid adhesive and the image is mounted with a combination of liquid adhesive and foam squares. For my sentiment, I stamped and heat embossed it on black cardstock and used the banner die from the Trinity Stamps Mini Slimline Card and Envelope die set. Then I popped it up with foam strips.

I finished things off with black glaze pen on the critter eyes and the dog’s nose. Then glossy accents on the penguin beak, coffee cup lid, lights and wheel hubs on the card and trailer and also the rope around the tree. For a little shimmer fun I added unicorn Stickles to the penguin’s earmuffs, the bow on the gift and the dog’s pompom.

I created an envelope to coordinate using the Trinity Stamps die set. I love doing this from time-to-time. It gives the card a little extra something. Sometimes I even stamp an image from the card on the front to give a hint what’s inside.

Products used on today’s card:
Jane’s Doodles Driving Home
Jane’s Doodles Hot Cocoa
Jane’s Doodles Warm Hugs
Jane’s Doodles Warm and Cozy
Trinity Stamps Mini Slimline Card and Envelope dies
Trinity Stamps Mini Slimline Stitched Layers dies
Trinity Stamps Slimline Scenic Border dies
Thermoweb 3D Foam Tape
Thermoweb Ultra Bond Liquid Adhesive
Glossy accents
Copic markers
Distress Oxide ink – victorian velvet, stormy sky, tea dye, gathered twigs, chipped sapphire, ground espresso
Stickles – unicorn

I appreciate you sharing your time with me. Have a fabulous day!

Trinity Stamps – Tree Rex

Hello everyone! Today I also have a super fun dinosaur Christmas card featuring the Tree Rex stamps and dies from the new Trinity Stamps release! This set is too cute for words and so fun to color up any way you like!

I chose a variety of greens for my dinosaurs using copic markers. After the image was colored, I used the coordinating dies to cut it out. I stamped and heat embossed a sentiment on black cardstock and used a banner from the 4-Bar Card die set to cut it out.

Moving on to the background, I cut a white panel using one of the stitched rectangles in the 4-Bar Card die set and inked it from the center out with my blending buddy brush and a red dye ink. Then I splattered it with gold watercolor.

Once the panel was dry I added foam tape to the back and popped it on a white card base. Then I used foam squares and strips to pop the image and sentiment strip up on that.

I finished things off with glossy accents on all of the Christmas lights and unicorn Stickles on the star. Last, I went over the dinosaur eyes with black glaze pen so they shine.

Next time I think I’ll try heat embossing and watercoloring the whole image. That extra texture on the dinosaurs will look really cool I think!

Products used today:
Tree Rex stamps and dies
4-Bar Card die set
Blending Buddy
Glossy accents
Stickles – unicorn
Foam tape, squares and strips

I appreciate you sharing your time with me. Have a fabulous day!

Ellen Hutson – Halloween Pyramid Box

Hi there! Today I’m popping in with a simple little treat box just in time for Halloween! It featuring the recently release pyramid box dies from Ellen Hutson and a total favorite dinosaur from Dinomite Halloween!

I stamped and colored images from Dinomite Halloween with my copic markers. Then I used the coordinating dies to cut them out and used liquid glue to adhere them all together.

Next, I die cut 2 panels with the Pyramid Box die from black cardstock. I ran the panels through the die cutter a second time with the Trinity Stamps Starry Skies cover plate. This gives pierced stars and dots like a night sky. Then I used strong tear tape to adhere my box together.

I die cut one of the Farmhouse Tags from white cardstock and stamped a sentiment from Tag It – Halloween in green ink. Then I cut the reinforcer from orange cardstock, glued it in place and tied some magenta twine from my stash through the holes.

I adhered my dinosaur to the box with liquid glue and the tag with a glue dot. The box opens from the bottom so nothing is interfering with me being able to fill it and give it away. So cool!

Products used today:
Pyramid Box die
Farmhouse Tags dies
Tag It – Halloween stamps
Dinomite Halloween stamps and dies
Trinity Stamps Starry Skies die

I hope you enjoyed today’s project. I appreciate you sharing your time with me. Have a fabulous day!

Miss Ink Stamps – FaBOOlous Slimline

Hello everyone! I’m so happy to finally share this super fun Miss Ink Stamps ghostie slimline card with you. I just love this stamp set and was so happy how this card turned out. I hope you like it too!

I had a general layout in mind for this card so I stamped the ghosts and large BOO sentiment and used the scan-n-cut to cut them out. Then I stamped and trimmed the other sentiment into a strip. I just used a B0000 copic marker around the edge of the ghosts for a little glowing look. Then I moved over to creating that fun background.

I die cut a stitched slimline panel from black cardstock and used a blending brush with white pigment ink over the Starry Night stencil. Then I inked up the edges of the panel with the ink left on my brush. Then I offset the burst layer from the Rainbow Sky stencil, inserted the circle so it was covered up and spread orange glitz gel through the stencil. I set the panel aside to dry and worked on the base panel.

For this I trimmed a piece of cardstock to 8.5×3.5 inches and inked up the edges with twisted citron distress oxide ink. I spritzed it with water and flicked black acrylic paint all over it.

Once both panels were dry I was ready to assemble my card. I started by adhered the green panel to a white card base. Then I popped the black panel up with foam tape. Next, I used foam squares to adhere the sentiments and one ghost and liquid glue to adhere the other.

Then, voila, my card is all finished! Isn’t it so much fun!?! I love these ghosts so much! Plus all the accessories you can have them hold AND don’t even get me started on all those awesome punny sentiments! So great!!! I love it all!

Products used today:
Miss Ink Stamps Boo Sheet stamps
Miss Ink Stamps Halloween Sentiments stamps
Miss Ink Stamps Starry Night stencil
Miss Ink Stamps Rainbow Sky stencils
Trinity Stamps Slimline Stitched Card Panels and Windows dies
Trinity Stamps Blending Buddy Brushes
Distress Oxide – twisted citron
Thermoweb Glitz Glitter Gel – orange
Stencil pal
3D foam tape

I appreciate you sharing your time with me. Have a fabulous day!

Trinity Stamps – Treetops and Trimmings RELEASE DAY

Hey there! I’m super excited to share that today is release day for the Trinity Stamps Treetops and Trimmings Holiday Release! There are some really fun stamps, stencils and dies in this release. We’re having an Instagram Hop today where you can comment for a chance to win but the release is live now so don’t wait, head over and stock up on all the holiday goodness!

Today I’m sharing a card featuring the new Ribbon Wrapped Tree stencil. It’s a 2 part stencil which allows for multiple colors or other fun mediums like foiling, which is what I did today.

I inked up the first layer with some green dye ink and then spread Thermoweb transfer gel blanco through the second layer and set it aside to dry. Once it was dry and my laminator was heated up, I sent it through with some glittering green fancy foils from the Gina K line at Thermoweb.

For my background, I used the slimline stitched strips dies to cut some red and white strips. I glued them to a white panel and die cut that with the largest slimline stitched panels and windows die. This die gives a small border so I inked up the edges of my white card base with twisted citron distress oxide ink to match the tree and adhered the striped panel down.

After foiling, I trimmed my tree out with scissors and added foam squares to the back. I popped it up in the center of my card and heat embossed a sentiment on black cardstock. I used a banner from the 4-Bar Card die set and popped it up as well.

For finishing touches I glued a scattering of glitzy gray baubles across the whole design.

So much bright and fun shine and shimmer on this card. I just love it! And have so many other ideas to try with this simple, but awesome stencil!

Products used today:
Ribbon Wrapped Tree stencil
Slimline Stitched Card Panel and Windows dies
Slimline Stitched Strips dies
A Sentiment for (almost) Everything stamps
4-Bar Card dies
Glitzy Gray Baubles
Thermoweb Transfer Gel Blanco
Thermoweb Fancy Foils – glittering green
Thermoweb Stencil Pal
Distress Oxide – twisted citron

Remember there is an Instagram Hop going on if you’d like to see more inspiration and comment for a chance to win. Or feel free to click HERE to head to the Trinity Stamps shop and check out the whole release there too!

I appreciate you sharing your time with me. Have a fabulous day!

Jane’s Doodles – Warm Hugs Release Hop

Hey friends! I am SO EXCITED to be apart of the Jane’s Doodles release hop for the adorable Warm Hugs set. Today I have a fun slimline card to share with you for a little inspiration.

I wasn’t sure if I was going to create a slimline card or an A2 size card with a tag so I just started by stamping a bunch of the images from the set. I did a little masking to add things to the bike and skateboard with those cute critters! I colored them all with my copic markers and used the scan-n-cut to cut them all out.

After playing with the images a bit I obviously landed on a slimline card. So the next step was inking up my background layers. The sky is blueprint sketch and tumbled glass. The dirt mound is gathered twigs, the grass is evergreen bough and shabby shutters, while the front dirt path is tea dye and gathered twigs. After inking the panels I used Trinity Stamps slimline dies to cut the borders.

I adhered dirt mound with foam tape, then the grass to that with liquid glue. Finally I added the front dirt road with another layer of foam tape. All of the images were then adhered with a combination of foam squares and liquid adhesive. To add little details to the sky and ground, I pulled out Sky’s the Limit and used a cloud with white pigment ink in the sky. Then I came in with a leaf from Warm Hugs and stamped some in brown on the ground.

I popped the whole card in my MISTI and stamped a sentiment in an open area in the sky and moved on to finishing touches. I kept those simple for this card because the scene is busy. I used glossy accents on the critter noses, pumpkin stems and various other small parts of the images.

Products used on today’s card:
Jane’s Doodles Warm Hugs stamps
Jane’s Doodles Sky’s the Limit stamps
Trinity Stamps Slimline Great Outdoor Borders dies
Trinity Stamps Slimline Scenic Borders dies

GIVEAWAY
To enter, leave a comment on the stops of the hop. The winner will be able to choose a stamp set of their choice. Winner announced on Monday, October 11.

SALE
Jane’s Doodles is having a sale to celebrate the new release. 25% off the entire store, no code needed!

Here’s the hop list for you!

Marion
Milka
Katerina
Claudia
Bobbi
Katja
Tinne
Janine
Amanda (guest) *YOU ARE HERE!*
Hanh (guest)
Laura (guest)
Yana (guest)
Jane’s Doodles blog

Trinity Stamps – Bonejour!

Welcome everyone! Thanks for stopping by. Today I have a SUPER snazzy slimline skelly to share with you. He’s so fun and I found a simpler way to use these awesome dies!

I started this card by playing around with the slimline skelly dies. I cut the base from black cardstock, thinking I would glue the white bones onto it. Then I had the idea to cut the bones from the black cardstock and cut another base layer from white and glue them together! Then all I had to do was inlay the pieces in the pelvis, ribcage and skull. So awesome!

Then I cut the hat from silver glitter cardstock, the band and bowtie from orange. Then I took YR09 and YR07 and gave the orange pieces a little shadow and depth.

Switching gears to the background, I inked up a panel with seedless preserves, twisted citron and carved pumpkin distress oxide inks. I spritzed the panel with water and flicked black paint on it. After it was dry, I die cut it with the slimline striped frame panel and adhered it to a white card base. I used liquid glue to adhere the band to the hat and then the hat and bowtie to the skelly.

I added foam tape to my skeleton and popped him in place. For the sentiment, I chose 2 from the Shake Your Bones stamp set and heat embossed them in white on black cardstock. Then I die cut them with a banner die from the 4-bar card die set. and added them with foam strips and liquid glue.

This card is so much fun and I really can’t wait to share it with a special little guy who I know will just love it!

Products used today:
Slimline Skelly dies
Slimline Striped Frame Panel die
Shake Your Bones stamps
4-Bar Card dies

I appreciate you sharing your time with me. Have a fabulous day!

Pretty Pink Posh – Caroling Critters

Welcome everyone! Thanks for stopping by today. I’m sharing a clean and simple Christmas card featuring the Caroling Critters from Pretty Pink Posh. I love this set but with no coordinating dies I decided to come up with a window style design for them.

I stamped the image on white cardstock and colored it with my copic markers. Then I used the Trinity Stamps Embossed Edge Rectangle dies to cut a panel from kraft cardstock. For my window opening I used an old MFT arched stax set. I lined the kraft with foam strips and popped it on the scene panel.

I stamped and heat embossed a sentiment from the Joy stamp set and trimmed it into a strip. I added some foam tape to the back of the, doubling the layer in the center so it would lay nicely and placed it over the scene.

I cut another embossed rectangle from red cardstock and adhered it to a white card base and then adhered my scene panel to that.

Moving on to finishing touches, I just added some glossy accents to critter noses and unicorn Stickles to the hat pom poms and open music notes.

I found that this layout idea would work great for me to stamp multiple scenes out and color on the go. Just an idea since it might work for you too.

Products used today:
Pretty Pink Posh Caroling Critters stamps
Pretty Pink Posh Joy stamps
Trinity Stamps Embossed Edge Rectangle dies
MFT Stamps Arch Stax dies
Glossy accents
Stickles – unicorn
Foam tape

I appreciate you sharing your time with me. Have a fabulous day!

Thermoweb – Laura Kelly Designs Card Duo

Hello everyone! I’m over on the Thermoweb blog today sharing how I created this pair of cards featuring Laura Kelly Designs products from Thermoweb. Her foil colors and toner card fronts are so fun. Pair those with her whimsical stamps and you’ve got adorable, fun cards!

To create these cards, I started by foiling the toner card front on the right and then adding the negative decofoil sheet to a toner sheet and then foiling the rest with some awesome Rainglow decofoil. It’s kind of a process but it’s fun and magical as you do it!

To add a little something to this first card, I added glitter gltiz gel with a Pink & Main stencil over the foiling. Isn’t it so much fun!?!

And then this amazing double-foiled card needed nothing added because it is so gorgeous!!!

Be sure to head over to the Thermoweb blog for the step-by-step and a list of products used too!

I appreciate you sharing your time with me. Have a fabulous day!