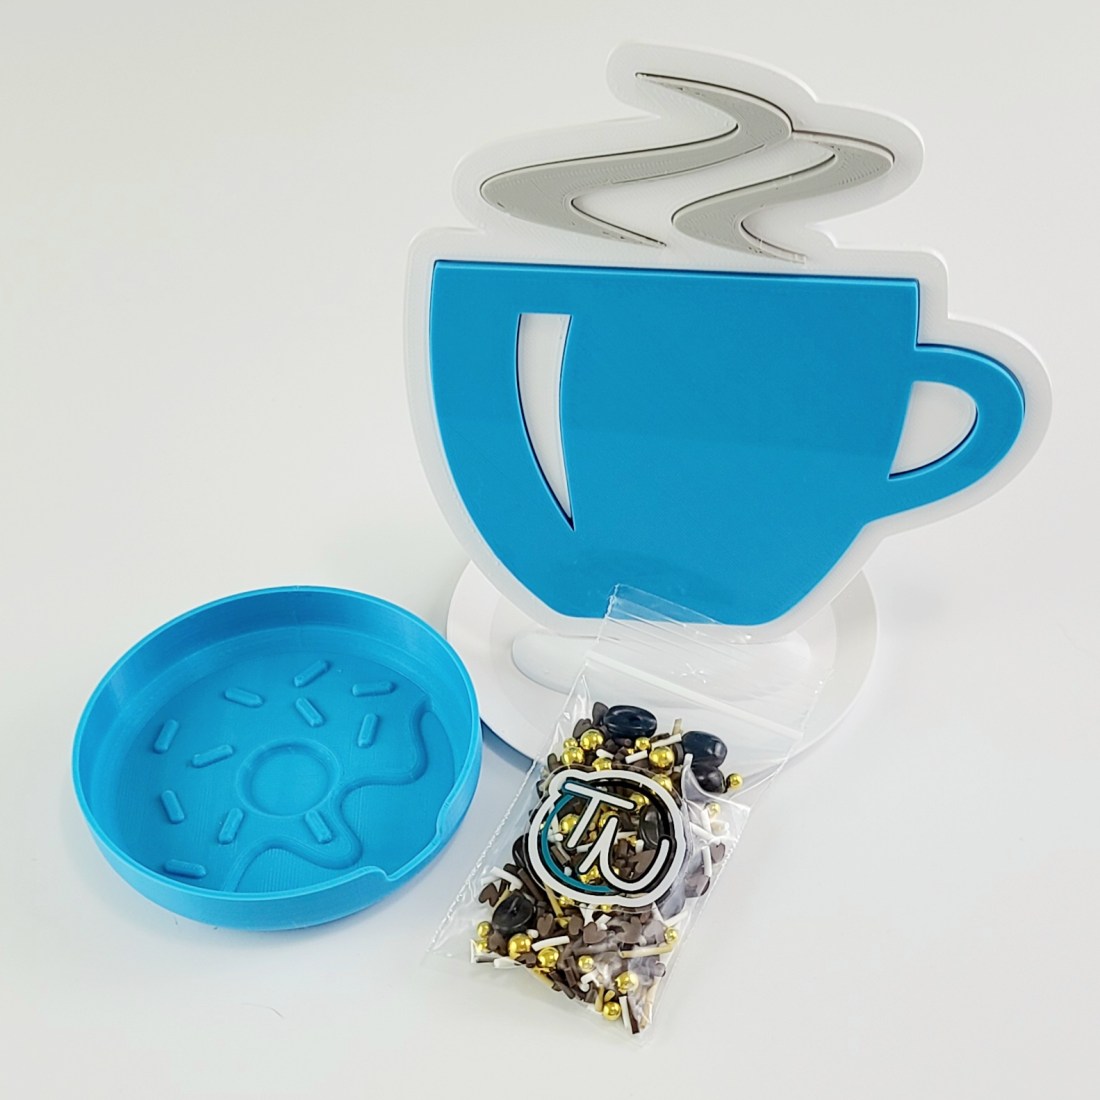
Hey friends! It’s time for the Spring|Summer Coffee Lovers Hop! Be prepared for a week chock full of awesome caffeinated inspiration! Once again, Twiddler’s Nook has the privilege of being a Super Sponsor for the hop. This time we’re running a special package deal for all of you caffeinated crafters.
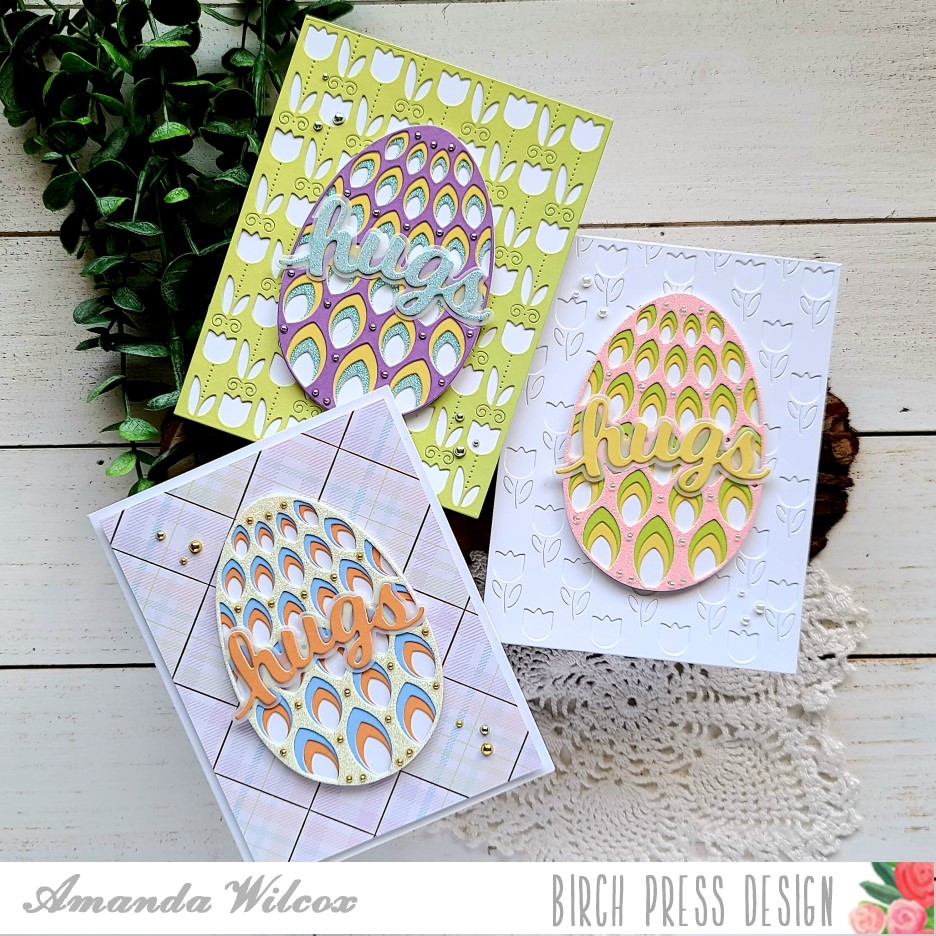
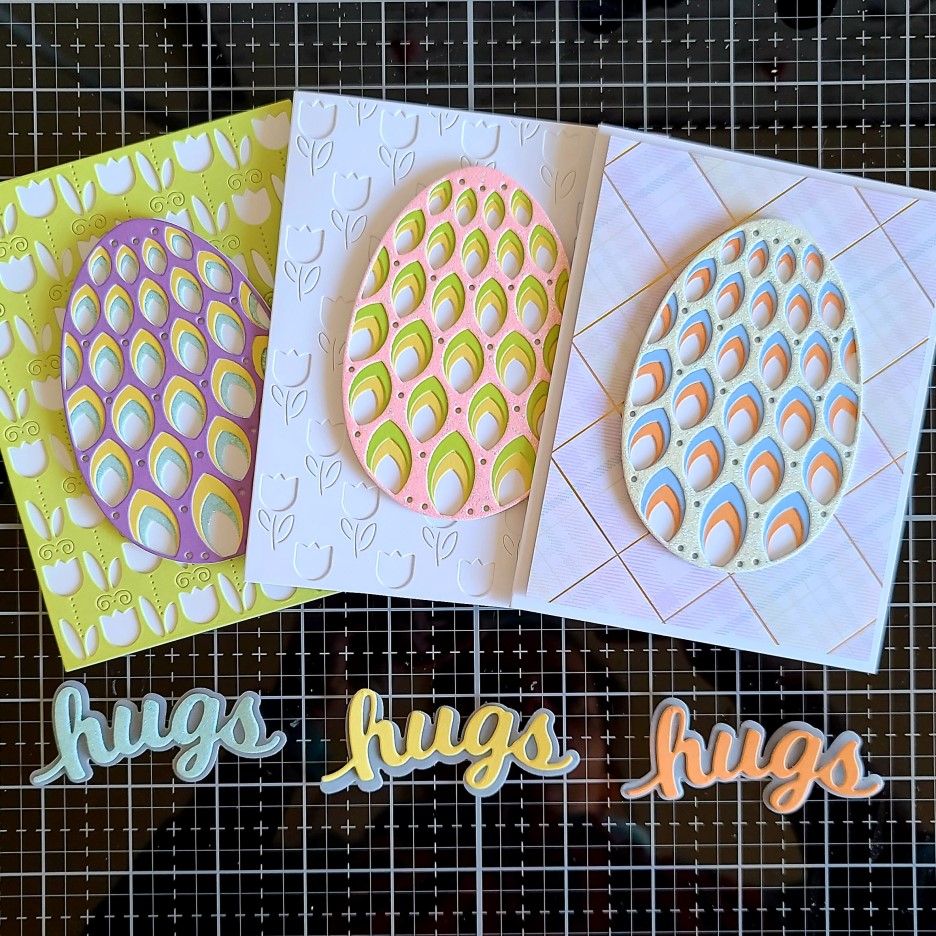
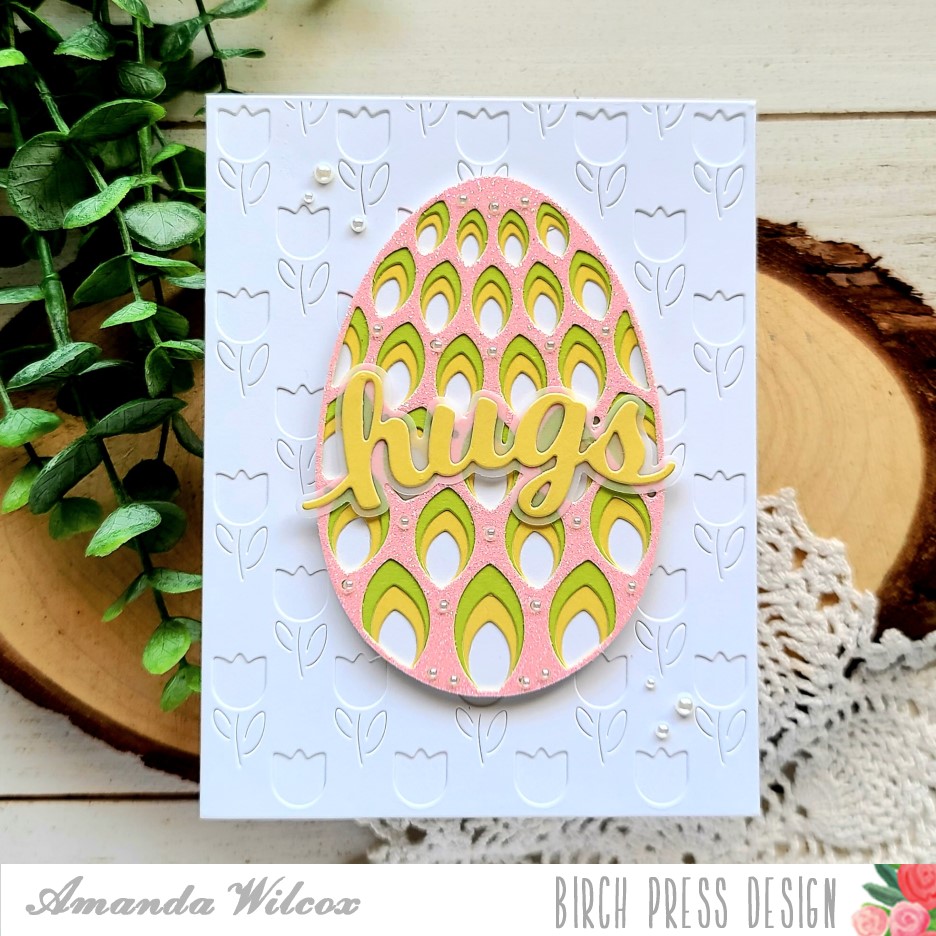
Hello everyone! I’m over on the Birch Press Design blog today sharing a trio of cards to share featuring the petal egg layering set and a few different backgrounds to pair it with.
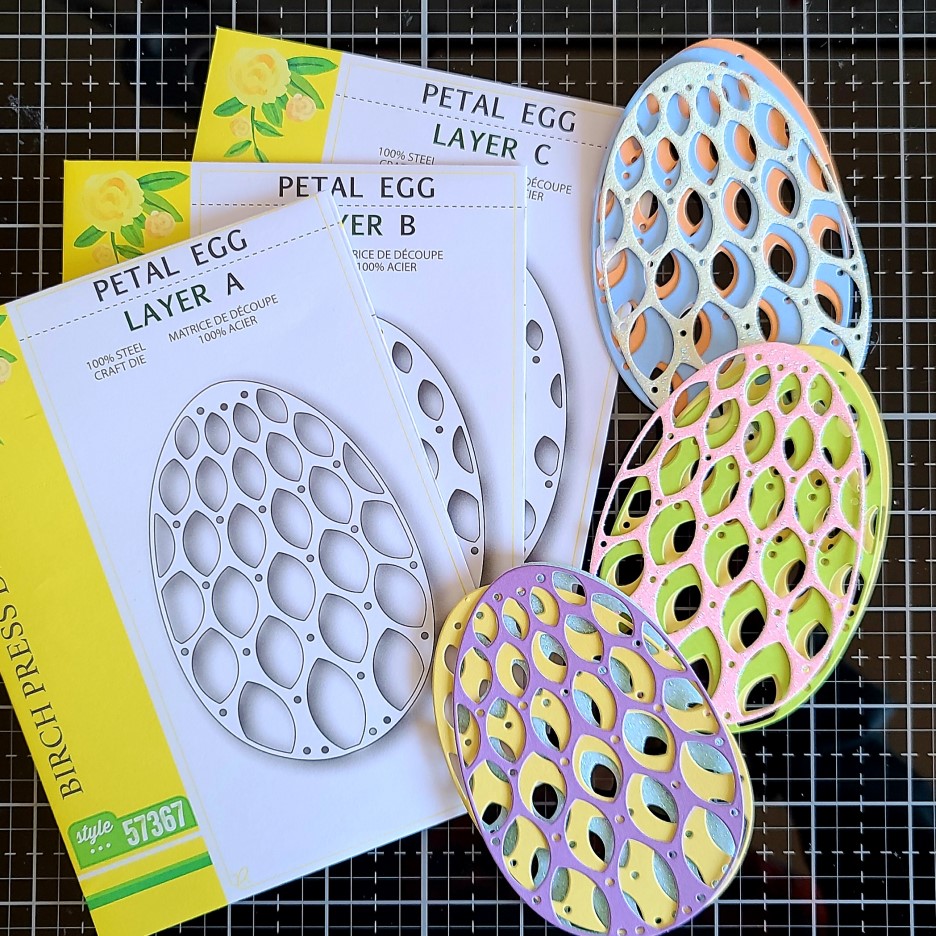
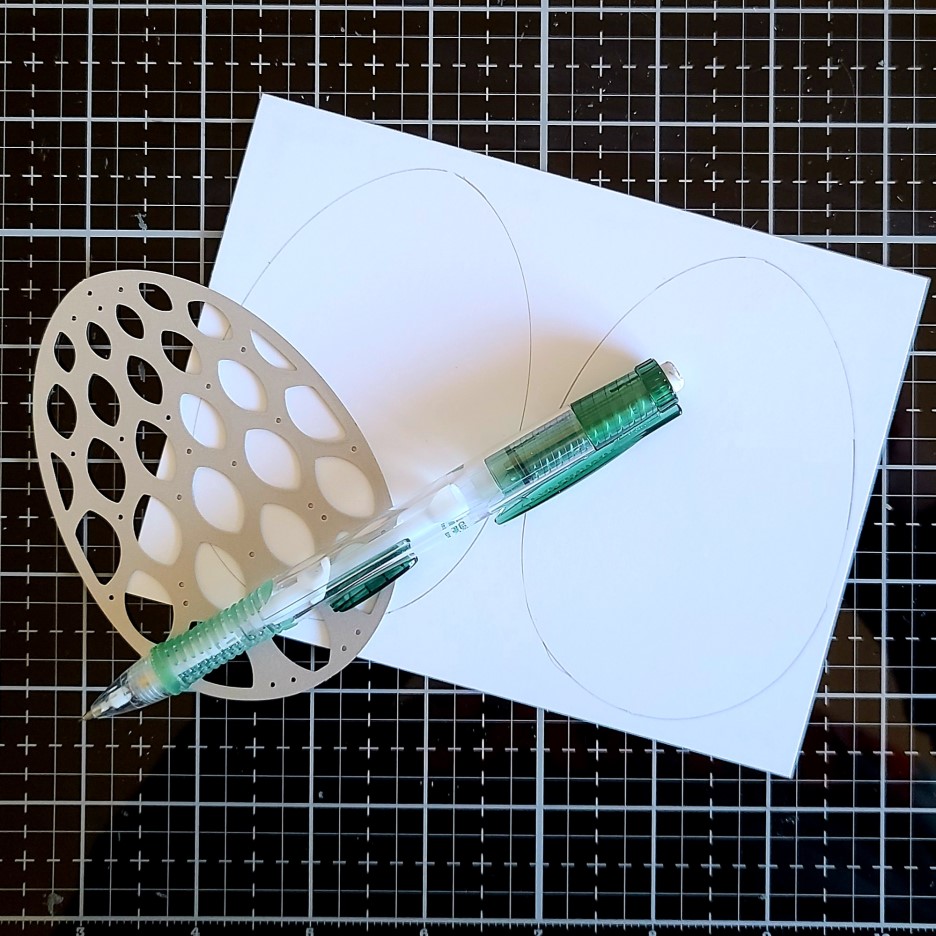
To start off today’s cards, I just pulled out a variety of cardstock colors – glitter and not – and started cutting the layers of the petal egg. It was so fun to mix and match, and just play, with all of them once they were cut out.
After I decided on the layers that I wanted to use together, I ended up with three complete eggs and thought it would be fun to make three cards to share with you today.
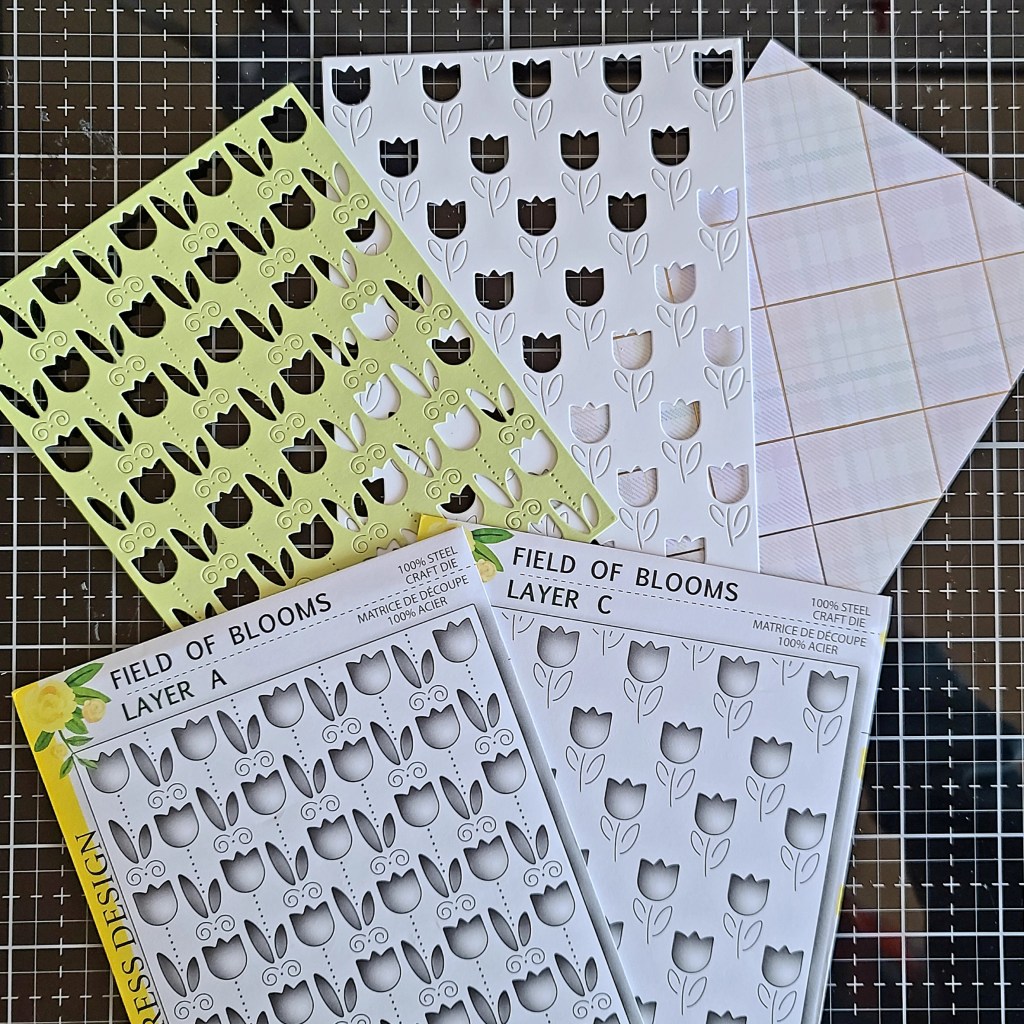
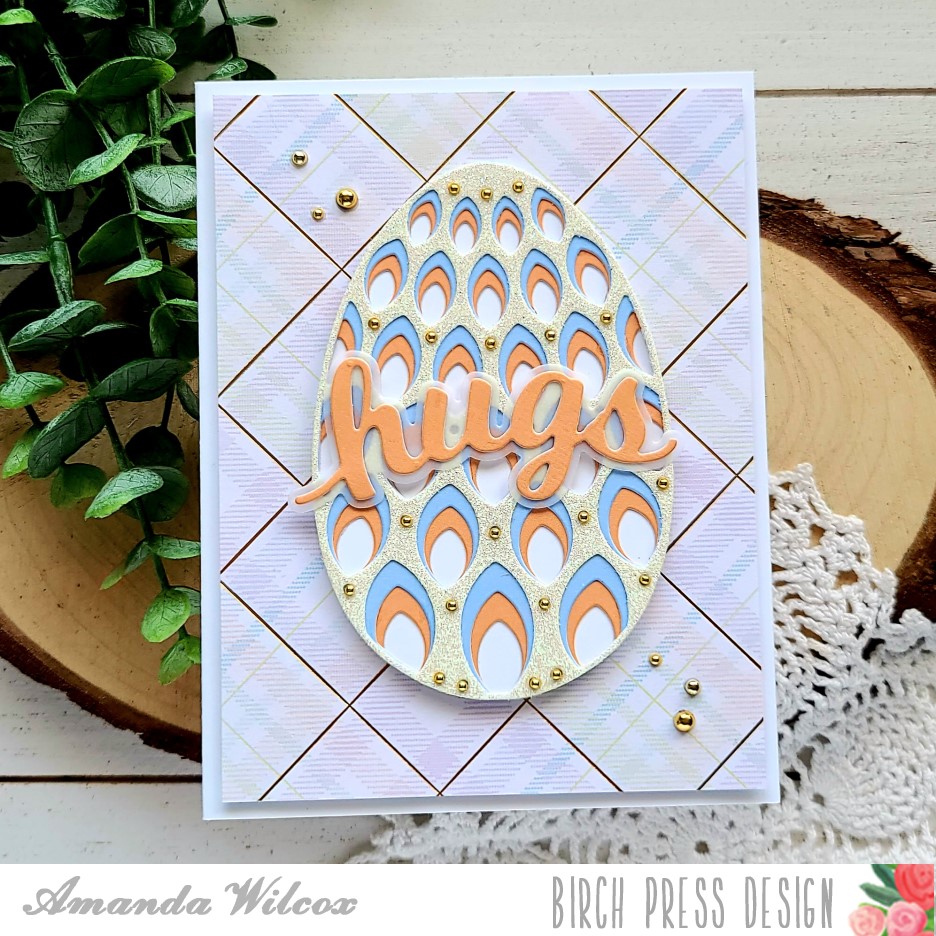
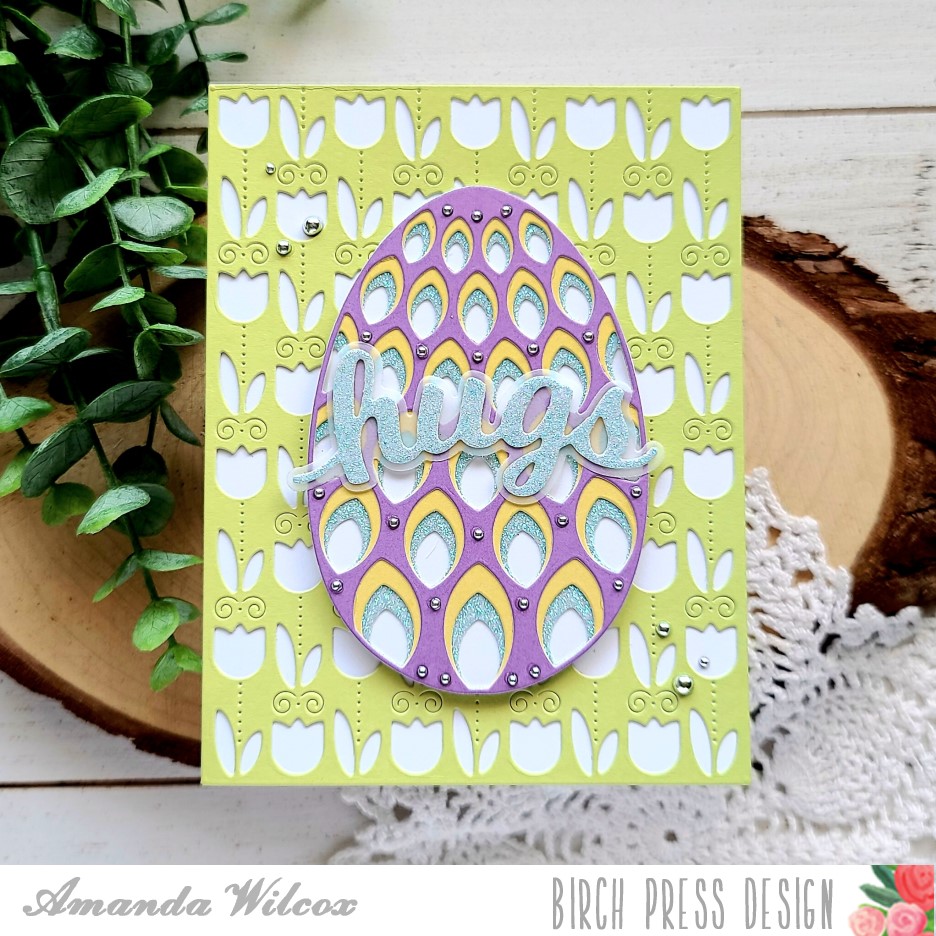
For my backgrounds, I used layer A and C of the Field of Blooms set. Then for my third card I pulled out the Memory Box spring plaid paper pad and chose one of the beautifully foiled pieces to use.
I used liquid glue to adhere all of my egg layers together and decided I wanted the backs to be solid so the background panels didn’t show through. Since there isn’t a solid egg shape I traced one of the dies three times and cut inside the tracing line and glued it to the back of my layers. If anything hung over, I just used my scissors to trim off the excess. Super easy and forgiving if you don’t fussy cut well.
I used liquid glue to adhere the Field of Blooms backgrounds to white card bases and then used foam tape to add the plaid paper, which I had trimmed down to 4×5.25 inches. Then for my sentiment, I went with the hugs honey script dies. I cut the shadow from vellum and then the words from the same paper as the bottom layer of the egg it was coordinating with.
I adhered the sentiments with liquid glue and the popped the eggs up on each background with foam tape. For finishing touches I added Twiddler’s Nook baubles to each one. This first one has gold to play off the gold foiling in the patterned paper.
Then I used silver baubles for this one because I thought the bright colors worked well with the bright silver.
And for this final card, I chose pearls because it’s got a bit softer colors and I just loved how they worked with the pink glitter paper on the top layer of the egg.
I appreciate you sharing your time with me. Have a fabulous day!
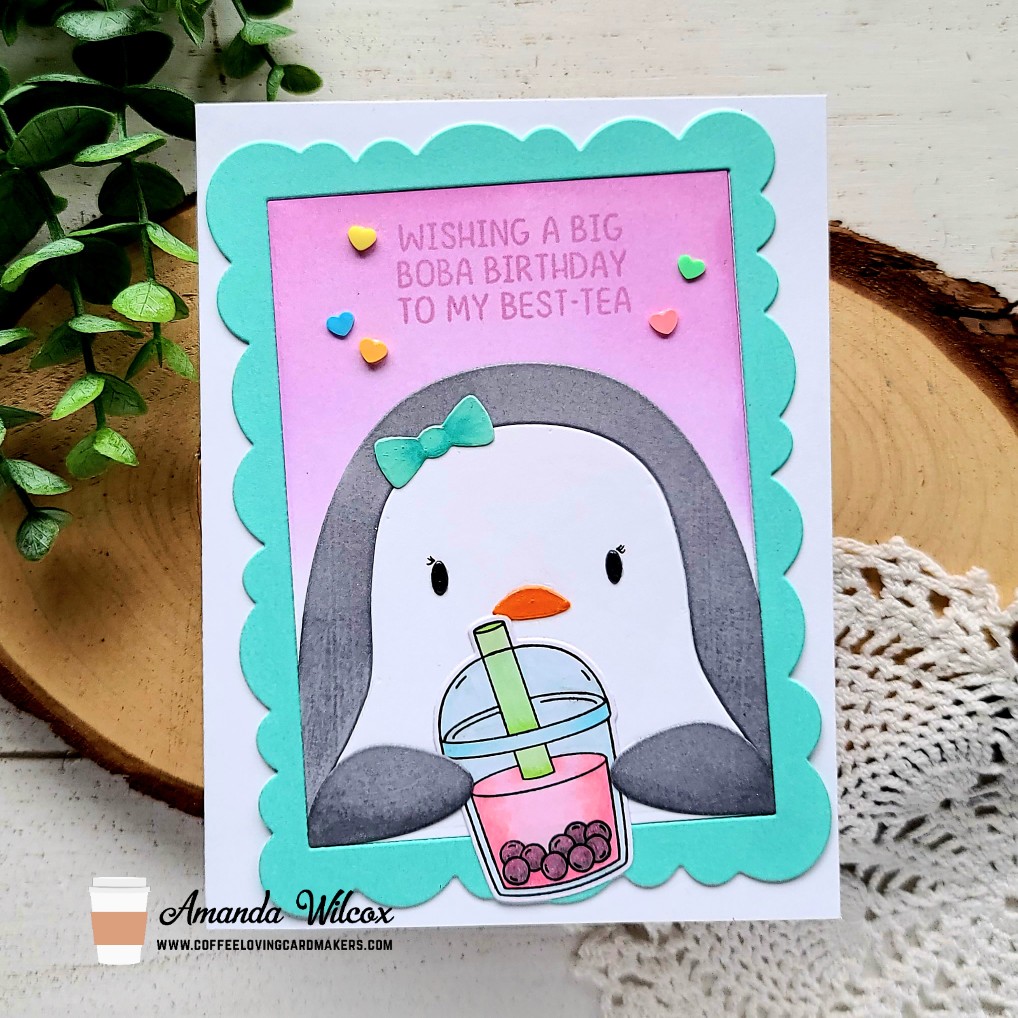
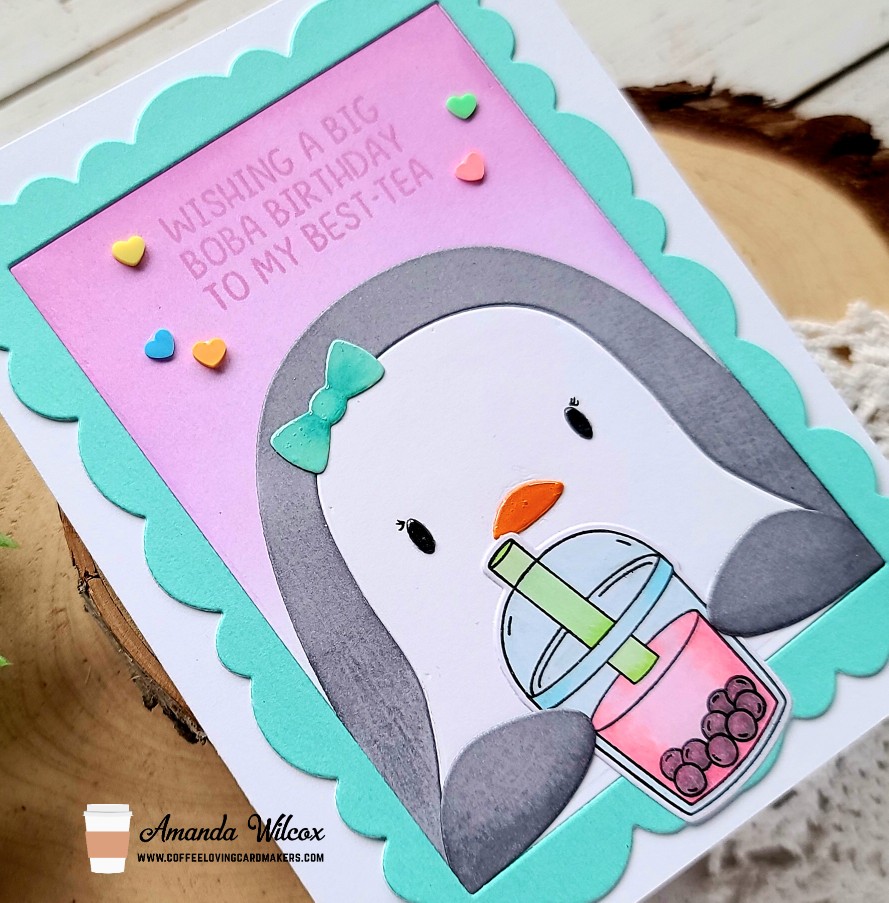
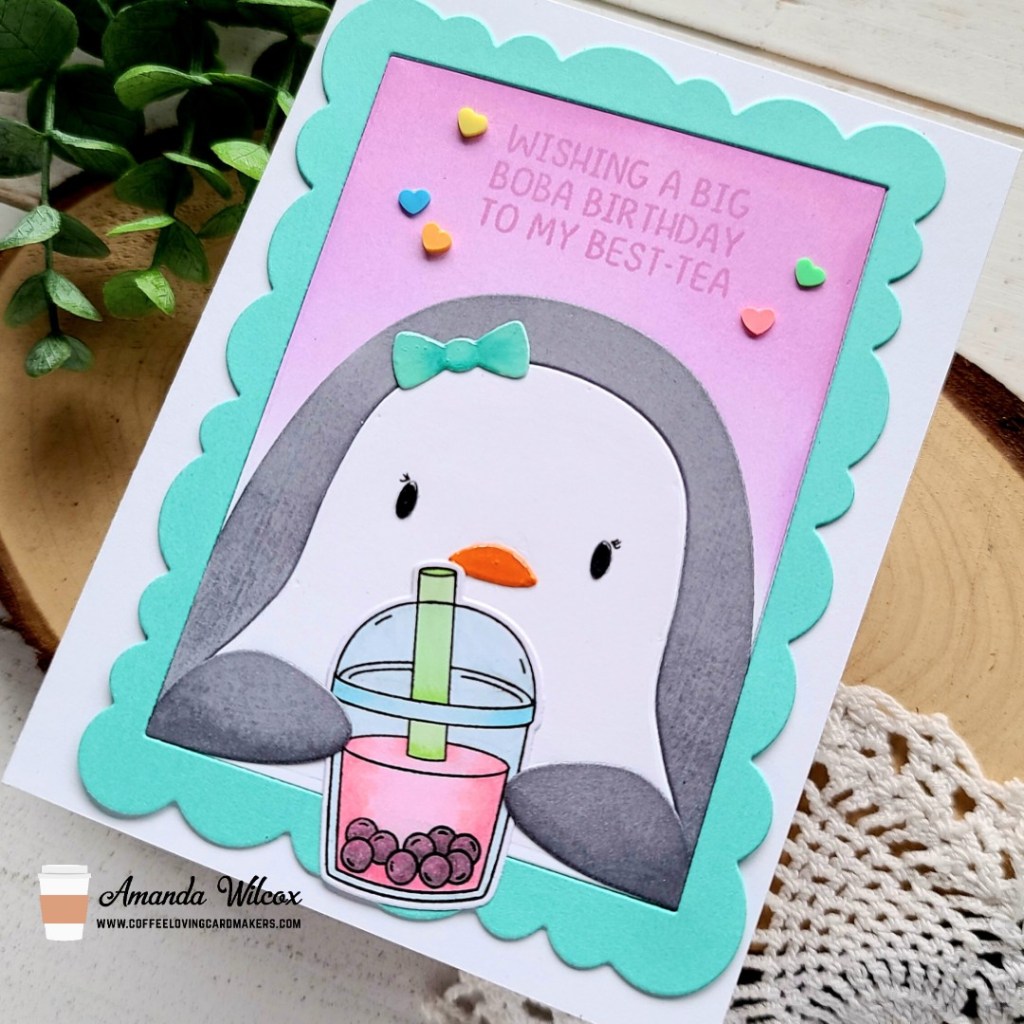
Hey everyone! Over on the Coffee Loving Cardmakers for another fantastic Tuesday Tea with Twiddler’s Nook! Today I’m playing with some really fun Mama Elephant goodies my family spoiled me with for Christmas.
I simply started by die cutting the penguin favor bag add on from white cardstock and colored it with my copics. Then I had a fun idea to add it to a frame so I pulled out my Avery Elle wonky scalloped frames and cut the largest from teal cardstock. I inked up the center part that the frame cuts out with a couple of purple inks and my blending brushes and decided my penguin needed to hold something. My mind immediately went to the super fun boba tea set so I went to work stamping and coloring one of the cups. I used the coordinating dies to cut it out and started assembling everything.
I found it easiest to adhere my penguin to the inside frame panel and then adhere it to the card base. Then I added the frame around it because it overlaps the side of the penguin just a bit. I carefully tucked the boba cup in the penguins hands and glued it in place. Then I popped the whole thing in my MISTI and stamped my sentiment in the same purple ink that I blended on the panel.
For finishing touches, I added eyelashes to my penguin and glossy accents to the penguin beak, eyes and the bow on her head. Finally, I added some conversation hearts clay bits from the Twiddler’s Nook shop around the sentiment.
Isn’t this just the cutest?!? I seriously have a thing for these big die cut cuties! I love playing around with them!
I appreciate you sharing your time with me. Have a fabulous day!
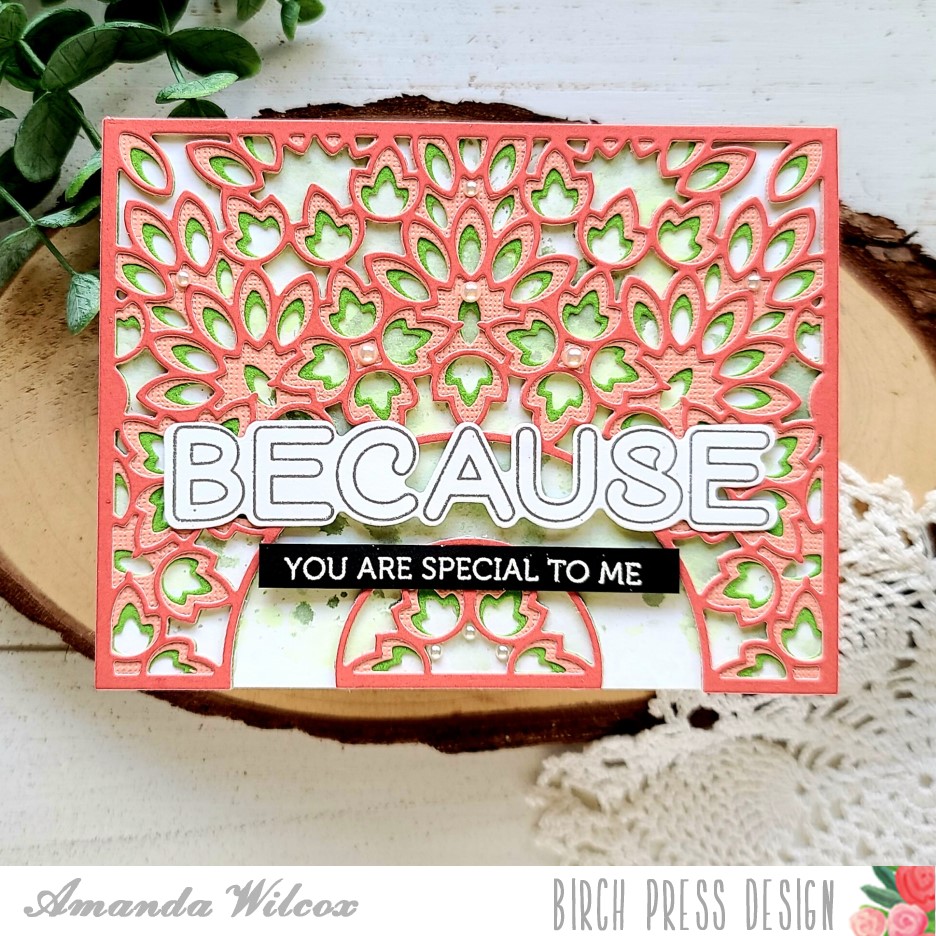
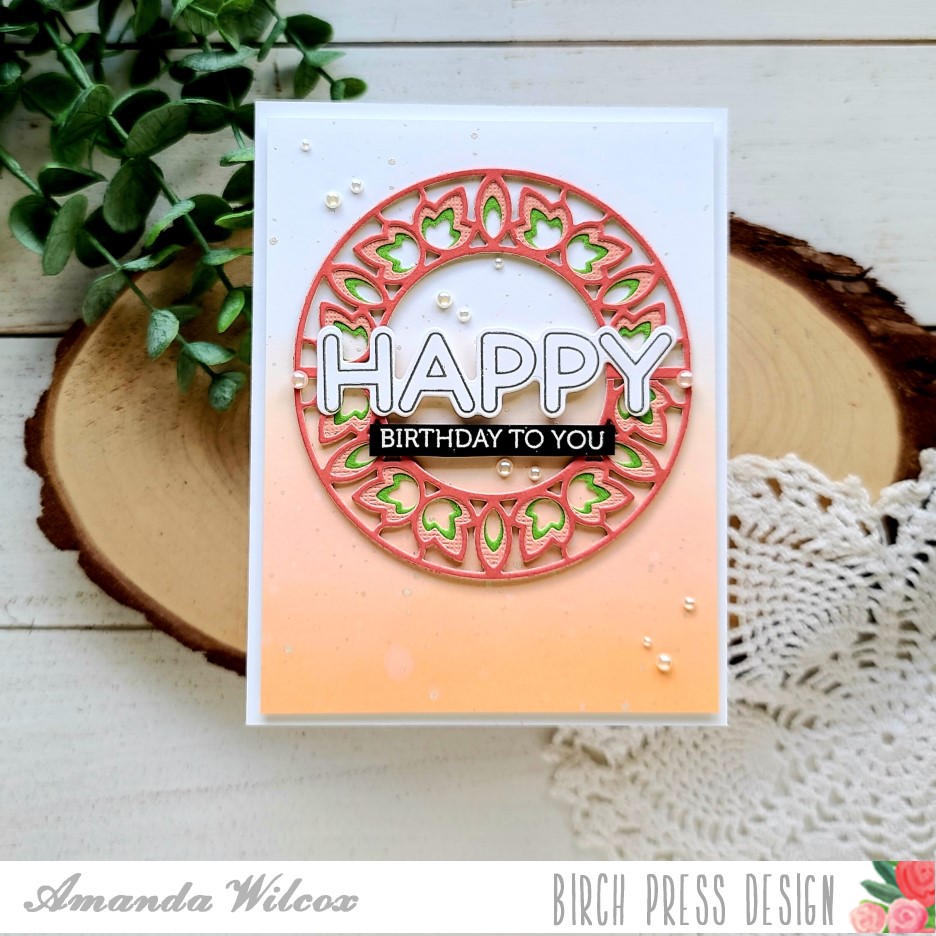
Welcome everyone! Today I’m over on the Birch Press Design blog with this pair of cards featuring the Enchantment layering dies and the Crystal Lingo stamps and coordinating dies. I had a fun idea I wanted to try after being inspired by my friend Ellen earlier this week and instead of having waste, I made 2 cards!
My original idea was to die cut the three layers for the Enchantment layers but omit the middle arch like I did on the card on the left, but I couldn’t just waste those pieces so I went ahead and cut just that middle part a second time and created another card!
My friend Ellen inspired me this week by using Thermoweb Deco Foil Flock for her Birch Press layers and I thought it looked so cool that I wanted to try it out. For today’s card, I used green flock, a pink textured cardstock for the middle layer and a smooth rose colored cardstock for the top layer.
On this first card, I didn’t want the background layer to be stark so I did a little ink smooshing on a panel and adhered it to a white card base. Then I adhered the Enchantment layers together and on to the card. I stamped, heat embossed and cut out the sentiment from the Crystal Lingo set and used a combination of foam squares and liquid glue to adhered them down. For finishing touches I used pearl baubles from Twiddler’s Nook to give some shiny accents around the design.
For the second card, I blended tattered rose and dried marigold distress oxide inks on a panel, spritzed it with water and flicked some pearl watercolor on it. Once it was dry, I trimmed it down to 4×5.25 inches and popped it up with foam strips on a white card base. I adhered my Enchantment ring and then the sentiment just like the first card. I used the pearl baubles from Twiddler’s Nook on this card as well, just in a different way scattering them across the design randomly.
These colors are so pretty and have me wishing for sunshiny warm days and being outside!
I appreciate you sharing your time with me. Have a fabulous day!
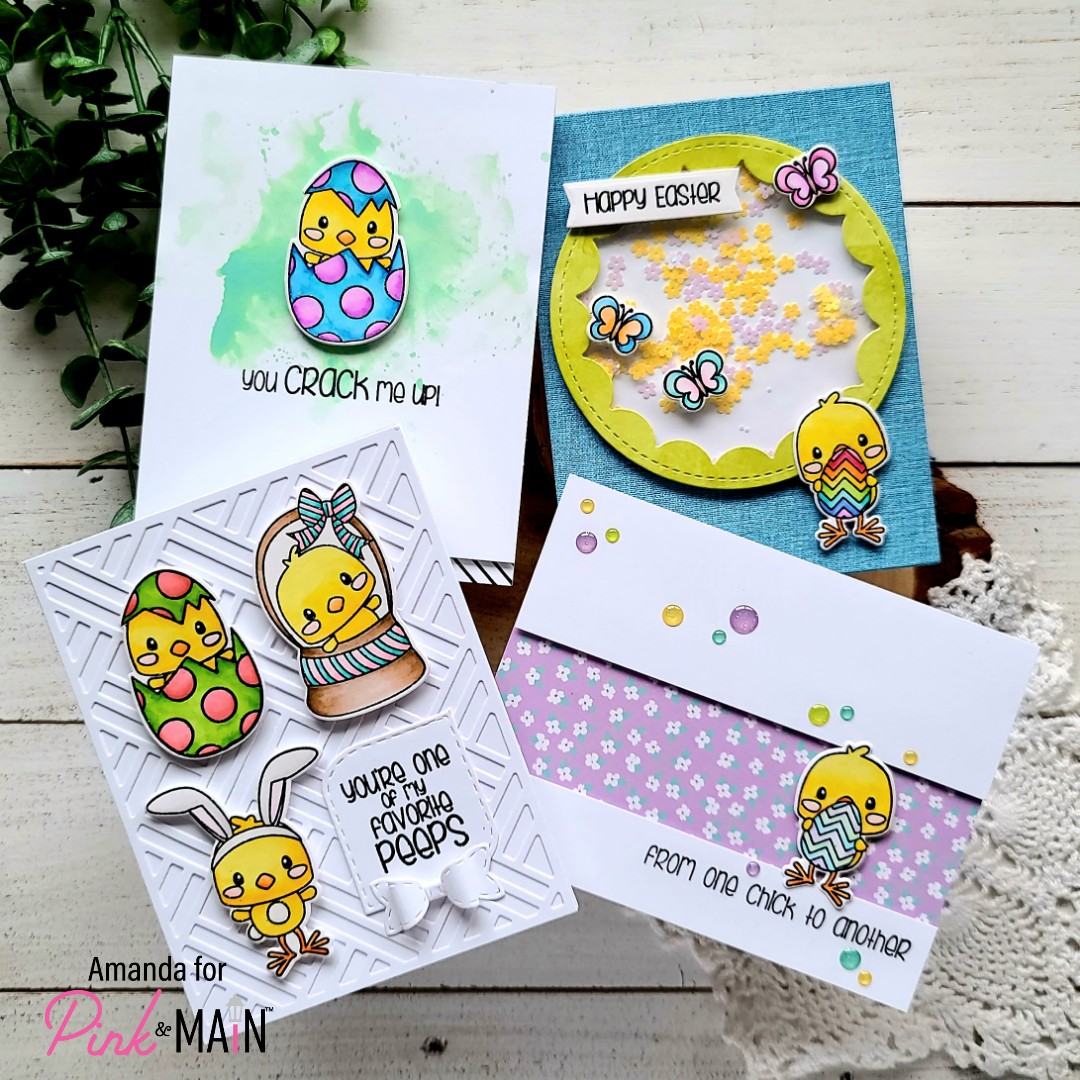
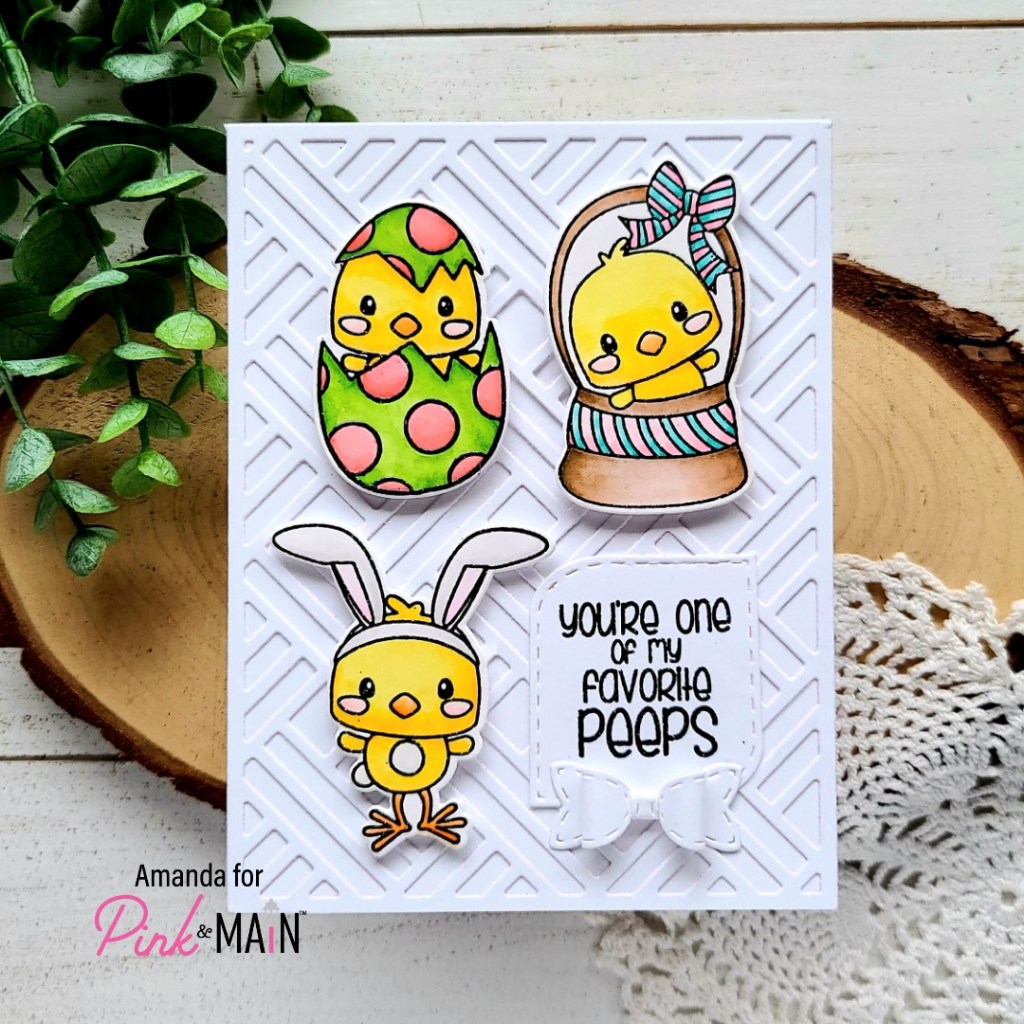
Happy Friday everyone!!! I hope you all had a wonderful week and are ready for a great weekend ahead! Today I’m over on the Pink & Main blog sharing this set of 4 Easter cards featuring the Easter Peeps stamp set, coordinating dies and some other goodies too! Let’s dive in and I’ll give a little explanation of each one.
Actually, first…I had no direction when I started these cards, just an itch to watercolor these cute chicks so I stamped and heat embossed a bunch of them on a piece of Bristol Smooth cardstock and colored them with my Zig markers and a waterbrush pen. Then…
For this first card, I pulled out the new Happy paper pad and the largest Stackable A2 rectangle dies to create my background. I cut a white circle and, using the green watercolor paper from the same pad, a reverse scalloped circle. I created a shaker mechanism adding some great primrose confetti bits from the Twiddler’s Nook shop. I adhered the background to a card base with liquid glue and the shaker mechanism on that the same way. Then I added foam tape to the back of my images and popped them in place. I stamped a sentiment from the stamp set and die cut it with a large sentiment strip and popped it up as well.
I knew that I wanted to make a card with the basket cover die as my background so I pulled that out next and cut it from white. I used liquid glue to adhere it down and added foam squares to the back of my images. For the sentiment, I stamped and heat embossed it black so it matches the images and did partial die cutting with one of the mod stitched rectangles to create a custom size. Then, to finish this card off I made the smallest stitched bow and added it below the sentiment.
I only had 2 images left at this point so I made a couple of fun clean and simple cards with them. This one, I did some ink smooshing with cracked pistachio distress oxide ink on a white panel, popped my image up with foam squares and stamped the sentiment below it. I trimmed 1/2 inch off the bottom of the panel and added foam tape to the back. Then I stamped a striped background with black ink on a card base and added my panel. This card might be my favorite of all…
For this final card, I trimmed another piece of paper from the Happy paper pad and adhered it to a card base. Then I trimmed a piece of white cardstock to 2 strips and popped them up with foam tape. Using my MISTI, I stamped my sentiment and then using a combo of foam tape and liquid glue to adhere my little chickie. I decided to finish this card off with some super cute Happy Mail glitter enamel dots scattered across the card.
I know this was a long post and I’m glad you stuck with me to the end. Did you have a favorite card from the bunch?
I appreciate you sharing your time with me. Have a fabulous day!
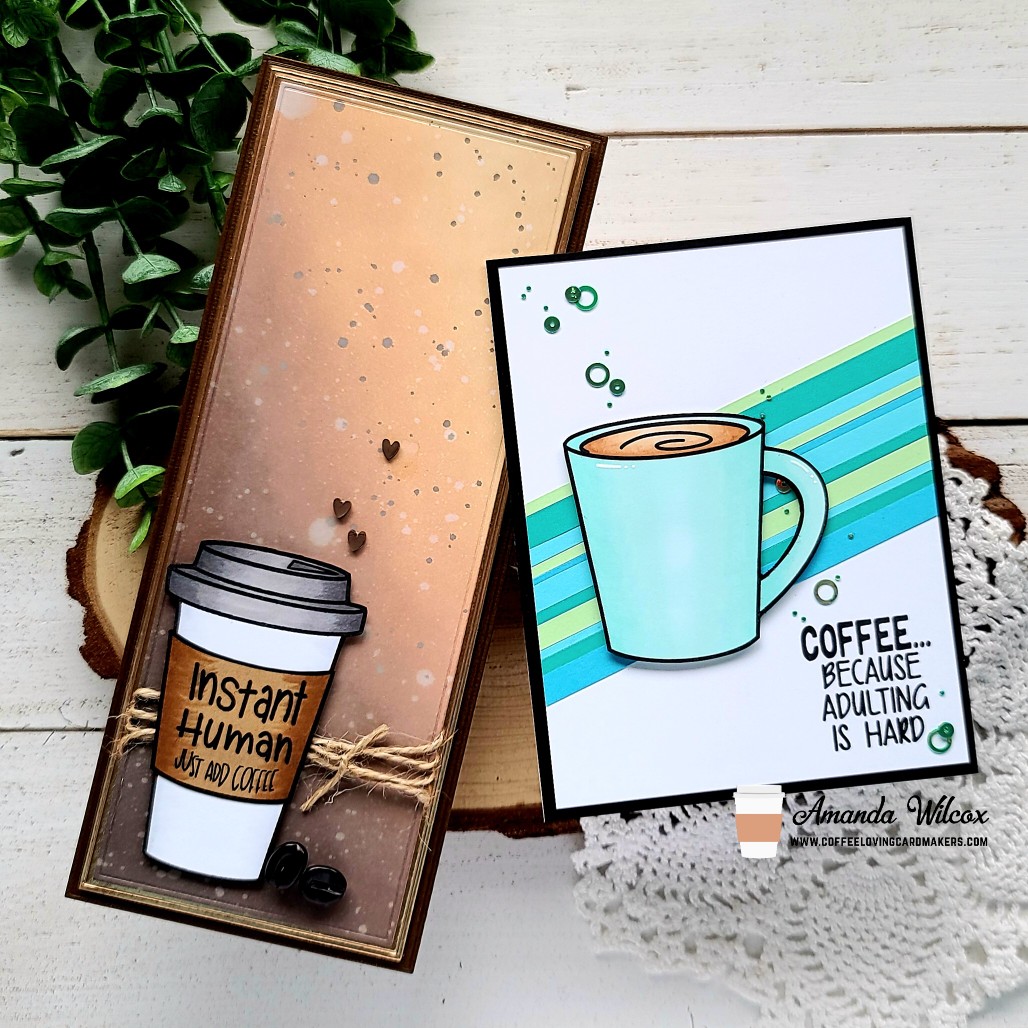
Happy Friday everyone! I’m super excited to be apart of the Coffee Loving Cardmakers – Sweet ‘n Sassy Stamps Collaboration today! I’ve made 2 cards to share with you featuring I Like Big Cups and Coffee Talk 2. These sets pair perfectly together so I couldn’t resist.
Let’s talk slimline first, shall we? I inked up a panel with ground espresso, vintage photo and tea dye distress oxide inks. Then I flicked some watered down ground espresso ink and regular water all over the panel. Once that was dry, I pulled out the Trinity Stamps slimline modern embossed panels dies and cut the 3 largest sizes from: dark brown, rose gold and the inked panel. The brown was adhered to a slimline card base with liquid glue, then the rose gold with foam tape. I wrapped some twine around the inked panel, tied it in a knot and put foam tape on the back avoiding the twine and put it in place too. Then I stamped and colored the travel cup and sleeve from I Like Big Cups and cut them out. I stamped a sentiment from Coffee Talk 2 on the sleeve and adhered them together with liquid glued. I added foam tape to the back of the cup, skipping the part where it overlaps the twine so it lays flat and popped it in place. For finishing touches I added some hearts and coffee beans from Twiddler’s Nook Caffeinated Crafting embellishment mix.
For my second card, I wanted to brighten things up a bit. So I chose a selection of blue and teal cardstocks and cut some different width strips. I added adhesive to a white panel and stuck the strips down at an angle and trimmed off the excess. I trimmed the panel down to 4×5.25 inches and stamped a sentiment from Coffee Talk 2 in the bottom right corner. I stamped another mug from I Like Big Cups, colored it with my copics and cut it out. I popped it up with foam squares and added foam tape to the back of the striped panel. I decided for a little contrast so I attached it to a black A2 size panel and used liquid glue to adhere it on a white card base. Then for finishing touches I added some white gel pen accents to the mug and a scattering of Twiddler’s Nook Princess Rings – Tiana across the design.
Remember, we’re hopping along today for the chance to win a $25 gift code to the Sweet ‘n Sassy Stamps store! You should have come from the fabulous Lori Turner and now will head over to the amazing Christine Burillo-Kirch.
Welcome everyone! I’m over on the Newton’s Nook blog today sharing this pretty floral slimline shaker card.
I had a completely different idea in my head when I started this card but I think it turned out very elegant and pretty in the end. I’ll give my other idea another try in the future. 😉
I started this card by stamping and coloring the Roses image with my copic markers. Then I used the coordinating dies to cut it out. Next, I cut a panel and inked it up using the new square masking stencil. Then I die cut the Slimline Frames & Windows frame from white cardstock and layered it on top. At this point I thought things were too plain so I die cut my stenciled panel with the Slimline Frames & Portholes scalloped panel die and turned my card into a shaker.
I added acetate to the back of the window panel and lined it with foam strips. Then I sprinkled some Princess Rings embellishments from the Twiddler’s Nook shop on each stenciled square and popped the frame in place. I added foam squares to the back of my rose image and popped it in place. Then I die cut one of the Banner Trio banners and stamped a sentiment from the new Heartfelt Roses set and adhered it with liquid glue.
I added foam tape to the back of my shaker and popped it on a yellow panel measuring 3.5×8.5 inches. Then I used liquid glue to attach it to a white slimline card base.
For finishing touches I just added some Wink of Stella glitter brush pen to the flower petals and leaves.
I appreciate you sharing your time with me. Have a fabulous day!
Hey friends!!! I’m super excited to share all the things with you today! I had a massive crafting session this weekend and created a ton of projects! It was so much fun and felt so good to be so productive! A handful of them all revolve around Jane’s Doodles’ set – Stinks! – so I thought I would group them all into one blog post to share with you.
It’s going to be long but I hope you’ll bear with me because there is so much cuteness to share. I hope you’ll find some fun inspiration along the way. Let’s get started with a peek at everything and then I’ll break it all down in case you’re curious.
This whole thing came about because I needed to create some gift tags for my daughter’s Valentine gifts she is delivering to friends in a few weeks. We both decided that the sentiments in this set plus the ADORABLE skunks were just too perfect to pass up. But I couldn’t stop at tags, I just wanted to color a million of these cuties so we’ve ended up with some string art, a dozen tags and two cards…and I love it all!
Let’s start with the tags. I’ve been fairly obsessed with Trinity Stamps nested hearts dies lately, so I cut 12 white ones in the middle size. Then used Newton’s Nook grass & hills and clouds stencils on it. I adhered the skunks with tape runner and stamped the sentiments, some hearts and a flower on them assembly line style. I die cut another heart the same size in pink and adhered them together for stability. Then I punched holes, added twine and glued some red bows on. My daughter loves taking her time with handwriting so she’ll add to and from herself to the back of each one. I just love them!
Next, I made some cards with extra images I had colored. Aside from the Jane’s Doodles Stinks! skunks, the goodies on these cards are all Newton’s Nook. They’re pretty self explanatory but I used stencils for the backgrounds – hills & grass, cloudy sky, argyle, and bokeh hearts. Then I used dies like frames & flags, framework and fancy edge tags for the components. Then everything is pretty much attached with foam tape or foam squares because I love dimension on my cards.
My final project today is another string art creation that popped in my head and I just had to create! I added water to my acrylic paint to create more of a white wash look, rather than the coated paint. I love this and will be making more with this idea. I used another one of the Trinity Stamps nested hearts to outline my nails for the string art. Then I die cut additional Stinks! images so each one is layered 4 times for stability and added with foam squares. I die cut LOVE from the Trinity Stamps marshmallow alphabet and adhered that directly to the wood with liquid glue. I finished things off with some red hearts from the Twiddler’s Nook conversation hearts clay embellishments.
Phew, that was a lot. Thank you so much for making it this far. I appreciate you sharing your time with me. I hope you found some inspiration to create something wonderful! Have a fabulous day!
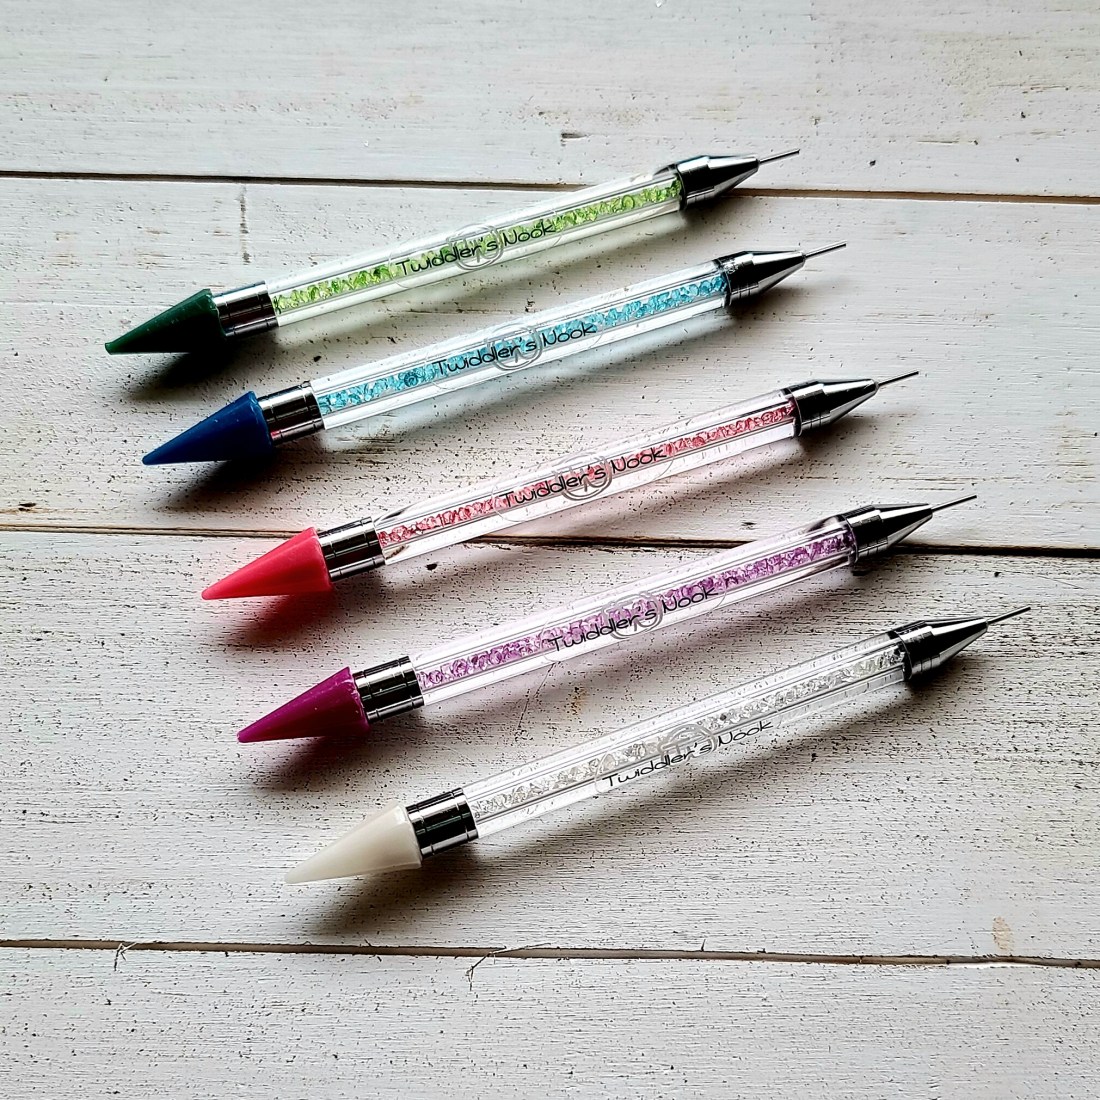
Don’t you love them? Blue, green, pink, purple and white! Which color is your favorite? I’d love to know! I don’t think I can choose. And I’m also really excited about the replacement tips too.
I think it would be super fun to get one color of embellishment wand and swap out the tip color to have a combo.
Here are links to the new listings so you can pop over and get yours ordered right away!
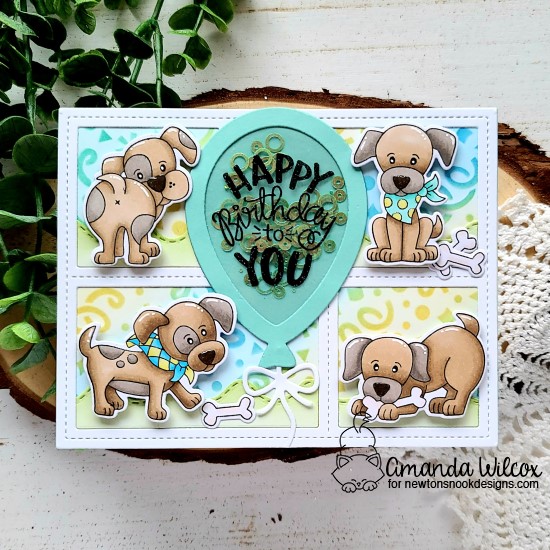
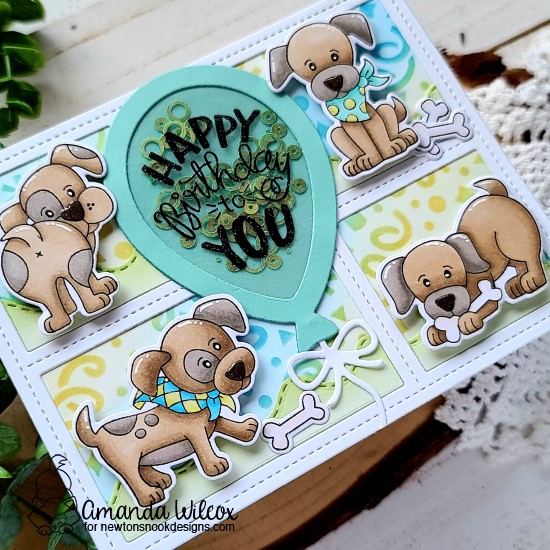
Hey friends! I’m over on the Newton’s Nook blog today with a really fun birthday card that I actually made for my dad this year. I had so much fun building all the layers to this card. I hope you enjoy it too!
I started by stamping and coloring the puppies from Puppy Playtime with my copic markers. Once I colored one, I knew I wanted to do a whole set in the same color combo. I just love it for some reason. Then I used the coordinating dies to cut them all out, including a bunch of the bones too.
Then I die cut the frame and also a panel to go behind it. On that panel I used blending brushes and dye inks over the Confetti stencil. I used liquid glue to adhere the frame and moved on to grounding the puppies. I pulled the windows that die cut with the frame out of the recycle bin (silly me) and used the Sea Borders die to cut them down. Then I blended some green dye ink on those and adhered them down as well.
At this point I was deciding on my sentiment and thought it would be fun to have the big Balloon Shaker in the middle of the party. I die cut all the elements and heat embossed my sentiment from Uplifting Wishes on the acetate and liquid glue to adhere it all together. The shaker bits are Princess Rings embellishment mix from the Twiddler’s Nook store in the Tiana color.
I popped all the puppies up with foam squares and used liquid glue to adhere the balloon and bones down in place. For finishing touches I added glossy accents to the puppy noses and scarves, and black and white glaze pen to their eyes.
I appreciate you sharing your time with me. Have a fabulous day!