Blog

Miss Ink Stamps – Some Days…

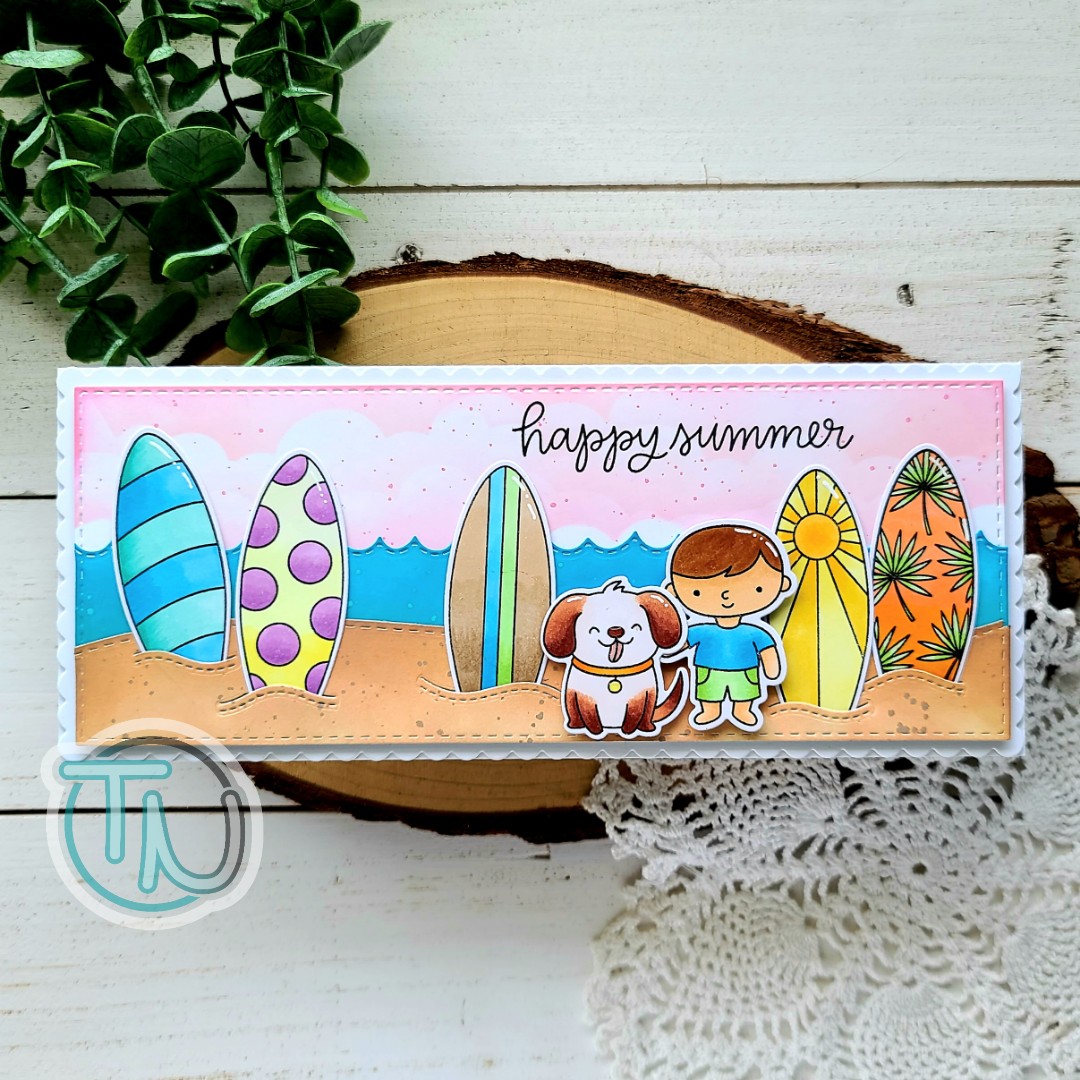
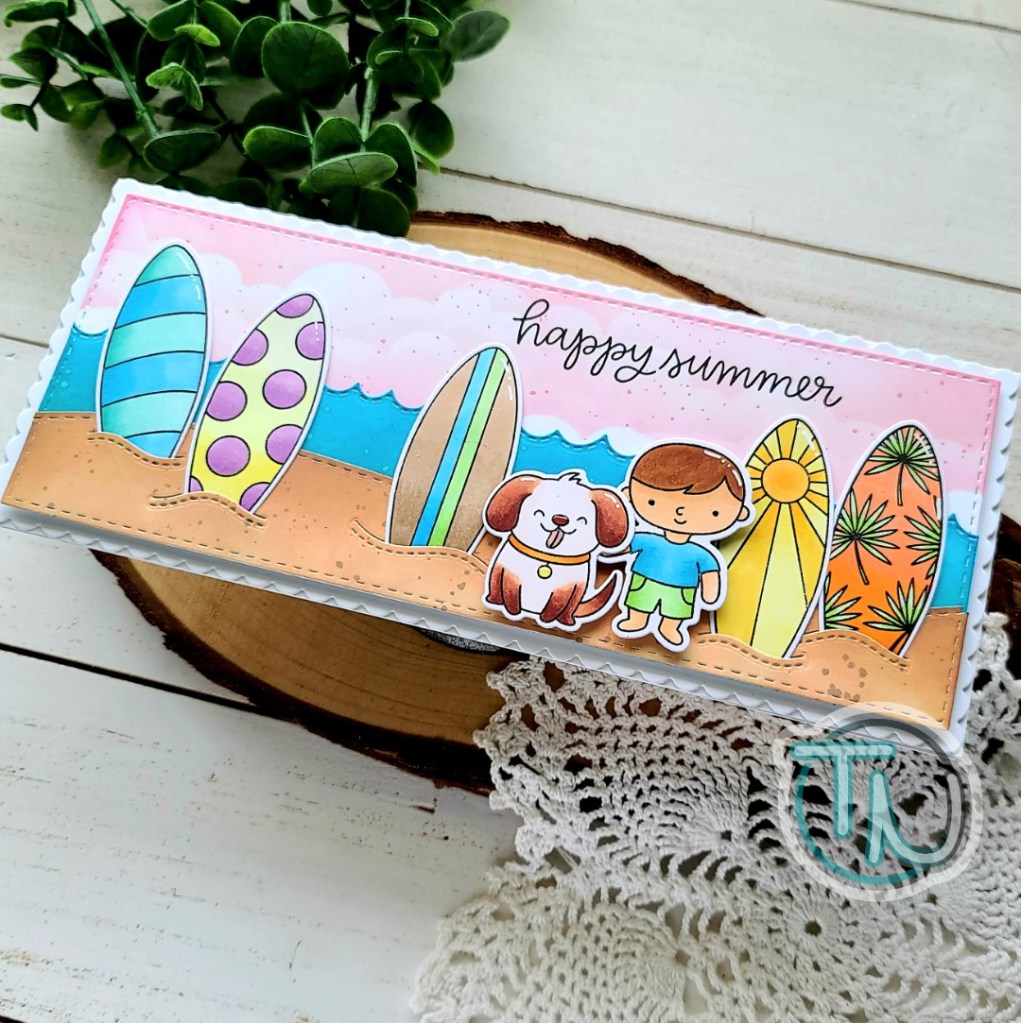
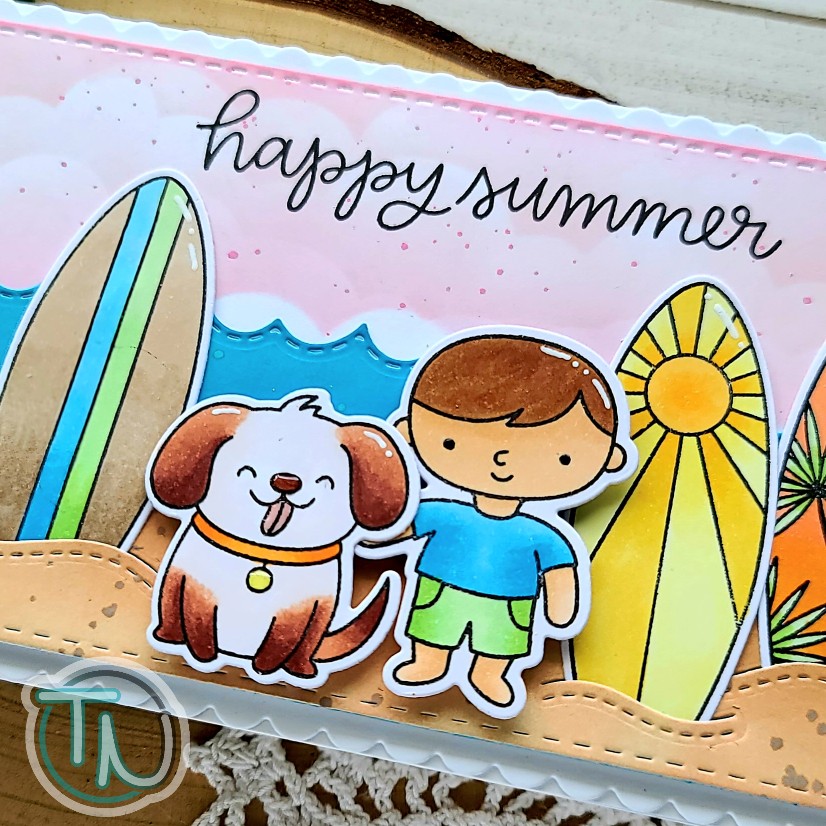
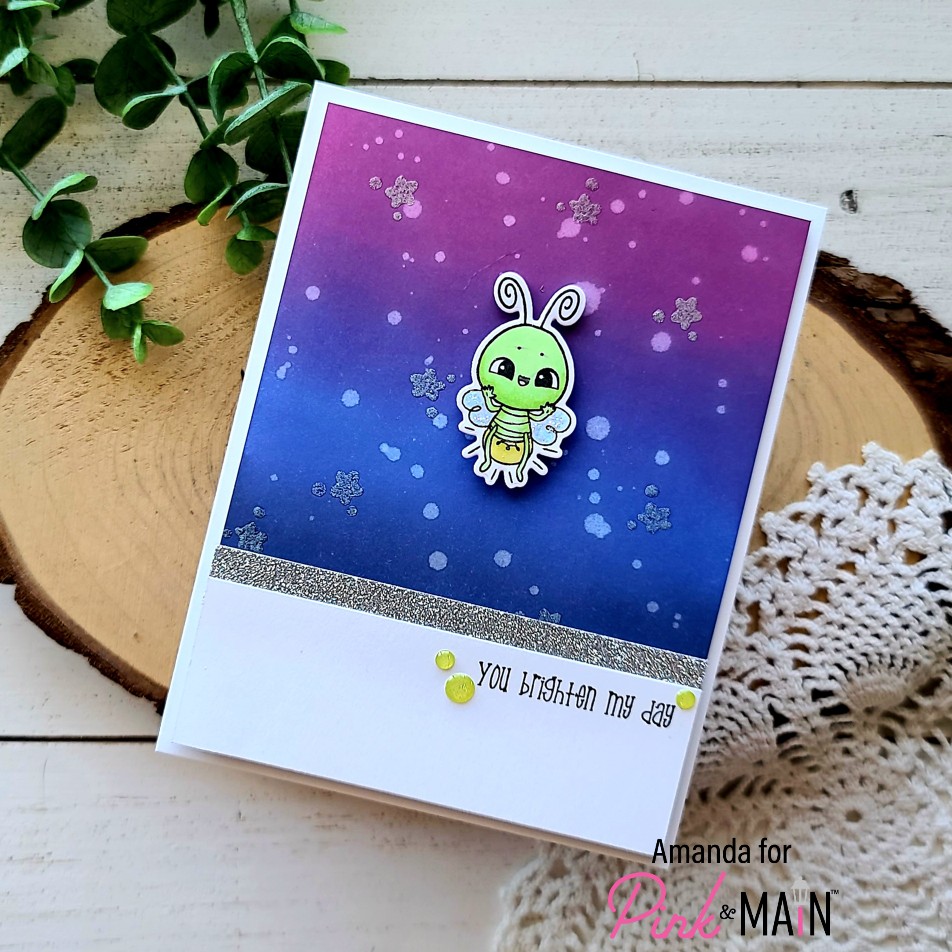
Hey friends! Thanks for stopping by again today. I’m over on the Miss Ink Stamps blog with a new-to-me idea on stenciling and some more of those wonderful Alice in Wonderland stamps! I hope you enjoy it!

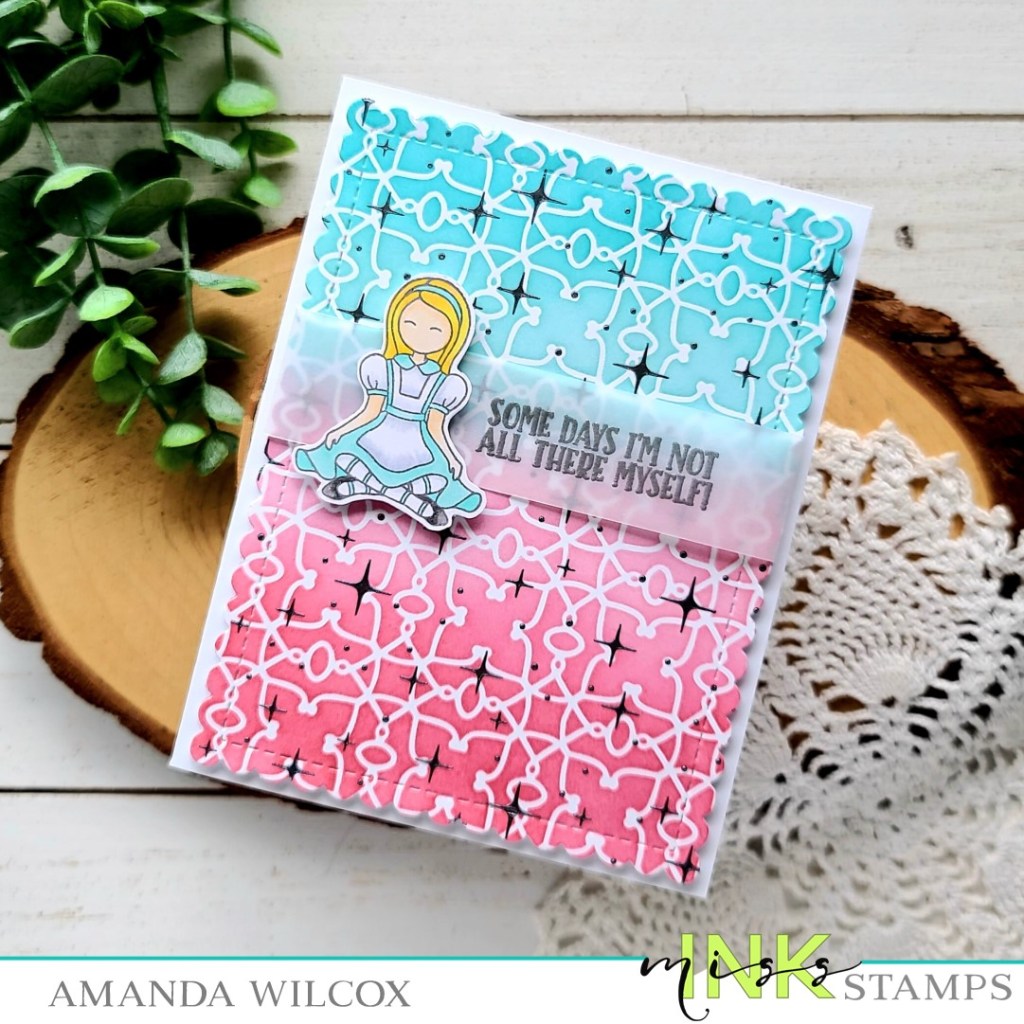
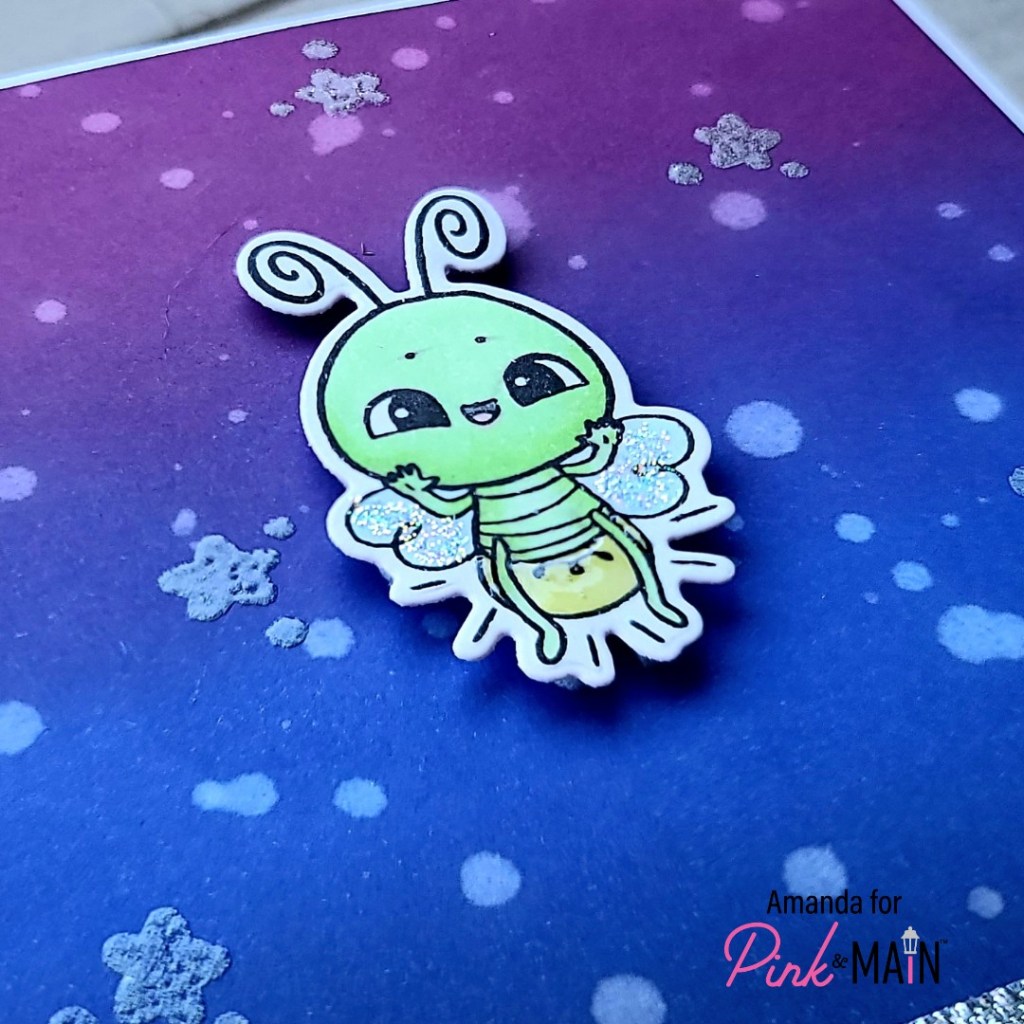
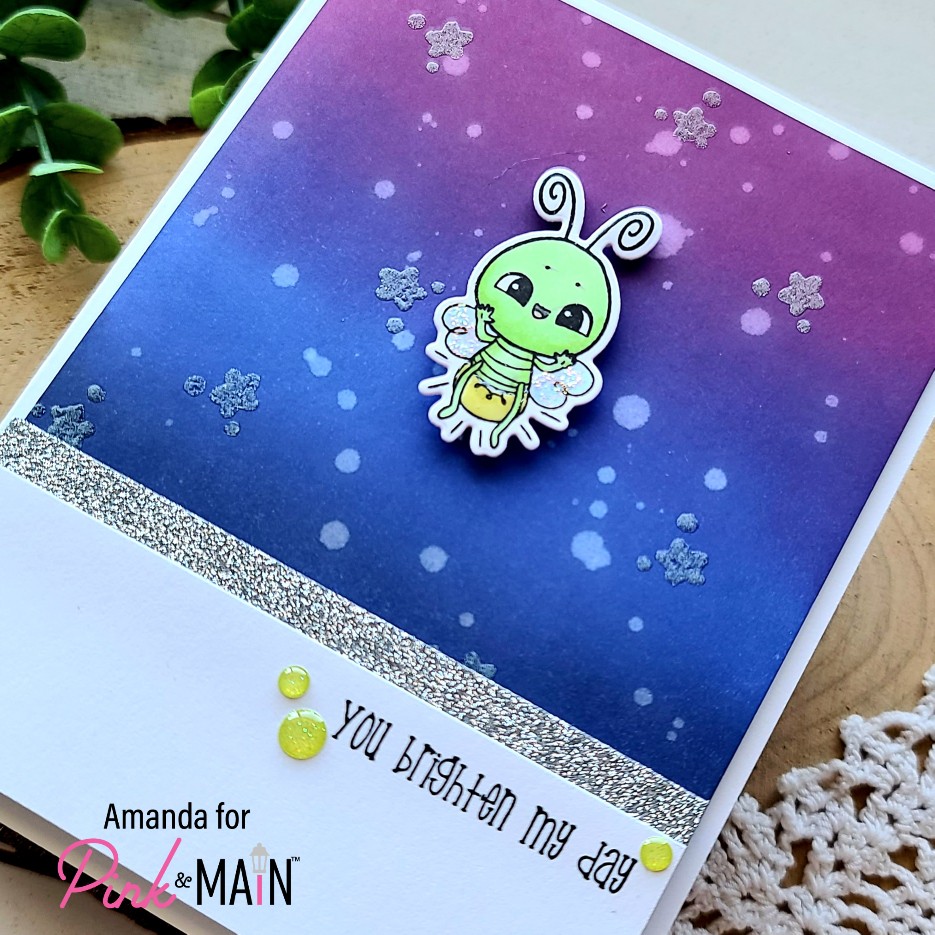
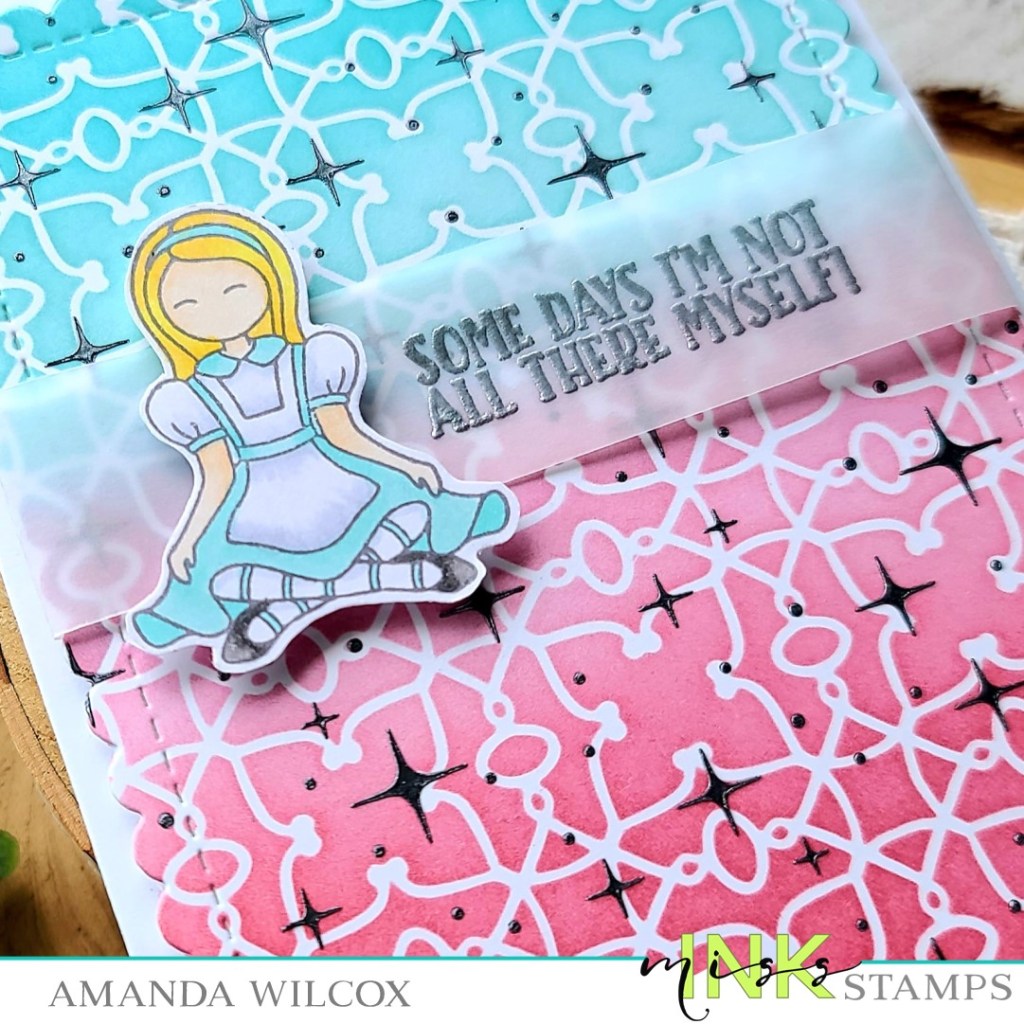
For today’s card, I inked up the enchanted stencil with a couple of peachy-red inks and tealy-blue inks. I tried to have them meet just shy if center on my panel so I could put my focus on the upper section of the card. After the panel was inked, I die cut it with a Newton’s Nook scalloped rectangle from the Frames & Flags die set.

After a teammate, Lynnea, had layered her stencils a while ago I’ve been enamored with the idea and wanted to try it with this card. So I taped my panel to the back of the Sparkles stencil and spread glazed pewter Metallix Gel through it. I removed the stencil and set my panel aside to dry.

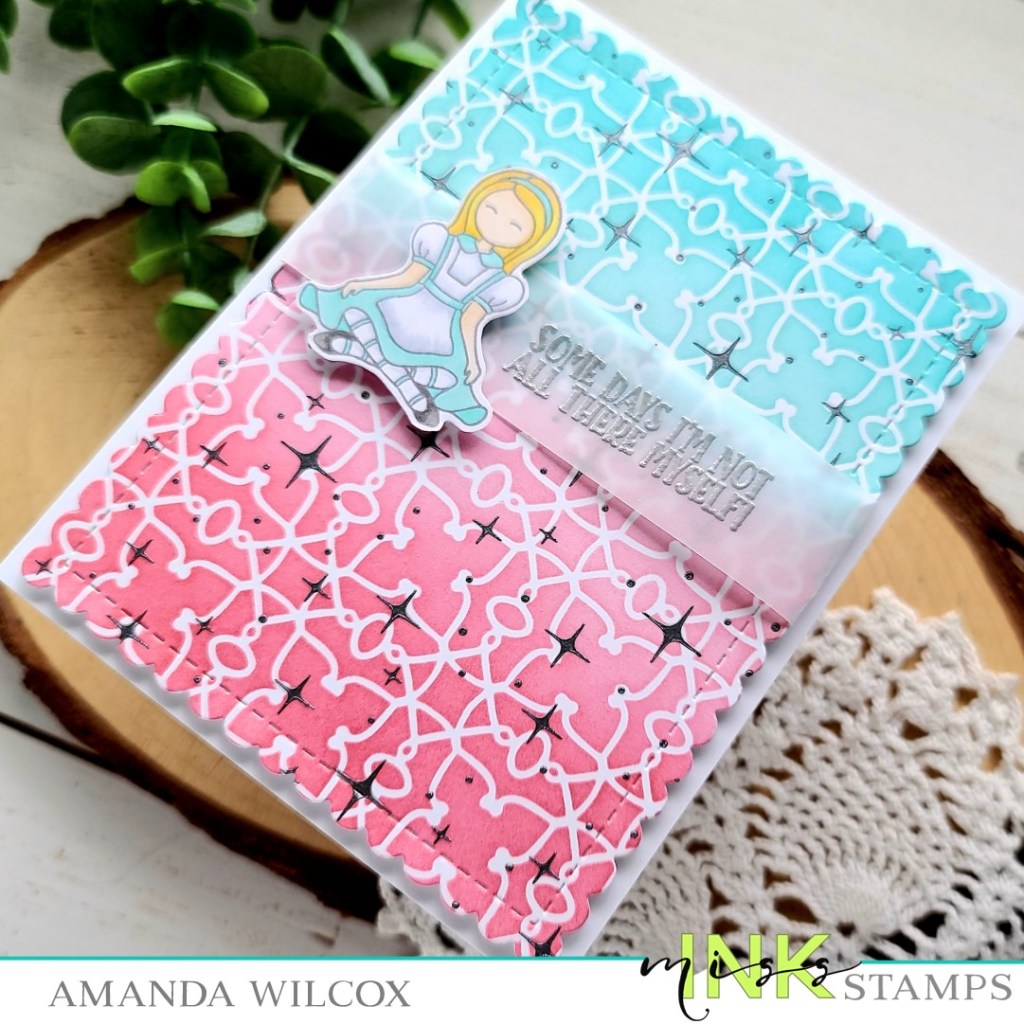
I stamped and colored an image from Alice with my copic markers and fussy cut her out. Then I chose a sentiment from Wonderland Wisdom, stamped and heat embossed it in silver on a vellum strip. I added foam tape to the back of my stenciled panel and wrapped my sentiment around it. Then I popped it on a white card base and added my Alice image with foam squares.

Have you ever layered stencils like this that aren’t “meant” for each other? I think it’s a fantastic idea and challenge you to give it a try! It extends the use of your goodies and will make you think outside the box. It’s so fun!

Products used on today’s card:
Alice stamps
Wonderland Wisdom stamps
Sparkles stencil
Enchanted stencil
Newton’s Nook Frames & Flags dies
Thermoweb Metallix Gel – glazed pewter

I appreciate you sharing your time with me. Have a fabulous day!

Coffee Loving Cardmakers – Jane’s Doodles card duo

Hi again! It’s Tuesday Tea with Twiddler’s Nook over on the Coffee Loving Cardmakers blog again today. This time I have a pair of really fun watercolor cards to share with you!

I recently ordered some new goodies from Jane’s Doodles and couldn’t wait to ink them up. I had originally planned to just share the tea card with you today but who knows what’s really in that coconut cup and I could really go for a giant coffee flavored ice cream cone, how about you?!?

To create these cards, I started by stamping and heat embossing the images on bristol smooth cardstock. Then I watercolored them with my zig clean color real brush markers. I used the scan-n-cut to cut the images out and separated them so I could focus on one card at a time.

For the tea card, I used the new Brew-tea-ful stamp set. I smooshed some dye inks on my glass mat and spritzed them with water. Then I blotted it up with a piece of watercolor paper, drying in between layers for extra texture. I trimmed the ink smooshed panel down to 3.75×5 inches and stamped my sentiment on the bottom left, then added foam tape to the back. Next, I trimmed a piece of textured yellow cardstock to 4×5.25 inches and also added foam tape to the back of that. I wrapped a piece of pink ribbon around these panels and placed them on a white card base. I added foam squares to the back of the images and adhered them above the ribbon. For finishing touches, I glued some flat back rhinestones to the design from the Twiddler’s Nook Midnight Stroll embellishment mix.

Next, I tried some ink smooshing that I hadn’t done before…with distress oxides. These inks give a much more thorough coverage and layer in a different way than dye inks so it was cool to play with it.

For this card, I used images from the Summer Icons stamp set. For the background I smooshed distress oxide inks on a couple of watercolor panels and then came in with my Trinity Stamps mini slimline dies to cut the panels and the circle windows. I layered the two panels together with foam strips and then a combination of foam squares and liquid glue for the images. I stamped and heat embossed a sentiment on black cardstock and die cut it with a banner die included in the original Trinity Stamps mini slimline card and envelope die set. I adhered it with a combination of foam strip and liquid glue. Then the whole thing is adhered to a white mini slimline card base with liquid glue.

I’m craving sunshine and all things summer these days so this card really speaks to me and let me escape the rain while I was creating it.

Products used on today’s projects:
Jane’s Doodles Brew-TEA-Ful stamps
Jane’s Doodles Summer Icons stamps
Trinity Stamps Mini Slimline Card and Envelope dies
Trinity Stamps Mini Modern Embossed Slimline dies
Twiddler’s Nook Midnight Stroll embellishment mix

I appreciate you sharing your time with me. Have a fabulous day!

Thermoweb – Foiled Father’s Day Cards

Hey friends! Welcome to a new week! Today I’m over on the Thermoweb blog sharing a couple of wild and fun Father’s Day cards with everyone!

It’s a two-for-one kind of deal which is always great when you’re creating! I used the newest Unity toner card fronts with some adorable Jane’s Doodles stamps.

To create this first card, I had cut the toner card front in half so once I finished it, I thought it would be fun to dive right back in and create a second version.

Here’s an angled look at the cool foiling! It really shimmers in the light. Photos don’t do it justice at all!

Remember, head over to the Thermoweb blog for a tutorial on how I created this fun cards!

I appreciate you sharing your time with me. Have a fabulous day!

Pretty Pink Posh – Celebrate America

Hey friends! I’m stopping in today to share a really fun shaker card I made using some new Pretty Pink Posh goodies. I just fell in love with this 4th of July stamp set the moment I saw it and was quite happy to color it up recently!

I ink blended a couple of panels using distress oxide inks – one in blueprint sketch and the other in candied apple. I spritzed them both with water and set them aside to dry. Then I stamped and colored the images I wanted to use from 4th of July with my copic markers. I used the coordinating dies to cut them out and started working on my shaker.

I used the Celebrate shaker die to cut a window from the blue panel, then cut the same die from white cardstock to use as an inlay. I lined the window with acetate and cover the back of the blue panel with foam tape. I poured some Trinity Stamps Sugared Stars and Stripes clay embellishments along with a small pile of Twiddler’s Nook Pixie Dust micro beads to help the pieces move around in the middle of the red panel, removed the release paper and sealed the shaker up.

Next, I used liquid glue to adhere the frame inlay and all of my images to the card front. That finishes this festively fun card off for the day!

For some reason I really enjoy creating Americana cards and decor so this card was extra fun to create!

Products used on today’s card:
PPP 4th of July stamps and dies
PPP Celebrate shaker die
Trinity Stamps Sugared Stars and Stripes embellishments
Twiddler’s Nook Pixie Dust Micro Beads – Silvermist color choice
Thermoweb foam strips
Distress Oxide Ink – blueprint sketch and candied apple

I appreciate you sharing your time with me. Have a fabulous day!

(This blog uses affiliate links whenever possible, at no additional cost to you.)

Pink & Main – Lovely Friend

Happy Friday everyone! I had a little die cutting fun with the most recent Pink & Main release and wanted to share it with you. This butterfly release was beautiful with so many options for styles of crafting! Today I’m using the Bold Butterfly Cover Panels and some fun paper!

For today’s card, I cut the layers using all 3 Bold Butterfly Panels from the following cardstock:

  • Panel A – black cardstock
  • Panel B – blue glitter cardstock from the summer glitter pack
  • Panel C – watercolor patterned paper from the Butterfly Wishes paper pack
  • Background panel using the largest layered A2 rectangle from patterned paper also from the Butterfly Wishes paper pack
  • Top frame – white cardstock using the two largest layered A2 rectangle dies together

I took the bottom layer of my card and the top layer of the butterfly and placed them in my MISTI together. Then I chose a sentiment from Cherry Blossom, placed it in the top left corner, removed the butterfly panel and stamped it in black ink.

Finally, I used EZ Squeeze liquid glue to adhere all of my layers together and then to a white card base. Then, to finish things off I scattered a few Butterfly Kisses enamel dots around the design.

These new fun cover plate dies have absolutely endless combination possibilities. You can use them all together, all separate or in different combinations too. Then when you add changing colors, textures and all the things, I could make butterflies forever!

Products used on today’s card:
Bold Butterfly Cover Plates Bundle
Cherry Blossom stamps
Layered A2 Rectangle dies
Butterfly Kisses paper pad
Butterfly Kisses enamel dots
EZ Squeeze liquid glue

I appreciate you sharing your time with me. Have a fabulous day!

(This blog uses affiliate links whenever possible, at no additional cost to you.)

Thermoweb – Laura Kelly Treat Boxes

Hey friends! I’m super excited to have some fun treat boxes over on the Thermoweb blog today featuring stamps, dies, toner card fronts and new foils in a new line partnering with Laura Kelly! Her doodles are so fun and whimsical I knew I wanted to create a variety of fun treat boxes to add goodies to and hand out to friends! They’re sure to make them smile!

I used to make treat boxes for coworkers for just about every holiday or occasion I could come up with and loved it! Since working from home I don’t get that chance really so this was a great excuse to pull out some dusty supplies and give them some love!

Head over to the Thermoweb blog for a tutorial how I created these fun boxes.

I appreciate you sharing your time with me. Have a fabulous day!

Miss Ink Stamps – Blowing Hugs and Kisses Your Way

Happy Thursday everyone! I recently ordered some older Miss Ink Stamps sets that I had missed when they release so I’m having a blast playing with them. Today I have a fun bubble card to share with some of the cutest critters out there!

To create my card, I stamped images from Bubbles and colored them with my copic markers. Then I used the coordinating dies to cut them out and set it all aside to get messy inky for my background!

For that, I trimmed a piece of white cardstock to 3×5.5 inches and inked it up with tumbled glass, mermaid lagoon and wilted violet distress oxide inks. Next, I took a scrap strip of white cardstock and inked it up with tea dye and gathered twigs distress oxide. I spritzed it all with a distress sprayer and blotted it dry. Then I smooshed some seedless preserves and gathered twigs on my glass mat and spritzed them with water. I used a small paintbrush and splattered the panels with the corresponding color.

Now it’s time to build the scene. I cut a piece of black cardstock to 3.25×5.5 inches and adhered the inked panel. Then I added the ground layers with liquid glue. Next, I adhered that panel to the center of an A2 size white card base.

Then I added the critters with a combination of liquid glue and foam squares. Next, I chose a sentiment and heat embossed it on a black strip with white embossing powder. I trimmed it into a flag shape and added it with foam strips.

For finishing touches, I added glossy accents to critter noses and bubble bottle labels. Then I added unicorn Stickles to edges of the bubbles for a little sparkle.

These guys are just soooo cute and I have tons of ideas for them! Can’t wait to create more fun to share with you!

Products used on today’s card:
Bubbles stamps and dies
Distress oxide inks – gathered twigs, tea dye, tumbled glass, mermaid lagoon, wilted violet
Glossy accents
Stickles – unicorn

I appreciate you sharing your time with me. Have a fabulous day!

(This blog uses affiliate links whenever possible, at no additional cost to you.)

Trinity Stamps – Happy Everything Balloon Shaped Cards

Hello everyone! We’re already to Wednesday of this awesome week! Today I have another set of cards to share with you. These balloon shaped cards were so fun to create! It all started with the Trinity Stamps Rainbow Funshine dies. Whenever I die cut colored cardstock for rainbows, I love to cut the whole rainbow from each color and then mix and match them for different rainbows. It also, always leads to multiple cards which is fabulous for stocking your stash or sending happy mail to a group of friends.

I began this project by die cutting and assembling all of my rainbows and sunshines. Then I die cut the largest balloon from the Bunch of Balloons die set and inked up the new puffy cloud borders stencil on each one. Then I just glued the rainbows, clouds and sunshines to each balloon.

I couldn’t decide on one sentiment so I pulled out the Happy Senti-mini stamps and dies and cut the happy from silver cardstock and vellum and glued them together. Then I chose a random assortment of supporting sentiments from the same set, stamped and heat embossed them. Then I used the banner die cut from the Merry Christmas Senti-mini die set and cut them all out. Then all of the sentiment pieces were adhered with liquid glue.

Last, I created 6 white card bases, positioned the same balloon die so that the top of the die hung over the edge (meaning it won’t cut the top portion) and created shaped card bases. Once those were done, I adhered the balloons and tied some black and white baker’s twine to the bottom of each one.

Aren’t these just so much fun!?! I love how they turned out!

Products used on today’s project:
Bunch of Balloons dies
Rainbow Funshine dies
Puffy Cloud Layers stencil
Happy Senti-mini stamps and dies
Merry Christmas Senti-mini dies
Pink & Main silver glitter paper

Also, this month is Trinity Stamps’ birthday month so we’ll be sharing tons of fun birthday inspiration and there will be fun challenges and giveaways going on. Be sure to stay in touch via Instagram and the Facebook group to make sure you don’t miss any of the fun!

I appreciate you sharing your time with me. Have a fabulous day!

Pretty Pink Posh – Happy Summer

Hello there! Thanks for stopping by today! I have a bright and happy summer card to share featuring some Pretty Pink Posh images paired with Trinity Stamps and Lawn Fawn dies to help create my scene. I hope you like it!

To create my card, I chose the images I wanted to use on the Summer Surfboards, Summer Friends and Playful Puppies sets from Pretty Pink Posh. I stamped and colored them with my copic markers and used the coordinating dies to cut them all out. Then for my scene building, I die cut the elements from white cardstock using the Trinity Stamps Slimline scalloped panels, stitched panels, scenic borders and great outdoors borders.

I inked up my layers with distress oxide inks. For the sky I used the puffy cloud stencil with spun sugar and picked raspberry. For the water I used mermaid lagoon and peacock feathers. Then for the sand I came in with tea dye and gathered twigs. After each panel was inked up I spritzed them with water and then flicked the darker color of ink on them. Once the sand was complete and dry, I came back in with the Lawn Fawn sandy beach accents dies to create the mounds to slip my surfboard into.

Moving on to assembly, I used liquid glue to adhere all of the layers together including the surfboards. Then I popped that panel in my MISTI and stamped a sentiment from Summer Surfboards in the sky. I added foam tape to the back of my panel and popped it on the white slimline scalloped panel. Then I added foam squares to the boy and his pup and popped them in place last. Finally, I used liquid glue to adhere the whole thing to a card base.

For finishing touches, I added white gel pen accents to the images and glossy accents to the puppy’s nose, tongue and tag.

This card is so happy and was a blast to create! I am very ready for summer break and all the adventures the come with it!

Supplies used on today’s card:
Pretty Pink Posh Summer Friends stamps and dies
Pretty Pink Posh Summer Surfboards stamps and dies
Pretty Pink Push Playful Puppies stamps and dies
Trinity Stamps Slimline Scalloped Panels dies
Trinity Stamps Slimline Stitched Panels and Windows dies
Trinity Stamps Slimline Great Outdoors Borders dies
Trinity Stamps Slimline Scenic Borders dies
Trinity Stamps Puffy Cloud Layers stencil
Lawn Fawn Sandy Beach Accents dies
Glossy accents

I appreciate you sharing your time with me. Have a fabulous day!

(This blog uses affiliate links whenever possible, at no additional cost to you.)

Pink & Main – Stamp of the Month

Happy Sunday everyone! I’m popping in really quick today to remind you that there is still time to sign up for the Pink & Main stamp of the month and get the May cuties! This month’s stamp set is called Way to Glow and it’s an adorable set of fireflies. I have a super fun glow in the dark card to share with you too!

I inked up that background with seedless preserves, blueprint sketch and chipped sapphire distress oxide inks. Then I flicked some water drops on it and let it dry. I stamped the star image from the set with versamark ink and heat embossed it with Lawn Fawn glow in the dark embossing powder! It’s so cool!!!

I chose one of the cute firefly images, stamped and colored him with copics, then used the coordinating dies to cut him out. He’s popped up with foam squares.

For my sentiment, I cut a strip of white cardstock to 1.5×4 inches and stamped the sentiment on it. Then I adhered a strip of silver glitter paper to the back of it and added foam tape. I popped it on my inked panel and added foam tape to the back of that before adding it to a white card base.

For finishing touches, I added a few butterfly kisses enamel dots, glossy accents to the bug’s bum and unicorn Stickles to its wings. Ready to see it glow? It’s so fun!!!

Now, head over and subscribe to the stamp of the month before you miss your chance! You won’t be sorry! These sets are sooo much fun to play with!

Products used on today’s card:
Pink & Main Stamp of the Month
Metallics glitter paper pad
Butterfly Kisses enamel dots
Distress Oxide inks – seedless preserves, blueprint sketch, chipped sapphire
Glossy accents
Stickles – unicorn
Glow in the dark embossing powder

I appreciate you sharing your time with me. Have a fabulous day!