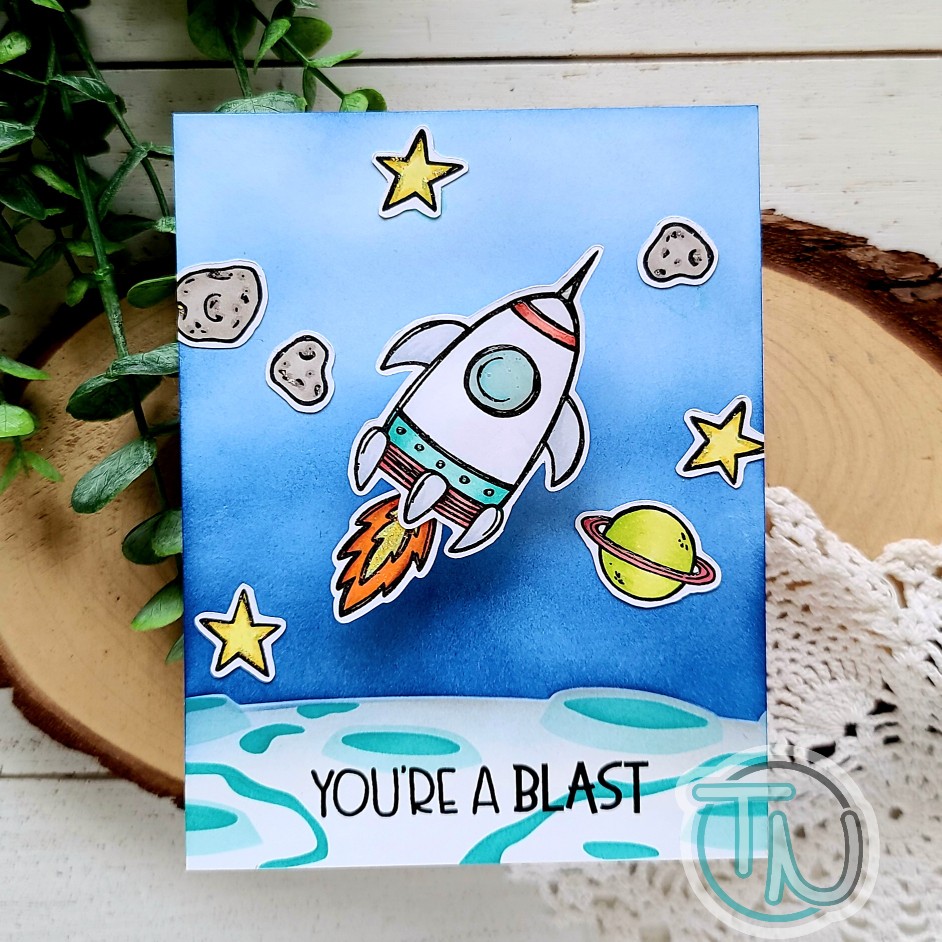
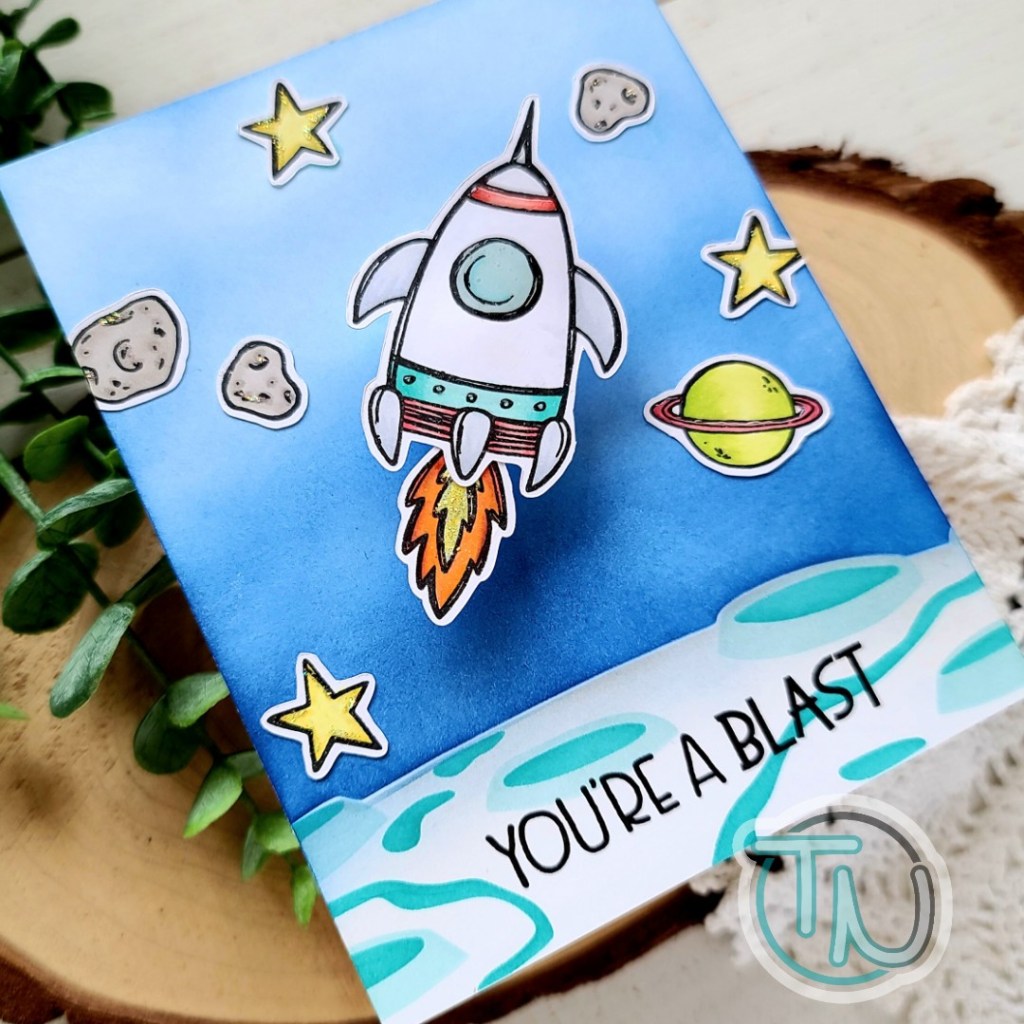
Hello everyone! I had some fun crafty time Friday night and wanted to share with you what I made. I’ve had this card in my head for a while and was super excited to get it down on paper finally! I just love this To the Moon set from Jane’s Doodles and absolutely had to pair it with the Trinity Stamps Crater Layers stencil.
I started by inking up a panel with Lawn Fawn inks and my Trinity Stamps blending buddy brushes using the crater layers stencil. Once the crater was complete, I used the negative piece included in the set to block the crater and ink up the rest of the panel.
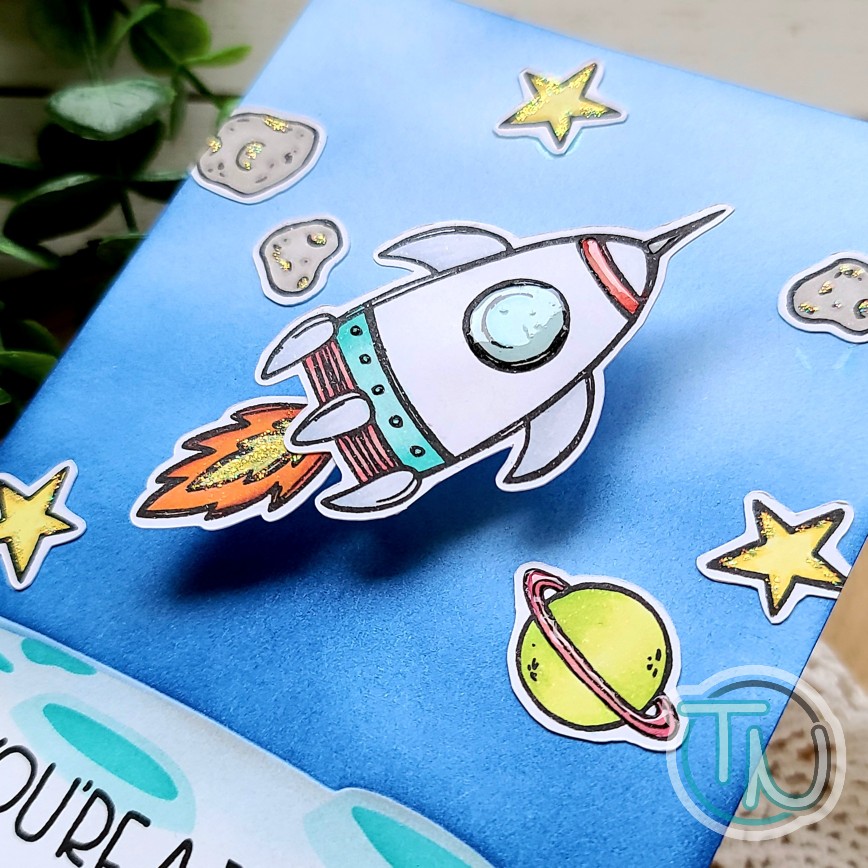
Then I stamped and colored my images from To the Moon with my copic markers. I used my scan-n-cut to cut out the images and started arranging them. I used liquid glue to adhere everything down except the spaceship. I put my card in my MISTI and stamped the sentiment over the crater. Then, I popped the spaceship on my card with an action wobbler to make this card SUPER FUN!
For finishing touches I added unicorn Stickles on the stars, moon rocks and fire, and glossy accents on bits of the spaceship and planet rings.
This card is so awesome and so much fun to play with! In fact, it’s so fun that I made a slo-mo video to share with you too!
Squeeee!!!! Isn’t that just so much fun! And I’m super excited to finally figure out how to edit these fun videos so I can share them with you more often.
I appreciate you sharing your time with me. Have a fabulous day!
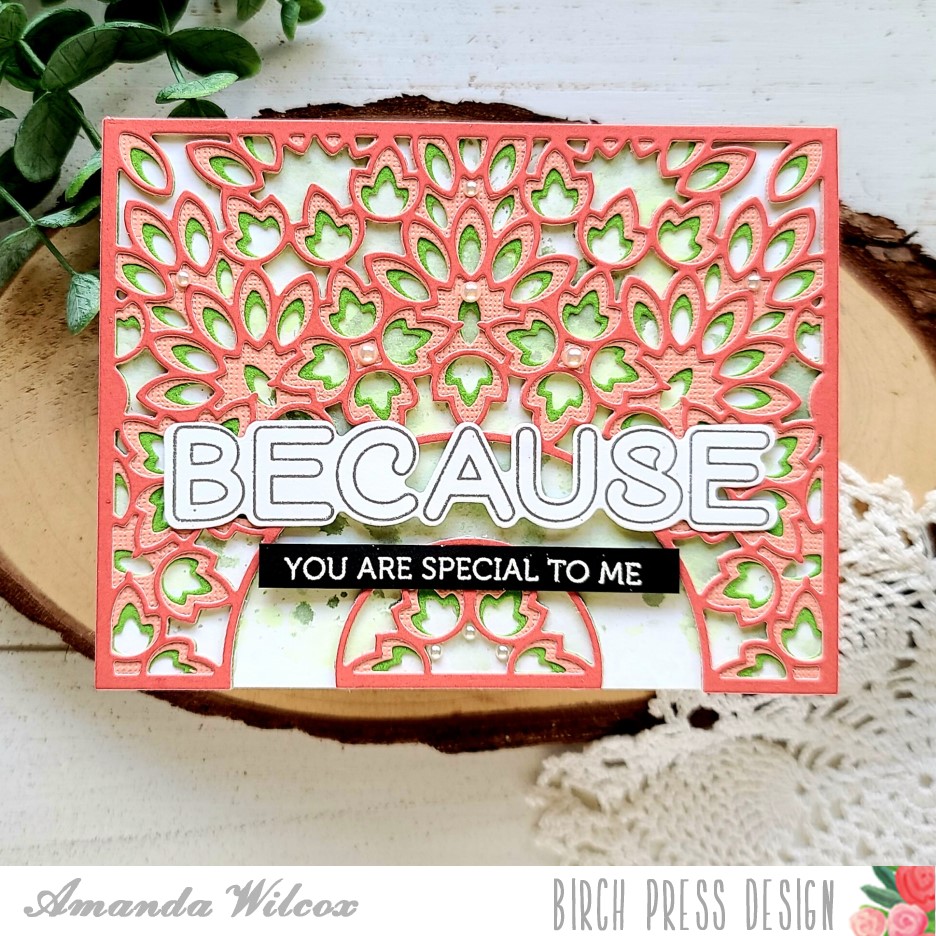
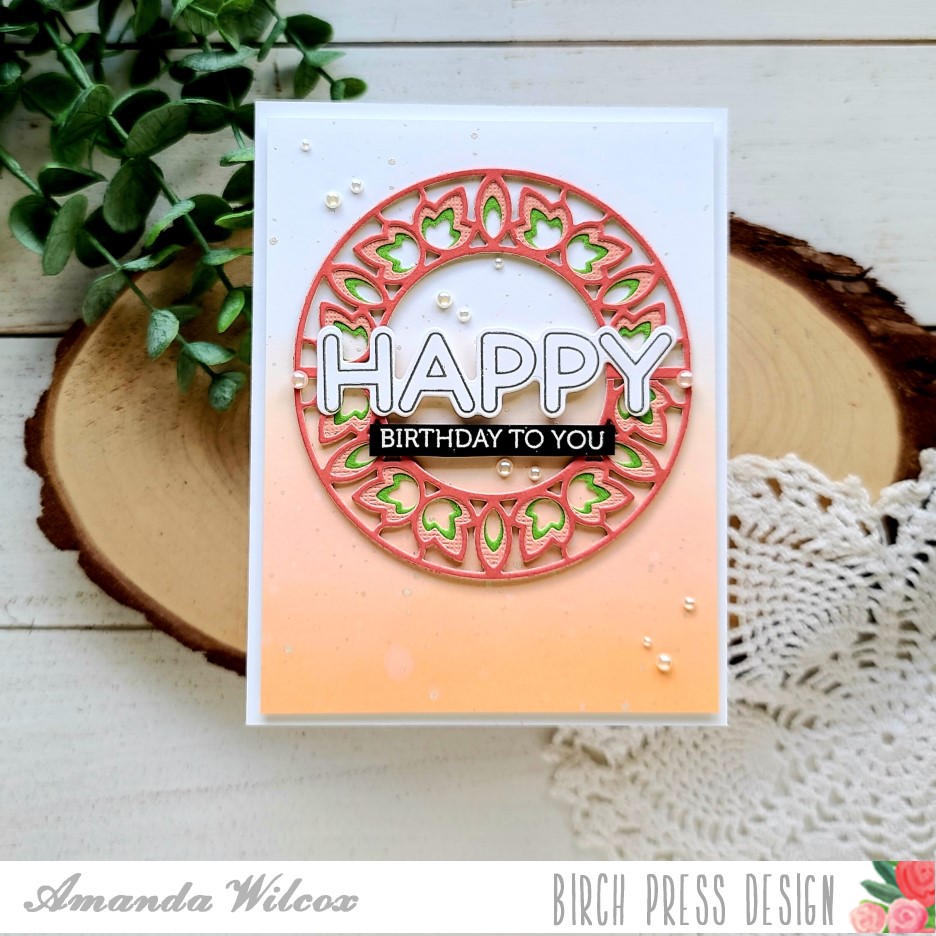
Welcome everyone! Today I’m over on the Birch Press Design blog with this pair of cards featuring the Enchantment layering dies and the Crystal Lingo stamps and coordinating dies. I had a fun idea I wanted to try after being inspired by my friend Ellen earlier this week and instead of having waste, I made 2 cards!
My original idea was to die cut the three layers for the Enchantment layers but omit the middle arch like I did on the card on the left, but I couldn’t just waste those pieces so I went ahead and cut just that middle part a second time and created another card!
My friend Ellen inspired me this week by using Thermoweb Deco Foil Flock for her Birch Press layers and I thought it looked so cool that I wanted to try it out. For today’s card, I used green flock, a pink textured cardstock for the middle layer and a smooth rose colored cardstock for the top layer.
On this first card, I didn’t want the background layer to be stark so I did a little ink smooshing on a panel and adhered it to a white card base. Then I adhered the Enchantment layers together and on to the card. I stamped, heat embossed and cut out the sentiment from the Crystal Lingo set and used a combination of foam squares and liquid glue to adhered them down. For finishing touches I used pearl baubles from Twiddler’s Nook to give some shiny accents around the design.
For the second card, I blended tattered rose and dried marigold distress oxide inks on a panel, spritzed it with water and flicked some pearl watercolor on it. Once it was dry, I trimmed it down to 4×5.25 inches and popped it up with foam strips on a white card base. I adhered my Enchantment ring and then the sentiment just like the first card. I used the pearl baubles from Twiddler’s Nook on this card as well, just in a different way scattering them across the design randomly.
These colors are so pretty and have me wishing for sunshiny warm days and being outside!
I appreciate you sharing your time with me. Have a fabulous day!
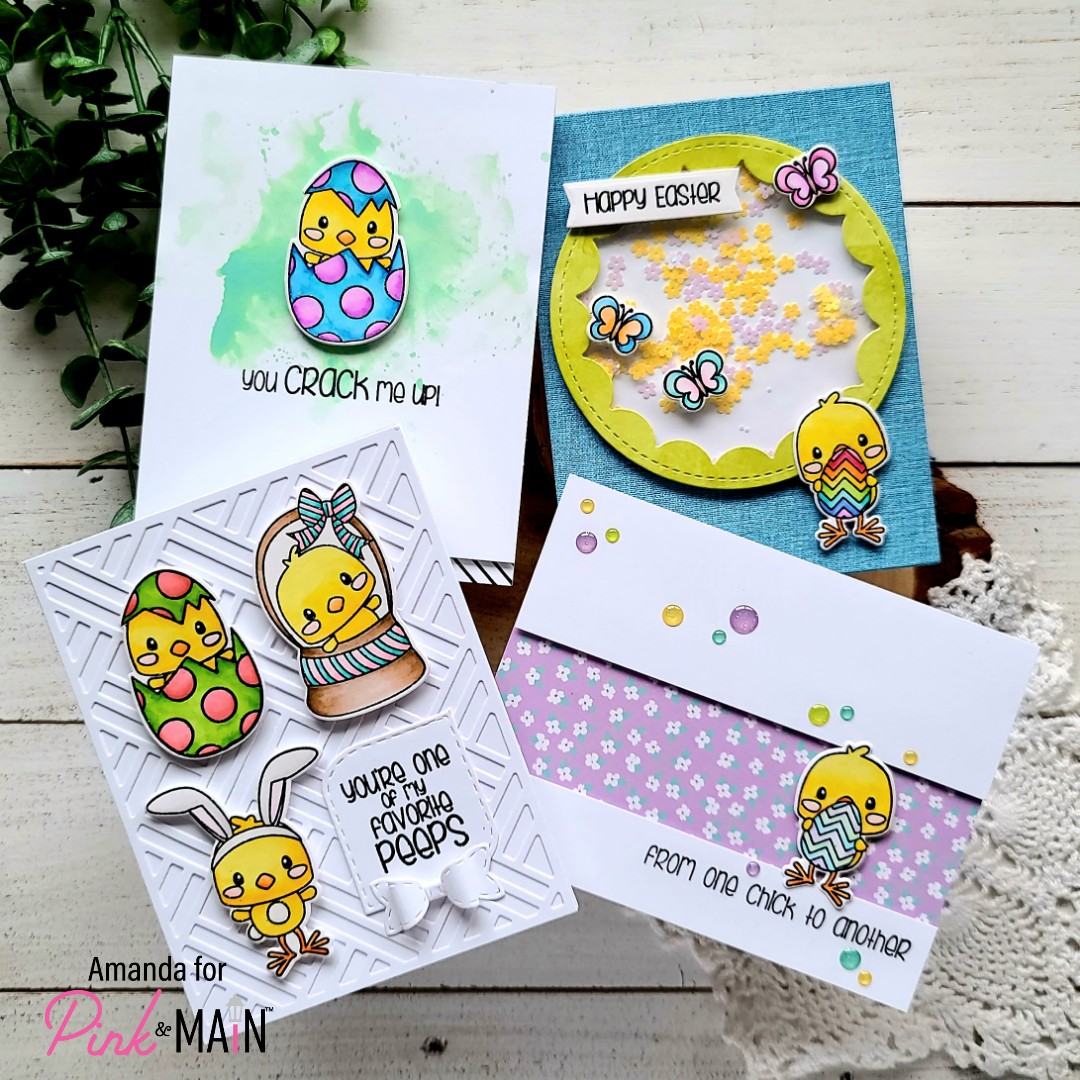
Happy Friday everyone!!! I hope you all had a wonderful week and are ready for a great weekend ahead! Today I’m over on the Pink & Main blog sharing this set of 4 Easter cards featuring the Easter Peeps stamp set, coordinating dies and some other goodies too! Let’s dive in and I’ll give a little explanation of each one.
Actually, first…I had no direction when I started these cards, just an itch to watercolor these cute chicks so I stamped and heat embossed a bunch of them on a piece of Bristol Smooth cardstock and colored them with my Zig markers and a waterbrush pen. Then…
For this first card, I pulled out the new Happy paper pad and the largest Stackable A2 rectangle dies to create my background. I cut a white circle and, using the green watercolor paper from the same pad, a reverse scalloped circle. I created a shaker mechanism adding some great primrose confetti bits from the Twiddler’s Nook shop. I adhered the background to a card base with liquid glue and the shaker mechanism on that the same way. Then I added foam tape to the back of my images and popped them in place. I stamped a sentiment from the stamp set and die cut it with a large sentiment strip and popped it up as well.
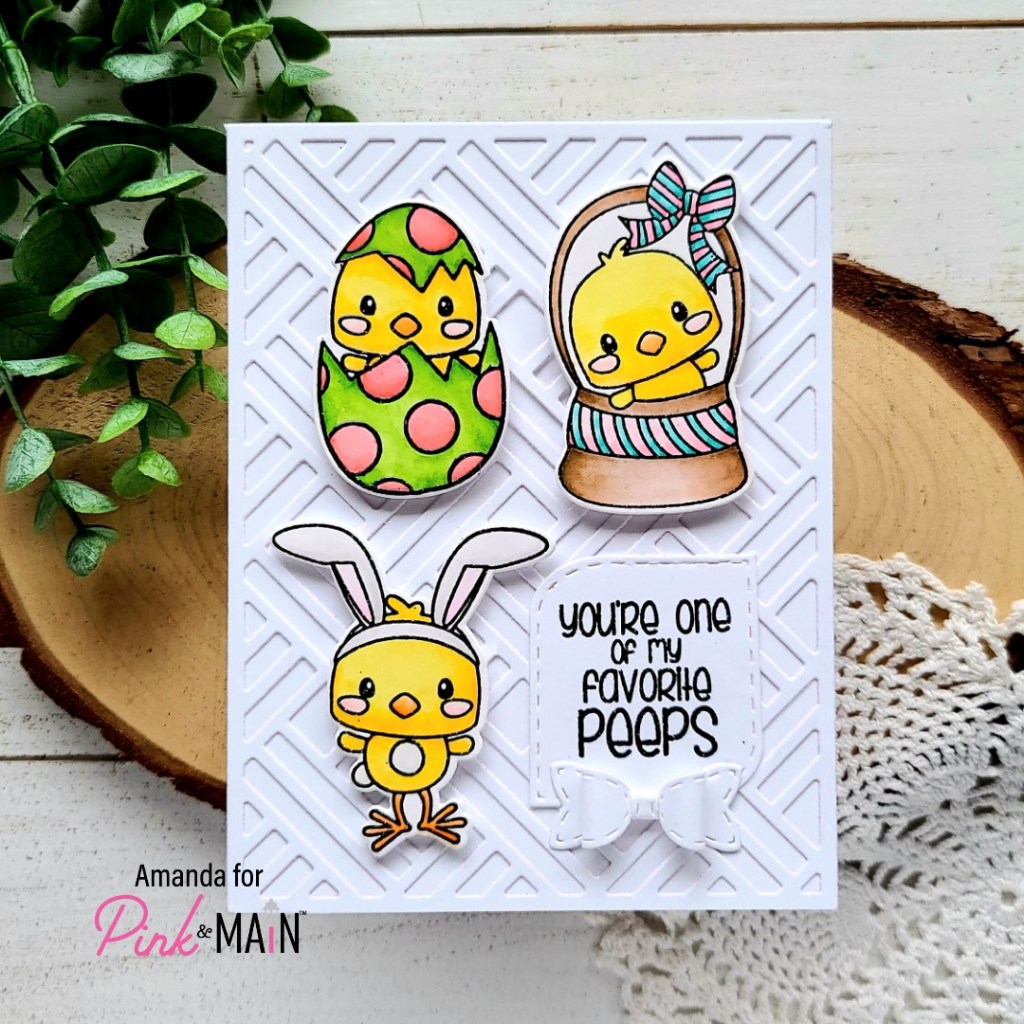
I knew that I wanted to make a card with the basket cover die as my background so I pulled that out next and cut it from white. I used liquid glue to adhere it down and added foam squares to the back of my images. For the sentiment, I stamped and heat embossed it black so it matches the images and did partial die cutting with one of the mod stitched rectangles to create a custom size. Then, to finish this card off I made the smallest stitched bow and added it below the sentiment.
I only had 2 images left at this point so I made a couple of fun clean and simple cards with them. This one, I did some ink smooshing with cracked pistachio distress oxide ink on a white panel, popped my image up with foam squares and stamped the sentiment below it. I trimmed 1/2 inch off the bottom of the panel and added foam tape to the back. Then I stamped a striped background with black ink on a card base and added my panel. This card might be my favorite of all…
For this final card, I trimmed another piece of paper from the Happy paper pad and adhered it to a card base. Then I trimmed a piece of white cardstock to 2 strips and popped them up with foam tape. Using my MISTI, I stamped my sentiment and then using a combo of foam tape and liquid glue to adhere my little chickie. I decided to finish this card off with some super cute Happy Mail glitter enamel dots scattered across the card.
I know this was a long post and I’m glad you stuck with me to the end. Did you have a favorite card from the bunch?
I appreciate you sharing your time with me. Have a fabulous day!
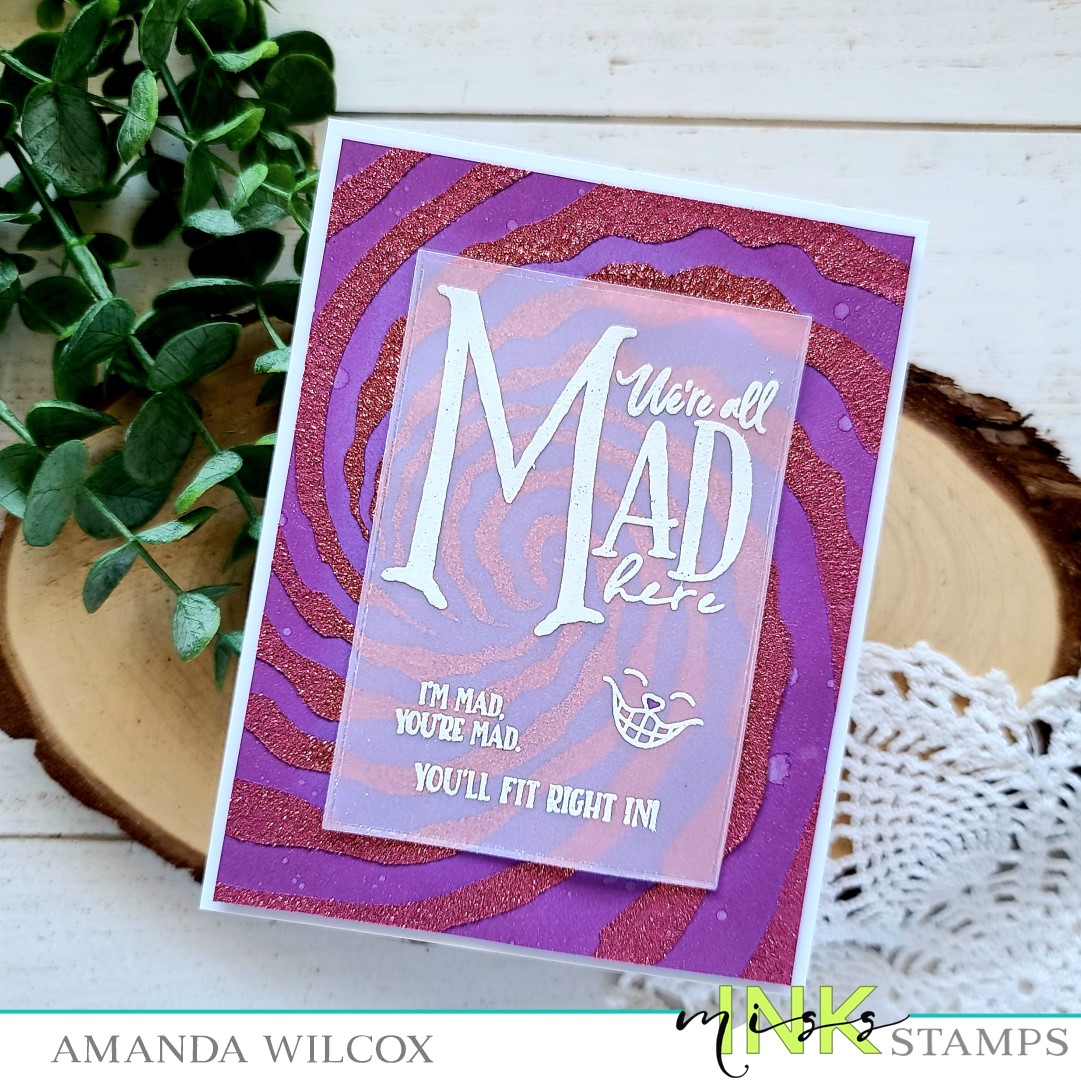
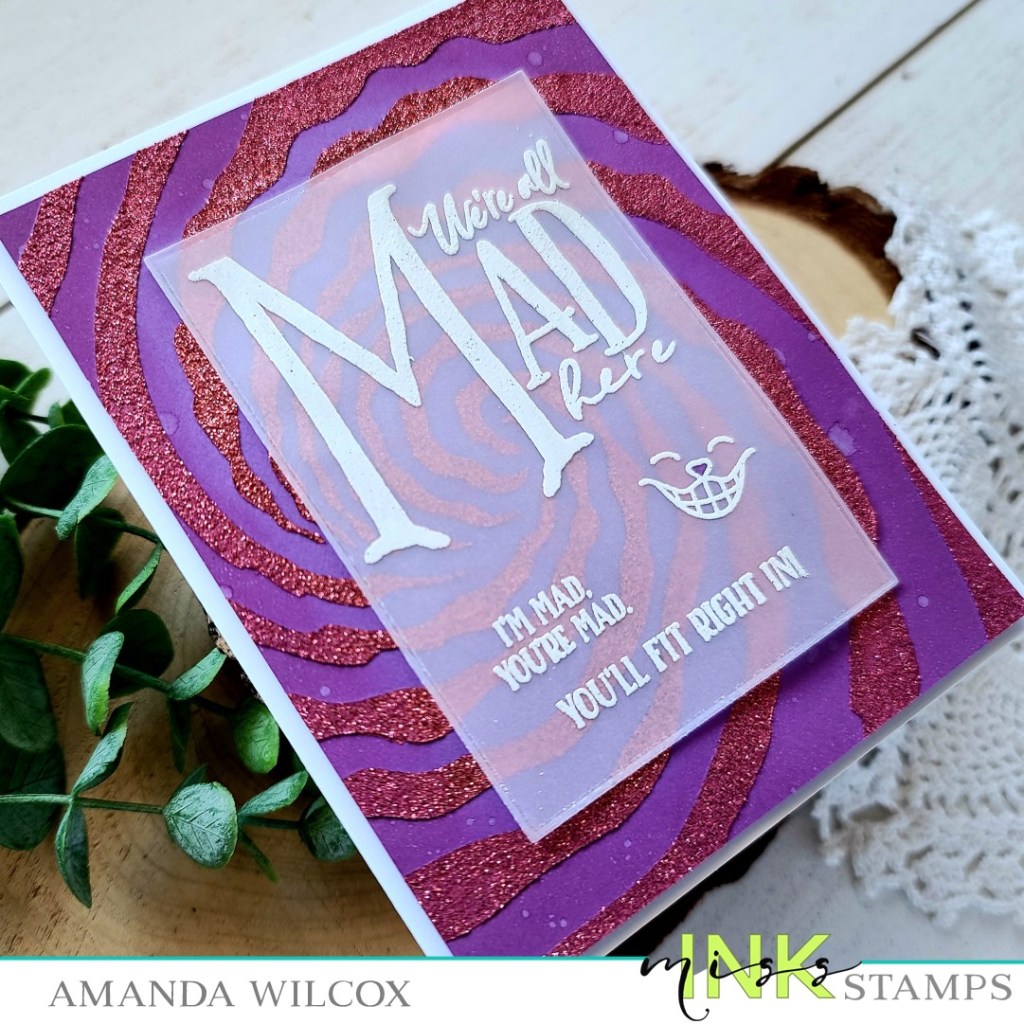
Hi again! I’ve fallen down the rabbit hole again…those wonderful Miss Ink Stamps Alice in Wonderland products are ahhhhh-mazing! This time for some reason, when I looked at the rabbit hole stencil looked a bit like the Cheshire Cat’s stripes so I decided to play a little bit.
I took some Glitz Glitter Gel in bubblegum and the rabbit hole stencil from Miss Ink Stamps on purple cardstock! It’s totally brilliant and I love it! I left it overnight to dry and when I came back the next day I did think the purple cardstock was a little flat so I inked up the edges with distress oxide ink in wilted violet and spritzed it with my distress sprayer.
I arranged my stamps how I wanted them and found a Trinity Stamps modern embossed rectangle the correct size and die cut a piece of vellum. Then I stamped and heat embossed my sentiments from Miss Ink Stamps Madness and that awesome image of Chesh’s face from Wonderland Wisdom. I hid some liquid glue behind the embossing and placed it on the stenciled panel, topping it with some acrylic blocks to help it dry flat.
I left it be for a while and came back to finish things up. I trimmed 1/8 inch off each side of the stenciled panel and added foam tape to the back. Then I adhered it to a white card base and my card is finished.
Isn’t it splendid?!? I just love how the bright, vibrant colors turned out! It’s so fun and the Alice sentiments just make me happy.
I appreciate you sharing your time with me. Have a fabulous day!
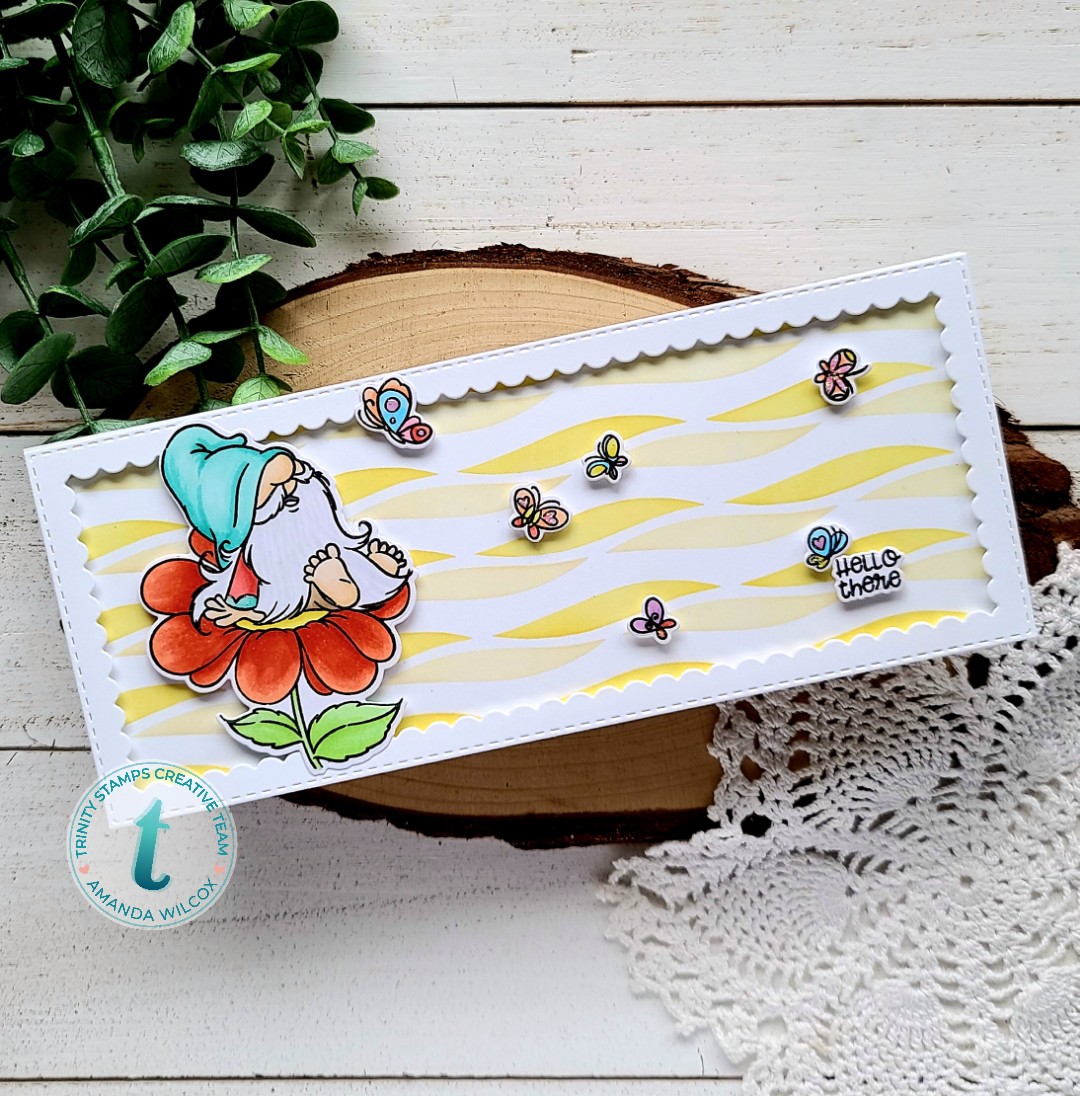
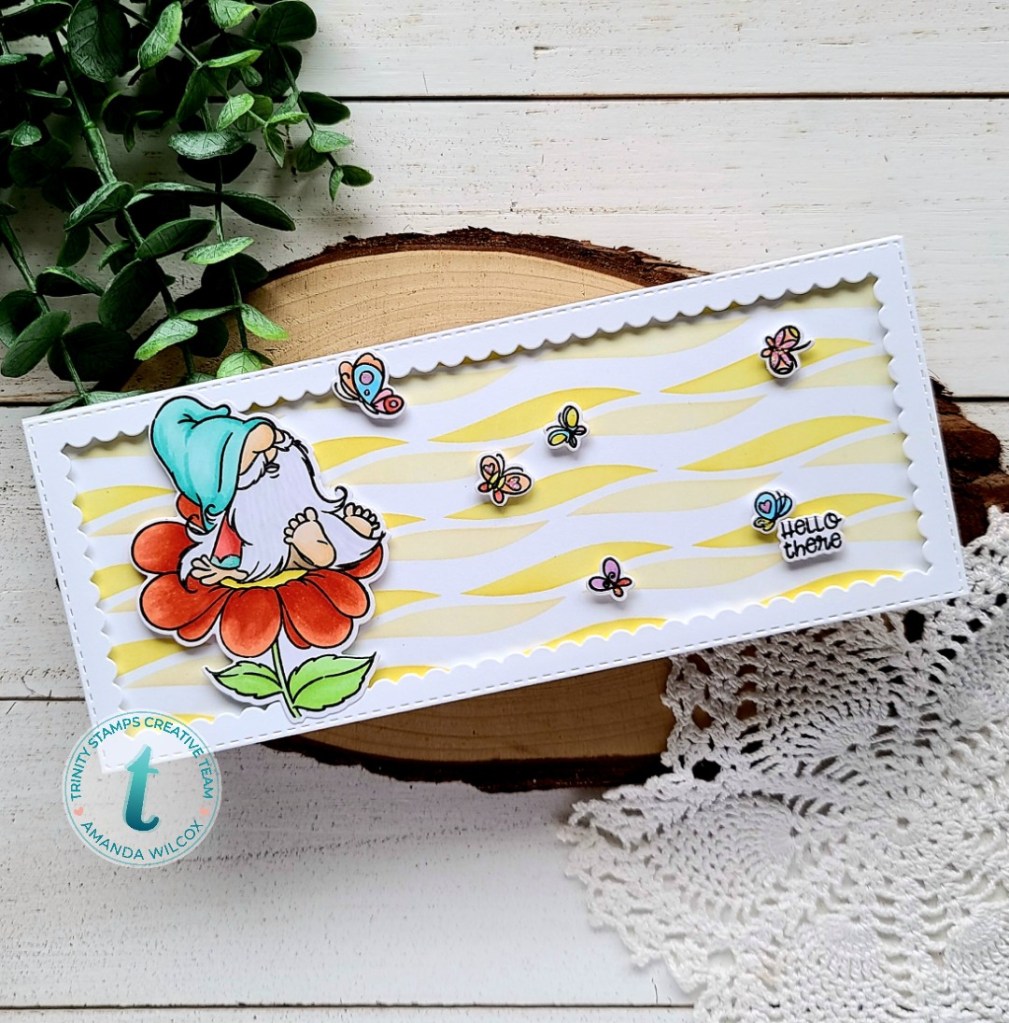
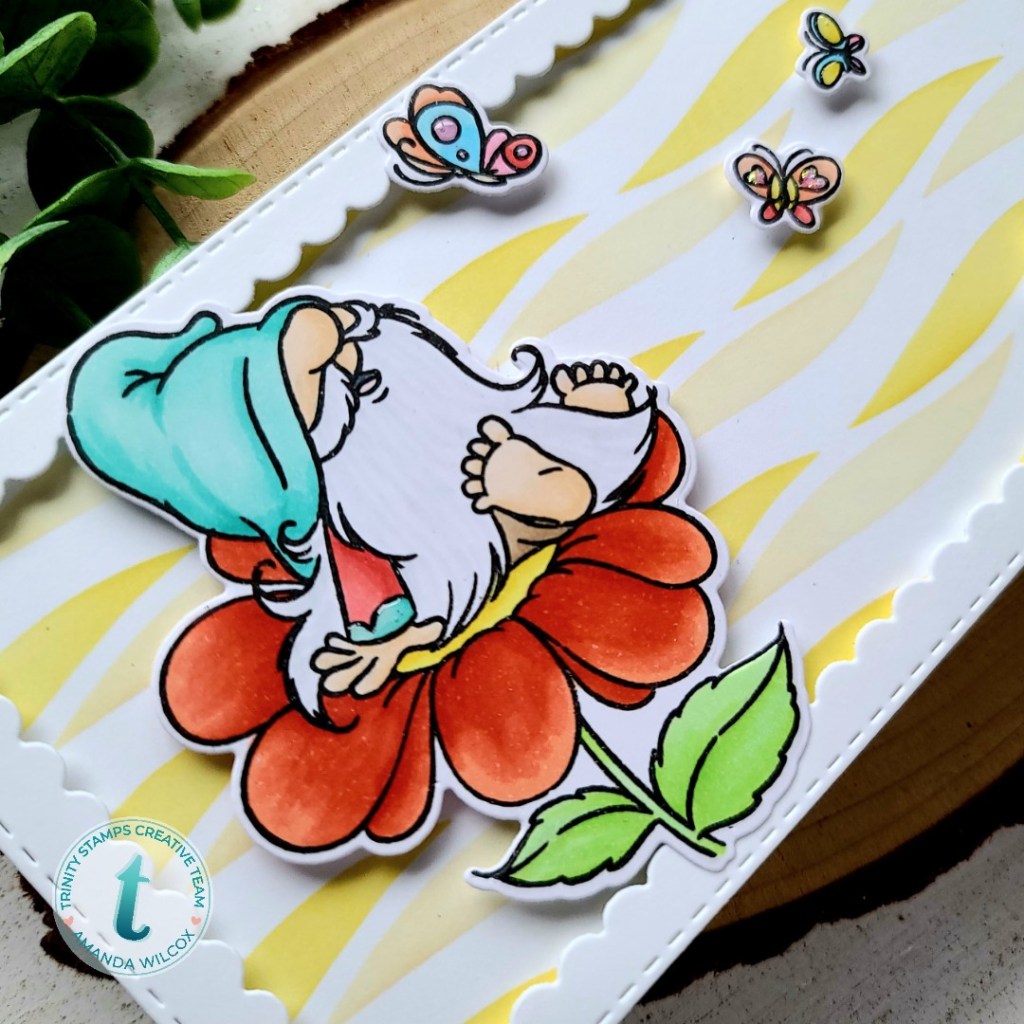
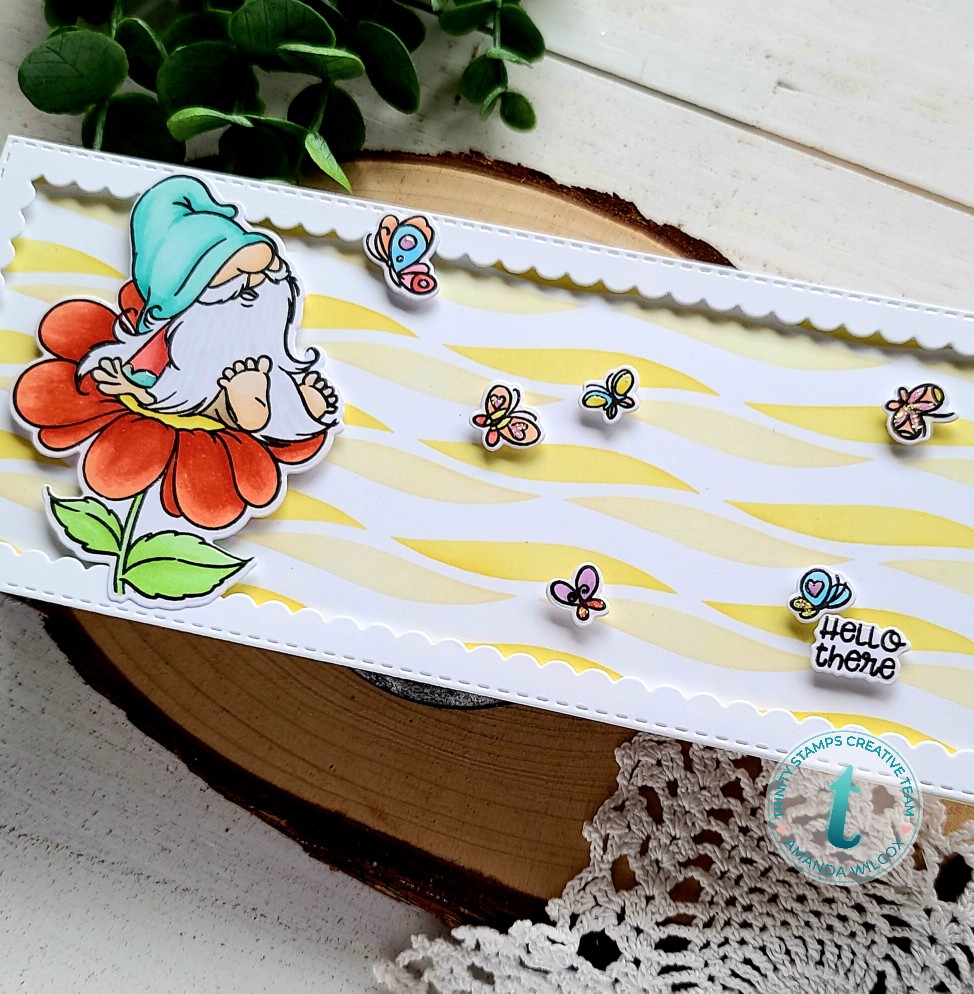
Hi again! Popping in with a super bright and happy slimline card featuring Trinity Stamps goodies today too. Hoping these sunshiny vibes will go out into the universe and come back to me in the form of a weather change around here. Haha!
Moving on to assembly, I used liquid glue to adhere the stenciled panel to a slimline card base measuring 3.5×8.5 inches. I added foam strips to the back of the frame and put that down next. Then I added foam squares to the back of all my images and sentiment and put them in place.
For finishing touches, I added some glossy accents here and there on places like the gnome shirt sleeve and parts of random butterflies. Then I went back and added a little sparkle with unicorn Stickles to other parts of butterflies.
Cheers to better weather soon…I hope. I could really use some sunshine and walks outside soon.
I appreciate you sharing your time with me today. Have a fabulous day!
Welcome! Welcome! The party is just getting started! So glad you could join us…
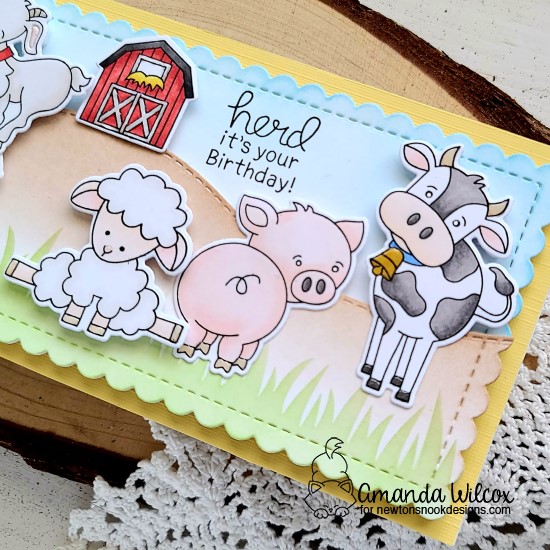
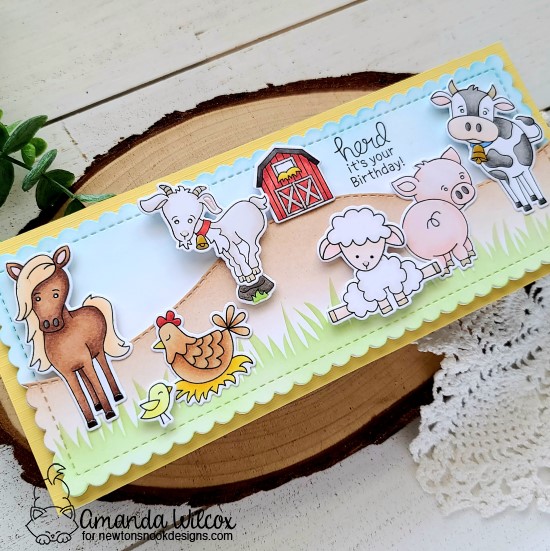
Haha! I couldn’t resist. I’m over on the Newton’s Nook blog today sharing a really fun barnyard party slimline card. Now that we’ve got sheep to add to the farming mix I couldn’t resist getting everyone together for a birthday celebration.
I started this card by die cutting a panel with the Slimline Frames & Portholes scalloped die and laid out my stamps across it to make sure everyone would fit. Then I stamped images from Bleat, Moo, Baa, Neigh, Oink and Cluck. I used my copic markers to color everything in and then the coordinating dies for each set to cut them all out.
For the background, I inked the top of the white scalloped panel I started with in a light blue. Then I cut a second scalloped panel and then used the Land Borders die to cut a hill. I inked the top brown and then used the Hills & Grass Stencil to add some grass to the bottom. This gives the look of another layer without an actual extra layer.
I added foam tape to my hill and attached it to the sky panel. Then using a combination of foam squares and liquid glue I adhered all of my animals and the barn. Some are popped up for extra dimension and some are glued straight down. Once that was finished, I popped the panel in my MISTI and stamped the sentiment in some of the open sky.
Next, I cut a yellow panel 3.5×8.5 inches and used liquid glue to adhere it to a white card base. Then with foam tape I popped the panel on that and moved on to finishing touches.
For those, I started with black glaze pen on all of the critter eyes so it had time to dry. Then I moved on to glossy accents on things like hooves, beaks and noses. Then I added some glossy accents to the white parts of the barn as well. Once the critter eyes were dry, I went back in and added white gel pen highlight to the ones that typically have one in the stamped image.
I can’t get over all these different critters and how well they work together. This is such a fun and happy card! I hope you enjoyed it too!
I appreciate you sharing your time with me. Have a fabulous day!
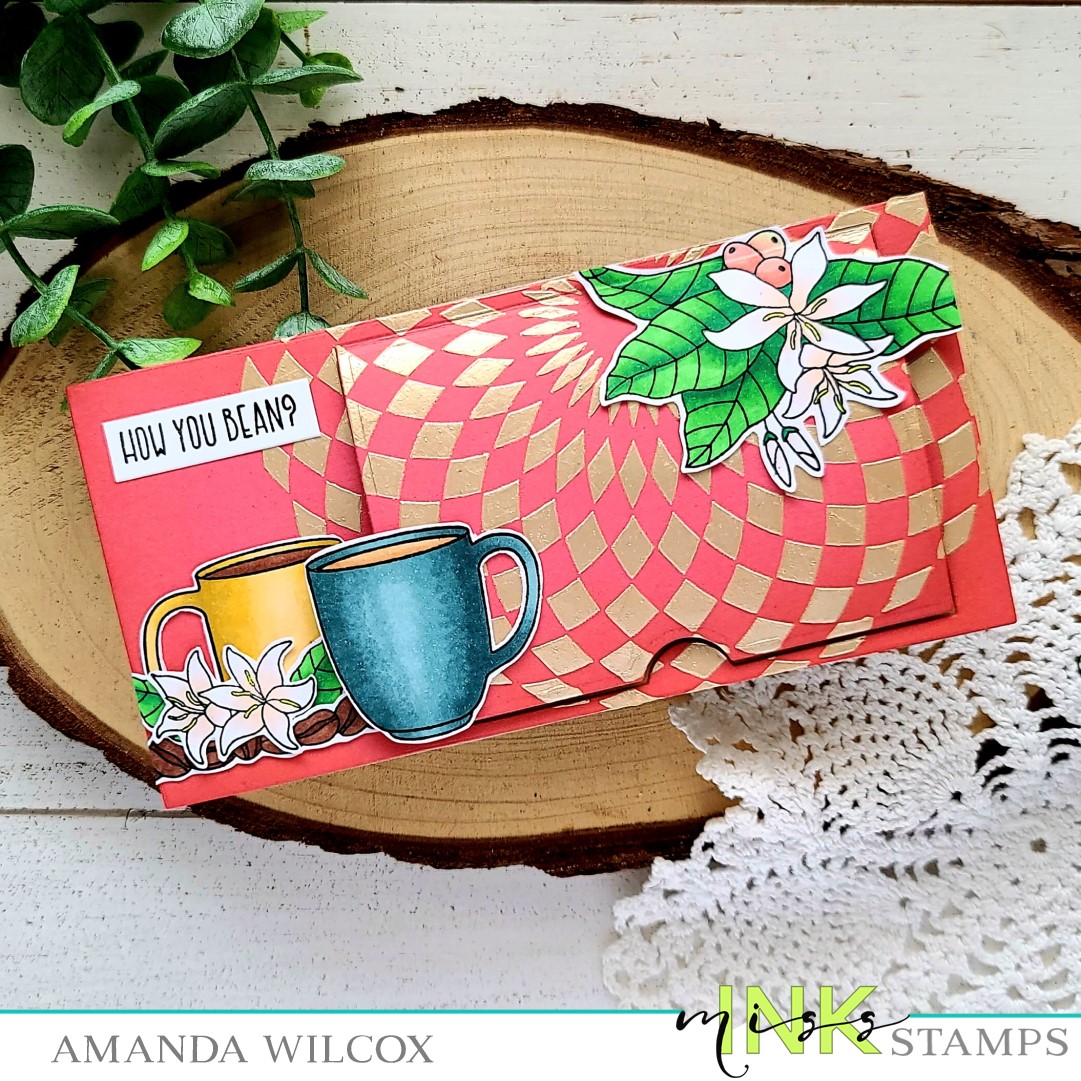
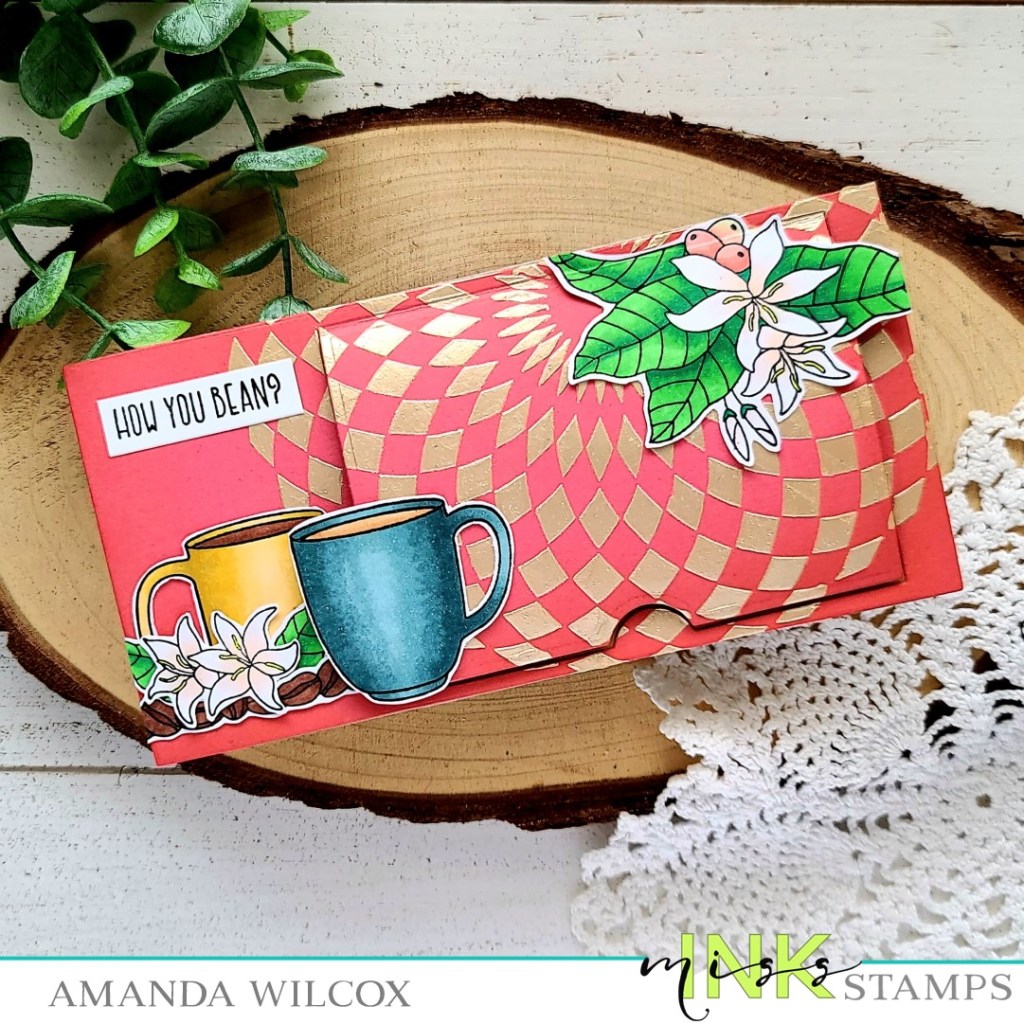
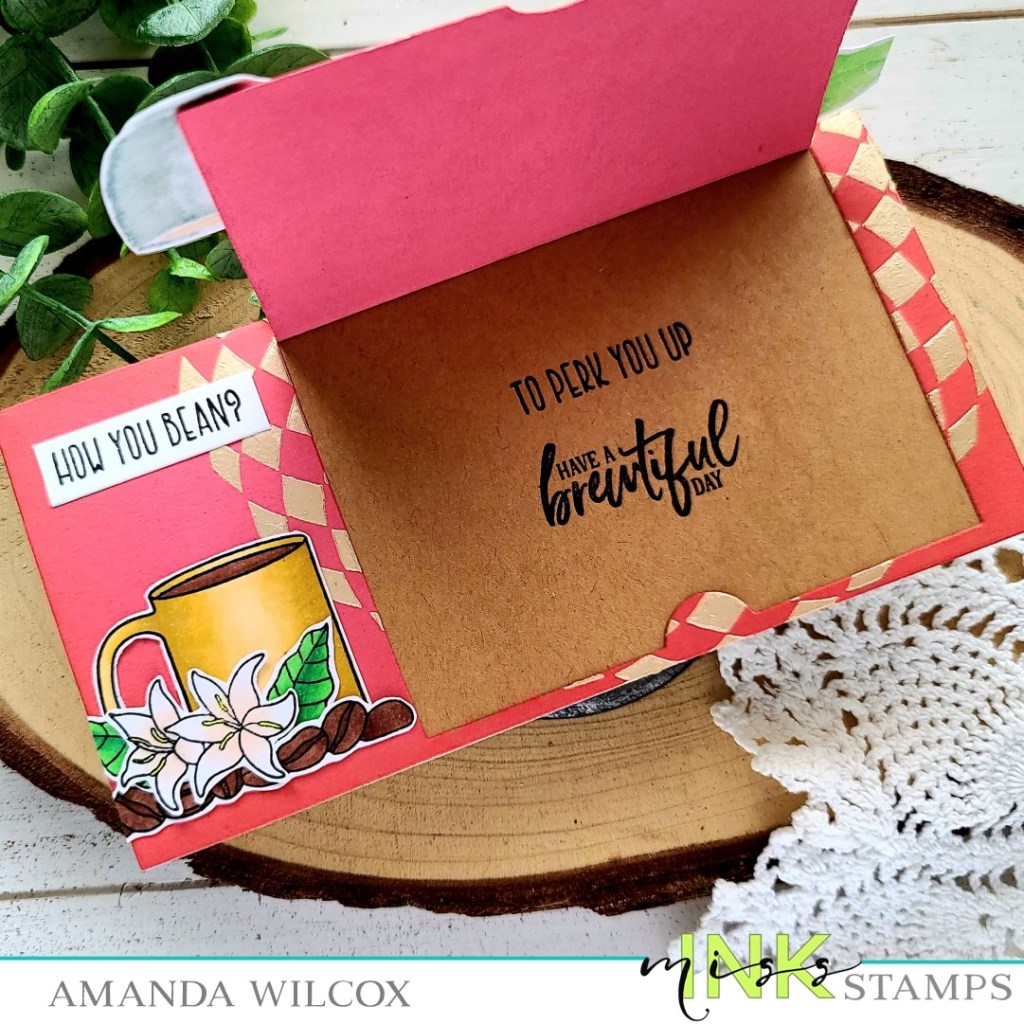
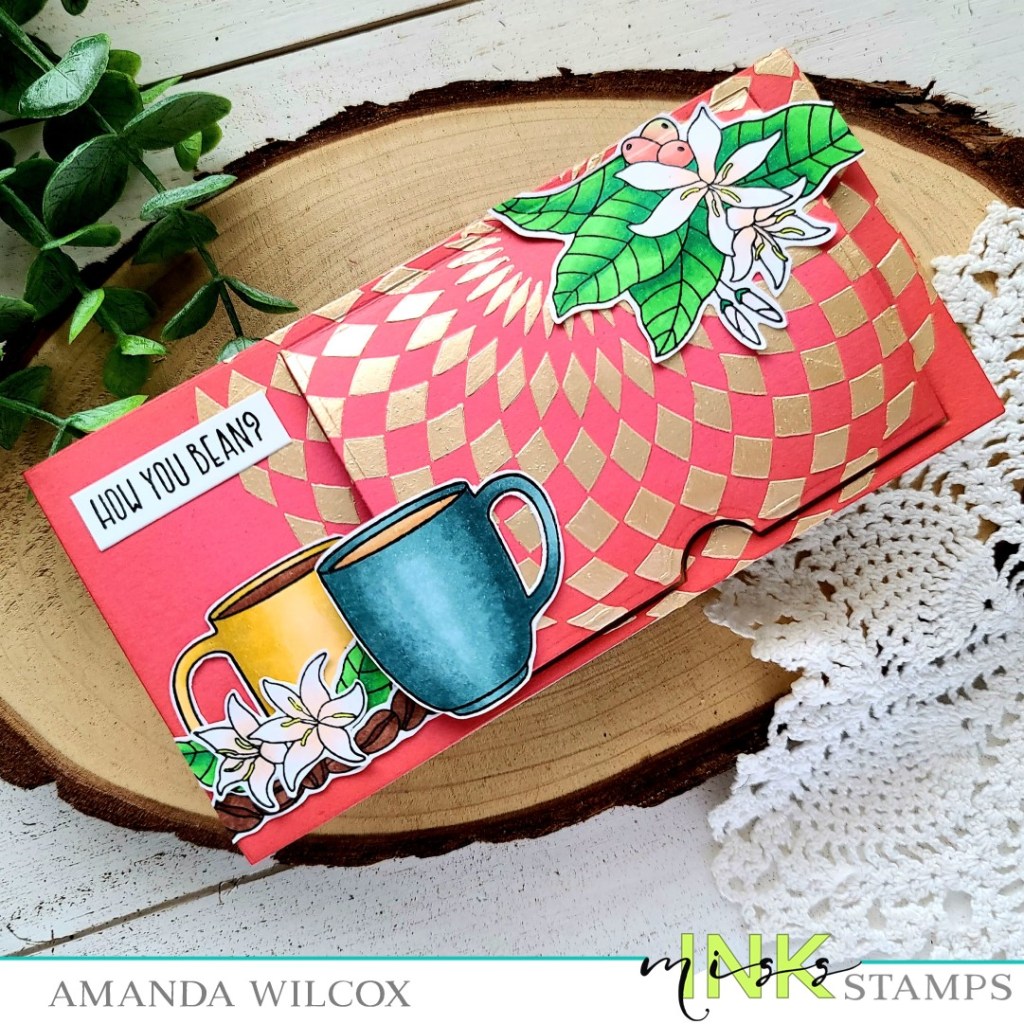
Hi everyone! I shared this card on social media earlier in the week but hadn’t had a chance to write up a post about it. Someone had asked so I wanted to pop in with a quick explanation how I created this fun mini slimline card. It features stamps and stencils from Miss Ink Stamps and dies from Trinity Stamps.
I started by die cutting the largest panel from Trinity Stamps Clean and Simple Mini Slimline Panels die set from a melon cardstock and a second from kraft. Then I used champagne metallix gel from Thermoweb over the Circular Harlequin stencil from Miss Ink Stamps and set it aside to dry. I stamped and colored images from Miss Ink Stamps Brewtiful and colored them with my copic markers. Then I fussy cut them all out.
Once the metallix gel was dry I used one of the Trinity Stamps Lift the Flap dies to create a flip up window. Using that panel as a guide, I stamped sentiments on the kraft panel that would show when the flap was opened and moved on to assembly.
I adhered the melon panel to the kraft one with tear tape and then used liquid glue to attach all of my images. The trick here is to not attach something to the flap and the card front. You have to choose one. Haha. I stamped one more sentiment and trimmed it into a small strip and attached it as well. Last, I used liquid glue to adhere the panels to a white card base that measures 3×6 inches and trimmed off images that hung over the edge.
I hope this helps and inspires you to create something wonderful.
I appreciate you sharing your time with me. Have a fabulous day!
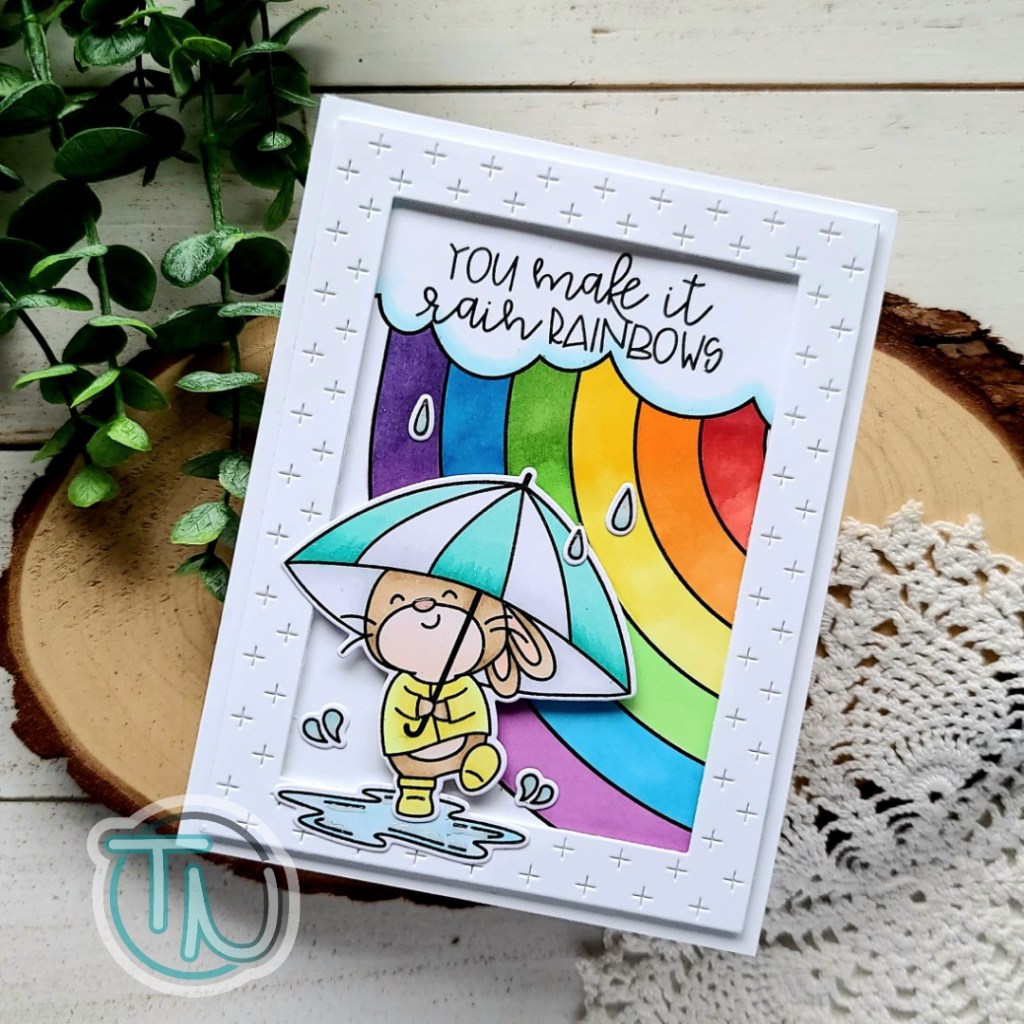
Hey everyone! I have a new happy card to share with you today. This idea popped in my head the moment I saw the reveal for Avery Elle’s new Look For Rainbows stamp set. It’s just too cute and had to be paired with the Rainbows stamps immediately!
I started by stamping and coloring my bunny images with copics. I die cut these images and set them aside to work on the rainbow background. I stamped it on a full panel and colored it with copics, then put it in my MISTI and stamped a sentiment in the cloud. I adhered the panel to a card base with liquid glued.
Then, I die cut the Avery Elle plus frame from white cardstock, lined the back with foam tape and popped it in place. I added the puddle with liquid glue and the bunny with a combination of foam squares and liquid glue where it overlaps the frame. Last, I glued the raindrops down in place.
Finally, for finishing touches, I added glossy accents to the bunny’s nose, the raindrops and just a few lines on the puddle.
I couldn’t be happier with how this card turned out. I think it’s a wonderfully uplifting and happy card and can’t wait to share it. I’m kind of feeling a set of these coming soon because I want to color that bunny in every color possible!
I appreciate you sharing your time with me. Have a fabulous day!
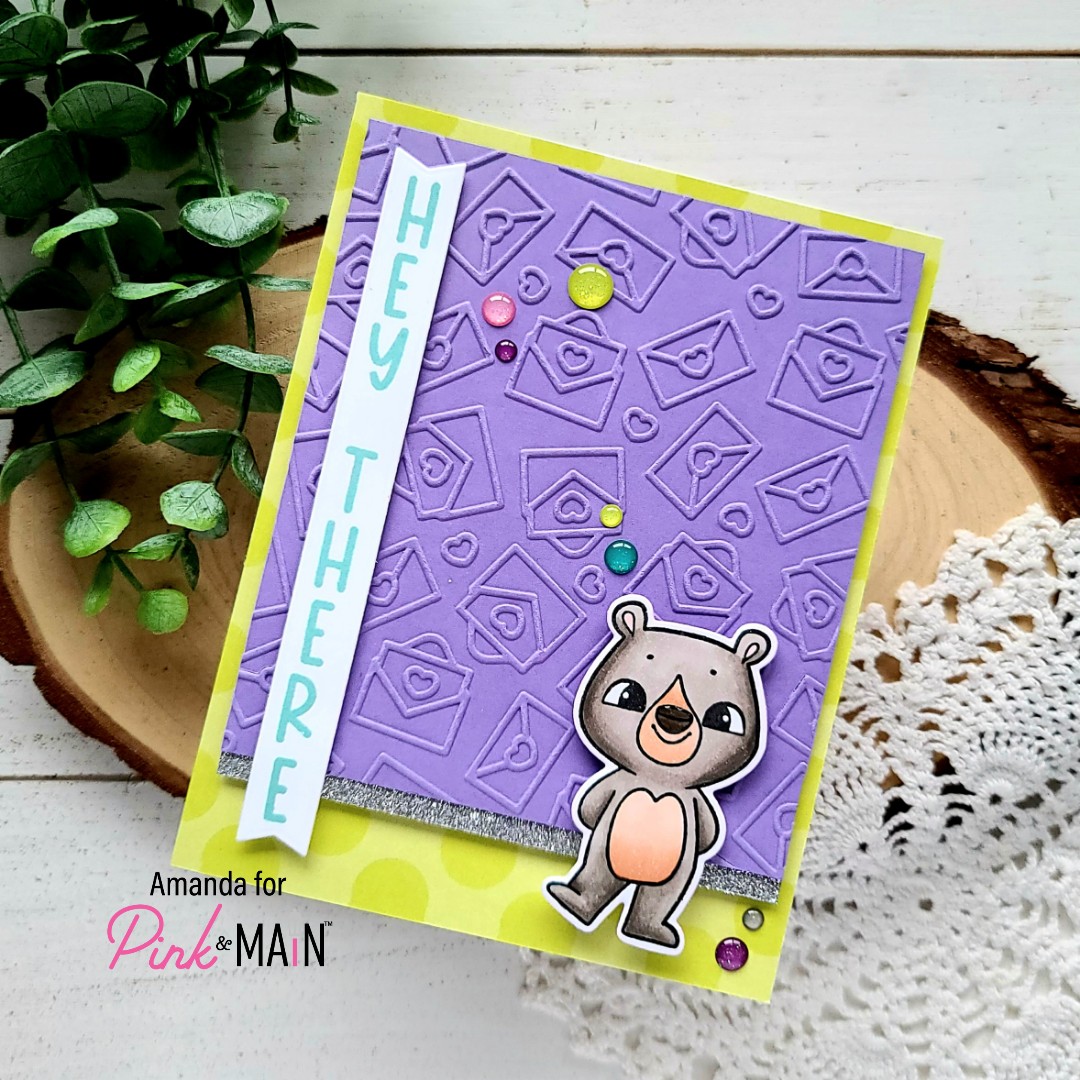
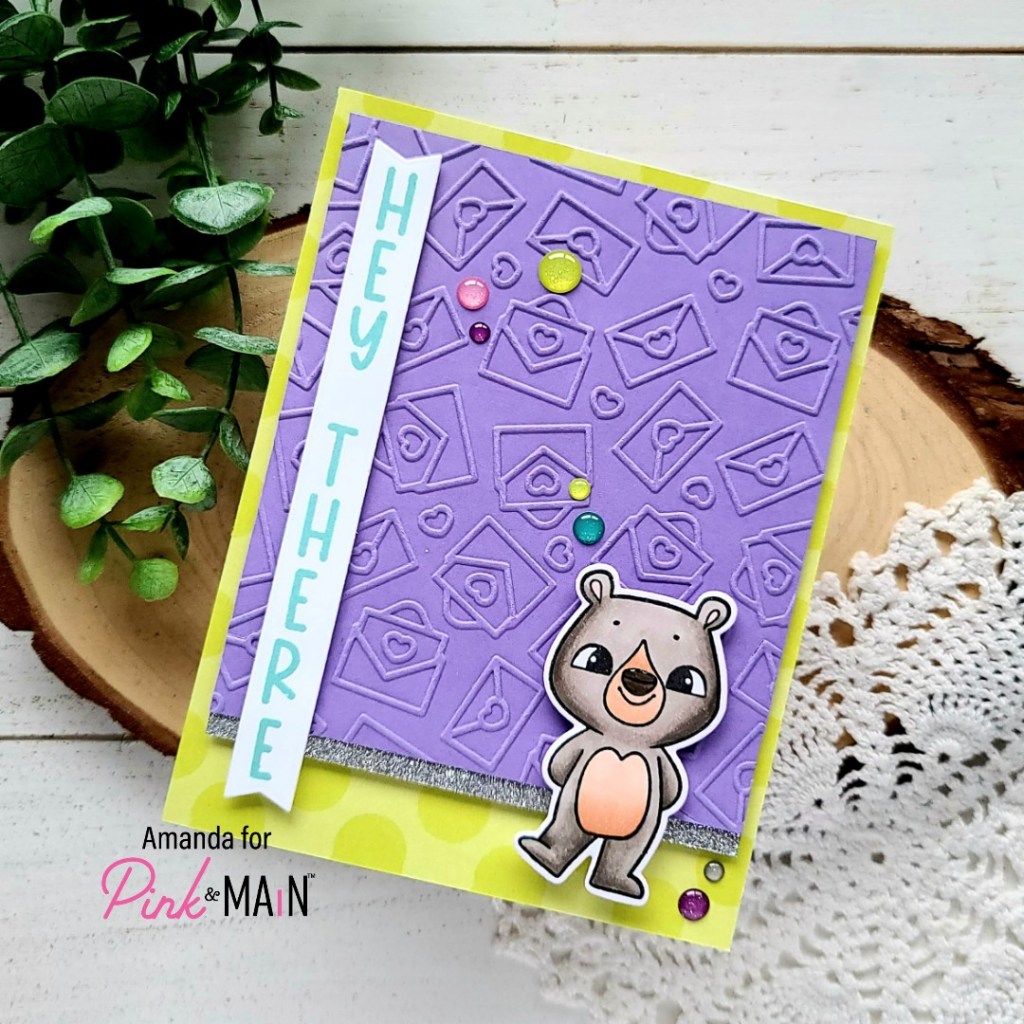
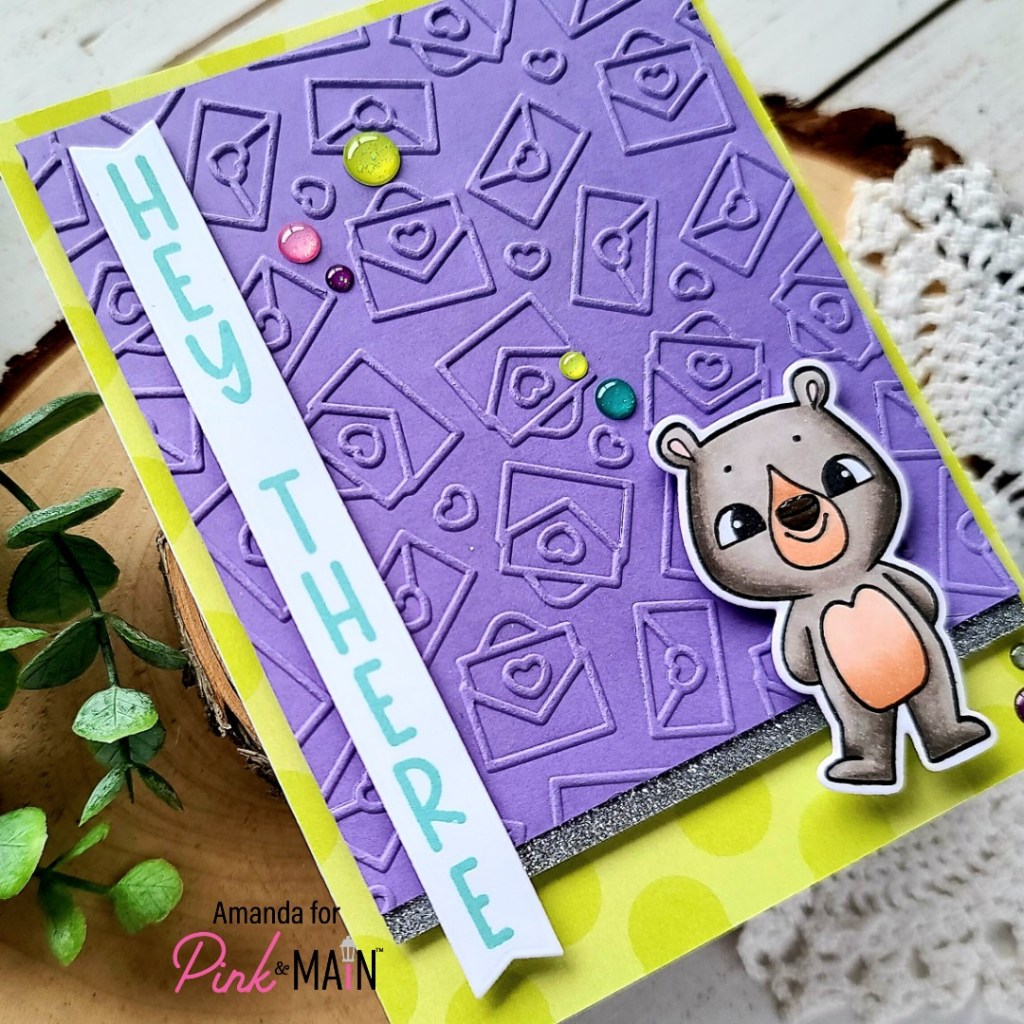
Hello there friends! Today I have a super fun sneak peek to the new Pink & Main February release for you! The release is available for purchase tomorrow and it’s packed full of soooo much cuteness you won’t be able to handle it!
I have got 6 different sneaks on here for you today! New paper, new enamel dot colors, an embossing folder?!? Oh my goodness! And vertical sentiments plus banner dies??? And don’t get me started on that super adorable bear!
To create my card, I just trimmed patterned paper from the Happy stack down to 4.25×5.5 and adhered it with liquid glue to a card base. I used the new embossing folder on a piece of purple cardstock and trimmed it down to 3.75×4.75. I added a strip of sliver glitter paper to the bottom and popped the panel up with foam tape. I stamped and die cut my sentiment and popped it up as well. Then I stamped and colored my bear with copics and popped him up with foam squares too. For finishing touches, I added a little glossy accents to his nose and some enamel dots scattered around.
I can’t wait for you all to see the new release tomorrow. It’s just wonderful and so happy!
I appreciate you sharing your time with me. Have a fabulous day!
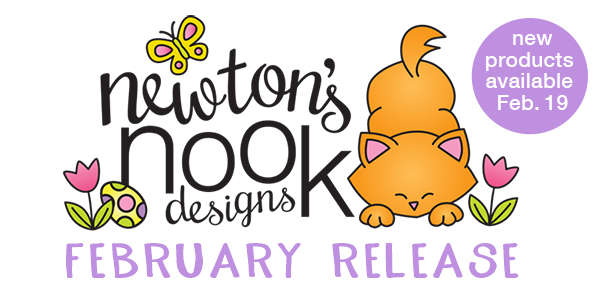
I can’t believe we’re on the final day of Newton’s Nook February Release reveals. Let’s go out with a bang and share 2 totally wonderful stamp and die sets today! Beautiful and adorable are totally covered!
Newton’s Rainy Day Trio
Daffodils
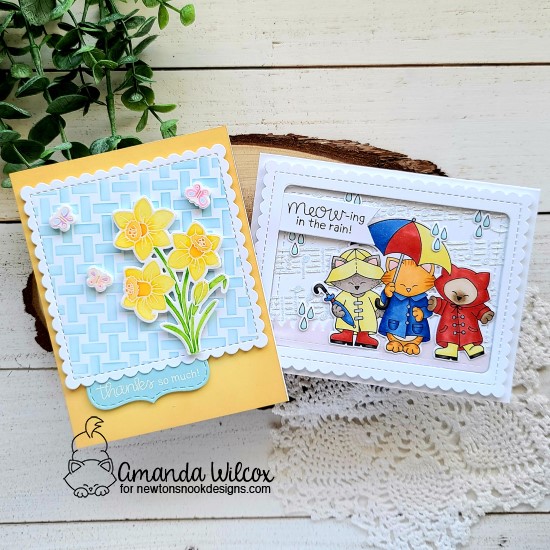
When I saw these cute kitties I just saw them singing in the rain and couldn’t help myself…
I started by stamping and coloring the image from Newton’s Rainy Day Trio with my copics, then cut it out with the coordinating dies. I also stamped multiple sets of raindrops and cut those out too. I die cut the largest scalloped rectangle from Frames & Flags out of white, then cut the center out with the rounded rectangle in the same set. Taking that rounded rectangle, I used the music stencil and some Glitter Glitz gel for a tone-on-tone musical wonder in the background. I die cut a flag, stamped my sentiment on it and moved on to assembling everything.
I added foam strips to the back of the frame I created earlier and adhered it to a white card base. I used liquid glue and adhered the stenciled panel inside that and when I started arranging images I realized I wanted a ground for my kitties. So I die cut another rounded rectangle from vellum and cut it off with the land borders die. Hiding liquid glue behind where the kitties would be, I adhered the grass down before popping the kitties up with foam tape. Then I used liquid glue to attach the raindrops and finally foam squares to slip that sentiment banner in place. For finishing touches, I added glossy accents to the raindrops, kitty noses, umbrella accents and coat buttons.
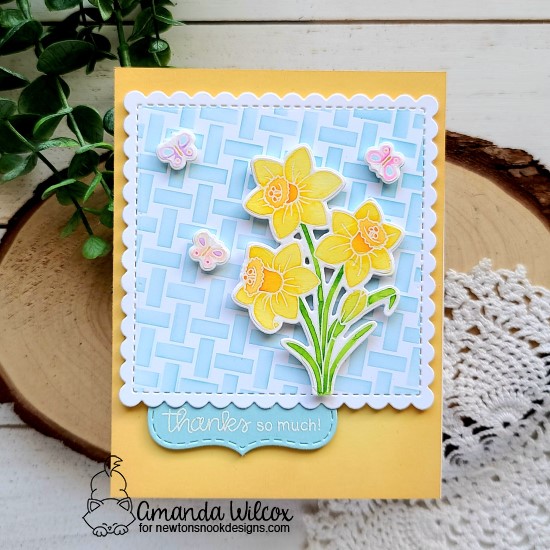
Up next, I just had to watercolor those beautiful daffodils so I started my stamping and heat embossing them in white on Bristol smooth cardstock. Then I used Zig Clean Color Real Brush markers and a water pen to color them in. I used the coordinating dies to cut them out.
I die cut the scalloped square from Frames Squared and taped off the edge before inking up the basketweave stencil with blue ink. I adhered my images with foam squares. For my sentiment I die cut a blue label shape from the same die set and heat embossed it in white. I wanted the background to have a little texture so I cut a yellow A2 size panel and just inked the edges with scattered straw distress oxide ink. The label is adhered to the square with liquid glue and the whole thing is popped up with foam tape.
Would you like to win the “Newton’s Rainy Day Trio” or the “Daffodils” Stamp Set? We will choose ONE lucky winner for each stamp set!
Here’s how to win: Comment on the NND blog and Design Team blogs (see list below)! The winner will be chosen at random from the collective reveal posts. Make sure to check out each of their blogs and comment for your chance to win. You will not know which blog has been chosen so the more you comment on the better your chances are of winning! You have until Thursday February 18th at 9pm EST to comment — winners will be announced on the blog post on Friday, February 19th.
Check out all the awesome Design Team Blogs below to enter: