Blog

Newton’s Nook – Spook-tacular

Happy Halloween everyone!!!!! I just love this holiday! I look all the spooky and fall and kiddos running around dressed up. It just makes me happy! So I wanted to share a special card with you today to celebrate.

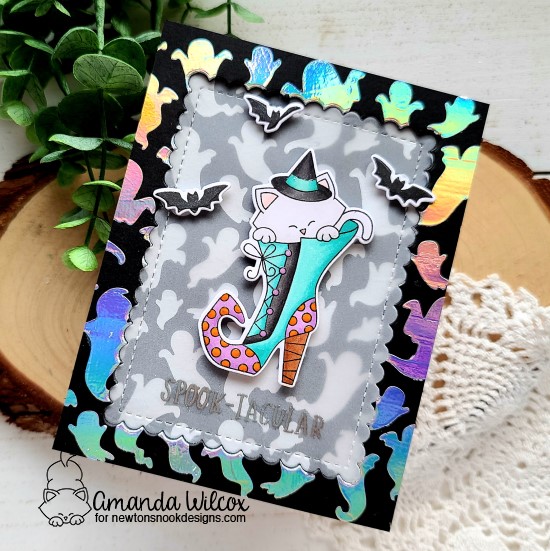
To create this awesome card, I started with the background. I used the ghosts stencil with deco foil transfer gel blanco on black cardstock. When it was dry, I sent it through my laminator with iridescent deco foil. Then I sat and played with it for a while because those ghosts are SO COOL!!!

I stamped and colored Witchy Newton with my copic markers and also made sure to stamp a couple of bats too. I cut it all out with the coordinating dies and decided on my final layout. Using the Framework dies, I cut the scalloped rectangle from the middle of my stenciled panel. I lined the outside frame with foam tape and adhered it to a white card base. Then I inserted the rectangle in the opening and glued it directly down. I cut a second rectangle from vellum and heat embossed my sentiment from the Spooky Roundabout on it. Then I used foam squares and popped Witchy Newton and the bats up. I hid some glue behind those areas and placed the vellum rectangle in its place.

The coolest thing happened when I added the vellum to the center…it mutes the light refraction from the deco foil and makes those ghosts look stark white. I had no idea this would happen but got really excited and thought it looked soooo extra cool! What do you think?

For finishing touches I added glossy accents to Newton’s nose and hat, and dots on the boot. I didn’t want to distract from the cool background but I just love adding those little touches.

I’m linking this up to the Cat Lover’s Hop. Today is the final day, so get your projects linked up if you haven’t already.

I appreciate you sharing your time with me. Have a fabulous day!

Birch Press Design – Sending Warm Wishes

Happy Friday everyone!!! We’ve made it through another week and I’m so excited for this weekend! Before I switch back to Halloween festivities tomorrow, I have another wintery Christmas card for you today with a coordinating ornament. I’m also over on the Birch Press Design blog today with a full, photo step-by-step if you would like more detail how to create your own.

I had a lot of fun creating this card. I started with what ended up as my ornament just playing around, then switched out the middle layer for some silver cardstock and kept going. I blended spun sugar and shaded lilac distress oxides for my background and also added a splatter of water and pearl watercolor for some shimmer. I adhered my snowflakes, cut off the excess and adhered my panel to a card base.

I wanted to tie the silver in a little more so I used it on my sentiment too! The stamped, heat embossed banner comes from the Christmas Ornament and Labels set which I thought finished the card off perfectly.

I didn’t want my first snowflake to go to waste, so I cut another set and glued them back to back. I sandwiched some fishing line between one set of points and held it with tweezers while it dried. Then I added Trinity Stamps silver baubles to both sides so no matter which way it hangs on the tree, it’s beautiful! I feel like the silver baubles really tie it in to the card design and they’ll be a perfect gift! Time to make these in all the colors!!! A rainbow set of snowflakes just sounds wonderful to me!

I appreciate you sharing your time with me. Have a fabulous day!

Miss Ink Stamps – Thanks for Being my Friend

Hello everyone! It’s Amanda from Twiddler’s Nook today with a different, fun technique I’d been wanting to try for a long time. I created a clear front card and decorated it with the blooms from Fall Bouquet. 

To make my card, I started by stamping and heat embossing the Fall Bouquet image 4 times on Bristol Smooth cardstock. Then I watercolored it with my Zig markers. I used my scan-n-cut to cut them all out and moved on to my card front.

For that piece, I took a transparency pocket and sprinkled gold embossing powder inside, then I ran it through my laminator to melt the powder and seal it up. Then I trimmed it down to 4.25 x 6.5 and scored it at 5.5. I glued the flap to a white panel and then glued another panel to the back of that sandwiching the clear flap between them. I laid out my images and adhered them down in place. I trimmed off the excess and used those pieces to fill in the sides so my card front was nice and full.

Using the images on the front to position my sentiment, I stamped it on the inside where it’s hidden from view. I also love how the gold embossing powder shows through on the inside and hides the adhesive holding the images in place on the front too. 

I think this would be a really fun card to give or receive and can’t wait to try the technique with other embossing powders and images in my stash!

I appreciate you sharing your time with me. Have a fabulous day!

Trinity Stamps – Merry Christmas Gnome

Hello again!!! I have some serious cuteness to share with you today featuring some new goodies from the most recent Trinity Stamps release that just went live last Friday! It’s full of so much holiday goodness, I can hardly stand it!

Today I’ve got this super cute shaker card to share featuring the Comfort and Joy stamps and dies for my main image and the Scripty Christmas dies for a bold sentiment to catch your eye! In the background, I heat embossed the All Spruced Up pine needles in gold over a distress oxide ink blended panel. Using the frame from the Slimline Frame and Fold I turned it all into a fun shaker card!

In typical fashion, my gnome was colored with copic markers and then I added white gel pen dots to his hat for a little added interest. I just love how that turned out.

I die cut the scripty words 3 times from red cardstock and glued them together, then added them to the shadow cut from vellum. I think vellum is my very favorite thing to use for the shadow of die cut words. It’s there but it doesn’t take away from the sentiment. It’s just perfect.

I appreciate you sharing your time with me. Have a fabulous day!

Pink & Main – Christmas Cookies

Welcome back! I’m over on the Pink & Main blog today sharing this fun Christmas Cookies slimline card. I decided to try stamping on kraft cardstock for my cookies and doing some coloring with colored pencils for a change of pace.

It was a fun process. One trick I use when coloring with colored pencils is to leave my stamps in my MISTI and when I’m finished coloring, I stamp the images a second time to cover up and pencil markings that cloud up the image lines. I feel like this makes a big difference in the final product.

A new toy I’ve got on my craft desk that I’m absolutely loving, but hadn’t shared yet, is this new mini die cutter called the Mini Maker from The Maker’s Movement. It’s fantastic and so convenient! I used scraps of cardstock for my images today so it was easy to pop them on the plates and run them through without even getting up. This cutter is super easy to use and cuts like butter!

Separately I die cut the scalloped panel from Sympathy Slim Line Dies and stenciled it with a diagonal stripe in red ink. I also cut the third largest Stitched Slim Line Die in a soft blue and inked the edges for a tone-on-tone effect. I arranged my cookies and glued them down. Then I popped the blue panel up with foam tape. Last, I stamped my sentiment and did partial die cutting with the smallest Stitched Slim Line Die to make a matching sentiment strip. Then I popped it up on top of my cookies with some foam strips.

I added my panels to a white card base and moved on to finishing touches. For those I added some Stickles in Sprinkled Sugar for a sugary effect on various parts of the cookies. Then I added a scattering of Nuvo Crystal Drops in calming aqua around the background.

I love this set and had so much fun dreaming of Christmas baking while I was putting it together. But let’s be real, that will be here before we know it!

I appreciate you sharing your time with me. Have a fabulous day!

Trinity Stamps – Dropping In

Hi there! Thanks for stopping by today. I’ve got another fun entry into the Cat Lovers Hop today featuring a fun stamp set and goodies from Trinity Stamps.

I knew I wanted to turn this Purrachute kitty Christmas themed so I chose my colors with intention. I colored him with copics and used the coordinating dies to cut him and his sentiment out. Then I stamped Merry Christmas from the Christmas Senti-mini set and die cut them with those coordinating dies too. I didn’t like the stark white banner so I inked it up green for a little contrast.

When deciding on y background, I wanted to stay away from a cloudy sky so I pulled out the quilted coverplate and stencil set. I die cut a teal panel and stenciled green hearts on it. I used a combination of liquid glue and foam squares to attach all of my elements. Then I decided to trim off the edges of my panel so I had a white border on my card front and popped the panel up with foam tape.

For finishing touches on this sweet card, I just added a little glossy accents to the parachute, kitty nose and toe beans.

I love this non-traditional looking Christmas card! And the fact that it’s kind of a hybrid between our two kitties is super fun too! I’m linking this up to the Cat Lovers Hop! Are you playing along too?

I appreciate you sharing your time with me. Have a fabulous day!

Newton’s Nook – Reach for the Stars

Hello friends! Welcome to a new week! Today marks the start of the Cat Lover’s Hop which Newton’s Nook is a sponsor of. They’ll be showcasing some fun inspiration on Friday but I wanted to jump in early with an extra card share for you.

I started my card by inking up a panel with fossilized amber, spiced marmalade, blueprint sketch, faded jeans and black soot distress inks. I spritzed it with water and blotted it dry. Then I flicked some gold watercolor on it. Next, I used the cascading stars stencil with some champagne metallix gel for my sky.

I pulled out Cosmic Newton, stamped a couple of images and colored them with my copics. I used the coordinating dies to cut them all out next. I needed to create a ground for my images so I inked up a small panel with evergreen bough and twisted citron distress ink and spritzed it with water. When it was dry, I used the land borders dies to cut a grassy top and adhered it to my stenciled panel. Using the images as a guide I stamped my sentiment on the bottom right.

With my background complete, I adhered it to a white card base and then popped my images up with foam squares. For finishing touches I added some glossy accents to the planet, shooting star and glass on the telescope and of course Newton’s nose.

This is not my typical sky color combo but it was so fun to play around and I love how it turned out. What are your favorite combos for sky colors? I’d love to hear in the comments.

I appreciate you sharing your time with me. Have a fabulous day!

Pink & Main – Believe

Welcome! I’m over on the Pink & Main blog today with this soft and sweet Christmas card featuring a sweet angel and dove along with some fun techniques.

To make my card, I started by stamping and coloring the images from Little Angels with my copics. Then I cut them out with the coordinating dies. Next, I cut the wreath base three times – from vellum, pink cardstock and white glitter cardstock. I layered them together and adhered them with liquid glue. I placed acrylic blocks on top while I die cut and assembled the medium sized bow from the new Stitched Bow dies. Then I used liquid glue to adhere the bow to the wreath. I held it together with my tweezers while it dried.

I cut an A2 panel and, using my wreath as a guide where not to ink, I used the holly layering stencil and some pastel inks to match the feel of my angel. Once that was done I took the same pink ink and blended the center of where the wreath would be breaking up the stark white. Now, I used my MISTI and stamped the sentiment below where the wreath would be.

On to assembly now! I adhered the wreath with liquid glue and then popped the angel and dove up with foam squares. For finishing touches I added a couple of pink clay hearts and Wink of Stella glitter brush pen to the dove and angel’s horn.

I am very much a typical red and green Christmas girl but I am just in love with how this soft color palette turned out. What are your favorite Christmas colors?

I appreciate you sharing your time with me. Have a fabulous day!

Ink Pink | Pink & Main – Get Through It

Hello again! I am part of a second Instagram Hop today to celebrate Think Pink – breast cancer awareness. It’s called Ink Pink! and there is a wonderful group of us so be sure to head there and hop along. Comment lots for chances to win prizes from great sponsors like Pink & Main and Twiddler’s Nook!

For my card, I stamped and heat embossed images from Sunny Greetings in black. Then I watercolored them with my Zig markers and cut them out with the coordinating dies. I took spun sugar and picked raspberry distress oxide inks and blended them in a panel. I spritzed it with water and flicked black paint on it. Once that was dry, I used the larger of the Beautiful Slim Line dies to cut the panel out. Then I took the largest Stitched Slim Line die and cut a black panel.

Time for assembly, the black panel was adhered to a white card base and the inked panel was popped up with foam tape. The Sunny Greetings images were adhered with liquid glue. I laid acrylic blocks on them to hold them flat while drying and heat embossed my sentiment in white on black cardstock. I used on of the sentiment strips from the Sunny Greetings coordinating dies and did partial die cutting to stretch it long enough to cut the whole thing out. Then this was popped up with foam squares on the card front.

My finishing touches were simple, just a scattering of holographic hearts from the Twiddler’s Nook shop for a little added interest. They look really cool when they’re caught in the light.

Remember, head over to Instagram and hop along. Comment for chances to win! And most importantly ladies…get those tatas checked!!! You never know and it’s been to be squished than sorry. Love you all!

I appreciate you sharing your time with me. Have a fabulous day!

Trinity Stamps – Release Day | Merry and Bright

Hey friends!!! Today is Trinity Stamps release day for the holiday release! We’re having a hop over on Instagram, so head over there and hop along for awesome inspiration and comment for a chance to win!

Today I’m showcasing a new stamp set called Merry and Bright. I just love how happy this big tree is! I thought it would be fun to make a gatefold card and have my tree on the belly band holding it all shut. I used one of the candy cane images from the set and heat embossed it on the belly band before popping the tree up with foam squares.

I also used the slimline stripes stencil with some white pigment ink on the panels decorating the front of the card. I love how it all flows together.

For finishing touches, I added some unicorn Stickles to the tree star and ornaments. I can’t leave a card without some sort of glitter and shine!

Don’t forget to head to the Trinity shop to pick up some new goodies and also Instagram to hop along!

I appreciate you sharing your time with me. Have a fabulous day!