Blog

Clearly Besotted – Snow Day

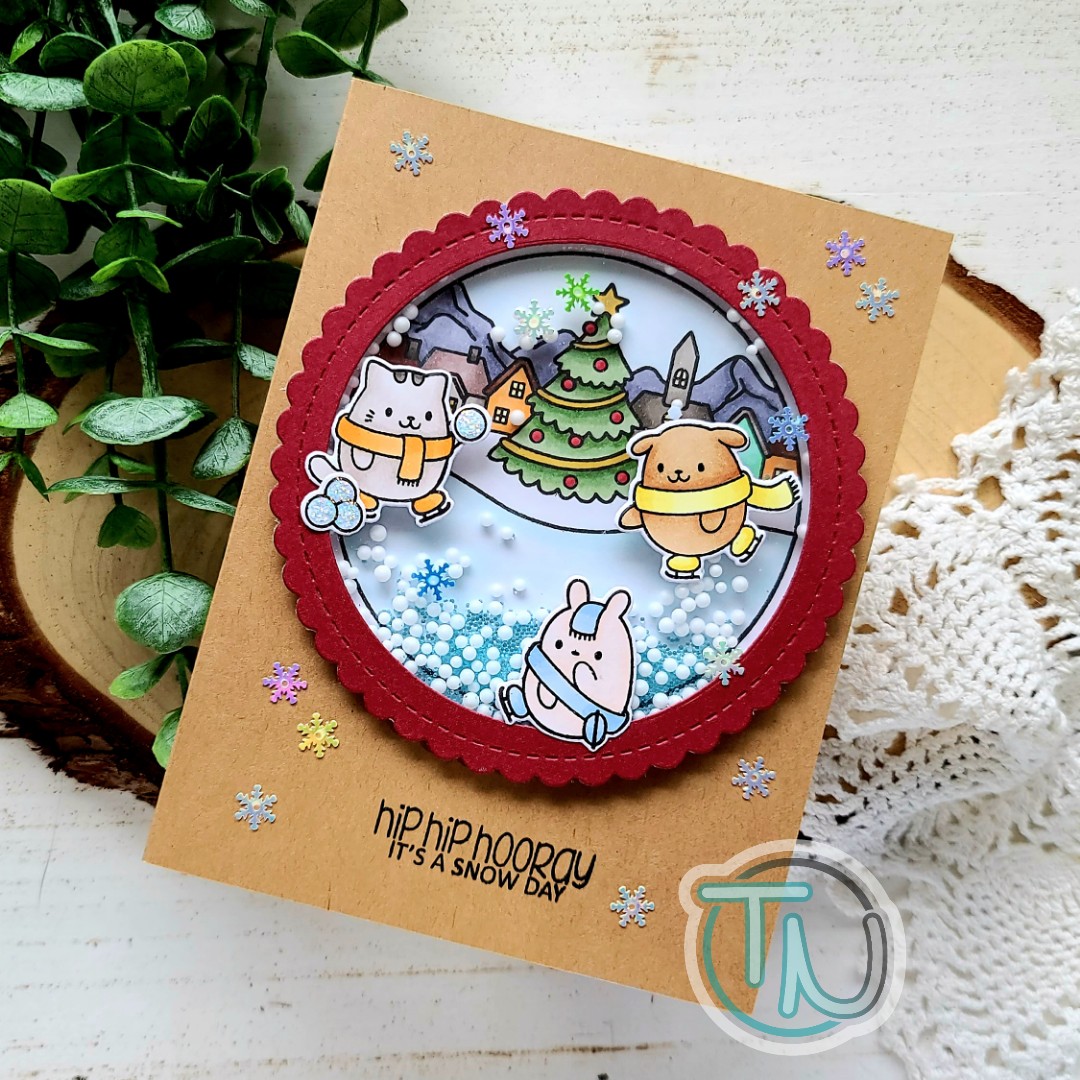
Hello again! I’m having fun making Christmas cards lately and wanted to share this fun shaker with you featuring the Simon Says Stamp Stamptember collab with Clearly Besotted.

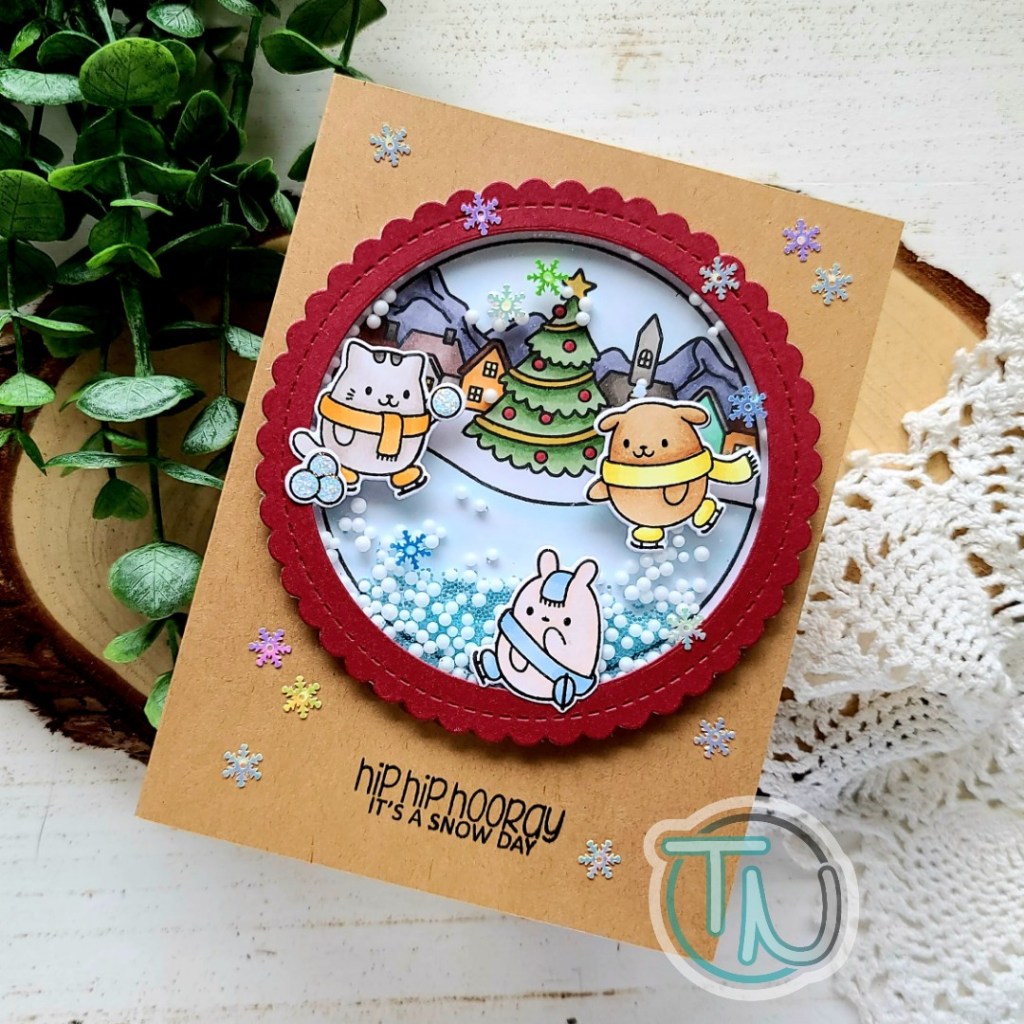
I had so much fun stamping and coloring these images out! I used the coordinating dies to cut the critters out. Then I used my Newton’s Nook circle frames to create my shaker mechanism and frame.

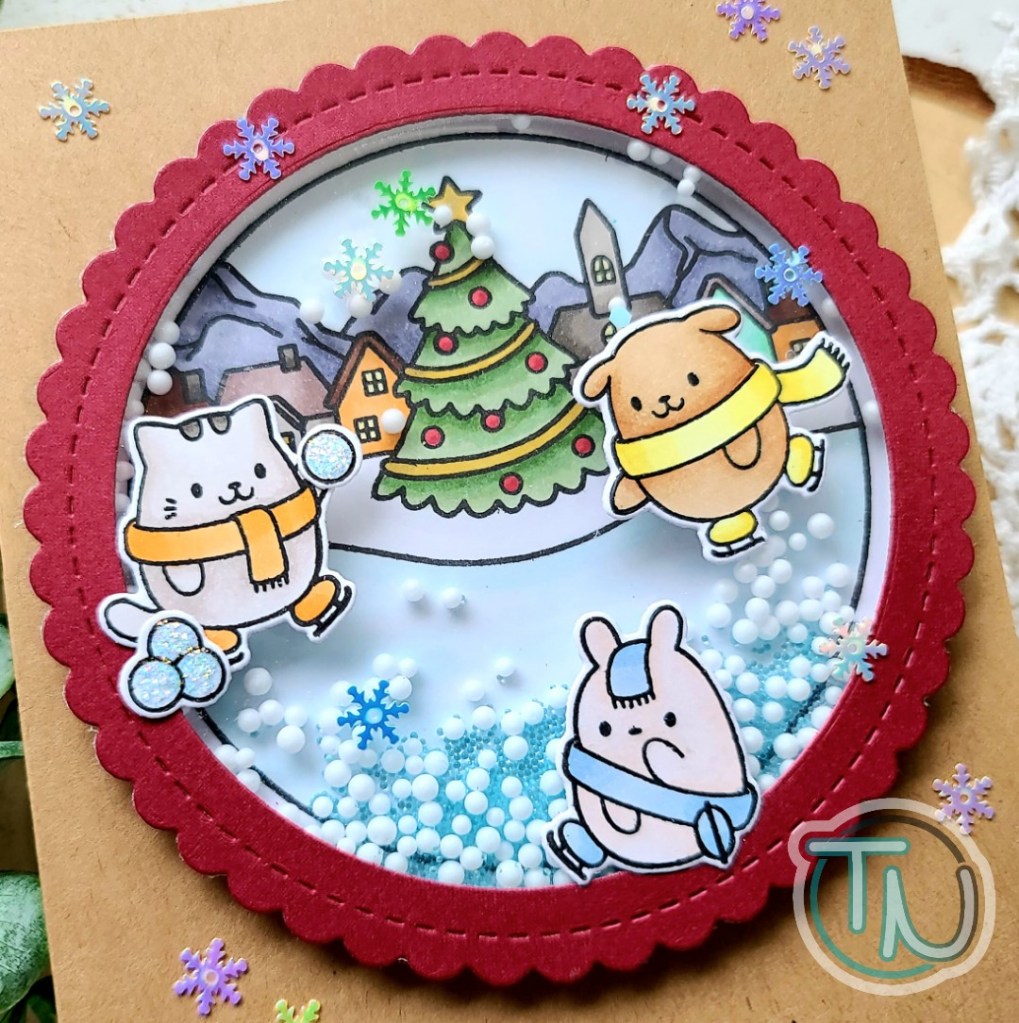
I filled my shaker with some foam snow balls I’ve been hoarding from the Dollar Tree and some Pixie Dust micro beads in Silvermist from my Etsy shop. Once the shaker was created, I adhered it to a kraft card base and used my MISTI to stamp the sentiment.

I adhered the critters and snowballs with liquid glue and moved on to finishing touches. I added unicorn Stickles to the snowballs for a little glittery shine and some Frosty Flakes embellishments scattered across the card front.

Such a silly, fun card. I love how it turned out and can’t wait to play some more with this set.

I appreciate you sharing your time with me. Have a fabulous day!

Newton’s Nook | Designer’s Nook Preview

Hey friends! Tomorrow is another Designer’s Nook newsletter from Newton’s Nook! Remember there’s a weekly inspiration newsletter that’s for subscribers only. You get special project inspiration directly from the design team!

Here’s a teeny sneak peek for you but you’re going to want to head over and subscribe if you haven’t already so you don’t miss it!

I appreciate you stopping by today! Have a fabulous day!

Lawn Fawn – Spooky Cocoa

Hey friends! I’m over on the Scrapbook Pal blog today and we’re having some spooky cocoa. The weather is changing and things are getting ooky spooky around here! It’s great since this is my favorite time of year!

I had 2 new goodies from Lawn Fawn that I have been dying to use and thought it would be so much fun to combine them! So today we’re having Halloween themed cocoa with some ghostly steam rising from our cup!

I created my Lawn Fawn Stitched Mug shaker mechanism, filled it with fun embellishments from Trinity Stamps and sealed it up. Then I stamped and colored my Lawn Fawn Booyah ghosts with copics, using the coordinating dies to cut them out. Then I used liquid glue to adhere the accessories to each ghost.

To create my background, I used some Tombow brush pens on watercolor paper and did some messy ink smooshing. I always have so much fun with this technique! Once it was dry, I trimmed it to 4×5.25 and popped it up on a black card base with foam tape. I adhered my whipped cream and spoon to the back of my mug and glued it directly to the card front, while the ghosts were popped up with foam squares. (The whipped cream came from the frosting of the stitched cupcake dies from Lawn Fawn.)

Then I stamped and heat embossed a banner from Bannertastic and a sentiment from Booyah and die cut it. I used a quickie glue pen to adhere my banner, trying to hide the glue behind the embossing lines.

For finishing touches, I added black glaze pen to the Frankenghost’s eyes, glossy accent’s to the witch’s hat buckle and spider and white gel pen accents throughout the images.

I had so much fun mixing and matching and making things a little spooky for Halloween!

I appreciate you sharing your time with me. Have a fabulous day!

Coffee Loving Cardmakers – National Coffee Day WINNER

Hey everyone!!! I just wanted to pop in and announce the winner for the Coffee Loving Cardmakers National Coffee Day Hop!

Drum roll please….

Congratulations to BrandyAnn!!! You’ve won our coffee mug magnetic die stand, donut embellishment tray and a bundle of embellishments too!

Please email me at twiddlersnook@gmail.com to claim your prize.

Thank you everyone who hopped and left such fun comments. I appreciated each one!

Take a moment to check out the shop HERE if you weren’t the winner and wanted to snag one of those awesome products!

Birch Press Designs – Christmas Shaker Cards

Hello and happy Friday everyone! I’m over on the Birch Press Design blog with a photo tutorial how to put together these awesome Christmas shaker cards. They were actually pretty quick and would be fun to make in larger batches to mail to friends and family this year.

I think these are so pretty and fun at the same time with the shaker mechanism adding a little whimsy to a more fancy stamp set.

I added a combination of snow queen embellishments and pixie dust micro beads in the Silvermist color – both of which are from my Etsy shop. The microbeads are so great in shaker cards, helping move things around more fluidly and they’re just cool looking on their own too.

Have you started making Christmas cards yet? With these 3 finished, I think my total is at about 12 and since it’s still October I’m feeling pretty good about that.

I appreciate you sharing your time with me. Have a fabulous day!

Pink & Main – Merry Christmas

What are you hoping to find in your stocking this Christmas??? Maybe one of these fun filled stockings would suit you. 😉 I’m over on the Pink & Main blog with this adorable slimline stocking card featuring new goodies from the October release.

To create my card, I stamped and colored the images from Stocking Stuffers and then used the coordinating dies to cut them all out. I used liquid glue to attach the stuffing to the stockings and set them aside.

Then I die cut a green panel from the Stitched Slim Line dies and used the 2 floral images from Stocking Stuffers to create my own patterned paper. I cut a white scalloped panel from the Sympathy Slim Line dies and adhered the 2 together. I cut a red panel with the Layered Slim Line dies and popped the scalloped panel up with foam tape.

I popped my stockings up with foam squares and moved on to my sentiment. For that, I stamped it in green on a white piece of cardstock and die cut it with a smaller Layered Slim Line die, shifted the die down and cut it a second time to shorten the length. It’s like making your own custom sentiment strips. I attached it with liquid glue and moved on to finishing touches.

For those, I added glossy accents to the puppy’s nose and tongue, all the mistletoe berries and poinsettia center. Last, I glued a couple of wintermint candy embellishments from my shop to the sentiment strip.

I appreciate you sharing your time with me. Have a fabulous day!

Trinity Stamps – Tell You a Story

Hello everyone! Thank you so much for stopping by. I have a very fun card to share with you today. It features a few new products from Trinity Stamps that are just too fun and super cute!!!

I started my card today by stamping and heat embossing the images from Tall Tales on Bristol smooth cardstock. Then I used Zig Clean Color Real Brush Markers to watercolor them in. This was such a therapeutic process because there is so much to these adorable images! I’m absolutely in love with them! Then I used the coordinating dies to cut them out and moved on to making my card front.

For that, I stamped and heat embossed the new woodsy background stamp with clear embossing powder on kraft cardstock. Then I trimmed it down to 3.5×8.5. I used my blending buddy brushes with some green dye inks on a white panel and used the slimline cloud border to create a top for my tree. I did the same thing a second time and used the great outdoors borders to cut some grass. Now, we move on to assembly.

I adhered my woodgrain panel to a card base and used liquid glue to adhere the tree top and grass directly to that. Then I popped the giraffe, books and owl up with foam squares. For my sentiment, I pulled out the new Cozy Bear stamp set and used one from there. I stamped it in green and trimmed it into a strip. Finally, I popped it up with foam squares and my card is finished.

I appreciate you sharing your time with me. Have a fabulous day!

Coffee Loving Cardmakers – Hug in a Mug

It’s Tuesday Tea with Twiddler’s Nook over on the Coffee Loving Cardmakers blog today and we’re wrapping up a fabulous celebration where we turned National Coffee Day into National Coffee Week on the blog! Be sure you commented on all the hop posts for chances to win 32 different prizes! Click HERE to go to that post.

But for now, I’ve got a super awesome card share for you featuring bundles of products from Super Sponsor Newton’s Nook!

I had an idea in my head so I got my stamps out and piled them together to see if it might turn out how it was looking in my head. Things were looking promising so I stamped out a bundle of images from My Type, Cup of Cocoa and Lovely Blooms. I colored everything with my copics and used the coordinating dies to cut it all out. Then I stamped and heat embossed the jar from Lovely Blooms on vellum and cut it out as well. For the sentiment, I carefully masked off part of a sentiment from Cup of Cocoa and stamped it on the typewriter from My Type.

Next, I moved on to my background so it would have time to dry. I used Nuvo Embellishment Mousse in forest green over the Mugs stencil on a white panel. I let it dry and trimmed it down to 4×5.25. However, while it was drying I pulled out the Essential Alphabet dies and cut the word “hug” from gray cardstock 4 times and glued them together. I die cut a flag from the Frames & Flags dies from white and dark red and adhered them together with a little overlap showing at the bottom. I adhered the letters to that with liquid glue.

At this point, I used liquid glue to adhere all the flower layers together and the cup to the side of the typewriter as well. The flower jar was adhered to the stenciled panel with liquid glue white the mug and typewriter were popped up with foam squares. Then I popped up the flag with foam squares too.

I popped the whole decorated panel up with foam tape on a white card base and moved on to finishing touches. There’s a lot going on so I just added some glossy accents to the mug, typewriter, flower centers and the die cut letters. A little extra shine but it doesn’t distract from the whole picture.

I had so much fun creating this card and I can’t wait to share it with someone. I hope you enjoyed it and also enjoyed our week of celebration for National Coffee Day!

I appreciate you sharing your time with me. Have a fabulous day!

Trinity Stamps – Trick or Treat

Hello there! Welcome to a new week! Since it’s October already, I thought it would be fun to share some Halloween themed fun from Trinity Stamps. I don’t know about you but I loved trick-or-treating as a kid and after I had my daughter, I always loved taking her out! Seeing all the costumes and hearing the laughs and giggles from the kids in the streets is the best!

To create my card, I started playing with distress oxides on a panel. For this combo I used seedless preserves, picked raspberry and wild honey, which mostly gets covered up by the ground but it still gives a glow that I like. I used my slimline modern embossed panels die to cut it out.

Then using the slimline great outdoors border builders I cut some grass and fence from black cardstock. Using these as a guide, I laid out my stamps how I wanted them. I stamped and heat embossed the images from Trick or Treat with black embossing powder.

I adhered my panel to a slimline card base measuring 3.5×8.5 inches. Then I adhered my fence and grass together with liquid glue and popped that piece up on the card front with foam tape.

For finishing touches I glued some crystal clear rhinestones in the background. If you have followed me for long, you know I always like a little shimmer and shine somewhere on my cards. This one was no different.

I appreciate you sharing your time with me. Have a fabulous day!

Miss Ink Stamps – Roll With It

Hello again. I’m stopping by today to feature a new, funny stamp scene – Roll With It – that just released in the Miss Ink Stamps shop this last week.

I let the stamp do all the talking with this one and just colored the scene with my copic markers and trimmed it down with my Pink & Main layered rectangles. I framed it up with a slightly larger black rectangle and popped that up on a white card base.

I finished it off by trimming the sentiment into a strip, using a black pen to edge it and help it stand out. This is adhered with liquid glue along with a couple of stray TP rolls that got left behind. 😉

I added glossy accents to the house windows because I love how this looks and some stars in the sky with a white gel pen.

I hope this gave you a little chuckle today. I appreciate you sharing your time with me. Have a fabulous day!