Blog

Lawn Fawn – Let’s Go Nuts

I’ve been having so much fun with the little bit I ordered from the Lawn Fawn fall/winter release and today I’m excited to share a card with you featuring some of those goodies! It’s a little more involved in cutting and measuring so I’ve got a step-by-step for you with measurements in case you want to follow the design completely.

1. Cut card base from kraft cardstock and score at 2 1/8 from each side and crease. Cut 2 plaid panels measuring 1 7/8 x 5 1/4 and adhere them to either side.
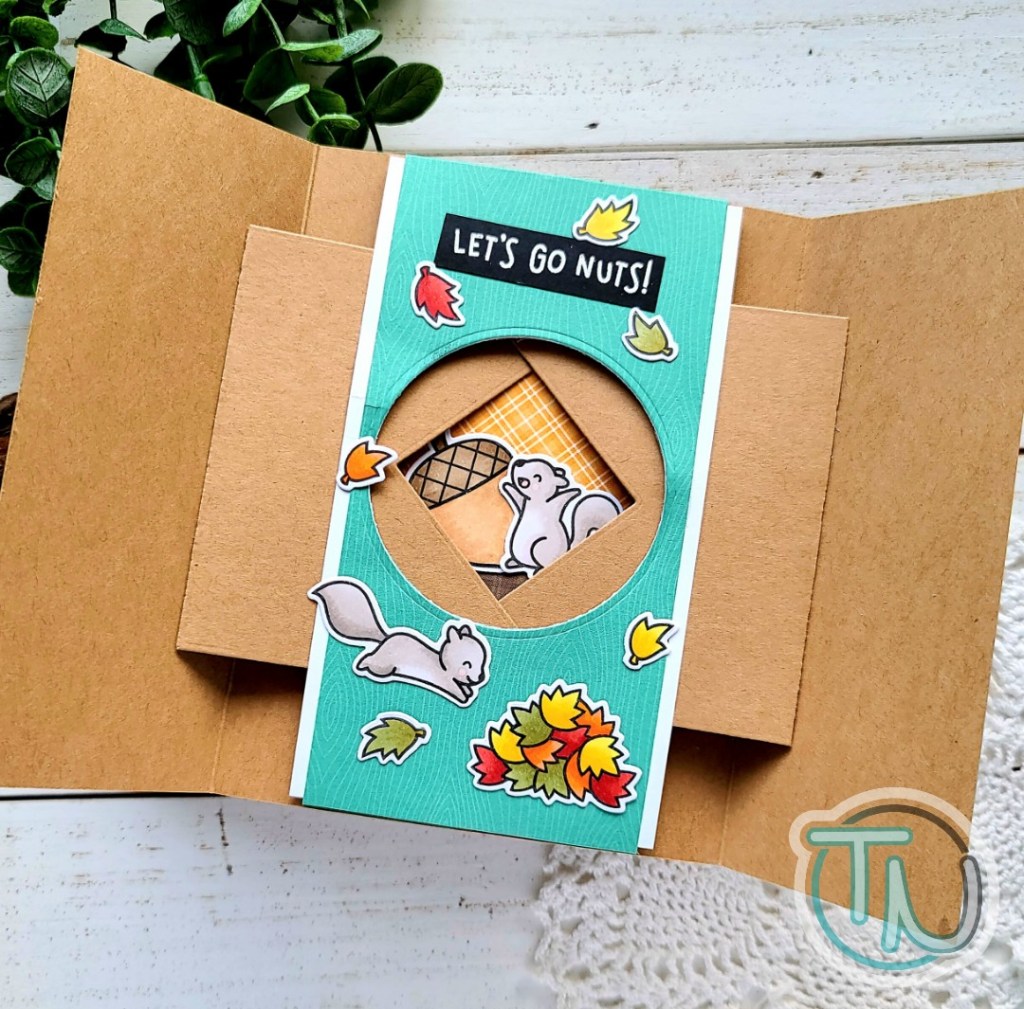
2. Die cut shutter pieces from kraft cardstock and crease the score lines. Cut a woodgrain panel 2 3/4 x 6 and score 1/4 inch from the top and bottom. Cut a white piece of cardstock measuring 3 x 5 7/8 and adhere it behind the woodgrain panel. Then use the circle die from the shutter card components set and run them through your die cutter.
3. Die cut another circle from yellow plaid and using your shutter components adhere it to the inside of your card base.
4. Stamp, color and die cut your images from Let’s Go Nuts and Big Acorn however you like.
5. Using scrappy tape, adhere your kraft shutter pieces to the inside of your card and then adhere the woodgrain panel over the top of them. 
6. Using liquid glue or tape runner adhere your images inside the shutter and on the woodgrain panel however you choose. Don’t forget to stamp and heat emboss your sentiments and cut them into strips too. Then close your card up to create the belly band that keeps it closed. 
7. Cut a white strip that measures 2 x 8 1/2. Instead of scoring at a specific spot, I just wrap the strip around my card and crease it where it folds. This still gives you over a 1/4 inch overlap to adhere the band together. 
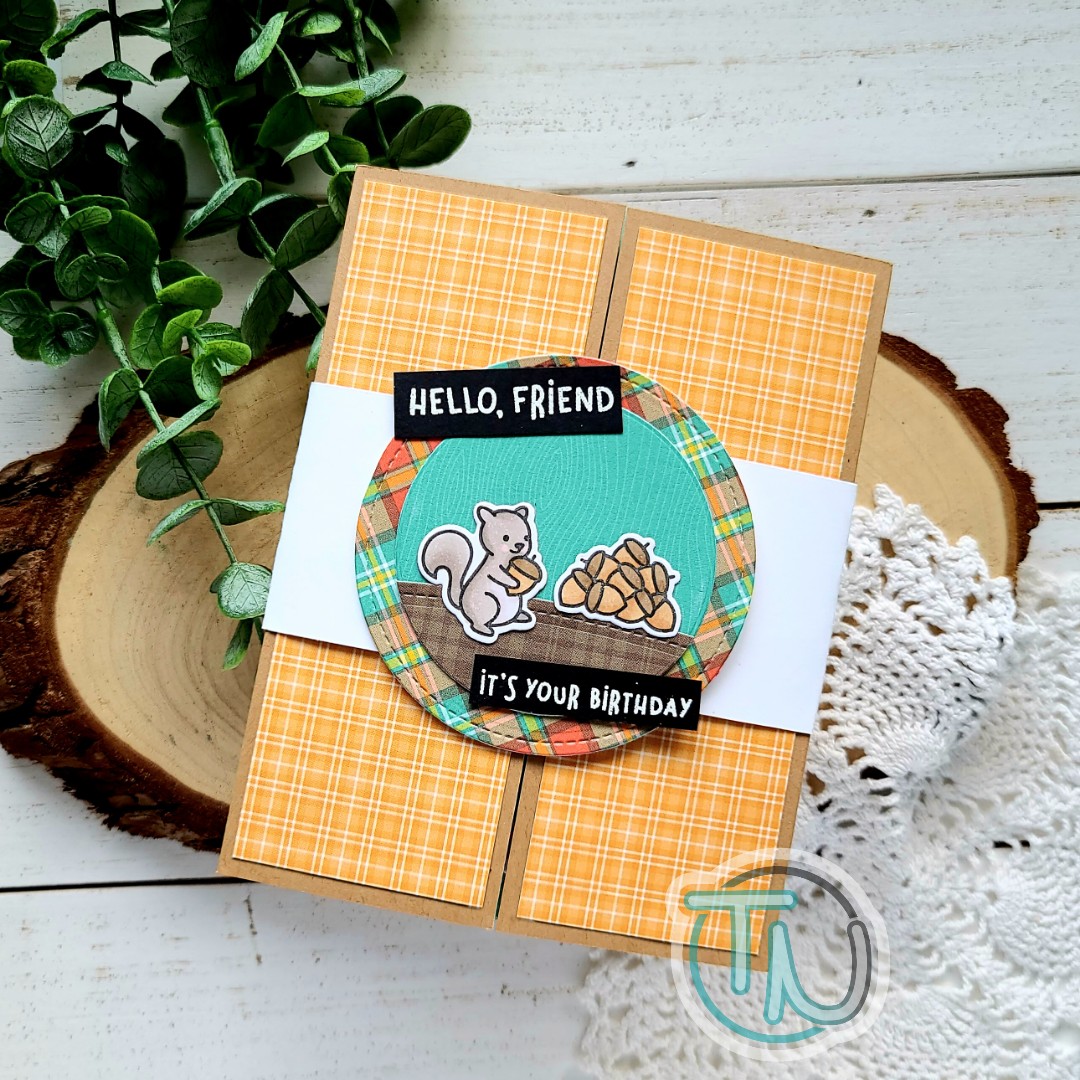
8. Die cut a plaid circle with the stitched circle stackables and adhere the woodgrain circle you cut from the inside of your card to it. Cut another woodgrain circle for a ground and use the simple stitched hills to cut the top. Adhere it along with your images and sentiments. Then add the whole circle to your belly band. I glued it over the seam so the band looks seamless but you could put the seam in the back too.
9. Slide your belly band over the top and VOILA your card is all finished and ready to wow the recipient!
I hope you enjoyed today’s card. I appreciate you sharing your time with me. Have a fabulous day!

A few notes about today’s card…where I love all things Lawn Fawn, I decided to go with the My Favorite Things shutter card components dies because they give you more control and flexibility where your opening will be and the opening is larger too. Keep this in mind if you want to use any of the add-ons for the Lawn Fawn version though, they won’t work with this one. But today’s card could easily be modified for that shutter die set too.

If you have questions or need clarification on anything, just comment below, email me from the contact form or message me on IG or Facebook. I’m super happy to help in any way I can!

I appreciate you sharing your time with me. Have a fabulous day!

Pink & Main – Season’s Greetings

Hello everyone, I’m over on the Pink & Main blog today sharing a card featuring stamps and dies from the new release. It’s all things Christmas and I’m in love with every bit of it! Typically I like stamping and coloring on my cards but today it’s all about stamping in color and heat embossing for accent.

Today’s stamps all come from the new Mistletoe set and I’ve paired them with the mandala stencil from the September release. I started this card by stamping my images on kraft cardstock with different dye inks. I heat embossed the flower centers in gold for a little texture and contrast. Then I used the coordinating dies to cut them all out.

I trimmed down a piece of green cardstock and used the mandala stencil with green ink and my mini ergonomic blending brush. I placed my images where I wanted them and used a combination of tape runner and foam squares to adhere everything to the green panel. When I was finished, I heat embossed my sentiment at the bottom and adhered the panel to a card base.

For finishing touches on my card, I scattered Nuvo Crystal Drops in pale gold around the design. It’s incredible to me what something so simple does to round out a design. I just love what they add.

I appreciate you sharing your time with me. Have a fabulous day!

Trinity Stamps – Fang-tastic Friends

Yippee!!! I’m so glad you’re here today! I’m over on the Trinity Stamps blog with this FANG-TASTIC trio of cards and I’m excited to show you! Bats are one of my favorite critters and these guys are just so stinking adorable, I couldn’t resist coloring a bundle of them up as soon as I opened my stamps!

I showed a sneak peek of this set – Fang-tastic Friends – before the release, you can check that card out HERE if you missed it. But I actually created these beauties at the same time. I decided to use the same general layout but make each one different by switching colors and accents on each one.

This first one features the catching some rays stencil at the top for a fun focal point and a scattering of Nuvo Crystal drops for added interest. I also added some Stickles to the banners because you know I like glittery things!

For the second one, I inked up the panel and then went back and stamped the cool skull image from the set for my own patterned paper. I also added the skull by the sentiment to tie it all together. This time I thought it would be fun to have a couple of snoozing bats with my super awake cutie instead of the banners.

For the last card, I wanted to go away from the Halloween feel and just went for night-time. I inked up the top panel with blues and teals and ran it through my die cutter with the starry skies coverplate. Then I scattered a bunch of the popcorn sugarstar embellishments across the design.

These cards were so much fun to create! I hope you enjoyed them today and found a little inspiration to create something wonderful!

I appreciate you sharing your time with me. Have a fabulous day!

Miss Ink Stamps – Boo to You!

Welcome friends! Thanks for stopping by today to see my super adorable Miss Ink Stamps Boo Crew card. This is the first time I’ve done a masked/ink blended background like this and I’m so happy with how it turned out.

To make my card, I started by laying out my stamps on a card base to decide where I wanted everything and make sure it would all fit right. Then I stamped my Boo Crew images and colored them with copics. I used my scan-n-cut to cut them out and moved on to my background panel.

For that, I stamped the graveyard image and did second generation stamping on a full-stick post-it note and cut out the moon and headstone to mask off. Then took a long piece of post-it tape and tore it down the middle to mask off an uneven ground. I used Trinity Stamps blending buddy brushes and some dye inks to ink up my sky. I removed the masks and inked up the dirt next. Then I came back with copics and colored the images like the trees, headstone and pillars on the gate.

When the background was finished I popped my images up with foam squares and put them in place. Then I stamped and heat embossed my sentiment and cut it in to a banner. This was also popped up. I trimmed my panel to 5.5×4 and popped it up on a white card base.

For finishing touches on my card I added a couple strips of washi tape to the bottom and some glossy accents to the pumpkin eyes, treat bags and candy pieces. Last, I took a white gel pen and added some stars to my night sky.

This card was so much fun to create, words don’t really describe it. The excitement and satisfaction from taking off the masking paper and seeing how cool the inking looks and how it all comes together in the end is awesome! If you haven’t tried this style before, you really should.

I appreciate you sharing your time with me. Have a fabulous day!

Coffee Loving Cardmakers – National Coffee Day Blog Hop

Hellooooooo everyone! I’m soooooo excited to be a part of the Coffee Loving Cardmakers National Coffee Day blog hop today, not only as a design team member but as a Super Sponsor because Twiddler’s Nook is releasing a new die stand and coordinating embellishment tray today!

Is that mug die stand not the cutest thing your craft desk has ever seen? And really…a donut embellishment tray?!? So much fun!

SALE!!!
Today through, Tuesday, October 6, we are running a special: Order the coffee mug magnetic die stand and get the donut embellishment tray free. ***Be sure to note the color of embellishment tray you would like in the comments of your order or you’ll get one that matches your die stand.***
Head to the Twiddler’s Nook Shop to order yours today and check out everything else we have to offer!

GIVEAWAY!!!
We’re giving away a coffee mug die stand, donut embellishment tray and a collection of super fun embellishments to one commenter. Commenting closes Tuesday, Oct. 6, at 11:59 p.m. Winner announced here on the blog and also over on the Coffee Loving Cardmakers blog.

Newton’s Nook – Nat’l Coffee Day Hop

Happy National Coffee Day! Today the Newton’s Nook Design Team is hosting a blog hop to celebrate! You can visit all the Design Team Member’s blogs and leave comments for a chance to win! You can also visit the Coffee Loving Cardmakers blog today for another big blog hop and a chance to win more prizes! They will also be posting inspiration over there all week long! 

Here is what I created:

There were so many fun sets to choose from when looking for caffeinated inspiration but this Pumpkin Latte set from last year is really one of my favorites so it was a no-brainer to use it today. I stamped and colored my images and then used the coordinating dies to cut them all out. Then I stamped the Fall Roundabout on kraft cardstock and gave it some brown shading with copics before using the largest Circle Frames die to cut it out. I had some leftover textured leaves from another card so I die cut some red and golden yellow ones to add to the mix and created a “ground” for my girl to stand on.

I adhered the leaves together and used a combination of liquid glue and foam squares to attach those and my images to the Fall Roundabout circle. Then I cut a teal A2-sized panel and used the Houndstooth stencil with some teal ink. I added foam tape to the circle and popped it on the panel.

Then I used my MISTI to stamp and heat emboss my sentiment on the bottom right corner. For finishing touches, I added some glossy accents to the girl’s coat buttons and the pumpkin stems. Last of all I added a scattering of clear gems throughout the card design.

Would you like to win a $25 store credit to Newton’s Nook Designs online shop?
We will choose one lucky winner from our Hop!

Here’s how to win: Comment on the NND blog and Design Team blogs (see list below)! The winner will be chosen at random from the collective reveal posts. Make sure to check out each of their blogs and comment for your chance to win. You will not know which blog has been chosen so the more you comment on the better your chances are of winning! You have until Tuesday, October 6th at 9 p.m. EST to comment. Winners will be announced on an NND blog post on Friday, October 8th, so please check back to see if you’ve won!

Check out all the awesome Design Team Blogs below to enter:

Newton’s Nook Designs
Ellen Haxelmans
Larissa Heskett
Samantha Mann
Zsofia Molnar
Andrea Shell
Tina Smith
Tatiana Trafimovich
Amy Tsuruta
Amanda Wilcox

Trinity Stamps – Thankful

Welcome back friends! I’m so glad you stopped by because I’m super grateful for each and every one of you and wanted to dedicate this beautiful card to everyone who takes the time to follow my blog, Facebook and Instagram and for all of your wonderful comments and support. I truly appreciate each one!

To create today’s card, I started with the Trinity Stamps woodsy background stamp by heat embossing it on kraft cardstock with gold embossing powder. Then I stamped the images from the same stamp set and colored them with my copics. I used the coordinating dies to cut them out and set them aside.

Next, I cut the word thankful out from the scripty thanks die set. The shadow was cut once from white and the word was cut 3 times from white and once from gold mirror cardstock. Then I used liquid glue to adhere them all together.

I adhered my woodsy panel to a card base and cut a frame from the slimline frame and fold set with white cardstock and adhered it with liquid glue. Then, I arranged my images and decided what I was gluing to the card front and what I was popping up with foam squares.

After that I adhered everything in place and decided to add a scattering of glass slipper confetti mix throughout the design. It’s simple and adds just a little interest and shine to the card. The final finishing touches I added were white gel pen accents to the images.

I appreciate you sharing your time with me. Have a fabulous day!

Miss Ink Stamps – Adventure Awaits!

Hey friends! I’m stopping by today to let you know that the new Miss Ink Stamps release is live for purchase and share a card featuring a couple of the new sets available!

When I think of gnomes, I think of them living in the woods, enjoying nature. So I thought it would be fun to combine Coffee Gnomes with Beautiful Destination for my scene. I stamped and colored my gnomes with copics and used the scan-n-cut to cut them out. Then I cut a panel to 3×8 and stamped Beautiful Destination on it and colored the scene with my copics as well. Once the coloring was done, I stamped my sentiment on one of the mountains before mounting everything. Then, I popped the panel up with foam tape on a black panel that measures 8.25 x 3.25. And then popped that up on a white slimline card base.

I added my gnomes with foam squares and moved on to add just a few finishing touches. I decided the coffee mugs needed some shine so I added glossy accents to them and Stickles to the girl’s bows. Then went back and added glossy accents to the flower centers and bunny slipper noses too.

This card was a labor of love and I’m so excited with how it turned out.

I appreciate you sharing your time with me. Have a fabulous day!

Trinity Stamps – You are MAGIC

Happy weekend everyone! I wanted to pop in really quick with a simple but fun card that I made with one of the new stamps from the Trinity Stamps Autumn Rainbow release.

I used the mini card from the slimline frame and fold set for my card base and the panel I stamped on. I stamped the image from You’re Magic a second time, colored it with my copics and used the coordinating dies to cut it out. Then I layered it all together with foam tape in between the layers.

These word art images from Trinity Stamps are so fun and make putting together a beautiful card simple and effortless.

While I was making my card, my daughter loved the sentiment and thought that whoever we gave this card to needed a wand to go with it so she made one herself. I thought it was pretty cool and now we have to find someone special to share it with.

I appreciate you sharing your time with me. Have a fabulous day!

Miss Ink Stamps – Pumpkin Spice & Everything Nice

Hi there! It’s that fabulous time of year again…pumpkin spice everything! Which happens to be exactly what my shirt says today. I love pumpkin everything and this time of year is my absolute favorite! But I digress…

It’s release week for Miss Ink Stamps and we have some super fun sneak peeks for you! Today I’m sharing Pumpkin Spice Latte. This set is so much fun! I had a blast coloring it, especially with these bold, fall-type tones.

I paired the image with the stripes stencil from the basics stencil bundle and a vellum die cut Lawn Fawn stitched circle. I also heat embossed my sentiment on a strip and cut banner ends with my scissors.

I finished things off with some white gel pen accents to the images and glossy accents on some key areas like the coffee beans, decoration on the mug and the gnome’s hat. Then I glued down some Trinity Stamps boiled sugar jelly drop heart embellishments too.

Today is your last chance to comment over on Instagram for a chance to win before the release goes live for purchase tomorrow!

I appreciate you sharing your time with me. Have a fabulous day!